How to Use a Multimeter For Beginners
105.32k views3552 WordsCopy TextShare

Word of Advice TV
How to use a multimeter for beginners. I explain what each selection does and how to use all the dif...
Video Transcript:
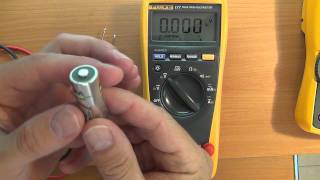
in this video I'll be showing you how to use a clamp-on multimeter I'll be explaining what all the different selections are and how to use them I'll try to explain this in a simple and downto Earth way but the meter that I'm going to be using is loaded with a ton of different features that some other meters don't have so for those of you that are interested I will be going over some of the advanced features just briefly so you'll know what all of them do to start things off let's begin with voltage which is represented by this letter V right over here there's two type of voltages there's direct current and alternating current on some meters they're going to be separated there's going to be one for direct current and one for alternating current but on this meter they're both under one selection and to change between the two I would press this select button which brings me to direct current this symbol right over here it's one solid line and dashed lines right under it and if I press select again it switches me back to alternating current which is this wave symbol right here in order to test voltages with our meter we are going to need to plug in our meter leads and those go in right on the bottom over here the red one will go to the plus sign and the black is going to go to Comm in order to test any kind of batteries we would use direct current and to check anything that comes from the Energy company we would use alternating current so Outlets light switches anything that comes from the breaker panel all of that is going to be alternating current so let's test some batteries and see what this would look like so I'm going to switch to DC current and then I got a round battery right here a round 3vt battery and we got 3. 2 volts perfect that means this battery is good here's a c battery which is 1. 5 volt it's reading 1.
59 so this battery is good as well and here's my little drill that uses a 12vt battery the slots on this battery are really thin so I can't actually fit my meter leads in here so my options are either to stick a wire in here or some kind of a paper paper clip and then test it with the paper clip instead or if your meter came with these thin meter lead attachments they work really nice in narrow spaces like that so with these two attachments I should be able to get in there and check my battery and we are reading 12. 32 volts and by the way if I flip the leads on most batteries it doesn't matter which lead goes on which side you're still going to get the same read most batteries are labeled so you want to put the red lead on the plus and the black lead on the minus and we're getting 18. 2 Vols so this battery is good if this battery was bad we would get a reading that is really low or it would read o on the meter this car battery is 12 volts and with a meter we can verify that it's good and when testing alternating current do exercise caution because live electricity could be dangerous don't touch any exposed metal or exposed wires when testing alter ating current it's a lot safer to use one hand only and what helps with that is if your meter has a little holder like this you can plug one lead in to the holder and use your meter as one hand and use your lead as the other testing ac voltage is a perfect way to see if something is getting power or not it can be used to test furnaces air conditioners household appliances circuit breakers thermostats and Etc some meters will also have a low z voltage setting low z stands for low impendence and is used to eliminate ghost voltage when I have my meter set to voltage it is a lot more sensitive than the low z setting it catches any kind of fluctuations in voltage for example even if I start wiggling my leads look at that even just wiggling my leads gives me a little bit of a ghost reading so if you're checking an outlet or any kind of power wires the ghost voltage could be a lot higher than that but if I switch my meter to low z it becomes less sensitive to those fluctuations and it's not going to pick up any kind of ghost voltage another cool feature about the low z setting is that it has automatic mode which switches automatically between DC voltage and ac voltage when you plug your meters in whether you're testing a battery or alternating current into an outlet it will automatically determine what it is you're testing and give you a read but if you don't like that you could always press the select button and go to either alternating current low z or direct current low z next up we have the omega symbol which stands for resistance this setting is used to check electrical loads such as Motors compressors resistors or anything that requires electricity to turn on when you're testing resistance and you're getting a reading that says o that usually means that that component is bad and here's an example of a really low resistance reading if I touched my two meter leads together there is .
1 ohms of resistance which is basically almost no resistance at all and that's because my leads are literally touching each other there's no resistance between them the meter that I'm using is auto ranging but when I let go of my leads if you look at the symbol right here notice how a k appears and then M appears that stands for Aila and mega my meter automatically ranges and it selects the proper range that I need whenever I put my leads on something to check resistance but some of the cheaper meters you have to select that range yourself if I measure this light bulb over here which I know is bad my meter is either going to read over limit or the reading is going to be massive which also means the light bulb is bad so what I'm getting right now on my meter is 12 million ohms usual light bulbs go up to like 100 ohms so we know that this bulb is for sure bad and if I was using a manual meter the way I would check this is by putting the meter leads on and then I would set the meter to the highest ohm reading and start going down from there on most meters if the number one appears on your display that means you took it one step too far just back up by one click and you should get the proper reading the easiest way to select voltages would be done in the same way here's a water heater element and we can use resistance to check if this element is good or not if an element is good the resistance on it is usually somewhere between 10 to 20 ohms so if I put my meter leads on both screws on the element we are getting 12. 6 so this element is good but if you had your leads on there and you were seeing o that means that element would be bad Auto ranging meters will automatically select the proper range for you but it does allow you to manually switch the range if you want to do so all I have to do is just press this range button and it'll switch from ohms to kilo ohms and then higher higher Mega ohmss even higher and back to ohms also one very important thing to remember when you have your meter set to this resistance setting right here is that the power has to be off to whatever you're checking power off and usually the wires have to be disconnected before you check resistance on anything for example if we take this light switch right here usually there would be wires going to it if you wanted to check the resistance of this light switch you have to take the wires off before you check the the resistance and the power has to be off if the power is off but the wires are still on you're going to get a false reading because you're also reading the wires along with the switch so let's try checking the resistance of this light switch right now it's in the off position if I put my meter leads on either end we see that I'm getting a read of O when you see o that means that there is no connection between these two points inside of here so for example if you were checking a motor Why winding and you're going to be seeing o like that that means that winding inside of that motor is probably burnt out and there's a break inside of that winding but if I turn the switch on we see that now I am picking up some resistance it's very small because it's literally like a little piece of metal inside of the switch so there's not much resistance to the electricity whereas a motor winding would be resisting the flow of electricity a lot more so the reading would be higher another really useful feature is continuity which is this symbol right over here checking continuity is similar to resistance but the meter is also going to beep if there's a connection between the two points so if I put my meter leads on here we're not hearing anything that's because the switch is open but if I close this switch put it in the on position now we're hearing a beep continuity is perfect to check any kind of switches including the safety switches in a appliances and HVAC units fuses are also easy to check in this manner when you're checking for continuity you're literally checking if there's a connection between point a and point B for example see how this metal piece is all just one piece that means there should be continuity between these two points and there is and there's continuity there too and of course this only works with Metals which conducts electricity any kind of material that does not conduct electricity well like Plastics or rubber those are insulators and of course we're not going to be picking up any kind of continuity when we're checking plastic the continuity setting is also a great way to check to make sure that your meter leads are good and there's no brakes in the wires if you just touch the two leads together you should get a beep if it's not beeping then you know that the wire is broken on one of the leads next up we have the capacitance setting which is used to test all kinds of capacitors capacitors are measured in farads abbreviated by this letter F right over here and the letter N right in front of it stands for Nano the letter N is rarely used because it's such a tiny reading usually what you're going to see is a UF which stands for microfarads just to show you what I mean . 1 microfarads equals 100 nanofarads just like the resistance this meter automatically selects the proper range but I could select it manually if I so wanted to so there's the Nanos if I just click on that a few times that brings me to the micro farads and if I click on it again it moves the decimal point by one place and one more time moves it once more I prefer to just leave it on auto and let the meter select the proper range so right here I have a dual capacitor which is rated 45 microfarads and 5 microfarad and sometimes instead of this backwards letter U you're going to have the letter M so it'll be MFD which is the same exact thing as UF and stands for microfarad this right here is a dual capacitor which means there's two capacitors in one so let's go ahead and check both of them let's start with the larger reading first which is supposed to be 45 I am getting 43 microfarads which is pretty good I believe this one is still in range because it's plus or minus 6% from the 45 and if we check the smaller raing we should be getting somewhere around 5 microfarads usually if the capacitor is bad the reading will be much lower than the rating next up we have the diode test this is used to check diodes which are basically like oneway check valves in the Electric World these things allow current to easily flow through them oneway way but prevent it from flowing the other way the way the meter accomplishes checking diodes is by simply sending a small amount of voltage to one of the leads and when you put both leads on either side of the diode you'll have voltage going one way and not the other so one way you would get 6 volts and if you swap the leads you would get zero volts if the diode is bad then you would get a read on both ends or get no read on both ends next up is temperature and if your meter has the temperature option usually you have to dis disconnect the meter leads before you can plug in your probes after the leads are disconnected I move this little knob to temperature and then I can plug my probes in most meters are only going to have one of these plugins this meter has two of them which is perfect to measure the temperature difference between two points also known as the delta T you can use a k type temperature probe or a clamp on temperature probe so right now I have T1 selected which is the first temperature probe this guy right here if I grab it with my fingers you can see that temperature is climbing up and if I press select that brings me to T2 which is my clamp probe and if I press select one more time now we're getting the difference between the two so if I grab this guy one more time to heat it up a little bit the temperature difference between the two probes is about 6° next up is amperage and this is used to test how much current an electrical device or a motor is drying the easiest way to check the amp drw of something whether it be a motor or some other electrical device is to use the amp clamp if we compare electricity to Plumbing the voltage would be equivalent to the water pressure whereas the current the amperage is equivalent to the flow rate the gallons per minute so when you put your amp clamp around a wire that is powering some electrical device you will see how much current is flowing through that wire and it doesn't matter if you put your clamp on the neutral or the hot wire both of them should give you the same read one important thing to note is that the hot wire does need to be isolated from the neutral if you put your clamp around both wires the hot and the neutral are going to cancel each other out and you're not going to get any reading you can also check molts with this meter by pressing the select button and we see a little m here so if you're using your meter to check something that has really tiny voltages like fractions of a volt you can use this setting to accurately measure those voltages keep in mind that voltage and M voltage are very different a molt is only one 1,000 of a volt and then we also have this setting so we have amps right here and then the backwards you stands for micro so on this setting you can check micro amps a micro amp is only one 1 millionth of a regular amp so you can't use the amp clamp the reading is way too tiny for this thing to be able to pick it up so you have to use your meter leads and you have to set your meter in series with whatever it is that you're checking in heating and air conditioning microamps are often used to test flame sensors on a furnace next up we have non- contct voltage labeled as ncv with your meter set to non-c contct voltage you could use the tip of the clamp as a voltage to detect if there's any power in the area it's a fast and easy way to check if there's any power at an outlet a light switch or if a power cord is energized most meters will also have a hold button which when pressed will freeze the reading on a screen just in case you want to take a picture of it or show it to somebody before it disappears and the back lit display is another feature that most meters will have and with this particular meter there's also a little flashlight that lights up right on the tip of the meter just in case you need a little extra light next up we have the minimum maximum average and Peak button if you select Max while you're measuring voltage amperage or resistance whatever reading that the meter will register that is the highest that one is the one that's going to stay on the display Min is the same thing except it records the lowest reading that the meter registers and then we have average if whatever it is that you're measuring is fluctuating let's say you're measuring an outlet and the the voltage is bouncing around from 115 to 122 the average would simply give you the average read which would probably be around7 volts and then if I press and hold this button we have Peak Max and Peak minimum when you select Peak it's the same thing as the regular minimum and maximum except it's almost three times as sensitive so it reacts a lot faster for example if you're measuring voltage and it spikes just for a fraction of a second if you have it set to Peak Max it'll still be able to catch that next up we have inrush current which can only be used when the meter is set to the amp setting the inrush option would be used to check amperage when Motors start up because when a motor is starting it draws a lot more amps than it usually does while it's running so if you're measuring amperage and your meter is set to inrush your meter is going to catch the highest spike in amperage right when that motor is starting up this test is useful to see if a motor or compressor is drawing locked rotor amps next up we have HZ which measures frequency and frequency is the rate at which current changes Direction per second in America the frequency we use is 60 Hearts but in many other parts of the world such as Australia China and Germany they use 50 Hearts frequency is only measured with alternating current and an easy way to check it is to Simply stick your meter leads into a power out outlet and see what you get you should have exactly 60 or something very close to it and the last cycle I'm going to go over is the duty cycle which is usually labeled as Duty or a percent symbol the duty cycle is used to determine the ratio of time a load or a circuit is on compared to the time that it is off for example if you have a welding machine that has a duty cycle of 25% that means that machine can run at a designated amperage for 2.
5 minutes followed by 7.
Related Videos

28:43
How to use a multimeter like a pro! The Ul...
The Engineering Mindset
2,509,717 views
41:49
How to Use a Multimeter - With Examples an...
Word of Advice TV
1,157,725 views
10:11
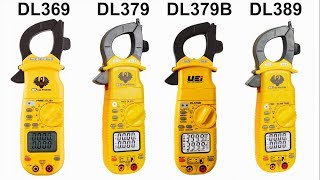
The Difference Between UEi DL369, DL379, a...
Word of Advice TV
44,643 views

12:55
How to use a multimeter like a pro, the ul...
James Gatlin
3,084,966 views

11:09
Multi-meter Basics made Simple
Dennis and the Machines
5,344 views
15:56
Ultimate DIY Homeowners Guide To Multimeters
Everyday Home Repairs
59,233 views

12:38
Even EU Shocked by Germany’s Bold Move Aga...
PPR Mundial
1,810,025 views
28:50
How to Test and Replace a Bad Car Battery ...
ChrisFix
5,068,670 views
25:50
Contactors: how we power the big stuff
Technology Connections
1,211,279 views
10:23
HVAC Multimeter Basics: Measuring Electric...
AC Service Tech LLC
168,983 views

24:52
How to use a multimeter like a pro - Clamp...
The Engineering Mindset
423,824 views
18:45
Electrical Current Explained - AC DC, fuse...
The Engineering Mindset
1,828,181 views

13:55
8 Wire Stripper Features Everyone Should Know
LRN2DIY
2,664,389 views

8:12
Why The Clamp Meter Is The Only Tester You...
Everyday Home Repairs
713,959 views
30:28
AC Unit Not Turning On - How to Fix It Ste...
Word of Advice TV
3,198,794 views
32:58
How to use a Multimeter for beginners: Par...
mjlorton
4,303,956 views

44:04
Learn how to use a Multimeter - for solar ...
Solar Power Edge
153,172 views
10:19
Multimeter 101 for HVAC 3D
HVAC School
70,352 views
32:02
How to Find a Short (HVAC)
Word of Advice TV
779,521 views

11:51
How To Use A Multimeter: The VERY Basics!
Simple Electronics
167,288 views