I turned into a cute girl in realtime. Here's how
405.47k views4691 WordsCopy TextShare

AI Search
Realtime AI deepfake faceswapper. Free & opensource. No GPU needed. Deepfacelive tutorial.
#deepfake...
Video Transcript:
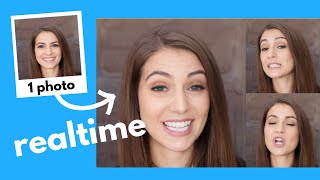
a few weeks ago I shared this video where this guy claims to turn into a cute girl in real time you can see that even when he pinches his face it remains consistent he can also eat things and the face Still Remains consistent you just got to ignore all those awful male chewing sounds more anyways a lot of people were asking well what tool did he use can I do a tutorial on this well I'm going to show you how to do exactly that in this video I'm going to show you how to install it and run it you can use the face of anyone you want and yes you can do this in real time and as you can see it syncs to my talking and my Expressions very well I can smile and the face remains fairly consistent this whole time and there are plenty of preset options you can choose from so for example here we have Jackie Chan I look ridiculous in this and you can see even if I pinch my face it doesn't really distort it Still Remains very consistent and then let me turn it back to this cute girl face I can eat food with this not bad not bad and you can see the face remains fairly consistent this whole time you can also take a single photo of a face and sync it to yourself in real time so right now I'm talking I'm moving my head now I'm smiling and it's able to map my movements onto this photo in real time you know I started this YouTube channel around a year ago and never would I have thought that a year later I would be here doing a tutorial on how to turn yourself into a cute girl in real time but I mean I've gotten a lot of comments requesting this tutorial and I love my fans dearly so as promised here's the tutorial now first of all this is a real-time face swapper this is not a hair swapper so if for whatever reason you want to turn into a cute girl well you do need to get a wig for this but it only costs like a few bucks on AliExpress it's not going to break your bank all right so let's go over the installation if you go to the GitHub page which I'll link to in the description below and you scroll all the way way down you can see first of all some system requirements so the good thing is it doesn't have to be just an RTX Cuda GPU you can use this with any direct X12 compatible graphics card and so even older generations of RTX gpus or AMD gpus are able to run this so you'll need at least 4 GB of RAM plus 32 gbt in your hard drive for the paging file you'll also need at least Windows 10 by the way I'm using a Dell Precision 5690 you can integrate a powerful RTX 5000 Ada into this huge thanks to Dell and Nvidia for sponsoring this and then if you click on Main setup the first thing you need to do is install the latest Graphics drivers for your video card and then you need to set the virtual memory to 32 GB or more so on Windows you would search for advanced settings and then click this one view advanced system settings and then once you're in here under performance click on settings and then in the advanced tab you should see virtual memory so you can see my total paging file size is 5 GB so I will click change and then uncheck automatically manage etc etc and then click on custom size and then set the maximum size to 32 7868 which I see here and then initial size I'm just going going to enter in the current allocation which is 5120 and then click set and then click okay and then note that you do need to restart your computer before it takes effect on okay and then okay and then okay again all right and then under releases here's the really nice thing about installing deep face live they've compressed everything into one Standalone zero dependency file which you just double click to run and then it would go ahead and install all the functions and dependencies for you so you don't actually need to manually install this install that it's just one file which you double click and it would extract and install everything for you so there are two links you can click on I'm going to click on this one and then you can see there are a few builds here I'm using Nvidia so I'm going to select the most recent one which is on July 9th and then click the three dots and then download and then standard download so this is 2. 6 GB so it's going to take a while I'm going to pause this video and wait for this to finish all right so the download has finished I am going to double click on that exe file and then you might see this Microsoft Defender screen pop up with all of these open source AI tools do download it at your own discretion anyways I'm going to click on more info and then run anyway all right so next you're going to see this now just to keep everything more organized on my desktop I'm going to create a new folder and let's just call this deepface live and then here I'm going to change the extraction folder to deepface live all right so it says the total size is 7 GB so this might take a while all right once it has extracted everything we can open up the folder and then double click on deep face live Nvidia and then there would be this deepface live bat file so going back to the GitHub all we need to do to run the program is to double click on this deepface life. bat file so I will double click on this and let's see what that does and voila now depending on your computer this might take a few minutes to load up but eventually you should be able to see this window all right there are a lot of settings here so let's go over each one if you open the interface you're going to see four columns and basically the data from one column will get past on to the next column which gets passed on to the next column and then finally the last column and then you will get your output video over here now for this first node this is the file Source if you turn this on this is basically where you can upload a video and then apply face swap to that video but of course for our tutorial we want to do this in real time so let's turn this off and we would turn this node on Instead This basically turns on a c source so for me I have a webcam built into my laptop so it knows to automatically connect my webcam to this but if not you can always select your webcam or whatever input source you have in this drop- down list and then there are several drivers that you can choose from depending on what drivers you have but I just tend to leave everything at the default and it should be able to pick it up automatically and then down here you should be able to see a video of yourself through your webcam there are very few software tools that I use every day but this is one of them thanks to our sponsor turbo type this is a tool that I personally use every day it's free forever and it saves me so much time basically you can create custom keyboard shortcuts so that you don't need to keep typing out repetitive things for example if there's a prompt that I use in chat GPT very often I can make a shortcut here and then when I go to chat GPT or anywhere else I just need to type in the shortcut and voila or let's say I have a very long email address I can also make a shortcut for that so that whenever I need to enter in my email I can simply type in the shortcut and it types out the email finally it also supports Rich Text so for example you can add in bold and italics and add links to your text as well so let's say I need to send out a lot of cold emails with the following template well I can just create a shortcut for that and then when whenever I start an email I just need to type in the shortcut and voila the text is already styled and linked for me this tool saves me so much time every day there's absolutely no reason not to use this because they have a free forever plan so definitely check it out and download the free Chrome extension in the link below all right so your webcam video will be passed on to this next column for further processing the first one is a face detector it detects and locates your faces in the source input and it uses an algorithm to do so and there are several algorithms for you to choose from each algorithm has subtle differences on how it detects a face so feel free to play around with each of these I don't really notice an obvious difference between these algorithms so I just tend to leave everything at the default and then for the device you can select either CPU or a compatible GPU if you have one and that's another great thing about deepface live is that you don't need a high-end Nvidia GPU to run this it might still work with just a CPU now of course if you select CPU this is going to be way slower so I'm going to set this to GPU and then feel free to tweak these settings if you want but again I just tend to leave everything at the default and then so down here you're going to see this mesh of points which signifies that your face has been detected and these points basically detect the dimensions and the features of your face and then this next node basically aligns the detected face to a standard position and scale and you can adjust these settings if you want to cover more of your face or less of your face but this tends to just work well right out of the box so I just leave it at the default most of the time but depending on the shape of your face or head you might need to tweak these settings a bit to get the right configuration all right so that's the Align face again you should see your face but with a mesh of green points overlaid on it and then this gets fed into the next column so in the next column the first node is called the face marker this is responsible for detecting and marking facial features this usually involves identifying key points on your face such as your eyes nose mouth and jawline this process is important for aligning the face swap with your face and ensuring that your facial expressions and movements are accurately tracked and then so here are different types of face marker algorithms that you can choose from including open CV lbf and Google face mesh and insight face again I just tend to go with the default I don't really notice any obvious differences between these algorithms but feel free to play around with it and see which settings work best for you all right now the next three nodes are are the most important things in this interface each of them offer different functions of face swaps so we're going to go over all of these right now let's start with this middle one here face swap Insight so let's turn this on and then it might take a few minutes to load depending on your Hardware now if you load this for the first time again for this section choose GPU if you have one cuz it's going to be way faster than a CPU and then for your face you can select a predefined face or upload your own so actually if you click on this I icon it will bring you to this folder and this folder is actually located in your deepface live folder which you installed and then in user data and then in animate tables this is where all your images are located so you can see there are some defaults like Biden and Elon Musk Kim Jong-un Putin and then for me I just basically took a screenshot of the girl in the initial video that I showed you and then I saved the image into here and then I named it girl z.
png so back in this deep face live interface if I select from the drop down note that I have girl z. png over here so if I select that this might take a while to load but in the bottom you should see that we have our swapped face over here and it should sync to your webcam video and by the way if you don't see this this node might be collapsed so you might need to click this Arrow to expand the node now here are some additional settings you can tweak these basically control the shape of your face so feel free to adjust these settings depending on what face you're swapping into because each face is different so I do find that sometimes you need to tweak these dimensions a bit to get the right configuration and so basically this node takes in one still image of a face and then uses that to swap out your face so let's open up the folder again instead of the girls face face we can try for example let's try Putin and see what that gives us and oh my god what have I done this is moderately horrifying and then if I select Elon Musk let's see what that gives us bloody hell this is absolute nightmare feel here my friends now again keep in mind that this is just a face Whopper this is not a hair swapper so if you do want to impersonate Elon Musk in real time well you probably need to get a haircut that looks like Elon Musk anyways let me switch back to that cute girl face and then let's move on to the final column so next we have this node note that all these three nodes need to be turned on for you to get your output video so the first node is called frame adjuster and this is basically responsible for pre-processing your video before it undergoes face swapping so it makes slight adjustments to to ensure that the frames are in the best state for face swapping and this leads to more consistent and more realistic results so if your face doesn't look quite right feel free to like tweak around with these settings until you find the right configuration but again I usually just leave it at the default settings and it should work well all right next node is the face merger now again if you have a GPU definitely select your best GPU otherwise you're going to get a lot of delay now this face merger node is where the actual face swapping happens this takes the processed frames from above and merges the new face onto your face so here there are some further settings you can tweak to adjust the alignment or the colors or the smoothing and the blending but again I usually just leave everything at the default and it should work well right out of the box and then finally we have this last node which takes the final video and outputs it to a window or another output of your choice if this is for whatever reason collapsed just click this Arrow to uncollapse it and then you should see your full video and then if you click on window here this window should pop up with your final video now there are multiple options that you can choose from so for example here in this drop- down where it says Source right now we are just selecting the merged frame so this is your final output but you could also select source and merged frame which would give you a side-by-side comparison of your original webcam video with the face swapped video all right so we've basically covered the entire workflow and we got this to work we uploaded one image of a face in our case it's this girl face and then we are able to apply this face swap in real time but this is just one method remember there are actually three three things you can do so let me turn this off now and then I'm going to turn on face swap dfm dfm stands for deep face model now this is a face model which you can train or which another user has trained by feeding an AI with tons of images of a person at different angles and with different expressions from being happy to sad to talking eating shouting screaming or having their tongue stick out and all of these images would be fed into this AI to create this deep face model which gives you a very realistic very coherent face for face swapping so once you have this node on first of all we need to select our device now again it's always advised to use the GPU if you have one because it's going to run a lot faster and then for the model there's a list of predefined models you can choose from already and so let's test out Jackie Chan and see what that gives us this might take a while to load but as you can see here I have now turned myself into jackiechan now note that this looks very realistic and this is a lot more coherent than this face swap Insight method which only takes in a single photo as the face now training a deep face model is very complicated and very technical and it requires a lot of steps plus you need to have a lot of images of a face at various angles doing various Expressions so training a model is beyond the scope of this tutorial but if you really want to get into the weeds and train your own deep face model from scratch I will link to another users tutorial in the description below and you can go through that but instead of training a model from scratch there are a lot of resources online where you could potentially find a deep face model that other users have already trained so for example here are a few Discord channels where people have shared their custom deepface models so this first one is called share your dfm live and I'll link to this in the description below but if you scroll down to this dfm share Channel you can see that a few other people have shared deep face models of various people and then another good resource would be this one called DF live sharing and they also have a channel for dfm models that other people have shared it's pretty much the same thing to be honest I think they just copied these over from the other channel but I'll link to both of these Discord channels in the description below and you can browse around with it and see if the face that you want already has a deep face model that someone made so for example let's search for G Su from black pink and indeed we have juu over here so we can click on this link and then click save and you can see that I saved it in user data and then dfm models and then you can see my G 3 20. dfm is saved here so make sure all your dfm models are saved in this folder so going back here let's say we want to now use our G Su deep face model all we got to do is Select from this dropdown and you should see G Su down here so let me click on this and you can see that I've now turned into G Su I don't know something looks off here let me know in the comments do I look like juu maybe it's the hair by the way you might be wondering how do we know for sure deep face live is the tool that this guy used well here's proof here's another video I found and this time you can see this is the deepface live interface and here he's actually using a deep face model for his demo so again if you want to go for better quality and consistency using a deep face model instead of just an image is your best bet by the way it's crazy that I could only find two videos of this guy on the internet I have no idea who he is or what the original source of this is usually I'm pretty good at tracking down the original source of something but I just couldn't find any trace of this guy if you happen to know who he is please let me know in the comments below all right so let me turn this off now and then the final option is called face animator now this is a bit different compared to these two face swap methods this basically takes in one of your input photos and animates that face so let me show you right now let's turn this on and then if you click on this eye icon you should see that it takes you to the same folder where you have all these face images so let's say I want to animate this face this girl z.
png well all I got to do is Select from this dropdown I will select girl z. png and you can see that right now I am animating her face and this is in real time so it's not doing any face swap it's just basically taking my facial expressions and mapping that onto this girl's image now let's try some trickier Expressions so I'm going to frown this is this is me frowning it doesn't really look like she's frowning what about smiling okay she can smile kind of okay it does look quite creepy though let me do it again yeah that's moderately creepy and then what about like tongue sticking out okay I'm sticking out my tongue she's not sticking out her tongue so it can't really handle tricky expressions like that but for just regular talking in real time this is a really powerful tool now let's try another one let's try let's try Kim Jong-un and see what that gives us this is indeed Kim Jong-un and I am indeed animating his photo so this is a very powerful tool and all of this is done in real time now depending on on the power of your Hardware or basically What GPU you have you might get like a few milliseconds of delay but other than that I mean it renders pretty quickly so again this is a very powerful tool but it's not good with tricky Expressions so if you want more flexibility definitely check out this video where I go over another free and open source tool called live portrait this is really good at handling tricky Expressions all right let's try a few more other examples let's try Biden this time oh this is really good this is a really good real time impersonator of Biden I must say all right so let me go back to the cute girl face all right so you might be wondering a few things the first question is how do I change my voice into a girl too because if I'm animating this cute girl face but it's a man's voice that ain't going to cut it so there's another free and open source tool which is a realtime voice changer called w oata so you can simply just install that and use that in sync with this to change your voice into whoever you want now of course if you run both of these tools at the same time it's really going to max out your compute and there might be an increase in delay but I mean that's how you would change your voice in real time in addition to doing face swap in real time and I've made a full tutorial on W oata already so check this video out if you haven't already all right so now let me turn back into my cute girl face swap all right so next you might be wondering well how do I stream this in real time like on Discord or on a zoom call so if you go back to their deep face live GitHub page and then under documentation there's this page called additional setup for streaming if you click on that it will give you some instructions so first of all you do need to have OBS Studio installed this is a free tool for recording your screen and customizing different outputs and this is actually the tool that I'm using right now to record this video so first of all let's open OBS and then what it's telling me to do is add a new source and then select window capture and then it's going to create a new window capture I'm going to click okay and then in window I'm going to select this one deepface live output and if all goes well you should see your output video from face live here so let's click okay and then now you should see your video here so if I expand this window to whatever size I want I can now stream this so I just need to click on start streaming or start recording and so you can stream yourself as a cute girl on Twitch or Discord just like this so yeah I mean this is basically how you turn yourself into a cute girl in real time and that wraps up our tutorial on deepface live if you have any questions questions or you run into any errors please let me know in the comments below and I'll try to troubleshoot as much as possible also let me know in the comments if you're actually going to use this and if so who are you going to turn into are you going to turn into a cute girl and here's the main question what are you going to use this for are you going to use this to troll your friends or scam people or catfish guys on Discord what's your use case for this let me know in the comments below as always I will continue look out for the newest and coolest AI tools to share with you if you enjoyed this video remember to like share subscribe and stay tuned for more content also we built a site where you can find all the AI tools out there as well as look for jobs in AI machine learning data science and more so check that out at ai- search.
Related Videos

1:18:44
Master AI image generation - ComfyUI full ...
AI Search
41,002 views

24:07
AI can't cross this line and we don't know...
Welch Labs
321,623 views

22:40
Midjourney is Free Again... and here's why.
Matt Wolfe
102,965 views

23:58
Google's new robots, AI video-to-video, GP...
AI Search
17,240 views

22:14
You Can't Believe Anything On The Internet...
SomeOrdinaryGamers
786,282 views

9:46
I found 7️⃣🔐Hidden Deep Fake & Video Face...
zapiwala ai
33,633 views

6:42
Face Swap AI Tutorial | Deepfake myself No...
AI Tech Talk
7,808 views
25:30
Adobe is horrible. So I tried the alternative
Bog
1,011,926 views

28:48
INSANE OpenAI News: GPT-4o and your own AI...
AI Search
894,840 views
15:23
Microsoft's New REALTIME AI Face Animator ...
AI Search
190,195 views

8:10
OK. Now I'm Scared... AI Better Than Reality!
AI Revolution
196,487 views

29:26
This AI image generator destroys everything
AI Search
446,366 views

33:05
Deepfake anyone with just 1 photo - FREE &...
AI Search
97,685 views
![I Replaced ALL my ADOBE APPS with these [free or cheaper] Alternatives!](https://img.youtube.com/vi/5EfqHg49kMk/mqdefault.jpg)
10:18
I Replaced ALL my ADOBE APPS with these [f...
Joris Hermans
515,941 views

21:34
Hollywood is so over: The INSANE progress ...
AI Search
421,448 views

23:06
NEVER Pay For AI Video Again (BEST FREE AI...
AI Samson
94,462 views

6:52
DeepFake and AI will together fool EVERYONE
Exonet
2,895,463 views

30:02
Consistent AI Video Characters Are FINALLY...
AI Samson
352,766 views

14:42
How to build an AI MODEL that makes $11,00...
WesGPT
1,191,205 views

29:55
This AI deepfake is next level: Control ex...
AI Search
226,214 views