Best Softbox for Portrait Photography
19.63k views3319 WordsCopy TextShare
Kyle Cong
For in depth portrait lighting online turorial:
www.kylecongphotography.com/photographers
Instagram:...
Video Transcript:
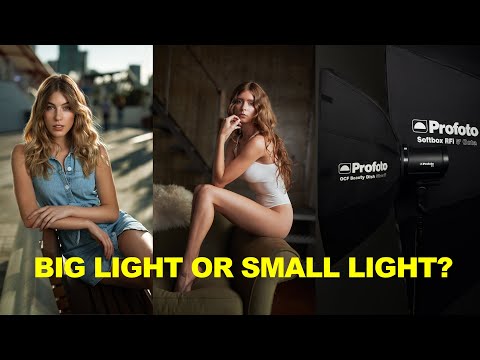
let's say you have a photo shoot coming up you have everything planned the location the time the model but you still have one thing you haven't decided yet that is a what light you should bring in terms of choice the light modifier we all know that the larger the light source the softer the light will be and soft light seems like the goto look for portrait photography so if that's case is that mean we should always pick big lights of course that's not the case there are so many small lights available and they do exist
for a reason small eyes can give you a unique look and then sometime they can give you a much better result and in the meantime sometimes small eyes just not going to work and that's when you have to choose the big lights so when to choose what light modifier based on the condition of each photo shoot can be not so straightforward and the quality of the light is not the only deciding factor your location the quality and the quantity of the ambient all should be put into consideration when you choose your light modifier so how
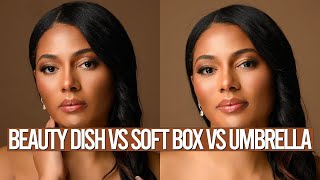
exactly shall we choose the light modifier for each photo shoot don't worry this video will give you an [Applause] [Music] answer to better understand the difference between large light and small light we need to go through some uh serious stuff so uh let's uh introduce our model again Sophie uh again I want to give you some information about her she's uh 12 in tall and then the light we're going to use today to for the demonstration is one is a 10 Ines OCTA box so in the real world is relatively around uh 4T OCTA and
the other one the small LED is only uh 2 in diameter so in the real world it will be around like a 24 in uh Beauty Dish so let's take a look at the the lighting effect so we you compare these two video together you can clearly see okay the large soft box and give you a much softer light and then the small Beauty Dish give a a little bit somehow harsh light so when we uh Define the quality of light we always use like a soft light or harsh light I think that's too General
we need to uh dig a little bit deeper that help us to better understand what's going on so when we say soft light so you can see this uh the light coming from this large soft box basically what we see is a let Shadow what I mean let Shadow is like the area of the Shadow is smaller and the shadow is brighter the other thing is smoother transition between the light and Shadow is basically the transition area between the light and Shadow is wider and then let's take a look at the heartlight the heartlight will
give you more Shadow means larger area for the Shadow and the shadow turned to be darker and then narrow transition between the light and Shadow so you can see these two are top uh they're totally opposite why is that why things are like that with a large light source because the size of the light is so large so the light can hear a subject from wider range of angle so that that's why uh there's a less area for the shadow because there a more light Hing the shadow side with a smaller light of course because
it's such a narrow beam of light it will live more area for the shadow untouch that's why you get darker you got more Shadow but how about this transition between the light and Shadow yeah the size of the light modifier does play a rule in there but I think that's not the most important rule I think the most important rule is actually something called inverse Square law so what I mean by that is like when you put a large light source uh to your subject because the size is so large you're going to have one
area of a softbox is closer to your subject the other side which is further away from your subject because the sbox is so big the difference of the distance is quite big and then we all know that the closer the light source to your subject the more intense the light will be so we would think okay the light on our light softbox is even so the light on your follow on your uh subject will be even actually that's not the case because they're at a different distance for that particular reason the lighting that he subjects
is actually a gradient of light from the brightest to the darkest this thing helped to create that smooth transition between the light and Shadow you can easily tell this effect will be much less obvious on a smaller light source that's why the transition is not near as smooth when they compare with a large light source of course to make this thing more obvious two thing going to happen you need to put your light to your subject close enough I said close enough not too close the second uh the second thing is the light need to
be little bit pointing away it's kind of like when people talking about faing the light yeah same idea now we understand the why behind all this then let's take a look how these lights perform under different situation so first let's take a look at the studio uh Studio shoot so when I talk about Studio shoot I want to clarify I mean there's a absolutely zero ambient either there's just like no ambient light in or you just set up your camera so it kills all the ambients when you're doing that way you basically have control of
all the lights like light is a key light or fuel light or Kicker light when you shoot like this large softbox large light source usually will make it easier for you because the size of light is too big and also because that gradient effect which I just explained will help help you to make this one light work as multiple functions it's very easy to use a one large softbox work both as key light and F light and apparently is something very hard to do with a smaller light you most the time you really cannot just
shoot with a one smaller uh softbox uh in studio with with no ambient unless that's the dramatic look you want to go for so usually if you want to shoot with a smaller light you need more than one light sources so there's a pros and cons like uh yeah like you need more light source seems like that's uh uh that's something not ideal but actually it create a different look because smaller light have a different character the smaller light is very good at showing texture like skin texture and it's very good at showing the uh
specular highlight it's something very important to create a 3D look because it give you actual level of tuning other than just the light and Shadow it give you highlight mtune and Shadow which one to choose it will be totally depends on like uh the nature of your photo shoot and the large soft box uh has a other than this one light serve as a multiple function it has another benefit is that the light is more forgiving for example if you do some shots like a the model probably going to walk around jumping around turn turning
here and there and then with large saw box it's just much easier to do that like you can just keep shooting without changing the position light too much with a smaller light because it's such a narrow beam of light so you light need to be more accurate every time they turn or they move around you have to adjust your light accordingly so which light modifier you should pick for Studio shoot well that depends on the photo shoot but if you've been following along I believe it's much easier for you to choose the right one now
next shooting on location shooting out outdoor location will be very different from shooting studio uh in my previous video I mentioned that before is that you cannot uh move your favorite Studio setup outdoor and expect to get the same result it just simply not going to happen the reason is simple because now we have a ambul joining the game and once the ambul join us we have to do something differently you cannot kill it because if you kill all the ambient light there's no point shooting outdoor you might just shoot in the studio and you
cannot ignore it the ambient light have to function something uh like for example either a a fuel light or key light or Rim light or maybe two of these functions so you have to let them do what he do and then don't mess up with it for example if the ambient lights work as a fuel light and you're going to make sure you're not going to add any more Fu light because otherwise you're going to kill too much Shadow and then the photo going to look flashy that means you're going to make sure your light
only going to work on the part that is needed not going to uh cover unnecessary area because they only going to make the image worse actually the large light going to work against you because the light source is so large it's very easy for them to cover both the key light and part of the F light and then end up going to give you a flashy look the small light going to work much better because it has a it covers a smaller area it's very easy for you to pinpoint only in the area that is
needed and let the ambient light do the rest at this point some of may ask you mentioned that the small light it's not going to give the smooth transition between the light and Shadow as the large light so what you going to do about that okay let me explain so when we shooting on location we're going to make sure the light on our subject somehow match the light on the background it doesn't have to be exact but they should like look closer similar enough so for example if you're shooting on a a sunny day so
the the light on the background going to come from the Sun and the Sun is a point light source the light going to be somehow harsh so if the light on your subject is too smooth actually going to create this unnatural look a good example will be uh you may seen some behind the scen videos um they do photo shoot like say in the desert or somewhere like on a sunny day so what it did is I just use this large diffusing panel to diffuse the light fall on the model and then you can see
the lighting on the model is very soft but the lighting on the background is very very harsh for me that's a very unnatural look I normally not going to shoot it that way on the other side if you're shooting in the overcasting day the the light fall on the background going to be very soft because of coming from this diffuser Sky if you use a small light source you might worry okay the light transition going to be between the light and Shadow going to be harder so it probably not going to match the background and
you might think that's a problem actually it won't be a problem if you properly blending your ambient together with your strob light think about this your St light working as a key light the ending going work as a fuel light if you blend in them properly the fuel light going to help you to smooth this transition between the highlight and Shadow it's almost like a drawing you draw the highlight and you draw the Shadow and you smudge the area between them help to build this smooth transition of course you need to set up your lighting
your camera the right way to get that result but it's absolutely doable that you still get the lighting result from the strob light and then match the lighting of your subject with the background due to this reason I almost exclusively shooting with small ey when I'm working outdoor of course there's an exception that one exception will uh will be when you're shooting with a very low ambient and shooting Outdoors like you shoot after dark then so you still have certain level ambient but it's a very minimal that's when you need a little bit more coverage
on the fua as well that's when the larger light source will make your life easier let's move on to the next scenario that's when you're shooting indoor so when you're shooting indoor there are two typical situation one situation will be you have a lot of ambient for example a lot of ambient light coming from the window the other situation will be there won't be many ambing light a lot basically just uh a little indoor light here and there the lamp the seating light things like that for these two different situation we need to treat them
differently so when you have like a lots of ambing light coming from the window it's sort of kind of like a shooting outdoor so you basically you just use a small light just work on the particular area particular function that you need it but when you shooting with a very low dark ambient then you back to the situation just like a shooting the studio you either use a large light source work as both a key light and fuel light or you use a smaller light but you have to use a multiple light sources so far
we've been talking about choosing the right modifier only based on the quality of light but there's some other things that we need to take uh into consideration one thing will be how much light will be needed s light just like a water and then uh your sof box just like a shower hat so if you have a one large shower hat and one small shower hat and then you're taking a shower you want to have the same amount of water fallowing you within the same amount of time apparently the large shower hat going to consume
a lot more water exactly the same idea for light large saw box going to take a lot more light than the small one uh it's very easy to do some calculation to get like exactly how many stuff more you're going to need but just give you idea like a for a a 1x3 street box uh if you want to get the same brightness which let's say a 5 ft OCTA you easily need like another three stops of light to make sure the brightness is the same level so what that means like if you're shooting outdoor
and then uh you're competing with the ambient and then you have a 250 wat light with a 1x3 soft box you're shooting at the maximum level if you change that soft box to a 5 ft OCTA you're going to need three stop more of light that's kind of 500 1,000 you're going to need 2,000 watt light so that's a lot more power that will be needed and 21 light going to be super heavy super big super expensive that's definitely something you need to put into consideration the second thing will be um the light spill the
light spill is basically uh the light hitting the area that you don't want to hit uh for example you're taking a picture of your subject you want the light only following your subject but sometime the light could ACD hit the background creat this a Poky light effect and the people can tell obviously the artificial is being used it's not a very natural look so you always trying to avoid the light spill make sure the light only get get to the error that uh needed for this it's very easy to do with a smaller light because
smaller light has a narrow light beam but large light will bring you a lot of problem if you're shooting in the small space so there are some solutions uh for example you can use a grade to narrow down a little bit sometime if that's still not enough you have to use a flag so that means you need actual stuff to carry especially for flag you're going to need an actual Li stand or someone hold it for you so for that particular reason small ey will be much easier so that's pretty much we went through all
the things that I think that are important uh when you choosing the right light uh Right light modifier uh but I know there's a one question that I haven't answered and someone going to ask that question and that is somebody say hey Kyle I know that the size of the light modifier is relative you can make a small light look appears larger if you put a light closer to your subject and then you can get like a similar lighting effect as a uh large light modifier is that right absolutely right but there's some big problem
with this the first problem is very obvious like if you put your light too close to your subject and then you're shooting with a wider lens like a 15 mil 35 mil or 24 mil like Le the range I use most of the time the like are showing your frame so that's problem and somebody like you know what I'll do this I'll put a light on the tripod I'll take a shot with the light and then I'll take out the lights take a n then Photoshop it yeah you can absolutely do that but it doesn't
means you won't have a problem you will have another problem because your light is too close to your subject and then you're trying to create this larger light effect with a smaller light so you move the small light very close to your subject the light only going to hit uh her face maybe just like a shoulder up or waist up so what happened is you had just a huge light fall off below her waist and then even if you do the Photoshop you make everything look perfect and people can easily see the light fall off
and then can easily tell the the artificial light is used because it's a very unnatural look so it's not going to help you anyway so what I'm trying to say is when it's time to use the large light just use the large light choosing modifier for your photo shoot is like everything else about photography there's no such thing called one face for all you always need to choose your modif Fire based on the nature of your photo shoot and sometime it cannot be so straightforward but I hope after this video it'll be a lot easier
for you to pick the right one thank you for watching this video I will see you next time
Related Videos

12:53
How to use flash for portrait photography:...
Kyle Cong
42,188 views

16:33
Portrait Lighting tips1: soft vs hard light
Kyle Cong
5,683 views

25:03
Two Models and Two Photographers! Check ou...
Jason Allen (J. Allen Photography)
9,955 views

9:51
Common Portrait Photography Mistakes
Kyle Cong
9,992 views
7:39
5 Secrets to Stunning Sunset Photos
Iti Järve
3,259 views
12:09
Mastering 3 Light Fashion Photography The ...
Kyle Cong
4,514 views

6:59
One Lighting Tool That Changed Everything
Piero Gianni
292,745 views

14:31
The Ultimate Stripbox Guide | Take and Mak...
Adorama
68,445 views

13:32
Use this SIMPLE technique to create STUNNI...
Neil Redfern
63,093 views

21:37
I tried Portrait Photography with Irene Ru...
Anthony Gugliotta
132,479 views

16:13
Portrait Photography with Cheap Speedlights
Sean Tucker
40,376 views

14:41
10 Must Know Portrait Composition Tips
Kyle Cong
89,188 views
23:33
Speedlight Portraits Explained | Mark Wall...
Mark Wallace
90,289 views

10:26
Off Camera Flash tips: 3 lighting setups w...
Kyle Cong
24,145 views

14:21
I WISH I Knew These PORTRAIT PHOTOGRAPHY S...
Iamtongue
22,028 views
10:51
What Is The Difference Between A Beauty Di...
Ryan Troy
2,394 views

1:08:56
Portrait Lighting Placement Explained: Unl...
B&H Photo Video Pro Audio
18,553 views

1:03:31
Is Flat Light Ruining Your Portraits? | LI...
Adorama
10,370 views

17:23
Mastering Portrait Lighting: Pro Tips for ...
Visual Education
175,223 views

7:52
3-Light Setup for Flattering Editorial Por...
SLR Lounge | Photography Tutorials
37,403 views