Portrait painting can be simple when you know what is important
28.6k views2988 WordsCopy TextShare
Paint Coach
Free Drawing Lesson - https://convertkit.paintwithpaintcoach.com/portraitdemo
Patreon - https://pa...
Video Transcript:
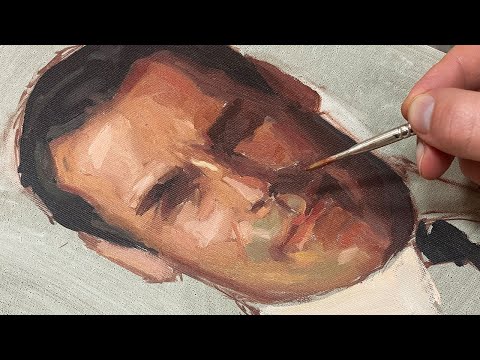
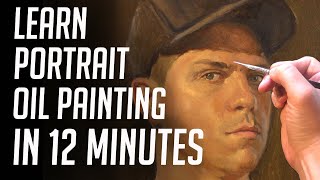
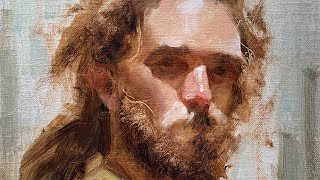
all right welcome to the studio uh I'm going to be doing a really fun exercise today where I'm going to be painting this portrait of Don Draper but very simply just with very simple shapes to show you how little you actually need to communicate face at a portrait and also just to show you what is most important because I feel like a lot of people don't get this I didn't get this for a long time and getting it will make your P painting a lot easier and make things go a lot smoother so if you're
new to the channel then welcome to paint coach my name is Chris foro and I help thousands of students every single month get better at oil painting through my online courses and tutorials and today I just have a Frederick's panel 9x 12 nothing expensive put a wash of ivory black and yellow ochre on it with paint thinner whites with paper towel did it yesterday so it's dry my palette I got Ivory black lesen Crimson cadmium red burnt sienna yellow ochre and titanium white and this is pretty much like the palette plus crimson and burnt sienna
find the zor palette extremely helpful when it comes to painting portraits cuz you kind of automatically desaturate the colors because yellow is a desaturated yellow Iving black is a saturated blue a lot of times with students uh portraits I see like a lot of two vibrant oranges or two vibrant purples in the shadows so that's going to help a lot and just got some paint thinner here using brushes from my brush said this is just a number four flat brush got some paper towels here and we are good to go now I already have it
drawn in I just used some Thin paint like a little bit of ivory black mix with CAD red drew it in using my proportional divider to get some key measurements and then kind of freehand it from there if you struggle with drawing if you're like Chris like I can't even get to this stage like my drawing is always inaccurate doesn't look like the purse I don't know what I'm doing I can help you with that cuz I actually have a full free drawing demonstration we show you how I use this how I get measurements and
you'll get to see in real time me drawing in a portrait uh if want to check that out there's a link to it in the description of this video but it is time for us to start painting now what I like to do is I like to block out the face into light and Shadow so that's what I'm going to do first and when I do the shadow I don't want the darkest value that I can that's going to come a little later so I'm going to get some Ivory black CAD red yellow ochre I'm
going to make definitely a dark value but not the darkest I can by any means and what I'm going to do is just block out I'm going to squit my eyes and look at the shadow shapes here and just simplify what I am seeing and using a big brush like this like a number four it's going to really help keep you thinking big and the more you do this the easier it's going to get for you the more you're going to pick up on Tendencies and common things that happen in every single portrait even over
here I'm just going to got some Shadow it's best even like I know this doesn't seem that dark in there but it's always best to air on the side of too dark than too light you can always add in lights it's harder to add in darks or harder to go back in darkening values so it's just easier to build dark to light now I'm going to move to the hair which is darker pushing some more black making sure I'm getting enough paint on my brush so that this goes nice and quickly and this isn't going
to be like a full finish polished painting just going to be an exercise but I think as I said before you're going to be surprised at how much communicated with so little when you know what to communicate just getting this in very simply nothing special going on here just kind of coloring inside the lines okay I got the hair in now I want to go in and work the darkest dark so I can actually take the same color and areas I see are darker I'm just going to work that right in there and if you
pay attention to the areas that you're putting in you'll notice all the darkest areas are the areas that are deepest in like inside the eyes here can also push this underneath just coming back in don't ever feel like you can't go back a step there are no real concrete steps with oil paint there's going to be a lot of back and forth you know dark to light light to dark like I actually want to come back to the previous value I could probably bring that down just a little bit a little bit of my trusty
paper towel with pain thinner just making sure I got that angle right so I got Shadow I got darkest dark now let's put in a light now when I do this I don't want to put in the lightest light that I can like this lights I'm just looking at the forehead here there's this light and that light this is definitely lighter than that so I would want to start with that always say darkest light that you can that way you can build to lighter values so if I just get some Crimson yellow ochre touch of
the ivory black should give me to where I want to be yeah something like that I just want to go in fill this in they'll be tight in a minute to change colors and get values and all that good stuff still using a big brush too except a little more paint and even areas like the lips here I know lips are a different color but I'm just going to still block them in with this light value it's just going to help keep me on track help keep things organized you ever get like lost or confused
used while you're painting or just overwhelmed doing this step will help a lot notice that I probably could have brought that hair down a little bit let's bring that down so we have our face broken down into light into Shadow now comes the really fun part because now we can start to find things within these and we can also start getting more specific with shapes and edges just going to simplify that I think bring that down like that dial in that a little bit more all right so got light got Shadow darkest dark let's put
in a lightest light let's get these shapes in so if I get some white yellow ochre little bit of crimson I'm just going to block these out real quick real simple not taking my brush off the canvas trying to create big shapes see one there one there also like I see this light it's uniform right down the center because think of the head like an egg like a spear got the Shadow and there's going to be an area where it gets light and it starts getting dark again so I see that here definitely catches on
the cheek because this cheek is like a shelf kind of pull up this you see that right there it's more of like a shelf opposed to a wall always think of planes like either walls or shelves and since it's a shelf you can see it's catching more light than this right here same thing is happening right there it's why it's really helpful to do the work on the planes of the face actually see it just kind of carried right down into there a little bit there it gets less as it comes down further and then
the nose different planes of the nose there you go but you can see just doing this like how much is communicated like how much form like I know it's not super pretty but like it's still working looks a lot like Superman right now but here we can now start doing some really fun stuff because we have bright as bright but we could find transitions between this value and that value and make things a little more natural a little smoother so I'm going to try and find a value that's between these two something like that you
know it's still darker than the light a slide but it's a little lighter and I could also start working color shifts and it's hard to see here it's a lot easier to see here that there's a color shift with stubble it turns cooler and grayer sometimes that seems purpler or sometimes greater I feel like this goes a little gray and you can even see it right there so I can actually get some yellow ochre and ivory black kind of push that just have S slight color shift and if you have to paint over some you
already did like I'm going to paint over this highlight here that's okay a lot of times I'll paint in stuff like those highlights just to like help me see things better but you can see just that color shift here kind of helped portray that stubble a little bit and I can actually push it even more up here I'll show you cuz if you get the ivory black and the the yellow ochre it mixes into like a green because if you think it' be black like a blue blue and yellow M green so you can kind
of see where I'm going here see said a little more blue but it's black but how I'm thinking about it push a little bit of it into there and I could probably go a little bit brighter within that kind of like that now let's work some more transitions like here is definitely lighter the main reason I wanted to do this exercise in the way that I'm doing it you know I kind of really wanted you to focus in on this aspect because I feel like you know I've come to learn that when teaching painting to
students a lot better to trying to teach one thing at a time and if trying to teach like drawing and planing and all this stuff at once it's not going to stick or you're going to get overwhelmed it's got to kind of take it one thing at a time so I'm going to actually work transitions here now this is actually this like area it's kind of orangey almost definitely want to get that in some yellow CAD red some black get a really warm warm value here because this area here it's not nearly as light as
over here and push a little more yellow see like a transitional kind of shape right there but I'm also seeing that I could probably go even lighter within the light that I already blocked out so if I get some white Crimson yellow ochre and just go a little bit lighter this time and put it in the center just like here a little bit bigger there little there same there and then getting coming down I'm going to lessen it like knock it back some of these surrounding colors not nearly as bright right here you can always
go back to dark to but actually get some uh's get this here in lighter some also that I really like to do whenever there's a white shirt I like getting it in get some white get kind of some of these other colors here because it's not going to be Pure White kind of grabbing some of these from the face it more yellow I getting this in it just helps you relate your other values this what looks cool a little black cool it down a bit yeah something like that let's talk a little bit about color
ship let's do this mouth so the top lip is always going to be darker than the bottom lip and so I can kind of get some red I black here or some so that part's dark it's very thin but then this next part gets lighter because the lip turns like this part here get a little bit lighter it's facing the light more light's coming from the left side and this is facing left you see like how knowing these things it allows you to be very simple with your brush work and like how you communicate it
when you know things like that like okay I'm going to change the the value for the turn of that lip there boom and it works now there is like some skin before you get to the stubble here like hair soften the transition now the bottom lip acts more like a shelf than a wall top lip is more like a wall so this is going to be a little lighter and see I'm going to let the color blend right into the skin here a lot of people make they kind of like outline their lips and you
know they want that it kind of just Blends right into the skin there and it gets darker as it goes to the right that's a shadowed side of the face so I'm also having that value change a lot of things like I know I'm talking a lot here and got to go over a lot of things there's just a lot of things you can learn about the face like you know what I was just talking about with the mouth that really help you and really help you see more actually the whole kind of through lineer
theme of my portrait course is learning to like break it down in the it's like a complex skill pain and portra and be able to break it down into subskills and focusing on one at a time like now I'm going to a midtone even though I'm not going to be taking this to completion you already know like you already know how I'm going to do it because I'm just going to be doing the same things that I've been doing just getting more and more specific as I go and paying closer and closer attention to smaller
shapes and like the dialing in value change is better like this here could be lighter it's still dark but I could I could lighten it a little bit also working edges like I'm a really harsh Edge right here same here maybe I don't want that work my edges it's actually going to be hard for me to like stop working on this I didn't want this video to be super long I wanted it to be short until the point it's hard to step away like I'm not going to do the eyes now I am using a
small brush here now trying to think if there's anything else I want to show you before I stop I feel like everything's working pretty well again like I I mean I see a ton of things I could do and you maybe like kind of lighten up more of that it's all about adjustments things like if I want to come back dark if I want to maybe darken this Edge just to show the turn of the plane a little bit more a lot of times people don't communicate that they don't make it get darker they make
the face look wider than it should be and they're like why is my face look too wide and they'll like check their measurements oh it's all measured right and everything but they didn't indicate like a a plane change that would have helped okay I need to find a stopping point here soon all right I'll show you the hair too real quick really simple iy black yellow ochre the lights in the hair are not that light but I can see like here will rub don't really see much on the other side I push a little more
red CH the swallower brush here like the transition from hair to skin my finger to kind of blend in a little bit last thing is I can push a little more a little more into this nose put that there sometimes like the littlest shapes can like do so much like right here getting the lighter shape not super light but just enough to kind of indicate that push back in that's all you need so that is about it for this demo hope that this helped you see portraits differently hopefully it made you less intimidated by them
when you see like kind of how simply they can be made up by just these simple shapes and knowing where to place things and how to think about the face most importantly but that's it for me I hope you enjoyed this video if you did please hit the like button subscribe to the channel if you want to see what I'm painting on a daily basis you can follow me on Instagram at fors of 43 I'm Chris fornito here telling you to go get painting
Related Videos
17:05
10 Things New Oil Painters Get Wrong
Paint Coach
297,419 views
30:12
How I draw and block in my portrait paintings
Paint Coach
20,935 views
19:32
The eye painting demonstration I wish I ha...
Paint Coach
39,515 views
13:37
How To Find Your Art Style So Fast It Feel...
Dries Ketels
40,892 views
29:04
Painting an Old Man with White Hair Step b...
Portraits Painting
3,492 views
15:41
This might be the best thing a new oil pai...
Paint Coach
8,739 views
27:08
How to Paint Eyes - The Biggest Mistake Ar...
SIMPLIFY Drawing and Painting
539,419 views

1:14:59
John Wellington Skin Tones and Underpainti...
JerrysArtarama
39,152 views

22:58
How to paint trees - the demonstration I w...
Paint Coach
154,425 views

15:25
JOHN SINGER SARGENT: LEARNING THE STYLE AN...
Chelsea Lang
288,514 views

20:01
Want to draw people (use the Loomis Method)
Rusty Nelson: Your college art professor
410,268 views
11:52
Portrait Painting Broken Down
Paint Coach
349,887 views

12:51
Inside The Studio of The World’s Messiest ...
Alex William
44,549 views
22:33
How to Paint a Portrait from a Photo
Andrew Tischler
603,253 views

15:24
Caravaggio's Technique
ARTEnet
1,246,624 views
9:20
Learning This One Thing Instantly Improved...
Paint Coach
744,848 views

30:08
Thick Impasto Painting Tutorial in Oils | ...
ZR Fine Art
14,206 views
10:08
How I get oil paint to do what I want it t...
Paint Coach
11,759 views
18:56
What I Learned From Master Oil Painters (P...
Chelsea Lang
151,717 views
19:13
Alla Prima Portrait Painting: Walkthrough ...
Arthur Gain
344,239 views