I Created AI Mike to Manage My Community 24/7!
1.53k vues3829 MotsCopier le textePartager
Creator Magic
🔥 Exclusive AI Tutorial Premium Resources Available Now!
Join our thriving community at https://m...
Transcription vidéo:
Hello there. I'm Mike, recently the Creator Magic got so incredibly busy, I'm actually finding it hard to keep up. And as much as I love responding to all the posts, I thought, what if I could make an AI Mike that could respond to posts while I sleep?
This video will show you how to create an AI version of yourself. If you're a content creator on YouTube, or you're a podcaster and you have a repository of knowledge, essentially you'll show your channel. I'll show you how to take all of that information and make an AI bot version of yourself that can interact with your community, even when you sleep or when you're on holiday.
Now this is part two of a two part video series. So I suggest you go back and watch the first video before you watch this one in full. In the first video, I show how to set up a vault that kind of stores all of your knowledge in places like Trello, Notion, Airtable, Google Drve, and more.
It also puts it into R. A. G.
RAG. That's retrieval augmented generation. I explain what that is and how that works, and how to get all your stuff broken up and chunked into databases like Qdrant or Supabase or Pinecone.
So all of that is in the previous video. In this video, I'm going to assume you've got that knowledge base created. Now I'm going to show you how to take all of that data and respond to your community members instantly, and also reference the content used to make the AI response.
Let's dive in. I'm using Circle to host my community. And you can see all of my community spaces are over here now, because I don't want to spam up the rest of my community with AI generated responses.
I'm going to create a brand new space here in my circle community just for the AI version of me. So we'll create a space that is a post space and we'll give it a name called I Mike like. So we can also give it an emoji.
And I think, well, what's better than the robot emoji for an AI version of yourself? It's going to appear in my standard community area, and the access will be open to all members to test out. I'm also going to switch off things like email, in-app, and mobile notifications because I don't want to bombard all members with responses generated by AI.
obviously AI Mike is not in the group, so I need to go ahead and invite him. So I'll go in here and I'll look at the members tag here. You'll see at the moment it's just one member.
It's me in there. So I'm going to click to add a member. And I've already created a user account for the AI version of me.
It's called AI Mike. And if I type in his name there he is. Oh, there he is with the robot avatar.
Quite like that. That's quite nice. I don't have to notify AI Mike as he's an AI.
I'll just click add. Now, to make this automation work and this AI agent run around the clock, I'm going to be using a tool I really like called n8n. And to handle the process in the background, all the talking to AI, all the retrieval of knowledge that will happen there.
Now, unfortunately, on the regular plan circle doesn't allow you to use an API key with anything just to prove partners and those approved partners are Zapier or Make. So I've got a Make account and I paste in that API key. With that all done, I can create my first scenario inside make, which will essentially go ahead and grab the details from circle and pass it on to Nat in.
So I'm going to go in and there are many options here. But I'm looking for the watch posts trigger. I'll click that and it'll ask me to populate with my community details.
So of course I'm selecting Creator Magic and then you'll see it'll come up with space ID. Now of course I've got AI Mike there. These are exactly the same as these spaces I've got linked over here in my actual community.
With that done, I'll increase the limit so it can handle ten posts to that space at a time and click okay. And then I link this trigger through to something called a Http. now it's asking me for a URL now, of course, I need to get that from n8n.
And that's where Make is going to pass all of that lovely data from Circle over to my automation, so I can do the lion's share of the work and then pass it back to Make to get it back into Circle. I know it's it's quite convoluted, but buckle up. It'll all make sense by the end of the video.
And by the way, if you want all the code and all of the stuff that I'm using to make this automation, I've posted it for community members in my community. So go ahead and join using the link down below. Okay.
So I'm inside now ten. And I'm going to create my first workflow to work with make. So there it is I Mike for the community.
And we'll go ahead and create the first step which of course will be a webhook call okay. Because make is calling then sending all that lovely data over. So I'll click that.
Now you'll see here it creates me a test URL. I can use that for testing if I like. But this is going to be a real thing.
So I'm going to go straight to the production URL. I'm going to copy that over. And that's all I need for the moment to go back to Mike and paste that in there.
So you'll see it'll take the data from circle and send it to Nitin using my webhook URL. Now this is really important getting all the data over. Let me show you how to set that up.
first we want to change this method from a get to a post, meaning we're posting data and then under headers we want to go ahead and give this a name. And first of all we'll start off with content type. And the value will be application JSON.
We're sending all of the data that comes from Circle. All of this stuff that Make will grab from circle when something is posted in the community will be sent to n8n let me show you more. So next up, the body type.
We want to be raw and the content type will indeed be JSON. Now here under the request content, I'm going to paste in quite a lot of Json. And again all of this will be shared in the tutorial post inside my community.
So there is all the JSON that will take everything from Circle and send it over to my n8n an instance. With this I can just click okay and then that automation is done. You'll see down here I can choose to run it whenever I like.
Every 15 minutes is pretty good. And actually if I run this every 15 minutes, it'll run 96 times a day and nearly 3000 times a month. So on the basic make plan, I can run this 3000 times in a month comfortably, without needing to pay for the next tier.
So it works perfectly for me. All I need to do to get it started is save this and then enable it inside Make. Okay, with that all set up, we'll leave Make behind.
We'll return to it later when we need to get a reply back into the community. So I'm going to listen for a test event in Nate n and all being well, if I go to my community and create a post, the now enabled make automation should pick it up and send it to n8n. So I'm going to type in cats.
What do you think of cats? And this is what I'll use to test with AI. Mike I'm posting in AI Mike inside my community, so I'll click Publish.
And there it is. Now let's see if it worked. And indeed, it did work.
Look, here's the lovely data. Now, don't worry that this is all gobbledygook at the moment. We'll make sense of it during the automation.
All you need to know is that make manage to pick up the data from my community and send it to n8n, so I can now further build out my automation with this data, which I've pinned to the webhook node. So I can take this a little bit further and show you more. Okay.
So with all that lovely data, let's go ahead and add another node. And this time I'm going to add one of my data stores. And you could use anything Pinecone, Supabase I've demonstrated in my previous video I'm going to use Qdrant because it's self-hosted and really cool.
So I'll select that and select Get Ranked documents from Vector Store. Now this is the point at which we start to take out the information we need. So everything is good here so far.
We got the data from the webhook. We've got the quadrant API linked up. We've got operation mode, get many.
And from the collection which using the YouTube database I set up previously. Now as the prompt, we are going to want to bring in the name and the body of the post. And if we look all the way through here, we'll see there is a name of the post that we can drag and drop over here.
And there's also a body and specifically I want this, which is exactly what the person has posted inside their community post. So we'll drag and drop that and maybe even put it on another line. Finally, all we need to do is limit it to, well, how many bits of data do we want to pull out the database?
The standard for I think is great to get started with. that done, I need to use an embedding AI model. I used OpenAI to train my database, so I'm going to use OpenAI to retrieve embeddings from OpenAI is here.
And you need to make sure you select the model you used to train your database. In my case, I use the most expensive text, embedding three large so I could get really accurate data retrieval. Let's select that and we're done.
For this part. Save the workflow and let's test it. So far.
Yes it's successful. It's pulling stuff out of our quadrant database. Let's actually have a look at what's happened here.
And you can see here actually it's gone ahead and looked at a bunch of my different videos and pulled out chunks, including chunks about, yes, fluffy cats, which is the question I asked to answer the question in the community. This is pretty cool, isn't it? Let's see what happens next.
okay next up let's move along and we'll add in the aggregate node. And here because we've got a lot of data for chunks to be exact, we need to aggregate all the data into a single list that we can essentially feed into our AI in a single prompt. That's added in.
And next up we're going to add in the code node. And this is just going to do a final aggregation to make sure that everything is in the right place. So I'm going to delete this paste in this code.
And don't worry because I'll post all of this code in the community that you can use yourself. Copy and paste this workflow and try it out, but this will essentially combine everything together from our database ready to feed into our AI. Let's test the workflow, make sure it's working so far.
And yes, it is. And now we get one final output. Let's actually make this a bit smaller.
So you can see this. Combine text and also combine text with YouTube links embedded in. And this will be important when we reference sources later on in our reply.
with this all done I'm going to go over add another node and we want a basic LLM chain. It's where we feed all of that lovely data to the AI model. Now for the prompt source.
We're actually going to define it below. And I'm going to make this a bit bigger. So you can see what I'm doing.
Turn it into an expression. And again you'll see I'm pulling in the title of the post and the content of the post there is coming through perfectly. Next I need to add in chat messages and I need to add the system prompt.
This is probably the most important part of the whole automation. This is where I tell AI Mike who he is, where he needs to grab the data from, what he needs to do with that data, and how he should reply. So let's add a prompt.
It is indeed a system prompt, and for this message we're going to make it really big, because I want to put in quite a comprehensive prompt. Okay. The prompt that's going to go in here will also take in all the information from YouTube links and sources.
I'm going to paste it in. I of course will share this prompt inside the community, but I'll briefly gloss over what I'm trying to do. So we start off by saying you're Might Russell from the Creator Magic YouTube channel.
You need to answer using the transcripts, and it's important that you use all of the information here, which of course is the information we restored from a RAG database. And you need to answer it with information only from YouTube. Speak in a casual style, keep the responses short and to the point.
If you don't know the answer, tell them you don't know the answer. So don't hallucinate what I'm asking for there. And don't use phrases that respond to many people.
You're replying to one person essentially, in the community. Okay, I've done a bit of enhanced prompting here because I had to play with Claude, and Claude kept giving responses like in the transcripts or I remember discussing, and I wanted to make it a little more personal and less detached. Also, I've asked it to reference sources, and I've told it how to get those sources.
And the question of course you need to answer is here. Now, I've course got to change that to be webhook. So it actually receives everything from my webhook.
I rename that to receive from mate. But that is now all working. Use your knowledge to answer the questions.
Respond only with the response and nothing else. And remember, you're me, the creator. Speak confidently about your content.
So it's a rather large prompt. But if you're interested, I'm going to share that one in the community as well. Let's move on.
Okay, before testing this workflow again, I need to hook up a model. And like I say, I've played with many models here. I played with OpenAI's ChatGPT-4o, I had to go with Google's Gemini, I played with flash and things like that.
But the most natural sounding reply came from anthropic, and I think many people are finding Anthropic great for writing. So I've hooked up anthropic and I've gone for their latest tool. 3.
5 Sonnet model to make the response. Now that's hooked up, we should be able to test this out and see what kind of response I make might give given that prompt. So let's zoom out so we can see the whole workflow in action.
Obviously with the pinned data from my initial community post and click Test Workflow. And there you go. Working with Claude.
We've got a response. Let's double click the LLM chain and see what the response is. And there is the response.
In one of my videos, I explored some really cool cat related content. I remember showing the amazing slow motion sequence of a fluffy cat leaping through a sunlit forest, which indeed I did do in one of my videos. And you'll also see the sources here.
I generated cat videos and animations quite absolutely amazing that it knows that I mentioned cats in one of my videos. This is all good. The automation is working, so let's get that data back in to make and then eventually back into my circle community.
As a reply to the initial post, I'll show you how. before posting this back, I'm actually going to add one more code node, and it's a code node that simply escapes the Json that's generated. I found that, if I didn't do that, I was getting all kinds of errors.
So this code is designed to basically take the AI response and escape characters like quotation marks and things like that. Again, all of this code that I'm showing on the screen will also be posted in my tutorial guide in the community. Let's move on and get this back in to Make.
So I'm creating one more scenario in make. And first of all, we need to use the webhook. And we need to do a custom webhook.
It triggers when the webhook receives data. And that will be obviously the AI reply from end to end. So custom webhook here and we'll click Create Webhook that will give us a URL that we can then paste into n8n.
Okay. With that done I'm then going to go ahead and add on circle. And this time I want to go ahead and create a comment.
So I'm looking for the create a comment action. Click that there. It should connect to my community again.
But before I go ahead and fill out that further information I need to go to now and just add on the HTTP node, which will, of course, send that data over to Circle. Now I'm doing a Post request again here. And the URL is of course the webhook from Make.
com. We need to send body using JSON and then using JSON And basically this takes all of the data that I was initially sent from Make. So it knows which comment thread to reply to.
And it finally puts my AI response text at the bottom, which is sent back to make to post into the community. Okay, the workflow is actually complete inside Nathan, so I can save this. I can click the webhook, unpin the data so it's fresh and ready to activate, and I can make my sequence active here so that it's ready to run and do all of the good stuff.
Okay, so setting up the last part of the make automation. I'm selecting my community as I did before, and then I need to select the space ID, which, of course, is going to be I might. And then it's very important that we get the topic ID correct okay.
So I'm going to make sure that obviously is cats. It's picking that up already. But I don't want to select that because otherwise it's always going to reply to the cats topic and nothing else in my community.
So I need to actually map it to something that came in from the webhook, and that will be the body record ID there. And then for the response text, that's the body text that's going to go back to circle. That will be my AI response text.
And I pasted that in there. And of course all of these automations will be provided for you to easily download inside the community, so you don't have to copy everything I'm doing on the screen, which is good to know. Finally, use the email that's the user email of my AI agent.
So I just map it and then here I type in my eyes, email. Okay, with that done, I can save it and activate that scenario inside make. Now everything is built.
Let me recap what we did. First in video one. In this two part series, we build the awesome YouTube channel vault, where it watches for new videos, grabs the captions, throws them into places like Airtable, Notion, Google Drve, and Trello.
But what we're interested in is it also throws them into Pinecone, Supabase and Qdrant for vector database storage, meaning we can do RAG. Yes, that's right, retrieval augmented generation on all of our created content that we ever made. Next, we went over to Make so that we can integrate with the Circle API.
And we're watching for posts inside a certain part of our community. And one one is found. We'll send it using an HTTP request to our n8n workflow, which does most of the work.
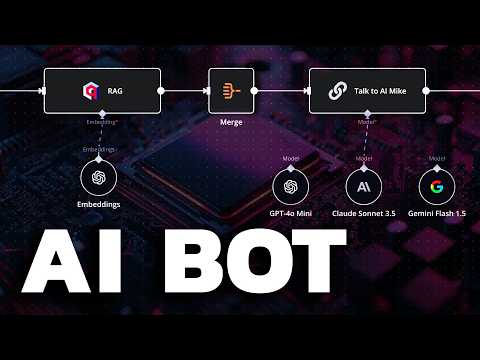
We start with a webhook trigger, receiving the data from make, sending it to Qdrant or Pinecone or Supabase or whatever you want. Then we merge things together, combine the sources using code we talk to I. Mike.
I'm currently using Cloud Sonnet 3. 5, but like I say, I didn't play with GPT-4o mini, which was fairly good. And Gemini 1.
5, which was fairly cheap. And then we escaped the JSON and post the AI response back to Make. Make has a webhook that receives it and then instantly posts the comment back to my community.
Let's see if it worked. Okay. It looks like all of my scenarios and workflows are working.
So let's just refresh this community post and. There is AI Mike, I have a soft spot for cats. Isn't that great to know there's the full response with stuff that I've done in my previous videos.
And if I click See More to see the full post, we can see a source here. It'll take you straight through to the YouTube video I made before that references fluffy cats getting chased by lasers. So there you go.
That's how you create an AI agent. The works on your behalf as a content creator around the clock, responding to your community with stuff you've already spoken about on YouTube, videos or podcasts. Now, I know this has been a really technical one, so click the link down below.
Join my community and let's discuss this further and let me help you out with any issues you have over there in the community. Thank you so much for watching, and you'll probably find there's a video showing up on your screen now that YouTube thinks you should watch next. Thanks.
Vidéos connexes

12:27
I Cloned A SaaS App In 30 Secs With This A...
Creator Magic
20,925 views
15:37
7 Free AI Productivity Tools I Use Every Day
Futurepedia
451,043 views

16:02
I Tested No Code AI App Makers and Found t...
Creator Magic
39,533 views

13:20
I Made an iOS App in MINUTES with This AI ...
Creator Magic
343,028 views
17:28
5 FREE AI Tools To Refine and Share Notebo...
Blazing Zebra
18,651 views

20:55
How to Backup ANYTHING with AI
Creator Magic
2,811 views

31:28
How to Build A No-Code AI Agent in N8N tha...
Neil Stephenson | No-Code AI & Automation
15,894 views

16:05
Qwen Just Casually Started the Local AI Re...
Cole Medin
102,073 views

16:39
Multi-Agent AI EXPLAINED: How Magentic-One...
Sam Witteveen
15,982 views

4:12
Mexican president reverses course after Tr...
Fox News
949,460 views

18:30
The Best AI Tools for Your Money This Blac...
Creator Magic
7,088 views

36:34
Build Anything with Grok-2, Here’s How
David Ondrej
105,881 views

22:09
9 Advanced AI Automation Tips & Techniques
Mitch Asser
2,612 views

18:53
Feed Your OWN Documents to a Local Large L...
Dave's Garage
179,886 views
21:18
5 CHALLENGES for Claude Computer Use: Here...
All About AI
196,211 views

35:01
Make Your RAG Agents Actually Work! (No Mo...
Leon van Zyl
19,962 views

15:19
Coding a FULL App with AI (You Won't Belie...
Creator Magic
243,092 views

34:13
Step by Step: RAG AI Agents Got Even Better
Nate Herk | AI Automation
10,417 views

24:24
How To Change the Voices in Your NotebookL...
Bill Mcintosh
13,216 views

1:20:10
Breaking Up with WordPress After 1 Hour wi...
Creator Magic
4,441 views