Secret Techniques for Super Accurate Measuring
74.52k views2280 WordsCopy TextShare
Carey Alvez Art Academy
Learn secret techniques for super accurate measuring in drawing! These tips will help you improve yo...
Video Transcript:
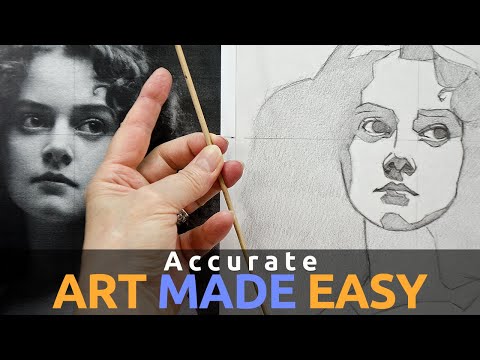
did you know that there's a staggering number of artists that struggle to get their measurements accurate it's true they're so caught up in the creative flow of what they're doing they either forget or they don't pay attention or just simply don't even know how to measure accurately and this is particularly critical if you're going to be doing realism welcome to the channel and if you're a beginner looking to up your creative and drawing skills you're in the right place today we're going to explore the sight-size measuring technique now this method is taught in some of
the best Artmy in the world and is a fantastic way to introduce students to the whole method of measuring accurately therefore bringing their artistic skills up to an entirely new level so let's get started this tutorial was taken for my brand new patreon course called Fast dramatic charcoal portraits okay so now we're going to set up our board for our construct and this is the scale that I'm working at I've got a 2X 3T board and I've got 18x 24 in paper and an 8 and 1/2 by 11 in reference image I need to and
what I need to do is make sure that everything is set up very straight and perpendicular we don't just sort of slap the image down so we need to make sure that everything is straight and everything is aligned up really really well and it has to do with the measuring technique that we're doing so I'm going to take and put this piece aside and I'm going to take my ruler I've got my pencil and I'm going to take a sheet of my sketch [Applause] paper I'm not going to need a a whole sheet so what
I'm going to do is simply take tear this in half and I'm going to use a half sheet of paper so all I did was score my paper and then just run that score along my ruler so it tear nice and clean and now this is the scale that I'm working with I don't want it really really tight I'm just giving myself a little extra room and I'm going to work from there so one of the things I want to do is find out basically where I want this this piece where I want them to
sit it's about like that I guess so close to each other and centered as possible so I'm going to measure so I want this to sit nice and straight and I'm going to measure down looks like about 6 in from the top of this particular piece so 6 in there I'm measuring from the edge of the board 6 in and I'm just going to make a line at the 6 in mark and that gives me a line that I can use as a reference to line things up nice and straight then I'm going to use
my green painters tape because I don't want anything too too sticky and I'm simply going to put my reference image in place then I'm just going to line up my paper here nice and straight beside it so now that we've got our paper set up side by side what I need to do is create what's called an axis line and that acts as a focal and anchored point in the image that never changes that we do all of our measurements from and when I've got a face like this I like to use what I call
the dominant eye now most faces are usually on some kind of a 3/4 angle or they're slightly slightly tilted so there is actually one eye that's dominant but this one's pretty the eyes are pretty even so I just have to choose I have to choose an eye and I'm going to choose the right hand side I find myself leaning towards that and I always choose the corner of the eye because it's a very very fixed Point pretty much in the middle of the face I don't want to create that point hovering in the middle of
the nose or the cheek or the forehead or anything like that I want to find some point Point that's an absolute fixed Point that's easy to recognize and so I'm going to use the corner of this eye and what I'm going to do is I'm going to measure out from the edge of this paper over to the corner of the eye and then I'm going to create a vertical line so I'm going to go in there and I can see that from the edge of the paper to that point is 4 and 5/8 so four
and 5/8 there and I'm going to come down here where I can actually see the mark that I make that's four 5/8 there and then probably up in her forehead four four and 58 so I've got a little Mark then I'm going to double check this with pencil first before I make a mark with my I'm going to go up here on the board first come through and then down there on the board there's a reason for that because at some point you're going to take this off and I'm making sure that it looks straight
it looks straight so now I feel confident taking my Sharpie marker if you do it with just a pencil it's kind of hard to see that's why I end up putting it on with a sharpie marker as well and I just line everything up there we go so now I've got the line through the reference image as well then I've got to create a horizontal line and so I've got to choose corner now the corner of the eye if I go straight from there it's actually going to cut the eyeball in two and I don't
particularly care for that so what I usually do is take the bottom lid of the eye and of course on the bottom lid of every eye there's a bit of a double line so I can either choose the point where it's right where the eyeball is or I can choose the bottom of the lid and I'm going to choose the bottom of the lid I'm going to do the same thing I'm going to measure from the top of the paper to that exact point and it's actually 4 in exactly and 1116 so I'm going to
go up here while I've got my pencil here because this is already lined up I'm going to continue this line in pencil right across this piece of paper cuz I know for a fact that it's lined up I'm going to go back in with my Sharpie marker but I'm not going to use the Sharpie marker on here all I want is the darker line on the piece itself so now I have my Axis line through my reference piece now I need to replicate that over here I've already got my horizontal line so I'm going to
see how far that is about 5 in or so because this is a bigger piece of paper I can give it a little more so I'll go to the edge of the paper you'll notice I'm making my marks go beyond the length paper so there we have it we have our reference image next to our own paper and it's set up straight and perpendicular everything is nice and neat and clean it's actually really important that you do that in order to get accurate measurements and this is what allows us to then make a measurement and
then transfer it over and it'll be accurate and now we're ready to start our construct okay so what we're going to do we're going to take our measuring tool like this and we're going to hold it in our non-dominant hand in other words this is not the hand that I draw with this is my drawing hand with my pencil in it I'm right-handed and so I'm using this free hand in order to hold my measuring stick and I'm holding the measuring stick in my three middle fingers like this and I've left my four finger free
so that I could slide it up and down and establish my measurements my pinky finger I can leave so that I can use it as a stabilizing anchor when I'm got my measurements so my hand isn't sort of you know wandering around the page and I'm going to use my fingernail as the marking point for when I make my measure this is really important I've seen students just kind of put their finger there and they're not really sure how to do this and they end up with very inaccurate measurements so you want to make sure
that you use your finger nail as the the very accurate point in which to make your measurements we start from our axis line here in the middle and I put the tip of my measuring tool up at the very top of her head and then I bring my finger right down to right there where the axis point is and then I simply transfer that measurement over to my working surface and then with my pencil I make a Mark and I make that Mark a little Dash in the direction that I want my line to go
I don't just leave a DOT I give myself a little indicator as to what's going to happen so if it's going to be a vertical line I make it vertical if it's going to be horizontal an angle whatever the heck it is I just put the line there so that I know where it is I want to be going when I begin to link all these things up let's take another one I start let's go through the width of her face here so I put my tip over there right where my axis point is and
I establish the boundary of where this Shadow shape is same thing do that put my fingernail on my measuring tool transfer this over and then make a mark over there and I continue to do this you know for all of my boundaries and big shapes when I want to establish an angle let's say for instance here the angle of her jaw what I'm going to do is I'm going to take my measuring stick so what I do is I continue to hold it in my non-dominant hand only now I'm gripping like this and I'm using
my thumb basically what's happening is that this is pulling that's pushing and it makes it very very stable it means it's not kind of this wobbly thing so I'm holding it and I'm pushing it and now it's very very stiff and stable and then I'm going to extend my arm out and I'm going to lock my elbow and and I can hold my elbow up with my free hand and then I go in and I establish that angle once I've got that I simply pivot my arm over to my paper and see where that angle
is I go in make the mark go back double check bring it over if it's good that's great I've established this angle if not I have to make a slight little change I make that change check go back over and you will be amazed at how quickly your perceptual abilities can actually start to blck on to those angles very very quickly so I can do the I can do her cheek go over to there I can do the angle of her nose from there to there the angle of this jaw the angle of her hair
all these different angles I can establish those the angle of the neck which isn't quite straight all these sort of things and I simply go for from there to there and establish those lines make the line and that's how we get our angles so to recap the sight size measuring technique is a fantastic tool for any new artist to actually learn how to measure accurately and to bring their skills up to an entirely new level we see the importance of setting up your board properly with your reference material how to use your measuring tool properly
and also what to look for alignments angles proportions and shapes these are the important things that you need to be aware of and you need to also practice in order to master this skill remember it's all about the connection of being able to accurately represent what you see not what you think you see but actually what you see this tutorial is part of a full course that I offer on my patreon site called Fast dramatic charcoal portraits so if you'd like to develop the skills to draw beautiful and realistic portraits you can simply go to
the link provided at the end of this video and find out how and now I'd like to hear from you how have you struggled to get your measurements accurate in your own artwork feel free to leave your experiences in the comments below and don't forget to like share and subscribe for more transformational art videos coming your way thanks very much for watching I hope this tutorial helped Happy drawing and we'll see you in the next video
Related Videos

11:04
How To Draw Realistic Eyes With Charcoal P...
Carey Alvez Art Academy
6,940 views
9:14
You're Measuring Proportions WRONG!
SIMPLIFY Drawing and Painting
66,739 views
18:39
Unlock the SECRET to PERFECT Measuring and...
Carey Alvez Art Academy
5,609 views
21:31
"The Art of Accuracy: How to Measure Sight...
Carey Alvez Art Academy
2,067 views
15:59
Wyland - Don't Be A Starving Artist
WylandMarineArtist
43,993 views

14:16
Learn to Draw for Beginners - 5 Essential ...
Brent Eviston
72,410 views

20:36
Master Artist Reveals Why You DON'T Need A...
SIMPLIFY Drawing and Painting
71,452 views
11:54
You Won’t Believe How Quickly This Method ...
Florent Farges - arts
104,246 views

9:17
Transform Your Portrait Drawing with the P...
Carey Alvez Art Academy
11,886 views

10:50
All Artists are Self Taught - Interview wi...
Lights Out Gallery
7,700 views
10:58
Drawing Exercises Guaranteed to Improve Yo...
Drawing & Painting - The Virtual Instructor
301,300 views

12:09
Don't Let Perfectionism Ruin Your Art! Do ...
Anthony - Watercolor Affair
68,731 views

1:04:19
John Wellington Color Theory Master Class
JerrysArtarama
422,674 views
26:44
Secret Watercolor technique of Nicholas To...
Artefacto Learning Platform
30,578 views

16:53
The BEST ART TOOL You Didn't Know YOU NEED...
Leslie Stroz
281,123 views

12:05
How Edges TRANSFORM Your Art from Good to ...
Carey Alvez Art Academy
9,580 views

38:41
How to Draw Anything - Drawing accurately ...
Jason Morgan Animal Art Lessons Draw / Paint
186,530 views

20:01
Want to draw people (use the Loomis Method)
Rusty Nelson: Your college art professor
237,313 views
30:01
How to draw portrait like a PRO
Ksy Elf
44,651 views

22:14
The Secret to Drawing Overwhelming Detail!
Stephen Travers Art
1,782,067 views