This AI System Creates & Posts Faceless Shorts 24/7 (free n8n template)
13.15k views7442 WordsCopy TextShare
Nate Herk | AI Automation
🌟 Want my full course on building AI Agents with no code?👇
https://www.skool.com/ai-automation-soc...
Video Transcript:
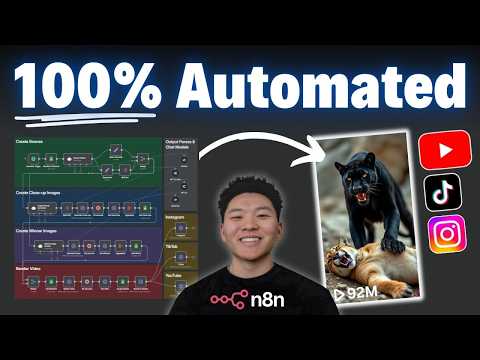
So, this YouTube channel right here got over 680,000 subscribers and almost 221 million views. And the craziest part is they've only uploaded 11 YouTube shorts that have been completely generated by AI. And it's not only them.
I've seen other YouTube accounts, Instagram, Tik Tok accounts that are doing similar things, which proves there's an audience for this type of content. And this was super interesting to me. So, I decided to build a workflow that can handle 100% of this process as far as creating all of the elements, rendering it all together, and posting on Instagram, Tik Tok, and YouTube.
So, here's the inspiration channel, and let's take a look at their most viewed video, which has 93 million views. It's basically two animals being pinned up against each other. And then the next image is basically which animal won.
And now if we flip over to my Google sheet content machine that's linked up to this workflow. Let's take a look at an example output. So, that was the gorilla versus wild animals.
Let's quickly take a look at polar bear versus big animals. All right. So, hopefully that just gives you a little bit of a taste of how we were able to replicate the viral shorts using our Naden workflow.
So, what we're going to do is a live run. I'm going to walk through the different parts of this workflow and explain what's going on within each step. I'm going to talk about how you can get this template for free and set it up in your own NN environment.
And then also at the end, we're going to cover pretty much the total cost of each run. So, if that sounds good to you, let's get started. Okay, so you can already see there's kind of like five main blocks, which is first of all, we're going to be creating the scenes.
Then, we're going to be creating those close-up images. So, like the polar bear versus the elephant, two close-ups. Then, we're going to be creating the winner images.
From there, we're going to pull all of the pictures back in, render the final video together, and then we're sending it off to Instagram, Tik Tok, and YouTube to be published. Okay, so for this run, as you can see, based on our Google sheet, this is going to be ape versus big cats. and it's going to pull in because we have this marked as to-do.
So, I'm going to go back into the workflow. I'm going to hit test workflow and we're basically just going to watch this thing start and we're going to start to break down each step. So, right here, we're accessing the Google sheet.
And what we're doing is we're pulling in anything from our viral shorts Google sheet, but the status column has to equal to-do and then we're only going to pull back the first matching row just in case you wanted to like fill this up with weeks worth of content and they were all going to be listed as to-do. We only want this workflow to process one at a time. And of course, the cool thing about the schedule trigger over here is we can just basically have this thing go off twice a day, three times a day, however much you want to do it.
And as you can see, what came into this Nad workflow is the ape versus big cats. So after this, we move on to the next step, which is the scene creator agent. And you can see what we give this agent as the user message is two things.
The first thing is the main character, where we're basically just passing over the ape. And then the second thing is the type of opponent. So in this case, the type of opponent was big cats.
So basically this agent's job is to take the main character and the opponents and as you can see on the right hand side it spits out eight different scenes which are the eight different opponents that the main character is going to be fighting in this YouTube short. So I'm not going to spend too much time on the prompt. Keep in mind you'll be able to download this template for free and play around with it.
But basically what we're saying is an AI agent that creates fight scene matchups. You're going to be given a main character and a category of an opponent. And then you need to generate a list of eight different opponents from that category.
And real quick before we move on down this workflow, I just wanted to talk about the prompts. The prompts are going to be the secret sauce that creates content, you know, AI generated content that people actually want to watch. So in here, these are prompts that I started with just to show you guys how this works.
But if you really want to get in here and customize this template to your needs, I would highly recommend playing with the prompts. And this will also show you how you can customize this workflow to create completely different types of AI generated shorts if you don't like this animal versus another animal type, but you can use this to create whatever it is. And a real quick example of that is if we go to my Instagram, I had a different type of short workflow set up where we were basically, you know, merging different animals together.
So there's a parrot with a cat. Here is an eagle with a cat. And as you can see, the actual content of the workflow is very similar, but we just had to play with the prompting a little bit.
Anyways, back to the workflow. Now, what we had to do here was a little bit of data transformation. So what we got out of the scene creator was eight different scenes, but what we wanted to do was split those out so we could basically do eight different runs.
So, I branched this off to a main character where all I'm doing here is I'm just setting the main character. And then what I did down here was I wanted to set the opponents. So, we could turn that into basically a list of all eight opponents.
And then we could basically split that out. And now we have eight different items. And the reason I needed to do this is so when we actually are sending that request to make the AI generated images, we're going to be passing over eight different items.
So, eight different opponents and the pictures are going to be generated individually. Cool. So, we have our main character, we have our eight opponents, and then all I'm doing now is I merged it all together.
So, we have eight items where we have the main character and the opponent and the main character and the opponent. And so, this just took a little bit of data transformation. And now that we have these eight items, we're able to feed this into the next part of the workflow, which is creating the close-up images.
And you can see as we speak, the final video is being rendered right now. Anyways, what we do is we feed those eight items into this image prompt generator where we're going to be giving this agent the main animal and the opponent. And you can tell there's eight separate runs because if I click into the user message, we can see the first item is ape versus lion.
The second item is ape versus siberian tiger. The third one is ape versus jaguar. And as you can see, this will just go on for all eight items.
But now here's where the magic really happens. And like I said, definitely customize this prompt to your liking. But we have the system prompt, which is basically telling this agent that it needs to generate highquality textto image prompts for photorealistic image generation.
It's going to be given a main animal and it's going to be given an opponent and it needs to generate two separate close-up image prompts optimized for cinematic AI generated images. So then I just gave it some more instructions about the output, what they should look like. I said they should be roaring with their mouth wide open.
They should look intimidating, all this kind of stuff. And what we get out are eight separate items as you can see. And each item has a main character close-up picture and an opponent close-up picture.
So, what you may be thinking is if the main animal is always going to be an ape in this case, can't we just create that ape image once and then use that in all eight different parts? Yes, you can. I chose to do it this way so that all eight ape images just look a little bit different just to keep the audience feeling fresh.
Anyways, as you can see, for item one, we have our ape image, we have our lion image. For item two, we have our ape image, we have our tiger image, and then this will go all the way on for our eight items. And the reason we're able to get the items split out like this in two different fields is because if we follow this dotted line, we are using a structured output parser.
And if I click into this, it basically says, okay, for each item that you're processing, you need to output the following two fields, which are the main character close-up and the opponent close-up. And as you can see, that's what we get over here. All right.
From there, a little bit more data manipulation where we're going to split out those items. So now instead of eight, we have 16 because each of those image prompts we want to process individually. So now we have all 16 different animals, a image prompt for them to be a closeup and then we're accessing this PI API endpoint to use a Flux image generator.
So here's PI API. It's kind of like an open router for, you know, like different AI models. And what we can do is we can click into workspace and we have image models, video models, audio models, all this kind of stuff.
And so what we're doing is we're using Flux's image model through PI API. And if I come in here and I click on task history, you can see that we have all of these different images. It says they're processing, but they're actually done just because we kind of did them in bulk.
But you can see that each of these images that we're generating are a little over 1 cent. So, it's not that expensive at all. Anyways, I'm not going to dive too deep into setting up this HTTP request right now, but I actually just released a full guide on APIs for AI agents for beginners.
So, if you want to watch that, check it out right up here. But anyways, basically how it goes is we're making a post request to PI API. We have our credential right here as a header off.
And then down here in the body that we're sending over, we're saying a couple things. What model do we want to use? We want to use Flux's model.
What is the task? We're going to do text image. And then for the actual input, we're just saying how do we want the image to come back to us?
First of all, we're dragging over the image prompt. So now you can see this is what we're telling Flux to make. And then this part's pretty important.
We wanted this image to be a 1x one, you know, square aspect ratio because at the end we need to have like one image here and one image here and they need to fit together. So, if I show you guys what I mean by that, let's look at our, you know, jaguar versus strong animals. So, here are the close-ups that we just generated.
The top half is a bear, the bottom half is a jaguar, and as you can see, it's kind of square ratio. But then the second image that we're going to create later, this one needs to be like that 9x6 um portrait style. So, anyways, that's why we're having this one be square.
And then you can see this is going to send over 16 different requests and it's going to create 16 different images for us. So what happens is we send over that request and PI API basically responds to us and says okay we're working on that right now and that's why it says status equals pending. So after that we have to just basically wait and I found that this takes anywhere from like a minute to 90 seconds.
So we just have this step waiting for 90 seconds just to be safe. And then all we're doing is we're checking back in on those requests and we're saying okay cool. Here's the ID that you gave me for this individual image.
Let's see if it's done or not. And yes, one great way to optimize this workflow would be to add a polling feature where we're constantly checking until status equals complete. But just to keep this workflow simple, and I don't want this video to go too long, I'm just going to be checking in after 90 seconds because I know the images will be done.
So now you can see we have 16 items, and these are all 16 of our images. And if I was to click into the URL that it returns for um item one, we can see that this is an intimidating looking ape that is roaring at us. If I scroll down to item two and click into this URL, we can see that it is an intimidating line that's roaring at us.
And basically, this is just the same for all 16 images. Okay, cool. So, at this point, we have all 16 of our close-up images.
And now, I'm aggregating everything back together so that we can make one request to Google Sheets and basically put all of the images in there. And the reason I want to store all of our images in Google Sheets is because we have all the close-ups that are going to go in there and then we're gonna have all the winner images that are going to go in there. And that's 24 total images.
So it's easier to store them somewhere else for now and then at the end we can pull them all back in rather than having to sort of keep track of them. So as you can see now this ape versus big cats run that finished up. We have all of these different images.
And if I click into like you know 5. 2 this is going to be um looks like a bobcat that the ape is fighting. And then 5.
1 this one should be another image of an ape. And the way that we actually tell this node to send data back is we come into the node and what we're doing is we're updating a row within our sheet. Now, this is the most important part of what we're doing here is we're mapping on a certain column and the column we're mapping on is main character.
So, this is basically telling Google Sheets which row do you want to update because in our Google Sheets we have all of these different rows and it needs to know which one to send the data back to. And so because we're telling it to match on main character, it's going to look for whichever row in our Google Sheets equals ape because we drag in ape right here. And the way I got that is I scroll all the way back down on this left-hand side to the Google sheet that actually triggered this whole process.
And we can see we have main character equals ape. So I just dragged in ape right here. And that way we know every single time that this workflow runs, whatever row it's processing, that's the same row that it's going to update the rest of this workflow.
Cool. And then from there, we just have all of these different, you know, fields to actually map, which is, you know, 1. 1, 1.
2, 2. 1, 2. 2, and we have eight total stories.
So, it goes all the way down to 8. 1, 8. 2.
And this is like annoying the first time you do it cuz you have to drag everything over. But then the variables are already set in stone, and it's always going to process the same way every time. All right.
So, now that we have all of our close-up images done, we can move on to the next section of the workflow, which is creating the winner images. So, what we're doing here is once again, we're prompting an AI agent, and we're going to give it two different animals. So up here we have animal one, animal two.
Let me make this a little bigger so we can see. Animal one is an ape, animal two is a lion. And that's just for the first scene.
And for the second scene, we have an ape versus a Siberian tiger. And for the third scene, we have an ape versus a jaguar. And this is going to go all the way down until we get to our last item.
And as you can see on this right hand side, what we get back are eight different image prompts. And each of these image prompts are going to contain, you know, like which of these animals actually won the fight. So, if we look at this first example, and I don't want to spoil anything when we reveal the short later, but we see that an opposing African lion is standing victoriously at top the lifeless body of an ape.
So, clearly, the lion won the first battle. So, once again, all of the magic happens in the system prompt. So, I'm not going to read this entire thing.
Once again, if you download the template, you'll be able to play around with this, but I definitely encourage you guys to customize the prompts a little bit. But the main piece what we're doing here is we're saying, you know, you're an AI agent that creates text to image prompts for photorealistic image generation. You're going to be given two different animals and you need to write one vivid prompt for a photorealistic image that shows the aftermath of a fight.
Decide which animal is the winner and it should be realistic based on the strengths of each animal. Just gave it a few guidelines here. This definitely took me a while to play around with, so I was getting the images the way that I wanted them to.
You also have to be careful with certain image generation models like you know can you how violent can the pictures be or you know can they be gory at all. So I had to play around with that for a little bit but basically what I did is I gave it some prompt guidelines. I told it how to output and then I gave it a good example of an image prompt.
And once again we got eight different stories output on the right. So we're able to feed those eight different scenes into the exact same process that we did up here. So you could basically just copy and paste these three nodes except for the one thing we have to change is we don't want this picture to be a square aspect ratio.
So we came back in here and we changed the width and the height. But after we send over these eight different scenes, it's going to do the exact same thing where it tells us, "Okay, we got your request. We're processing it.
Please wait a little bit. " So we go ahead and wait 90 seconds. We check back in and then we grab all of the completed images.
So let's scroll down to a random one down here and we will see who won this fight. Okay, so looks like this one was a tiger that clearly beat up this ape. Anyways, we're doing the exact same thing once again.
We're going to aggregate the data and then we're going to push it back into our Google sheet. And you can see our Google sheet now has all 24 elements of the stories have been created and those are all in the. 3 section.
So here is a bobcat over the ape. If we come over here, we can see this is a the ape that beat up the black panther. Okay, cool.
So we have all 24 elements. So you can see the final video is already done, but the next section of the workflow is to render it all together. So we're going to take all 24 images and we're going to stitch them together.
So what I had to do was merge all the items together because we have two paths going on. So this merge is going to wait for all the close-up images to finish. It's going to wait for all of the winner images to finish and then it's going to go ahead and move down the process.
So the first thing we're going to do is we're going to go grab all 24 of our completed images. And what we do here is similar to the matching thing that we did earlier with Google Sheets. We're saying, you know, which row do we actually want to pull back?
So, I put in a quick filter. I said main character has to equal ape. And once again, the way I got to ape is because I went all the way down to the Google sheet that started this process, and I dragged in the main character for this row.
Just be careful if you have multiple rows in your content sheet where the main character is an ape. It's going to pull back all of those where main character equals ape. Unless, of course, you come down here and you say, I only want to return the first matching row.
But if you only return the first matching row, chances are that one's already been processed. So that's why just be mindful of that. Anyways, you can see we have our ape, we have our big cats, and then we have all of the URLs for all the images that we need.
So we're ready to render it all together. So what we're doing here is we're hitting an API called Cremate. And if I click into Creatmate, you can see here are all of my renders and this is our completed video.
But what we need to do is we need to go to templates. And so here's a template I made that I'm going to give away to you guys for free. So let me click into this real quick.
And basically what this does is we're able to set up this template where we can just basically pass in different images and different text every time and it will be able to stitch it all together. So here's what that looks like. And just imagine we're putting our own images and text in there.
But what you can see is it's going to do the two split screen with text and then it's going to show a full image. And it basically does this eight times. And so for you guys to replicate this when you start a new template in Cremate, you'll come up to the top right, hit source editor, and then you'll just be able to copy and paste the source code that I'll give you guys.
um right into here and you'll have this exact same template popped up. And one thing you can play around with is the music you want. If you want that to be dynamic, you can definitely have the workflow create music and send that in every time.
But what I did is I'm using the same audio file every single time. And I'm just linking that from my Google Drve. But anyways, once you have that template set up, what's cool is that you can basically just click on use template in the top right.
You can click on API integration and it will give you this entire curl command where all you have to do then is click on copy. And then when you come back into nen and you open up a fresh HTTP request node, you can basically just import the curl, paste that in there, and then you'll have everything configured already, and you'll just have to drag in some dynamic variables as you can see down here. Or if you do just want to copy and use my exact template, all you'll have to do is when you make your own template, you'll just have to change the template ID right here to the one that's in your Creatmate environment and then you'll have to plug in your own Creatmate API key.
So once again, not going to dive too deep into how this works. I linked a you know APIs for AI agents beginner guide earlier in this video. Definitely give that a watch after this video.
But at a high level what we're doing is we're making a post request to createate. We are authenticating ourselves right here with a header parameter. So authorization bearer space your creatate API key right there.
And then where the magic really happens here is with this body request. And I know this may look very intimidating but it's not too bad at all. So let's talk about what we're doing here.
So really when we're sending over a JSON body, it's just basically like different parameters and the values that we want to populate them with. So template ID, this is where you could put in your own create a template ID. Music source, you could throw in your own music source.
And then we basically have like our eight different scenes and different elements for each one. So for each scene, we need a top image source, a bottom image source, we need the middle text, which I just manually put in as verses for all of them. And then we need the actual full background image, so the winner.
And so all I did is because we have all of the 24 elements right here on the lefth hand side, I just dragged them in to the correct spots where they're supposed to be. And then on the right hand side, you can see that we actually have all of those image links that are going to be sent over to Creatmate. And all it's going to do is put the right images in the right spots because we've already made the template in Creatmate.
And this does a very similar thing when we actually send off this request. Creatate basically says, "Okay, cool. We got all your images.
We have started the process of rendering this video. Here's the URL that you're going to get when it's done. " but it's not done yet.
So once again, we're going to wait for 90 seconds and then we're going to go ahead and do the same thing where we check back in on the video. And you can see we get it right here as a binary file. So let's take a quick little sneak peek.
Okay. Anyways, now like the hardest part is done. We have the final video rendered and basically what we want to do is send that back into Google Sheets and then we want to upload it to the different socials.
So once again, we're pulling up a Google Sheets and we're going to do an update row. We're going to do the exact same thing as earlier where we're going to match on the main character, which in this case is the ape. And then all we're going to do is two things.
We're going to change that status to created so then it doesn't get pulled in again. And then we're going to send over that final video URL right here. And that's the one that I was clicking on earlier that pulls up the actual finished video.
So then what we want to do is we want to post them to our Instagram, Tik Tok, and YouTube. And you could even do different ones as well if you want. And we're doing this through a service called Blot.
And Blotato actually has nine different things you can connect to. So Twitter, LinkedIn, Facebook, Tik Tok, Instagram threads, Pinterest, Blue Sky, and YouTube. In this video, we are only doing these three, but you can connect to all nine.
So if you guys want to see a video on how that works, let me know. But anyways, there's two main elements here. The first one is we have to upload our video to Blotato and then we can take that Blotato URL that it gives us for that video and then we can push it to wherever we want.
So the first step is to upload to Blot. And by the way, there'll be links for all of the services down in the description as well as if you download this template, there'll be a little setup guide right here with all the links. But anyways, in this HTTP request to Blot, what we're doing is we're making a post request to Blot's endpoint where we're going to upload media.
We have to put in our API key. So I saved that right here as a header off and then we're sending over a body which is literally just one thing and that's the URL of our final video. So all I did is I put URL as the name and then I dragged in the final video right from here and now is getting that final video and it basically just sends us back another URL and you can see if I open this up in the browser it'll be the exact same video that we already created.
The only difference is now it is stored within Blot's database so that it can actually post it for us. So we have it split out into three different paths now. The first one is Instagram.
These are all basically the same thing, but we'll still look through each of them. So what we're doing here is we're making a post request to Lotato once again, but we just tell it later that we're going to do Instagram. So anyways, here's the endpoint we're accessing.
We're putting in our API key once again. And then in the body request, here's where we can actually change things a little bit. We tell it right here, target type Instagram.
We give it the actual text of like the caption. So in this case, all I did is I put ape versus big cats. And I did that just by pulling in from that Google sheet the main character and then I typed in versus and then I dragged in the opponents.
Once again, we have the platform equals Instagram. We have the actual URL that Blot just gave us. So I dragged in this one from right here.
Put it right there. And then all you need to do is you need to put in your Instagram account ID. So when you're in Blotato and you connect your accounts, as you can see, I've connected these three right here.
What happens is you can click a copy account ID. So, all I did is I clicked copy my Instagram account ID, came back and ended in, and then I pasted that right there. And then when you post that, it'll just basically give you a ID of your post.
And that's how you can make sure it actually went through. So, if I come into Bot, I can see right here, Ape versus Big Cats, and this one was posted on Instagram. And I can actually click into this URL, and it will show us the post.
And then it's very similar for Tik Tok except for there's a few different parameters to send over. So, same endpoint, same method, same credential. And then here, we just have a few other things to fill out.
So I filled that out according to Blotato's documentation. Once again, all of this will be in the template if you choose to download it. And then the only difference is the platform this time is Tik Tok and then we have to do a different account ID.
So you come in here, click on copy account ID and then you'll paste in your Tik Tok account ID. And then you come here and you can click on the Tik Tok link for that video to make sure that it actually got posted. And as you can see right here, it did.
And then I just noticed it didn't actually post the YouTube one. I'm assuming it did because we can see that the node is green. And I'm assuming it gave us an ID, so maybe it just didn't show up in Blotato yet.
But we'll definitely go check the actual YouTube account in a sec. But anyways, here's another way to post through YouTube. You could do it natively.
In a previous Facebook shorts video, I was posting through YouTube natively, as you can see right here. But I figured might as well show how to do it with potato. So anyways, pretty much the exact same thing.
Same endpoint, same method, same credential. And then we need to come in here and we just have a few things to configure, which is the platform and the target type is YouTube. We have our title.
We have a little description and then we have our account ID once again. So, same thing. You'll go to Plotato.
You'll click on copy account ID and then you'll basically just paste that in right there. So, yeah, not exactly sure what happened with potato here. You can see that it posted to YouTube earlier for me, but it did show up here as an unlisted video.
So, it's working. And you can see I've experimented with some other types, you know, cats and birds had babies, farm animals versus Donald Trump, Elon Musk, other stuff like that. What I really want you guys to take away from this video is, you know, you have a template, but it's really just supposed to be a nice skeleton to show you how pieces move through, show you how you may need to do some things like store data, third party, pull it all back at the end, and you can really get creative here with your different image prompts.
You can even turn those images into videos. You can render everything together in a different style. You can play with different sound effects and stuff like that.
What I think is really cool is to be in that mindset where you see something and you think to yourself, I bet I could automate that. I don't know exactly how that's going to work, but I'm going to play around with, you know, different APIs and I'm going to play around with different tools and different data manipulation techniques and I know I can automate that if I, you know, sit down and end it in and I give it my best shot. But anyways, now that we have this on all three of our socials, let's just watch the final video real quick to see how it turned out.
Heat. Heat. So, I'm sure there's a few things you guys may have noticed as far as maybe not perfect consistency between the close-up and the actual fighting image.
And that's obviously because the image generator doesn't have the first close-up as context. So, there's a lot of ways to optimize these types of flows and do some really cool things as far as like creating completely automated AI generated content. What you could do is have some sort of story where you create an image and then you feed that image into an AI image generator and you say, "Hey, look at this image and look at this next scene and then create the next scene based on it to keep consistency.
" And so, that would be a little bit more of complex flow, but it would definitely provide some really high quality outputs. If you guys are interested in seeing that sort of like storytime type of content automated, let me know. I'd love to make a video on that and show you guys how that works.
Anyways, what I think is cool about this is it's a very, very lean system. There are definitely ways we could optimize this. Like, we could have the all the images running in parallel rather than waiting for the close-ups to finish to begin the winners.
We could also do what I just talked about with having more consistency across the stories. We could have custom sound effects come in based on the animals and based on what they may sound like. There's so many ways to optimize this, but what I wanted to do is give you guys a cool skeleton to play around with.
hit run in your own environment, watch the images be made, watch the data flow through the process, and really start to think how you yourself could improve on this workflow. So, anyways, let's talk about cost real quick before we wrap up because I'm sure that's what you guys want to know if you want to start to run, you know, like a faceless channel on autopilot. So, I threw together a little doc that's going to break down the cost per video for the system.
And the first element here is the image prompt generation. So in the workflow what we have are you know we're using open router to connect to 4. 1 mini and also 4.
1. We're using 4. 1 mini for the scene creation which is just which eight animals do we want and then also the close-up images.
And then I decided to use 4. 1 which is a little more powerful for the winning image prompts. Now this is literally going to be like 1 cent per run probably even less.
And if you don't believe me you can come into open router and you can see this is the run we just did. So all of these that that you know have like 1215 um every single time we're using it it's basically like 0. 00002 or 0.
00001. So when I added all that up it was like 1 cent. And then what we move on to is kind of the bulk of the cost which is generating the images but we're using Flux through PI API which is super cheap.
It's 1. 5 cents per image. And if we're doing 24 images it's 36.
So not too bad. It would definitely get more expenses if we wanted to turn all of those images into videos or even just the eight winning videos. But if you remember going back to that channel that was going viral with this stuff, these are just images.
They have a little bit of a zoom effect which we kind of replicated with that template. This is a little bit different. But these were just images and that's what I was like, okay, this could be cool to automate.
And then the third part of this is the video rendering using creatimate. And so what I'm on is the essential plan. If I come down here, we can see, you know, change plan.
The essential is 41 bucks a month. If you're build annually, you get 2,000 credits. And if we click on my API log, sort of like task history, we can see that each run is using 17 credits.
17. 69. 17.
69 cuz they're all the same amount of seconds. So if we're getting 2,000 credits and each one is 17, we can do about 117 renders, which comes out to about 35 cents a render. And then finally, with the publishing and scheduling, which is kind of an optional cost because you'll get the final video either way.
The growth plan for potato is 29 bucks a month and that gives you unlimited scheduling and publishing. Plot also has some AI features which that's kind of what you're paying for with like the credits, but you can still do the automated posting and scheduling on nine different platforms with potato. So, I didn't factor that into the per video cost.
But, as you can see down here, it's pretty much under a dollar per run, which I think is pretty solid. But anyways, now that we talked about cost, how do you get this system and plug it into your own NAN environment? Well, there's two things you got to do.
Kind of more than that, but two main things. The first one is you have to download this workflow and import it into nitn. So what you'll do is you'll join my free school community.
The link for that down in the description. Once you get in here, you'll click on YouTube resources and you can see I have all the videos that I've made on YouTube right here. Or you can search for the title of this video right up here in the search bar and the post will pop up.
And when you click on the post, all you have to do is you'll have a JSON file right here which you'll click on download. And then when you come back into Nit, you'll open up a new workflow and you can in the top right import from file. You'll import that JSON file and it will basically just pop up this workflow with a little setup guide right over here.
And then another really important part is going to be this exact same Google sheet that I'm using here. So there'll also be a link to the template in the school community wherever I make this post. And you need this exact same template with the exact same column names.
Otherwise, the mappings that I set up in NAN are not going to work. So you can grab that template for free as well and make a copy of it and then you'll be able to pull it into your own NAN workflow. And then from there, the other things you'll have to do will be listed on the setup guide, but it's basically just like, you know, connect your open router API key, connect your PI API API key, connect all your different API keys, and then you'll be good to go.
Okay, so that's going to do it for this video. If you enjoyed this walkthrough and this is the kind of stuff you're interested in, then definitely check out my paid community. The link for that's down in the description.
We just hit 1. 5K members, growing super super quick, and everyone in here is pretty much automating things with Naden. Not only is it a great community to ask questions, collaborate with people, but we also just launched two new courses in here.
Agent Zero, which is kind of the foundations of building automations, and then 10 hours to 10 seconds, which is like identifying, designing, and actually building automations. So, anyways, I'd love to see you guys in this community, but that is going to do it for the video. Really appreciate you guys making it to the end of this one.
If you enjoyed, if you learned something new, definitely give it a like. It helps me out a ton. And as always, I appreciate you guys making it to the end of the video.
Thanks everyone. See you in the next one.
Related Videos

15:00
25 n8n Hacks I Wish I Knew Sooner
Nate Herk | AI Automation
1,952 views

2:32:10
AI AGENTS EMERGENCY DEBATE: These Jobs Won...
The Diary Of A CEO
790,650 views
24:42
APIs for AI Agents: The Only Beginner’s Gu...
Nate Herk | AI Automation
11,498 views

26:52
How I Automated Product Videography with A...
Nate Herk | AI Automation
20,393 views
22:50
How to INSTANTLY Generate N8N Workflows Us...
Ethan Nelson
14,760 views

15:50
Gemini 2.5 Pro is now #1! And here's what ...
Migue Baena IA
77,088 views
24:47
How To Build a Startup Team of AI Agents (...
Simon Høiberg
592,797 views

19:55
n8n Just Leveled Up AI Agents (Anthropic's...
Nate Herk | AI Automation
67,045 views
5:58:32
N8N FULL COURSE 6 HOURS (Build & Sell AI A...
Nick Saraev
116,699 views

50:00
How to Build AI Agents in n8n for Beginner...
AI Foundations
6,697 views

20:15
Build Anything with Lovable + n8n AI Agent...
Nate Herk | AI Automation
75,388 views
18:20
OpenAI's Image API Just Changed the Game (...
Nate Herk | AI Automation
44,750 views

2:10:36
Master n8n in 2 Hours: Complete Beginner’s...
Jono Catliff
168,207 views

37:06
This AI System Creates Faceless shorts on ...
AI Workshop
11,279 views

15:25
Give me 15 minutes, I'll give you my entir...
Nate Herk | AI Automation
35,336 views

23:45
I Built the Ultimate Team of AI Agents in ...
Nate Herk | AI Automation
789,617 views

21:09
Replit is the KING of Vibe Coding (THIS IS...
Income stream surfers
3,346 views

2:08:44
How To Use AI Automation To Do ALL Your Wo...
Tyler AI
12,171 views
19:43
Zapier AI Tutorial for Beginners: Automati...
Kevin Stratvert
184,375 views

26:46
Sell AI Systems, Not AI Agents (how I made...
JP Middleton
88,432 views