Transform Your Bedroom Into A YouTube Studio ($5 - $250)
109.5k views1151 WordsCopy TextShare

Josh Winiarski
In this video, I'm going over how to turn your bedroom into a professional YouTube studio for $5, $5...
Video Transcript:
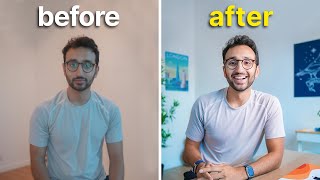
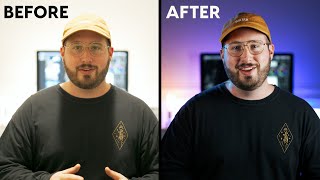
this is how you take a poorly lit boring looking bedroom and transform it into a professional YouTube Studio whether you've got five dollars fifty dollars or a couple hundred dollars this video is going to give you all the knowledge you need to film professional looking videos in the comfort of your own home we're going to start off with almost no money in some super basic concepts and then we're gonna build off those ideas with increasingly larger budgets and our first budget is five dollars seriously like like five dollars first things first we desperately need a
light source any light under five dollars is not going to be doing you any favors so for this first setup we're gonna be relying completely on all natural window light as you can see windows are a big soft bright light source and it looks really flattering on camera just by opening up that window letting some nice sunlight in this already looks so much better than where we started but it's not great we need to adjust our camera settings now if you haven't learned the basic camera settings yet like shutter speed aperture ISO white balance you'll
still be able to achieve a pretty good look but using manual settings we'll be able to dial it in and get exactly the look we're going for I'm actually getting some gross shadowy raccoon eyes from my ceiling light so if I turn that switch off I actually think this looks super natural next if we move the camera back and ourselves along with it that's going to blur out the background a little bit more it really helps you pop and get that professional look lastly this is going to vary a lot depending on your room but
remove anything from the background that's kind of distracting or unpleasing as well as you can add anything to the background like if you have a bookcase or a shelf or a plant okay and this didn't apply to my particular setup but the reason this is a five dollar budget is some of you are going to end up filming at an angle where the windows over here so this side of your face is very bright and this side is very dark and all you need to do to fix this is run to the store and for
a couple dollars pick up a piece of white foam board and what you can do is actually put it on the opposite side of your face and bounce the window light onto the shadow side of your face what's cool is this is totally adjustable so if you want it pretty close to even you can get it very close to your face and if you want a little more Shadow you can just move it farther away and get that high contrast look and there you go I would totally watch a video that looks like this the
difference is massive but what could we do if we had fifty dollars for fifty dollars you've basically got two options a light bulb with an umbrella or a soft box or you can get a small cheap LED panel I'm going to be using this small battery powered LED it's super bright it's portable apparently mine's discontinued but there are a ton of these things you can find online for around fifty dollars okay so this is what it looks like if we just take an LED panel and throw it right on top of our camera and it
kind of works but it's not great right now that's the only light in this whole room the background is way too dark so let's see how it looks like if I turn the lights back on so now we've got the on camera light we've got the ceiling lights and the background looks a little better but I've kind of got those Shadows coming back under my eyes what you can do is once again take a white piece of foam board put it at about a 45 degree angle to the side of the camera and then take
that harsh LED bounce it off that when the light hits the board it's gonna scatter defuse and become an overall bigger light source which is gonna soften it as it hits your face to take it a step further we can take one more piece of foam board and if you put it on the other side of your face it'll fill in some of those Shadows you can see if I take it away and then put it back this is still sort of a janky DIY setup but for fifty dollars the big Advantage is we can
now choose our background we could film at night we could film in the morning we can film in any direction because we have a lighting setup but if you're serious about YouTube and you've got some cold Hard Cash just burning a hole in your pocket get ready because this next setup is the one I personally use all right so this is how I'm currently setting up my bedroom for YouTube videos it's definitely gone through some iterations over the years but I've landed on this sort of natural looking orange and blue tone look basically I've got
a much larger LED panel with a nice soft box on it as my key light for my fill again just another LED panel on a light stand both of these are sorted at 45 degree angles a little bit above head height and angled slightly down one of the biggest advantages to having dedicated gear like this is I can set it up exactly the same every time or I can make super Minor Adjustments right now I've just got the key light on me definitely a dark and Moody Vibe now I've switched on the fill light still
a super dark background but I'm a little bit more evenly lit if I want to turn my ceiling light on that kind of just brightens the background a little bit more it's not quite so moody the goal of this video wasn't to get you to copy me exactly although you're more than welcome to but more so start figuring out how you can work with your particular space maybe you just need a better background or maybe you do need to invest in lights whatever it is hopefully this gave you some ideas everything I use is going
to be linked in the description down below so if you're interested you can definitely check that out if you want to learn more about content creation or video production I'll link a video somewhere and as always have fun stay creative and I'll see you all in the next one
Related Videos
31:36
How I Transformed This Tiny Room into a Yo...
Ali Abdaal
157,321 views

39:59
How to Start a YouTube Channel - Beginners...
Ali Abdaal
306,155 views

13:44
HOW TO BUILD A QUALITY DIY HOME YOUTUBE ST...
Stewart and Alina
392,189 views

14:00
My Entire YouTube Studio on One Desk!
Nate's Film Tutorials
186,197 views

6:54
How Much YouTube Paid Me For 20K Subscribe...
Josh Winiarski
97,994 views
8:02
EASY Cinematic lighting setup for YouTube ...
Lila
1,264,630 views

9:40
EASY Cinematic lighting setup for YouTube ...
Jacob Obling Nygaard
5,974 views

15:06
CHEAPEST Budget way For SOUNDPROOFING a Room
Soundproof Guide
2,969,190 views

9:13
How to Transform your BEDROOM into a HOME ...
Simone Ferretti
12,801 views

18:51
Transform Your BEDROOM Into a STUDIO (On a...
ADAM Audio
1,570,565 views
5:58
Lighting for YouTube Videos - Make Your Vi...
Ben Johnson
4,392,270 views

10:37
Build The Ultimate YouTube Studio Setup (P...
Gabriel VIP
137,635 views

8:03
Make a FAKE YOUTUBE STUDIO at home
Paul Heimlund
39,020 views

15:08
5 YOUTUBE FILMING SETS IN 1 ROOM | Our Mul...
Becki and Chris
598,991 views

6:36
Lighting For Youtube Videos in SMALL Rooms...
Ben Johnson
301,082 views

4:04
Make YouTube Backgrounds with AI (SIMPLE) ...
Nick Kendall
361,539 views

6:40
$0 Lighting Hacks That Make You Look Like ...
Cinecom.net
192,634 views

15:45
My Home YOUTUBE STUDIO & Desk Setup Tour
Joey Helms
40,298 views

14:35
Welcome To My TINY 9x9 Foot Youtube Studio...
Dunna Did It
456,027 views

12:54
Easy Cinematic Lighting Setup for YouTube ...
THAT ICELANDIC GUY.
111,506 views