How to Use Canva to Create Viral YouTube Thumbnails
91.5k views1508 WordsCopy TextShare

vidIQ
🚀 Grow your channel using the best YouTube tools: https://vidiq.com/
Thumbnails help you get more ...
Video Transcript:
videos live or die by the thumbnail and good thumbnails are kind of hard to come by what's even worse is when you know exactly what you want your thumbnail to look like but you don't quite know how to make it well not anymore the playing field has been leveled for those with a lot of imagination but not a whole lot of time to learn graphic design so take a break Adobe we're headed to canva today okay so full disclosure here I don't have a whole lot of experience with Cana and all of these AI tools
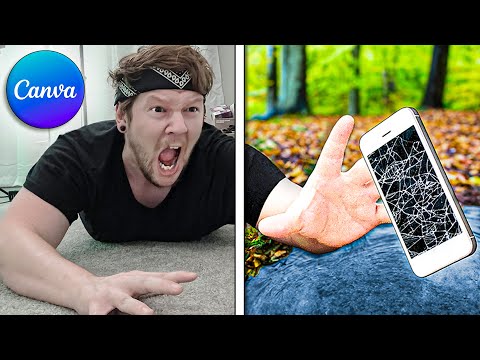
were announced yesterday so everything you're about to see I've learned in like the past two 2 to 3 hours so yeah let's see what kind of thumbnail we can make okay so my idea for this thumbnail was I wanted to do sort of like an I survived type video but make it ridiculous so I survived 20 hours in the woods without my phone who cares right so here is the photo that I took it's me on the floor so the first thing we're going to do is click on the photo click edit photo and we're
going to the background remover normally this would take me about um a minute to do in Photoshop I would get real specific about how sharp the edges were but honestly this looks pretty great for what was that 10 seconds yeah okay so I'm in the woods without my phone I guess I need a Woods background so let's go ahead and find one I'm going to search for forest floor it has to be at the angle that I'm laying because obviously I'm on the ground so let's just keep looking until we find something that's sort of
okay I think this angle would work pretty well but it doesn't have a whole lot of color also I want the phone to be in focus and the fact that like it's blurry up close in the background it feels weird so let's keep looking what about this that's that's not too bad it's got some green in the background I think the angle will work I know I go a bit fast so I just wanted to explain how I'm moving these layers around what I'm doing is I'm right clicking the photo I'm going to layers and
then I'm clicking send to back and that sends the photo all the way underneath everything else unfortunately it also sends it underneath the previous background layer at which point I just delete the previous background layer actually that's not bad at all almost like I have to kind of twist a little bit here but yeah I think we can make that work we'll see what it looks like when we get the phone in there so the next thing we got to do is search for a broken cell phone broken cell phone I could pick this one
and you know it this one could work like in that angle but the problem is it doesn't quite stick out as a cell phone to me I think I should change the search to broken iPhone let's try that the search is very specific every time you change it from iPhone to cell phone to regular phone uh you get different search results so like this I hadn't seen this before but I think that angle is perfect so we'll click that and of course we have a background that we should remove which we can do so uh
click edit photo background removal and that was fast I feel like there needs to be like a puddle here or something right let's go ahead and get rid of that phone for now and let's let's see if we can put a puddle of water right here edit photo uh let's do the magic edit and we want a puddle down here I haven't tried this yet so let's let's see if this works out puddle of water and then that's it let's see what happens okay uh it sort of did this isn't too bad it's kind of
impressive it's not quite what I was looking for but it is a puddle let's just do generate new search results and see what happens I almost wanted the water to like stick out more somehow that does not look like yeah something like that we'll roll with that now let's add a cell phone this is crazy okay man this is kind of difficult like it's crazy the things that you can do what about this one that's interesting let's see what happens when we remove that background hey that's not bad at all okay all right I can
deal with that in the color of that phone I have this like Peach kind of thing from the background and you can actually edit the color Itself by taking down the saturation yeah very cool let's start working on the color I can grab the background that's the first color I want to edit I want to see what filters work for it first ooh that's not bad yeah okay we'll do that and then we'll edit the color on top of it I think the colder makes the green pop yeah so there's that let's work on the
color of me put up the clarity and sharpness a bit crank up that white a little bit bring up the brightness yeah what I don't like about this so far is that I don't have a shadow under me and uh if you click on your photo you click edit photo it gives you the option to make a Shadow and when you make the shadow you it makes a drop shadow and a drop shadow only works sort of in a 2D way where it just slightly offsets the shadow so uh the drop shadow won't work on
me because the drop shadow won't go on the ground like I want it to what I'm going to do is duplicate me and so I've got a second me and I want to go to the color and I'm going to make everything as dark as possible if there was like a color overlay option that would be nice but it's not the case here there we go okay so now I have a black color overlay and I want to go to blur now I crank up the blur a little bit and then I'm going to do
this background remover thing which is the same tool that removed the background before but it gives you an option to erase more of it or or restore some of it so yeah the shadow would be under my arm under my chest and then a little under this area that should do it for where I want the shadow to be uh yeah so I press back I'm going to lower the transparency a bit just a a tiny bit and then I haven't figured out the best way to do this but if you right click and you
go on layer and then show layers I guess that's one way to get to all the layers and then I got to drag it all the way under me and there's my shadow so it's like the best way I could think to make a Shadow on this I don't know so yeah um I don't hate this this looks this looks pretty good now we're going to mess with the depth a little bit if we click the background and click edit photo we can head over to autofocus and we should be able to blur the background
more and make the focus more up front hopefully uh it does sort of like a AI analyzation of everything the focus is where the purple is which I want to be like right around here and then I want to lessen the blur just a tiny bit what else can we do to make this really stick out at this point I kind of struggled with not knowing where to place myself I knew I was missing part of my finger and at the moment canva isn't so good that you could just draw a finger in but when
I'm zoomed out I kind of like the context of my full arm in the picture so I didn't know if being further away or closer was the better thumbnail ultimately I settled R this this wow if somebody can understand your thumbnail in 2 seconds that's all that matters and this looks like John dropped his phone in a puddle like immediately I can see that so yeah that's just like thumbnail Basics if you if you want to know that stuff I have a video for you check it out when you're done watching that video head to
canva apparently they have all you need wow
Related Videos

22:03
The New Way To Make Money With Canva ($8k+...
Wholesale Ted
203,789 views

5:01
How to Make a YouTube Thumbnail in 5 Minutes
Think Media
610,937 views

15:33
16 YouTube Settings EVERYONE Should CHANGE...
vidIQ
238,003 views
![How to Make YouTube Thumbnails in Canva [2024]](https://img.youtube.com/vi/b_UJZ00-pX4/mqdefault.jpg)
19:53
How to Make YouTube Thumbnails in Canva [2...
Technically Trent
3,676 views

11:30
How to Make a Thumbnail for YouTube Videos...
Primal Video
4,062,851 views

5:09
Are YouTube thumbnails REALLY this easy now?
vidIQ
80,791 views

13:54
How To Make YouTube Thumbnails - Quick, Ea...
Primal Video
67,143 views

10:18
200 Social Media Posts In 10 Minutes Using...
Modern Millie
784,235 views

17:44
CRAZY! 1,000 YouTube Shorts in 17 MINUTES ...
Jamil Velji
3,464,898 views

5:44
Canva tutorial - How to make thumbnails wi...
Podia
218,376 views

12:58
If I Wanted to Get Monetized in 2024, I’d ...
vidIQ
152,869 views
![Ultimate Canva Tutorial for YouTube Thumbnails | [Canva for Streamers]](https://img.youtube.com/vi/0v_ZY_QohW0/mqdefault.jpg)
27:03
Ultimate Canva Tutorial for YouTube Thumbn...
DrHeals
15,314 views

16:13
How to Create Videos with Music and Animat...
Howfinity
113,074 views

8:52
3 Free & Easy YouTube Thumbnail Maker Apps
Think Media
619,187 views

5:53
How to Make a YouTube Thumbnail with Canva...
LiftHub
189,985 views

16:10
How to Make a Thumbnail for YouTube Videos...
Arti Creator
1,546,099 views

11:12
Genius YouTube Advice That Works (If You F...
vidIQ
48,210 views

11:52
How a Small Channel Went Viral without Get...
vidIQ
71,494 views

16:32
5 THUMBNAIL EDITING HACKS IN CANVA | Glow ...
Modern Millie
22,760 views

13:29
How to Create Animated Videos Using Canva ...
Makes It With AI
296,113 views