Precious Plastic - Build a PRO sheetpress machine and make sheets (part 3.7)
423.13k views1689 WordsCopy TextShare
One Army
Find the plans in our download kit:
https://community.preciousplastic.com/academy/download
More in...
Video Transcript:
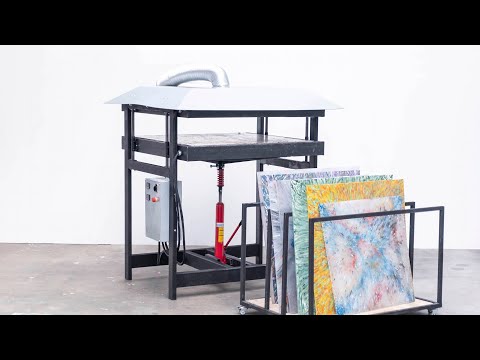
welcome to a new fresh plastic video [Music] so in this video we're going to make the sheep press finally so the sheep press makes plastic sheets like this one and they are 1 by 1 meter and made from plastic and you can play with different colors and patterns so it's a very fun one to work with in this video we're gonna make the Sheep press you can also get a bit more efficient I really set up a sheet press system with a few other things combined to get a higher productivity and but we talked more
about that later in this video if you want to download all the files you can go to a download kit if you have any questions go to our online community now Jason is going to show you how to build it step-by-step hey everybody so today we're going to show you how to build a sheep press we're gonna build it in 7 steps to pressing plates the frame the heating plates depressing mechanism the extraction hood and the electronics box and finally if we're going to assemble everything and show you how it's wrong I'll show you step-by-step
how to make it and you can find all the technical information and drawings in our download kit we'll start by making the pressing place overall for this video we got most of our sheet steel components laser-cut to save time they can also be cut by hand now let's begin with the pressing place [Music] so now we're going to assemble the support structure for the heat press the pieces are made from six millimeter sheets do we got a laser cut but you can also use an angle grinder to cut it from hand these pieces have a
small notch to indicate that they belong to the upper plate frame [Music] [Applause] [Music] okay so the first thing place is partly done before we continue we're going to assemble the frame this allows us to align everything once that's done we'll continue at the pressing place [Music] so when welding the bottom frame we used the three jack mounting plates to space the two bottom beams evenly make sure to weld the middle plate first as it's more tricky to access once the two outer plates are in phase we also put the boat in the three Jack
mounting hose so that they are aligned when loaded [Music] so now we're going to out the side frames and the bottom frame together to line them properly we're going to boat the top pressing play in place before boats here in place we're going to apply a layer of paint to the areas of the frame that unaccessible after boating the paint prevents the steel from rusting so every surface must be coated [Music] so now we're going to out the side frame and the bottom frames together we can use offcuts from the rest of the boat to
position the bottom frame in place it needs to be raised a hundred millimeters off the ground to allow for the pallet jack to slide underneath [Music] so now that we finished the frame in the pressing place we're going to focus on installing the heating elements we're going to mount the heating elements to the aluminium plate and make the aluminium blocks that hold them in place [Music] [Applause] [Music] so now we're gonna drill the hoes in the aluminium plate for mounting the cartridge it is to draw the host straight we made two jigs to make the
jigs we need one of the aluminium blocks which we're using to mount the cartridge heaters an offcut of steel extrusion some double-sided tape and some rubber so start by marking a square around the middle of the aluminium block to stop the block moving around to over drilling so we're gonna put a piece of rubber on the bottom surface [Music] the second tour we're gonna make is to ensure that the drill bit stays straight as we drill into the player so we start to by drilling a hole using the pillar draw into the piece of steel
fastening a piece of rubber onto the bottom of the stove to stop it moving around for drilling [Music] so now we're going to mount the aluminium plates inside the frame [Music] to position the plate you need some extra hands [Music] so insert the mounting plate inside the groove and then fasten it from underneath so we want to have the plate slowly lower than the steel frame so once you've tightened it fully we just reverse that one turn so that it drops down now we're securing the cartridge heaters inside the aluminium blocks to do so we
used a heat-resistant conductive glue make sure to wear the appropriate safety equipment suggested by the cam [Music] attach the words from the cartridge heaters to the ceramic terminals refer to the circuit diagram to distribute them evenly we numbered them with which phase they belong to to avoid confusion you may need to extend the cables from the cartridge heaters if you do make sure you soda and insulate them with soda and heat shrink that can withstand high temperatures next make the body panels for the press in place start by cutting and grinding them [Music] you can
use the mounting tabs on the pressing plates to mark the center of two holes [Music] next cut and insert the installation material [Music] now we're going to mount the pressing plates to the frame and make sure that they can slide up and down for this we need to build a sliding mechanism and a spring mechanism for the jack you're gonna need an eight-ton jack m16 boats m16 washes m16 nuts some still tube and some stove stoke the tube and the Stoke should run smoothly inside each other you can use the leftover material from the previous
versions injection machine we also laser-cut some components from six millimeter sheet steel and finally you'll need a spring so the size of the spring can vary slightly you need to adapt the size and the position of the washers when you wrote them we used to die spring but you could also use a spring from a motorbike or car you just have to make sure that is very stiff for the boat to Jack we used a minor one but you can also use a pneumatic run which we make pressing faster you need to make sure that
has an eye connection instead of a plate at the bottom so that you can fasten it to the frame so let's start by making the spring mechanism [Music] [Music] next we're going to make the sliders start by cutting the steel chips to size weld and grind the tubes [Music] [Music] leaving the boat slightly loose allows the sliders to move which prevents them from jamming when pressing [Music] so now the heating plates frame and sliding mechanism is finished the bottom plate should be able to slide up and down [Music] okay we're almost there next we're gonna
build the extraction hood before melting plastic make sure to check out our video about fume safety [Music] we're adding a hole on the top of the hoods to attach the extraction device make sure to make it fit your extraction system assembly the plywood sections and temporarily fix them with tape [Music] okay final part electronics we're gonna put with the electronics together in the control books to make the press what first world of books from sheet metal and protect it using a layer of pain [Music] next we're going to install the components you're going to need
cable glands three-phase plug some 5co three-phase wire cable ties shrink wrap some regular wire the ground spade some regular terminal spades a piece of din rail a piece of non electronically conductive material which will be the backplate an emergency stop an on/off switch some thermocouples 2 PID controllers to SSR to heat sinks into circuit breakers make sure to refer to the circuit diagram to ensure everything is wired correctly [Music] this is an easy buck fun pup and this is where it all comes together so both the body work and place and both the extraction hood
on top and finally attach the tube for the extraction system [Music] all right that's it that's how you make a shoe press so here we have to finish you press the switch on and leave the place to eat though you can close the place while the heating up put some plastic inside [Applause] and close the pressing place to wave to the plastic to mouth and then switch the press off and wave to the sheet to cool down so you can make cheese with this machine alone you can find the times and temperatures in the download
cup we recommend having a few things to make the process a bit more easy notes a prep table a cooling press and a sliding to having these allows you to heat and cool sheets simultaneously Rousseau makes the system easier and more efficient to use you can find out more information about these tools and the link below visit precious plastic dome to find more information you'll be able to find a download kit that has a bill of materials CAD model schematic diagrams maintenance lists and so on we searched at the how to's to find some hikes
and improvements for the system good luck building oh and before you go we just wanted to let you know that precious plastic runs on the support of people just like you everything we develop is posted online for free and open source so that people all over the world can tackle the plastic waste problem together so if you're willing and able to help us please with the support or precious plastic calm and leave a donation or find another way how you can help us [Music] you
Related Videos
26:26
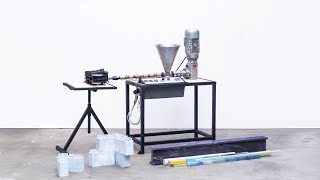
Precious Plastic - Build a PRO plastic ext...
One Army
468,539 views
18:27
Don't Throw Away Your PVC Pipe! I'll Show ...
DIYTechTrends
1,479,294 views
19:06
11 things we WISH we knew when starting Pl...
Brothers Make
334,510 views
16:06
Can an Air Fryer Recycle Plastic?
Brothers Make
101,535 views
17:28
Precious Plastic - Build the extrusion ( p...
One Army
1,009,781 views
21:21
How to Sharpen a Knife to Razor Sharpness ...
DIYTechTrends
19,508 views

20:07
Best Expensive Fails 2025 | Don't Show Elo...
FailArmy
412,682 views

16:20
Brilliant fishing hacks you need to know
FISHING knots
32,848 views

20:03
Lefties Losing It: Michelle Obama’s podcas...
Sky News Australia
175,600 views

9:27
Liquid Plastic DIY! I wish I had known thi...
You Can!
1,032,009 views
18:36
Precious Plastic - Build a PRO plastic shr...
One Army
305,525 views

35:19
BREAKING NEWS: Karoline Leavitt Holds Whit...
Forbes Breaking News
1,445,734 views
11:35
The ultimate guide to make the PERFECT she...
Precious Plastic
30,116 views

21:48
GLOVES OFF: Obama official SHUTS DOWN Elon...
Brian Tyler Cohen
644,490 views

14:26
BREAKING: Federal judge OUTSMARTS Trump in...
Brian Tyler Cohen
731,978 views
13:10
Making a Coffee Table from Recycled Plasti...
Brothers Make
268,599 views
15:48
How to make Shredding Machine - Amazing DI...
V. Idea
1,527,952 views
19:31
#40 We made a roof from RECYCLED PLASTIC s...
Project Kamp
812,103 views
31:20
The genius girl repairs and renews the gen...
Thoa Single Girl
682,167 views
13:44
Precious Plastic - Build the compression (...
One Army
345,111 views