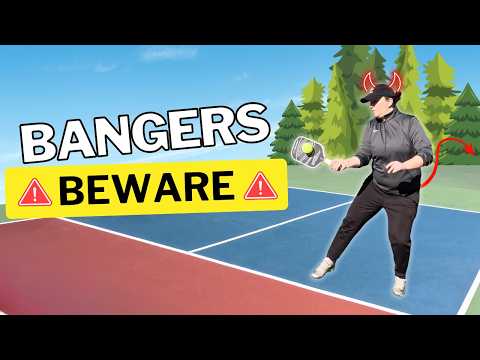
The Forehand Shot That Beats Bangers!
5.21k views4102 WordsCopy TextShare
PrimeTime Pickleball
Struggling to Beat Bangers? This is the shot you need on your forehand side to finally take down har...
Video Transcript:
hey Nicole hav from Prime Time pickle ball here and in this video we're going to be covering the forehand shot that you absolutely need if you want to beat bangers and it's also going to serve you well as you progress throughout the game you're going to be using this shot all the time this shot is useful at every level but it is definitely a must needed shot in order to overcome that hurdle that many players face of beating bangers all right so let's dive into it first I'm going to show you the scenario here that
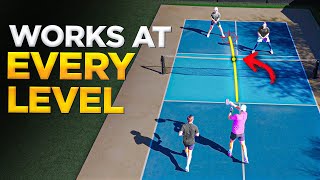
comes up and why it's so useful it comes up all the time especially in lower level play where it's only bangers but it also comes up in higher level play and I'll explain some differences between the two levels but in both cases you're going to need this shot okay so here we have this Baseline player Shan he's going to hit a drive notice that both these players are back uh this player's all the way up at the nonv zone line This player is on her way in okay so let's see how this unfolds okay here's
the drive this player was looking to poach but he couldn't quite make it so he backed off that shot and she ends up hitting this volley from the transition zone so let's freeze frame on her for a second she's in the transition zone so not all the way up to the non volley zone line yet and notice how she's just hitting this blocking volley not much swing to it her goal is to get it down at this player or at least hit her on a spot in the body where she can't do much damage with
an attack in this case she did Jam her up a little bit she uh this player here could not get like good spacing on a shot to either take a swing at her forehand or her backhand and be very offensive so she just kind of push blocked it okay so the key shot is this shot right here now let's discuss a few things you're going to need to be able to hit this shot well when it comes in at this height if it's a little lower if it's a little higher whether you're up here in
the transition zone or whether your feet are further back in the transition zone you're also going to need a similar shot up at the non-well zone line that we'll talk about a little later but basically the key shot to be able to beat bangers that are just blasting away at you is in this Zone here which corresponds to like this Zone here because you can see it better on this side to be able to hit this type of shot right here and to hit that shot to locations such as a player who's up here get
it down on their feet or Jam them up in the body if she were further back like maybe back here be able to get that down at her feet her feet will be more exposed as she's further back in that court so down here so have that control to be able to push it deeper and if she were all the way back at the Baseline then to be able to take that ball and send it back deep into this back third at least of the court and also be able to take that same shot crosscourt
low here to the feet of this player if he were up here or here or even deeper uh so at his feet if you were here and bouncing here if he were to stay back here like he is now at the lower levels when you're dealing with bangers they're going to be predominantly back in this area or maybe slightly up here and that's where it comes in handy to be able to hit this shot here and this shot here at higher levels such as these players are here they're at the 50 plus level notice how
this player drived and his partner snuck in cuz she has confidence that he's going to hit a pretty good shot and he did uh Katie here can't do a whole lot with this shot other than hit the type of shots we described has a little too much Pace on it for her to take a big swing to be very attacking it's not super high it might look kind of high from this angle but it's like waist high so she can't be very offensive with this shot as she wasn't and then this player is really looking
to poach hoping she comes this way and then she can intercept that high shot and be offensive with it that's going to be very common at higher levels it didn't happen here but that's what she was looking for so that's why this shot is going to be useful at higher levels as well but the general gist of it is in order to beat bangers and hard hit shots at any level you're going to need this type of shot right here hit well from the transition zone the reason that this shot here works so well against
bangers is because that you're routinely forcing them into low contact so even if you take it this way and he's at the Baseline you give him a low contact ground stroke if he's up here and so is she and you put it on their feet low contact and if you do that routinely they have no choice but to hit it up into your High contact and especially if they want to hit it hard you're guaranteed to get reasonably high like waist level or higher contact points because a soft shot is what would enable them to
get it back down low on you in that scenario and they're just unwilling to do that in the case of a routine Banger so if you keep knocking it low knocking it low knocking it low or knocking it deep and always making them hit a relatively low contact eventually their shots going to either go into the or they'll hit it too hard in a high and it will go long so that's why this is so effective against bangers it is still an effective play in the right circumstances of a point when someone's hit it hard
at you this shot is going to show up routinely and for the same reasons you're going to want to do the same thing although as the players on the other side get better such as these players they will be able to drop it and deploy different strategies but knocking it back low on them as you would against a banger that's a routine hard hitter is still an effective play against a player that hits hard sometimes but not all the time such as advanced level players do so this is a must-have skill in your toolbox for
beating bangers and Beyond okay so let's move on to how you're going to train this shot and the specifics of the technique and some footwork about how you're going to execute this shot here I'm training it with a ball machine I like to use the Slinger bag there's a link in the description below if that's something you're interested in you can also train this with a partner they can start here they'll feed you this type of shot that's about to come in out of the ball machine you'll hit back the type of shot we're about
to discuss and then you can play it out and that's how you can integrate it more into a game setting while still getting a lot of reps on this shot okay so let's break down what I'm going to be doing with this shot as you can see I have these cones set up here there's an orange set of cones and there's a blue set of cones so I have two primary targets which are between the orange cones and the blue cones the second target is between the blue cones and the Baseline now remember why these
targets matter and why they're important and why we're going to train them it's because a lot of the time especially at lower levels but even at higher levels players going to be in this Zone and you're going to be wanting to put it at their feet that's going to be a tough shot for them and if they do happen to be back here behind the Baseline you're going to want to get it bouncing closer to the Baseline so that's why these targets are important but also as you're training this be very specific about each shot
where you're taking it am I taking the shot here am I taking it there am I taking it here so don't just be happy about the depth you want to be really hitting your spots and you know there's roughly three ways you can go with it uh same thing if you're going in the back part definitely be specific about exactly what Target you're hitting each time you're hitting that shot and it can change from shot to shot it's just something you can mentally decide every time you're hitting the ball just as you do when you
play you have to decide your Targets on the Fly okay next let's take a look at the trajectory of these shots as I'm hitting them now I want to point out something important these are not straight bullets notice how I hit them up and they have an arc to them okay that one's a bit low and I do get it up over the net and dropping in an arc but even this one that's a little bit higher I still notice how it still comes up off my paddle and then I'm letting gravity drop it into
my target so I'm not hitting straight bullets I see that as a common thing that the misconception that people have you are hitting it with some Arc so I am sending my swing a little bit up so that's really something important to keep in mind okay now let's take a closer look at the breakdown of the technique of the shot okay so here I am in the ready position the shot is incoming and notice how I turn with my body I've not taken my paddle back look at that turn I'm not yanking the paddle back
at all in fact it barely comes back at all I really just set it back and then push up and out it's a very simple shut actually and most people do too much with it you do have to learn how to just coil up your body notice I just I turned from the hips and then I have a little more turn with the shoulder and that's it and then I uncoil those shoulders and send all of that uncoiling energy into my arm that's how shots are hit in this part I'm gathering energy into my body
and here I uncoil that energy from my body send it into my arm to push that shot forward very effortless small and efficient so it's really quite a simple shot with not a whole lot of moving Parts less is more on this type of shot you're really just taking all the pace on the incoming shot and knocking it back next let's take a look at a couple of different footwork patterns that can happen depending on where the ball comes relative to me on the previous example it came more or less right into my strike zone
so I didn't have to move a whole lot I could just coil up right in place and hit that volley basically right from where I was standing on these next few the ball comes a little bit out of my strike zone so I have to adjust my footwork so I start in place I get my coil in but now I see that it's a little little bit forward so I step in to close some of that distance so that I'm not reaching very much it's a little bit more out in front than the other one
so a pretty reasonable contact zone for me is like somewhere in this area right here so on the previous one I was probably here here I had to step in and reach for it a little bit more higher ones will be you know somewhere in in this C but basically as far as like front to back anywhere from here to there is acceptable out here if I start reaching out this way that's going to be too far and here I'm going to be jammed so if it's going to come into this area I have to
move out of the way and we're about to cover those shortly so on this particular one I had to take a little step forward and then I reset in place on this next one I believe I have to take a bigger step forward okay so my momentum's going forward and typically you're going to follow this one up to the nonv zone line but in this case I reset and I step back after this foot comes up here so I had to step a little bit more I have a lot of momentum forward so I bring
this foot forward here as well to catch my weight and then I step back and reset so there you saw like two similar yet uh slightly different footwork patterns because I did actually have to end up moving this foot forward as well and then I had to come back and reset both feet okay here's the next one now I can see that this one's coming in towards my body a little bit more so I have to get out of the way so I still get reasonable spacing remember the range I talked about right there is
still reasonable it's on the closer end of my acceptable range which is again about here there and the other ones I was contacting in this end of the range but I do have to get out of the way so that I'm not very damed so what did I do I stepped over with this foot and then I slid this foot in as I'm hitting I also straightened out this leg and I set my body weight over this leg over here so let's see that one more time so I get out of the way I create
space and then I set back okay here comes the next one this one's pretty interesting because I'm actually going to step back while still rotating forward you'll see Pros do this a lot Advanced players do this you have to learn how to hit while you're actually backing up but still put forward kinetic chain rotation of your body onto the ball so let's see that here okay I see that it's coming a little bit into my body again so I have to get out of the way and notice how I slid this foot back but I
still did have a coil here in my shoulders and in my hips as I set up for that shot so take a look as I slow it down here there's my coil to get set for the shot but I see I have to get out of the way so it doesn't Jam me and I slide that foot back while uncoiling forward so this foot's coming back while I send and uncoil my body into the shot okay not many people talk about that I don't know that I've actually ever heard it discussed on it video but
I haven't seen every video out there so it's possible it's just not something that's often discussed and uh that's how you get it done but this is going to have to be something you learn how to do on every shot drops drives like overheads definitely your feet could be moving back but you still have to uncoil forward okay let's take a look at the side view we already covered a lot of the technique but let's just get a different view so that you can see really my contact and where it is relative to my body
that's the pretty much the perfect place I'm very comfortable here um that's kind of right in the center of the acceptable contact range if I have to go get it this is still acceptable and if I get it a little close to me that's still acceptable but like this is pretty picture perfect notice how the paddle does not come very far back and the most of it getting back is from the turn notice how my arm stays basically next to me my elbow is still pretty tucked towards my body I'm definitely not reaching back with
the arm that's a very common mistake I see so you don't want to be doing that it sometimes looks like a player is reaching back when in fact it's just the paddle that's laid back in the hand but look at my arm it's not back but the paddle kind of makes that optical illusion so you're laying that paddle back with your wrist and I just push forward and up okay so notice how the swing has this kind of shape to it a little bit forward and up there's a balance between up and forward because I'm
trying to get that pretty deep look at this next one okay there's a lower contact so I sat a little bit lower but notice still how I coil up and uncoil and here's my contact more on the further side of my acceptable range so it's still in range but I am reaching a little bit more now let's do a comparison between the same shot being hit from the transition zone and up from the non volley zone line because you do need this shot in order to overcome bangers and you're first going to need to be
able to hit it from this location so that you can even get up and hit it to this location where you will use it further to then end the point against them uh so that's why we really want to work on this shot here heavily because this shot is the key to unlocking the possibility of you being able to hit it up here but you're going to need both so you're going to have to train both you could even start with the closer one if you're struggling to hit it from back here and then progressively
move back in the court until you're able to hit it from here but in a point you're going to have to be able to hit this one first in order to even get to this one as far as progressions to train it you can start here and then work your way back to here cuz this one is more challenging because you're hitting it from deeper in the court and you have to send it a longer ways now mostly this shot is like 90% similar but let's just cover some of the key differences so we'll do
one run through of the shot okay let's back it up so let's go kind of frame by frame so these are just timing timing differences so far though the shots look similar and let's take a look at how far the paddle gets back in each case in its furthest point so the furthest point on this side is is here the tip of the paddle gets reasonably behind my back but again the arm is pretty much next to me it's not back but because I'm setting this a longer ways I do have to have a a
bigger coil which is what makes it look like this is getting further back I mean which it is but it's not being sent back with the arm is the point I'm trying to make now I don't have to hit this one as hard also the ball is probably coming to me harder because even if the ball comes out of the machine or the player hits it at the same speed because I'm closer it hasn't had more time to decelerate by the time it gets deeper in the court it's had time to decelerate here it hasn't
so I'm going to exper erience like even on the same hard hit shot it's going to feel and be harder when I'm up in this position of the court so I have more Pace on the ball so I don't have to put as much Pace going back because I'm getting a lot of help from the rebound effect of the incoming pace so in this case let's on the right side let's look at how far it gets back at its furthest point which is right about here and you can see it doesn't get as far back
the other the one on this side got about this far back so I have a little bit less of a coil because I don't have to do as much because there's more Pace on the shot incoming and I don't I don't have to send it as far so I don't need as much coil so I can coil a little bit less but again it's still always you always get a little bit of coil on your shots and that's what sends your paddle forward is the uncoil and a little bit of shoulder add to don't want
to definitely ignore that you do send that shoulder a little bit forward but the energy of it comes from you uncoiling the hips and the shoulders which you can send that arm forward with in both cases there is a little bit of shoulder action but the primary energy comes from the coil of the body with a little energy added from sending the shoulder forward in combination those are some of the main differences and one more here is that I'll also this the the swing is a little bit longer in this case and here it's a
little bit shorter simply because here I have to send it like I said a longer ways to get to those orange and blue targets and here I don't have to send it as far so that is the shot that you need on your forehand side in order to overcome bangers and hard hitters at every level you need be able to take this shot from several locations on your side whether they be more up in the court more back in the court and send it to several locations on the other side depending on where your opponents
are but it's really this forehand push volley that is going to get it done for you and help you overcome those hard hitters now if you have a Slinger bag let me just quickly show you the settings that I used for this the speed is all the way here so about 2/3 of the way up to Max Speed there's not much spin on this ball it's a little bit forward of flat so some slight Top Spin and the feed frequency I have it coming out at a pretty decent clip probably about 2 and 1/2 seconds
or so between shots is what that setting represents and then I have the height on a 10% incline as I said again you can do it with a partner I like to get a lot of reps in with my Slinger bag uh you can check the description below if that's something you're interested in getting to help you with your training thanks so much for joining me today on this video get out there and go beat those hard hitters most importantly have a lot of fun when you're out there thanks and we'll see you in the
next video
Related Videos
11:26
These 5 Things Are RUINING Your Game (and ...
Briones Pickleball
13,114 views
11:29
Don't get beat down the middle - I'll show...
In2Pickle
3,383 views
8:29
就在今天,国际乒联做出最新决定,樊振东陈梦如释重负彻底死心!
足球之家
1,088 views
20:53
How To Hit A 3rd Shot Drop In Pickleball (...
PrimeTime Pickleball
67,128 views

24:43
10 Step Pickleball Blueprint I Wish I Knew...
PrimeTime Pickleball
62,240 views
11:54
How to Choose Between a Drop or a Drive on...
Pickleballwithdave
6,382 views

14:20
Analyzing How Pros Hit POWERFUL Drives (SL...
Ed Ju
103,236 views

25:57
Pickleball! What Skills Do 4.5 Players Hav...
Pickleball Pick-Apart
8,811 views

18:08
CRBN TruFoam Genesis Review - These Will B...
Johnkew Pickleball
28,707 views

14:06
The 3rd Shot Drop is SO EASY When You Know...
Enhance Pickleball
102,907 views
8:25
Felix Auger-Aliassime vs Aleksandar Kovace...
Tennis TV
9,910 views
14:28
Why 99% of Pickleball Pros swing this way…...
PrimeTime Pickleball
41,483 views
19:02
5 Mental Mistakes Destroying Your Game
ThatPickleballGuy - Kyle Koszuta
65,997 views

13:39
THIS Is Why You'll Be STUCK At 3.5 Forever...
Briones Pickleball
168,231 views
24:43
How To Block & Counter In Pickleball | Shu...
PrimeTime Pickleball
28,220 views
10:03
How to hit a Drop Shot in Pickleball: Tips...
The Flying Pickle Academy
13,306 views
8:49
Throw Further Forehands After This Video |...
Latitude 64
119,445 views
20:06
Learn how to hit your serve like Federico ...
Pickleball Playbook
11,849 views

23:30
CRBN TruFoam Genesis Review | You’ve Heard...
Pickleball Studio
32,195 views
8:32
How to Hit The 3 Key Dinks In Pickleball (...
PrimeTime Pickleball
13,334 views