SAAS Instagram DM Automations - Nextjs, Tailwind, Instagram API, Relume, Prisma, Webhooks
29.64k views123237 WordsCopy TextShare
Web Prodigies
🔴 Last day to join Prodigies University at a discount is 31st December (LIMITED SPOTS ONLY): https:...
Video Transcript:
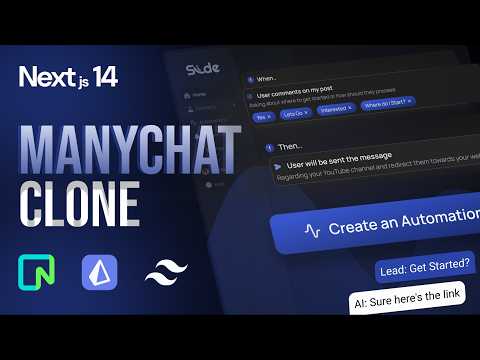
interacting with customers on Instagram is an important part of a business but as a business grows it becomes harder to maintain the same level of interactivity with your customers and many chats solved this exact problem in 2015 with DM automations on Instagram and now they serve over a million users bringing in millions of dollars every single month and today we will be building a better version of Min chats powered by AI in this free course you will learn how to build a SAS product just like many chat slide is an automation tool built specifically for
Instagram that allows users to capture and nurture leads through an automation sequence when viewers comment or send you a DM with a specific keyword we can use that as a trigger to fire off automations that send that user a DM and that's why it's called slide cuz you can slide in people's DMS and so this is the only video on YouTube that will teach you how to build a many chat clone there's not a single Source out there that can physically teach you how to build an application like this and the best part is this
course is completely free you will not find a link to purchase this course and another exciting announcement is we have hidden a cash price challenge inside this course and so by just watching this YouTube video you can potentially win money now before we jump into learning how to build a product let's understand how it works that way we know what we're building before we start so please do not skip this part or the next section because I'm going to explain how slide Works under the hood automations in slide are powered by triggers and a trigger
fires when a user comments with a keyword or sends you a DM with a specific keyword and the reason why slide is so much better than many chat is not only can we send a single DM as a response to this viewer we can also tell the AI and instruct it to have a full conversation with the viewer and so this means you can fire your DM Setters the AI can be trained by the user and you can tell it exactly what you need it to do if you choose to use Smart AI to respond
to these customers now I have been very transparent in the past as to why I'm doing this and the reason is because I want to give you so much free value so that hopefully I win your trust and then eventually someone down the future you decide to start run and grow a profitable SAS company and that's when yours truly can come in and help you scale to the moon but before we get started the sponsor of today's coffee is Wasim thank you so much for giving back to the web prodigies Community this way we are
able to give you so much more free value and now I'm not going to ask you guys to subscribe because I know you're going to do it anyway because I'm sure you'd want to see high quality projects like this on your feed and not the other type of projects out there but here's what I ask for you to do share this with another friend share this with another SAS developer so that hopefully they have the opportunity to quit their boring 95 web development job and start their own SAS and so without further Ado let's jump
straight right into this project users first land on our landing page which shows two different plans that we have the free plan and the smart AI plan with smart AI they can essentially plug in the AI to respond back to the customer and they can train the AI to react the way they like with a free plan on the other hand they can however send unlimited automations but it's only a single message automation next the user can log in and once they do they are redirected to a beautiful dashboard that they can see once they
begin integrating their Instagram profile if the user hasn't logged in already and connected their Instagram profile they can connect their Instagram account by clicking on the Integrations Tab and then clicking on the connect button which will then redirect the user to Instagram to login to create an automation all the user has to do is click on the create automation button but notice how blazing fast our application responds to the user click there we go it was almost instantaneous and now when you click on this tab it takes you into the automation editor this is where
you can create the automation triggers and the actions so first to rename an automation just click on the automation title and set it to whatever You' like I'm just going to call it new name and then when you when you click outside it's going to save instantly again and this is because we are using optimistic UI in this entire application next our automation Builder is a simple step-by-step process that anyone can read and understand the when tab indicates to the user that when one of these triggers take place the automation will fire and so the
first automation trigger is when a user comments on a post with a specific keyword and the second one is when a user sends a M with that specific keyword as well and so for now I'm going to select user comments on my post and I'm going to add a keyword as well so I'm going to say start and I'm going to hit enter and once that's saved you should see a pill icon like this and now once we have the trigger we can go ahead and create this I'm going to click on Create and there
we go now we see the keyword that's required to fire off this automation then the next stage is the action and the action here is either to send the user a single message or you can let smart AI take over that means you can train the AI Bots to respond back in the way you want so for now I'm going to select send the user a message because this one is an upgrade so let's go ahead and click on this and then down here you can send a message to the customer so I'm just going
to say here is a link and I'm going to paste a link you can also reply for comments so essentially if a user left a comment on a video you can respond back to that comment but this is a small challenge that we left inside the video for you and we'll also show you how to do that as well okay so let's go ahead and click on ADD listener and just like that our listener is also attached to this comment so if you read this it's an easy step-by-step way to understand the automation when the
user comments on my post then send the user a message with the exact message that they're going to receive and the final step is to attach a post post to this automation so if you click here you can see all of the posts that are inside your Instagram profile right now I only have one but if you have more you can select all of them if You' like and I'm going to go ahead and attach this post to this Automation and there we go now we have our automation ready to go to activate the automation
all you have to do is click on activate up here and just like that our automation is activated let's go ahead and show you a demonstration of how this works so I have two different Instagram accounts set up right here and from this account I'm going to leave the comment that is set as the trigger word for this specific automation which is start so let's go ahead and say start and hit enter I should have received a message so if I click right here there you go it says here's the link to get started all
right so now that we tested that let's go ahead and test the smart AI feature as well now I've already upgraded my accounts inside the settings tab and so it shows me that this is my current plan but if you are a new user you would see something that looks like this and it essentially prompts the user to upgrade to use Smart AI so let's go ahead and upgrade right here and there you go now you can put in your credit card information and when you click subscribe it's going to take you back to the
application and it's going to show you that this is your current plan so now that we have Smart AI running let's go ahead and create an Automation and let's click on that and then let's quickly change this to use Smart Ai and now when I click outside that's going to save and then I'm going to go ahead and add the trigger and this time I'm going to use the DM with a keyword and so let's click on that and then I'm going to say help okay and let's hit enter so we can add that keyword
and then let's go ahead and attach the trigger next I'm going to click on the smart AI right here and I've already copied a prompt from chat GPT I'm just going to paste it in here and all this says is you are a professional uh engaging DM Setter and this is for a Fitness business and then and once that's done let's go ahead and mount that listener as well and there you go so now we have Smart AI that can take over so let's go ahead and activate this automation as well and let's send the
keyword help to see if this automation will fire so now I'm going to go ahead and type in the keyword help and click on enter and in a few seconds we should see the message from the AI chatbot and smart AI is also aware of the conversation history that you've had with the customer in the past so let's go ahead and type something more more just to see how it engages yes I want to get fit let's hit enter and let's see if you can still remember the conversation history there we go so its goal
is pretty much what you tell it to do so if you wanted to close in the DMS or send it to a website link or maybe just give more information and help people who are showing up in your DMs and asking for support anything will work as long as you create a prompt that's doing exactly what you're looking for and so when another cool thing with slide is all your messages that are sent through the automation will end up in the user's primary inbox it will not go into the request Tab and this is something
we just discovered while we were working through the application and you'll see you'll see when we get to that but we just messed with the API and we found a workaround for it and so our users are going to see them which is the whole point of sending DMS and so this is one of the reasons why you will stand out in the market and another reason could be the pricing plan with many chats your pricing will grow as you have more users so let's say if I open an account on Min chat if I
have 1 million contacts with Min chat I will have to spend $5,000 every single month to run many chats and that to me sounds unreasonable and that's why slide is slightly different it's unlimited automations and unlimited contacts it doesn't matter you can send unlimited messages as long as you're paying $99 $97 per month and that's pretty much it right so here are some reasons why slide stands out and there's so so many more you'll come to know as we keep building this application but that's it for this demo and let's move on to the most
important part in this SAS which is understanding how everything works under the hood all right guys so this is the most important section of today's course so if you skip this section nothing else is going to make sense from here on so please watch this from start to finish okay we're going to be using a nextjs stack all right so that means we have a front end and a backend inside our application now our application is is made out of the following so each automation you can think about it that way right so each automation
has a couple segments right some sections to it so let's go ahead and indicate here by saying automation so our automation is broken down into three parts first we have the trigger then we have something called The Listener and then we have the final one which is a post among all of these this one is option okay this one right here so let's first understand what are all of these so a trigger the word itself says it it helps start the automation okay that's literally it and inside our trigger there are two different ways to
start okay we have comments and we have DMS and how a trigger works is with the help of a very important key feature in the application which is keywords okay so if a user sends a a keyword either as a comment or as a DM that will trigger this automation okay and the keyword can be keywords or keyword or multiple keywords as well that's fine okay and so that's how an automation starts when the user comments a specific keyword that is of course set by the user right we set it inside the application and so
if they comment that then it's going to start everything now what is a listener now a listener is technically Al an action okay an action is do something that's it so I called it listener for some reason because I had no other no other good names for it but now that I think about it it's probably an action okay but a listener is basically an action and there are two different actions that we can perform one is we can send a message okay so let's say for example in your video you said comment the word
get started below and I'll send you a free link to to get started just as an example and so the message you would send would be a single message right and so that's one action we have which is you can send a message the next one is an amazing feature called smart AI which is my favorite feature in this application and smart AI is an AI chat bot that is set up in the DM but it's it acts like a closer okay so you can replace your Setters and your closers with the help of the
smart AI so the smart AI will take over the conversation if the trigger has started okay and so the user can also give the smart AI a huge prompt telling it exactly what to do so it knows every single thing based on the scenarios or whatever you instruct it it will know okay because the prompt is going to guide it and we're also keeping track of all of the history of the conversation and we'll get into all of that later on but I hope this part is making sense next what is a post so if
the user chooses to comment of course there's going to need to be a post involved right if it's a DM that means a user just DMS you a specific keyword there's no need for a post so that's why we have a post here this way automations if set on a comment as a trigger might have posts so in this course you are going to learn how to get access to the users's Instagram and let me tell you something this is this is a course you will not find on YouTube I dare you to search up
chat clone and you will not find a single course on YouTube this took me such a long time to figure out because the AP API documentation is horrible so hopefully this helps you guys save hundreds and hundreds of hours because this took us that long okay so please do smash that subscribe button if you want free value just like this okay awesome so that's what a post is okay I hope that's making sense next this automation fires through an API endpoint okay so I'm going to go ahead and draw an API endpoint right here API
endpoint so essentially if you call this endpoint it's going to look for triggers and then if the keyword is existing right in that trigger it's going to start firing now how does this work that brings in the next part of our application which is the Instagram API okay so our application has a web hook so we set up a web hook right here and this web Hook is basically connected to the Instagram API okay and the Instagram API will send all of these comments which we will set inside the metad developer dashboard we will set
all of these apis and basically IG Instagram will send us web hook notifications whenever a comment is left on a video or a DM is sent to you and so once this once this message comes through what do we do with it well we are going to send that message that we get through the web hook into our API endpoint okay and what what is the API endpoints going to do well this is exactly what it's going to do there are two different ways to handle this right it's going to first check to search for
the keyword right because the keyword is what starts the automation right and so first thing it's going to do in here is it's going to check for the keyword okay and so once we have the keyword we can find the trigger and then we can also find the entire automation data so we can get all of this data that we need okay so in here if there is a keyword so maybe we can create two lanes here right so if there is a keyword so this is yes keyword exists and this is no keyword does
not exist right so if keyword does not exist well I hope you guessed right nothing happens okay and then if a keyword does exist then we start a whole process and so the first thing we're going to do in here is we're going to look as to what type of keyword automation or what type of trigger was set here and then what type of listeners we have okay so stage number one is this is broken down into multiple sections which is let me draw a little square here so we can see clearly is it an
automation that has a comment or is it a DM so what type of a trigger has a user set so that's what we're trying to look for here okay and so I can change this to say check for trigger so this makes more sense okay so we're going to check for the trigger and now inside our trigger we have a couple steps in here so let's say it was a comment well what do we got to do first thing is we're going to search for the Post we want to check if that specific post is
attached to this automation okay so in here first we're going to check for posts okay and let me put an arrow here so we're going to check for the posts and once this is successful right once we find the post then we also check that that post also is wired up to the keyword and then once that's done we send this request and we fire the fire an automation okay we just send a message back that's literally it based on whatever listener the user has said okay and then the next stage the next option or
the next variation is if it was a DM type trigger if it's a DM typ type trigger we're doing the exact same thing right we're checking to make sure that the keyword exists right of course and then we also make sure it's a DM type trigger then once that happens we take a look at the listener what type of listener do they have whether it's to send a message or use Smart Ai and again we're doing the same thing here as well right so if um now what about now what about the DM automation for
DM automations it's slightly different okay so let's go ahead and bring this out here because there there's a lot more happening under the hood now with DM automations you can also send the send a message listener right just like our comments but DM automations also have a new feature called smart Ai and the reason is because DM automations are the only way to trigger a specific keyword right so that you can start a conversation all right and so for that reason DM automations are the only way for us to have Smart AI okay and so
how does this work well there are three different scenarios the first one is a new customer so a new person so new lead right and they are jumping into a new automation this is what's happening okay or just newly this is good enough okay and so that's step number one or option number one and option number two is it's a returning lead okay so that means they're already having um a conversation with us okay and it's they are currently in an automation sequence and finally we have one more different scenario which is returning lead but
it's a new automation okay and so this is how we're going to handle these requests so let's say first new lead what are we going to do well step number one if they sent a specific DM keyword right this is what Instagram is going to do it's going to fire off the web hook it's going to come here great our end points is going to get hit and then we're going to check for the keyword so if what they sent does have a keyword so I'm just going to say keyword exists in here and if
the keyword exists that means we can proceed right and so next we're going to check for the listener so first we checked for the trigger then we're checking for The Listener so I'm going to say listener and what type of listener is it is it smart AI or is it send a message if it is send a message then we're just going to send the message okay whatever the user has said but if it is smart AI then we have to first check if we have already had a conversation with the user okay so that's
something that's important but here since it's it is a new lead right it's a new contact that means they have never entered into that automation then all we do is we just use open aai and we're going to get you know based on the prompt we're going to get a message and we're going to send it that's it okay now when the user is constantly sending a message keep in mind Instagram is also firing the web hook constantly okay and so that's why we need to handle the second scenario which is a returning lead so
a returning lead is someone who is having a conversation with the chat Bots okay so we're going to do the same thing here we're going to check for the keyword it's called a matcher okay that's what the keyword is so this process is essentially called matcher okay and so here we're going to check if the keyword exists all right and if the keyword does exist well that probably means that they might be in a conversation right and so that's why we are going to keep track of the conversation history because if we're if we're using
smart AI then we need to keep track of this history that way we can come back to it and take a look to see if they already had a conversation with us okay and so this chat history is what's going to help open AI create customized messages okay and so if it is a returning lead and we match the keyword right that means we're going to check the history first to see if we should chat with them and then once we have a history once we have all of those messages we're going to plug that
into the AI and send it to the user okay just like this now what if it is a returning lead for a new automation same thing we're going to check the keyword right and we're also going to check the history but history is going to have length of zero so there's not going to be anything and so that really doesn't you know pose a problem for us because we can just simply send the message right we can send the open AI message and then we can continue because they are going to probably follow up with
a second message because it's it's we're using smart AI right and smart AI is like a c conversation chatbot and so once they send the first message we're going to plug that into open AI send that message and then they're probably going to send another one so they might end up becoming the returning lead right and so once they are a returning lead that means they probably don't have a keyword or they do have a keyword right but we're going to check the history okay and so if there is history here then again we're going
to take all of their history plug it into open Ai and send that across okay and the same thing here as well if there is no keyword we're still going to do the same process okay if there's no I mean if there's no uh keyword in here that probably means that open AI is already speaking to them right so we still would be would be looking at we don't even need to look into the history honestly but um it just makes more sense to do it because if there is some history then the chatbot can
use that and have a conversation with the user okay and that's literally it guys it's a very simple yet powerful solution and if you ask me this is the best type of SAS to start right now and the reason is because the Creator economy is starting to bloom okay and I personally have a sass that does the exact same thing and I myself use this for myself as well okay and so if you are serious about your SAS or you're passionate about making money through software then this is your best opportunity and the reason is
because I have spent months of my time in thousands of dollars into the production of this course just to give it completely for free okay and the reason is because if you win I am happy that's all I want I want you guys to win okay and starting a SAS is the easiest eest thing because let me say that once more in quotations because we are developers okay it's the only leverage we as SAS developers have and so if you were to start as SAS from scratch you would need to First hire devs you need
to build a projects spend months of your time spend a boatload of money right but we have done that for you and trust me when I say this is there was not a single resource out there okay there was no YouTuber that created some video like this there was there was literally no document ation Instagram's API is very difficult to read but we did everything for you and we show you all the pages we show you where to go we show you what API to access everything right and if you needed to start from scratch
you would first need to create the idea you need to validate it we did that for you as well and your MVP is already done and so all you need to do is pretty much launch and Market the SAS that's it and so that's why we did every single thing the barrier for entry for SAS is very low there's nothing you need to do as long as it solves a problem and that's the most important part and this solves a huge problem automation automation is the future of business and you know that too and it
has AI so it's going to be trendy and so for that reason we also created a license for this project so you can make money out of our projects as well okay if you want to monetize our code you can grab the license from web prodigy.com and I I love rewarding people who take action and for that reason today I'm going to reward every single person that grabs the license by giving you a 20% discount and so all you need to do is use wp20 at checkout to get access to 20% discount okay but just
keep in mind this offer will end on 10th of December okay after 10th of December you can no longer use this coupon code wp20 all the best prodigies I believe in you I know you guys can do this and I'm excited to see what you have to create so here's a direct link into our Discord server so if you're looking to build this project or any of the future projects alongside other SAS developers and business owners then this is the free community where you should be okay so grab your phone and take a picture of
this that way you can join our Discord next go ahead and create a folder and please call it slide Das web prodigies just like this now you want to drag and drop it into your Visual Studio code okay and that should pretty much open up the project for you and you can click on this and awesome there we go next if you're using npm you can say npx create uh npx create-- app and I'm going to be using 14.2.2 just because I want caching if you don't want caching stuff and you want to do everything
you know like a traditional uh react application then you can use a latest version okay but I would highly highly recommend you do uh you do use the exact version that we are using in this project okay so I'm going to be using both bun so I'm going to say bunx create-- apppp at at 14.2.2 and go ahead and hit enter and for typescript you want to hit yes yes for ES lint yes for Tailwind yes for Source we want yes for the app router and for this we're going to hit no okay awesome and
because I'm using bun you see it's really really quick and just to confirm you should find a package.json uh right here if you scroll down you should find next set to 14. 2.7 next we're going to need shaten UI to get a bunch of components so I'm going to go into shaten right here and I'm going to click on installation for nextjs and it's giving me all of the instructions I need to do so I'm just going to copy this but I want the bun version and then inside my terminal let me expand this a
little bit more I'm going to paste that and I'm going to hit enter okay so DD flag for defaults um okay so I'm not going to use the dashd flag I'm just going to do in it okay awesome and I'm going to select New York I'm going to select neutral for this and CSS variables yes okay awesome and now once that's done we also have to install all the components right so I'm going to copy this and I'm going to get the bun command I'm going to paste it in here but I'm going to remove
the the button okay and you just want to hit add for now it's going to give you a set of instructions okay uh just like this you want to click on a okay a is going to toggle all of them and if you hit enter it's just going to install all of the components that way we save a ton of time so the next thing we're going to need for our application is the design right which is the CSS uh the style guide essentially and I have spent probably a whole week getting all of this
together for you uh this is every single design including the states and we also have custom components that use atomic structure and we it also gives you some cool insights into how into how we came up with the design in the first place uh sort of like a mood board right and guys we're also including a full uh shatan component library that is already built for you including light and dark mode so let me show you what that looks like right so if you click on one of these containers you can pretty much switch the
the entire container out to dark mode and all the components will also reflect accordingly okay so you can grab this from the description it's going to come with all of the components in chaten including all of the you know the styles that we created the designs and everything you need from there okay and so what I did with the design is I spent like a whole week um to you know create everything for you and also converted into a stylesheet that way we can import it into our application and so I want you to go
to the GitHub and the link is going to be in the description for you as well just copy this entire uh all the class class names including the St Styles and the colors and if you want to type this short you can but it's going to take you a very long time right um but you can essentially copy all the Styles and just go into your codebase go into Source app and inside the global CSS just replace all of your styling and the classes with whatever we just got inside our GitHub okay awesome and the
next thing is inside my project um I also might have set up some of these styles using custom names or colors and in order to reflect all of these you need to make those changes inside the Tailwind config file right so to make sure that we both have the same copy just go to the GitHub and you want to go into the Tailwind config file which is in the root uh repository right and you want to copy everything that is in this file and you're going to go into your project click on Tailwind uh Tailwind
config and you want to replace your entire file with whatever we just copied and you can see that right here right we're creating custom colors in here for example keyword um sort of like highlight accent colors and just some newer stuff and we need to wire that up into our Tailwind config so that way Tailwind knows which class and which color to use and now I'm going to say uh bun runev in the terminal and that's going to open up local host for us and we can see exactly what we have built all right guys
so the next step is we need to build a beautiful website for our SAS and this is the most important step because without a website we're not going to be able to convey the message of our SAS to our users okay so if you watch this section till the end I'm going to show you a secret AI hack that helps one of my students make about $900 in two weeks by just designing websites and the coolest part is only with AI okay now most of you guys also know that we have challenges in every single
video and in this section we will also have a fun and exciting challenge but this time it's going to be even bigger I want to reward you guys I want to give back to the prodigies Community I mean seriously man you guys have supported us so much we are so close to 100,000 subscribers and the reason is it's because of you and so we just want to give back to you that's literally it so the first problem that designers face or developers face is what is considered a high converting layout because most of the amateur
developers this is what they do right to build a website they just go in there they put in the website and they start building navigation sidebar whatever we have the titles and then we have you know two ctas and then we have some description and then they also build you know the SAS layout and then they realize you know what I actually don't like this so they will go ahead and start everything again say let's just delete this and let's make it look nicer and then they'll build something slightly different and then they'll finish this
and then they'll come to know they don't like this design as well and they're going to delete this as well right and so this takes very long time and the worst part is you don't even know if what you're designing actually converts okay and well I have about 2 3 years of AB testing experience and I've worked with really big companies okay and we' have helped to make hundreds and thousands of dollars just to small just through small little changes on their website and so I can I can almost assure you that yes the layout
does make a big difference on your website okay and so what is a high converting layouts and if you're not a designer you probably will have no idea about what converts more right or what are the different options that you have available this is a challenge and I'm going to show you solutions to each of these just by using one AI power tool okay now the other challenge is creating these wireframes this is what we call right we need to essentially create wireframes before we create the design itself that's the solution to solving this problem
of where you have to go back and redesign again and again until you get a perfect design right and so by creating wireframes you pretty much limit the possibilities of you or your client telling you to redesign everything okay and so creating these wireframes is kind of it's kind of like a shortcut but the problem is creating the wireframes itself take some time and now the other problem is imagine if you jumped into the wireframe without even understanding what each section is going to talk about and these are called site Maps right if you don't
know the sit map of your website if you start designing the wireframes and your your client says I don't want this one and I want this but I want it to look like this now you're like wait why didn't you just tell tell me all that in the beginning right and so again you end up scrapping some of your work and you waste a lot of time and so this was the exact same problem that my student was facing okay and so this solution essentially help them but um I'll get to the solution just a
second all right just bear with me I want to show you the problems and what guys are doing and how you can solve them individually okay and the other challenge is now that you have created these s Maps clients usually require you to create copy and if you use something like open AI you need to create prompts right or chat gbt you need to create prompts and each prompt needs to be for each section so you're going to essentially take a prompt you're going to explain the business idea and then you're going to tell it
to give me the prompt for the title the header right and then it's you most of the time it's not in the right word limits right cuz each section needs to look good and you can't just dump just 5 to 10 words in a paragraph that needs way more than that and so that's another challenge which is what AI copy works for the layout that I'm using and we also want the copy to look and sound nice to sound professional that's another challenge as well and if you're using chbt I'm sure you already know it's
a great experience right so that's another challenge and there's more to this right what if you want to use AI to actually generate all of these wireframes right that's going to be another challenge because there are no tools at least I don't think there's any figma plugins that can do this for you at least for free right it's not possible and so we need some way to build these on autopilot because we can't sit here and build every single thing that's going to take a lot of time right just building these these wireframes and the
S Maps itself is going to take you two to 3 days but what if you could do it in like 10 minutes that would be amazing the another challenge is what if you want to share these wireframes to with your clients so they first approve you share the site Maps you say approve this they approve awesome then you move to the next stage so they can never go back on this if they approved on something guys you should never need to go back on it right now of course if they need to sure but the
whole point here is you want to restrict it if they tell you they like it they're probably going to like the outcome as well right and so once the site maps are done then you get approval and then you move on to the wireframing and only once they approve and like your wireframes should you start to design and so this is another challenge right you need to get this approval process and we need a tool that can help us do that as well next what about collaboration and now another big challenge is what themes what
designs what styles go together or what fonts and colors go together and as a designer or if you're just not a designer as well you are going to face all of these problems right this solution is what helped one of my students make about $900 just because she just used AI okay and their client saw that everything was really fast and it just pushed the process forward right and then she probably got more contracts I'm not sure but um this is not just one student this is more than one student and I actually had a
whole program in this in the past okay um this was probably a year and a half ago and we used to teach people how to freelance how to do how to build websites and the AI tool that we used is reloom now reom helps you build s maps wireframes and their new beta feature is style guides as well so you can essentially convert your wireframe into a style guide that gives you the text the colors and everything that you need and you can copy it directly into your figma files and if you're using webflow you
can convert all of these Styles including the designs the wireframes whatever you created from your figma file directly into your webflow projects the best part is it's completely free to get started let me quickly just show you what the tool does because you're going to be using this tool in this challenge so the first thing is I'm going to click on new project and it's going to take me into this page right here and in here I can put the prompt which is the description of your company or whatever you want it to have on
the website and it will generate the sit map for you you can also select the number of pages you want so the benefit of this is if you had a big project right right and most websites or not one page right it's about 10 to 20 um well we have built Pages uh websites more than 50 pages long so sometimes you might have more pages and you can change that right here and it will do it for you but for now I'm just going to select one to five pages and I'm going to put a
prompt uh that just you know talks about slide go ahead and click on generate sitemap and instantly your sitemap is created for you and you can also select the um you know which page you want to run the sitemap for again so you can do blog Pages the features about page and I mean we only selected five pages right but here you can select as many as you'd like and you can generate the sections for them so this is the cool part you can change everything before you start designing and you can share these with
your clients right you can share get a link share it with them you can give them view access or common access that way you know you just control what they're doing on it right and you can also shift these around and you can of course change these as well right so this is nicer because you first understand what the it's literally s maap right that's the word it's the map for your website and once you have the map then you create the structure if you click on the wireframe in just a few seconds AI is
going to create all the copy including the wireframes for you as well now this may not be the exact design you're looking for so you can change everything okay so for example I don't like this type of layout so I'm going to click on it and I can rep place this component with a different type of design so this is the traditional SAS layout right so if I'm working with a SAS client I might use something like this or something like this or I think this one is the standard right this one right here so
you can change that as well and you can also change the copy you can use AI to kind of like refactor the copy and refactor the component as well and you can change things around and get exactly what you are looking for and once that's done you can use their style guide to create the themes the fonts whatever you want to make your website look amazing and you can also copy and paste them directly into your figma file and it also has all of the style guides and everything created for you another cool hack is
now that you have the U the wireframe ready you can take this and you can plug it into other AI tools like VZ or bolt. new and you can get a full design it will convert it into a website for you that's exactly what I did as well so I opened up v.d and I got my wireframe and I plugged my wireframe into VZ and I got a beautiful website well it's not too beautiful but I'll make it look nicer and that's it now I can click on this and I can get the code for
it and it is also in chatsi Nui and Tailwind so I get all of the classes I can literally copy and paste so here is the reloom challenge guys and all it takes is three simple steps to join this competition and if you win you get one years's free fre pro access to reloom that is one entire year and you want to get $150 in cash price okay so first you need to create a sitemap and wireframe using reloom and convert the wireframe to a beautiful website design and you have to build this design for
slide which is the application we're building today okay and next step is you need to create an Instagram real or a post that shows the wireframe which is built with fre Loom and the website that you designed and now please don't forget to do this you have to tag me at web prodigies and atom.io in the description of your Instagram post okay please do not forget this this way we know you know who to reach out to and how to give you access to your accounts okay and now the most important step okay you have
to do this in order to enter you need to be subscribed okay so go ahead smash that subscribe button we are so close to 100,000 subscribers thanks to each and every single Prodigy who supported web prodigies in our journey and guys I'm honestly so overwhelmed we have come here so fast I did not expect us to hit 100,000 subscribers this fast so thanks a lot for all the support and this is our way of giving back to you I've always wanted to do this this is my first attempt right so we're hopefully you know you
let me know in the comments if you want me to do even more challenges and even bigger challenges just like this that way you guys can win big and you know hopefully you get pro access to all other softwares that we use as well okay I wish you the best and I hope you win this competition I'm super excited to see what you guys have to create December 31st is your last chance to join prodigies University at our current lowest price that means just by taking action today you will save 10% every single month if
you are a SAS business owner or a web developer and you're looking to start run and grow a profitable SAS then this is exactly where you should be at the time this video was made we have helped over 400 SAS business owners and entrepreneurs who wanted to start and launch their SAS from the ground up we ourselves run three different businesses all within just 7 months that are now making $60,000 per month but it's not just about our success we've also helped other entrepreneurs do the same here's David who went from $0 to $144,000 by
implementing a high ticket monthly recurring Revenue SAS model all within just 3 weeks of joining Prodigy University and he did this without even posting content ENT on social media and here's Derek who made $3,000 using the exact same business model in just under one week of joining prodigies University or take Monty for example who made her first $1,000 through her business in under a month or here's another SAS business owner who now runs a SAS company with over 110,000 users in under 15 months but now you might ask well these are probably people who brought
something to the table so so what does the average student make inside prodigies University so here's funny who has never sold a SAS service in the past and now made $1,200 in just under 3 weeks of joining or here's yush who has never made money online and does not even know how to run a SAS business but he was able to get his first SAS client in under one week of joining Prodigy's University after implementing the quick win system here's sakam who made his first $200 through his SAS in under 10 days here's Shimona who
quit her 9 to-5 job and is now a full-time entrepreneur or here's aij who now has 3,600 YouTube subscribers and which also drives traffic to his SAS and his own SAS scor and now also a new community with over 400 members now I can go on and on about these results but I think you get the point here these strategies have proven to work and will work even if you don't have thousands of followers you don't have money to spend on advertisements or you don't want to send thousands of cod D Ms to prospects online
and to reward people who decide to join this enrollment period you get access to a bunch of free bonuses and you also get to take part in the Pu games to win cash prizes as you rank higher in our leaderboard but this offer is not going to be there for too long because December 31st is your last opportunity to join at a discounted price or when we run out of the 100 limited spots that we opened for this month's enrollment so if you want to know exactly what you're going to get by joining prodigies University
I'm going to leave a link in the description below if you sign up to that link you will get a free course that breaks down the exact business model from start to finish and you'll also see exactly what is offered inside prodes University so if you want to learn the proven systems that have helped these students start run and grow a profitable SAS the right way through mentorship and courses then I'll see you inside all right guys so I want to show you what I created it's not amazing I know you guys are going to
do much better job but this is what I built okay so I first went to reloom and um I got my free account and you can use a link in the description to grab your free account and once you get your free account you can build a wireframe okay build a wireframe and then grab that wireframe so make sure you have that ready before we proceed okay then you want to open up v0 dodev and you want to paste that wireframe and just use a simple prompt right use a wireframe as an example and create
a website design and you can tell it to also use the copy on the wireframe as well right and use that to build it with the website as well right and next also give it the colors the themes whatever you want your design to have okay and so once I did that I got something that looks like this okay so so first it gave me a hero section that looked like this and of course it doesn't look nice right we had to change the colors we have to change some border radius and stuff like that
but I mean that's not too bad and so what I did first was just copy all of the code in here okay so make sure you're doing it with me as well and then go into your homepage and paste it this saved you about 40 minutes of hard work okay and then the next thing you need to do is pricing card but I didn't get a pricing card with it uh with it so I asked it please add a pricing card but it gave me a really horrible looking design okay I didn't like this at
all so I told it to just use the is not suitable for light mode and dark mode please use the please use the general you know styling given by chatsi nuui and then it gave me another set of pricing cards and I like this a lot so I went in here and now I copied the pricing card and I paste it in my code pasted it in my code as well so two sections one for the hero section one for the pricing card okay and the next thing is they also used the dynamic plans array
and through that because I gave it enough information about the company because remember the YF frame has everything right so it's so clever it used all of that data and also created Dynamic features for me so I can update directly in here and I can update the card in here and it's going to automatically show in the front end okay so it created this array and if you want you can create your own array and I just plugged that in U I mean it already did it for for me right see it's mapping over the
plans and it's returning a list and that's all I had to do and my website was done in probably less than 10 minutes okay and all I changed was the class class names for the colors and the color right here and I just gave this slightly different type of Border radius now it looks more like I guess a content creator type SAS right great job guys hopefully you have an amazing design and you're ready to par participate and showcase your design in that challenge all right all the best and I hope you win the next
thing I'm going to do in here is I have a button on my page okay so if you don't have a button just create a button anywhere or if you don't even know how to create a website that's fine just delete everything all you need is just a button that says login okay so I said button like this and inside that I put a I put a link with the hre set to/ dashboard and I said login inside this link so when you click on this it's going to navigate to the login page but of
course we don't have that uh the dashboard page but we don't have that and that's why we're seeing a 404 but that's good that means we are you know rerouting the user to the right page now the next thing we want to do is we need to go into our GitHub repository so please use the the link in the description and open up the GitHub and you want to go into the environment. example files okay these are essentially all the variables and we're just need to we just need to populate these with the values so
just copy these and paste it in inside your file okay and as we go guys I'll keep explaining each and every single variable okay don't worry about it for now you need this because I don't want you to spend next 30 40 minutes typing it out okay so go into your root file and you want to say dot environment okay and inside this just go ahead and paste all the variables that you just got inside the GitHub now just to have a quick overview of this as well we have the next clerk signin URL and
the signup URL which is essentially tells uh tells clerk under the hood which link or which path to access and then we also have the clerk public key and the secret key which we're going to get right now so let's go ahead and open up clerk.com there's a link in the description so click on that link and it's going to take you to clerk so if you clicked on the link in the description it's going to take you to a page that looks like this and now I'm sure youve already heard of clerk I mean
the entire world knows about clerk but clerk is a user management platform and clerk makes it very simple and straightforward to wire up user authentication into your application they give you a single dashboard where you can handle all the users inside your application you can also impersonate users that means if you have a support team you can log in as their accounts and to set up this feature it's going to take you a while okay but you also have uh readymade components that are already built for you that have been tested and it's secure as
well so you get sign in sign up user profile buttons and you can also create custom multi-actor authentication flows and some Advanced security functionality that you will not get if you were going the traditional route in fact you would need to hire a whole team to make sure your application is secure okay and if you're doing this in a production environment the best way is to start with Clerk and today's video is also sponsored by clerk authentication so thank you so much to the clerk team for making this possible this is how we're able to
give give back so much more free value to the prodigies community and guys we need to support them because they are one of the few tools out there that give you free access to their software it's completely free to get started and you can build as many projects as you like in fact I use clerk for my production grade applications because I don't want to spend time and you know build a team just to handle authentication and security for my application so go ahead and click on dashboard and that should take you into a page
that looks just like this now as you see I have so many projects in here right you're going to create a new one so your screen might look slightly different all you have to do is create a new application so I'm going to click on create new application and I'm going to call this slide Das web prodigies and make sure you turn this off and only turn on Google authentication okay and go ahead and click on create application and once you're done it should take you into a page that looks like this now we are
using nextjs so make sure this is clicked and and then the first thing is you need to uh pretty much copy this Command right so open your terminal I'm using bun if you're using npm you can immediately paste it but I'm going to first quit my terminal and I'm going to say I'm going to paste this and I'm going to delete the npm command right here and change it to bun okay and once you hit install that's going to install into your project and the next thing is they're telling you to copy these and paste
it into your environment variables so go ahead and copy this you want to open up your folder structure and then inside your environment variables we're going to scroll up here and we're going to replace this with the new variables we just copied okay and so please don't delete this okay we need this don't think it's not used we need this okay remember I explained it to you so please make sure this is in here and then we also have a force redirect that's going to send the user to our dashboard page which we haven't created
but we'll create that in just a second as well okay let's first finish up the clerk setup now go ahead and Shrink all of your files open up the source folder and inside this you want to create a middleware do typescript file and inside this you want to essentially copy all of this from here and you want to paste it in here okay so you see they're making it a very simple step-by-step process as to you know how to wire up clerk into your application so it's really easy and I like using clerk as well
so the next thing we need to do in here is we have to create protected routes for our application because there was a new update to Clerk and um this is the new requirement that we have to do so first thing we're going to do in here is right above the clerk middleware we're going to say const is protected route equal to create route Handler or route matcher sorry and we need to invoke this and let me make sure I can import this okay create route matcher and then inside this you have to provide an
array and this array is essentially all of the protected routes okay and so what you want to do in here is first thing is we're going to say everything that's inside dashboard route is going to be protected so slash dashboard let me extend this a little bit more so you guys can see okay slash dashboard invoke it like this and we're going to say star do star so everything from here okay and then we're going to put a comma and we're going to create one more route which is the API route so API SL payment
okay and we're going to do the do star as well this means everything inside this route is also going to be protected and then finally we also have a call back route so we're going to say slash callback invoke it and say star just like this now the next thing they tell us to do is go into the clerk provider I'm sorry to create a clerk provider and we have to do that inside our app layout. TSX and that's exactly what I'm going to do so go into your app layouts. TSX and guys you can
change this based on what you're using but since you're using the app router please follow using the same steps okay and so inside here we need to First import this so I'm going to copy this paste it up top okay so now we have all of our clerk components right and I don't think we need to sign out uh buttons and sign-in button we just need the clerk provider so let's grab that and then we also uh need the clerk provider in here so you're going to wrap the entire application inside your clerk provider so
let's move this up okay awesome nice so now once this is done your entire application is pretty much set up with the clerk provider but now you need to render out the signin and sign out components so let's go ahead and do that next so go ahead and shrink your folder structure and I'm also going to shrink this a little bit more and inside this you're going to create a route okay it's a route group called O Okay and then inside the O we're going to create two routes sign in and the sign up so
I'm going to and say sign- in and then we have to create another folder inside the auth route and this folder is called the sign- up okay and now for both of these routes we also want to create a layout. TSX so we can wrap all of these in this component okay and now for our signin first we need to create another route in here which is a dynamic route using the spread operation which can essentially get every single type of um you know login that we need and we're going to say sign- in okay
like this and the next one is inside this we want to create a page. TSX so please make sure you have the exact same route structure okay and now inside this component we're going to essentially return a component like this and I'm using the uh the typescript uh code Snippets so if you don't know how to do that there's a plugin right so it gives me all of this I'm going to import this and I'm going to change this to page and in here I'm going to return the signin component and the signin component comes
from clerk so sign in Clerk nextjs and I'm going to go ahead and backspace all of this and return the signin component okay awesome and now next what we need to do is go into our layouts and we have to return another component in here so I'm going to say tsrce and change this to layout like this and inside this layout I'm just going to give it a couple Styles so I'm going to say class name height of screen Flex justify center items Das Center okay and this is going to make everything right in the
center of the page and inside this we also have to render out the children from the props so in here I'm going to say children is react. react node okay and let's also go ahead and destructure it from here and I can say children just like that okay now if you go back you can technically access this we can see well let's give it a shot so make sure you spin up your server again so do bun uh bun runev or npm runev and let's go into the sign-in route and see what happens okay so
it says the default export is not a react component that's because we haven't exported anything so I'm going to say export default okay and I'm going to set this to the page okay and this is inside our page. TSX so once you return this component it's going to return our signin component right awesome see just in like probably a couple seconds we already have authentication set up for our application and that's why I love using clerk next I want you to try to take this up as a challenge so pause this video and try to
build the signup component for the signup route okay and I'll give you a hint it's going to look pretty much the exact same you just need to change this to the appropriate components okay pause this video and give it a shot if you don't know how to do it I'm going to show you how you can do that okay awesome hopefully you got the right answer if not this is all you have to do F so first create a folder and we're going to call this uh sign Dash up okay just like this and inside
that a page. TSX and I'm also going to return a component in here and we're going to set this component to the signup component to return the signup component so let's backspace this and I'm going to say sign up okay and I'm just going to return this component here and that's it that's all you need to do okay and so now if you try to access the signup route awesome it Returns the component and we also are exporting it great job now that we have set up clerk authentication inside our application I also want to
have a theme provider okay and this theme provider comes from shat CN UI so if you go to shat cnu's website you're going to find a sidebar and inside this you want to click on dark mode and it's going to ask you where do you want to enable this we're going to say on a next a application and then it's going to give you some commands so make sure you copy the bun command or the npm command whatever you're using and then we're going to quit the terminal and we're going to paste this inside the
terminal and once that's done it's telling you to create a theme provider okay so I'm going to copy this code and this is essentially a theme provider that shaten is telling us to build so let's go into our folder structure right in here I'm going to shrink everything and inside source I'm going to create another folder and we're going to call this providers okay and inside this we're going to create an um create a file here called theme- provider. TSX okay and inside this just paste whatever shatan told you to paste okay and after that
it's also saying you need to wrap your root layout so let's go into our root layout component which is inside app layout. TSX and at the bottom here it's telling us to wrap the entire uh component itself the layout itself inside this theme provider so let's go ahead and and do that so I'm going to go into my layout right above the body tag okay and I'm going to say theme provider I'm literally copying what they uh they have given me right and I'm going to move this inside so wrap everything inside this component okay
and next we also need to import this so import it from the providers SL theme provider and then you want to set the attribute so only add the following class names okay the following properties so attribute set to class default theme set to dark and disabled trans transition on change just said it's true here so you just put this in here it's also considered as true all right so the other thing you need to do is you need to actually wrap the theme provider inside the body okay so what we had before was a theme
provider wrapped the entire thing that means theme provider was right here right so you want to move the theme provider inside the body tag and only the children components will be inside this body tag okay so please make sure you update that as well um and you can also put the suppress hydration warning on the body tag if you like now the next thing is inside our application we're going to use toast messages right and so we'll be using soner that comes from shats nuui which is already installed for us so just go ahead and
import this up top saying import toaster from sonar and at the bottom here after the children components you can essentially render out the toaster component okay just like this so now that we have clerk middleware set up we should expect clerk to work by protecting our dashboard page but if you try to access the dash dasboard page it's going to give you a 44 instead of redirecting you to the signin page and the reason is simply because inside the middleware file we created the protected routes but we haven't used them inside the middleware to indicate
to clerk middleware that this route that's being accessed is protected or not and so all you have to do in here is this clerk middleware essentially gives you a callback function and inside that callback function we have to check the route that's being accessed and based on that we have to protect the Au route okay so the clerk middleware call back in here is an acing function so I'm going to grab that as well and this is going to give us the O object that we need and the request as well and now in here
we're going to say if is protected routees and we're going to pass in the routes it uh the request itself if this is true then we're going to say o do protect we're going to invoke this but we also want to say await right here and so now if you try to access the dashboard page like this it's going to redirect you to the sign-in page so now if you try to sign in it should take you to the dashboard page but it should show you a 404 great job guys next let's go in here
and let's kind of tidy up the folder structure and our routing structure a little bit more so we have an off folder here for sign in and sign up that's awesome the another one I want to create is a route group called protected okay so everything that's protected will go inside this folder and then I also want to have a website folder you can also call this public but the reason why I didn't want to call this public is we have another public folder right so that's why I'm just going to call it website for
now and the next thing is inside this you want to drag and drop the page. TSX okay so now we have our website in there and you also also want to import update all of our Imports and that should bring this component inside the website folder if you are new to nextjs the reason why we are you know this does this is not considered a route is because a route group is just kind of like a theoretical representation of a group of routes okay think about it that way so it's not really a route itself
okay because folders I know create routes but this is not a routes it's just it's kind of like syntactical sugar just to group all of your files in in one single route and that way you can create a layout. TSX that can be shared within all the files that are inside this route group so keep in mind this is not a route so you cannot access it by saying you know website like this okay that's not possible so now if you go back to the public page you should see um you should see it it's
the reason is because it went to https but you should see our website nice and now inside our protected route we can create our first route which is the dashboard page okay and this is going to have a page. TSX inside this page as well and now inside our dashboard page I'm just going to return a component in here and I'm going to change this to page like this and this is going to need to be an async component because what we need to do in here is first we need to use a uh we'll
just call it a server action right I don't want to call it API endpoint so it's a server action right we're going to make a server action to essentially onboard the user okay so if there are a new user into our application we have to essentially onboard them and if the user is successfully you know created and if or if they already have an account then we're going to check the status which is 200 or 2011 and then accordingly we're going to push them to their specific dashboard page okay so we're going to maybe have
something like dashboard right dashboard like this slash a ID like this and that represents that user okay and if that is not the case then we're going to need to redirect the user to the signin page so that's what we're going to need to do in here now I want some page to show up in here and that's why I created this and I returned a page so now we know that the dashboard is working okay so if the user was signed out they would not be able to access this page anymore now that we
have user authentication set up into our application this is a good time to set up Prisma and if you don't know what Prisma is Prisma is an omm there are many benefits to Prisma such as you know you get type intelligence and also it's an easier way to communicate with your database because you get to create models schemas for your data and it's just one universal language for any type of database okay so first thing you're going to do is open up your terminal and you're going to say bun x uh bun sorry bun I
Prisma at Prisma client or if you're an npm npmi and go ahead and hit enter and once this is done that should install Prisma client into your application next you're going to say bun X Prisma in it and that's going to basically initialize a Prisma file for you so if you open up your folder structure you should find Prisma and schema. Prisma in here as well so in the last project we built a loom clone and in that project I showed you how to build Prisma schemas from scratch right including how relationships work how different
models work and how the entire Prisma ecosystem Works in in general okay so in this project I'm still going to explain all the schemas as well so you understand the relationships but if you want to learn more in depth learn the syntax then I would suggest you watch the last video that'll give you a good idea of how Prisma schemers work okay but the first model that we're going to create here is called the user model okay and the user model is first going to have an ID the clerk ID email first name last name
okay which is the most important stuff and this is usually what you're going to have in every project right but the difference here is the types that we set on them okay again I'm going to give you the user model as an example I'm going to break it down and show you how it works but then for the rest of them I'm going to you know just run through it because we have a huge application to build okay so first thing is we have the ID and the ID is the name of the field think
about it that way the name of that property next we're going to have the type that we need to set and this type is going to be a string and then we also have some Sy tactical stuff here which is a way for us to communicate with the database as to what this field is okay so this one is an ID type field okay and its default value can be set to a specific value as well so you can say default value like this and inside that you can pass in a generated uu ID um
function like this okay so default is DB generated gen random uu ID and you want to invoke it so on the database it will automatically generate a uu ID for us and now another type we can uh provide on this is db. ID okay um like this awesome and the next one is clerk ID so go ahead and pause the screen pause this video and try to guess what type would the clerk ID be okay awesome well a clerk ID is a string so we're going to say clerk ID we're going to set it to
a string and then there's one more value that we need to Prov provide in here this essentially tells the database that this clerk ID has to be unique so we're going to say at unique like this and now this value will always have to be unique in our application and if it isn't it's going to throw an error okay the next one is email I hope you guessed it right it's going to be the exact same thing which is string and we're going to say unique in here as well first name is going to be
string and this is also going to be unique and the reason why we're making this unique is I actually want the URLs to have the user's name in the URL itself okay so maybe you can um you know improve the functionality if you want but this should do the job for us right now and you can also use the clerk ID itself the reason why I like using the first name and last name is it just looks so much nicer right having a random ID like this looks weird and it's better if it just says
parent right looks nicer so that's why okay so after the first name we're also going to have the last name which is going to be the same thing string and uu ID now what is this question mark this question mark means that these values are optional okay so what I'm going to do here is I'm going to set both of these to optional okay and the next thing I need to do in here is we're going to also have the created at timestamp so I'm going to say created at and the type here is date
time so you see this is a new different a different type inside Prisma okay and its default value is going to be now so whenever we create this entry entry Prisma will essentially create these values and the database will also have the date and time set to the current date and time okay now the next step in building Prisma schemas is sometimes some schemas are related to other schemas right so for example a user can have a subscription now what I can do is I can go in here and say subscription ID right I can
say subscription type whatever and I can create all the values in here but that is very redundant you're going to have hundreds and hundreds of fields in here and it's going to be very difficult to create relationships and at the same time manage it right and so for that reason you can create another model and you can link that model into this user model think about it that way okay so I'm going to say model like this and I'm going to set it to subscription and first we need the ID so I'm going to do
the exact same thing like we did in here so I'm going to say ID string and it's a of type ID and the default is going to be the same DB generated gen random uu ID okay and now we need to link this subscription to this uh this model right here okay so how do we do that well first thing is we need to tell it what type of connection it is right or what type of a model we're connecting to so I'm going to say well connect the subscription to a user so a user
can have uh a subscription right and so we're going to say this user field is going to be a user model and this is going to be optional and now we have to let it know that it's a relationship but before we tell it's a relationship we also have to show which field in this model connects to this user model right here and the field that connects is the user ID and this is going to be a string which of course has to be optional right so this is a relationship that connects this table and
this table together okay and so the other thing is this is also going to be uh unique right the user ID is going to be unique so I'm going to put some types on it and say unique DBU ID now this gave me a spoiler anyway oh man I was working my way up but anyway so what you have to do in here now is do the relations right if you save it guys it's going to automatically do it for you and the reasons because uh my project has uh I mean we have es lint
and all that kind of cool stuff right and I also have a prettier installed so it does it for me but if you don't have this you probably don't have the autocomplete okay so I'm just going to create a relation here and first we have to tell it the fields and the fields are going to be an array and here I want the user ID because that's the connection and what does it reference inside the user table well it references the ID field and the other thing is when the user deletes this uh deletes this
value what do you want it to do to the other related items I also want that those to be deleted as well so I'm going to say Cascade okay so this is how you create a relationship between different different values now the other thing is sorry different between different models okay now inside our user table this was also not there initially right because now we have to say a user can also have a subscription and so what you need to do in here is you have to say subscription like this and this is going to
have a subscription type model so a user can have one subscription okay and the subscription is going to be like this okay and now the subscription is connected to the user with these uh properties that's literally it now I have one more question for you what do you think this means try to pause the video and try to guess take it up as a challenge what does it mean if we have an array next to the type here awesome hopefully you said it's a many relationship right that means the user can have many subscriptions great
great job that's basically what that means right here okay so you're going to also see for the next model we're going to need this so first a user can have one subscription only right of course and the other thing is they um our users are also going to have automations okay so let's go ahead and create an automation uh value right here okay so the automations is going to have again multiple automations so multiple of a specific model so let's go in here and say model Automation and this automation is going to be off the
following so we're going to need an ID we're going to need string name uh sorry ID is going to be a string the name the created at I'm going to go ahead and put that in here as well and then we also have active that means an automation is active or not and now I have a new model for the automation okay and also um we need to create a connection between our user and the automation but keep in mind a user can have multiple automations so go ahead and pause this video and try to
take this up as a challenge try to create a relation between between Automation and a user that means one automation belongs to one user but a user can have many automations okay pause this video and give it a shot if you don't know how to do it I'm going to show you exactly how to do it okay awesome hopefully you got the right answer if you didn't no problem this is what you had to do so first thing you have to do in here is you need to create the connection just like how we did
in here so I'm going to say this is going to be of type automation model but I want it to have multiple so I'm going to create an array here okay next I'm going to go down in here into our automation model and I need to create the connection between the user and say which field is connected to this model as well so first I'm going to say user and I'm going to set this to type of user okay and this is of course going to be optional for now and its relation is going to
be with the following Fields well which field the field we need in here is a user ID that means I'm going to connect this field to to this user okay and inside this we have to also state that user ID field and then we have to tell it what it references in the user table and it references the ID and next once that is deleted we also want to delete this data as well okay and now we also need to provide the types for this user ID well it's going to be a string and it's
optional and it's going to be DB like this. uuid okay awesome so now that we have connected these we can go here and we can provide the array and there we go now we have a connection between all our models now that you know or at least have a rough idea of how models and schemas work I'm sure you can create more on your own but for the Simplicity of this video I'm going to explain every single thing and uh break down all the models instead of typing every single thing out okay so let's go
ahead and jump straight right into it so the first model we're looking at is the user model right and we already came all the way way up to subscriptions what's next we also have Integrations and we already completed the automation as well so let's first take a look at Integrations okay so integration is going to have ID the same thing that we did before and it's also going to have something called name what does this name mean it is of this special type that we've never seen before called an enum and this is of type
only one value okay which is Instagram so the type here can only be Instagram for now guys you can expand on this application that means you can build automations for for Facebook um apis as well so even for if someone ran an advertisement you can use a chat poot there and also do the same exact process you could probably use Twitter you can use any application that you want and you just have to wire it up into uh into slide okay so this is the type of enum in here and the Integrations uh that we're
setting in here is the type for name and the default value is set to Instagram so you can create multiple enum values just like this and you can set a default value from there okay what's next after that we have created at which you already know and we're connecting it to the user table right we're saying user ID is linked to that to that table okay that means an integration is connected to one user and the integration is an Instagram account so a user can have uh multiple Instagram accounts connected in here okay and what's
next after that we have the user ID token these are all things that come as part of the API so you don't really have to care too much about it but uh we also have some tokens uh Instagram ID and the user ID okay which is connected right here okay so after Integrations what else do we have the automations uh table is also updated slightly more okay let's go ahead and take a look at that so we came up all the way up to here we have more so now an automation will also have a
trigger right what what is that a trigger is another model right here and a trigger has ID type and it's connected to the automation as well and if you don't know what a trigger is a trigger is sort of like the thing that causes the automation to start and so a trigger can be of two different types what are the types let's go ahead and take a look uh can't click on this it can be of type the smart AI or a message right because we have two different type of uh actually sorry guys that's
not the the trigger itself the trigger is basically if the user has a comment automation or a DM automation okay two different type of triggers and so you can you can add if you want you can add another uh type in there another enum uh but for now I just skipped that because I think I covered it everywhere else right you see here and a lot more places so what's next the other one is let's go up here okay and so after the triggers which means an automation can have multiple triggers right we also have
listeners and The Listener is basically is the user going to be responding back with smart AI or are they going to be responding back with a message and so that's exactly what we did in here as well okay so a listener has the ID the automation it's connected to and the type of listener and we only have two types here right you can hover over this and see all right smart Ai and message and then all we did is we connected a default value saying message and then we have the prompt that the user can
add in here and we can use the prom to essentially connect it to the AI and then comment reply is just a string this is just some stuff that we have to do in the back end don't worry about it you'll come to know about you know every single thing as we build now I'm not going to bore you by reading every single thing I think you can spend your own time but let's just understand kind of like a 10,000 foot overview right so inside the automations we also have posts right so which posts are
we connecting we have the DMS that means what was sent inside the Automation and we also have the user it's connected to and keywords that are connected to the automation because our automation fires based on keywords guys if you missed the first main part of this entire video which is the architecture stop whatever you're doing scroll back and watch that section because nothing is going to make sense from here okay so please please watch the architecture breakdown go back and watch it a million times until you know exactly what we're doing okay so that's it
for automations the next thing is uh let's take a look at uh this as well what is DM I think you guys understand what a DM is right and for a post I think you know what a post is as well it's just an Instagram post right what types do we have for an Instagram post well what type is it image or a real or a video right and the post is also connected to automations so that's something we connect in here as well okay and that's pretty much it guys that's how we created the
entire um you know Prisma schema and the tables for our project now that we have all our Prisma schema set up we need to store these in a database so we can keep track of data in our application and today we're going to be using neon and neon is a blazing fast serverless postgress database which has some really cool features like autoscaling branching and so much more and the best part is again it is completely free to get started and they have a new plan that they just rolled out where if you signed up today
using my link in the description to get your free accounts you get 10 free projects okay and now I don't know if it's only a limited time thing or they just did it for now but I just think they're doing so much for the dev community and we need to support them companies like this deserve our support so go ahead click the link in the description and grab your free account and then we can get started so once you have logged into your account go ahead and click on new project and I'm going to call
this slide SL web prodigies just like this and now just leave whatever it is just leave it as whatever it is and just click on create project okay awesome and just like that they give you the uh the URL so go ahead and copy this URL and then open up your folder structure scroll down Tov and you want to paste it inside your database URL okay and I put it inside a string in case I need it so you can put it in a string and paste that URL in here now go ahead and open
up your folder structure just uh open up the terminal and then you want to say bun X Prisma generate hit enter and that's going to generate all your Prisma files and then you want to say bun X Prisma DB push okay and then go ahead and hit enter and let's just give this a second and now if you click on tables you should see all of the Prisma schemas that we just created great job so far if you don't see this or you're not able to navigate um through the dashboard to find this just go
ahead and say bunx Prisma Studio okay and that should send you into your Prisma studio just like this and now you can also see a visual representation directly inside Prisma all right awesome now the next step is go into your Libs folder and we have to create our Prisma clients so go ahead and say Prisma do typescript and inside this we're going to say uh the following so we're going to say declare a global variable and this is going to be called VAR Prisma like this and we're going to set this to Prisma clients okay
and this Prisma client comes from Prisma clients I'm just going to go ahead and import this it's not giving me the import intelligence okay so Prisma client from Prisma client and I'm going to mention this right here or undefined okay then after this I'm going to say export const client equal to Global this. Prisma or new Prisma client and we're going to invoke it okay and then if we are in production environment uh if we're not in the production environment then we're going to use this this Prisma right here okay and we're going to essentially
set that to the client okay so let me show you how we can do that so in here we're going to say first if production. environment. node environment like this is not equal to production so we're not in production environment then Global disc. Prisma is going to be set to the client okay so this way when we hot reload we're not creating a new Prisma instance every single time okay cool all right awesome so now we have our database wired up we have the schemas so now we can go ahead and first build a layout
because once we have the layout only then can we get data create data and go from there okay at least this is how I S I I suggest all of you guys work okay which is first figure out the UI and the layouts and then go ahead and wire up data into it so you guys know the drill first thing I'm going to do in here is create a work in progress flag okay so make sure you do this uh which is create a work in progress flag for everything that you're that you're you know
putting on hold for and then you can come back to it later so now go into your page. TSX which is in here also I'm just going to shrink everything so it's easier for me to understand where we are protected page. TSX and inside this I also want to create another folder okay and this folder is going to have a slug which is basically the ID for this dashboard okay which is the user the exact user user information that we're trying to access okay so I'm going to create a slug in here and inside this
I'm going to create uh some more routes okay and so the first route we're going to have of course is page. TSX okay so I'm going to say page. TSX and inside this I'm just going to return a component like this and I'm just going to call it uh page this is fine okay next inside the root of the dashboard so dashboard page right here the dashboard folder I'm going to create another page in here called loading. TSX okay and this is the page that's going to show when the component needs to load so uh
when the page needs to load so I'm going to say loading like this and now I'm going to remove this text in here and I'm going to set the following class name which is going to be height screen Flex justify Center and we're going to say items Das items Das Center as well and inside this we're going to essentially create another component which is going to be called a loader component okay so open up your folder structure you want to scroll down into your Global components folder so inside components first create the global folder sorry
okay create the global folder and inside that you want to create loader. TSX um sorry loader like this and then index. TSX and in here we're going to return a component and just change it to loader okay and once that's done now we can create the states for this so this is going to have the state itself which is which is a Boolean okay and the state is going to you know basically tell the loader whether it has to spin or not okay and then after this we also need a couple more so down here
I'm going to hit enter and I'm going to say class name okay and this is going to be a string children which is going to be react. react node and then we're going to need color which is going to be set to a string as well now color is optional and class name is also optional as well and let me go ahead and destructure all of these variables okay um one more why is that not showing up okay there we go and inside this we're going to remove this first and we're going to say return
if state is true we'll return something in here or we'll return something else so first we're going to return a div okay like this with the following class name so we're going to change this to um CN function so let's go ahead and import the CN function and invocat and we can now pass in pass in the class name okay and then after this inside the we want to render out a spinner component okay and I'll tell you where we're going to get this from but just create a spinner component like this and we're going
to set the color to equal to the color that's passed in so you're going to go into the GitHub repository into Source components Global folder and inside that you're going to find a loaders folder Okay click on that and then click on spinner. TSX and this is basically just a spinner component it's an SVG okay and we have done this in every single project so it's the same exact thing and it's just an SVG image it's super long but um you can also just Google guys you can also use vzer to create a component like
this okay so if you don't like to build this or you know you don't have this component or it's outdated or you just don't like it then you can use VZ as well okay so I'm going to open up my folder structure and inside here I'm going to say spinner. TSX and I'm just going to paste the SVG icon in here okay and that's it so let's go back now and we can import the spinner component from our local file okay so now this spinner is is going to load whenever we are uh we are
when the loading state is fired and once the spinning state is set to faults that means all the data is is you know returned we're going to say children and render the children U out into the layout component okay nice so now let's go back um all the way back to our loading component inside dashboard loading. TSX and now inside this we can say loader so loader like this which comes from our new component folder called loading uh or loader like this right and inside this we're going to pass in the state set to true
and we're just going to say loading like this okay nice and once this is done now we can move on to the next stage so let's go back to our code okay let's refresh the browser okay everything is running nice and now the next thing is let's go back into this slug page and let's head into our page. TSX and now let's continue from here so this page is just going to sort of look like um I guess a gradient card right let me go ahead and show you what that looks like as well all
right there you go so you see we can uh we have some gradient cards on this page and that's what we're trying to build right so for now what I'm going to do is I'm going to first create a layout for our entire dashboard right because this layout is going to show on every single page so that's what I'm going to do first and to make that work first we need to go into the slug folder we need to create a layout. TSX okay and inside this I'm going to return U I'm just going to
return rafc and I'm going to rename this to layouts in here next our props are going to get children components so I'm going to say children and set it to react. react node okay and we also need params and if you don't know how this works um you can read some more documentation in xjs but essentially when you have a dynamic slug like this right you get access to the slug through the params okay so let's extract it from here and it's plugged into this component guys it's we're not manually doing it okay under the
hood it just gives you access to it okay so we're going to get this and now we can destructure these values okay so now that we have both of these we can now we can now use them in our code okay so the first thing we're going to do down here is um we need to create something called a query client now why do we need this query client we are going to be using a super powerful Library called react query and honestly speaking you well you don't really need it okay the main reason why
I'm using it in here is if you choose to use future uh you know latest versions of nextjs you are not going to have caching functionality okay and so you would have to manually cache all the data and this Library gives us more than just the caching functionality you can cache you can also invalidate previous cach responses and my favorite part which I've done in multiple projects in the past um on our YouTube channel and this is called optimistic UI now if you don't know what this is or you don't know how to use uh
query client uh react query and you want to understand how everything works in the last project I broke down how you know query client Works under the hood and how we're going to be using it for accomplishing you know all these powerful features that we may not get in future versions of nextjs okay so if you want to take a look at the previous video which is a really really cool clone of loom which is a video sharing platform okay so you can share videos with other people in a second and videos are uploaded in
chunks in real time okay so you can take a look at that if you want to learn how to build powerful uh you know software like if you want to build a software company you can do that as well right that code is good to go right so you can learn from that project and in that project I also explain how react query Works under the hood okay so that's what we need to do in here which is first create the query client and then we're going to prefetch some user information and pass them down
into our into components okay awesome so first thing I'm going to do in here is I'm going to tell this component right here that I need um I'm going to tell this component work in progress we need query client okay and fetch data and so this way I can come back to it later in the future okay so let's go ahead and say class name padding of three like this and I also want to make sure this component is rendering okay let me uh let me also change this it has to render out the children
component right so children like this and let's pass in an ID in here okay nice there you go you see that padding right that's exactly what we're looking for and so we're going to render the children component just to see if this is working right so I'm just going to remove this for now we don't really need it and the first one is I need something called the sidebar so I'm going to say sidebar in here and then I also need the navigation so let's go ahead and say sidebar like this okay and the sidebar
component is going to be a new component that we need to create okay so copy this name let's open up our folder structure let's go into our Global folder right here and we're going to create a sidebar folder in here with an index. TSX okay and inside this we're going to return a component using the snippet and I'm going to rename it to sidebar now this sidebar is going to need a slug right which we're going to get from the component as props so I'm going to bring that in saying slug is going to be
string and then I also need to destructure it in here so I can get that data okay now inside this component first thing is we're going to need to render out the slug as well as the page that we're on the path name and so for us to do that we're going to need a hook called use paths okay and so what we're going to do first first is change this to a client component because we need this hook okay so I'm going to say const page equal to use pths and this is essentially used
path name under the hood so let's go ahead and create that so scroll down uh actually first shrink everything and inside this you're going to find a hook folder right so inside this go ahead and say use dnav TSX and inside this we're going to first say export const use uh Pats like this and this is equal to a function okay Arrow function and this Arrow function is going to going to first have the path name and the path name is equal to use path name and let's invoke this and then next we also need
to split the path name so we're going to say const path equal to path name. split um Why didn't it show Okay so this we'll rename this to path name or actually we'll just call it path name like this path name dot split and we want to split it at the backs slash okay and then we're going to say let page equal to path like this at path. length minus one okay and after this is done let's go ahead and return this data so we need the page and we need the path name as well
okay nice and so now I can use this hook inside this component so let's import this use path hook use paths hook and now we can extract we can destructure page from The Returned variable okay so once this is returned down here now we can use this inside our components so first we see an error here so let's go ahead and import the sidebar okay and now let's go back oops sorry guys let's import it from the right folder which is UI sidebar and then I'm going to oh it looks like we also have a
sidebar components let me do that once more from Global sidebar okay and let's go into this component and we also need to pass in the slug so let's make sure we pass in the slug as well so I'm going to say slug is equal to um we need to get pams do slug okay nice now let's go back into our sidebar components and now everything should look good for you now the first thing I'm going to do is I'm going to create a div and I'm going to remove sidebar actually and inside this I'm going
to do I'm going to type the following class names to give the sidebar some styling okay so the first one is width of 250 pixels border of two radial fixed left zero LG inline block border and we're going to set the border to this specific color okay and then background gradient is going to be to bottom from this color right here so pause and type this color and we're going to say via so via this color so 17 1717 and then for the next one we're going to say two this specific color the same thing
right here and then we're going to say hidden bottom zero top zero margin 3 rounded 3XL overflow hidden okay so this is going to give us the style for our for our sidebar okay nothing is in here that's why we don't see it and that's because it's hidden on um on the you know smaller devices okay so if you expand it you're going to see everything and now inside this I'm going to create another div and I'm going to give this div the following class name so I'm going to say Flex Flex column Gap y
of five withth of full height of full padding of three BG is going to be the this color right here 17 1717 uh the opacity is going to be 90 uh background clip padding uh the backdrop filter uh backdrop filter and the backdrop -- blur Safari as well we're going to put that in here and this is a custom class that we created right and then after that back choper of three pixels so now if you expand it you're going to see it has a slightly different design okay nice and the first thing I want
to do now is have a logo up top right so what I'm going to do is inside this component I'm going to create another div and I'm going to give it the following class names so I'm going to say Flex gap of oops gap of X of two items Center padding five justify Center okay so justify we'll say Center like this and next inside this we're going to have another component called logo small and we don't have this so let's go ahead and grab that component as well so you're going to open up your folder
structure and you could you could also do this inside an icons folder so what I would suggest is let me think guys give me I think we can give me a second I think we can have a better folder structure here so one way is you could I mean you could technically have the SVG in here itself and that way your SVG is cached and there's a bunch of you know cool nexj stuff that you're getting but I think it's nicer to have it in here because you could do some styling to it if you
want right so you could use light and dark mode and a bunch of other things in it so what I'm going to do in here guys is I'm going to create another folder inside the source I'm just going to call it um svgs okay just to make it simple and inside this I'm going to say logo Das small. TSX and inside this component I'm going to need to paste in an SVG file that I'm going to get from my GitHub okay so I'm going to go into the slide premium now this is another codebase you
don't need this codebase uh this is for pu students and it comes with um you know the starter kit mixed with Husky and some good front-end principles um right some good coding principles you don't really need it but if you want to grab it there's a link in the description but um for now all you need is just this file right so what you need to do now is you need to go into your Source folder and you want to go into the svgs click on Logo small and you want to copy this entire file
okay so copy this file and you're going to paste it inside the logo small it's just an SVG so go ahead and paste that in here and another thing I want to do in here guys is I'm going to change the uh the color for background for this component right here right I'm just going to change it to the following color okay so it used to be this I'm just changing it to this so please make sure you change that as well looks slightly better okay and I also see we have a border and the
Border could be a little too thick so what I might do is instead of Border two I'm going to say one pixel let's see how this looks okay this looks slightly better at least it's a little closer to what we have in here right okay nice next after this logo we're going to create another div and the class name is going to be Flex Flex dasc column sorry made a spelling error Flex Das column padding y of three okay and inside uh inside this we want to essentially create an item component okay what is the
item component it's basically this okay so home contacts and whatever okay so let's go ahead and do that as well and one more thing guys it's a little distracting for me to open the screen so we have hidden here right on the first element so I'm just going to remove this or just add something in here and that way it shows also there's a crazy storm today and I don't know it might be ASMR to you but it's very scary to me so if you hear some noise in the background just keep in mind it
might be a tornado okay all right let's move on so uh down here I'm going to create the items component so I'm going to say items like this and let's go ahead and create this component as well so open up your folder structure and inside the sidebar you want to create another file and you want to call this file items items TSX and I'm going to quickly return a component using the script um sorry using the the snippet and in here I'm going to get some props so page I'm going to say string and slug
I'm going to set this to string as well okay and let's go ahead and destructure these values why is it not destructuring hello hello okay I'll just do it uh page and slug okay there we go and after this we need the sidebar menu items okay so how do we do this so open up your folder structure again you want to scroll down into your constants folder and of course we're not going to have that right now so we'll create that folder as well so create a folder in your root directory call it constants and
inside this you want to create a menu. TSX file and inside this I'm going to essentially um you can either copy it from the GitHub or you can type it out with me okay so I'm going to say export const sidebar like this is going to be an array and it's going to need a specific type called sidebar props okay so what are this sidebar props well let's go up top here and we're going to say type sidebar props like this equal to an object like this and we're going to say icon is going to
be react. react node and then we're also going to expand this and we're going to say and some other props that we're going to create so what are these props so let's go up top here and we're going to say type props are going to be label which is going to be string and we also need an ID I made a mistake here sorry this is equal to and then we need ID which is going to be string now I don't like this name so I might actually change this um maybe we can change this
word props to let me think of a better name okay maybe field props okay it just sounds nicer because I guess a field has a label and ID right and I mean you could also just make it local to just this one and you could call it something like this but I think we might be using this somewhere else okay so that's why I'm going to uh say field props for now and then in here we we are saying the sidebar items sidebar menu items going to be an array of these props okay so in
here first one we're going to create an array we're going to say ID is going to be uuid now where do we get this uh package it's another package that we need to install okay so let's go ahead and open up our terminal and we're going to say bun i u ID just like this and now we can go up top and we can import this at the top of the file okay so go up top and we're going to say import V4 as uu ID okay and then down here you can essentially invoke uu
ID like this and now we're going to have a new ID okay next we also need a label so I'm going to say label is going to be home and I need to also provide the icon okay so what type of Icon do I need now we have spent probably 2 3 days creating the best icon pack for you it's already done okay and if you did have the figma file you will also have all of the icons put right in here okay so you can scroll to the icons file and you can take a
look at all of the icons for the entire project okay so what I would suggest you do is go ahead and grab the GitHub right so grab that open it up and go into your icons folder and download the entire folder okay so pretty much download this entire folder and that way you just have to drag all of the icons because there's a lot of them and just paste it in here okay because there's a bunch of things you need to do like remove um you know pretty much set it into a component and a
bunch of stuff like that so just go ahead and download this folder and then drag and drop that folder into your folder structure okay so in here we have constants right you want to create another folder like this call icons and you want to paste everything inside this folder okay so I went ahead and did it as well and now I'm going to use the first icon which is the Home duone White icon so I'm going to say home Doone white icon like this and I'm going to import this component as well so the same
way I'm going to do this for every single sidebar item that I have including contacts automation integration and the settings page okay so here's what I'm going to do I'm going to first have the automations one so for automations I'm going to say ID uu ID label automations and for this I'm going to say automation Doone white okay next for Integrations same thing here okay so rocket duone icon white as well and finally we have the settings page so I'm going to say settings page just like this and settings do a tone white okay so
from now I'm not going to type out any of the constant variables because it's taking us uh probably 15 20 minutes and so so what I would do is for constants I'm just going to paste it in here you can pause the screen and type it out if you like or you can copy paste it from the GitHub okay so now that we have our menu items let's go back to our page um where is that inside this slug page. TSX or sidebar sorry sidebar and inside our sidebar index. TSX now we can create the
items right so inside items we have a component here that's screaming so let me go ahead and import the items component as well and now the items component also needs the page prop so I'm going to pass in the page and then we also have to pass in the slug which is going to be a slug component okay and now let's go back here and let's refresh the browser and say Bun Run Dev and then refresh again and then once that's done the component should render okay but in the meantime we're going to go into
our items components and now we're going to render out this component in here okay so inside the items component let's remove whatever we have in here and I'm going to say return sidebar menu which is the constant name that we just created and we're going to map over these and for each of these we're going to return a component okay so this is going to give us access to the item itself and also I just realized I don't know if you notice this logo it's basically a slide okay I just thought it was creative whatever
so um it looks a little weird actually now that I look at it but I don't I know man I just had some creative ideas I got some inspiration and that's pretty much it okay so what I'm going to do in here now is I'm going to Sally return a link component so I'm going to say link and inside this link component we're going to pass in um some props okay so let me just remove this real quick so for the link first we need to pass in the key which is essentially going to be
the item ID so I'm going to say key equal Item ID and then we need the hre and the hre is going to be the following please type this with me okay so it is slash dashboard slash dollar sign Slug and notice we're using the back tis here and then we're going to say dollar sign item. label equal to home and if that is true then we'll say back slash if not we'll put the items label itself okay and the next thing is we need a class name and for a class name we're going to
use our CN function so let's go ahead and import that one as well and now inside this we have to first pass pass in our default stuff so I'm going to say capitalize like this we're going to set it to flex gap of two uh Gap X of two and then we're going to say rounded - full and padding of three okay and then inside this we can now pass in our other classes right so I'm going to say comma like this and now I'm going to say if the page is equal to so if
the page we're on is equal to the current page or the current item we're mapping over which is the item. L label and I mean then we're going to render this part so we're going to return this class okay and the next if we have in here one more if condition is if the page is equal to the slug and the item U so if the page is equal to the slug then we're going to render this condition okay so and we're going to render this part in here so render this if it is true
okay so if this is true what are we going to do we'll render something else here or we'll render something in here so if it is true we're going to render a different color so the color we're going to render is the same thing up here okay and if it is false we're going to render another color in here so we're going to say text is going to be just like this okay nice and now inside this link component I'm just going to render out the item. icon and the item. label okay and there we
go great job we just created our sidebar awesome and if you notice the background was a little uh kind of a little dark right I mean it was little too U there was no contrast so I'm just tweaking this around until I get the perfect uh color and then we should be good to go and I mean the main reason is because the background is slightly different because this is a we I put this color and I hardcoded it so my bad on that guys probably shouldn't have done that but I think this should be
fine it's just to show that we're we're clicking on something right so what I'll do now is I'm going to copy this right here and I'm going to paste it in here as well okay nice so once this is done now you have this and if you click on it you see it's going to take us to that page okay which is awesome but of course we don't have those pages so we're going to see a 404 so now let's go back to our sidebar component right here and inside this after the items component we're
going to create another div so hit div here I mean hit enter here after this div and we're going to say div class name PX of 16 and then we're going to use our separator component from our UI folder now okay and then we're going to say orientation horizontal and class is going to be this following color okay oh why is it hovering okay there we go and you can maybe make this slightly darker if you want it doesn't really matter um I just want some level of separation between them right so maybe something like
this would be good up to you and after this we're going to have another div and here we're going to show U the a state right the clerk State and maybe like a help icon something like this okay and so let's go in here and hit enter after this div I'm going to create another div that has PX 3 so padding X of three Flex Flex column Gap y of five and then down here we're going to have two elements a div here and a div here this is going to have Flex Gap X of
two this is going to have Flex Gap X of three and inside this we're going to use an icon or actually another it's a well it's basically the um the clerk icon is itself right what do you call that I think it's like the clerk profile element so we need to grab that component so go into your Global components and we're going to create another component in here called clerk Das o-state and inside that an index. TSX and in here we're going to export const um or let me use the snippet sorry so I'm going
to use the clerk a state in here and inside this I'm going to remove this component and I'm going to return a react fragment and now the first thing I need is a couple components from clerk JS so I'm going to say clerk nextjs import from this and I want to get clerk loading sign in sign out sign in button and the user Button as well okay and then next I'm also going to need some more icons so I'm going to get the user icon from Lucid react so import user from Lucid react and I
also need our loaders component so from loaders import the following so let me go ahead and do this once more more so this is going to say from uh at uh let's see which one not sure I think okay it was because we had loader and loaders right so that's why so this should solve this problem loader okay that should solve the problem and inside this we can we can now render this component so I'm going to say clerk loading like this and this is going to be an open component and inside this I'm going
to pass in our loader right and our loader is going to have state set to true and for now just pass in a react fragments in here now this is throwing an error so I'm going to go back and quickly import the clerk a state and then we also have the duone icon so I'm going to import this um Doone icon in here as well okay now let's go back into the a state and let's complete this components next I'm going to have a signed out component in here so after the clerk loading I'm going
to say sign out just like this okay awesome and then inside this components we're going to have a sign in signed in button okay so I'm going to say signed in button like this and inside this I'm going to say button like this and this is going to come from our folder so components UI and inside this button we're going to have the following class name so I'm going to say rounded Xcel and we're going to say BG of 25 2525 text white hover BG set to 25252 but by 70 okay and inside this we're
going to say user icon and we're going to say login like this okay awesome cool and after this down here for the signed in which is after signed outs so you want to hit enter right here we're going to say signed in is going to be user button and we're going to say user button. user profile link and for this we're going to say label is dashboard URL is SL dashboard and um table the label icon is going to be the user size of 16 okay that's pretty much it guys so now if you hover
over you get the cool you know badge like design or you know animation if you click on it you can sign up do whatever you want directly from here the next thing we can build is this little subscription card okay so here's what you're going to do you're going to go back into your sidebar components index. TSX and you're going to scroll down to this div right here and you're going to hit enter and you're going to say subscription plan which is going to be another components so let let me go ahead and say subscription
plan component like this and this component is going to be inside our folder so inside our components folder okay so inside your Global folder right here you're going to create a subscription plan component so subscription Das plan in uh like this and inside that an index. TSX and in here first you're going to say export const subscription plan and this is equal to an arrow function and in here we're basically going to return you know whatever the user whatever the user has right but right now of course there's no data so for now I'm just
going to put a work in progress and I'm going to say return subscription of user okay so for now I'm just going going to say true maybe or um maybe I'll think about what type I can pass in here okay so I'll call this first I need some props right so I'm going to say type props equal to an object like this and we're going to say children is going to be react. react node and now in here I also have to say children like this and we need the type or actually for now we
well we do need the type so I'm going to get the type as well so type is going to be free plan or the Pro Plan right and don't worry we're not going to get into this stuff right now it's just for layouts but just to kind of semi complete this component so we don't have to come back to it I'm just going to do this okay and then in here we need the props and now inside this components typically I mean technically what we what we supposed to do in here is we have to
go into the user data which we have prefetched in another component and then we're going to need to get the user profile info and check the type if the type is equal to what has been passed in then we'll return true and we'll return the children component so for now what I'm going to do is I'm going to return children okay and now let's go back and let's quickly import the subscription plan component and of course there's nothing there right we'll create that in just a second and in here I mean technically speaking we need
to pass in um like a type in here okay so for now I'm just going to remove this and inside this I'm going to say div and I'm going to set this to class name and I'm going to set it to flex D1 1 Flex Flex D column and justify end okay and inside this div we're going to say an upgrade card so this upgrade card is going to be inside the sidebar itself so inside this we're going to say upgrade. TSX and in here let's return a component and let's change the name to upgrade
card and now this name is going uh this div is going to have a class name set to BG and let me get this color code and it's going to be this following hex code right here and after this padding of three rounded -2 XL flex Flex - column gap of Y of three and inside this I'm going to remove whatever I have here and return a span okay and for span I'm going to set a text name to s a class name to text SM and then inside this we're going to have uh the
text itself I'm going to say upgrade two and let's pass in some text here and now of course we need to import this right or nothing's going to work so let's go back and quickly um I mean put that component in here so I'm going to say upgrade card upgrade card like this and okay that should do the job nice and let's go back into this component now and we need to first set another span inside here so I'm going to hit enter after this and I'm going to say span and this this is going
to have a class name and the class name is going to be set to background gradient and this background gradient is to write so let me make this easier for me just going to paste this okay background gradient to right and now I'm going to have some colors for the gradient as well so I'm going to say from this color right here and font Boldt to this color right here so I'm going to move this up here so from into font Boldt the background clip is going to be text and text transparent okay nice and
inside the span I'm going to say smart AI okay just like that looks amazing very different colors right we have blue and then we have purple here well I just thought it looked cool so I'm just going to use this for now and after the span you want to hit enter here and you want to create a paragraph and the class name is going to be text and this is going to be set to the following class name okay color and then I'm going to say font light and then text SM okay and inside this
I'm going to say unlock all features including Ai and more okay nice and then next we're going to have another component in here and this component is basically a button but it's called a subscription button okay but um right now again we're not doing the subscriptions yet but for now just for to have something I'm just going to say payment button and let's go ahead and open our folder structure and we're going to go into our Global folder and inside the global folder you can create payment Das button like this and inside that an index.
TSX okay and I'm going to return a component with a snippet and change it to payment button now inside here first I'm supposed to get their subscription details and you guys know the drill we're going to say work in progress okay and next what we need to do in here is just return a button so I'm going to say button like this and this button is going to say upgrade okay or update whatever you want doesn't matter but um I'm going to say button in here and for the class name we're going to we're going
to set um the following Styles so BG gradient to bottom right text white rounded full let me hit enter so you guys can read clearly okay and then after that rounded full from this color via this color right here font bold to this color okay awesome and once this is done we also need to essentially go back and import this I'm going to import the payment button so we can see something and just like that you see it shows upgrade at the bottom okay and we can also have a loading State guys there's a bunch
of stuff we can do so I'm going to say maybe work in progress all right and another cool thing about this project guys is it has a market that means I have spent about a month and a half researching doing market analysis competitor analysis and just seeing if this is feasible or not and it is feasible and the reason is because I sell something very similar too okay of course I'm not going to show you everything but I'm just saying I do the same thing as well okay and so we went ahead and invested thousands
of our you know thousands of dollars of our money to get this project in front of you that way you have no excuse to take action okay and so by just watching this entire video however long it is right you will have the most difficult part of a SAS done for you which is creating the SAS itself and now is the most important part which is marketing your SAS that's all you need to do and trust me when I say this this is an amazing SAS it's very sticky because if content creators use your software
that's doing exactly what slide is doing and it's getting them results they will never want to leave you because it's working right and you can create more sticky Solutions and figure out a way to make it um you know a no-brainer offer for them right and so that's why we have given you an opportunity to make money with slide as well there's a link in the description so when you're ready to you know go live and make money with slide you can purchase the license okay but if you just want to put a project on
your resume then this is a great opportunity if you watch this video from start to finish you're going to learn every single thing about SAS developments okay so I hope some of you guys get to go live I mean last time we had hundreds and hundreds of students who purchased the license and went live with their SAS for the loom clone and they created their own version of their Loom clone um and I was really impressed because some people went above and beyond and you know did some really cool things that even we could not
accomplish right so I love to see you guys you know create your own versions of slide as well and put them inside the Discord right and if you're ready to go live and you want to make money with slide you can purchase the license in the description okay awesome now let's proceed to The Next Step next I'm going to go back into my layout. TSX inside the slug folder the dynamic folder right here and after this I'm going to create my navbar right so first thing is let's go ahead and hit enter here which is
right here and I'm going to say div and I'm going to set the following class names the class name is going to be LG margin left so from large devices margin left of 250 pixels LG padding left of 10 padding y of five Flex Flex column overflow Auto and inside the STI we can then render the children including the navbar components so first I'm going to say Navar like this and let's go ahead and copy this name so I can open my folder structure and just paste it and inside my components inside the global folder
I'm going to say navbar and inside this an index. TSX file now let's go ahead and also return a component and I'm going to change this name here oh all right there we go I don't know what what what just happened but I'm going to change this name to navbar okay and so inside this first I'm going to get the slug right which is a string that's a prop that's required for this component and inside this I'm going to extract uh destructure the slug as well and the next thing I need here is the page
that we're on so I'm going to say use paths going to invoke it and I'm also going to change this to a use client components and now I can get the page uh from here okay now we also see the error because we haven't imported the nav bar so I'm going to go ahead and do that and next I need to pass in the slug so I'm going to say slug equal pam. slug okay and now I might also need to hide this we'll we'll come to that in a second but for now this is
what we're going to do okay so inside the nav bar um right here I'm going to say const current page equal to and I have to create a um an object in here which is essentially a constant so I'm going to go into my constants file where is that okay right there I'm going to create pages. TSX and in here I'm going to say export const page breadcrumbs which is going to be an array of strings and we're going to have contacts automation Integrations and settings okay now let's copy this title and I'm going to
set it in here and also import these breadcrumbs and then I'm going to say if the title includes in one of these right so I'm going to say includes and I'm going to pass in the page title right and if that includes then we'll return that if not we'll say page equal to slug okay just like this and then down here we're going to remove this and we're going to say current page okay if this is true and that means we have a value in here then we're going to return the following so I'm going
to say div like this okay and inside the div we're going to pass in the following Styles so I'm going to say class name Flex Flex D column and that should be enough okay uh Flex St call and inside this you may not be able to see it right now let's see what we see okay it's right behind that that's okay and the reason is because we are showing the sidebar right we'll hide the sidebar in just a second so let's go back here and let's go into sidebar and I'm going to bring in the
hidden class as well okay so now we can see whatever we're trying to build so let's go back into our Navar now right here and now whatever we put in here should show up up top here okay and if you expand it you see it's going to take that space accordingly okay awesome so inside this Navar I'm going to return another div and this div is going to have the following class names so Flex gap of X of three LG of Gap of um X of5 justify end and inside this I'm going to have a
span with the class name set to LG hidden Flex items Center Flex -1 Gap dx-2 okay and that should be good to go okay awesome and inside this span we're first going to have a sheet component okay so I'm going to say sheet like this and let's go ahead and import the sheet components and it's going to have a trigger which is going to be our menu okay so I'm going to say menu from Lucid react and on large devices we're going to hide this uh sheet components okay what seems to be the problem with
this let me see okay I think H okay um let's do this instead guys so I'm going to remove the import that I had for Sheet because I want to create a different version of the sheet components okay so go into your Global folder and I'm going to say sheet like this and inside that an index. TSX and I'm going to return a component in here I'm going to rename this to sheet like this okay and so now when we try to import we want to import only this sheet okay at least for this custom
design and the next thing we're going to do here is we're going to get the props so the first one is a trigger is going to be a react node the children going to be react node as well and the class name is going to be a string but it's optional okay and I'm also going to go ahead and destructure these values from here um let's do that one once more okay and inside this now we can return that sheet component but we want to return the chat cnii sheet component so I'm going to go
up top and I'm going to say sheet as shaten sheet okay so I'm going to import this and rename it to a different uh different name essentially okay and then after that I'm going to scroll down here and I'm going to say shatan sheet and now I can render this components okay and now inside this sheet component we have to render the trigger and the sheet content okay and in inside this I'm just going to render out the trigger that comes in from props and child that comes in from props as well okay should be
pretty straightforward and now let's go back real quick and import this component but you want to import it from the same folder okay not the um not the other sheet the one that we just created custom sheet okay and then the next thing you need to do is you need to pass in our children components now I want you to take this up as a challenge um basically try to recreate the other nav bar that we created right remember we created a sidebar in here we want to use the same sidebar elements but we want
to put them into um you know into this component right so create a way to make it reusable now if you don't know how to do it that's totally fine because we don't need it but I think that's that is kind of like a good bonus challenge you can take up okay so pause this video and try to render out this sidebar all the elements we see inside this inside this new sheet component that we just created okay hopefully you got the right answer if not no worries this is another way you can do it
as well so you can go into the previous components right and you can copy everything in here so let's go up to let me search for um we need uh where is this right here okay so you can copy everything from here and you can just paste it so I'm just going to copy this for now and all the way down to the subscription plan and I'm going to remove this go back in here and I'm going to paste it and import all of these components and then I'll change the styling okay um so let
me import the separator components as well and then we also need the clerk auate component and our icon and then the subscription plan as well and the upgrade card okay awesome and that should solve all our bugs so if you open this now you can see all the elements in here okay nice and yeah guys you can tweak this around make it look nicer uh I'm going to spend maybe a few minutes and just make this look a little nicer and then I'll let you know once I have an answer all right guys so I
just made some changes the first thing I did was I went into my component in here okay so this one and I removed everything from here because I wanted to put in another component and so remove this stuff and then you want to go back into the other sidebar and you want to also include this component right here this div okay so copy this entire div with the subscription plan not the one above just the one below and then in here I'm just going to paste that okay then you're also going to need to import
import the logo small component so go ahead and import that as well and if all of this is just you know going to a different line uh you can just bring it back on the same line and once that's done you want to go back into the sheet component and then in here I'm just going to set class name to zero padding zero on the sheet content and then I also created another prop called side which is left or right and I added uh destructured it from props here and I pass the prop in here
as well that way I can set the the side that this side should open on okay so if you go back in here you can change this and you can say side and you can say left okay so now it looks it makes more sense because it's coming from the left side okay awesome so yeah that's pretty much it and let's move on now next go ahead and scroll all the way to the bottom here and you're going to find a div right here um let's hit enter after this subscription or actually after this span
guys there's a span here right hit enter here and you want to say search we're just going to create some icons in here so it looks uh a little nicer okay so if you're putting this on your resume it looks nicer as well okay so I'm going to create some icons to make this look nice and the first component that I want in here is a create automation component okay so go ahead and we're going to select this here actually we don't need to select I can just type it so create automation going to copy
this and we're going to go into the folder structure into globals and I'm going to create another component called create Das Automation and inside that we're going to create an index. TSX and let's return this and now we can paste that thing that we just selected okay and so in here we're going to have another workin progress flag which is going to say uh create the Automation in the database okay using mutate so we can do um optimistic UI stuff okay and so next we need to also render out a button in here and so
what I'm going to do is I'm going to say button like this and inside this button I'm going to give it a class name and please pause and type with me um we're going to say LG PX of 10 padding y of six BG gradient to to bottom right hover opacity 80 text white rounded full I don't think I have to read this right you can probably pause and just type um okay let's go ahead and refresh this and now it's going to show um that the component doesn't exist so go back here and let's
import this create automation component and now inside this you can essentially render whatever you want right and so the next thing we're going to have is we're going to have a loader component so let's go ahead and bring in the loader component from our folder the new component that we created and then we're going to pass in some states in here so for now I'm just going to set the state to True okay and then after that we're going to need another uh icon in here called automation duone white so let's import that one as
well okay and let's refresh our codebase okay and I see some really cool designs here not sure why let me see if I can fix this okay so the reason is because I set state to true so I'm just going to set it to false for now and that's going to show the icon and when you expand it it's going to say create an automation okay and um I can also look at the design here so you see create an automation just like this okay and we also have to fix the search uh stuff so
instead of the uh what do you call this instead of just the icon maybe we can create the search component itself okay so I'm going to remove this and I'm going to go into my folder structure inside Global I'm going to create a search component and inside this an index. TSX and let's render a search component in here okay and inside this component first we're going to remove this in here and we're going to set the following class name so we're going to say hidden LG Flex overflow hidden Gap X of two border 2 border
with this specific color rounded full PX4 py1 item Center Flex of one and let's go back and let's render out the search component inside our um inside our nav bar okay so I'm going to say search but from the new component that we just created why is it not showing up let me go up top and delete this search we have one more search in here right okay let's delete this let's scroll all the way down and we're going to say search okay thanks for is happening because I'm zooming in too much guys so that's
why there's a limit okay I don't want to zoom in too much and so okay now we have the search let's go back into this and inside this we're going to first pass in the search icon okay and the search icon is going to have the following color not class name it's going to say color and the color is going to be this specific color okay and inside this we also want to pass in um the inputs so you're not going to see it right now because it's hidden on you know smaller devices but now
you should be able to see it okay and for Border I'm also going to change this to one pixel it's too too broad right and that should also we're we're zoomed in a lot so this is what 100% looks like but it's also because this device is slightly different so I'm just going to zoom in so you guys can see clearly okay and so let's shrink this down again nice and so the next thing is in here we want to hit enter after the search icon and let's put the input so inputs is going to
be from the components UI and then we're going to say placeholder search by name and class name now in the last project we built a optimized search component right and so if you have a moment I would suggest take a look at that project because it shows you how we build uh you know complex stuff like search functionalities that are also optimized okay so you can take a look at the last project if you want to know how to make this functional but it doesn't matter nobody cares it's just MVP okay in fact you can
probably just hide this you don't even need it okay I just want to make your project look at least decent and then you can add functionality to this and we've done this a million times so it shouldn't be too hard and the other thing I'm going to do guys is I'm going to change this um large Flex I'm going to remove large and just say Flex okay so that way you can also see it right here nice now that our search component is done let's go back here and after this we're going to create another
component called notification okay there there's pretty much nothing in here but um I just want to make it at least into another component so you can build this out and I've done this in plura I've done this in Loom I've done this in so many projects so you can take a look at those to see how to build notifications okay but for now we're just going to say notifications and in here we're going to say index. TSX okay and inside this we're going to say export const uh or let me just return something here like
this okay and we're going to say export cons notifications which is a button with a bell icon inside it with the following colors okay that's literally it so let's go back and also bring in the notifications so notifications component and just like that now you should have a notification component inside your napar okay and I think a better name for this guys is not navbar this is called infobar okay at least that's what I like to call it you can call it whatever you want but U infobar just makes more sense okay so maybe rename
that to infobar that would probably make a little more sense okay so I'm going to also go ahead and change it to infobar everywhere as much as I possibly can okay and things just broke let me go ahead and fix that I think it's just a folder structure nothing else so let's search for that right so we have navbar right here okay so I'm just going to change this to infobar like this just change the folder to info bar and that pretty much solves the problem okay and yeah just make sure you change it anywhere
else if you're using it okay next I'm going to scroll down all the way here into my info bar and after this div I'm going to create another component called main bread Chrome okay and it kind of looks um a little bit like this right and so we're going to render this component in here only if um you know so based on some logic okay I'll show you what we're going to do go ahead and open up your folder structure and inside the global folder going to create another folder in here and this folder is
called main bread Chrome and inside that we want to create an index. TSX okay and inside this I'm going to return a component and rename the component as well and now we need two props for this component page and the slug okay so let's go back and let's import this main breadcrumb component so now we can use it and we also have to passen the props for this component right so I'm going to say page and the page is if the page is equal to the slug then we're going to say home if not we'll
return the page itself okay and the slug value is also being passed in so we can use this in here if we need to okay and next what we're going to do in here is we're going to remove this and I'm going to say div class name Flex Flex Das column items Das start and then inside this we're going to say if page is equal to home then render this component okay like this oh I'm so bad at typing guys I hate typing my god oh all right oh my God that was so hard all
right let me Al go ahead and destructure this from here nice and so inside this div first thing is we're going to create a class name with some Styles so Flex justify center with a full and inside this another div and this div is is going to have radial gradient and that is set to width um 4X 12th padding y of five on large devices padding y of 10 and then Flex Flex columns item Center okay so let's also go ahead and uh what seems to be the issue here I think this is just not
closed okay that's just it nothing else and now next I need to create a paragraph in here very straightforward text text secondary text large welcome back and then inside this I'm going to create an H2 and I'm going to say the slug so whatever the slug is that's going to show up in here as well okay that's it and we also have this cool gradient effect right here all right looks nice and so after that H2 at the bottom we're going to create a span here so hit enter and we're going to say span and
the class name is going to be set to radial gradient in line Flex padding one five padding 10 on large devices padding right of 16 Gap X of two and item Center and ins inside this we're going to essentially render out a constant called page icon and let's go ahead and grab the page icon from um a constants file where is this okay right here click on pages and we're going to create we're going to create another const here we're going to say um export const page icon equal to or sorry this is of type
props and these props are actually the sidebar props that we created right so let's go ahead and grab those which is the field props right so I'm going to say field props like this and I don't think I can okay because I probably need to export that or never mind guys um this is not the one we need to create another one sorry about that okay so I'm going to remove this and I'm just going to create a prop in here okay so type props page and props and then we're going to say each of
these are going to have uh going to be of type react node okay and so now in here we're going to have this set to props okay and that's equal to an object like this and for each of them we're going to pass in their icons so I'm going to say automations um and we're going to set it to the blue uh tone blue and then con contacts doonee Doone rocket contact Doone as well and this one actually this is not contact Doone let me see what I'm supposed to put in here this one would
be settings do aone so let's go back and for settings we're going to say settings do tone okay like this and let's also import this component nice and now we're going to see some errors so let's go back and solve these errors as well what seems to be the problem all right there's no problem let's go back to our component and at the bottom here inside the span we can now render that component so I'm going to say page icon like this and let's import this component at whichever page we are at and we're going
to get uh we're going to convert it to an uppercase okay and then after that we're going to put an H2 and we're just going to render out the page so we're just going to say homepage like this okay awesome one more thing guys sorry this uh breadcrumb is the main breadcrumb right that the other one I showed you in the nav bar that's something else okay so for now this is the main breadcrumbs all right awesome so now we are done with our navigation bar or our info bar so let's go back and let's
just verify real quick to make sure everything looks good okay we have the info INF bar nice and now we also need to render out an element here um sorry which is all the children elements right so let's go ahead and say children like this and let's render out all the components after this info bar and just like that you should now see the page show up in here great job and so the next thing that is worth changing is the fonts for application so shrink everything you want to go into your app folder into
layout. TSX and inside this folder we're essentially going to create a font for our application we're going to change this font so first I'm going to rename enter to jarata because that's the font that we're using and then the font that we need to import is plus jarata Sans and I'm also going to import that from Google fonts and then in here subset Latin this is fine no problem and then you want to scroll down here and you also want to change the metadata you want to say slide and for description you can say automate
DMs and comments on Instagram okay just as an example and then down here you want to change this to jera okay jer. class name and now all your fonts are going to look much more uniform nice next open up your folder structure let's shrink everything we're going to go into app inside protected inside Slug and we're going to create a settings page okay we'll we'll come back to the dashboard because we don't have data right so there's no point building it right now but we'll create the settings page and inside the settings page we're going
to create uh a page. TSX and let's go ahead and return a component just call this page and this is basically just going to have billing related information okay so I'm going to say billing like this and inside our folder structure inside components Global I'm going to say billing. TSX sorry guys not TSX it's just billing as the folder itself and then inside that index. TSX and let's go ahead and return a component and rename it to billing as well okay and so this component of course we're going to need to fetch some data so
work in progress um fetch billing information for the customer okay something like this and then in here we're going to remove this and for class name we're going to say flex and um let me just copy this and then we're going to say large devices Flex row Flex column Gap five with full uh LG with 10 x 12 and on extra large devices 8x2 okay and we're going to also set container inside this and now let's also render this out so we can see what we're building so let's go into this component and let's import
the building page the settings page essentially and let's try to click on the settings page right here okay awesome and just like that it took us into the settings page all right and so if you render something in here you should see it okay nice and so the next thing we need to render is a payment card component okay it's a custom component and let's go ahead and say payment card just like this and copy this name and then you're going to open up your folder structure and inside your Global folder we're going to create
another folder in here and this folder actually you don't need to create another component guys just say card or payment-card dtsx and I'm going to render return uh TSR fce and change the name okay now this is going to need a couple props we need the label we need the current plan the user is on and the landing um essentially whether they're landing on this from the landing page or not okay and so um that way you can use that as a state to persist what type of plan the user is looking for next I'm
also going to go ahead and destructure these values from here and inside the components now we can remove this payment card and we can return a class name which is going to need the CN function and inside this we're going to have the label right so I'm going to say if label is not equal to the current right then we're going to return background is inactive okay and if not we're going to say BG uh to write like this and then from Indigo 500 via purple just copy paste these colors okay and after that inside
this we're going to have another div okay and inside this div we're going to have another class name and we're going to say if uh Landing right so Landing if this is true then return radial gradient pink Flex Flex column rounded XL padding left five uh padding y five right of 10 um back background is going to be 90 okay and inside this div now we're going to render out the title of the plan that they have right and so what you can do here is we're going to hit enter and we're going to say
Landing if this is true that means some they're coming from the landing page then we can say H2 uh label if it's Pro then we're just going to say Premium plan and if it's free we're just going to say standard plan okay and then after that uh down here if they're not coming from Landing then we can say label equal to current your current plan and if this is true then we're I mean sorry if label is equal to current then if this that's true we're going to say your current plan and we're going to
say current plan is if it's Pro we're going to say downgrade or upgrade based on that okay so because they don't have any plan right now we're just we're just going to you know render your current plan for now and then down here I'm just going to say paragraph and I'm just going to put some text in here for now or you can say this is what your plan covers okay and for automations and AI features just something slightly more okay and then after this paragraph we're going to again check the label and we're going
to return smart AI or standard so we're going to say if label is pro then we're going to say smart AI if not we're going to return a gray text that says standard okay and then after this down here we're going to say if again the user is on Prop plan um sorry about this I made a quick error small error so we're going to say if the label is pro then we're going to say 99 okay and if not we'll just say free and I'm also removing this guys I don't want this to be
text 3 XL doesn't make any sense because this is already really big right so I'm just going to change that and change this to margin top of two okay nice and so now after this we're going to essentially create U five variables cuz we need to return features and you can do whatever you want in here for now I'm just going to make it a little simpler on my side and I'm just going to render out feature like this okay or this actually looks bad I mean I want to make it slightly easier for you
I don't want to build I don't want you to build everything so uh let me let me do this right so go into your page which is inside the website page. TSX and you see these plans right here right we already have this so we can reuse this so copy it and let's go down into constants I already went ahead and did this but just paste it in the constants file and change it to export const and make this Capital plans okay okay and now we can go back into our billing page um why did
it render this page for me okay payment card let's scroll all the way down and now we can import the plans in here so we have two plans right so let's go ahead and uh figure out which plan we're trying to render in here okay and actually I made a quick refactor so we're going to say plans and inside this we're going to say if the label is equal to Pro Plan then we're going to need to take the second one okay so number one if not we'll take this one number zero okay so number
one if it's true or number zero and then from here we need the features and for each of the features we're going to render them out so what we're going to do in here now I see something really crazy here what is this okay let's remove this feature right here okay and I'm also going to render a circle check inside this um and I'm going to set this to flex gap of four and then I'm going to set the color on this to maybe our uh the pink that we had right so we can set
class name and set this to text um something like this so not this actually so text- pink let's see if this works okay and the color also just looked really really weird so what I did was I changed it to text Indigo 500 okay and this should do the job I think we can also reduce the Gap to two that way it doesn't squash any of the icons okay it looks like it is squashing it so maybe you're going to need to give it some padding or some fixed width and height height and now the
final step is we need the button for them to activate their plan right so how do we do that right down here after this we're going to hit enter and we're going to do the following so first we're going to say um if Landing is true so that means you're coming from the landing page we're going to return this button if not we'll return this button okay and let's also go ahead and import this button from our components folder nice and just like that we already have the activate right active or activate button but right
now the user is already active cuz you already have have a plan right so that's why we're just going to say active in here but if they are if they are trying to upgrade then we can show another button and also to show you what the designs look like sorry about that just kind of sped through this process uh we're going to have a class name here rounded full margin top of 5 and we're going to say if the label is pro and keep in mind guys we don't have any data right now so you
might see something that's slightly different and that's totally fine right we can come back to it and we can swap it around that's totally okay so if it is pro then we're going to say the following styles if not we'll return this grayish background okay and then if the user's current plan is equal to the label that we have in here which is Pro or you know uh free plan then based on that we'll return get started okay and um in here we're going to say current if it's Pro then we'll say free or get
started okay but this is only if they're coming from Landing but this is if we are just rendering it right here so for now we're saying if the label is equal to current then we're going to return active okay and if uh current is equal to Pro then we can tell them to downgrade or upgrade so if they're on a higher end plan then they can also downgrade to the freeer or the paid plan uh upgrade to the paid plan okay nice and so just to give you an example in here you can duplicate this
and you can change this to Pro Plan so let's change it to Pro or let's change this one to Pro so I can show you what that looks like and this can change to Pro as well and just like that you see it's it's showing which plan they have but of course their current plan is not going to be this it might be free or for example free plan like this and so we can tell them hey you can upgrade right here okay and so we're making this stand out a little bit more okay so
now that our settings page or Integrations page um sorry settings page for pilling is done guys there are so many pages in our application all right and in here we're going to create the next one which is Integrations page okay this is where the user can connect the their um their Instagram profile so I'm going to say page. TSX and in here we're going to return another component we're going to just change this to page and then in here we're going to need to give some class names I'm going to say class names like this
okay I'm going to set it to flex justify Center and inside this we're going to return another div and this is going to have another class name and this class name is set to flex Flex DC column with of full LG width of 8 by 12 gap of Y of five okay and I hope I okay there we go there's our error so with full all right and now let's also try to access the Integrations page so let's open the sidebar and let's click on Integrations okay nice and now we see something in here but
there's nothing rendering because we're not rendering any cards yet right and so now we have to render the integration uh cards essentially now the way we're built this is you can have any sort of functionality you want right and so to give you an idea um in one of our previous projects we created a solution where you can integrate other softwares like CRM tools and stuff like that right and so for that reason it's always better to put things inside a u like a constant okay so I'm just going to give you the setup So
eventually in the future you can also expand on it all right so first thing we're going to do is we're going to go into our const constants folder and in here we're going to say Integrations ttsx and I'm going to say export const and I'm going to essentially um say Integrations cards like this and this is going to have a special type of prop right here okay don't get overwhelmed I'm going to explain it there's nothing in here okay so we have title icon description and the strategy so what are what type of integration are
we creating and then we're going to Loop over these and render out the different type of connections so for now I just put Salesforce in here maybe that's a bonus that I can create in the future uh let me know if you guys think that might be helpful or maybe in the next project we can include that feature as well okay so I'm going to import the Salesforce duone icon and the Instagram Doone icon so we're just rendering out different type of card components that help us connect to those um you know to that API
or whatever okay and so if you are doing this in a production environment I would suggest you have a function in here and that function should give you the ability to connect your Instagram profile okay or it should be a function that anyone on your team can pass in so it should be a little more Global okay and so that's why you don't want to hardcode all of this and kind of pull everything into uh or at least build a better architecture for your application and so going back to this we have only two which
is in which is Instagram and connects so that's why uh CRM so that's why we have the strategy as Instagram and CRM in here okay and the title is just going to be connects and I'm just going to put some lurm ipsum for now for the description and icon is Instagram Doone icon strategies Instagram and same thing for CRM as well okay so let's go back here and now we can import this and map over this so I'm going to say integration cards. map and for each of them I'm going to render out a card
and a key okay and so this component is going to be another component called integration card okay and I'm going to copy this and I'm also going to just quickly render this out like that and I'm going to pass in the key right away because we're already might as well do it right and this is the key and we're going to just pass in all of the card information into this so open up your folder structure and inside this we're going to scroll down all the way to or actually we can do it in here
itself so inside this Integrations folder you're going to create another folder call it underscore components and someone asked me this question last time what does this components uh underscore mean this underscore essentially does not consider this uh folder as a route okay so it bypasses it okay and the other reason why we're doing it in here is we're never going to need the integration card in any other folder in any other uh you know page and so that's why we are creating that component directly in here okay so in here I'm going to say uh
create a folder call it integration Das card and now this will not be considered as a route guys even though it's in here it's not going to be considered as a route and now inside this component I'm going to create a page. TSX and I'm going to return a new component using our snippet and I'm going to change it to integration card okay now let's also go back and quickly import our integration card component and now we should see two cards rendered out in here okay nice now let's go into our page and let's grab
whatever we need in here such as the props first so the prop that we're going to need is first a title so I'm going to say title is going to be string description is going to be string as well and we also need an icon which is going to be react. react node and then next we need the strategy so what type of card is it and right now we only have these types you can also move this into a type if you like and I'm also going to go ahead and destructure all of these
values wow it's not doing it anymore okay I thought I had a superpower at one point never mind and so now that we we have this we can uh use them inside our components so just like usual we're going to say work in progress wire up prefetch or some data that we need right uh or wire up fetching data and also get the Integrations from the database right or oo integration stuff basically um for ooth for Instagram basically so down here we're going to remove this we're going to say class name and we're going to
set it to the following uh Styles so I'm going to say border two and border is going to be this color and then we're going to say rounded 2 XL Gap X of five and padding five and flex item Center and now inside this I'm going to render the icon okay awesome and after this I'm going to create a div I'm going to give it a class name Flex Flex of column and flex of one and then inside this H3 is going to be class name text- excl and inside this we're going to pass in
the title that we just received okay and then inside here we're going to pass in another paragraph and this is going to have the following class names so text with this color it's a grayish color and then text base with full and then uh on medium devices we want the width to be 10 x 12 and just go ahead pause this and type it out okay and so and then inside the paragraph we're going to pass in our description so I'm just going to say something here we just have lower mysim for now right and
this is what it looks like on a larger device just to show the different connections available okay and then after the paragraph we're going to need to have the integrate button so down here after this div we're going to have a button and this button is going to have uh let me also go ahead and import our button first and the button is going to have an onclick which is basically when the user tries to click we need to create the oath flow for Instagram right so let's comment that out and then after that if
it's disabled that means they're already connected or whatever something's going on then we can disable it with that prop but we're going to need some class names in here and then after that we're going to also show if it's connected or not and based on that we're going to render some text I'm going to comment this out for now and say connect okay connected or connect like this and so now if you refresh the browser there you go okay we don't need this anymore let me remove that and there you go now it gives the
user the option to connect all right guys and just few more changes that we need to make I made an error here so this is not Q this is one and then this is going to be justified between on top and that way the button will stay on the right and the top the other elements will be on the left side right just like this nice all right guys the next uh tab that we're going to work on is the automations tab so inside this slug in here we're going to create another folder we're going
to call this automations and please don't make any spelling errors okay and inside this we're going to say ID okay it's a dynamic uh Dynamic folder but before that that inside this we're also going to have a page. TSX okay and this page. TSX is going to again have a component so I'm just going to bring that in and I'm going to rename this to page and now let me try to click on the automations page and just see what happens okay cool it takes us here and this is the exact page that we need
to access okay awesome and so this page we're just going to list out all the automations that we have right and so first thing I'm going to do in here is I'm just going to say work in progress connect real automations uh list okay because we're going to need to get the automation list and render that and of course right now we don't have any data right so in here we're going to remove this and first we're going to say class list I'm sorry class name and I'm going to set the following styles on this
div so I'm going to say grid grid colum one uh grid column six on large devices in gap of five okay and inside this another div with the following class name I'm going to say LG column dspan of four not one and it's going to look something like this all right just as an example um something like a little subtle just to show all the automations that we have and so inside this I'm just going to say automation list for now right and uh after this right down here we're going to create another div with
the following class name we're going to say LG column span das2 and inside this we're going to have another div and this div is going to have the following class name okay so we're going to say a class name like this and we're going to set it to the following so Flex Flex column rounded x uh background 80 Gap y of six uh padding my of uh padding of five and I guess you guys can just pause and type right so I think U this part might be the right side section all right and so
first thing we're going to do here is inside this we're going to have another div and inside that we're going to have an H2 and the class name is going to be set to text xcl and inside this we're just going to say automations something like this okay and so it's this section essentially and then after that right in here we're going to have a paragraph tag and this is going to have the class name text uh text- secondary right and let me let me actually change this to made a spelling error okay like that
uh is it wait what okay never mind sorry I did not make a spelling error okay for a second my brain cannot function all right and inside this I'm just going to say all the live automations will show here okay or let's improve that your live automations will show here okay this is slightly better and then after this we're going to have another div and this is going to have the class name of flex Flex dasc column Gap Dy and of three okay and inside this we're going to basically uh create three elements and for
now I'm just going to render some I'm just going to render some data in here you guys can create whatever you want okay I'm just giving you kind of like a starter kit so um that way you can improve on this and make it look nicer so I'm just going to create three elements like in an array one two three I'm going to map over these and for each item right we're going to render out a div and that div is going to have the key which is the item itself and then class name is
going to be Flex item start justify between and then we're going to have a div here that says Flex Flex column and inside this we're just going to put the heading and paragraph okay like this heading paragraph and then after that we have the check icon so let me bring in the check icon as well from Lucid react okay awesome and that should bring in that section all right great job and now at the bottom here if I look at the designs I also have a create automation button right so I'm going to scroll down
here after this div and I'm going to create a create automation button just like this okay and this button is a custom component so let's go ahead and create that and so I'm going to go into my Global components because I want to use this component in many other places I'm going to say create Das automation dasb button and an index. TSX and I'm going to return a component and rename it quickly okay and then in here again we're going to need another work in progress because this requires functionality when you try to create a
automation we need to have a server action that can go into the back end and then save that for us right so that's why I'm going to say uh create automation server action functionality okay and so in here now I'm going to remove this and I'm going to return a button component okay so return a button like this and this is going to have the following um class name and so I'm going to say class name going to set it to this right here so please pause the screen and type this out I'm also going
to go back and just import the create automation component okay nice and there you go we have that button just like that we just have a gradient right we have a gradient on it and we just give it some padding that's pretty much it and now inside this button I'm going to also have a loading component right so I'm going to say loading loader like this right remember a loader component from our loader file and this is going to come from our states right because we're going to be calling This Server action and we're going
to get some States from there so we can decide accordingly and so for that reason um right now I'm just going to set it to false all right and then in here I'm going to say automation duone white icon and then that shows that little you know squiggly line right and create automation we also have another create automation right here maybe we can just use that guys H let me see create an automation where is This Global create automation button looks like we have two components did we already create this component create automation button okay
looks like we already created this and I am really sorry so we can just use this component then okay so I'm going to go back and I'm going to say create automation uh where are you right here create automation or what is that component called let me search for that again okay it's called create automation oh I made a spelling error so this is supposed to be create okay automation all right and then we can probably change it everywhere create automation create automation all right let's change that nice and now let's go back and let's
import this create automation component okay hey nice look at that all right great job and so now it shows just like that and you could probably actually show this but um it's up to you all right and so now that we have the create automation button we can go and create our automation list component right here so go ahead and scroll down in here we're going to remove this and we're going to call call it automation list component okay copy this title so it's easier to rename the component and want to go into our folder
structure inside Global components and I'm going to create another component in here called automation Das list and inside that an index. TSX and let's go ahead and use our snippet and create a component and also rename it to automation list now inside this uh component we don't really need the props but it's okay you can be there for for now and in here here we're going to need to first uh do a couple things right work in progress we need real data so we need um get the automation list data okay so there's some stuff
we need to do in here and also if we are using um any kind of um you know optimistic UI updates then we need to get that as well and I'm going to change this to a use client component and the reason is because I also want the path name so I'm going to say const I'm going to destructure something from here and I'm going to say use paths okay we already used we already created this hook and then I'm going to get our path name from this okay so let's get path name nice and
now inside this we can essentially um I mean we can make a quick little check here but for now it wouldn't matter but just saying work in progress if no automations exist show no automations okay so just something in here all right but let's go down here now and also actually I'm going to import my automation list component and now let's go back here and I'm going to remove this and I'm going to set a class name on this element so I'm going to say Flex Flex D column Gap Dy of three okay and then
inside this I'm going to um essentially return a link component okay and so what I would actually have done what I would have actually done here first is I would have looped over the data and then data. map and then I would have rendered some data right but since we don't have that I'm just going to say link component and I'm going to import this from next link and this is going to have href the href is going to be set to um some sort of a path name right so what I'll do is let
me just first put the path name here okay so I'm going to say dollar sign path name like this and in here we're going to put say slash and we need an ID for the automation so for now I'm just going to say something random like this okay and this also needs a key um technically but for now it's fine and then after this we also need to pass in a couple more props so we need the class name to give it some styling so I'm going to say class name BG like this hover opacity
80 transition uh duration 100 just pause and please type the class name okay and inside this I'm going to say div class name Flex Flex D column Flex D1 items Das start okay and inside so you can see it's already forming right it's just all of the automations that we have and that's pretty much what we're trying to render out here okay you can take a look at the designs as well um like this see just like that all right and let's go back and now inside this we're going to essentially render out the um
an H2 with the automation name and so for that I first need an H2 so I'm going to say H2 like this and it's going to be text X ccel font of semibold let's refresh the browser I don't know why it's stuck okay there we go and then inside the H2 I'm going to just say the automation name right so I'm going to say automation name like this okay awesome and after this we can render a paragraph with the following class name and this class name is going to say text with this specific color okay
and then text SM font light and margin bottom of two okay and inside the paragraph I'm just going to put some sort of message in here like what typee of a automation it is so I'm just going to say this is from the comment okay just giving it some data in here and you can see um you can essentially use the type that we're using for this automation the trigger type and you can set that in there okay so after the paragraph down here we're going to render out all of the automation keywords that the
user has okay but for now of course we don't have the automation keywords so this is what we're going to do okay so first create a div and this div is going to say Flex Gap X of two I'm also going to have another work in progress flag here and I'm going to say automation keywords okay and then inside this we're going to essentially uh loop over all of the automation keywords and then render them out okay and so in here we're first going to have a div and this is going to have a class
name but this class name is going to need our CN function so let's import CN and let's invoke CN okay and essentially what we're doing here is we're looking for um the different type of keywords that they're using and we're just going to give it a different color okay that's it and so let's go in here first and let me just quickly put the default styling which is rounded full PX of 4 padding y of one and capitalize and then for the first statement I'm going to say if the key exists or essentially if um
key plus one percentage one is zero right then we're going to render another color Okay so this color is going to look like this all right and we don't have this key for now so I'm just going to put maybe zero right so it's going to be the first element right and then there you go now you can see the element show up in there right and inside this div I'm just going to put a keyword and a keyword example we have here is get started for example and you will see it will show right
in here okay nice and so that's exactly what we're doing but we're going to do this for different colors okay and so the next one is going to be for purple so I'm going to put a comma here and I'm going to say if 1 + 1 percentage 2 equals z then we'll render this okay and then same thing for the others as well so let me go in here with a comma and I'm going to create another one which is kind of like a golden yellow color right and then finally I'm going to have
a red color pill so let's go to the end here and say if 3 + 1 equal percentage 4 it's going to look kind of like orange color right same similar to this and that's it so that's how we can render the keywords in here okay and so tradition I mean typically we would wrap all of this into a map okay okay and so now let's go down here okay right here after this div guys and you're going to hit enter or actually we can do it probably right here let me just think real quick
okay so after the second div I'm going to create another div and this div is going to have the following class names so I'm going to say div class name rounded full border two um border dashed white 60 and then PX through P padding y of one okay and inside this I'm going to create a a paragraph and the class name is going to be text- smm text- # BF cc3 okay and this is basically um what we're trying to build on the right side I believe or actually this is a way for us to
show them that there's no keywords on the automation okay so sorry about that so I'm just going to show you what that looks like for now so I'm just going to say no keywords okay so if they never created any keywords we're just going to have this gray dotted line right here okay and so for now um I'm just going to keep it like this and I'm going to scroll down here and after this div we're going to hit enter right here and we're going to create another div and this is essentially going to be
this section right here okay the date and kind of like it tells them what option did they use to create that automation so this div is going to have Flex Flex column justify between and then we're going to need a paragraph tag okay and for this I'm going to say capitalize okay and then I'm going to say text DSM font dlite and text- with this specific color code so 9 B9 C a0 okay and inside this paragraph I'm just going to give it some sort of text for now right and so right here I'm just
going to copy this whatever I have here and paste it in here so you can see it and of course we also need to create that work in progress right so work in progress flag attach real date okay nice and then after this paragraph down here we're going to check if they're using smart AI or if they're using the regular uh default text right and based on that we'll just send a we'll return a different button okay and now this button is a custom component that we're going to need to create it's called gradient button
okay so gradient button like this and this component is going to have two types and before that before we pass in all the props let's all go ahead and create the component itself so inside Global components I'm going to say gradient Das button and inside an index. TSX and let's return a component like this and this component is going to need some props and the first one you need first one we need is the children which is react. react node the types is it can either be a button or a link any href because if
it's a link we're going to need that and this is going to be optional of course and then finally any class names so some sort of styling and then let's also go ahead and destructure these values and in here we're going to first create um the gradients okay so I'm just going to say const gradients and we're going to store this inside a variable okay and this is going to have the following style so BG gradient to write from Indigo 500 via purple 500 to Pink 500 and then rounded XEL P of two pixels okay
and then in here we're going to remove this and we're going to return a switch statement and this switch statement is going to be based on the type that is passed in from as a prop okay and so if the case is of type button then we're going to do something in here so for now I'm just going to say return div like this okay and uh at the end we also have to okay I don't because the return is there we don't have to save break and then down here if the case is of
type link we want to return something else in here okay and then finally we can also have a default um default like this and we can just return the button elements right whatever we have in here so I'll just return actually we can just return null for now okay so inside this button what we need to put in here first is a class name and we need to pass in all the gradients that we just created okay like this gradients nice and then if it's a link we're going to do the exact same thing so
I'm going to remove this and I'm going to say gradients okay and now inside this now we have to return the button component so I'm going to say button like this and this is going to have a class name which is going to need the CN function so let's import that and then we're going to need to pass in the class name that the user wants so class name like this that comes in from props and we're also going to pass in something that we want right uh right so it's going to be rounded Excel
right here and then inside this okay we also need to import this guys so I'm going to go back and import the gradient button so we can see something okay nice all right and now we also need to pass in some props right so what I'll do is I'm just going to pass in the type which is button element right here and then a class name and the class name is going to be like this with full background of 80 uh text white hover background 80 okay and let's go back into the gradient component and
okay it looks like it also needs children so I'm going to say smart AI for now okay and you see it's rendering the button here right and then um that should be good to go let's go back inside the button and now we can continue so in here we have rounded Excel and I don't think this should be enough I don't think we need any more and I'm also going to render out the children elements that are passed in okay so there you go it says smart AI now nice and the same thing we're going
to copy this we're going to paste this in here but this is going to change to a link element from next link okay and the other thing we need to pass in is the hre so href is equal to href and we're just going to put the exclamation here so it doesn't throw that weird error okay and there we go now we have a button here looks amazing now I'm going to go back to our the same automation list page and I'm going to duplicate this button or actually uh we don't need to duplicate this
button because we just want to use a regular button right this is a regular button here so I'm going to say button like this and inside this I'm going to pass in a class name okay and this class name is going to look like this so background 80 hover background 80 uh text of white okay and inside this I'm going to say standard okay and then that should render at the bottom here okay so just to give you an idea of what both buttons would look like of course we're not going to show both of
them right based on the if condition accordingly right just like what I showed here um I can attach that here as well so I'll put another uh work in progress and I'm going to say render the button based on the listener okay so if it is smart AI or whatever okay great all right so now when you click on this component when you click on the automation it's going to take you into another page which is that that specific automation ID and that's exactly what we want right so the reason why we're seeing the 404
is because of course we don't have that page created inside our Dynamic page so in here I'm going to say page. TSX and I'm going to return a component and rename this to page as well okay and so inside this component uh the first thing we're going to do down here is I'm going to remove this and I'm going to give this a class name and I'm going to set the class name to flex flex-all items Center and GAP y of 20 okay and the component that we're going to be building is going to look
something like this okay it's like the automation editor that we're trying to build all right so we're not calling it an editor and the reason is because this this application is for anyone that means it's not complex it's very basic and simple to use okay and so if we called it an editor they're going to think it's a whole automation editor and we don't want that because honestly anyone can build this okay and so let's go ahead and build that out as well so in here I'm also going to have some stuff that I need
to do guys right before this but I need to add work in progress flag so I'm going to go ahead and do that as well okay so first I'm going to say work in progress and in here I'm going to say I need to prefetch the user automation data right based on the the params we're getting right the props we're getting in here and then after that um on top right here I'm also going to do some metadata settings okay so work in progress set some metadata stuff okay awesome and once that's done down here
I'm going to uh also need to because we're prefetching we're also going to need the hydration boundary so I'll add that once we get to it but for now let's just focus on our layout okay so after this div we're going to create um another or we can first build the automation crumbs right breadcrumbs so I'm going to say automation breadcrumb like this and this is going to have an ID set to the pam. ID which we're going to get uh it's not showing up and that's because we need to first get it from here
right so first we're going to need children right here so I'm going to get the children items and um actually we don't need children in here so I'm going to remove that uh we need the pams sorry okay so let's get the params and we're going to get ID from this slug so I'm going to extract that and I'm also going to destructure it from here so pams or this is fine we can just keep it as pams okay and in here I'm going to say pam. ID all right and of course we need to
create this component so let's go ahead and copy this name and then I'm going to open up my folder structure and I'm going to scroll down into Global where is this okay and I have something called breadcrumbs in here maybe it would made more sense to call this breadcrumbs and then we could have had you know a bunch in here right like main folder or whatever so let me see if I can create that so in here I'm going to create red Dash crumbs like this and inside this folder I'm going to move the main
red crumbs and so it's going to also update that for us yes please update uh don't break okay didn't break awesome and now inside this I'm going to create a automations okay and inside this I can create the index. TSX file and let's return a component and let's rename the component and also let's import the component from here so we don't see that error anymore okay nice there you go we can see the breadcrumbs now inside the breadcrumb component this is what we're going to need to do here so first I'm going to put some
work in progress Flags because I need to get the automation data right so get the automation data and then I'm also going to need to have some mutation States in here right a bunch of other stuff that I'm going to need so this should pretty much help me get back to this the work in progress flag okay so this div is going to have a class name and this class name is going to be the following so please pause this and type this as well and after this we're going to have another div in here
okay and this div is going to have Flex item Center Gap X of three then we're going to have a paragraph tag that's going to say text with this exact color which is 9B 99 C a0 okay and in here I'm going to say automations like this okay there you go nice and then after this automations right here I'm going to have a Chevron right icon okay just have an icon in here Chevron right with the following color and there you go it shows or you can also um maybe remove this and it's too bright
right so we can probably just have the same color here guys so going to copy this and paste this one in here it just looks nicer I guess right um okay and after the Chevron I'm going to have a span and this span is going to have Flex Gap D x-3 items D Center okay and inside the span we're going to basically have an input element and the reason is because the user can have the ability to edit this stuff so they can edit this by double clicking on this okay and so how does this
work exactly inside the span which is right here right this is the thing that they can double click and edits we want to First have a state that can record if the user is clicking uh to edit it or not and if they are editing it then we will show them an input field where they can update the data and if they're not editing it then we're just going to show them the value itself okay I hope that makes sense and so for now just for Simplicity I'm going to say show editing data and create
a work in progress flag okay and so in here I'm then going to um return a paragraph and I'm going to set the value in here to this is the automation title okay and so they should be able to click on this double click and edit it and to let the user know that they can edit that I'm also going to return a span with uh span right after this so hit enter after the paragraph or actually inside this so right here and I'm going to create another span and for this we're going to have
a class name and I'm just going to import uh an icon okay so it looks like this so the user knows that they can edit that title all right okay and maybe we can you can reduce this if you want to but I'm just going to keep it right here maybe you can make it smaller right or maybe we could just use um a different pencil icon let's see what Lucid react has hello give me an icon okay that that's what it has so let's use this one and let's see what that looks like okay
and what about size 20 10 okay so okay this one looks so much better okay it's subtle and it doesn't take away from the attention all right so after this down here we're going to hit enter after this div we're going to create another div and set a class name of flex Gap dx-5 and inside this we're going to create a paragraph with a class name text- text secondary and divided by 60 in here and then we're going to say text- smm and inside this paragraph I'm going to say all updates are automatically saved not
sure if they are but just going to say automatically saved okay and after this paragraph I'm going to create another div and in here I'm going to give a class name of flex gap of X of five and let me I made a spelling error here okay and inside this we're going to return a paragraph actually two paragraphs and in here we're going to say text- text- secondary oops sorry guys this is class name text- text- secondary okay and text- smm we're going to say changes saved like this okay and then maybe here you can
have something like an undo redo button right so let me go ahead it's the same thing right so I'm just going to copy this down below here so let me copy this bring it down and I'm going to change the text here to undo or redo okay just something to show design all right and so the other thing you might want to consider is uh maybe kind of giving this some spacing so let me go ahead and fix that as well all right guys so I made some quick changes here I actually did not like
how the text was not wrapping and so I used the help of bolts. new okay just to see how it would work and it did did a pretty decent job okay and so I had to make some changes the only thing is I was too lazy to see what the change was so let's just go through this component once more okay please make the changes accordingly so first thing is here we set this to rounded full with a full padding five BG at this color and then um Flex items and Center okay and then inside
that we had another div Flex item Center Gap X of three and then we added this minimum width of zero and then in here for paragraph we set it to text with this color and then we set truncates at the end so you see how it truncates the text right and then for the Chevron we set Flex uh shrink to zero and after this down here we have a span and this span says Flex Gap X of 3 item Center minimum width of zero and in here we have truncate okay and this truncate also kind
of Clips the this text right here okay awesome and then after that we have another span here with the cursor pointer uh hover opacity 75 duration 100 and transition Flex shrink zero for the pencil as well okay and then down here we have a div with flex item Center Gap X of five margin left of Auto and then we say hidden because we're going to hide this on mobile devices this text right here because changes saved already tells that you know everything is saved right and so that's why we no longer need the second text
so we can hide that and that's why I said I said hidden in here and then from medium devices block text text uh secondary 60 um divid by 60 so it's it has an opacity and then text SM truncate minimum width of zero for this as well and here Flex gap of five x of five Flex shrink of zero we have a paragraph and that paragraph also has truncate minimum width of zero and this one also has truncate minimum width of zero and that's essentially what's helping us accomplish that okay and now the other thing
is we had a margin left let me search for that uh okay we had a margin left here margin right here and so we have this icon right where's that icon right here and so you could give this a margin right of two or maybe four and let's see what that looks like okay that kind of pushes it off a little bit more so it looks slightly better all right great job to this tool for helping us accomplish or helping us solve this problem and then at the bottom here after this div so you see
we have a span here right so let me see where this is okay there's a div right here I'm going to hit enter and after this I'm going oh actually let me put it right after this one guys I'm going to say activate automation button okay and this is another button that I need to create and so I'm going to open up my folder structure and I'm going to go into button and I'm sorry into Global and side I'm going to say activate Das automation DB button okay and inside an index. TSX and I'm going
to return a component just like this okay and inside this component again we're going to have a work in progress flag that tells us to you know essentially set up the mutation stuff so we're going to do some optimistic UI here right so set up optimistic UI and also maybe fetch some automation data okay and then after this down here I'm going to remove whatever we have in here and I'm going to return a button instead okay just like this a button and let's go back and quickly import this automation button the activate automation Button
as well and let's see what that looks like okay nice we see the button right there and I'm going to go into this button and here I'm going to give it a class name okay so the class name is going to be large devices padding of X padding 10 gradient bordom right hover opacity 80 text white rounded full from this color to this color and font is going to be medium okay and I also want to give this a margin so I might say margin X of four and that should push it off or maybe
two might be better that's going to push it a little bit more okay so you see everything is getting a little too truncated um you could probably remove the well the under redo technically is not needed right so let's do that let's go back and let's just remove this we don't need it anymore and that should give us more space nice okay and so let's go into our automate button again and in here now we can create whatever we need so the next thing is we're going to need a loader so I'm going to create
the loader going to import the loader as well okay and for state I'm going to set it to fall false and again H zooming in is so hard guys and then in here I'm going to say set the loading state right it's going to be another work in progress flag and then for this we're going to need to um inside this we're going to have a paragraph that essentially shows whether we can activate or deactivate it and for now I'm just going to set it to activate and then we're going to need a button in
here called active uh automation okay and this is just like a kind of like an SVG okay so what I'm going to do I don't think I already have this okay I already have this guys if you downloaded the icons folder you're going to have this okay so I'm going to import the active automation icon and there you go okay it shows and it looks amazing and I'm also going to give this uh maybe margin left of four instead of all of this other stuff that I did okay there you go much better looks amazing
now I'm going to go back back into my automations breadcrumb component right this one and I also need to get a prop from here which is called the ID right and the ID comes from our uh Dynamic slug right and so I'm also going to go ahead and destructure this from here and now I can use it inside this okay right now we don't really need it but eventually we're going to need this so this also needs a work in progress flag and in here we're going to need to maybe fetch some automation data again
right and then maybe we might also use mutation stuff to update um the automations okay CU we're showing uh some automation list right okay and so let's also go back now and make sure we're passing that prop okay we're passing it awesome and then after this down here I'm going to say div and in here we're going to pass in the following class name so this one is going to be with full just pause and type this okay and in inside this we're going to have another div with a class name set to flex gap
of X of2 and inside this we're going to say uh we're going to have a warning icon uh from our icons folder and inside this I'm going to say when for example okay so when this happens what do I do okay and so after this down here hit enter and we're going to create another component called trigger okay and this trigger component um is also going to be inside maybe this folder or let me uh see maybe there's a better way cuz I don't think we're going to use a trigger anywhere but it's okay for
now I'm just going to go into Global and I'm going to create something called do I have something called automations already no okay or maybe I do let's see okay we don't have and inside the automations I'm going to create a trigger in here okay so trigger and inside that an index. TSX and let's return a component and let's also rename this to index um rename index to trigger okay looks like it's not going to do anything so I have to do it myself thank you all right and so this component will also need an
ID which is going to be a string and I'm also going to destructure it from here okay just like that and now I can reuse it inside my components and now let's go back and quickly import the trigger so it doesn't panic and let's refresh the browser okay and we are seeing must be collapsible what is this oh it came from radic UI sorry guys make sure you import it from the right component folder okay so trigger should come from components Global automations and we need to pass in an ID like this and this ID
is going to be the pam. ID so I'm going to say ps. ID like this okay nice and now we're passing in that trigger in here so now let's go into the trigger component itself and we need to start building um the trigger element okay and it's going to look something like this okay so now that we're coming towards the automation section of this application I think this is a good time to go back and start wiring up our database okay so first thing we're going to do is we're going to go into the uh
dashboard / page. TSX and the first uh step that we need to do in here is we need to create our user and also onboard the user into this application okay and so let's go ahead and do that first so in here I'm going to say const user equal to await onboard user which is a server action that we need to create so open up your folder structure and inside source you want to create an actions folder like this and inside that we're going to create a user folder and we're going to also create um
something called index.ts okay not TSX just TX and now for this file to become a server action file we have to change this to use server okay and this is what allows us to create server actions and so the first one we're going to create is a helper function that we're going to need to authenticate and authorize the user for you know any type of server action and so let's first go ahead and create that one so we're going to say on current user equal to an async a function okay and this Arrow function is
going to help us pretty much um authenticate and authorize the user okay so we're going to say const user equal await current user which comes from next server and if there is no user then we want to return something called redirect from next navigation and this is going to help us redirect the user back back to the signup page okay or signin page is better and then if you know the user does exist then we'll return the user profile okay so you see we're going to need this in different areas in our application so now
let's go ahead and open up um the other uh folder in here okay sorry this is just the onboard uh error so let's go back here again and let's continue building that function so export const on board user equal to an async AR function again right so async Arrow function and this is not going to need any params um and then in here what we're going to do is I'm also going to go back and quickly import This Server action and now inside this the first thing we're going to do is we're going to call
our helper function so I'm going to say con user equal await on current user and we're going to invoke this so it's going to give us the user if it exists okay next we're going to create a TR catch block and I'm going to use the Snippets here and inside this we're first going to see if the user exists so const found equal await find user which is another query that we need to fetch the user from the database and so let's create a better structure here last time we had all of the server actions
doing all of the fetching creating and stuff like that but it was in one single file so what we're going to do is we're going to create another file here called queries okay and inside this we can use all of our query files and that way we can uh reuse these queries in all of our server actions so this one is going to be called um create uh not create user sorry find user okay and in this we also need to change this to a use server file so don't forget about that okay and so
let's go ahead and first say export con find user equal to an async arrow function and inside this we're going to need the clerk ID of the user so clerk ID is going to be a string and next we're going to say return await client which comes from our Prisma file right do user. find unique and we're going to invoke this and we're going to say where the clerk ID or where the data for or clerk ID itself is this one right here okay and then after that we want to include some data in the
response we want to include the subscription stuff so we're going to say true we're going to include Integrations and we're going to say true for this or actually um I want something more specific in here so I'm only going to select the ID right right here and uh let me do that one more time so ID true and then we're also going to get the token and set this to true and then I need expire at and finally the name okay and so this will be returned if the user exists so let's go back here
and now we can import the find user server action and now we can invoke this and pass in the user. ID okay so if we found something some data that means if the user does exist then we're going to do something in here so we're going to then look at the Integrations so the reason why we need to do this is when we're integrating the user's Instagram account there's something called a refresh access token okay and this token will always refresh based on a certain span of time like 5 days or something like that okay
and so if it's less than 5 days we're going to need to pretty much refresh this token again okay okay so I just wanted to point that out and that way you can you can keep that in mind so if we need to update the Integrations accordingly uh we'll need to refresh that token okay so that's what we need to do in here so we're going to say if found. Instagram oh sorry. Integrations do length if we have any Integrations in here then we're going to do the following so we're going to check the um
check the refresh access token in here okay check to refresh not check the it's check to if we need to refresh so I'm going to say const today equal first new date okay we're going to invoke this and then I'm going to say const the time left for this token is going to be found. Integrations okay dot uh sorry at zero. expires at and if this exists. get time and then we're going to subtract uh also we need to put this in here so it doesn't scream at us and subtract today do get time okay
and let's invoke this as well so now we'll know how much time is left and now we need to get the days from that so I'm going to say days equal to math.round and I'm going to say the time left right in here okay and then divided by a formula so this is 1,00 St 3,600 star4 okay and then now we know how many days are left for this refresh token okay and so the whole process here guys is trying to create the user in the database but we have to check if there is a
refresh token anytime they log into the app as well okay so that's why we're doing this right here and now in here we have to see if the days is less than five so if the amount of time left on this refresh token is less than five then we're going to refresh so maybe I can say uh console.log refresh right if we need this and also put this in strings okay so we can uh print in the console letting us know that we're refreshing and we're going to refresh it if it is less than five
days so to do that we have to say const refresh equal await and there's another function a helper function that we need called uh the refresh token okay and so what we're going to do is open up our folder structure we're going to scroll all the way down here to Libs and in here we're going to create a fetch. typescript okay and in here I'm going to say export cons refresh token is an arrow function which is going to be an Asing function in here and inside this we're also going to need the token that
we have in the database so I'm going to say this is going to be a string and then const refresh token is equal to await axios and axios is a library that's going to help us uh make API calls so I'm going to open up the terminal and say bun I axios and hit enter and then Bun Run Dev okay and now we already have this so let's go ahead and also import axio real quick so I'm going to scroll up top and I'm going to say import axios from axios like this okay and now
down here I'm going to uh say axios doget and invoke this and then we need to pass in the first string which is the URL endpoint okay so I'm going to say dollar sign uh we're going to use back Texs for this sorry so oops not here let's go back and I'm going to say dollar sign like this and inside this I'm going to use a variable that is already stored for you inside the environment file okay so it's basically the Instagram base URL so I'm going to copy this real quick and I'm going to
go in here and I'm going to say process. EnV do that new variable that we just created okay Instagram based URL and then after that right here we're going to put a backs slash and we need to pass in the refresh access token so I'm going to say please type this without making any spelling errors okay even I'm going to copy it I I do not want to make a spelling eror here so please type this Asis okay so we're going to say back slash refresh access uncore token okay and a question mark because it's
a um it's basically a Pam right and then it's a quer Pam right so in here we're going to say Grant type igore refresh unor token and access this is another variable access token is equal to the Token that we received okay and so once this is done we're going to return the refresh token to. data okay so now we can use this to refresh the token so let's go back in here and now after this await we can say refresh token we can import it and invoke it and now we can pass in our
integration so found uh the integration token so found. Integrations at0. token okay nice and then down here uh inside the same if block once we have called to refresh you know from from the uh from Instagram API we also have to store that right we have to um sorry we have to update the uh update our our token as well right so let's go ahead and get a date for that so const today equal new date and down here I'm going to say const expire uh expire uncore date equal to today. set dat going to
invoke this and we're going to say today. getet date invoke this as well plus 60 okay so we're giving it some time to expire and then we're going to say const update the token equal to await and here we have to we have another uh server action called update integration okay so I'm going to go into my folders click on uh the actions right here I'm going to create a folder called Integrations and inside that an index. typescript and a query. typescript or maybe queries is better so okay and in here let's change this to
use server and here I'm going to say export cons update integration and in here we're going to also get some values so let's go ahead and get the token first which is going to be a string then we need the expire which is going to be of type date and then we also need an ID which is going to be of type string and inside this we're going to return a await client. Integrations do update so we're updating it in the database right we're going to update it where the ID is as follows and this
also has to be an asnc function and where the ID is the ID that's passed in and the data that we're going to update is we're going to set the token that we received and the expires at date as well okay awesome and so let's go back now and let's go back to our index. typescript file and at the bottom here we can now import this so this uh server action was called update integration so I'm going to bring this in and now in here I need to first pass in the refresh token so refresh.
accessor token uh where is refresh refresh right here uh let's go in here and see if we're passing that refresh uncore token okay so it's called access token so let's go in here and we're going to call this access underscore token like this and after this we also have to pass in a new date so new date expire uncore date like this and then we need to also pass in the ID of the integration that we're trying to update so Integrations at zero. ID done okay cool and then at the bottom here maybe we can
also print a message of something happened wrong right so I'm just going to say if there's no update token like something happened wrong we'll just console log uh update token failed okay nice now after this blue uh bracket right here I'm going to return a status of 200 and I'm going to say data and I'm going to set this to first name which is found. first name and then last name is going to be found. last name okay nice and now after this let's go ahead and and create the user so right here after the
purple bracket we're going to hit enter and we're going to say const created equal to await create user um create user and we're going to invoke this and this is another server action that we need to create so let's open up our folder structure go into queries and in here we're going to scroll down scroll down to the bottom we're going to say export const create user is going to be a server action in here and we're going to need the clerk ID first name last name and email so let's go ahead and bring those
in and then here we're going to return await client. user. create for uh we're going to create with this data so we're going to say data like this clerk ID uh we can actually pass all of these in so I'm just going to copy this paste it remove this string and maybe remove these as well okay we're passing in the data what seems to be the issue here let me see dat okay H um all right so after this something something okay this is why it's wrong so want to put the dot there okay and
this is going to be an async function in here and we also want to create a subscription but it's going to be empty for now so we're just going to say create like this okay nice and then after this down here I'm also going to select some data from here so I need the first name which is going to be true and I also want the last name which is going to be true as well okay nice now let's go back and I'm going to import This Server action okay let's wait for that error okay
error is gone and now after this we can go ahead and pretty much pass in all the data so in here I'm going to need to first pass in the user's ID so I'm going to say user ID like this nice and then we also need the user first name and last name so user first name and then user. last name not last active last name like this okay and then we also need the email so user. email addresses at 0. email address okay nice so now this is done we can send a21 because we
created the user and if nothing happened some sort of error took place then we're going to get the error and I'm going to console.log the error and I'm going to print uh return a status of 500 okay nice and now let's go back to our page. TSS and now that we have called this onboard user we're going to check the status of the user so if user. status is equal to 200 or user. status um like this is equal to 201 that means we either created the user or they already have access right we updated
the refresh token and then what we're going to do is we're going to return redirect from next navigation and we're going to send the user to the dashboard along with their first name and last name so I'm going to say dashboard like this and we're going to use backx in here and now we're going to say dollar sign user. dat. first name and after this we're going to say another variable it's going to be user. dat do last name okay so first name and last name all right and now at the bottom here I'm going
to hit enter and so we can remove this work in progress we can remove this one as well and next we're just going to redirect the user if they are not uh you know if they're not signed in or they don't have an account so return redirect the user to sign- in okay nice great job so now if we try to access let me also quit the server and refresh everything and so now if I try to refresh the page with dashboard there you go I can now see the first name and last name and
it's also showing first name last name inside the account so let me go into Prisma uh the Prisma studio and refresh here and just to confirm okay we have the user awesome and we also have the subscription that is created with nothing right now great job thing we're going to do is we're going to go into our layout. TSX under the dashboard page and um dashboard slug layout. TSX and in here we're going to need to use a library that's going to help us prefetch data cach the data and also give the user optimistic UI
features and the benefit with react query is more than just caching I mean in a way it's kind of like you're using service side States and in the last video I explained every single thing about react query including the mutation including you know how the optimistic UI Works under the hood I broke down every single thing so if you're looking to learn more about this you can watch the previous video which is the loom clone and maybe you can learn a thing or two from that project as well right but if you want to learn
more about react query I would suggest you watch the previous video because we already broke down every single thing in this video I'll still walk you through how things work and what we're doing but if you want to learn more in detail the last video is your best bet okay so open up the terminal and we're going to quit the terminal real quick and we're going to say bun ey at tanack SL react query and go ahead and hit enter and that's going to help us create uh install our react query package okay next we
need to create a query client that's how we can get access to react query now you can do that directly in one file that's fine or you can do it um you know in a separate file and import it that's you know no problem it's just one line so I'm just going to say const query equal new query client okay and this query client is going to come from uh react query okay so let's go up top here and I'm going to import query client just like this and now I can invoke it down here
so now I have a new client instance and now I can use whatever I want on top of this and we're also going to create a helper function okay this helper function is sort of like a prefetch helper it's going to help us prefetch all data for different server actions so how do we do this first we're going to basically uh say const prefetch user profile okay and this is basically like a server action you can think about it that way well yeah it's just an API call right but what it's going to be doing
is it's going to use this uh query client right here so the query we pass in right here and it's going to use the prefetch query method and inside that it's also going to pass in the uh we're also going to pass in the query key along with the action that's needed to be performed and a stale time okay so let's go ahead and invoke this prefetch user profile and I'm going to open up my folder structure and I'm going to scroll down to Libs folder right here and inside this you can create a prefetch
or maybe you can create a react query folder itself right so let's do that I'm going to shrink everything open source and inside this I'm going to say react D query okay and inside this we're going to create a prefetch do typescript okay and so in here we're going to export const that prefetch user profile right the thing that we just created and this is going to be equal to an arrow function and inside this we're going to return await that new helper function that we're going to create which is called prefetch okay we're not
we're of course we're not going to have this right now but we're going to create that in just a second but it's called prefetch okay and in here this function is also going to get us the client so I'm going to say client and this is going to be of type query client um query client right here okay and down in here this prefetch is going to need the client itself and any sort of um you know action so we'll pass it an action right here and then we'll also pass in the key okay okay
and the key for now is just going to be user-profile okay so let's go up and let's create this prefetch so let's called const prefetch equal to an arrow function which is an async function and this is also going to be an async function and in here we're going to get the we're going to get those parameters which is the client which is query client action which is going to be a query function I'm going to bring this in as well and then we also need the key which is just a string and so now
we can invoke this and pass in that value okay and so what does this prefetched do all it does is return await client. prefetch query and we're going to invoke this and inside this we're going to pass in the query key which is going to be an array with the key that is passed in through the pams and then we also need the query function which is going to be the action that was passed in and then we need the stale time and the stale time is just going to be 60 seconds so that's 60,000
milliseconds and that's it that's all you need to do in here okay so we significantly reduced the code from the last project uh because I know we had this we pretty much did this on every single page right it was very redundant okay and now we need to pass in the server action to prefetch user profile information so open up your folder structure we're going to go into our server actions and we're going to go into index. typescript and at the bottom I'm going to say export const on user info which which is a server
action we need and inside this we're going to need to say cons user equal await on current user we're going to invoke this and this is going to need to become a async component and then now that we have the user info we're going to create a TR catch and we're going to say const profile equal await find user which we already done then we're going to say user. ID and if the profile exists we're going to return status of 200 and the data is going to be profile okay nice and then if something failed
we'll just say status of 404 okay and if there was a server type of uh action error in here we'll just say 500 okay awesome so now we can use this on user info let's go back and inside prefetch we can say on user info just like this and now uh there we go nice and now let's go back to our component here which is our layout and now we can import this uh why is it not showing let me see if I oh that's because I'm assign I'm assigning it here this is not cons
this is await okay and we're going to set this to prefetch user profile and this needs to become an async component okay nice and then inside here we're going to pass in our query there there we go great job same way we're going to do another server action called prefetch user automation okay so I'm going to say prefetch user automations and I'm going to pass in a query in here as well and now let's also copy this and I'm going to need to go into the same file right here which is a pref fetch. typescript
and I'm going to say export cons prefetch user automations which is going to be an arrow function I'm going to change this to an async function as well and this is give us the client which is going to be of type query client and in here I'm going to say return await prefetch we're going to invoke this we're going to pass in the client that we got and a server action and the key that we want is user- automations and guys this key is essentially what um assigns the data to so imagine it's like a
key that represents this version of cache data okay so every key represents cache data if you invalidate this key it will also invalidate all the data that's stored with this key okay so that's why we're passing in this key that's why it's called query key okay and so in here we need get all automations which is going to be another server actions uh server action so let's go ahead and build that out as well and this Ser action is going to be inside our automations folder so I'm going to create a folder in here called
automations and index. typescript inside this and then a queries. typescript as well and inside this I'm going to change this to use server and I want to make sure that this also has use server up top okay use server here too Integrations C is okay nice and inste automations uh index. typescript I'm going to say export const get all automations equal to an eror function and in this eror function we're going to say con user equal await on current user we're going to invoke this and this is going to need to also change to an
async function and then in here we're going to have a TR catch block and we're first going to create an Automation and this is going to be a query a new query that we need to create so I'm going to say const create equal await uh create Automation and I'm going to copy this uh title this name right here I'm going to go into queries going to change this to use server and down here I'm going to say export cons to create automation equal to an async function and this is going to uh need the
clerk ID so clerk ID which is going to be a string and here I'm going to say return 08 client. user. update where clerk ID is of this right and this is going to need to change to an acing component okay and the data that we're going to update is going to be as follows so we're going to set the automations to an empty automation right now just like this okay great job and now once this is done we're going to go back and we're going to import this create automation server action okay let me
make sure I didn't import it from the wrong components okay queries nice and so after this we're going to check if we found some data will return 200 so return status 200 and the data is going to say automation created but if something took place incorrectly we're going to say 400 404 error and if there was a server side error we say 500 internal server error okay great job and now let's go back and uh this is our Integrations queries we don't need this um Let me let me go back real quick okay and now
I'm going to import This Server action right here and I can close this and also import it right here here as well prefetched user automations so now we're prefetching all the data that we need now inside this component if we need to access the service side uh cache and the values we need to wrap it in something called a hydration boundary okay so go ahead and say hydration boundary like this and I'm going to move all of this data inside this hydration boundary and this hydration boundary is going to need the state remember I told
you it's sort of like a storing stuff um in a state itself right and it's happening server side which is really cool so technically in a way they do have some client side stuff that works under the hood and it also uses the cache data as well okay so in here we need to pass in dehydrate and in inside this we need to pass in the query that we the query client that we created okay that's it and now all our components can get access to this uh to the state that we're stored in here
so the prefetched data and now you might see an error that look looks like this and the reason is because we have another provider which is a query client provider that has to wrap the entire application so we're going to go into our root layout. TSX right in here and let me zoom out a little bit more and in here we're going to need to wrap these children elements inside that okay so I'm going to say the following so I'm going to say react query provider and I'm going to import this react query provider and
this query provider is is uh going to be inside another folder it's a custom component and so I'm going to go in here into providers and I'm going to create something called react dqu D provider okay. TSX and inside this I'm going to return a actually I don't need to return a component in here or yeah let me just return a component because we need props as well right and so I'm going to change this to tsrce like this react query provider and this needs a query client so up here I'm going to say const
clients equal query clients new query client like this and inside this I'm going to need to destructure and get the props that we have which is children which is going to be react. react node and then in here we're going to get this from here okay and now we need to return that query client provider that they're telling us to return so I'm going to say query client provider like this and the square client provider comes from tanack RE query and in here we have to say client is equal to the client we just created
and we also need to pass in the children elements so I'm going to pass in children as well and now let's go back and I'm going to re U pretty much uh repport this and refresh okay and so I see an error here and let me see what seems to be the error okay and the error is because this is a CL client component right here so I need to go up top and I have to set this to use client like this and there we go nice great job next we're going to go into
our automations and page. TSX okay the root page. TSX and we have a work in progress flag here that's going to basically help us render out all the automations on the page so let's go into this and let's see what we need to do in here I think we ought to have some setup in here or maybe not okay let's just go into this one and inside this we're going to need to essentially render out all of the automations that we get from uh our database okay so the first thing we're going to do in
here is we're going to say const data okay equal to um use Query automations now this is another hook that we need to create and so because we're creating a hook in here this has to be a used client component okay nice and then let's go down here and in inside this I'm going to copy this name and we're going to go into our hooks folder right here we're going to create another file in here called use- queries. typescript okay and in here we're going to say export const use uh query or whatever we just
created right so use Query automations equal to an arrow function also I'm using a different keyboard guys this might be like ASMR to you I don't know okay hopefully it's not too annoying but uh I just wanted to change up a little bit CU I'm my hands hurting okay so we're going to return uh something called use Query okay and this is a hook that's essentially going to um help us make a query call okay based on a function and the query key okay so we're going to say uh return use Query we're going to
invoke this and inside this we're we're going to need to pass in an object and the first value is the query key and the query key is going to be um an array like this and inside here we're going to say user- automations okay and then after this we're going to need to pass in the query function okay and the query function is going to be something called get all automations okay and this way this will essentially fetch it for us and so now let's go back here and let's quickly import this okay and that
should do the job okay so now we're going to have all of the data we need and this is also going to be destructured okay and that's how we get data from here sorry so let's change this to data like this and now inside here we're essentially going to check if no automations exist show no automations so let's go ahead and do that first so I'm going to remove this work in progress as well and let's remove this work in progress as well right here so if data dots success or sorry not data. success. status
equal to uh 200 or is not equal to 200 sorry so it's not equal to 200 then we're going to need to return something okay and so I'm seeing some errors here let me just fix this error real quick okay that should fix that error so it's saying data is possibly undefined so we need to put a question right here and then in here we're going to say return and we're going to return a div okay a div like this and the class name that we're going to have on this div is going to look
as follows so let me just quickly paste this in here so we're going to say height uh is going to be 70 Flex justify Center item Center Flex column Gap y of four okay and let's also go into our automations page so we can see that okay automations list all right nice and so it's rendering out a div and if we put something in here let's see what it does okay it's showing something let me expand this okay it's showing um some data in here what are we getting exactly let me console all right guys
so I made a small error um I actually created the wrong action for the get all automation section so I'm sorry if you were super confused and like what the hell am I typing it's totally fine we're going to need this anyway but we just need to rename this to create automations okay and of course we're going to see a bunch of Errors uh um and I'm also going to go ahead and quickly remove it from here too so go into your user queries uh user queries inside Hooks and we have something called use Query
automation right so we'll remove this for now because we don't have the actually we don't need to remove it that's fine just want to make sure that here we had something called get all automations right so this is also incorrect so we have to build this automation real quick so let's go back into that file which is right here inside the actions automations and let's build that other uh get all automations server action so you're going to say export const get all automations and this is equal to an arrow function and this Arrow function is
going to be an async function and in here first thing we're going to need is to verify the user so we're going to say uh user equal o08 current user and then we're going to say try catch and inside the triy block we're now going to get all the automation so this is essentially another server action that we need to fetch okay so this one is called get automations and it's a query so you're going to open this up go into the query section and you see we actually created the wrong one right so sorry
about that and then all we have to do here is say export const get automations equal to again another async function and this is going to need the clerk ID okay which is going to be a string and then in here we're going to return await client. user. find unique we're going to invoke this and in here we have to say where and for where we're going to say clerk ID like this and then we have to select the following data so we're going to select automations and in this I want to order it by
created at okay and this is going to be ascending for us and then after this down here I'm also going to include the keywords set it to true and we also need the listener okay we're going to set this to true as well and let's go up here and remove this okay awesome and now that we have the get automations let's go back and quickly import this new query action okay and after this we're just going to make a quick if statement to see if automations exist if it does return to 100 and for the
data we're going to send the automations automations okay and then if not some error happened we'll send 404 and if something else happened in here just send a 500 okay awesome now let's go back okay we have the get all automations let's make sure it's the same function okay nice and we want to make sure we're using the exact same thing inside our file right which is inside this automations list component Global automations list right or you can also go to the aut automations page. TSX and you can click on the list and now you're
going to notice something we're going to have a bunch of automations show up in here and I have 85 and the reason is because we're using the wrong automation right the wrong uh sorry the wrong uh query right and so what we need to do is I'm going to go into Prisma studio and if you don't know how to do this it's bunx Prisma studio and then in here I'm going to refresh this and we're going to see 85 automations I'm going to select all these automations and I'm just going to delete it okay so
once that's done you should be good to go okay awesome let's close this zero automations looks amazing and now we're going to refresh the browser okay and let me also close this and I think hydration okay the hydration warning is probably it'll probably go away let's just give that a second and the reason why this is happening is because the data that's coming in from the cache and the API request is not uh basically it's it's not the same right so you're going to have a hydration warning in the beginning for maybe a couple seconds
and then after that it will disappear okay so I remember some of you guys asked me uh why does used query throw a hydration warning if you create something using the mutation data or the if you use mutation and if you try to refresh the page immediately you might see an error okay and that error is something that I think they should work on their end and it's simply because we are invalidating the cach but in the in their code in their Library they're not really invalidating it for some reason I don't know why they're
doing that it it still does but it takes some time so the cash is still it still exists and so maybe that's something that is just part of the react query Library itself um but you don't need to because when someone adds something thing and we're using um optimistic UI right when they add a new element then we're using optimistic UI they're going to see it so they probably would not refresh but even if they do well you can suppress the hydration warning if you want okay so once this is done in here now we
have some data we have about uh we have zero elements actually and so let's see what's going on in here so the status is always going to be 200 right because we're fetching for data but if there's nothing in here then we also have to check with an if condition so we have to say or sorry not if it's a or condition we're going to say or the data dot dot data is less than or equal to zero so there's not that many elements in here okay uh looks like there's an error here okay so
I'm going to make a small change here guys so just go back into the get all automation server action and in here we're going to need to update something so this data do automations in here if we did not have this you see it can also be um let me click on this once more okay so it is showing as an empty array so what seems to be the issue so that means data is going to okay I'll also just pass in data in here and set it to an empty array because that could also
be the reason why it's saying hey there's there's nothing in here right so let's look at this okay so now there's always an Mt array being returned and now let's go back to our component okay and so now we can say or data. data. length is less than or equal to 0o then we want to do this okay and awesome now it is rendering this component in here so now I'm going to return a an H3 element and for class I'm just going to set text LG text- grade -400 and in here I'm just going
to say no automations created okay and after this I'm also going to put an icon in here create it's called create automation or maybe we could possibly just return the create automation button right so they can create something directly from here itself all right and let's go down here now and make the change so I'm going to remove this link and in here I'm going to to say data. dat. map and for each of this I'm going to need to return this link component okay so technically we should not see any elements inside here okay
nice and I also see something in here direct traffic I think that's coming from somewhere else so let's go ahead and fix that but now we're essentially looping over all of the elements right and then we're rendering a link and now we also have to change the path name so let's go in here and I'm going to say dollar sign automation uh or whatever we get from here right so we can call this automation like this and we're going to say automation. ID okay and then we also need a key in here because now we're
mapping so I'm going to say key is equal to automation. ID like this and then this should be good to go inside the H2 we can remove this and we can set an automation. name okay and for the content uh we'll just keep it as whatever is in here you guys can create another property if You' like and we can also uh let me see what other data we have in here okay okay this is fine and so down here we also need the keywords right so I'm going to remove this work in progress flag
from here and I'm going to copy all of this so just remove all of the um what do you call this the keywords itself right so let's remove that and I'm going to say automation. keywords. length if it's less than if it's greater than zero then we're going to check if so we'll return something if not we'll return something in here and so if it is greater than zero then we're going to return the keywords right and if it is less than zero then we need to return something else well we're going to scroll down
here and return this div instead so I'm going to remove that and paste it in here okay nice now we're returning the keywords and if there's none we'll say no keyword selected okay and then in uh down here we have to also attach some real date uh the real date of this this automation right so what we can do now is we can remove this work in progress as well and now we're going to say the following so first we need to get the month and the month is another helper function that we have so
let's go into our Libs UTS F uh uols file right here and in here I'm going to say export const get month is equal to an arrow function and this is going to take in the month which is going to be a number okay and in here we're going to say const months equal to or it's going to be an array of strings right and this is going to be equal to an array like this and I'm just going to basically use chat gbt and get all the months that I need and capitalize letters and
then once that's done I'm going to first check if the month's number that is passed in is between 1 and 12 okay and if so I'm going to return um an inval I'm going to return a message saying invalid month number please enter a number greater than 1 or 12 okay so um down here I'm just going to say if month is less than one or month is greater than 12 then we're going to return the following uh text okay so return this string like this and this string is just going to be something that
says hey invalid month okay so if you're using this helper function anywhere else you get some messages as well and finally I'm going to say return months at the month that's passed in minus one so whatever they passed in with the number will return that specific month itself okay nice so now we can reuse this so let me copy this let's go back here and where do we do this okay right here so I'm going to create this ET and I'm going to say get month which comes from Libs U and you want to invoke
that and in here you want to pass an automation. created at. getet UTC uh month okay right here you want to invoke it and say plus one and then after this uh right here you're going to put another bracket and you're going to leave a space okay and so once we have the month here we're also going to need to get some date and time related stuff so I'm going to create another bracket I'm going to say automation. created. getet UTC date okay we're going to invoke it and we're going to check if it's equal
to one and if so we'll return something if not we'll return something else right here and so in the first block we're going to remove this and we're going to say with back ticks dollar sign automation. created at. getet UTC date we're going to invoke it and after this we're going to say St okay just formatting for the date and then in here we're going to say back takes again dollar sign automation. created ads. getet UTC dat we're going to invoke that and after this we're going to say th all right and then here we're
going to do the same thing and leave a space and then after this we're going to say automation. created ads. getet UTC full year we're going to invoke this and that should be it okay and now down here we also have have uh to render the smart AI button or the regular button right so now that we have data we can also do this so I'm going to remove this real quick and I'm going to say automation. listener why is it not showing up sorry making some spelling errors listener doth listener itself and if this
is equal to the smart AI then we're going to do something here or we'll do something else right here okay and so for the first block we're going to copy this gradient button and we're going to paste it in here and for the second block we're going to return the standard button okay and yeah that's pretty much it so as you can see now we have this that shows up right here saying no automations right you don't have to say no automations created let me remove that where is that right here no automations okay and
so on a larger screen it's going to look like this but also this is going to disappear as well so let's go ahead and remove that one so now let's go back to automations page. TSX right in here and now we can remove that card based on the if condition all I think it's okay guys you can you can have it I mean it in a way it just gives the user more info as to what happens here so I think this should be fine so I'm just going to leave it because again we're going
to need to fetch data in here then make an if condition we've already done that right we' already showed you how to do that so yeah this is okay no problem just have this in here and that just provides more info to the user now the next thing we're going to do in here is the create automation option okay and so to make this work we're going to need to create a new hook and this Hook is called use creates automation okay so I'm going to copy this title so I can use it and we
also want to assign it to a value so I'm going to say um like this and destructure the values that come from this okay so let's copy this and you want to open up your folder structure you're going to scroll down to hooks right here and inside the use automation hook we're going to do this this okay so use automations do typescript and in here I'm going to essentially say export const use create automation equal to an arrow function and in here we're going to first say const we're going to destructure some values that come
from use mutation data which is another hook that is super super important for us okay this Hook is essentially going to help us uh use optimistic UI updates okay so open up your folder structure and in here we're going to say use- mutation DD dat. typescript and in here we're going to essentially say export const use mutation data is equal to an error function again and this is going to take in uh a couple uh going to get a couple parameters so let's grab that as well first we need the mutation key mutation function query
key and an on success and these two are optional okay and the reason why it's optional is the query key is a way to kind of reset or invalidate the past responses right so that's why so now I'm going to import some types so I'm going to say mutation function for the mutation uh mutation key for the mutation key mutation function for the mutation function and query key is going to be string on success is just going to be an error function that returns nothing so void okay and so now inside this I'm also going
to go back and just quickly import so I can reduce the number of Errors I see and okay what seems to be the problem okay nothing's being returned so let's go in here and now inside this function first we need to create our client so use Query client and I'm going to invoke this okay and then down in here I'm going to say const mutate and is pending December 31st is your last chance to join prodigies University at our current lowest price that means just by taking action today you will save 10% every single month
if you are a SAS business owner or a web developer and and you're looking to start run and grow a profitable SAS then this is exactly where you should be at the time this video was made we have helped over 400 SAS business owners and entrepreneurs who wanted to start and launch their SAS from the ground up we ourselves run three different businesses all within just 7 months that are now making $60,000 per month but it's not just about our success we've also helped other entrepreneurs do the same here's David who went from $0 to
$14,000 by implementing a high ticket monthly recurring Revenue SAS model all within just 3 weeks of joining Prodigy University and he did this without even posting content on social media and here's Derek who made $3,000 using the exact same business model in just under one week of joining Prodigy University or take Mony for example who made her first $11,000 through her business in under a month or here's another SAS business owner who now runs a SAS company with over 110,000 users in under 15 months but now you might ask well these are probably people who
brought something to the table so what does the average student make inside prodigies University so here's funny who has never sold a SAS service in the past and now made $1,200 in just under 3 weeks of joining or here's yush who has never made money online and does not even know how to run a SAS business but he was able to get his first SAS client in under after one week of joining Prodigy University after implementing the quick win system here's sakam who made his first $200 through his task in under 10 days here's Shimona
who quit her 9o5 job and is now a full-time entrepreneur or here's aij who now has 3,600 YouTube subscribers and which also drives traffic to his SAS and his own SAS SC and now also a new community with over 400 members now I can go on and on about these results but I think you get the point here these strategies have proven to work and will work even if you don't have thousands of followers you don't have money to spend on advertisements or you don't want to send thousands of C DMS to prospects online and
to reward people who decide to join this enrollment period you get access to a bunch of free bonuses and you also get to take part in the Pu games to win cash prizes as you rank higher in our leaderboard but this offer is not going to be there for too long because December 31st is your last opportunity to join at a discounted price or when we run out of the 100 limited spots that we open for this month's enrollment so if you want to know exactly what you're going to get by joining prodigies University I'm
going to leave a link in the description below if you sign up to that link you will get a free course that breaks down the exact business model from start to finish and you'll also see exactly what is offered inside prodigies University so if you want to learn the proven systems that have helped these students start run grow a profitable SAS the right way through mentorship and courses then I'll see you inside okay these two are going to come from use mutation okay which is directly imported from tanack query react query okay and now this
Ed mutation is going to need all of this data and so we first need to pass in the mutation function um sorry guys the mutation key okay we need to pass in the mutation function as well and then we also need to pass in the on success if the user passed that in as well so on success is going to be an arrow function okay and in here we're going to say if the user passed in on success only then are we going to invoke on success okay and next we're going to return a toast
and this toast is going to come from sonar okay and this toast we already um for the toast to work we also have to put a provider or it's kind of like we have to render a component inside the root layout but we already did that so we should be good to go and then in here we're going to say data. status and this data actually comes from here guys so we have to say data from here okay data do status like this if it's equal to 200 then we're going to say success or we're
going to say error okay nice and inside this message we can also pass in the description and the description is just going to say data. dat okay and after that for unsettled we can also have another async function in here so we're going to say async like this and inside this function we're going to return await client. invalidate queries okay and in here we need to pass in the query key which is the most important part so let's say on query key just like this nice and finally we also have to return this stuff right
so return the mutate function and is pending okay so you see how to set up optimistic UI there's multiple components right you also need a pending State you need the mutation you need to invalidate the cache you also need to um essentially revert back in case something f failed and there's a lot of complexities that go into creating optimistic UI at least the right way right and so that's why um this react query Library can help us simplify the process a ton okay so once this is done let's go back and now we can extract
the data that is being returned from this function okay if it will give me an opportunity to do so what's going on it's not letting me get the mutate okay and now we need to pass in some values in here right so let's go ahead and pass that in so if we use create automation the first one we need is called uh the mutation key so the mutation key is going to be an array with a string and I want to say create automation for this key next I need to pass in a callback function
and my callback function is going to be create automations okay create automations like this okay and invoke this and let me make sure that this is the same function so if I go into this I have create automation which is another function in here okay that's good with a user ID okay this is good so let's go back and so now we have the call back that it requires let me put this on a new line if it will allow me okay I don't think it will we we'll see and then after this we also
need one more which is the let's see what's the final one mutation function and query key right we have mutation key and now the query key so which query exactly is this this is the mutation key but there's also a query key that means the original response that we're trying to invalidate and that is going to be called user automations okay and that's pretty much it now I'm also going to return the states that we need so is pending and mutate so I can also grab it from here okay so now let's go back and
let's import our used create automation hook use create oh use create automation it's us okay let me go back and also change that all right and now we should be able to import This Server um sorry this hook okay nice and now I'm going to grab is pending and mutate and now down here I'm going to pass in is pending okay and our mutate function is going to be inside the button so I'm going to say on click is going to be mutate all right okay awesome let's refresh this and I see some errors here
that's because we're using a hook inside a component that should be a client component I believe so let's go ahead and figure this out okay so we have used okay so let's change this component up top to use client like this and everything inside should also change to use client component okay nice and now if you try to click on the create automation button you're going to notice that no automation will be created in real time at least you're not going to see it happen optimistically and the reason is because there's another hook that we're
going to need it's called use mutation data State okay and the use mutation data state is a hook that essentially allows us to pass in a specific uh keyword which is the mutation keyword and then it returns a a variable called latest variable and then that latest variable is what we need to render out here when it is available okay and so that's exactly what we're going to be doing right now so go ahead and uh inside your automation list component right here you're going to say const you're going to destructure a value here and
you're going to say equal to use mutation State uh use mutation data State and inside this we're going to need to pass in the mutation variable and if you go inside the create automation button and you go inside use create automation you see this is the mutation key so you're going to copy this and you're going to paste it inside that um inside this right here okay and now you also need you're going to get a value from this and we're going to grab that in just a second but before that let's go ahead and
create this data state so you're going to scroll all the way down into your use mutation right here and inside this we're going to need to say the following so export const use mutation data state is equal to an aror function that gives us a mutation key okay mutation key like this and the mutation key is going to be of type mutation key like that all right and then inside this first thing we're going to do is we're going to say cons data equal to use mutation uh State okay and this is what we get
from the react query Library we're going to invoke this and in here we're going to say filters and we're going to set the filter to the mutation key okay so only for this specific mutation and what we're going to do now is we're going to select the foll following data so we're going to say select mutation and we're going to return the variables so whatever is stored in the variables and a status okay so this is the latest variable essentially okay and now we need to create that latest variable so we can return it back
to the front end so I'm going to say variable equal latest variable equal data at data. length minus 1 okay and after this we have to return that as an object so I'm just going to say latest variable like this okay and now I can grab this latest variable and import the Ed mutation data State and I'm also going to open up the terminal so we can kind of see this work and let's refresh the browser okay awesome and so what I'm going to do now is I'm going to I just want you to pay
attention to the console okay the second I click the button you're going to see it's going to load something and okay looks like nothing was printed and the reason is because I didn't print a messageer so let me go ahead and say console.log latest variable okay and I'm going to go back and also delete this from my Prisma schema so let's delete all of the automations okay and you might see uh an error here which is a hydration error and that's totally fine that's because we're seeing cache data okay okay and so let's refresh this
okay and now I want you to just pay attention to what you see right here okay so if I click on this button boom there you go we see something called variables and it says status pending all right and if you open this you're going to see it's a specific type of variable that we're going to pass in okay so where do we pass this data so this data is going to be passed in into the mutation function okay so inside the creates automation button if you see we have the mutate function in here right
you have to create an an arrow function and whatever you pass in here will essentially be passed into the component itself all right or it will be passed into the mutation function okay and so that data is what we see right here okay hope that's making sense and the other thing is it's not going to refresh so we can just look at the variables the latest variable and we can return that all right now another thing you can do is instead of returning only the last variable which is you know minus one you can return
the entire you know string so what the entire array so whatever is in there and you can render all of them as well that way if the user keeps spamming this it's going to keep showing in here okay and now I'm going to go back here and I'm also going to delete this real quick so we can do that once more let's go ah and delete this all right awesome cool so we deleted that and now the other thing we need to do is we have to pass in that those uh that state okay so
the first thing is the name is going to be Untitled right so I'm going to say name Untitled like this and we also need an ID and the ID is going to come from V4 which is also uu ID I really hope they changed that I don't know why it's called V4 I think it's just a version but maybe it's time it's probably time guys please change it to uyu ID all right so now we have the ID itself and what other type of information are we going to need I think we're going to need
let's go into a Prisma schema here so we can take a look at that name created at okay created at might be something else that we probably might need so let me go ahead and do that as well okay I'm not sure if this might work but we'll see what we need to do okay so now that we have this mutate function another thing is we also want to save this specific ID in the back end okay so here's what I'm going to do so I'm going to first create a variable called um mutation ID
okay and I'm going to set it to this V4 in here okay and you can also use memo if you want uh that way you can kind of store that variable and not just keep refreshing all the time but for now I'm just going to or maybe let's do that okay so mutation ID is going to be use memo we're going to invoke this and this is going to take an arrow function like this with an empty dependency and then here we're going to return the V4 okay so let's invoke that and set it like
this so this will never refresh unless the dependency array changes okay and so the next thing we need now is now that we have the ID we have to pass that ID in here so I'm going to say mutation ID okay not mutate mutation ID hello okay and let's also move this all the way up top so we can use uh reuse it and now let's go back to our component okay and so if you try to console.log the mutation ID let's see what we get okay there you go you see we see some IDs
in here right so let me refresh the page and let's see okay so the reason why it's happening twice is because we have a bunch of unmounting and remounting but that's fine um it also happens only in development mode and maybe some of the components um are also refreshing right so that's totally fine as long as we have the ID in here we're good to go that's all we need right because once it's cached it's not going to update again so next stage is we also have to pass in this mutation ID into the server
action because on the back end we have to store the same uu ID so let's click on this and inside the create automation function in here we're going to essentially need to make a couple adjustments okay so in here I'm going to accept an ID which is going to be optional or yeah let it be optional for now and I'm just going to call this string okay and in here I'm going to pass in that ID okay and now let's go into create Automation and I'm going to say ID has to be a string and
this is optional as well and now once we have this ID I'm going to need to pass that ID in here so you see how we're creating an Automation in here and um well you technically are not going to see this because I just created it but we're going to need to pass that in here right and so what we're going to do here is after this we're going to take in the ID itself and now let's go into create Automation and in here we also have to pass an ID which is optional which is
going to be a string okay and so now we can use this and dynamically return it into this object so we're going to say if the user provided the ID then we're going to create an object and with a spread operator we're going to pull out this specific property and we're going to attach it to this create object okay and instead of V4 we're going to pass in the ID itself so like this okay so if ID exist return that ID all right nice and now um let's go back one step right here let's make
sure we have this setup okay we have the ID we're passing it in here and now we also have this in here too okay we're passing it here great and let's go back one more step use create automation all right use memo storing okay so let's first console.log the mutation ID okay and that way we can confirm whether it's saving in the back end so I'm going to refresh this and I'm going to quit this uh cancel the terminal and I'm going to click on the button and it looks like this is the ID let's
go into the database and see if we find the ID that ends with e okay um 137 is this the right ID I think this is the right ID okay so it looks like it might have autogenerated that ID and it's probably not sending it right but um interesting let me take a look at this guys okay so first thing is I did not pass in the mutation ID in here so I'm going to pass the mutation ID into our use create automation hook and I'm also going to cancel this once more and now let's
go ahead and create something in here okay we see a 200 response and let's go back okay we see something that ends with this value so it ends with four let's go in here and let's refresh this and let's click on this one there we go okay so that was the problem I just wasn't passing it in okay so now that we have that it's all set all we have to do is render that data out okay and we can get that data with the help of the used mutation uh data State hook that we
created so let's go back to our automations list index. TSX component and then in here you see we're printing this out right so based on the latest variable and if you look inside the console right here latest variable okay looks like I did not print that out or did I it was right here 18 okay let's just see what we have stored right so it's going to have the title it's going to have created at it's going to have the name and the ID and this is pretty much all we need I believe so you
see there's nothing else that we need I think right apart from the keywords but once they create the automation there's not going to be any keywords in there right so what we can do now is we can uh we can essentially one thing we can do is we can just mutate this data here right we can append something to it that's one way or we could um we could pretty much I guess we could U just render out another data element right here so I think what might be better is H let me think guys
give me one second okay so I'm going to try this let's see if it works I guess you're also getting like a behind the scenes right so what I'm going to do do here is I'm going to say const optimistic UI this is just new stuff that I added right now and we're going to set that equal to use memo which is going to take in a callback function and the dependency array is going to have the latest variable and the data inside it and inside this I'm going to check if we have anything inside
latest variable. status okay or variables this might be better and the variable is just looks like an object right so if anything is inside this then we can render that data out so what we're going to do in here is I'm going to also there's one more discrepancy that could occur because I noticed that we still have do we still have data okay line number 18 okay it's undefined because I noticed after a little while I was still able to extract that that that value and it made no sense right and so we want to
make sure that this has something in here uh this does not have something in here or we're going to see some wrong data right so we're going to do in here is we're going to instead of rendering this we're going to replace this with optimistic uh data and let's refresh and this should work exactly like expected okay and the reason is because well it's going to render okay nice and so now what we're going to do here is we're going to check if there's anything inside latest variables right and so if it did update we're
going to add that to the array so I'm going to say return a new array with everything inside the latest variable right I'm sorry everything inside the data array but on top of this we're going to add the latest variable like this okay latest variable dot uh why is this not adding do variables okay we'll see how this goes it's saying type okay we have some type issues let me just fix this as well so this has to be dat. data okay and that might be slightly better and if I try to add something okay
we're seeing an error here cannot read something okay not sure what was returned in optimistic data and so I think we can store this const test and let's print this value out so console.log test okay and let's take a look at the console and let's also clear this console real quick and let's try to add something okay so it is working I see 1 two 3 elements and inside this I see an ID I see the name what seems to be the issue optimistic data do Loop over that and render it yeah it should technically
render how many elements do I have here one two three four huh interesting okay that's because nothing was returned from here guys sorry about that and so it hopefully okay we don't have any data but I want to just confirm this once more so I'm going to go in here let's select everything and let's try to delete this delete two records okay let's refresh the automation should have nothing in here oh great awesome two more created I think that's because we did not refresh it initially so I'm going to do that once more okay now
this is new data that's deleted so if we see that okay this is fine we're just going to see that problem there that's okay and so now when I click on this all right what are we seeing here we're seeing test and what is test here test is this line number 32 and so this used memo is actually not getting ired even though this is or is it h okay so I tried and I think it worked now so what I did here was I updated this to return and an object with data set to
test and let's remove this and now I'm going to go into create Automation and I also have to create the keywords right so I'm going to say keywords and we're going to set the keywords itself to an empty array like this so it doesn't throw an error for for us and now if I click on this hey there we go how awesome is that and this is the latest one let's just test it out and see okay uh we need to refresh I think let's refresh this we might see some errors that's totally fine um
okay there we go that's the latest data that we want to see and now if we click on this it should take us into the automation with the exact ID which ends with 68 and I'm going to refresh the automations in here and 86 sorry I think that's that I make an error yeah hey 68 86 which one is it okay 68 it's right it's right here oh that's that's crazy what is the what are the odds right so let's go back now and now let's change this back to Untitled okay awesome there we go
so this is one way to do it the other way would just be to render out whatever is inside the latest variable okay that's another way but this is slightly better because I can keep keep appending to this right so you see I can keep appending and it also shows right here okay so that would be my approach to this and now I'm just going to go in here select everything and delete all of this okay H I need to refresh first but that's fine I'm just going to delete this once more and let's go
in here refresh and we shouldn't have anything awesome now if I create one um oh it's because we have some weird errors here okay yeah it's trying to return the old stuff um I guess that's one problem with the react query right let me know guys if you don't want me to use react query again or you think it's over complicating things let me know and maybe next time in the next project I'll show you how to do every single thing from scratch with Redux okay all right then the next thing I'm going to do
is I'm going to go into automations the automation page. TSX and first thing is we need to change uh we need to add some metadata in here okay remember I told you we're going to add something so let's go ahead and do that and the first thing we need to do is right here I'm going to export a variable okay and let me go ahead and grab that on my end as well so in here we're going to say export function generate metadata like this okay and this is going to be a function just like
this so let's make it look like that and this is an async function as well so I'm going to write async in here and this is going to give us the pams so I'm going to say pams and these pams are going to give us the following so we're going to have pams here and this is going to have ID which is going to be a string okay and inside this we're going to say const info equal equal await get automation info we're going to invoke this and pass in pam. ID okay and now of
course this does not exist so let's go ahead and build this as well so open up your folder structure and inside automations index. typescript at the bottom we're going to say export const get automation info and this is going to be an async function that is going to take in oh I can't do this okay Asing function it needs an ID which is a string and inside this we're going to say await on current user okay and then once this is successful we're going to have a tri catch block and we're going to say const
automation equal A8 find automation find automation okay let's invoke this and now let's copy this right here and let's go into queries and scroll all the way to the bottom we're going to say export cons find automation equal to an async function and this function is going to take in an ID which is a string okay and in here we're going to say return await client. automation. find unique like this and we're going to find unique for the following so we need for this specific ID right here right so where ID is this ID okay
and then after that we're also going to include some data well what do we need we need the keywords trigger post listener so I'm going to say keywords true trigger true post and for listener as well and then we also need some user related stuff okay so I'm going to say user and I want to select subscription and their Integrations and at the bottom here actually we're already returning so we don't have to do this so I'm going to go back and now import the find automation okay awesome and then after this in here we're
going to pass in the ID that we just received and then if the automation is successful not at rule sorry why is it ah I hate typing guys I need some I need someone to type for me please let me know if you would be okay typing for me um all right and then return status of 200 and then we're going to pass in the data which is going to be an automation okay this response right here and then return status of 400 404 if some error happened and then in here I'm going to return
500 and now let's go back and quickly import this get uh automation info server action and once we have the information we're going to return an object with title set to in info. dat. name okay nice and now once this is done down here we also have to put some real uh automation breadcrumb information right you see I have a prefetch prefetch automation data a work in progress flag right here so let me remove this metadata stuff and next I'm going to scroll down here remove this flag as well I'm going to say const query
equal new query client let's invoke that okay and I want to make sure I used new pretty much in all the places I feel like somewhere I didn't use new query client okay I think I did all right no problem okay let me shrink this and so down here we're going to say await prefetch user automations uh not automations it's actually automation it's a new one so I'm going to go up top and and I'm going to delete this and then I'm going to invoke this right here and this function is going to be inside
react query so let's scroll all the way down here to react query inside prefetch and at the bottom I'm going to say export cons prefetch user automation like this okay and inside this first let me change this to an async function and we need the client which is going to be of type query clients okay and then we also need the automation ID so automation ID which is going to be a string okay and inside here I'm going to return await prefetch or magical helper function and inside this I need to pass in the client
first okay and after the client I need to pass in a server action which is a call back with uh something called get automations what is this client comes from here prefetch do you not have it already prefetch something seems to be wrong let me fix this or is it just saying I don't know let me see what's going on so I'm going to have hm give me a second guys okay so I made an error here this is not supposed to be an object it's just a function right so prefetch client and then an
error function here as a second parameter and in here we need to pass in um another server action called get autom info so open up your folder we want to go uh your folder structure you want to go into index and at the bottom we're going to say well it looks like I already have this why did it not let me import that okay now there we go okay and so this one is going to need an ID so I'm going to pass in the automation ID and finally I need a key here right and
so this key is going to be called automation info like this and now I'm going to to go back and import this prefetch function okay just like that and this needs to be an async component and in here I have to pass in the query and I have to pass in pam. ID okay where is pams where is the ID where is it h what's going on but got two okay I think I'm passing in the wrong prefetch function again so so I'm going to import prefetch automation like this and let me see what what
seems to be the problem here well technically it should be from the same folder so I could just say this and remove this unless it's not being imported the right way so let's go back in here and search for prefetch user automation okay spelling errors hey look at that auto automation okay and now let's go back and rename this prefetch user automation okay there we go and so now we are prefetching this data um why is this like this okay there we go we're prefetching this data we need to use it inside this component and
the way we should is by wrapping it in a hydration boundary so I'm going to say hydration boundary like this and uh I think I accidentally deleted the return statement hydration boundary and inside this I'm going to pass in the div nice and this is also going to need the state and that has to be set to dehydrate with the query passed in okay and dehydrate also comes from tanack react query so let's import that as well and that's it so now we are passing it into this component as well okay cool we're going to
go inside the automation breadcrumbs component right in here and now we have some more work in progress flags that we need to do inside here as well well so first thing is we're going to fetch all the data from use Query automation which is another hook so I'm going to say const equal to use Query automations uh automation sorry not automations and let's remove this and inside this we're going to need to pass in this ID that we're getting from the props and now this is another hook that we need to create so I'm going
to open up my folder structure go down to Hooks and go into use queries at the bottom here I'm going to say export const uh used query automation like this okay and inside this this is also going to actually not an async component sorry and in here use a query automation we're going to need to return use Query let's import that and we need to pass in the query key and the query function the query key is automation info and the query function is get automation info okay and this is also a call back so
pass a call back and then invoke it so we can pass in the ID that we're going to receive from here okay nice now we can go back and quickly import this specific um hook and now we can grab data from this okay so now we fetched the automation data nice so now what we need to do is we need to wire up okay I'm seeing an arrow here okay this has to change to a client component I believe so use client because we're using a hook in here and that should solve the problem all
right there we go and so now we can work on maybe the double click editing features in here as well so go ahead and hit enter right here and the first thing we're going to do is we're going to create a new hook called use edit automation okay so I'm going to copy this right here and I'm also going to invoke and pass in the ID because I got to do it anyway and then we'll also um use uh say const We'll extract some data once we're done creating this okay so go ahead open up
your folder structure and you want to scroll down all the way to Hooks and inside your hook folder you're going to create use- automations do typescript okay uh or actually we already did that uh let me take a look let me make sure I don't delete the the wrong file right so let's go into hooks real quick create automations okay something's wrong okay never mind we did not delete the wrong file that was scary so inside use automations we're going to say export const use editor edit automation which is going to be an arrow function
and please build this with me okay I hope you guys are building this with me there's no point in you watching this so um once you're done go back inside this function and in here we're going to get the automation ID which is going to be a string okay and in here we're going to say const edit and set edit which is going to be a state which comes from US states and let's get that and then this is going to need to change to use client okay or actually we don't need to because it's
a file so it should be okay and then inside this state we're going to set fault as a default value okay and then const uh input ref is what we're going to need to essentially refer to the value that we are uh that we're pretty much putting inside that input field right so this is going to create a ref for us and we can mount that ref to that element so I'm going to say use ref and this us ref is going to be of a specific type so it's going to be an HTML uh
element input element right or null okay and then in here for now I'm just going to set it to null and next we're going to need two Setters that are going to help us set this value so I'm going to say const enable edit equal to an arrow function that sets edit to true and then we need another one called disable edit disable edit and this is going to set it to false that was funny set it edit all right and so after this now we're going to need another hook called use mutation data so
I'm going to say const something right here is equal to use mutation data we're going to invoke that and from here I'm going to get is pending and mutate okay and so in here we're going to say the mutation we're going to create is called update Das automation okay and then after that we're also going to need to pass in some more props in here so we're going to pass in an arrow function okay and this aror function should return a server action so for now I'm just going to do this I'll fix that in
just a second and then after that we need to pass in another function in here sorry another key in here and this key is the query so the query is going to be called automation info okay and then finally we're going to pass in our disable edit right here which is I think it is our on success okay and now let's fix this um this callback function right here so this one first is going to give us access to data so I'm going to destructure the name from this okay and now I can use it
in here so I'm going to say update automation name okay or automation data and this is going to be another server action so let's go ahead and create the server action inside index. typescript so I'm going to say export const update automation name and we're going to set this to async and inside this we're going to say uh we're going to need a couple values so first we're going to need the automation ID so I'm going to say automation ID and data it's going to be name act name active and automation okay active is Boolean
all right and then in here first thing is just like always we're going to say await on current user and then we're going to create a TR catch block and in inside the TR catch block we're going to say const update equal update automation update automation like this which is again another server action uh it's actually a query so let's go ahead and create that query in here so scroll to the bottom we're going to say export update automation which is going to be another Asing function and in here we're going to need some values
as well so get the ID which is going to be a string and update which is going to be an object with name which is optional which is going to be set to a string and active which is going to be set to a Boolean if it will give it to me okay there we go and then in here I'm going to say return await client. automation. update going to invoke and pass an object for this ID and we're going to update the following data by setting the name to update. name and we're going to
set active to update. active Okay okay and then let's go back here and quickly import this query okay nice and let's invoke this and say automation ID and data okay and once this is done we're going to make sure this is successful so if this was returned successfully then we're going to return a status of 200 and we're also going to say data is automation successfully updated okay and so I made another error here um what seems to seems to be the issue this is data hm okay so I made an error here so inside
the update automation query this is actually optional okay and now that should solve our bug okay nice and so after this if nothing happen here we'll return 44 and say oops could not find an Automation and then down here if server side error happened we'll just say 500 oops something went wrong now let's go ahead and close this and let's import this new server action that we just created and then inside this first we need to pass in the automation ID okay and once that's done the name is going to be set to data. name
like this and that's pretty much it now right here we're also going to need to create a use effect and this use effect is essentially just when the element mounts right we're going to listen to when the user clicks outside okay so in here I'm going to say function handle click outside we're going to invoke this like this because it's a function and in here we're going to say this which is going to be document and event which is mouse event okay and inside this we're going to first check if the click was outside the
elements and so I'm going to say if the input ref. current and input ref. current. contains event.target as node or null and then inside this we're going to do the following so first we're going to say if the input ref. current. value is not equal to uh an mty string then we're going to invoke the mutate and pass in that value okay which is the input field value if not we're just going to set the disabled edit to True okay we're basically going to disable editing for that element okay and guys in the last project
I actually wrote a much better optimized approach to this because there's a function called the on blur on the input field right and you could do the same thing and you don't need to create the you know like a use effect to do this and the use effect would essentially I mean you can just replace that right and what happens here is you no longer need like a event listener and all that kind of stuff so um this I just did it because for some students they said this just made more sense because it's an
event listener that listens to the document and if you click on the document it's going to pretty much fire that but I I suggest you take the previous approach okay you can take a look at the last video if you need more support but uh this is also another alternative okay so now that we have this function I'm going to create a use effect and I'm going to invoke it like this and in here this takes a arrow function and an mty dependency array okay and inside this I'm also going to I'm going to pass
in actually let me put this inside here so it's just easier to look okay and so inside this first I'm going to attach the event listener so I'm going to say document. add event listener for Mouse down and we're going to say hand handle click outside we're going to pass this call back in here okay and then we're just going to have a cleanup function in here as well so you see how this is very redundant because we probably wrote way more than we should have right and so this is why the last approach is
the previous approach is better but there are some there are some differences Okay the reason is because if you click on elements around it or on it it'll also trigger this click so just take a look at that and see if you might need it okay and once this is done of course we need to return all of these variables that we created up here so I'm going to say return edit enable edit disabled edit input ref and is pending okay nice now let's go back and let's quickly grab all the values that were returned
from our use edit automation okay right here we need edit enabled uh enable edit input ref and is pending okay and then we're also going to need to get the mutation data State value that means the optimistic UI value so I'm going to say const equal to use mutation data States and we're going to invoke this and the value that we're going to pass in here is the key the mutation key and if you remember we have a mutation key in here right called update Automation and that's the mutation key we want to use so
I'm going to put an array an array like this and pass in the string okay just like this and now I can get the latest variable and now down here we're saying automations okay and then we have uh Chevron here for editing let me take a look we have a span as well okay right here we're showing some text right so let's remove this just do command X so cut it and then we can paste it later so I'm just going to cut it from here and then I'm going to say edit if this is
true then we're going to return something in here or return something else so in this section I'm going to return an input field and in this one I'm going to return exactly what I had before which is a paragraph but I'm going to change it to data. data. name okay like this and not sure what this error is okay there we go and so we're just returning that value in here now for this section we're going to say input okay and this input comes from components UI and inside this component we're going to need to
first pass in that ref okay we have a ref from here right so let's pass in the ref saying ref equal input ref and then after this we have to have a placeholder okay and so this placeholder is going to say if it is pending that means we're making some save or API request then we're going to say latest variables. variables or add a new name okay and then after that some class name for some styling so I'm just going to say BG transparent h of Auto outline none text Bas border none and padding of
zero okay and now down here we also have another span which is the pencil icon and so what I'm going to do is I'm going to copy this just remove it okay remove it again and I'm going to say edit if you're editing we're going to do something if it's true or false right here and so if it's true we'll just return nothing okay and if it's false will return the span okay awesome cool now let's also scroll down and make sure we have everything else change is saved okay this should be good to go
let's just try so I click on this edit let's see what happens but we had to make a quick change here so right here where we are saying uh last variable. variables right we're rendering it when we are loading but when we click outside that means we're no longer editing what we're doing is we're just showing the paragraph which is this right here right but that is technically going to be the old value so we need to first check if latest variable. variables exist so this is all the this is the only change you need
to make okay so inside the paragraph here you're going to change it to latest variable Dov variables if this exists then latest variable. variables name or we'll return this one okay else we'll return the data. DAT name so now if you try trying a new name and you click outside it's going to stay there and it's not going to swap again okay so that's why you saw that flash if you try to pretty much save it without uh without this option right here now let's go back to the automation SL id/ page. TSX and now
we have a component in here called trigger right that's probably something that we can work on right now so let's click on the trigger component in here and first thing we're going to do uh actually I think we have this when let me search for this first so when right in here okay I think we are all right I think we're done with this section yeah so inside this trigger let's go ahead and complete this component now okay so what we're going to do in here first is we're going to need to uh use a
hook called use triggers okay and so this Hook is essentially going to help us uh store some state in our application and in this app we are going to be using Redux so in all my past projects I have built Redux from scratch okay so we used something very similar to react context API and we mixed it with Redux principles and we pretty much built a Redux Library completely from scratch so in this product uh in this project I'm going to use uh Redux that way if you choose to use this as a production uh
you know ready application or you're going to you know get the license and go live with this and probably make some money with this application then I will uh that's why I want to use Redux in here that way you can expand on the architecture okay so the first thing I'm going to do is I'm going to quit my terminal right here um why is it not cancelling something seems to be wrong okay there we go and we're going to say bun I and we're going to say at Redux toolkit okay and go ahead and
hit enter awesome and the other package we need is react Redux so go ahead and say bunai react Redux okay awesome there we go and these are both the packages that we need to pretty much set up Redux in our application first let's go ahead and shrink the entire project and let's go into Source Let's uh go into app inside layout and now we have to wrap our entire application uh application inside something called a provider okay and this provider is what's going to give us that state across the entire application okay so let's go
ahead and create that Redux provider so right here uh right above this query provider we're going to say Redux provider like this okay and then let's move this inside the provider and this component of course is going to be a custom component so open up your folder structure you want to go into providers and in here we're going to create Redux provider or you could also create another folder called Redux and you can do stuff with that but I think providers should be in here right so I'm going to say Redux Dash provider also guys
someone asked me a really odd question which is why are we using this naming convention which is lowercase D lowercase so the reason is because this is not a traditional react a vanilla react application in vanilla react applications we are building components okay and so the general naming convention is capital right kind of like camel case right but except the first letter is going to be Capital so it would be something like component like this. TSX right and that's the traditional vanilla style but in nextjs most of our routes are going to be in small
letters right so I would suggest you just have one naming ition across the entire project and just having everything make it sort of look like a route itself or just make look make it look similar to everything else in your in your project is probably a better approach that way everyone understands okay you know this is the naming convention now if you like you can have all your components in capital I mean in U you know the case that I just showed you but you'll notice even shat cnii is doing the exact same thing so
it would not make sense for you to create components like that okay so just wanted to point that out uh cuz someone asked me that question and I wanted to make sure you knew what you were doing what you were doing okay so inside Redux provider I'm going to say TSR fce and inside this I'm going to change this to Redux provider okay and the first thing we need for Redux provider is something called a store and if you don't know what this is guys I really suggest you watch uh maybe I think plura is
a good plur is a good project I mean that's my favorite project so you can take a look at that where we built um sort of like a funnel Builder and a bunch of other cool stuff and we used Redux in that application as well right and we also kind of uh broke down what a store would look like and more data you know in that video but or you can just go to the just read the documentation okay read the documentation because that's going to help you become a better developer okay and so we
need a store for our provider and that store is sort of like a state okay and the Redux provider under the hood is going to take that state and plug it into all of our components how does it do that well it does it with the help of a hook okay the hook is going to have access to the store and so when we use that hook in any client component we will get access to our Global state so Redux is nothing else but a global State Management tool okay so inside my root folder in
here inside source I'm going to create another folder called Redux oops that one once more sorry Redux like this and inside this I'm going to have the store and any slices that I need if you don't know what slices are I would suggest you read the documentation this is not a Redux course right so um or if you if you join the Discord and uh you ask someone in the community I'm sure the community will help you as well so first thing is I'm going to create the store. typ script and in here I also
need to change this to a use client file okay and first thing is we need something called the root reducer this is what essentially holds um all the reducers in our application okay so I'm going to use a function here called combine reducer it's not letting me install it so let me see if I can install it manually uh okay so now so import combine reducers from at Redux toolkit okay it's doing it there all right and I'm going to import this invok kits and now I can pass in my reducers and my reducer here
is pretty much like a function right and um well it is technically a function and what we're going to do in here is essentially tell it what to do depending on based on different cases and so think about it this way right imagine you had a function that listens for different type of events for example create store or I'm sorry not create store create action create Trigger or something like that right and so based on the type of action you tell that function to perform it will accordingly reduce the state okay that's why it's called
a reducer it reduces the state to a different value okay I think there's a better definition but that's how at least I think about it okay so the first reducer we're going to create is called automation reducer so let's open up our folder structure and inside Redux we're going to create a folder in here called slices okay so let's say slice and in here we're going to create automation. typescript and inside this first we're going to create that uh slice so I'm going to say export const automation equal to create slice okay and let's invoke
this as well and this is going to take the name of the slice first and this is called automation okay and then after this we need to also provide the initial State and the initial state is essentially what this what this state should hold when the application loads okay so you can have default data if you'd like and that's exactly what we're going to do as well so we're going to go up top here and we're going to say const initial state is going to be of a specific type which we're going to create in
just a second and that type is called uh that type is called initial State trigger props okay initial State trigger props and let's also go up here and create the the trigger props as well so type initial State trigger props equal to to an object like this and we're going to say trigger which is optional but we're going to say trigger like this and we're going to say type is either comment or DM the keyword which is going to be a string types which is going to be an array of string and then we also
have keywords which is also going be going to be an array of strings as well okay and so this is essentially the initial state of this specific slice okay and so now we can come down here and we can assign data to this so here's what I'm going to do I'm just going to set default data so trigger is going to be an object with type undefined UND undefined for keyword Mt Mt for these two as well okay and so now I can use this down here awesome finally we need the reducers and the reducer
is going to be an object and we are going to create a trigger reducer okay this is the word trigger and inside this um this is the keyword trigger right that basically acts like a case right like a switch statement and so if we're trying to trigger something then it's going to fire this this function so first this function gets access to the state and the specific action okay and this the type of these is payload action with our initial State trigger props so I'm going to put that in here okay nice and now inside
this function this is all I'm going to do so I'm going to say state DOT state. trigger okay if this exists then I'm going to say types uh equal to duplicate validation which is a helper function that we're going to need so let's go into our uols folder right here and all the way at the bottom I'm going to say export const duplication validation and this function is going to takeen an array and an element Okay so an array string elements and element like this and essentially we're going to say if we find that element
in here we're going to push it into the array and we're going to return that new array okay if not we're going to filter it that means remove it and return that value so let's go back here and I'm going to import this duplicate validation function and we're going to invoke it okay and so in here I'm going to say state. trigger. types like this and after that I need to pass in the action. payload do trigger. type okay like this guys and if you need more help just join the Discord and uh we probably
might have one session where we might help you guys understand a little bit more and so if you need more assistance we'll be in there or even the community and we'll be more than happy to help out okay at least we'll try our best because I'm I'm here trying to make more free projects for you guys right all right so now we have our Auto automation slice created let's go to the bottom and I want to say export const trigger equal to automations automation. actions okay so this is an action that we can fire and
then we also need to export default automation. reducer so this is the reducer that's being being exported from this component okay so now let's go one step back and now we can import this this reducer that we just created okay so I'm going to scroll up top here and I'm going to say import automation reducer from that file and now I'm going to paste this in here okay that's it next we have to configure the store so export const store equal configure store and we're going to invoke this and inside this object we're going to
pass in the reducer like this and this reducer is the root reducer itself okay and then we're going to have a middleware okay and this middleware is going to be a function an arrow function in here and all we're going to do is we're going to need to create um actually I don't think we need to create a function this is going to give us access to the default middleware so I'm just going to call this get default middleware okay and let's invoke this actually let's copy this sorry and in here we're going to return
this instead of doing it this way so invoke the this return it and then we're going to say serialize check set to false okay and guys there's a lot more benefits to using Redux for example um you know you can get the Redux Dev tools in the browser and you can see every single state change and so imagine if you have a really big application and every app or every component is firing off these reducers or basically fire dispatching actions to the reducers and so it's very difficult to track if you did not have something
like this and you had something like vanilla you know react stuff right so uh like context API and so that's why I like using Redux and in in a production environment we almost never use react context API we only we only use it if it's needed in a very small section of your code okay so next you need to export all these types so I'm going to say export type root state is return type type of store.get state and then the dispatch um type as well so app dispatch type off store. dispatch and then finally
we need um the use selector okay and guys this is not magic I didn't magically create all of these I just read the documentation and I just followed documentation okay so you don't have to know how to code I promise you all right so next thing is uh let's go up here and we also have to install one more package which is use selector and the type uh not install we have to import sorry so I'm going to say type use selector hook and use selector from react Redux and that way we can export the
use app selector and that way we can use it in all of our components okay it's the same thing here except we're using a state inside it so this app selector knows exactly what reducers we have what states we have and stuff like that okay so in a vanilla react application without typescript you don't need to do all of this okay you can just do use selector or use dispatch whatever you want and you don't need to do all these typescript stuff okay so now that we have this done we can go back and import
our store I know it's a you know very long process but there's a reason why right it's pretty much production level stuff so you're going to need to set it up this way and Redux always takes a very long time to set up but it is helpful okay so we're going to get children from the props first so I'm going to say children right and okay children which is going to be react. react node I can't type guys react node where is that okay right there and then in here we're going to need to return
that component so let's remove this and now we have to import a provider from react Redux so I'm going to say provider okay and inside this let's return the children okay and now in here I'm going to set the store equal to the store that we just created from our Redux store okay and that's it that's all we need to do for the setup now let's go back to our root layout and let's import our Redux uh provider all right so now that this is done for our trigger U that's the whole point of why
we need this right so we're going to go back now all the way to our trigger page which is automations page. TSX ID right here and Trigger component and now we can proceed from here so first we're going to need to get the automation data so I'm going to say const data like this equal to use Query Automation and let's import that and pass in the ID okay and here we can uh destructure data from this and now we can use that data down here so I'm going to say if data. dat exist then I
want to render something in here so I'm going to say data do data. trigger. length if it's greater than zero then what are we going to do well we're going to do something in here looks like I made a small error here this is not a curly bracket it's going to be this bracket okay so instead of return I'm going to say if like this okay so if this is true we're going to return the following so I'm going to return a div with the class name of flex Flex D column Gap Dy of six
and let me also make sure I'm running this guys so Bun Run Dev and let's refresh okay and in the meantime we can continue so I'm going to set items to Center and inside this I'm going to create a component called the active trigger component okay let me see if it is still refreshing okay is still refreshing that's a really really big refresh but okay we can proceed and so the active trigger component is going to help us pretty much um click on it and change the elements right so let's go ahead and create that
component so active trigger just like this and I'm going to copy this open up my folder structure and inside the trigger I'm going to create active. TSX and inside this I'm going to return a component also why is it taking so long guys something's wrong okay so it looked like it went to 3001 why did it do that or something wrong here not sure yeah for some reason it opened up in 3001 am I I don't know if I'm running another server somewhere probably need to disconnect that but I don't think it should be a
problem because so far we haven't used Local Host literally anywhere right in our code so that should be fine also this looks really horrible why do I have such a big gap here let me go and fix that H where is this all the way inside page all right guys so I solved the problem inside your website so website page. TSX in here there was some magical class that was added called minimum height of screen okay and I think that is not my problem that my just be v0 okay and everything else should be fine
now it looks beautiful I actually like this website it's kind of like a funnel right very straightforward maybe you can have a video here or something but anyway we don't want to think too much about our website only but hopefully you guys do a great job and show me a better website okay all right let me go back to our active trigger and now inside here we're going to get some props that we need and the first one is type type which is going to be string and then keywords which is going to be an
array of um values okay so ID word and automation ID okay and so we also need to D structure these so we can use them right and let's get let's go into our application and let's quickly log into everything okay there's one error here and the error is coming from the trigger index. TSX this needs to become a use client component okay and that should solve that problem okay let's go nice and now this uh I'm just going to import the active trigger component as well all right okay so now inside this component I'm going
to remove this action trigger and I'm going to set a class name to the following so background is going to be BG background 80 padding of three rounded XEL and width full and then inside this I'm going to set another div and this div is going to say Flex Gap X of two and items Center and I also want to make sure that this component is actually rendering in here let me take a look okay so the reason why nothing is rendering in here is because there's nothing inside data. trigger length right so I'm just
going to comment these two lines out and now you can see that the active trigger so now we can see what we're building and then we can turn it off if we need to okay and so inside this component now I'm going to check the type okay the type here if it's equal to comment do I have some type intelence nope okay no problem comment then I'm going to render something in here or I'll render something in here and now for this I'm going to render in uh some some icons right and should already be
there for you and I made an error here so equal to equal to equal to we're going to set this to Instagram blue component and the other one is going to be Planet blue okay or plain blue sorry not Planet blue okay so let's import this as well okay just like that and you can just swap between these and take a look if you want so let me remove this and show you what this looks like today hopefully okay I think there oh it's rendering the same thing so we need to remove this one right
here okay like that nice so let's go back all right so if it's a comment we're going to use this one and if it's not we'll use this okay kind of looks like a DM and then after this we're going to render a paragraph with text- LG and inside this we're going to say if type is equal to comment then in here we're going to do something if not we'll do something else in here so here we're going to say user comments on my post and in here we're going to say sends me a DM
okay so user uh send yeah user comments on my post or or they send me a DM okay so I can say user sends me a DM or DM is probably not a nice word to use in production so I'm going to change that to direct message okay people need to understand and so after this paragraph We have a div here we're going to hit enter and then we're going to say class name text- text- secondary and in here we're going to say um you know what Bas what are we trying to render uh what
are we trying to let the user know so that way they can click between the different options okay let me show you what I mean from the design so I'm going to copy this line right here and I'm going to paste it in here and I'm just going to give a description okay and so the description here is going to be if the user comments on a video that is set up to listen for keywords this automation will fire nice now we can copy that and we can paste it in here and we can say
if the user sends you a message that contains a keyword then let me remove this this automation will fire okay there we go so it gives more information now and next after this we're going to create these little um I guess pill components right kind of like keywords and so I'm going to say div class name Flex Gap -2 margin top of F flex-wrap and then inside this we're going to Loop over the keywords and we're going to say map and for each of these words we're going to return a components okay looks like I
made an error here what is this error oh right here okay so keywords. map and we have to return a div okay nice and now this div is going to first have a key and the key is going to come from here I honestly think react should just fix this problem I don't know why we have to create keys still should probably be something that's automatic right anyway well I I know there's a reason why but I'm just saying I really hope they update this so we don't have to do this every time all right
so in here we're also need to pass in a class name so the class name is going to look like this um in here so it's a background gradient from this color to this specific color Flex item Center Gap X2 capitalize the text is going to be white and it's just some padding with a with a rounded Edge okay and so looks like there is nothing inside keywords and so why did it map that means it's not an array it should be an array though oh it's because I haven't passed in any data okay so
let's go one step back and I'm going to pass in the type and the type here is going to be from this one let me do this once more okay so we're going to say type is data do data and the data is coming in from here and it looks like it also has another issue here what's what seems to be the problem okay it's because of this if condition right here right so that's that's the main issue and what is this supposed to be it's supposed to be a type here and so for now
I'm just going to say comment okay okay just to make this simple so I'll put a work in progress right here and also copy this and maybe just say commment for now okay so let's say work in progress add this instead Okay add this for the type okay and so the next prop we also need here is the keyword so I'm going to Loop I'm sorry I don't have to Loop over it I just have to return it in here so keywords is going to be equal to data. data. keywords okay and because it looks
like we don't have anything I I'm just going to pass in some default data so let me copy this object let's go back and I'm going to paste an array with this object in here and the ID is just going to be a random ID right and the word is going to be get started like this and the automation ID is going to need to be this specific Auto ID and I think this one is the same thing pam. ID I think this ID should work right so we can pass that value in here like
this okay and let's see what it does now okay it's not screaming anymore awesome now let's go back inside the trigger so active trigger and let's search for the word okay right here so we just have to render out those keywords now and so so inside this we're going to say paragraph word dot word. word there we go get started looks amazing okay so now let's go ahead and close this component let's go back one more step because we need to add more stuff in here and I'm going to change this to a Clos component
so it looks a little nicer and in here now we're going to need to Loop over the triggers okay so what I'm going to do here is I'm going to say data. data. trigger. length of course it's not going to be in here but if it's greater than one then we're going to render this out so I'm just going to return a react fragment and of course this is going to scream at me because this can be possibly null right and so let me see if I can fix this so for now I'm just going
to comment it that's the best way to fix it I believe and I'm going to change this here and just put another work in progress here so I know what to do okay and this is going to be dot length Okay and then down here I'm going to essentially just return a react fragment like we did before and a div inside that and then in here we're going to say class name relative width of 6 / 12 and inside this we're going to return a paragraph and we're going to say or okay and it kind
of looks like this guys right here okay so you're going to say or like that and looks like it's too far off what seems to be the problem okay the reason is because I said tative relative okay so relative and that should bring that up there and the background color can be removed you don't need it that should be good nice and then after this orb we're going to have a separator component so I'm going to say after this separator like this and this comes from our components UI folder orientation is going to be horizontal
and the class name for border is going to be a different color actually so let me go ahead and add that okay so I changed this to border muted like this and I'm not sure why that happened okay I don't know what exactly was going on and then in here I set the margin top to four okay so it gave it a little bit more spacing from the top and now it looks a little clean okay and then after this um we can we can also put the background if you want to kind of give
it some space right like a little space in left and right but that's that's okay if you don't want to do that's fine and then after this div guys we're going to hit enter here and we're going to create another active trigger component so I'm going to say active trigger like this and for this type um we're going to need to pass in a different type in here so let me see what other types we have here so I just went ahead and added the message as a type and for keywords I just copied what
was up here and I pasted it down here now for those of you who skipped the first video I really suggest you go and watch the first section so you understand what these are and how everything works okay but for those of you who skipped unfortunately and you're just jumping into the project I just want to help you understand what we're building right now okay so a trigger is essentially these two options right here a trigger is what helps start the Automation and there's two ways to trigger the automation user comments on a post or
user sends a DM okay this is no longer called replies uh to story because initially we I thought okay story is something cool but it's the same thing as a DM okay so sends you a DM keyword okay and so basically the user can select one of these or both of them as well all right so there are technically three ways to trigger an automation one is through this second is through this third is through both of these okay and the keywords you attach will attach to both of them as well like this okay and
then down here you can also see that once the trigger is done you can also add a then block okay this then block is basically an action which in the code we are calling listeners okay and the then is sort of like once this happens then what are we going to do we're going to send a message to the user right and that's pretty much it and you can see this is what it looks like and if you attach the posts to it the post will also mount to the bottom like this okay let me
change this to dark mode so you guys can see what it looks like on dark mode as well all right there you go and the post will pretty much attach so you get to select them and put them in here and story doesn't really matter right remember because it's just a DM so it's pretty much the same thing and that's it so that's what we're trying to build right now okay so let's go back here and just to confirm this is why we have this if condition right here okay if there are more than one
triggers that means greater than one then we'll render the extra trigger at the bottom right here okay which is this one and if there's not I there's just one then we'll render only the top one okay cool so now after this down here I'm going to hit enter right above this and in here I'm going to create the then button that we just spoke about which is this section okay so I'm going to say then action okay then action like this and this is going to be another component so let's open up our folder structure
and inside this trigger inside the same folder I'm going to create the then button so I'm going to say then action. TSX okay and now in here I'm going to return a component and I'm going to change this to then action also looks like I made an error here for triggers this makes sense it's not a trigger it's a then right right so I'm going to call this then like this and I'll move this then action inside this one okay awesome and now let's also go ahead and import this okay and now we can go
inside this component and pretty much do whatever we need to do okay so the first thing is we see everything render here that's awesome we're going to get a prop called ID which is a string and I'm also going to destructure it from here and after that in here we're going to use a new hook book called use listener okay and I think in the previous component we're also going to need another hook in here hm let me just take a look give me one second guys yeah we're going to need another hook in here
which is essentially going to help us store that state right inside our Redux store but for now we don't really need it we can just go into this and we can finish creating this component okay so inside our then component what we're going to do here is first we're going to create that hook so this Hook is called listener okay use listener use listener okay I don't want to call it use action because it sounds like a server action but up to you okay at least our Prisma says listener so I think that makes more
sense now that I think about it I probably could have come up with a better name sorry guys just change it if you like okay so I'm going to copy this now and I'm going to open up my folder structure and I'm going to go to actions and actually sorry this is a hook so we're going to go to hook down here and inside this I'm going to create a hook called use Dash or we already have the automations right so let's do it in here so scroll all the way to the bottom and we're
going to say export const use listener is equal to an error function and this eror function is going to take in a string which is called ID okay and then first we're going to create a state called The Listener itself so I'm going to say const listen listener okay which is basically the action guys remember this can be done in two ways one is with AI right let me show you right here so you can use Smart AI right here or you can use a message okay so that's why we're creating a listener so I'm
going to say listener or set listener and this is going to be equal to use State and the types in here is going to be message or smart SM AI okay and now inside this we're going to need to use uh react hook forms and so for that we're going to need Zod to create a schema right so I'm going to say const prompt schema okay equal to Z doob because this is where we can uh pretty much add the AI related stuff right so see if the AI is selected so smart AI is selected
there's going to be a text field where the user can put all the data in here right so that's why we're going to say object and we're going to invoke this and Z comes from Zod so let me see if I can import it okay I got to do it manually so I'm going to scroll all the way up top and I'm going to say import Z from Zod and the first one is going to be the prompt so I'm going to say prompt is z. string and the reply is z. string okay and then
after this I'm going to say const and I'm going to say use mutation data we're going to invoke this and we're also going to get mutate and is pending and now inside this we have to pass in the parameters so the first one is the mutate key right mutation key so I'm going to say create Das listener okay and then in here I'm going to pass in a callback function and then after this this is going to give us access to data and I'm going to destructure this value and get the prompt from this which
is going to be a string or the reply and the reply which is going to be a string as well and now in inside this call back I can essentially pass in the server action which is called save listener okay and I'm also going to remove this because we're returning this back and this is another server action that we need to create so let's go into automations in actions and inside index. TSX at the bottom I'm going to say export const save listener equal to and inside this we're going to need a couple par so
we're going to need the automation ID which is a string The Listener type which is smart AI or message The Prompt and the response reply sorry and then inside this first thing we're going to do is we're going to wait for the current user so wait current user and then we're going to have a TR catch and inside the TR catch we're going to create another query right and so we're going to say create equal await add listener please go away thank you and then in here I'm going to also change this to an async
component and then I'm going to copy this and then go into my queries file and at the bottom I'm going to say export const like this which is an async function and in here we're going to again get access to those values right so I'm going to pass in the parameters the same thing automation ID listener smart AI message prompt string reply string and in here we're going to return await client. automation do update like this and in here I'm going to say where ID is going to be automation ID okay the one that we
got from the params right here okay and then after this we're going to say data and inside data we're going to pass in The Listener which is going to be create so we're going to create a listener we're going to pass in that listener in here the prompt in here and the reply as well okay now let's go back and quickly import this add listener add listener okay not from process it's from queries and then after that down here we can check if this exists and it created successfully and then we'll return a 200 status
saying data listener created and then after that if something happened wrong we're just going to pass the 404 error saying can't save The Listener and then if a server side error happened I'm just going to return a 500 okay now let's go back to the other component right here use automation. typescript and guys if you don't know which page I'm on or I'm a little fast because I have to be fast just use this right here okay look at this breadcrumb all right the breadcrumb should help you okay and so I'm going to invoke this
save listener now and I can pass in the props that it needs okay so the first thing it needs is the ID which is right here so I'm going to say ID like this The Listener which is here the data. prompt okay data. prompt is coming from here and data. reply okay and then after that I also need the uh the key for the query itself so I'm going to say automation info okay and then once this is done we have to essentially use a hook a hook called use Zod form okay and this is
essentially going to help us wire up the fields or the input fields or whatever elements you're creating with react hook forms using the use form hook along with a schema and all that kind of stuff okay so let's go ahead and say const equal to use Zod form okay and this use OD form is going to be inside our hooks again so I'm going to create another hook say use- Zod dform dots and inside this I'm going to basically say const oh I said U is instead so it's TS and this is is Zod not
zon so in here I'm going to say const uod form equal to an aror function and this is going to need some properties so just going to pass in these arguments so schema which is going to be sod schema okay and the mutation function is going to be use mutation function as a type and the default values okay and so now in here we're going to say const equal to use form hook and we're going to import this use form hook and this is pretty much the magic of this entire application okay this entire hook
so we're going to say Z Dot and Z of course comes from Zod so z. infer the type that is passed in okay the type of the schema itself so in here we got to say type of schema and in here we have to pass in an object like this and now we have to pass in the Zod resolver okay so Zod resolver comes from Zod resolver um from Hook forms so I'm going to import that as well and then guys if you're wondering where is this package I think it's already too late to tell
you but shaty UI is going to install it okay all right it's probably way too late now but I just wanted to let you know if you're still confused and you're just coding with me so finally we need the default values which is going to be everything inside default values like this okay or you don't even need to do this you can just return this object itself okay cool now down here we're going to say const on form submit equal to handle submit which is going to be a function that's going to come from react
to forms itself okay like this and this handle submit is going to come from here so I'm going to extract it by first saying registers let's get everything we need right register we need form State and this is going to give us errors which is important and then we also need a couple more so after form State we also need handle submit watch and reset okay and after that down here here now we can invoke this handle submit function okay not sure what it did here okay like this and now we can pass in the
values so I'm going to say async function which is going to be an arrow function like this and this is going to give us access to the values and if you hover over this you're going to see any for now and that's because we don't actually need this okay so it's a promise okay I don't think it's going to matter but you can actually set the type of these as well but in here all we need to do is retain return mutation like this and we're going to invoke that and pass in everything that's inside
values okay like that nice and now let's go ahead and return everything that we just created so return register errors on form submit watch and reset okay nice now that we have this function we can export default usod form hook right so let's scroll all the way to the bottom export default use Zod form okay and now let's go back and let's import this magical form this magical hook all right and now we can get all those values that are being returned okay nice and now in here we need to pass in the schema that
we just created which is prom schema so let's go ahead and pass that in and let's see what's the second prop okay it's mutate so I'm going to pass in mutate as well all right nice and then after that I'm going to set a function here called onset listener so I'm going to say on const onset listener equal to an arrow function and this is going to have type which is smart AI or or it's going to be message right and this is going to essentially return something called set listener okay and we're going to
invoke this and pass in the type now where is the set listener it's right up here here okay there we go nice so we can use this kind of like a helper function and we can pass an A type into it okay and then after that we want to finally return everything that we created so return onset onset listener register on form submit the listener itself and the is pending State okay great job now let's go back and import this use listener hook okay and now we can destructure all of the values that are being
returned from that hook hook right here okay cool and then now I'm going to remove this okay remove it like that and I'm going to return another component in here and this component is called a trigger button okay and so we're basically reusing the same component for another section as well all right so we're going to say trigger button like this and we're also going to be needing this for the other sections right so this place right here and so in here I'm going to say label cuz it's the only prop that we need for
now is equal to then and then let's copy that title and then inside this automation tab I'm going to create another folder called trigger dash button and inside that an index. TSX and let's return a component and rename that component as well now this is going to take in two props the label and children so let's bring that in okay let's also destructure that from here and now down here we're going to essentially return another component called a popover cuz this is basically a popover component right so let's go here and remove this and also
let's go back quickly and just import this component before it screams okay nice and then all right we're good to go what seems to be the problem with label is it okay it's because it needs children elements right we don't have any children elements so I'm just going to say children something like this okay this wrong spelling child all right so let's go in here now and then I'm going to remove this and I'm going to create a pop over component this is a custom component okay and so we're going to open up our folder
structure we're going to shrink up we're going to click on global and create a pop over component in here. index. TSX and let's return a component and change it to popover and this is going to need the trigger for the popover the children that's going to be inside the popover and any class name right so let's grab that from the props like this and and also you guys know the drill let's destructure them really quick and then in here we're going to delete this and we're going to use the regular popover from components okay from
components UI and so this popover is going to need the popover trigger so I'm going to grab the popover trigger as well and let's import that as well okay please do not import from radx UI and then show up in the Discord and ask me questions all right guys please check your Imports check everything do as much as you can before you ask for help that way you'll learn okay all right and now let's go back and also import the popover component from this folder all right nice and now inside this component I'm going to
essentially do the following so in here I'm going to pass in the trigger and then after this I need to popover content so let's bring that component in as well so popover content is going to be from components UI as well and it's going to have a class name name which needs CN so let's bring that in and then we're going to say the following class name and anything that's passed into this component okay next align and side bottom so it shows up on the right side okay and then children are also going to be
rendered inside the popover content and that's pretty much it so now let's go back and inside our popover we can now pass in some style so I'm going to pass in a class name with of 400 pixel and then the trigger is going to be like a blue icon okay like this so what I'm going to do is I'm going to go in here and I'm going to say trigger equal to a div okay it did not do what I expected it to so div like this and this is going to have the following class
name so I'm going to say class name like this just please pause and type this okay it's just uh an element that's going to look like this right here okay and so after we have this inside this element I'm going to have an icon called a blue ad icon and you should also have this installed already inside your code okay and what's the error here okay there is no error no problem and then we also need a paragraph right after this that has a label in here that says then okay and so if you click
on it it's showing the popover you see that so there's just nothing inside the popover but it's doing exactly what it's supposed to so nice awesome now let's go back here and inside this we want to render out the children elements okay and then what else do we have to do here I think this should do the job there we go now we can see the children elements okay now let's go back really quick into our previous component and here we have this trigger right this trigger button now we can pass whatever we need to
have inside this so I'll try to open it and type along if it resets I'll just open it up again okay and then for this I'm going to say Dev U div Flex column and then gap of Y of two and inside this div we're going to have some listeners okay and so I think we may not have these let me go into constants and take a look inside okay so we're going to create a file called automations do automation. TSX inside constants and now we're going to need to create something called automation listeners in
here so export const automation listeners are equal to an array of objects okay so I'm going to say it's an array of objects but which specific type of objects is it's going to we're going to call this automation listener props okay so automation listener props is going to have ID label both are string icon is a jsx element and then or you can also say react. react node that should be fine as well this description is string type smart AI or message okay and now this is the specific type that we need in here okay
now for the automation listener in here I'm going to pass in some data guys you can also copy this from the GitHub all right please feel free to copy don't worry about it but I'm going to paste this as well and all we need to do in here is um we're going to say ID is generate uu ID label is user will we will send sorry this is wrong so send the user a message okay and then we're going to have an icon here called plain blue and then enter the message that you want to
send the user okay and then the type is going to be message in here and now this is basically a helper function you don't need this you can just do V4 if you want okay that's fine as well it's just uu ID under the hood okay all right and so after this done we have one right here we need one more so this is the Smart AI okay so I'm going to say smart Ai and let's change this to V4 and I'm going to import the smart AI icon and then I'm going to say label
let smart AI take over icon smart AI description and type okay tell AI about your project upgrade to use this feature and let's smart AI take over okay so basically they can swap it between these right and the smart AI is a chat bot that's essentially going to speak to the user which is really really cool okay so let's go back now all right and now we can use this constant that we created and we can map over them and for each of these we can return an element okay so in here I'm going to
say listener like this and I'm going to say listener. type if it's equal to Smart AI then we want to do something here or we're going to do something else okay and so what are we going to do in here first well if it is smart AI then we're going to uh return a subscription plan element okay and if not we're going to return a regular div so in here first I'm going to say subscription plan like this and first we're going to need to pass in a key okay and the key is going to
be the following which is listener do type okay that's fine and then the type here is going to be equal to Pro Plan okay of course we don't have this yet so we're going to create this component as well it's a really really small component so let's go into our components folder and let's search for we have billing in here okay do we have anything that says payment all right so we already created the subscription plan component so we don't need to create it again but we have a work in progress flag because we have
to do something in here right right and so what we're going to do in here is we're first going to say const some data in here is equal to use Query user which is another hook that we need to create so let's go ahead and copy this title here and then we're going to go into use queries down here okay we're going to scroll to the bottom and we're going to say export const usequery user is equal to an arrow function and in here we're going to return use Query we're going to invoke it and
the query key is going to be equal to an array with user- profile please don't make any errors here okay and then after that we're going to say query function and then the query function is going to be a function here called on user info okay so make sure you pass it in as well and let me make sure we created this completely okay nice and now we're going to go back and we're going to import the used query user and now inside this we can now destructure the data so we're going to grab the
data from here and now we're going to return something in here so we're going to say return data if subscription exists right so data. subscription. plan if it's equal to type then we're going to return that if uh if but then we're going to return the children elements if not we're going to just return this okay and now let's go back here and let's import that subscription plan okay subscription plan components nice there there we go great job and now another thing I want to do here is I want to go back to the trigger
component so trigger index. TSX and I'm just going to import the then action or do we do we still need this okay it is rendering U well we we do need this of course because we need to see the component that's what we're building but uh we need to pass in some props right or it's not going to render correctly and so what I'm going to do is I'm going to say ID because that's what it needs is equal to ID okay and then we're going to say something in here which is if the data
has a listener then render this out but actually guys we we don't need it because that has to be wrapped inside the if condition right so what I'll do is I'll copy this and I'll put a work in progress for this as well and right down here I'm going to render this out okay and now what seems to be the problem here why doesn't this then oh it's actually not then button right is it it's then action sorry okay and so I'm just going to say then action and the if condition is going to be
right here and I'm just going to comment this out just like this okay work in progress nice let's go into the then action and it says then action is okay never mind that was just an error and now we have the subscription plan set ready to go so now we're not going to see this because we don't have the component rendering because we are passing in uh The Listener type is not smart AI so what we can do guys is we can probably just change this to message let's see if we can change this here
and let's see what that looks like or would it really matter okay it wouldn't matter guys and the reason is because even though this is smart Ai and it should I mean even though we're just mapping over the listeners and we're rendering them out the user however does not have the subscription plan that has the that's the Pro Plan essentially right and so for that reason we're not going to get that element right we might get something else down here right just like that but we're not going to get this one instead and so what
we need to do here is we can just ignore this for now I mean we can just keep in mind assume what's going on okay which is just understand that we're going to be rendering um a div here with the listener we're just going to show an icon that looks like this okay so in here I'm going to remove this we're going to have a div and this div is going to have an onclick which we just got from up here which is the onset listener okay and then we're going to invoke that and pass
in the type inside that okay and then inside this div we're going to then have the key so I'm going to pass the key in here as well like this and after the key we're going to need to pass in a class name and the class name is like this okay so we're going to say CN function and if listeners equal to the listener type that means the user clicked on that then we're going to render a background gradient of blue okay if not we'll render a background gradient of 80 all right and then down
here we're going to just set the basic colors the basic styling okay so please pause and type this okay nice then after this down here we're going to say div and inside this div we're going to say Flex Gap X of two items Center and inside this we're going to put the listener icon okay and we also need to put a paragraph with a the label that we have for it so I'm going to say paragraph and label like this nice and then after this guys down here after this div we're going to have another
paragraph with the description of that specific listener okay cool and now we are done with this part now let's go down here and let's create the other one okay so we're pretty much going to need the exact same thing so I'm just going to copy this div all the way till here and I'm going to paste it in here and I'll see if I need to make some changes okay no changes needed exactly and all right that should be good and also one more thing real quick the reason why this is already pre-selected is inside
our hook right here we set that as a default okay so I assume if I remove this and let's refresh and let's just see what happens there we go now it's not selected so if you select it again it's going to show up like that okay just wanted to point that out and now you may also see another error down here right and that error takes takes place because we're creating the use mutation data and for the server action we're setting this in here okay which is the listener and if there's nothing in the listener
and they're we're trying to save it essentially then we're going to need to pretty much um save a default value right so I'm just going to say message as a default value so if listener is null for some reason then just use this so that way typescript does not scream okay nice and now let's go back let's go back down here and now you shouldn't see uh well now you're you're going to see this not unselected and now you can select this if you like now down here also I don't like this weird H weird
indent let me actually push this up so I'm going to click on the trigger button and inside this class right here I'm going to head I'm going to click margin top of four okay so that sort of pushes it out just a little bit more so it gives it some space and now let's scroll down here to the bottom and after this div uh after this bracket right here we're going to create a form element and this form is going to have the onsubmit like this set to the on form submit that we got from
here okay and then after that we're also going to need to pass in a class name which is flex Flex DC column Gap y of two and then inside this we're going to create a text area component okay text area like this that comes from shat CI and this is going to need first a placeholder so for placeholder I'm going to say the following so if it is smart AI all right The Listener is equal to Smart AI then I'm going to say add a prompt that your smart AI can use okay and if not
I'm going to say add a message you want to send to your customers or to yeah this should be fine okay and then after this down here we also have to use the register to register this element so I'm going to say spread operator for register and I'm going to pass in the prompt okay this is the type essentially the the ID for this and then after that we need a class name so I'm going to say class name background 80 outline none and uh we're going to say ring zero Focus ring zero as well
okay and then after this class name uh after this text area we're going to have another field in here which is an input element so let's bring in the input and we're going to use the spread operator for register and we're going to call this reply and then for the placeholder we're going to say add a reply for a comment right for comments this is optional and then down here we're going to say class name BG background 80 outline none border none ring zero and focus ring zero as well okay so you can add that
in here and you can optionally render this if you want guys for now I'm just just for Simplicity sake I'm just rendering it anyway but you could do some something like limit this if it's smart AI then of course we don't need you know some other things right like reply we only need the custom prompt right and so you can basically kind of go between that and decide which one to render next we need to submit all right so we need a button here so for this I'm going to say button like this which comes
from sheni and for the class name I'm going to set the following style so please pause and type and then after that we're going to have a loader in here and I'm going to say state is pending and I'm going to say add listener so it's a button that you can add now okay cool and if you try to add it let's see what happens okay it's just focusing on this cool all right now let's go back here and we're going to go one step back which is your trigger index.ts X and in here we're
going to turn on these Flags Okay so let's go ahead and turn this on right here and let's turn this off as well so you're not going to see both of these um let me also save this okay you're not going to see them that's because of course it doesn't fulfill that right and so let's also make sure I complete all of this this as well so return this and I say add this for the type data. trigger. type what does this mean okay it's the value I got it so we're going to copy this
and we're going to remove that work in progress flag and for the type I'm going to change it to data. data. trigger. type like this and for keywords we're going to remove these keywords and change it to data. keywords okay and then down here we also have another if condition so I'm going to turn this if condition on okay and this react fragment is going to go into this if condition right here okay and so we have if the length is greater than one then we want to do this okay so add this I'm going
to remove this as well and let me just uh quickly look through this okay so here's one more error so we need to change this active trigger as well so I'm going to remove the type and keyword and I'm going to copy these two and I'm going to paste them in here okay so type is data type trigger. type and then data data. keywords and then after this down here this is one more that we need to create so I'm going to remove the work in progress okay we're going to remove this then action and
we're going to place it in here okay cool done and now if you refresh the browser you will not see anything of course very sad but we're going to essentially render another trigger button down here so after this bracket right here I'm going to say return and we're going to return this trigger button so let's import the component and for label we're going to say add trigger okay and so there you go now you can see a trigger show up so if you click on this there we go now we have a popover okay and
this popover is going to have something very similar but we're going to have a class name here for this div Flex Das column and GAP Dy of two and inside this we're going to say automation triggers like this okay oh we need to create the automation triggers right so let's go into our constants file right here and inside this you see automation let's click on that and on top of this right here I'm going to create something very similar okay it's called automation triggers but this has a different trigger prop okay very similar to the
one we have here so I'm just going to say export type automation trigger props is going to have the ID label the icon description and the type which is going to be set to this and then down here we need V4 so I'm going to import that and then that's it we're just creating two values one is comment one is DM right remember we had two different triggers right and then here I'm going to import these two icons and I'm going to change this if I need to so user comments on my post select if
you want to automate comments on your post okay and then we also have V4 in here as well replies to my DMs okay and then select if you want to automate DMS on your profile so this is not replies to my DMs this is sends or when it's basically when the user sends me a DM with a keyword right this is what it is so keyword like this and now we can copy this and go back and we can import the triggers and then we can map over this okay so we're going to say map
we're going to invoke this and now we're going to return a a component for this so in here I'm going to say Auto okay and our automation basically so our trigger should be fine and then down here we're going to say div why is it not creating the ending tag for me so weird and then inside this we're going to need to first pass in the key so I'm going to say key is going to be trigger trigger. ID and inside this we're also going to need uh it's not inside this sorry we're also need
the onclick so onclick is going to be trigger. type okay and the onet trigger is going to come from let me see up here okay so we're going to need to create this hook and this is essentially going to help us activate this okay so this Hook is called onset uh not onset trigger sorry use triggers okay so this is equal to use trigger triggers like this and it needs the ID so I'm just going to pass that in and let's scroll down into our hooks folder in here I'm going to click on use automations
and at the bottom we're going to say export const like this use triggers is equal to an arrow function with ID set to string okay and in here we're going to say const types equal use app selector okay this is why we need that Redux store right and this is going to give us an arrow function that gives us the state and we can pretty much return whatever state we want so I'm going to return the automation reducer do trigger. types okay not type types and then once we have this stored we can say cons
dispatch equal to use dispatch and we're going to invoke this and we're going to get the app dispatch type okay and then down here I'm going to say const onset trigger is equal to an arrow function like this and this is going to give us the type which is of type comment or of type DM right and in here we're not going to I'm just just going to remove the curly bracket and directly return a dispatch function okay and this dispatch function is used dispatch right here right but what are we going to dispatch well
we're going to dispatch the Trigger action okay so let's dispatch this and we need to pass in the values so the payload essentially and this is going to have type set to this type okay uh sorry this type is set to this one right here okay cool then after this we're going to say const onsave trigger which is another helper that that is needed for the mutate function and we're going to say actually before we do this guys we need to grab the mutate so I'm going to say const equal to use mutation data we're
going to invoke this and this is going to give us is pending in mutate and then down here I'm going to say mutate going to invoke it and we're going to pass in types and this used mutation data is also going to need some values so the first thing is it needs a mutation key so that's going to be add. trigger and then we need a callback function and this callback function is called data which is an object with types not type types set to an array of strings and then finally this error function also
has to return a save trigger server action which we don't have of course but we're going to make that and then um we can do that by going into the automation index. TSX and down here I'm going to say export const save trigger which is an async function and I'm going to set this to async and we're going to say automation ID is going to be a string and Trigger is going to be string array and in here first we need to await the current user I'm going to say await current user first and then
we need our typical TR catch okay and inside here we're going to basically add that trigger so I'm going to create another server action called add trigger that's going to take in the automation uh the automation ID so this one and the trigger itself okay and this function is going to be inside the query so we're going to go in here and we're going to say export const add trigger is going to be an async function and this is going to do the following in here so first let me also get the automation ID which
is a string okay and Trigger which is an array of strings and in here we're going to before we return we have to check if the trigger has anything so if the trigger. length equal to 2 then we're going to say return await client. automation. update and we're going to update for this so we're going to say where the ID is like the automation ID and we're going to update the following data so what are we going to update well we're going to change the trigger to be the following so created um sorry create create
many we're going to create multiple and we're going to pass in the data which is an array with the type set to trigger at zero and another type which is trigger at one okay because there's only two right now or you could just pass them in that's fine as well right because we know what it's what it's going to look like okay so now if it's not equal to two what do we do then well here we're going to return await client. automation do update okay and we're going to say where set to ID is
automation ID okay and then data is going to be set to trigger which is going to be create so we're going to create some data here and type is going to be set to trigger at zero okay awesome all right so once this is done let's go back and let's import this query action okay server action query action and then we're going to return 200 if it's successful you guys know the drill return 4 4 if it's not and then down here return 500 if some error took place and let's go back and I'm going
to import this use uh not use mutation data sorry import this save trigger server action now and I can I can also pass in the ID and the data. types okay and then we finally need one more which is the query key and so this is the automation info okay let me make sure I didn't make any spelling errors okay that's good to go and then after that we're going to now create this on Save trigger mutate we're going to invoke mutate and pass in the types okay and then we also need to return everything
that we just created so let's return everything right here okay something looks wrong here guys it's saying okay I messed this up so this is not an array this is an array okay only this part okay this is a this is a function we're passing in parameter okay or this I mean this side is called arguments all right not parameters parameters I think is when you are accepting it into the thing right so you're accepting it in here that's called parameters this is called arguments okay all right pH that was a lot so now let's
go back and let's import our beautiful hook okay and we can also destructure all the values right away and we're going to need the ypes onset trigger on Save trigger and is pending okay and now let's scroll down right here and for the onclick this onset trigger should now work nice now for the class name I'm going to say class name is CN function right let's import that and the default styles that we're going to need is this right here which is hover opacity 80 text white rounded XL flex cursor pointer Flex column and padding
three and GAP y of two and then after that we're going to say if we're not able to find this which is if this type so amongst the types that are selected if we cannot find the one that was selected right here right then we're going to return background of 80 if not we'll return the selected icon okay there you go now you can see two okay great so let me refresh and see if I can select them individually all right there we go nice and now after this inside these elements we have to Al
have to render those um the icons and stuff right so first we're going to have a div and that div is going to have the following class name so we're going to say why is it not creating my div correctly okay and this is going to have Flex Gap X of two items of Center and first we need an icon so I'm going to say the trigger do icon and then after that we're going to need the label so inside here I'm going to say trigger. label and then finally we're going to have another paragraph
right here which is going to say trigger. description and that should be pretty much all we need there we go now you can select whichever one you want or both of them and you can run them now again there's one more part which is the keywords right so let's move to that section now and so after this one right here we're going to hit enter and we're going to create a component called keywords okay and this is going to have ID set to the ID like this and now let's go ahead and create this component
so inside the trigger page we can say keyword. TSX and let's return a component and let's rename it okay awesome it's probably key words is it okay it's one word I think okay now we need some props so I'm going to get the ID and also destructured from here and inside this component let me make sure I can also import it so it doesn't scream so let's go back and also quickly import the keywords component why is it not oh it should be capital okay let's do that once more there we go nice and now
inside this component we can essentially um render out keywords and give the user an a way to end enter keywords as well okay and so let's first do the setup because we're going to need a hook here that's going to help us with this and this Hook is called use keyword okay use keyword okay and then I'm going to invoke invoke this and I'm actually going to add an S here to make it plural and now let's go into our hooks folder right here and we're going to click on use automations and at the bottom
we're going to say export const use keywords which is going to be a server action and this is going to first need an an ID which is a string and we're going to first create a state here okay this is the keyword itself so I'm going to say const keyword and set keyword okay and this is equal to use State and let's invoke that and the default values for this is a string so you don't have to add it again um even for Boolean guys if it's a static type you don't actually need to put
that that type in here okay if it's Boolean number it will automatically do typescript automatically knows okay and then next we're going to say const on value change on value change which is a helper function which is going to take which is an arrow function that's going to take it going to get an event but this event is of type react. changeevent for the HTML input element okay and then in here we're going to return the set keyword function and we're going to say e. target. value like this nice and then we're also going to
have another one which is on key press but which specific key press so when the user clicks on enter we want it to essentially mutate and set that keyword right so that's why we're going to have the on key press as enter so down here we're going to say const on key press equals to an arrow function and this is going to have the same element same uh event right here which is HTML input event and in here now we're going to say if e do key is equal to enter okay then we're going to
do something here okay something looks wrong here guys because this is not a change event sorry this is a keyboard event okay keyboard event for the HTML input and then you'll also get um you know type intellisense for this event here and so in here if it if this is true we're going to essentially get mutate right and this mutate is going to come from um from our use mutation and so what we can do is right above this I'm going to say const mutate equal to use mutation data we're going to invoke this and
first I'm going to pass in the mutation key which is ADD keyword and then the server action is called save keyword so let's pass that in as well okay it's a it's a call back function that returns a server action right and of course we need to create this and we'll get to this in just a second but let's also add the query key as well which is automation info and then we also need the final one which is on settle which is set keyword to empty okay and now let's also go in here and
quickly create the server action so let's go into our server action folder inside index. TSX for Automation and I'm going to basically copy this guys I think we've done this a million times right so I don't have to do it again but I'll read it of course okay so we're going to essentially say save keyword which needs automation ID and the keyword itself both are strings and we're going to do on current user and then in here we're going to say const create await add key add keyword which is another query and then we're going
to pass in these values okay and then you know 200 00 response 404 and 500 according to the situation so now let's go in here to queries maybe there's a way to also improve this code right because the only thing that changes here is this so definitely something you could do to improve but I think just consider the data that's being uh returned from here as well okay because there's a lot of code in here that we're pretty much it's I mean it's very redundant so maybe you can do that but if you think about
it like different teams might like if there are different teams working on your project they might all have like a different style or they might need different requirements so maybe it's not a good idea maybe it is I'm not sure but um it's very difficult to tell so early on in the project right as you go eventually you'll come to know and then you can refactor code okay and so save keyword uh add add keyword is another query so let's go in here and let's create this query which is a very simple query as well
so I'm going to say export const add keyword okay equal to an error function which is going to be an async error function and this is going to need the automation ID which is going to be a string and the keyword itself which is going to be a string as well so keyword string man I can't I can't type guys I need a replacement anyone wants to take over web prodigies please let me know and now I'm going to essenti return client. automation. update okay and for this one for this specific Automation and we're going
to update the keyword by creating that specific keyword okay that is it now let's go back and import this beautiful query that we created and let's also go back one more file and import the server action that we just created okay all right and now after this down here we can now do the next stage which is invoke the mutate function and pass in the required data which is the keyword itself right so I'm going to say keyword like this awesome and then down here I also need to set the keyword to empty because they
have hit enter right so let's do that as well and then after this down here we're going to essentially call another mutation data if the user is trying to delete this right so another mutation for this as well so I'm going to do pretty much the same same exact thing but we're going to have a different server action here so use mutation data same thing for mutate and delete uh this one we're just renaming it to delete mutation and the mutation key is delete keyword it's an error function that gives us data and we're destructuring
to get ID and the arrow of the the server action is called delete keyword and the query is query key is automation info okay so now let's go ahead and create This Server action as well I'm going to go into the same same file up here and at the bottom I'm going to say pretty much the exact same thing which is delete uh Delete keyword for the specific ID we're going to wait the current user and then we're going to call a uh server action and This Server action is actually hm so this might be
wrong guys just give me one second okay this is wrong so I'm going to call this uh we have ADD keyword delete keyword save keyword delete keyword query okay and let's go in here and I need to create that so export const delete query like this and then this is going to be an async function and we need an ID which is a string okay so which one we're trying to delete and in here we're going to say return client. automations or CL client. keyword. delete where the ID is as follows okay nice and now
let's go back and also import this one okay and so if this deleted if this is deleted it's going to just say deleted successful and we're going to return to 100 saying keyword deleted and then in here keyword not found and then 500 if some error took place okay all right and now let's go one more step back and let's import this delete keyword function and that's pretty much it okay that's it and now down here we also have to pass in this delete mutation right that way we can click on it on the front
end and then make a change so we essentially returning all of the things that we created in here and so the things we need to return is keyword on value change on key press and delete mutation now let's go back and let's bring in our amazing uh function which is in here okay our hook use keywords and now we can pretty much grab all the data that is being returned here so I'm going to destructure and grab all the values and I need to also pass in the ID itself okay okay so we see keywords
here nice we're getting very close we're almost done guys we're very very close so next I'm going to say const latest variable because we're going to need some data from here as well which is equal to use mutation data State we're going to invoke that and we're going to pass in an array with ADD keyword as the mutation key okay and then we're also going to need another server action in here called use Query automation so we can get all the data that we need and now we can scroll down here and we can remove
this and we can return a class name for this div so I'm going to hit enter here and let's change this okay not sure what it did there okay there we go okay so these are the Styles uh background color Flex Flex column some Gap and padding and rounded as well well and then we're also going to have a paragraph in here guys one more thing do you even remember CSS I hope you guys do all right CSS is my favorite and I well I used to use something called scss I don't know if you
know this but this is in in production grade applications or at least in corporate level applications we they usually have something that's a little older so they probably don't use Tailwind okay and it's kind it kind of sucks but um I hope you guys remember CSS man don't forget CSS okay cool such a weird off topic thing but let's go back actually maybe we can sometimes create sometime in the future create an application just using pure CSS it's going to be a pain right it's going to take very long time probably double the amount of
time but maybe maybe a small little application okay all right and so we're going to have another div we're going to say Flex Flex wrap justify start Gap two and items of Center and then now we're going to Loop over the element so we're going to say if data. dat. keywords and that means if that exists then we're going to check if data. dat. keywords. length why is it not letting me do that do length okay and if this is true I mean if it's greater than zero then we want to say and data do
data. keywords map and also this is not a truthy value so you don't even have to put this in here right but just for code readability it's nicer okay and then we're going to map over this and we're going to return something so in here we're just going to return an element and the element we are going to return is a div so I'm going to say div like this and let's remove this right here okay there we go and now this div is going to have a color but actually before we do that guys
we have to make another quick if statement okay we want to make sure that it is the latest variable right so what we can do here is we can say um if this is not equal to the latest variable that means what someone has just entered then we can render so so basically if the word. ID is not equal to the latest variable. ID then we'll return this okay so I'm going to remove this from here and I'm going to say word like this and we can now return this div all right and this word
comes from here okay basically is the keyword essentially and so inside this div what are we going to render well also take a look at this right we have the input field looks amazing um but for some reason I can't can't access it and the reason is because it's going to be um an input field at the bottom okay so sorry about that I think this is more like a description probably let's see is it a description or not where is a design Hello design okay it is just a description never mind yeah we're going
to have an input field at the bottom then okay and so what I'm going to do here is if this is true then I'm going to return a div and this div is going to first have a key so I'm going to say key it's going to be word. ID and then the class name is going to be the following so we're going to set some background Flex item Center Gap capitalize text color padding and rounded full okay and in here we're going to say paragraph is word. word and we're going to create another icon
uh not create we're just going to import an icon called X FD react and it's kind of like an x mark okay that helps us delete that um that keyword essentially and then the user can essentially click on this and delete it as well okay now we're going to use the latest variable to render out the mutation state right so we're going to say latest if this is true and the status is pending then we're going to return a div in here and we're going to set the following styles on it and we're going to
say latest variables. variables. keyword okay nice and then after this down here we're going to say input input like this and this comes from components UI and this is going to have a placeholder we're going to call this add keyword and then for style I'm just going to set some hardcoded Styles in here so I'm going to say with which is Max minimum and the reason is because we want to use this right so math. minimum which is math. max keywords. length and we're just going to basically pass in uh how much ER we need
okay and then after this I'm going to pass in the value which is the keyword itself and then some Styles so we're going to change padding some background color ring border and outline and then after that we need an on change and an on key up which we also got right so let's pass those in as well so now if you click on it there we go now you have that thing right here okay the input field and so you see the width also increases accordingly right super nice or I mean if do you even
need it let me see if I if we even need it all right let's refresh this okay let's click it's just going to take the entire width right like that if you if you like that that's fine too I think I probably like that so I'm just going to remove it okay now let's just quickly test this out so I'm going to try to add a trigger so I'm just going to say test and hit enter there we go nice and the X shows up once it is successfully added only okay and now if we
close this um we're not we have haven't actually set up the the optimistic UI for deletion but it will delete it okay nice cool and so if you wanted to do the optimistic UI for deletion as well you would have to render this data differently okay that means you would have to render the keywords without that the new latest variable so you would see the latest variable that's being deleted right right and you can use that to essentially kind of remove it from here filter it from here so another simpler way is you don't even
need this you know that for a fact that when the user clicks the X Mark we got to remove it right and so what you could do is you could filter this data for that uh value that was deleted okay all right guys great job so far I'm super super proud of you you have come so far there's so much more but I hope you're excited now because now we're getting into the juicy stuff so after the user selects the keyword they also need a way to save it right so we're going to have a
simple button in here and this button comes from components UI button and we're going to have an onclick which is a save trigger that came from our hook and then we're going to have disabled set to if the types is length of zero we'll disable the button and then we'll have some class names so we're going to set a gradient from this color to this color with text white and font medium and then for loader I'm going to import our custom loader and for is pending uh state is going to be is pending and then
I'm going to say create trigger okay so you see you can't add it now and now you can add it once you select something okay so let me refresh the page and let's try once more so add trigger user comments on my post and let's also add a keyword here so I'm going to say testing or get started and let's hit enter okay and let's create the trigger hey there we go looks amazing great job guys okay so I also don't like the wording of this so I'm just going to quickly change that from our
constant file so let's go to constants you might have it already done for you if you copied it from the GitHub if not no problem okay so when user comments on my post that makes sense right and so when user sends me a DM so user sends me a DM with a keyword okay there you go now this makes more sense okay all right I just deleted the trigger cuz I wanted to try it once more make sure it looks nice so let's try it once more so I'm going to select this one and now
the last time I selected this so let's select this and now I'm going to say testing or we'll say yeah testing should be fine okay and then let's go ahead and say create trigger okay there we go looks nice so user sends me a direct message great job guys so now we have the trigger set up we also need the then node and the post node right so this way we can render them in here so what I'm going to do is I'm going to say then node in here and then this then node is
going to be another component inside our then so let me see if we can bring this in here okay you see we have then we're going to say node like this. TSX and inside this we're going to return a component and set it to then node and let's also go back and import this component as well so in case you're confused this then then is not the same thing as this okay this is slightly different um we just need to we need to kind of show the component right here right so as a then block
right here so that's why we have this as another component okay so in here first thing we're going to say is const data we need to get the the autom a data right so I'm going to say equal to use Query Automation and we're going to invoke it and pass in the ID that comes in from props so this is going to be a string okay and we need to go ahead and destructure this and now we'll have the ID right here and next we're going to say common trigger is equal to data which comes
from here if data. dat. trigger. find where the comment is equal to comment here the type is comment and we're going to store this in a variable and then right here we're going to check if there is a listener so let's remove this and we're going to say return if the listener does not exist so if there's nothing inside I mean not does not exist we're essentially converting this to a truthy falsy value right so we can compare it so if the listener exist in here then what are we going to do well we're going
to do something in here or we'll return something else and so in here what's the issue is this loading that's a really big load and so in here what we're going to do is because we're using a client component here we got to say use client because we're using a hook and let's refresh and that should solve this bug and then now here I'm going to just return a react fragment okay and in here now I'm going to return that listener itself so remember I told you guys this is basically an act right so that
action is what we're going to render but we're calling it a listener in the code um it's fine if you want to call it listener or action but I'm just going to call it a listener because that's what we're worked on so far okay so in here now we're going to essentially return a div like this okay so return this if it's true return react fragment else return a div okay and now this div is going to have a class name and the class name is really long so I'm going to copy this and it's
going to say width is full okay and on large devices we're going to change it relative on extra large we'll change it as well padding rounded flex and then we also have some colors okay and then in here we're going to return another div with the following class names so we're going to set absolute height some left bottom flex and item Center and Z index as well and now in here we're going to next return a span and so this is just like a element here itself it doesn't really do anything right and so after
the span we now have a separator component so I'm going to say separator like this and let's bring it in from our components folder and the orientation is going to be vertical and we're going to set some styling on it okay and so right now because we don't have any listeners of course we're not going to have any data in here so if there was something then we'll be showing this card right so we can try to add one let me just try to add one and see what happens so add a listener well send
the user a message add a message you want to send the user thanks for joining pu okay let's add this listener all right there we go so now you see it's added the listener for us right great job so now after this separator down here we're going to add another span okay another span like this and right below this uh sorry after this div we're going to add another div with a warning okay it's a warning icon let's bring that in from our icons folder and then we're going to say dot then here okay and
what seems to be the issue all right there we go so when then okay and so what are we going to do here well if this exists um actually we don't have to check if sorry guys um after this we're going to hit another div and then inside this div I'm going to create another div with flex gap of two items Center okay I'm going to change this and then inside this div we're going to Loop over all of the data and let's make sure we have that okay we have data so data. data. listener
okay and if this is equal to message then we'll have another operation right here okay and this is um also this is incorrect this has to be one more listener right here okay and so for this right here if this is true we're going to return the plain blue icon and let's go ahead and import that icon and then if not we'll return the smart icon okay smart AI icon like this okay all right there we go cool so then we're rendering this and uh let's see so the listener message uh let's Al so refresh
the browser make sure everything's running okay there we go now we see the icon and so after this down here I'm going to create another paragraph and this paragraph is going to have font bold text large and then inside this now I'm going to Loop over the data so I'm going to say data. data. listener. listener and if this is equal to message again then we're going to do something in here or we'll do something else here okay so if it's true we're going to say send the user a message okay and then down here
we're going to say let smart AI take over okay very straightforward and maybe the text bold might be a little too powerful so we could just remove text bold from here okay so it looks a little more uniform right all right and then after this paragraph we have a div here right hit enter after this you want to create another paragraph tag with font dlight and then we're going to say text- text- secondary and inside this we're going to say data. dat. listener. prompt okay and then uh it's going to show up right here okay
okay cool there we go and then all the way down here after this div we're going to say data. dat. poost posts. length and this is of course only once we connect the post right right now we don't have anything because we haven't connected the Instagram API and now if this is true I'm just going to return a react fragment and if this is false I will return a another state another if condition okay so I'm going to say common trigger if this exists then we'll do something in here I'll return something else and so
for this one what I'm going to do here is I'm going to return a button here and this button is called post button okay and for this I think we might need some stuff from uh Instagram we'll see we'll see if we need something but for now I'm just going to create the post button like this and let's also copy this title so we can go back and open up our folder structure and inside then or actually not inside then sorry inside the automations folder we can create one for post okay and inside that an
index. TSX and the node. TSX if we need it okay and so so for the index. TSX I'm going to return a component and just rename it to post button and also let's go one step back and import this component real quick all right nice and looks like the browser is taking too long to load I think I have a bunch of things running all right that's fine and so after the post button here if this was false we're going to return a react fragments okay awesome now what is this section well if the user
had selected comments as a trigger well the comment has to be on the video and so for that reason we're going to need to render out all the posts that they oops okay that's my alarm forgive me so we have to comment out uh we have to render out all of the posts and the ones that they have selected to listen for all right and real quick just want to give you an idea of how we're going to go about this okay so the tricky thing with uh Instagram API is you want to limit your
API calls as much as possible at least when you're not in live mode okay so if you're if in Dev mode we want to make sure that you know we we limit our API calls as much as possible and so for that reason we're going to do the Instagram setup towards the end okay just to be safe or maybe somewhere in between where it just makes sense to get it set up right then okay so for now what what we can do is we need to at least look at the design from our figma mockups
and this is why figma is amazing we're going to look at the design and just have an idea of what we're trying to build okay so look at this design and that way you can you can know exactly what we're coding and so with this in mind we can build a setup right we can build a setup and then we can wire up the Instagram API okay because there are two more sections to this the first one is we also have to create a web hook okay okay and how Instagram API works is it will
call your web Hook when the user you know basically sends that message or they comment on your on your videos right and so we need that web hook to be set up as well so there's a web hook section and there's also an ooth flow and we also have the posts so for now we're going to do as much setup as we can before we actually grab the API and plug it in here so take a look at the design like I said and let's assume that this is what we're building and kind of just
lock your mind onto this because for the next few minutes we're not going to be able to see exactly what we're coding okay so just look at this and assume that okay this is what we're doing all right cool so first what I'm going to do in here is I'm going to create a hook called usequery automations post I'm going to say const data equal to usequery automations post I'm going to invoke it and this is going to come from our hooks folder so let's scroll all the way down here I'm going to create another
file called uh actually we already have used queries so we can click on use queries and scroll to the bottom and we're going to say export const use Query automations post is going to be an arrow function like this and this Arrow function is first going to need to fetch the data right and so inside here I'm going to say const fetch the post first and this is also going to be an async arrow function in here so async Arrow function okay okay and this is going to need to have a wait in here and
we're going to say get profile posts okay and so of course we're not going to have you know we're still calling the endpoint but it's not going to work because we're not going to have some data so just keep that in mind all right and so what I'm going to do now is let's quickly go to our automations folder and let's build this action okay so we're going to say export const get profile posts equal to async Arrow function like this and this Arrow function in here is first going to call the the current user
right to make sure the user exists and then we're going to need to get the access token okay and so this is what we need to do inside our TR catch so first let's go ahead and find the user so we're going to say find user like this and then after this we're going to need to fetch the posts okay and so we're fetching the post from the Instagram API now um I'm going to need to copy this and paste it because I don't want to make any errors but all we're doing is we're using
the fetch API and the reason is because for some reason guys axios was not doing it I don't know what error it was maybe something to do with headers I don't know but uh fetch was working perfectly axios was not doing it right and so I just changed this to fetch and now everything worked okay so we're going to say cons post equal await Fetch and we're going to say process c.v. Instagram base URL which is already done for us inside the uh inside your environment file right and then we're going to say slm SL
media question mark so we're going to pass in some pams now some query pams we're going to need the field for we're going to say ID comma cap uh caption comma media URL comma media type comma timestamps and the other variable is limit to 10 and you can change this if you want right you can do scrolling load more whatever you want but I'm just going to limit to 10 for now and we need the access token okay so access token is going to be equal to uh the profile. Integrations z. toen and now we
don't have this information okay at the moment we're not going to have it because we haven't connected the user account now another thing to keep in mind is Instagram is very very specific with how you can get all these tokens okay and so in development mode the only only way we can do this is inside the metad developer dashboard okay and so we're going to need to create the token manually and then paste it in here okay we can't do it uh through the oath flow because the the app is not going to be live
so only once it's live will you be able to uh get the token with through the oo flow and all that kind of fun stuff okay so next in here I'm going to say const par equal to A8 post. Json okay and let's invoke this and after this down here I'm going to say if parse so we have some data then we're going to return an object with status 200 and we're also going to return data set to pars like this and then if there was an error we'll say 404 right here and we can
also console.log and say error with a little red Emoji cuz it's going to be hard to tell so error in getting posts okay and here I'm also going to say error in getting post server okay server side error so server side error and you can also console the error itself right of course and then here I'm going to just return status of 500 okay cool now let's go back and quickly import the get profile posts um server action and then down here now we can use use Query so I'm going to say use Query we're
going to invoke it we're going to pass in the query key and the query key is going to be instagram- media like this okay and let me make sure I'm using the exact spellings no errors okay and then we also need the query function and the query function is going to be get all automations okay all right that's it so now let's go back and let's import this hook okay nice and then the next thing is we're going to need to create another Post in U sorry another hook called use automations post and this is
a way for us to essentially keep track of what the user has selected or kind of like have a state to have whether the user has selected that or not okay and so let's go up here and I'm going to say const use automation post so some data in here equal use automation posts and let's go ahead and invoke this and also pass in the prop which we're going to get from here which is the ID okay so I'm going to say ID here which is a string and also destructure it from here as well
okay and then now I can copy ID and paste the ID in here now I'm going to copy this hook right here and inside our folder structure I'm going to scroll down to hooks use automation now I'm going to say export const use automation posts and this is going to need the ID which is going to be a string okay and now in here first we're going to store a state for all the posts okay and then we're also going to have a helper function called called on select post and we're going to return this
to our component and that way we can mount that onto the the element that shows the post itself so that way when we click on it we either show it as selected or we remove it okay it's like filtering it out and then we're also going to use the use mutation data to essentially uh set the post and stuff like that okay so in here first let's go ahead and create the states I'm going to say const posts and set posts equal to use State okay like this and let's import this and for the type
here we're going to set an array of objects and I'm just going to give it a default value and for this we're going to need media post ID caption which is post ID is a string caption is optional in a string media is a string as well and then we're also going to need media type which is image video and Carousel album and now inside this now we can create our on select post helper so this is going to need the post itself which of course is going to be this type so I'm just going
to copy this here and paste it in here okay and then inside this we can now set this set posts to whatever the user clicked on okay so what I'm going to do here is first I'm going to say set posts like this and this is going to give us the previous state so previous items and then inside this we're going to need to say if the previous items like this dot find and we're going to find for something in here so we're going to say p which is a post if p. post ID is
equal to the post. poost ID that means this is the one the user wants then we're going to dup uh we're going to remove its duplicate by filtering it out okay so what we're going to do in here is we're going to say return previous items or pre items what did I oh I spelled it incorrectly that's why so previous items okay this is better so previous items do filter not fil sorry filter and we're going to say filter for where this is the item and the item. poost ID is not equal to this post.
poost ID okay and then after that else here we're going to say the following so we're going to say return and we're going to add that new post or add the uh post the user wants into this array okay so we're going to say return everything that's inside previous items but we're going to add the new Post in here okay and now after this helper function I'm going to hit enter and now I'm going to use the use mutation data hook so I'm going to say const equal to use mutation data we're going to invoke
this and now we're going to also grab mutate and is pending from here and inside this we're going to pass in an array with the key the mutation key which is ATT p- posts and then after this we're going to pass in an error function and this error function is um our our mutation function essentially our server action so I'm going to call this save posts and now let's go ahead and also create that so go to the automations folder actions automations right here and inside index we're going to do the following so I'm going
to say export const actually we already done this a million times right so I'm just going to copy and I'm going to explain each line so first thing we're going to do in here is we're going to say export const save posts which is an async arrow function and that's going to give us the following so we're going uh we're going to take in two uh props right here that is the automation ID and the post post itself okay which is going to be an array of objects with the exact same type okay so post
ID caption which is optional media and media type and then in here first we're going to await the current user then we're going to have another query here called add post okay and then we're going to pass in the automation ID and the post itself and then if we attach the post then we'll say good job 200 response and we'll send some data to the front end if not 400 or 500 if there was a server error now for the query we're going to go in here we're going to scroll to the bottom and this
query is super super simple all we're going to do is we're going to say export const add post we're going to need the automation ID and the post itself right and then we're going to return await client. automation. update where for this ID and the data we're going to update is for posts we're going to create many and pass in those posts okay so this is how we can attach the posts to that trigger or that automation essentially so now let's go back and import the add post and let's also go one step behind this
and import the save post uh action in here as as well now this needs to be invoked right and inside this we need to pass in the ID and the posts because that's what it requires and then after this we need our key which is the query key right so this is Automation slin and then after this we're going to have an unsettled which is going to say set posts to an Mt array okay nice now we can finally export uh or return all of this so I'm going to say return post on select post
mutate and is pending and now let's go back and import our new hook and now we can import uh destructure and grab all of the data that was returned okay nice now down here what we're going to do is we're going to create a trigger button so I'm going to say trigger button like this and inside the trigger button first let me also import it okay guys again just keep in mind we're not building this right uh we're not going to be able to see this because we have that if condition and we also don't
have Instagram set up right so for now just assume that you know uh based on the design and just Envision what we're coding with the design in mind okay so we're going to set the label to attach a post okay and then in here we're going to check if the data. status is equal to 200 and if that's the case then we'll return something in here here and for this we're going to return a div first so we're going to say div like this and this div is going to have Flex Flex column Gap Y
and GAP Y3 and width of three and then inside this we're going to have another div which is going to have Flex Flex wrap with full in gap three and inside this now we're going to Loop over all of the data so I know this is going to look really weird but it's data. data dot data I think so let me take a look so we're getting data from here okay so looks like I made an error here and that's why I'm not getting the right data types sorry about this guys and you probably already
noticed this a very long time ago we're going to go into the usequery automations post and you see we created the fetch post right this is not get all automations this is the fetch post I forgot to uh actually put something else in here by accident okay so we're going to pass this in here and now this function is going to call it's going to get called okay which is get profile posts all right so now let's go back and now when we do data dot let's see what we're getting here okay so now this
is good to go so I'm just going to say dat. map and we're going to invoke this and for each of the posts we're essentially going to render out a little card okay and so in here I'm going to remove this again and I'm going to set this to post and this is of type um Instagram post props okay and let's copy this and now let's go ahead and create that and a good practice would be to have a types folder if you need and so there you go I just created a types folder and
inside that I'm going to say post. type. typescript and inside this I'm going to export type Instagram post uh post props and we're going to need the same variables right so ID Media type media URL timestamp and caption at Le actually it's a little different so just please pause and type okay and now let's go back and let's import this okay awesome and now in here we're going to need to return a div okay so I'm going to say div okay and inside this div I'm going to need to give it a class name so
for class name we're going to say the following Styles and then inside here I'm going to say key equal to post. ID okay and then after that we're going to need to attach the onclick Handler so the onclick Handler is going to be a callback function that's going to take in the on select posts that we just imported and then inside this we're going to need to pass in all that data so we're going to say post ID like this and this is supposed to be an object so post ID like this media media type
caption and the same thing comes from this post okay so if we click on this we're essentially going to change the data with the help of this helper function that's what we did here now inside this div we're going to say if posts. find so if it is selected right then we're going to show a check Circle check so kind of like this okay and so let me move this here so it's easier to navigate and then I'm going to say find we're going to invoke this and we're going to say p which is a
post and then we're going to say if p. poost ID is equal to the post. ID okay the same post that we're on then we're going to render something in here we're going to render a check Circle icon or check Circle this is fine too and this is going to have Phill and stroke set on this so Phill is white stroke is black and then I'm going to have some class names in here as well next after this down here I'm going to hit enter and now I'm going to create an image okay I'm going
to use next image like this and I'm just going to make this a closing tag and first I'm going to set it to fill and then I need the site uh the size which is going to be 100 vertical width vertical width and then the source is going to be the media URL the all tag is going to say something like post image okay and then we also have some class names so I'm going to say class name is going to be CN function and let's import that and then we're going to say if post.
find so if we find and it's the same exact post then we're going to give it some opacity kind of like this okay and so that way we know it's selected if not uh we're just going to give it hover opacity 75 transition and duration 100 so when you click on it and it's active then it will have the permanent opacity all right okay great now after this down here we're going to create a button like this and in this button we're going to first set the onclick which is going to be the mutate function
and then down here we also need to set the disabled prop which is going to say if post. length is equal to zero then we're going to disable this button okay and I'm also going to give this button some class some styling and this is what I'm going to set for this button okay next we're going to use our loader components I'm going to say loader like this and I'm going to import our loader and for State we're going to pass in the is pending and the attach post now if there are no posts instead
of showing nothing here we're just going to create a paragraph with text secondary and text Center saying no posts found okay awesome great job guys now I'm going to go back one step into the thenen node. TSX and in here I'm going to set an ID prop just like what it wanted okay awesome and then we are good to go with this component so let's move on to the other component now so once the then note is completed we also have to show these elements once they are connected right and so that's what we're going
to do next so in here I'm going to say post node like this and this is another component that we need to create that's going to need pam. so I'm just going to pass it in right now and then let's open up a folder structure and let's copy that title and then I'm going to go down here all the way to posts and inside this in our node. TSX I'm going to return a component and rename the title as well and now I'm going to need the automation details so what I'm going to do here
is I'm going to use our hook called use Query Automation and let's go ahead and import this and now we can get the ID which is a string and let's destructure it from here and pass that down as well so now we can render out that data or whatever post was created right so now I'm going to remove this here and I'm going to say data do data if this exists then data. data posts. length if this is greater than zero only then are we going to go inside this if statement so I'm just going
to return a div for now just to save that okay nice and now I'm going to add a class name to this so let's go ahead and add a class name like this okay so please please pause this and type this out and I also see we need to import the post node so I'm going to import our post node component as well okay and now inside our component next we're going to have another div here so I'm going to say div like this and inside this div okay so since we're using usequery automation the
this component needs to become a use client component okay so let's go ahead and do that as well and yes so we add another div in here and this div is going to have absolute High 20 uh please type pause the screen and type it all right guys and then in here we're going to have a span okay and this span is just sort of like I think the connector right I think this is what we're going to create here and then inside that we're going to have the separator so the span is this little
dot here and the separator is the line all right and yeah so the separator component right here is going to have the orientation vertical and a class name like this and like I said that is going to be this section okay and then after this we're going to have another span at the bottom of this and this one is going to be of this specific uh style and then after that we're going to have a div here that says warning okay which is like a warning icon let's go ahead and import that and I'm going
to say so if they comment on these posts right so if they comment on and then to create that other section we're going to need another div let's say div like this and and this is going to have the following Styles and inside this we're going to have another div here called Instagram blue so let's bring this in and this is basically this icon right here that says these posts okay so the post you selected so I'm going to say Instagram blue and P these posts okay and then after this I'm going to Loop over
all of the posts that the user has selected and I'm just going to render them out okay so in here I'm going to say div like this and I'm going to give it a class name just like this and inside that I'm going to say data. dat. post. map and I'm going to create an arrow function in here and that Arrow function is going to return an element which is a div and inside this div we're going to have an image like this okay also don't forget to add this key and the class name okay
and then now we're going to have an image here and let's go ahead and import this from next image okay and this is going to have fill sizes of 100 ver vertical width source is going to be post. media and ALT is going to be post image okay awesome done there we go we're so close guys we're almost done so now let's close this and let's proceed to the next stage all right so now we have a couple more components that we need to quickly fix up and the first one is the activate automation button
okay so let's shrink this also I realized our hamburger menu just disappeared that might be because of H that might be because of the AI okay cuz remember we had to fix this error and I used v0 right so it might have removed that so I'll bring I'll bring that back later don't worry about it so now I'm going to go into my folder structure and I'm going to click on globals activate automation button index. TSX and you see we have some work in progress Flags right so let's go ahead and create this so first
I'm going to need all the data so get the automation data so let's remove this and I'm going to say use Query Automation and and from here I'm going to get the ID which is a string and I'm going to destructure it from here and say ID like this now I can use that in here and now let me see if this is glowing up on any of the other components or we'll we'll find out later okay so now down here okay something looks wrong what seems to be the issue okay never mind oh what's
going on HM interesting okay so I think the reason might be because we're probably not passing in the ID and it's trying to render null for some reason and it's probably probably invalidating the previous data I think that's what's going on right so let's go ahead and find out where we're using this component and then let's pass in the ID so I'm saying active automation okay there we go so you're going to say ID now and this is going to be equal to ID hopefully that should be passed in from here okay and now if
you refresh you should not see that error anymore next thing we're going to need here is the use mutation data hook so I'm going to say const mutate and is pending equal to use mutation data and let's import that and then the first prop is going to be the mutation key so I'm going to call this activate and then we're also going to need to pass in a server action which is a callback function and this callback function is called activate automation so let's go ahead and create this action so open up your folder structure
and let's go to actions here inside automations index. typescript and at the bottom we're going to say the following so since we already created the same thing a million times I'm going to paste this in here and just explain it to you so we're going to say export cons to activate automation is equal to async Arrow function which takes in the ID and the state ID is string and state is Boolean and inside this function we're going to wait for the current user and then we're going to have a TR catch block right and inside
the catch you know we're we're just going to show a 500 if anything happened next we're going to have another error function uh another uh server action called update Automation in here which we have already created so we're just going to leverage the same query so we're going to say update equal O8 to update automation with the ID and the data that we're trying to change so we're trying to change the active state in here right and then down here we're going to say if everything was successful return 200 with the data saying Automation and
then is activated or disabled okay and then down here we're going to send a 404 if something took place or something went wrong and in here we're going to send A500 okay now let's go back and quickly import this this action the server action and then after that we also have to pass in the query key so I'm going to say automation info like this and please don't make any spelling errors okay nice now we have the optimistic UI also set so I'm going to remove that work in progress flag and now I see all
of the work in progress Flags in here so I'm going to keep it and then remove it as we go so the first thing is we're going to take this mutate and we're going to pass it into our onclick Handler so I'm going to say onclick is an arrow function and we're going to return mutate and invoke it and pass in state which is data. dat. active okay which is the opposite of this right cuz we're kind of like toggling it on and off and another component you might want to use in here could could
probably be a switch component right that might be the best use case but for now this is okay this also does a job it's simpler and easier okay and then after that down here we're going to have the loading State and this is going to change to is pending so now I can remove this and inside here we have the active automation which is just an SVG and then we have to render out the active state so we're going to say data um I'm sorry we're going to remove this paragraph and we're going to say
LG in line hidden data. dat. active if it's true then we're going to say disabled if not we'll say active okay that means you can disable it by clicking it again and activate to turn it on okay there you go so right now we see activate and now if I click it it saves and then it says disabled okay nice and you don't have to show the loading State guys I mean you could technically just remove this and just have this and that's totally fine as well if you probably like you know this response better
that's fine too right or maybe you could have another class here let's see if we can do that okay so I see something in here inside chaten called a loader component so maybe this would be nicer so what I'm going to do is I'm going to copy this loader let's scroll up top and let's import this component and I'm also going to remove some stuff that I don't need from here anymore okay and CN function can it does I mean we don't technically we don't need it we can just set the the disabled prop right
and now that we have this loader to I'm just going to render it in here just to see what it looks like and let's go back to our code okay that looks so much better actually I really really like it and so I also see some padding so maybe I can give it oh it looks like our class name disappeared I might have removed that sorry guys so in here I'm going to set the class name again which is going to be the following okay and now you see we can see that loading State okay
and now we have to render out that loading State based on what's clicked so I'm going to say disabled equal to is pending and then in here I'm going to say if this is is pending so is pending is true then we'll render this out okay if not it's going to remove this logo and well right now we're technically not showing anything I think I had another icon before this right oh yeah I did I don't know why I removed that one okay so let's remove this and say if it is is pending then we'll
return this if not we'll return this component and let's also import this one okay there we go and let's refresh our browser okay and now you can see we have the component so if I click it's going to swap it's going to show loading and disabled okay so disable it now boom nice okay much more sticker probably should have done that for all buttons sorry guys maybe you guys can take you know the extra effort and fix that up okay and I also notice some weird margin issue here so let me fix that as well
okay so I'm just going to call I'm just going to add margin left of four on the button okay and that should solve this problem so now if I click awesome if I remove it great now if I click on this it loads awesome guys looks amazing here is a challenge for you guys if you notice the hamburger menu does not show on the automations tab but if you click on the homepage the hamburger menu does show on mobile devices and so the reason is because this info bar up here is different from the info
bar inside the automations Tab and so your challenge is to create that hamburger menu and that's already done for you inside the infobar component okay so go ahead and pause this video take a up as a challenge and try to build this sheet component for that info bar okay all right so now we're going to also complete the payment section right so inside the settings tab um we have to show the user billing information and we also want to you know update this upgrade button right so that way they can upgrade to a different plan
of their choice so the first thing we're going to do is we're going to go into our payment button component and you can do that by either searching up the work in progress Flags or just just look up payment button okay and now inside this right here we only have the button itself but we're also going to need to um render out a kind of like a loading icon in Cas in case the user is paying and we also have to open up their subscription okay so first let's do the setup on the code side
and then we'll go into stripe which is what we need to essentially set up payments for our application so this hook right here use subscription is what's going to help us accomplish this okay so I'm going to copy this real quick and I'm going to also just say const some data equal to this and then I'm going to open up my folder structure Also let's change this to a client component right use client like like this or I don't think we need to because the component before this might be a client component but uh anyways
you can you can change it to a client component if you want okay so I'm going to go down here into Hooks and I'm going to say use subscription so inside this like this use- subscription. typescript and then inside this we're going to do the following so I'm going to say export const use subscription is going to be an arrow function and inside this we're going to essentially first create a state okay so I'm just going to say const is processing and set is processing equal to U State and this is going to be false
for now and then in here I'm going to create my helper so let's call on subscribe equal to an async arrow function okay and inside this Arrow function first we're going to set is processing to true and then after that we're essentially going to make an API call to one of our one of our endpoints okay we're going to have an API endpoint in here under an API folder we'll get to that in just a second but let's first do this here which is response to equal a weit and this needs to change to actually
this doesn't need to we already have async here so await axios doget and we're going to send it to/ API SL payment okay next if the response. dat. status is equal to 200 then we're going to reroute the user to that endpoint so we're going to say return window do location.href is going to be equal to to I don't know why I wrapped it in this okay I think it it needs to that's fine so we're going to send back Tex like this and inside this we're going to say response. dat. session uncore URL okay
please don't make any spelling errors with this guys even I'm going to copy and paste so I don't make any spelling errors here because we're not going to get type intellisense okay and then after this we're going to set his processing to false all right cool okay and then down here at the end I'm going to also return on subscribe and is processing so now let's go back and quickly import this hook okay and now we can destructure those values that are being returned so I'm going to say on subscribe and is processing and I'm
also going to remove this and I'm going to use the same loading state that we used in the in the other component so this is in inside my activate automation button right so remember we have that is pend is pending state right here so I'm going to copy this and I'm going to go back to the other component which is a payment button and inside the payment button I'm going to essentially put this in here so if is pending we're going to say loader to set this to True right and is processing is the word
here so I'm going to replace that and then if not we have to show some text right so what we can do guys is we're returning this right here okay I think this should be fine maybe we can use like a credit card icon right something like this and it's going to look like that that should be fine okay and I see some error here what's the error I think it just needs to refresh okay awesome and now the next thing I'm going to do is I'm going to attach the disabled prop on top of
this going to set it to is processing and then onclick is is going to be equal to ons subscribe that helper function we created so if I click on this now it's going to load but nothing is going to work but I just wanted to make sure it's loading right and the reason why it continues to load is because there's an error and so what you can do to improve code quality is you can wrap all of this inside a tri catch uh Tri catch block and then accordingly you can set this to you know
set is processing to false as well inside the else condition okay but just for Simplicity I think you guys already understand that stuff I mean we did did it so many times right so just for Simplicity sake I am going to keep it like this okay so that's it now that we have this upgrade button the user can click on this we see the Beautiful You Know loading icon of course it's going to throw an error and um now we can finish that API endpoint and also get the user stripe credentials so first open up
your folder structure I'm going to shrink everything and inside app I'm going to create another actually I'm going to use the protected routes and in here I'm going to create a folder called API okay and inside this I'm going to create a web hook uh sorry not web hook guys it's called payment okay just the way we mentioned right here right the exact same way and inside this payment I'm going to create a route. typescript okay and now in here we're going to have the stripe credentials and also an API endpoint which is a get
endpoint and that way we can call this when the user clicks that upgrade button okay so in order to use stripe we're going to need to First install stripe so so I'm going to quit the terminal and I'm going to say bun I stripe and hit enter and now I'm going to scroll up top and I'm going to import Stripe from stripe like this okay awesome and then I'm going to create a stripe client so what you can do is you can create another file in here inside your Libs folder and you can create a
stripe instance in here okay that's fine as well but I know I don't need stripe anywhere else so I'm just going to put it in here for now so export const stripe equal new stripe and we're going to invoke this and now we have to pass in a environment variable called stripe client secret now of course we don't have this and that's totally fine but for now let's just go ahead and type this in right here and then eventually we're going to get all of the credentials that we need for stripe to work and then
we'll add it inside .v file okay so the variable that we need is called stripe stripe client secret sorry and I'm going to say as string and next I'm going to export an async function called get like this and first thing we need to do in here is we need to check that the user is logged in so I'm going to say current user okay and if there's no user we're going to return next responsejson sorry let me redo this Json and inside this we're going to say status of 404 okay and then if everything
was good we're going to say const price ID is equal to process.env do another environment variable which is called stripe subscription price ID and eventually we're going to get this right we're going to go into stripe we're going to grab all of these credentials and we're also going to create a product and then grab its subscription price ID as well right and we'll store that in the environment but for now we're just going to create a variable and store it right here and now we're going to create something known as a checkout session okay so
I'm going to say const session equal to await stripe. checkout do sessions. create and inside here I'm going to say mode equal to subscription and then the line items are going to have the following items so we're going to say price is going to be the price ID that we passed in and then the number is just going to be quantity set to one and then after this once everything is successful the URL that we want stripe to redirect the user to is back slash dollar sign curly bracket like this and this environment variable is
called next public host URL and so we're going to put it in here and guys in production you're going to need to change this right and so when we're putting the environment variables in versel that time you can change this to the exact public URL okay but for now uh Local Host should still do the job okay so we can we can have a public URL set to Local Host if you like okay but of course it's not I don't think it's going to work because uh stripe is not going to know which URL or
where to send it to because it's in development mode so for that we'll we we'll basically have another solution in place right but in production it's going to redirect the URL to uh redirect the user to this specific URL okay and then after this I'm going to copy this please type this without any spelling errors okay it's SL pay payment and then question mark we're going to create a search program called session ID and we're going to say equal to checkout session like this okay so what stripe is going to do behind the scenes is
it going to like redirect the user to this endpoint and it's also going to plug in the checkout session ID and that way we can create another endpoint on our end to listen to that okay and then if the user canceled then we need to send them to another URL and the URL we're going to send them to is the same thing right public host SL payment but cancel is going to be set to True Okay then if everything was successful and we got this session we're going to just return a next response of status
200 along with the session URL that way we can redirect the user to that stripe session and then down here I'm going to redirect uh sorry I'm going to return a 44 if there was some error okay nice now let's go ahead and close this out and I'm going to scroll down to actually let me shrink everything real quick and I'm going to go into Source app protected inside dashboard we might need to create another uh component in here or sorry guys it's not a component first of all it's a page second of all it's
not going to be inside dashboard because you see we said payment right so what we what I'm going to do here is I'm going to shrink this API folder and then inside protected the root of protected I'm going to create this folder called payment okay and inside this payment I'm going to create a page. TSX and a loading. TSX okay you don't really need the loading page but I'm just going to say loading. TSX because that's what we're doing so far right and inside this loading. TSX I'm just going to have what I had in
another loading. TSX file right just like this and I'm going to import my loader components okay and that's it all right and inside the page. TSX I'm going to return a component like this and I'm going to call this page and then in here we're going to get access to the search prams okay and the search prams is going to have a session ID so let's go ahead and grab that so search pams is going to have session ID like this and cancel as well and these are optional okay and so this is how we
can get access to these values so now I can destructure these as well like this and we can use this okay and now inside this component right here first we're going to check if we had the session ID if we have the session ID then we're going to essentially create the subscription that means update in the database and we're going to redirect the user to the dashboard page okay but if we have scel instead then we're going to just show oops something went wrong or something like that okay so first thing we're going to do
in here is I'm going to say search params sorry guys search fors like this or we can just copy this we don't need that right so session ID directly if this exists then const customer equal await and since this is await we got to change this to an async component on subscribe which is a new server action that we need to create but this server action is going to need U the session ID passed in okay and so once we have that session ID now I'm going to open up my folder structure and I'm going
to immediately just create this right here so inside user index going to scroll to the bottom I'm going to say export const on subscribe is an async arrow function which is going to need the session undor ID which is going to be a string and then inside this first we're going to say const const user equal await on current user we're going to invoke this and then we're going to have a TR catch block and in here we're going to say const session equal await stripe and this stripe is another um instance that we need
to create right or I think we already exported it let me see if I exported it from here okay I already exported it so I can just use it from here right so I'm going to say stripe like this um if it'll allow me to okay it is allowing me so I'm just going to say stripe like this okay stripe Dot checkout sessions so checkout. sessions. retrieve and we're going to pass in the session ID okay so if this is a valid session ID and everything looks good then we're going to say const subscribed or
sub or subscribed okay equal to await update subscription which is another server action okay sorry like this it's a query technically so I'm going to change this to update like this subscription and then let's open up our folder structure and I'm going to go into queries and at the bottom I'm going to say export const like this this is an async function and also guys you might wonder why are we typing this over and over again first because I want you to practice okay but in the real world we would not create server actions or
API endpoints for each individual update okay instead we would have endpoints like put or update the entire data okay and so if we're changing the subscription we would basically um we would let's say for example if we're updating it the updating the information directly on the user right instead of saying updating subscription we would say update user right and then that can be reused across all different type of data so for the subscription for user for anything that belongs to them right and so that that would be more of an Enterprise type approach but for
now you need to type a million times to learn so this is the best way okay so I'm going to say clerk ID is one thing that we need which is a string so I'm going to grab that from here and then we also need the props why did it do that not sure okay let's do it this way so Props is customer ID and the plan and this is optional and plan is optional as well and this is a string and this is Pro or free and then inside this I'm going to return await
client. user. update you see we're updating the user right and that's why we need to pass it in that way and that's why we need to create a server action that can be reused for the user instead of only for subscription so in here I'm going to say where and I'm going to put the clerk ID and then for the data I'm going to create an object but I'm going to update their subscription okay okay like this and I'm going to set update for the data and I'm going to put everything that's inside props okay
awesome great job so let me make sure yes this is right okay and I'm also returning great now let's go back and quickly import the onupdate subscription nice and now if everything is successful uh we also have to pass in the data right so user. ID and we also need to pass in an object with customer ID set to session. customer okay as string and then the plan is going to be set to Pro okay like this all right there we go and now if subscription was successful we'll return status of 200 if not we'll
return 401 and then if all of this has failed we'll return 404 and then if something happen in the server we'll return 500 and now let's go back and import This Server action okay on subscribe session ID awesome and so if the customer I made a spelling error here so it's customer dot status equal to 200 then we're going to return redirect from next navigation and we're going to redirect the user to the dashboard page okay if not down here we're going to redirect them uh we're just going to show a message saying some error
took place so Flex Flex column justify Center item Center okay height of screen width of full H4 is going to have a class name of text- 5xl font D bold and in here we're going to say 404 okay and then we're also going to create a paragraph tag with text XO and font dashboard all right and in here I'm going to say oops I don't know how to spell it okay oops something went wrong okay nice and then now if the session does not exist so after this if we have cancel in the search params
so cancel exist then we're going to return another div and this div is going to have pretty much the same style so I'm just going to copy it from here and I'm going to say class name and I'm going to paste it right here okay and then inside this I'm going to just copy the same thing I have here as well and just say 44 and also show a me uh like an error just saying oops something went wrong okay awesome and then we don't need to return anything right here there we go okay now
we can close this like that and now we can use the subscription page great job guys so now that we have the users information billing related information and we also have our database setup now we can also complete the other work in progress flag which is inside the Billings component so all we need to do in here is we're going to say const data equal to use Query data uh not use Query data sorry this is used query user we're going to copy this and this is going to give us the data so I'm just
going to destructure that and I'm going to open up my folder structure and I'm going to scroll down all the way to books down here and inside use queries user queries or this should have been used guys think I made an error here sorry about that okay this should be use queries but it's fine for now all I'm going to do here is I'm going to say export const use Query user and we're going to return use Query use have a habit of typing user for some reason and what seems to be the okay okay
looks like we've already done that use Query user we already created that so we can go back and I can import the use Query user hook and that's it okay and then down here I'm going to remove this and I'm going to say data. data do subscription. plan okay and then this is going to be Pro Plan okay and then down here I'm going to also copy the same thing here and I'm going to change this to data. dat. subscription. plan and I'm going to change this to free all right now let's refresh okay we
have to say one run Dev let's refresh the browser okay and now we're going to see an error for stripe and the reason is because we don't have the those environment variables so now is a good time to jump into the stripe dashboard and grab all of these environment variables all right guys now navigating the stripe API can be extremely challenging especially if you are a web developer who's just getting started and even today I still get overwhelmed with stripe and the reason is because their documentation is huge okay and they have different versions of
documentation for different versions again and because of this it's very confusing and it took me probably two months to learn stripe when I first started especially when I was creating the stripe connect feature in my first viral project on YouTube right which was plura and nobody on YouTube ever taught how to connect other people's stripe account into your project and so researching that was hell I had to go through hundreds and hundreds of pages of documentation and for some reason they had different versions of them and so I realize that there's a problem here and
so that's why I created the stripe quicklink guide this is a simple three or four-page document that gives you only the links that you need and nothing more so if you want connect features here are the links for that that if you want to access the API Keys here's a link to that as well if you're trying to create subscriptions here you go that's it nothing else you don't need you don't need more to this okay and that's exactly what I'm going to be using for this project as well to access our API keys so
if you believe that this is going to save you a ton of time and that way you know hopefully you don't have to read thousands of lines of documentation like I did then I'll leave a link Down Below in the description to access the stripe quicklink guide okay or you can just go to web prodigy.com sshop or/ store and then you can pick it up from here it's the the cheapest price I could even think of right and yeah that's it this is the fastest way for you to access stripe okay and so what I'm
going to do here now is I'm going to scroll down to API keys because we need um a specific secret key to wire up stripe into our application so go ahead and copy this link and I'm going to open it and that's going to take me into this page and I'm going to click on the developer dashboard and that will take me into the API Keys tab okay and you'll notice there's no way you can find this anywhere in the dashboard okay so it is a little challenging all right and that's why I put together
that document if not all you have to do is First Look up developers and then you'll find this tab and then you can click on API okay you won't find it in here but I think you can pin stuff I'm not sure if you can do it with this page but uh yeah guys I'll leave a link in the description if you want to grab that okay and so the first thing we need is I'm going to open up my environment file and I'm going to scroll down to where I find this client secret key
right which is this one right here and I'm going to copy the secret key right here and I'm going to paste it down in here okay so stripe client secret and then the next thing I need is to create a subscription so I'm going to go ahead and copy this link as well and then I'm going to open up another Tab and I'm just going to paste this in here and this this is going to take me into the product catalog or you can just click in here as well that's fine okay and then I'm
going to create a product which is a subscription product so I'm just going to call this slide Pro okay and then I'm going to click on recurring and I'm going to set the price to $99 you can set it to whatever you want but I think I had $999.99 if I'm not wrong right and so or I we just keep it at this okay 99 Cents I can't do anything with that and then once that's done I'm going to go ahead and you can also add a description I'll just say this is a description for
the slide Pro Plan or let's make it slightly better so use Smart AI to automate conversations on Instagram okay and then let's go ahead and add this product okay awesome and then it also created a price for us right this is the price I'm going to click on this and then I see a product ID and I also see a price right here and so you can copy this price ID and if you paste it it should start with p with price okay and now um we can go back to our code going to open
up the sidebar go into EnV and I'm going to look for the stripe price ID subscription price ID and let's go ahead and paste that ID in here okay and now let's quit this and let's open up our browser and let's refresh and we also have to quit the terminal right so quit the terminal and say Bun Run Dev and let's refresh once more okay so that worked but we have the use Query problem and the reason is because this needs to become a use client component okay so I'm going to change that to use
client and just like that now we have this upgrade right here okay nice so now if I click on upgrade it's going to load okay I see an error it's saying API failed with status code 500 okay let's take a look at this guys all right guys so I assume that stripe would not know the success URL if it was Local Host but I think it does because it's probably you know routing through the same browser um but yeah so this is good to go it's not like um other applications because stripe itself is not
calling it I think it's coming from our application right and so for that reason just scroll down here go into your do environment and you should put HTTP local Local Host uh not 4,000 you can put 3,000 like this okay and then this should be good to go so it'll redirect the user to this endpoint once everything is done and don't put the trailing backslash for now uh because you see we're already having the backslash in here okay awesome and now if you click in here and click on upgrade it spins that up and then
it takes us to the stripe page awesome okay so I just went ahead and put some fake credit card details and now let me go ahead and click on subscribe okay and everything is good it should send me back to this endpoints so for some reason it sent me back to 4,000 and the reason is because I did not um pretty much refresh the browser right so it has the old environment variable but for you that should be fine you should get redirected to the 3000 endpoint so I'm just going to change this for now
set it to 3,000 and hit enter all right guys and one more thing I want to point out I had to change it to 3001 because that endpoint was actually taken by something else and I still haven't killed that terminal but that's okay so I'm just going to change this to Local Host 3000 and you know copy the same URL and just hit enter and let's see what happens okay I think everything worked let's take a look at our building page so inside settings we should see smart AI there we go great job guys all
right guys so now that we're done with setting up payments for application we can move on to setting up Instagram so there are three parts we need to work on first is the API which is basically the web hook then we need a redirect path when the offlow is completed and we also have to set up the Integrations page right so first thing I'm going to do is I'm going to go into the integration Das card component which is inside Integrations page and then in here I'm going to say const on Insta o o like
this and this is equal to an arrow function and we're going to create a function here called on oo Instagram and we also need to pass in this strategy in here so I'm just going to pass it right now okay and so copy this uh copy this function right here then you're going to open your folder structure and we're going to scroll up to actions inside Integrations and then in here inside index. typescript we're going to create this action okay so we're going to say export actually first let's change this to use server right and
then we can say export const on o Instagram on ooth Instagram and this is going to get the strategy which is going to be Instagram or CRM I think it would be better for you to put all of these into an object right so put it into a type and then after that in here I'm going to say if strategy is equal to Instagram then we're going to return redirect and we're going to redirect the user to that page and so what is this redirect URL well this redirect URL is inside our environment file and
it's called Instagram embed oath URL and this is something that Instagram is going to give us so we're going to need to do a bunch of stuff on meta side and that way we're going to get access to this okay but for now I'm just going to just put this in place because we're not going to be able to click this and do anything anyway because we have to have a live application okay and so for that reason I'm just going to keep this here knowing that it's not going to work okay so I'm going
to say process. environment. Instagram embed off oath URL as string okay nice and now I can go back and just quickly import this okay um let me import so import this one okay and then after that let me also comment this out so it's not confusing and then we need to use Query right here and we're going to say query key is user profile and then we're going to say query function and we're going to pass in on user info okay and then next we're going to check if this is integrate also if you're wondering
why this is here it's because I tried something and it didn't work and then I knew okay I have to U kind of strategize slightly different okay I didn't want you guys to get confused so that's why I was typing some code okay but um what we're going to do here now is we're going to say if they're integrated so data. dat. Integrations doind for where the integration. name is equal to the strategy okay and if this is true then we're going to store that in here all right and then down here we're going to
pass an onclick which is on Insta o this function okay and then disabled which is going to be in integrated. name and if this is equal to the strategy then we're going to uh disable this as well and then down here we're going to remove that connect and we're just going to say if integrated is true then connected if not connect okay done awesome so that's it for this page and now if you click of course nothing's going to happen in fact if you look at the uh description I mean if you look at the
network calls of course you're going to get a probably a 300 three 303 right uh let's see not that one this one here okay 303 and the reason is simply because we do not have um the URL set right and so we will get we will get back to that once we do the Instagram setup okay please don't rush into it and do the setup because there's more important things that we need to do and the most important part is we don't to abuse the uh the end point and get banned okay so that's why
we're going to wait until the last minute so now I can remove this work in progress flag and I can head over into our API folder and inside this folder right here I'm going to create another endpoint and this endpoint is our web hook okay so I'm going to say web hook like this and inside that a route. typescript or actually to make this um slightly better better I'm just going to call this Instagram so I'm creating another folder I'm going to create another folder in here called Instagram and then I'll move this in here
okay because you might have other web hooks as well like Clerk or enro all and we're also going to need enro in here but I'm saying if you need some other type of web hook for even for a stripe then you're going to need to put it in here all right so now inside this routa typescript there's a bunch of code that we're going to write okay so please pause and type with me okay and don't get overwhelmed and even if you do it's fine it's part of the process okay stop whenever you feel like
you're confused and then read the code all right so the first thing we're going to need here is a function the get function so I'm going to say export async function and um or let me say async function like this and I'm going to change the name first to get and in the pams I'm going to remove this or I'm going to just set this to request and in here I'm going to call it next request okay and now inside this we're going to say const Hub equal to request. next URL search pams and we're
going to get a specific Pam which is called hub. challenge okay next down here we're going to say return new next response and we're going to return this value okay now this is basically a method that is used to validate the web hook okay so this is required from uh from Instagram okay it's not it's not my magic also guys sorry this is next response not request so this is required by Instagram because they want to validate your endpoints your web hook and this is only needed once okay so once it is verified Instagram will
verify your your web hook and you're never going to need to do it again okay and they are going to do that not you and so one more quick thing before we move forward this took me forever in fact honestly speaking this was the biggest challenge I have ever faced in web developments imagine that okay and the Instagram and the reason is because the Instagram API is almost impossible to read there are there are no resources there's I don't know why they have it like I don't know why even have documentation right and so read
I had to read every single page and even then I couldn't figure it out I had to mess around with stuff and so for that reason I'm not going to ask you guys to subscribe because I know you're going to do it anyway but here's what I'm asking for you right I want you guys to win and the best way to win is learn things that are not on the Internet or that are not easily available on the internet and that's why we created web prodigies right because I'm not building boring crud applications who has
ever built a Min chat clone nobody right well call slide not many chat but all I'm saying is if if you want to succeed in your career you need projects like this not projects like how to build a CRM or how to build you know some sort of crud app that does absolutely nothing and brings no value to anyone and so if you want projects like this on your feed then subscribing is going to get you the highest quality projects and here's my promise to you right I want to go above and beyond and give
you so much free value it should be a no-brainer for you to work with me right and so for that reason I'm going to give you more value than all the other creators out there okay and so this project took me so long and so by subscribing I promise you it's going to save you so much time not just for this project but any other project I ever create in the future because the type of projects I create is something you will never find on YouTube okay so thanks a lot if you decided to subscribe
okay means a lot to me so anyway now let's move down here and the next thing is we need to create the post end point uh endpoint okay so I'm going to say export async function async please give me the type intelligence I'm sorry the snippet okay and this is going to be a post endpoint and it's a request which is going to be of type next request okay and first we need to get the request payload in inside this uh function inside this API endpoint so I'm going to say const web hook payload equal
to await request. Json and I'm going to invoke this and then I'm going to create a matcher okay I'll tell you why I need this matcher and stuff but first let's also create a tri catch and inside the tri catch here's what we're going to do okay first we're going to verify if the keyword that was commented or dm'd is inside that message okay so that means a keyword exists and this way we can tell if we have an automation or not okay so that's what we need to do in here and so this matcher
is essentially uh going to have that like it's like a Boolean essentially okay and this is going to tell us uh whatever like the data that's coming back from the API endpoints right from the web hook so first I'm going to say if web hook payload entry at zero. messaging and I'm going to copy this so I don't make any errors okay it's just messaging never mind so yeah if this messaging exists then I'm going to say matcher equal to await match keyword okay and this is a function we're going to create just give me
one second and sorry guys this is not match this is matcher okay and um inside this we're also going to need to pass in that value so I'm just going to say web hook why is it web hook okay payload and I'm going to say dot entry at zero and for this I'm going to say message. messaging so m s a g i n g messaging at zero. message. text so this is a helper function that's essentially going to tell us if um the word matches or not okay and so what we're going to do
next is I'm going to copy this and I'm going to open up my folder structure and inside the web hooks right in here or actually sorry guys inside actions right here I'm going to create another folder let's just call this web hook and inside this queries. typescript okay so this is not really just the helper It's actually an um a query call to our database and in here we're going to check if you know we're able to um we're able to match it based on the query that we make okay so I'm first going to
change this to use server okay and then in here I'm going to say export const match actually we don't need the use server guys I think this is not required for now but I'm going to say match keyword and this is going to be an arrow function oh how did I create that character nice I didn't even know and then here is the keyword which we need which is a string and then first I'm going to say return await client. keyword. find First and for this I'm going to say where the ID or sorry where
the keyword or word I think that's what it's called okay word equals keyword okay and the mode is insensitive okay so that way even if they used a capital or small letter we're still going to uh we'll still consider that as an automation okay you can change it accordingly if You' like but I think it just makes more sense this way and now let's go back and import this helper okay nice awesome and then next down here um after this if condition we're going to say if the web hook payload do entry at zero do
changes okay so if this exists and this part I believe I'm trying to recollect because the API was very confusing I think this is the comments okay so this is messages this is going to be comments okay and same thing we're going to say matcher equal to await and we're going to say match keyword and again we just need to pass this one but slightly different of course so I'm going to say web uh web hook payload entry at 0. changes at0 0. value. text okay and then down here now we're going to check if
the matcher exists and it has the uh automation ID okay so let's say if matcher so this exists and of course we have the matcher why is it giving me I don't know why I type in cell this is so bad like I'm using this more okay match. automation ID so if these exist that means the matcher exists right and so basically we have the matcher here right or we have a keyword match we have a keyword match hopefully this can help you guys read if you are getting the U also by the way if
you did get the premium GitHub repository which comes with the license you basically get a bunch of um you know code comments inside here okay so it might help you even more and um there's a couple more things for example we make it production ready and what I mean by that is again please keep in mind it's the same codebase it's the exact same code basee the only difference is we make the front-end code base a little more um I guess we set up like a production environment and what that means is we set up
the linters we set up husky and uh also some scripts that's it okay so there's nothing different all right please keep that in mind we're not hiding anything okay it's the exact same thing there is absolutely nothing different the only difference is you will get code comments okay and also you get the license so now you can you know use that without any risk and you can also make money through it right okay next down here let me first tell you what we're going to do okay so we want to first check if it is
a comment or a um it's a comment or a post okay and so or like a message or a post essentially and then this way we can decide which path we need to handle all right so first I'm going to say if web hook payload . entry at zero. messaging please don't make any errors here guys okay it's going to be really really difficult to debug so if it it is a message then uh we're going to say so sorry I think I mentioned something incorrectly on top let me say this once more what we're
doing here is we're going to check if it is a comment on a post or it is a message a DM okay and based on that we're going to have two different branches okay so this means it is a message so if it's a message then I'm going to say const automation equal to await get keyword automation okay we're going to invoke this and essentially what we're doing here is we're getting the automation itself just fetching the details of that Automation and um this is also going to have two different paths inside here right and
so we're going to first check of course now we know it's a DM and then the two possible paths I'll show you in just a second but um we want to check if the customer can uh basically is a brand new user or if they are an existing user inside the application who is trying to get a new automation up and running okay I know it's not going to make sense right now because like I said this is a really really big file eventually I want you to stop and read through everything okay and so
in here we're going to create this other function and so let's go back into our web hook actions right here and inside the queries down here I'm going to say export const which is an arrow function and then I'm going to change this to async and this is going to need the automation ID which is a string and the DM which is a Boolean okay or you can also pass in a string but I'm just going to use a Boolean for now and then I'm just going to say return await client. automation. find unique and
inside this we're going to say where for this ID which is equal to the automation ID and we're also going to include some data in this response okay in this returned object so first I'm going to say DMs like this and I'm going to set it to true if I want it back and that's why we have this I guess and then after that the trigger so trigger where the type if DM exists we'll say DM or comment and then next we need the listeners so I'm going to say listener itself and I also want
the users's information so I'm going to say user and I'm going to say select subscription data and I'm going to select their plan and set it to true because now I can do stuff like AI driven stuff right and so that's why I'm trying to fetch this info because if I know what plan they have then based on that I can check the Automation and what type of a listener they have set and then based on that I will check the subscription plan and I will either turn on the AI or the default message okay
and then after this I also want integration so I'm going to select the token specifically set it to True okay nice and that's it that's literally it so I'm going to go back here and quickly import this sorry guys having a really bad time because I've been speaking for a very long time all right and then I'm going to say matcher do automation ID and I'm going to set this to True okay because I want that uh the DM as well and so after this hit enter and now we're going to check if there is
an automation trigger okay because that's the only way we can fire it and if it does exist then we're going to fire the automation so I'm going to say if automations if this automation here exists and automation. Trigger exists then we're going to do the following and so now that they have the Automation and they also have an automation trigger set it makes sense to start the automation here right and so to start the automation we need the listener and that's why we're going to now check for the listener so we're going to say if
the automation. listener exists and The automation. listener. Listener is equal to message then we're going to do something in here and so there are two different paths right I hope you can I hope you understand that there are two pths in here why do we have this okay there are two pths one is is the message and one is smart AI right and so the first rule the first path is this one which is it's a direct message so now we can create that simple response that the user has set in the automation so I'm
going to say const directore message equal to await send DM which is another helper so let me go ahead and open up the folder structure and I'm going to scroll down to Libs folder right here and I'm actually going to call this of I mean we already have fetch. typescript so I'm just going to use this one okay and so I'm going to say export const send DM equal async error function and this is going to need a bunch of values so first thing we need is the user ID and the receiver ID so user
ID receiver ID prompt and the token okay and I'm also going to print a message here so I know that we're sending something and first thing I'm going to do is I'm going to return await axios dopost okay and the end points is going to be process it's basically the Instagram base URL right so let me go ahead and copy that so I don't make any errors here so it's process. env. Instagram baseurl and then after that please make sure you put v21.0 okay sorry after this guys so right here SLV 21.0 and then slash
dollar sign user ID like this and then after that slash message messages okay with the exact same spelling please don't make any errors I physically can't help you okay and then after that we're going to have an object here which has a recipient um okay I don't think it's giving me of course it's not going to have any intellisense I'm going to hit enter here I'm going to say recipient is going to be ID receiver's idid and the message is going to be text which is a prompt and so this receiver ID is essentially coming
from Instagram right so that's how we're getting it here okay then we also have to pass in some headers so after this I'm going to hit comma and I'm going to say headers we're uh headers going to be an object with authorization set to Bearer dollar sign and I'm going to pass in the token here and then the content type is going to be application. Json okay and that's it let's go back now and let's import this and now we can invoke the send message and all we have to do is pass in these values
so I'm going to say web hook payload entry at zero. ID that's the first one the second one is web hook payload entry which is a sender ID receiver essentially right sorry not sender ID it's the receiver ID from for from our side it's the receiver ID but from Instagram it's called the sender right because that's who sent the message and so first was um let me also check this to ver ify first was the user's ID okay that's probably ours and then this is sender or is it the other way around H okay we
we'll find out I think this one is the receiver right so receiver is basically the person who is getting the message so from Instagram side it's called a sender I think that's what it is okay because remember we're triggering this based on what the user has sent us and next we also have to pass in um the automation listener prompt so what m M the user wants to we want to send them and then after that the token so I'm going to say token like this okay nice and then after this hit enter and we're
going to say if the direct message response. status actually not response is equal to 200 then is successful okay so me so this basically means um we successfully sent everything so now we have to keep track of the first time responses and the the reason why we have to do this is because if the re the user keeps spamming we're going to take um you know we we don't want to essentially keep firing the automation so that's one condition and the other condition is if the user swaps between different automations so let's say they sent
get started and then immediately they sent another automation keyword we want to take the most recent one so there's a bunch of things we need to do here first let's focus on um tracking the First Response okay so I'm going to say const track equal to await track response which is another uh function that we're going to need so I'm going to say track response and invoke it for now and then let's go to server actions inside web hook queries and at the bottom I'm going to say export const track response track responses equal to
an async function okay and this is going to need the automation ID first which is going to be a string and then the type which is going to be comment or DM okay and then down here we're going to check if it's of type comment so if type equal comment like this then inside the curly bracket we're going to say return await client. listener. update like this for where the automation ID is automation ID and we're going to update the following data by setting the comment count and increment it to one okay all right then
down here after this if condition if type here is equal to DM then this is what we're going to do here we're going to return await client. listener. update we're going to invoke this and in here we're going to say where automation ID and then we're going to say data for DM counts and increment it by one okay so same thing for both use cases okay nice and let me make sure we're returning all right we're returning both and so let's also quit this and let's import our track responses hook I'm sorry not hook it's
just a function server I guess query action qu query action okay and in here I'm going to pass in the automation ID and the DM as well so I'm going to say automation ID and the DM and then after this inside the bracket itself if everything was successful so if we track the response okay and we got a 200 response here then we're going to return next Json uh next response. Json and we're going to say message is message sent and status of 200 all right awesome hopefully you guys are still with me and please
pause and read okay if you're confused just scroll back up and read this it will make more sense now after this yellow bracket right here which is after the main if condition okay for the listener now we're going to do smart AI okay so I'm going to first say if automation automation. listener exists and it it's the smart AI listener so smart AI listener and they're on a Pro Plan right so if all of these conditions are true which is smart AI listener the user. subscription plan is a Pro Plan then we can do the
following so now we can generate everything based on chat gpt's response okay open ai's response so here I'm going to say const smartcore aore message equal to and now we're going to need open AI before we do this right so let's go ahead and grab that okay so the first thing you're going to do is you're going to open up your open AI login okay so just say open AI log in like this and then click on the first link and then make sure you log in and it's going to take you into something that
looks like this again guys their stuff always changes okay so you may not see this and that's totally fine but the idea is you just have to get to the dashboard okay so if you have a if you don't have a project first create the project and then once that's done click on dashboard okay next I'm going to click on API keys and now I cannot show you this unfortunately but you're going to click and create create a new key or if you have an additional key an old key you can use that one as
well but I'm going to click on a new key and it's going to give you the key just go through the process and make sure you copy that key and paste it inside your environment file okay and so from now I will not be showing my environment variables okay so please understand that you're going to need to still follow through and at least have some understanding of development okay so just common Lo IC just click on this create the create the new secret key copy the key and paste it inside your environment file and if
for some reason you're not able to create an API key that's because you have to add your billing details okay so go to settings right here and then click on billing and add your credit card information Okay add your payment method and then you want to click on usage limits and you want to scroll down here and set the daily budget to $5 and enable a budget limit of $5 as well okay this way um you know it stops IT worst case scenario you do something insane and you mess up you're still safe okay so
go ahead do this it's um it's not expensive it's five bucks it's you're learning a ton from this okay and so once this is done you should be good to proceed and the next thing you're going to do is you're going to quit your terminal and you're going to set you're going to say bun I open AI I think that's what the API is let's just take a quick look all right open Ai and then go ahead and hit enter okay and you're all set all right and now we can proceed from here now you
might feel like I've typed a lot of code and I actually have okay and so what happened is um turns out that I was not recording and that really pissed me off but no problem we're still going to push forward we're not going to let that stop us right and I'm going to explain each and every every single line so you understand so don't worry about it I'm not going to just say okay this one this I'm going to explain okay so now we can essentially use open AI to create a message so the smart
AI message so we're going to say await open AI chat and please type with me okay please type with me and so we're going to say chat. completions do create we're going to pass in the model and the message itself but this has to be an array cuz there's m I mean that's how their API is and then we have to say role assistant the content is going to be automation. listener. prom. prompt which is basically what the user set inside the UI right and then we also want to we want to make sure that
the responses are only less than two sentences okay awesome and then after this bracket right here we're going to hit enter and then we're going to say if the smart AI message. choices so we got some response. message. content exists then we're going to going to create a chat history okay and so the reason why we're doing this is since we're using smart AI right we're using the AI responses sometimes there's a chance where the customer can follow up with another response and so we have to save the chat history as a result okay and
so first thing we're going to do is we're going to say receiver and sender so we're saving two different okay so receiver is going to be create chat history which is a new function we need to create and first let's pass in these uh these parameters okay these arguments so we're going to say automation. ID the um the workflow sorry the web hook payload entry. and then the messaging so entry at z. messaging at zero sender's ID and the message text now what are these values we're going to figure that out in just a second
so copy this title and then you're going to open up your folder structure and inside actions you're going to have this web hook folder and you're going to create this queries. typescript right so inside that you're going to say the following so you're going to say export cons to create chat history which is going to be which is going to require first the automation ID itself then who's sending it and who's receiving it right their IDs and then the message and next we're going to say return clients. automation. update for this specific automation ID and
the data that we're going to update is the DMS and we're going to create this specific specific DM entry okay with the receiver the sender ID and the message that was sent that's it and now let's go back and you can import this okay next down here we're going to say const sender equal create chat history we're going to pass in the automation ID and this one is let's see what's the second one okay it's a sender ID and then the receiver's ID and this sender is because it's coming from the web hook payload and
then their in from their perspective it's considered a sender okay that means who sent this DM keyword right so that's why it's called sender and that's why we are storing it as a receiver okay that means they're the ones who are receiving our message next smart AI message so the message itself the content itself is stored in here okay then down here we're going to create something called a transaction all right and well basically the reason is um we still want to send the DM right here right and so if the transaction fails we're still
going to proceed through the flow and that's why we need this transaction so we're going to say client. transaction. receive. receiver sorry we're going to pass in the receiver and the sender um queries okay next we're going to need to send the DM and this is another action that we need to create and we'll come to this in a second but first we're going to say cons direct message equal await send send message and we're going to send this specific message um this DM okay the first one is a user ID the second one is
going to be the receiver ID the third is going to be the prompt which is the message the smart AI generated message and the automation token the integration token okay and now let's copy this let's go into a same uh actually we're not going to go into the into the web hooks file we're going to go into our Libs file under fetch. typescript and in here we're going to say the following so export con send DM is an async arrow function that takes in the user ID the receiver ID a prompt and the token okay
this is not a prompt literally it's the message okay keep that in mind next we can also print a message in the console saying Sending message if you need and then in here we're going to say return axos dopost okay and then in here we're going to say process. environment. Instagram based URL okay and then SL v21.0 with the user ID and the messages and now that this is done we're going to make sure that we have a status of 200 and so we're going to say direct message. status equal to 200 if that's true
then um we're essentially going to track the response okay and so we're going to say constract equal await track response track responses we're going to pass pass in the automation ID and the DM okay and let's just take a quick look at this and so all we're doing in here is export const track responses which is an async arrow function that takes in the automation ID which is a string the type which is a common or DM and if it's of type comment we'll do this and if it's of type DM we'll do this okay
so what do we do for comment well all we do is we're keeping track of this um of the automation okay we're keeping track of their responses and the reason is because because the user can pretty much um start sending another message again right and so we want to store it as as though they have already entered that specific automation sequence and so we're going to say if it's comment return await client. listener. update for this automation ID and we're going to update the data by setting the comment count to but to increment by one
and exact same thing for DM except we're going to say DM DM counts increment by one okay that's pretty much it and also make sure you're returning this okay and now let's go back all right and after we have tracked the response we want to make sure that tracking was successful too so if track was successful then return next response. Json and we're going to send a message with a 200 response okay so yeah just please pause and type so and I'll focus on trying to explain a little bit explain you know what's going on
a little bit more so you understand okay and again guys this is a really really big file with a lot of code okay so I'd expect you to take some time I honestly I think you should take some time pause and read the code if you're confused okay if you're ever confused stop and go back scroll all the way up top and read through this uh read through this so you understand what's going on okay then after this 1 2 3 4 5 6 7 seventh bracket or the sixth curly bracket you're going to hit
enter and in here we're going to check if the web hook payload entries at uh changes so there was some value that exists and the web hook payload entry at zero. changes. field is comments and inside here we're going to do the following so essentially this checks if the payload that was sent is a comment type payload and since we know that you know comment is one type of event we don't need to check for any of the chat history okay and so down here um we can now check first if it is the correct
post that has been that is that we're listening to on that automation right and so first thing we're going to say is Con automation equal await get keyword automation we're going to say matcher do automation ID and we're going to pass in faults and let's just take a quick look at this as well well and so all we're doing inside this Arrow function is export const get keyword Automation and for a specific keyword we're just uh for this specific um automation we're just trying to get some values okay and so we're going to say return
await client automation. find unique for this automation ID but we're going to include all of this data okay so what do we need well first we need the DMS okay and this is a Boolean that way we can choose to return it or not and then we're also going to need the trigger okay so trigger where if it's a DM then we're going to say DM if it's a or we'll just say comment okay so it'll return those triggers as well we want the listeners as well and we also want the users's subscription status okay
and the reason is because throughout the code we might want to check if the user is has a Pro Plan and accordingly we can fire smart AI if they have that wired up okay so subscription select plan we're going to set it to true and for inter ations I'm going to select the token okay nice now let's go back okay and right here after this now we can say const automation post equal await get keyword post and we're going to pass in that um the media ID which is essentially that post itself and then the
automation ID as well okay and I think uh I don't think we've done this before here so we're going to need to let's just take a quick look at this one so get keyword post is an async arrow function okay that needs a post ID and the automation ID okay and all we're going to do is find that post from our post table so client. post. findfirst and we're returning this right so await client. post. findfirst where it is of this post ID and it's the same automation ID and we're also going to select the
automation ID instead of to True okay and so now we get the automations post all right so what are we going to do next down here next we're going to check if there is a trigger or the that respective trigger exists in our database okay and we also want to check that that post itself right has an Automation and the keyword automation matches okay and so here we're going to say Automation and Automation undor poost and the trigger this and if that does then we're going to check if it has a listener because if it
doesn't have a listener we can't really do anything right and so if it does have the listener then inside here we're going to do a couple things so first what we're going to do is we want to check if it is of a type of a message type listener or if it's smart AI or Pro okay that's all we're doing in here so we're going to say if automation. listener. listener is equal to message then we're going to say const direct message because that's what the user wants right and we're going to invoke our send
DM function and we're going to say await send DM we're going to pass in the ID which is essentially the user's ID we're going to pass in the receiver's ID next then we need the prompt and the token as well okay and if this was successful we're going to go ahead and track this response all right and so we're going to say const track equal await track responses we're going to pass in the automation ID and comment in here okay next if everything was successful we'll just return next response. Json with the message set to
message sent okay and status is 200 next let's scroll down here this is if the user has smart AI okay so you first have to see if the listener is smart AI because we're not always going to fire smart AI even if they are on the Pro Plan right so first check that and then of course they have to also have the Pro Plan so we're going to say automation user subscriptions. plan equal Pro and if this is true then we can generate the response based on open ai's prompt okay so you're going to say
smart AI message equal await open. chat. completions doc create we're going to pass in the model pretty much the exact same thing we did all right and the messages is going to be the role assistant the content is going to be automation listener prompt so whatever the user has set but we're going to keep their responses under two sentences and now we're going to make sure we got some response from open AI so we're going to say smart aim message. choices at 0. message. content and inside this if this is true now we're going to
do the exact same thing that we did before which is we're going to need to save the chat history okay so you're going to get the receiver and the sender and we do that by doing the following so create chat history and we're going to say automation ID uh let me go into this real quick and check return client. automation. update hm maybe I might want to okay I know why sorry guys totally forgot the reason why we're not saying await here is because we're trying to create a transaction okay we're going to do both
together so we're going to get this we're going to say automation. ID which is essentially the automation ID right and then we need the sender ID and then we also need the receiver's ID and then the text okay and same thing for the sender as well we're going to get the automation ID the entry. ID then entry. changes. value. from ID and then the smart AI message okay and then down here we're going to create this transaction and then we're going to pass in the receiver and the sender all right cool and now after that
we're also going to go ahead and send this DM and so for that we're going to pass in the web hook entry ID which is the user ID the receiver ID next The Prompt itself and the token okay and now we're just going to check if everything is successful so we're going to say if we have a 200 response great awesome we're going to track it by saying track responses away track responses we're going to pass in the automation ID and say comment okay so guys please pause and type all right as I'm explaining I
want you to pause and type it out okay next if everything successful will return a next response. Json saying message sent and a status of 200 all right okay now all the way down here this is the basically if we did not have a match condition right so 1 2 3 4 five 6 7 eight curly brackets not this one the curly bracket after that we're going to say if no matcher right and the reason why we're doing this is it means that there was no keyword match right and so we can check if they
are an existing customer and this could basically indicate that they're having an ongoing continued conversation right and so that's why what we're going to do is we're going to check if a chat history already exists for the customer all right because sometimes the user can send a message and they can follow up again with the next message right because the AI is talking to them and so if there's no matcher we want to just check the chat history okay and so here we're going to say await get chat history we're going to pass in the
recipient and the sender's ID okay and then down here we're going to see if there was any chat history that we stored in the database then we're going to check if it's greater than zero and then we're going to find the automation down here okay and so if there is a history that we found we are basically going to just continue with smart AI okay and keep this in mind guys we only save conversation when smart AI was used because if smart AI was not used and it was just the traditional message that's just one
message so we don't need to save the conversation history right so that's how we can prove that smart AI was being used here and so next what we're going to do is we're going to say const automation equal A8 find Automation and I think we already went across this but if I did not all we're doing is it's a arrow function that has an ID which is a string and we're going to return A8 client. automation. find unique for that specific ID and we're going to include the keyword trigger post listener and the user but
for that we want to return we want to select only the subscription and Integrations okay all right so now we have the automation details now we can verify down here that the Automation and the user uh basically um have permissions to conversate right so first if it's prop plan and if it's smart AI only then can they conversate basically so we're going to go ahead and say the same open AI thing so we can continue with it so we're going to say smart ai. message uh smart AI message equal await open AI chat. completions doc
create and here we're doing something slightly different we're passing in the model right the messages as well the exact same thing and here we're saying assistant content automation. listener. prompt keep it under two sentences and then we're also passing in the customer's history response right so the entire history as well and then we're saying roll we're passing another object with r user and we're passing the content which is web hook payload right here right which is this one entry at zero messaging at zero and the message text okay that's it and then let's scroll down
here and then here we're just making sure that you know the same exact thing since we're using smart AI um there's a chance the customer can follow up with the response and so we're going to save all of this chat history so anytime it happens again it can go through this if there's no keyword okay and so we're going to create the receiver and the sender with create chat history automation ID web hook payload entry at 0. ID the sender ID and the text and then same thing here but we're going to pass in the
the message from the smart AI okay and then we're going to create a transaction saying await client transaction receiver and sender and then we're also going to send this message and then once that's done we can we can return so if everything is successful we have a 200 response we can return a next response of 200 like this with a message okay awesome now after all of this if no automation was set right so 1 2 3 4 four brackets if no automation was set we're going to return a 404 and say no automation set
okay and even after that if still nothing nothing worked right then we're going to say no automation set as well with 404 same thing and then if an if an error took place we'll just return a 500 in the catch block that's literally it okay I know it's a lot of code but I want you to pause this video and scroll all the way up top and read this once more okay or watch this section once more so you understand exactly why we're doing all of this okay and one more quick thing if you did
purchase the license um the thing is it does come with comments okay you do have some you do have comments in them and um you can probably use this to better understand what the H is going on if you need that assistance okay by the way some people ask me whether the you know the license code and this is different there's absolutely no difference okay and so the license only comes with two additional things the first one is we have husky setup that means for GitHub stuff right for creating commit messages and then we also
have some linters to create a uniform you know linting uh like a linting setup for all the devs that are working on your project and then we also have some environment scripts set up to run those and yeah that's it just just frontend setup stuff okay and so if you're looking to make money with slide first of all I really believe in Slide the this micras is in high demand and honest ly I use it myself okay and so what I would suggest is if you got the license you have all rights to use your
assassin anyway we're not going to trouble you okay you can read the you can read the U you know the the agreement and you're good to go but this is probably the easiest SAS you can ever start the code is very simple it's straightforward and at the same time it solves a really big problem okay because people want to automate client acquisition nobody wants to sit and chat all day okay and so if you have a you don't even have to use it as a SAS you can sell it as a high ticket service okay
so we cover a lot of this stuff ins ipu again this video I don't want to get too much into how to start the SAS and all that kind of stuff if you think that is something that you might find helpful let me know in the comments and we'll see what we can do okay but um I feel slide is probably your best bet at starting a SAS because it's easy to manage the code is less it's a it's a micro SAS right and creating content for this is so easy imagine you created content that
is like a free trial for people to test how the content works or the SAS Works sorry and so imagine you created a video saying here's an awesome sass that solves a problem Etc and you just show exactly what it does you just show the outcome right and you show have how people can benefit by using your SAS and then you can tell them if you want to test it out just comment the word get started down below and the AI will speak to you that's like a free trial right and so you're giving them
a free trial without them actually needing to get an account because they can pay you right like straight off the gate right you can just say hey here's the price because you already have the free trial already done for you right and so you can charge guys this is the best SAS ever I love this sass okay and I use this in my business as well okay so yeah getting the license is if you're going to get a license to any one of our code bases I would highly highly recommend getting this one just because
you can make money from it okay it's much easier than any other um you know ideas that you probably have because this is already validated all the projects that we create are validated okay but I just love this one because it's simple and easy and fun at the same time okay awesome now now that we have done creating our web hook for Instagram the next thing we need to do is the oath endpoint okay so once the user signs in using oath we need to send them to our application so we can get the token
and then save the token in our database and so that's exactly what we're going to be doing right now so I'm going to shrink everything I'm going to open up Source going to open up app and inside the protected routes I'm going to create another folder and we're going to call this callback okay and then inside this we're going to create another folder call this Instagram and we're going to have a loading. TSX and a page. TSX okay and for the loading you can copy exactly what's in the payment loading so I'm just going to
copy this and I'm going to paste it in here and for the page. TSX I'm going to return a component and I'm just going to call this page like this okay and so first we're going to change this to an async component like this and we're going to need search prams okay and the search pams when they return back from Instagram they're going to come with a code okay and this code is a string and it's going to have like a hashtag okay like #and an underscore and we're going to need to split that and
that way we can do whatever we want to do with it okay and so first let's go ahead and grab the search pram so I'm going to say props search prams and search prams is going to have a code inside it okay and so next I'm going to go ahead and also destructure this saying code like this okay and now inside this I'm going to first check if the search or I don't I can just check if code exists then first I'm just going to console log so we can make sure it's returning in here
okay if I need to and then I'm going to say const user equal a wait on integrate which is another server action that we need to create and again there's a lot of code in this so first let's just do the setup for this okay and this just needs that code all right so I'm going to say code dosit and we're going to split it at that hashtag okay and then we're going to take the first value all right and next if user. status uh status for now we're not going to we're we're going to
get some typescript stuff but that's fine so if status is 200 then down here we're going to return redirect okay and in here we're going to pass in the following so first thing is slash dashboard okay slash and we're going to say dollar sign like this user. dat. first name user. data. firstname okay and then we also need to pass in user. dat. last okay and then slash Integrations like this so that way the user can see if they're connected or not okay and then after this if this failed then we're just going to return
the user sorry guys it's not there first let me remove this and then down here okay so return redirect like this slash sign-up okay and now let's go ahead and create this um the server action so you're going to open up your folder structure you're going to go into actions into Integrations in index. TSX sorry index. typescript and now we're going to say export const on integrate like this which is an async arrow function and we're going to need the code right so we're going to grab that as well and first we're going to await
the current user so I'm going to say await current user like this so user await on current user and then we're going to have a tri catch in here and inside the tri catch first we're going to check if an integration exist or if that specific integration exists for that user so I'm going to say const Integrations or integration this is fine equal to 08 get integration let me make sure I get the right spelling okay and this is another query that we need to create so what I'm going to do is I'm going to
open up my folder go into queries and down here I'm going to say export const get integration which is going to be an eror function okay and in here this is going to be an Asing function of course and we're going to get the clerk ID which is going to be a string okay and then first we're going to say return await client. user. find unique where this where the user has this specific clerk ID right and then then down here we're going to select some more data so I'm going to say Integrations give me
this where the name is of type Instagram okay because that's the only one we're dealing with right now and then let's go back and let's quickly import this get Integrations query and now it needs that clerk ID so I'm going to say user. ID like this okay nice and then down here I'm going to hit enter and I'm going to check if Integrations if Integrations and Integrations do integration. length is equal to sorry length is equal to zero and if it does then we're going to generate new tokens okay so I'm going to say const
token equal to8 generate tokens okay generate tokens and we're going to pass in the code all right and this code is what we got from here and so this generate tokens is going to be inside our folder which is our fetch folder so let's go inside Libs sorry guys Libs folder inside fetch file all right we're going to scroll down and we're going to say export const generate tokens equal to an async error function that takes in the code which is which is a string and now we have to essentially get um the token right
but this token first of all is a shortlived token so we always have to refresh that stuff right so first I'm going to say insta unor form equal to new form data and we're going to invoke this and then we're going to say instore form. append and we're going to append append the client _ ID please don't make any spelling errors okay and here we're going to pass in an ID that we don't have yet but we're going to get eventually but it's called the Instagram client ID okay and we're going to send this as
a string okay and then we're going to say insta form. append and now we're going to pend the client secret so I'm going to say client secret and we're going to pass in the client secr secret so process. environment. client secret as a string and then we're going to need to have the grant type so I'm going to say Instagram form. append Grant type authorization code and then we're going to also need to have uh the redirect URI so the redirect URI is exactly that route that we just created right so I'm going to say
insta form. append redirect URI is going to be process. environment. next public host URL SL callback in callback Instagram okay and then after this we're also going to need to pin the code so I'm going to say instaform append code and pass in our code and all right that's pretty much it and now we have to essentially create that token okay actually we're going to refresh that token so I'm going to say short token response equal wait Fetch and I'm going to say process. env. Instagram let me copy this it's Instagram token URL of course
we don't have this as well so we'll get to all of this when we need it and then we're going to pass it in as a string and then we're also going to need to pass in some data in here so we're going to say method method like this is post method okay and the body is going to be instaform okay also if you're wondering why we're using fetch here for some reason when I tried it just wasn't working with axos and that's why I'm just using fetch okay all right and now um this is
going to give us the token so we need to extract it from there so I'm going to say cons token equal to await short token response and we got to get the Json from this okay nice and now we want to make sure that um that the token. permissions token. permissions length is greater than zero and I'm also just going to print a message here here in case I need it and so if this is successful um we are basically getting a token right so we get the Long Live token and it's going to be
valid for 60 days okay and we're going to exchange it with that short short live token essentially okay so I'm going to say const long token equal to await axos doget and then now I'm going to pass in a string please pause and type and do not make any errors here because I cannot help you if you show up in the Discord because it's going to be very difficult to track this okay so it's process. environment so base URL SL access token okay and then we're going to say Grant type equal to ig exchangeor token
and client secret equal to process. environment. Instagram client secret and then access token is going to be equal to that token that access token that we just created okay nice okay and we will come back to this part of course but for now we just want to make sure we're returning this as well so I'm just going to say long token. dat all right nice and now after this um this should be good let's go back and let's import the generate token okay and after this I'll console a message here just to see that we're
getting the token and then we're going to make sure if the token exists then we're going to get the Instagram ID for that user so I'm going to say const insta ID equal to A8 axios doget and we're going to get U we're going to basically pass in this specific key u sorry this specific endpoint so it is process. environment Instagram based URL /me questionmark Fields equal user ID and access token equal access token like this from that token and then down here we're going to create a new integration and we're going to set that
to expire with 60 days from today okay so I'm going to say cons today equal new date and then expiry date is going to be expire date equal today. set date to today. get date plus 60 days okay and then after that let's go ahead and create an integration so I'm going to say create await create integration and of course this create integration is a new server action so I'm just going to go ahead and copy this and before that let's just understand what we're passing in we're passing the user ID the token the access
token itself the expiration date with the new the new 60 days token right and then the Instagram ID okay and so I'm going to open up my folder structure inside queries I'm going to scroll to the bottom and I'm going to say export const create Integrations integration and this is an async function and this is going to need some values right here okay some parameters which is clerk ID token expired ID the expired date and the Instagram ID and inside this I'm going to say return await client. user. update and we're going to basically update
where this clerk ID is like the clerk ID we sent in and the data that we're going to update is going to be Integrations and we're going to set that so so let's change that once more okay Integrations we're going to create the token uh why is it not setting okay token like this expires at is going to be set to the expiry date and the Instagram ID is going to be set to the IG ID okay nice and then after this down here we're going to select we want to select the first name and
set it to true and we also want the last name okay so last name said it's true nice okay something looks wrong here okay there we go now let's go back and let's import the create Integrations hook I'm sorry create Integrations query and now you see we are just passing in those values that it requires okay and then down here if everything was successful we're just going to return a 200 saying it was created and pass in the creation data and then after this right here I'm going to say 401 if some error took place
and then 404 at the bottom here if nothing happen Okay and then I'll change this one to 500 nice and you can also print a message here so just so it's slightly easier so console.log slightly easier to just you know debug and stuff right so let's say 401 okay like this and then here we can say 404 and then here we can say 500 and we can print the error as well so 500 error okay nice and now we have this one also set up on integrate ready so let's go back and let's import on
integrate okay nice and I see some errors here so let's quickly fix these so it's saying this is possibly undefined okay and this is possibly undefined as well and that should solve that problem all right great job all right guys so now we can proceed with getting our Instagram credentials and also building our meta app and that way we can get started with our project okay so the first thing you want to do is you want to create a new Facebook account okay it should be a brand new account with an email you have never
used before and the reason because just in case if something happens and you get banned I don't want it to be your original account right and so that's why just just use a brand new Facebook account and a brand new email once you're done you need a new Instagram account so go to instagram. uh.com and then sign up with these credentials okay the same thing you used your uh you used right here to create this Facebook account just sign up and create an Instagram account all right so the same email and the same credentials you
used for this one all right and then once you're done with that then we can move forward December 31st is your last chance to join prodigies University at our lowest price that means just by taking action today you will save 10% every single month if you are a SAS business owner or a web developer and you're looking to start run and grow a profitable SAS then this is exactly where you should be at the time this video is made we have helped over 400 SAS business owners and entrepreneurs who wanted to start and launch their
SAS from the ground up we ourselves run three different businesses all within just 7 months that are now making $60,000 per month but it's not just about our success we've also helped other entrepreneurs do the same here's David who went from $0 to $14,000 by implementing a high ticket monthly recurring Revenue SAS model all within just 3 weeks of joining prodigies University and he did this without even posting content on social media and here's Derek who made $3,000 using the exact same business model in just under one week of joining Prodigy University or take Monty
for example who made her first $11,000 through her business in under a month or here's another SAS business owner who now runs a SAS company with over 110,000 users in under 15 months but now you might ask well these are probably people who brought something to the table so what does the average student make inside prodigies University so here's funny who has never sold a SAS service in the past and now made $1,200 in just under 3 weeks of joining or here's yush who has never made money online and does not even know how to
run a SAS business but he was able to get his first SAS client in under one week of joining Prodigy University after implementing the quick win system here's sakam who made his first $200 through his SAS in under 10 days here's Shimona who quit her 9o5 job and is now a full-time entrepreneur or here's aij who now has 3,600 YouTube subscribers and which also drives traffic to his SAS and his own sasc course and now also a new community with over 400 members now I can go on and on about these results but I think
you get the point here these strategies have proven to work and will work even if you don't have thousands of followers you don't have money to spend on advertisements or you don't want to send thousands of cold DMS to prospects online and to reward people who decide to join this enrollment period you get access to a bunch of free bonuses and you also get to take part in the Pu games to win cash prizes as you rank higher in our leaderboard but this offer is not going to be there for too long because December 31st
is your last opportunity to join at a discounted price or when we run out of the 100 limited spots that we open for this month's enrollment so if you want to know exactly what you're going to get by joining prodigies University I'm going to leave a link in the description below if you sign up to that link you will get a free course that breaks down the exact business model from start to finish and you'll also see exactly what is offered inside prodigies University so if you want to learn the proven systems that have help
these students start run and grow a profitable SAS the right way through mentorship and courses then I'll see you inside okay awesome so I'm assuming that you already have the new Facebook account and the new Instagram account created and now we're ready to move on to the next stage so once you log in into your Facebook account you're going to see something that looks like this right it's say brand new accounts you're not going to see any posts no history absolutely nothing and that's what we want okay and you're going to go to the sidebar
right here and you're going to click on pages okay and once you click on pages it might take you into a page that looks like this guys again Facebook is going to change every single day all right the idea is still the same thing okay which is you need to create a new Facebook page now all right and so in here you're going to click on create new page and that's going to take you to a page that looks like this and just go ahead and put a name title category I'm just going to pick
software I suggest you pick the exact same stuff that I'm doing just change this page name okay put something that you want all right and then at the bottom you want to click on create page and that's going to take you to the next page here which is some sort of setup stuff and I think you should be good you don't really need to do anything apart from that because we're just testing it right and so if you go to the right side here and you click on this profile icon you should see that new
uh user that you created right so this is your original Facebook accounts you need to switch between your uh you need to switch to your Facebook page account so click on see all profiles and you're going to see your original accounts and the new Facebook page you you created so click on this Facebook page and it's going to log you into that account okay and you probably might see a modo like this I'm not sure just CLI click on not now we don't want to take any tour and that should take you into your Facebook
page okay you see we're logged in as the Facebook page user then at the bottom here on the sidebar if you go to the homepage you're going to see shortcuts okay and you want to click on that new Facebook page that you created next it's going to take you into a page that looks like this and then that should take you into a page that looks like this okay scroll down and you're going to find permissions and this might change of course but you can look probably search for it right here but you want to
click on on linked accounts okay so go ahead and click on linked accounts and then you're going to find a section here that says Instagram accounts and if you haven't connected this account you haven't connected your Instagram to the new uh Facebook account or the Facebook page then you want to go ahead and connect it okay so I've already done this um so you're probably going to need to do it if this I mean since this is a new account so go ahead and click on connect or whatever it has right here and then that
will connect your account and one more really important thing is you want to allow access to Instagram messages in inbox okay this is the most important part because if you don't do this then you're not going to be able to accept messages DMS and also send DMS from the app okay so if for some reason you did not select that option you can click on view and you can turn this on and so when you're trying to connect your accounts this is probably what it would look like right so when you click on settings and
you click on the connect Integrations to link your account it's going to again take you to the um you know to Instagram's login just make sure you log in with Facebook okay you don't want to do anything here like just log in with the same exact account and you see I'm just going to click on continue continue as the account click on yes finish adding and then you know just set whatever credentials you want in here shouldn't really matter and that's pretty much it so now you have your Facebook and your Instagram account linked to
each other great job all right now the next stage is we need to create create a meta developers account okay so just look up metadev account like this and make sure you click on developers. face.com this link all right and so once you click on that it's going to take you probably into a page that looks like this and then you want to go ahead and sign in or whatever you need to do and then I think this is they are of course they're changing it every day right so it's a little different now but
if I click on my apps it should take me into my dashboard okay so once you click on my app or once you click on register for Dev account it's going to take you into a page that might look like this okay and the next thing you want to do is just proceed by following through with all the details you're asking for so hit continue right here and then put your mobile number to verify the account they're going to send you an SMS and then put your primary email and then click on confirm email and
then on the next page you want to click on the developer option right here and then of course check I'm not a robot and then complete registration okay and then that will take you into this page so for me because I've already created slide it's not showing uh it's it's showing for me in there but for you it's going to show like this okay next go ahead and click on create app and that's going to take you into a page that looks like this go ahead and log in with your Facebook account if you need
to you know password put all that stuff and then it's going to ask you for the credentials so for app name I just put slide-- web prodigies you can try the same um not sure if it's going to be unique but if it is is just add a number at the end okay and then for the app uh just put an email or it's probably going to automate then click on next then on this page please really really important why are we creating this app well for other stuff to explore other products and get other
data permissions okay so select this option right here and then click on next and then it should take you back here uh take you right here which is to select the type of the app so once you click on this it'll take you here please click on business okay don't click on consumer click on business and then it's going to take you into this page and in here you want to click on the business Prof portfolio uh dropdown and then you want to select that new Instagram account or Facebook account whatever it shows right here
okay it's the new one that you just created I think this might be the Facebook account not entirely sure but uh just uh if it's either it's Instagram or probably it's a Facebook The Meta account you created right but it's going to show up just click on that all right okay and then once that's done it's going to take you into your developers. facebook.com/ apps like this okay and this is where you need to add a product and we're going to add Instagram as our product so click on setup and that's going to take you
into a page that looks like this and then from here we're going to do a bunch of stuff and then I'll show you exactly what we need to do okay great job okay so first thing you're going to do is you're going to copy this Instagram app ID and you're going to go into your environment file file and you're going to find something called um Instagram client ID okay please paste that inside your environment file okay and then next you're going to find the app Secret Show click on Show app secret and then copy that
app secret and inside your. environment file it's called Instagram centore secret okay paste that in there as well now the next tool we're going to need for our web hook endpoints to work is enro and the reason why need enro is because our application is not live right and so how will Instagram know where our web hook endpoint is and so for that reason we need to set up enro and it basically gives you a temporary live um like URL and then you can use that as a web hook endpoint okay so go ahead open
up your terminal if you haven't already installed enro then I would suggest you go to the website and just quickly install it it should be pretty straightforward I've already installed it so I can move on to getting it set up and the first thing I want to do is make sure my service server is running so Bun Run Dev like this and it says 3,000 for me okay awesome and then I'm going to open up another terminal and I'm going to copy this Command right here and I'm going to paste it and then I'm going
to change this to 3,000 okay I think this should do the job let's take a look I mean let's try it out right so let's go ahead and hit enter all right and now it's saying found a bug okay there you go now it's online and it's also given you the forwarding um URL and so now you can use enro with your web Hooks and now to make sure that everything is working you can go into your dashboard and you can click on endpoints and you should see something in here um and you should also
see of course that it's just created right a new endpoint and now this is the endpoint that you can use all right guys so now we can go ahead and finish all of these steps that Instagram is telling us to do okay but the first thing to keep in mind is you're not going to be able to get the access token or get the Instagram account connected using slide and the reason is because we don't have the application Live okay so the criteria to do U you know do this entire process directly inside slide is
first you need to have a live application that means you need a real privacy policy page you need to get your app reviewed and you know approved and then you have to be live okay so because we can't do that right now we're going to be manually just creating the access token so imagine we are basically manually setting up the account that's what we're doing okay so first thing is go ahead and click on add account it's going to show an off flow like this go ahead and log in with the new account we just
created and make sure you click on Save information okay and once that's done it's going to show some permissions like this go ahead and click on allow and then it's going to gener generate that access token for you okay now please click on I understand and immediately copy this and paste it inside a Word document or inside just paste it somewhere okay save it and the reason is because once you hit done you're no longer going to be able to see this token that's that I generated okay later on I'll show you how we can
take that token and put it inside Prisma okay we're going to put it in our database using Prisma studio all right so copy and paste this and the next thing we're going to do here is we're going to configure a web hook all right so go ahead and hit configure and then it's going to take you to a page that looks like this and for the call back URL you're going to essentially put the enro URL that you have okay not this one the one you have the one you created okay and then you're going
to say SL API SL web hook and then after this slash Instagram okay this is basically our web hook URL all right and then for a verify token just put what just put anything okay I'm just calling it testing just put testing if you like and then click on Save okay and once that's done um you will essentially uh see like a check icon right a check like that and then it'll show you all this information um you don't have to worry about it but just to know that it's completed uh just to get a
sign that it's completed you should see something like this okay then you're going to click on setup Instagram business login this is our oat callback okay so you're going to say the same um enr ql SL callback SL Instagram okay and then go ahead and click on Save and please don't make any spelling errors because it's going to be very confusing to you know kind of debug all this stuff all right and then go ahead and click on Save and you should be done great job all right now remember we had that access token right
so this is what we're going to need to do with that access token so copy that access token and inside Prisma uh Prisma studio if you don't know how to open this it is is bun X Prisma Studio okay inside the terminal and that should open it up uh in here in the browser and then you want to click on Integrations like this right here and then you're going to create a new integration so click on ADD record and then you're going to essentially paste the I can't scroll because I've already entered the data right
but you're going to find the access token and you're also going to find another field that you need to enter okay which is the Instagram ID and the Instagram ID is this little ID that you see right here okay so copy that ID by the way that ID is not user ID it's not this ID okay it's literally called something like uh let me let me take a look at the Prisma schema here so I can tell you what it's called so we have Integrations okay you see we have Instagram ID right so for Instagram
ID you're going to paste this ID right here and for the token you're going to paste the token that you just copied into your file okay and so so once that's done you can hit you can click on done and uh then you should be good to go yeah you'll have this set in here and then the next step is you have to connect that to your user okay and so you're going to click on user and you're going to click on the user's account that you want to connect this Instagram account to okay so
I think um you know whatever account you're logged in into your slide application just use the same thing all right and so once you connect that it will automatically populate their user ID and everything else and then go ahead and click on save you'll see a button right here called save click on that and that will save all of your credentials all right awesome now there's one more URL that we need and I think it's called oath embed URL inside your environment variables and so once you set up your Instagram business login right here you're
going to get a URL okay and so that URL is the embed URL so copy that and paste it inside your environment file okay all right guys now I went into the automation step and I created an Automation and I named it test one and then if everything worked out correctly we should be able to get all of the posts on this user's Instagram profile all right so let's go ahead and click on this I want comments that's the only way for me to get the posts and then I'm just going to create a keyword
so I'm just going to say start and hit enter awesome and then let's go ahead and create this trigger and there you go you can also see the specific um keyword that's attached to this automation right and then we want to send the user a message and I'm going to send something in here so I'm going to say thanks or here's the link and I'm just going to send web prodigy.com just want to test out how links work as well right okay and then you can also reply to the comment on the post which is
really cool right and so what we're going to do is I'm just going to say thanks or sent check your DMS right like this and then now we can go ahead and add this listener all right nice so send the user message and this is the user that we're sending uh this is the message that we're sending and now if I click on attach posts you might see an error okay there we go I knew why I was going to see that already and so the reason is because we did not add the well in
next con I don't actually know what it's called but inside the next configuration file you essentially have to set up the image paths in there the domains in there okay and that's the only you can you can read the error okay and it literally tells you so you see invalid Source prop and then it says on next image host name this is not configured under the images tab right and you can read more about it right here and so the way to do that is we need to open up our folder structure and we're going
to scroll down into let me also shrink this so we can see more we're going to scroll down to the next config okay and inside this we're going to say images and we're going to set remote patterns to the following actually not an object guys sorry this is an array I was wondering why I couldn't get that and so it's an array with an object like this and the protocol is going to be https right but the host name is going to be this one right here now this might be different for different people um
because the last time I did this it was different for me right and so go ahead and copy this host name and paste the host name in here and once this is done let's go ahead and quit the terminal okay I think uh it's running here and Let me refresh okay then I'm going to say Bun Run Dev okay and now let's refresh the browser and then once this spins up now since we have the host name uh wired up in here it should render okay so attach posts all right there we go take a
look at that looks amazing it's just a random post that I that I put up so it doesn't really matter but just to show you that now we can see all of the posts okay and now if I click on this post you see we see the check icon as well and now I can attach this to this specific Automation and just like that it says the these posts are attached to this Automation and you can create multiple and attach multiple to this trigger as well okay great job all right guys now step number two
is we also need to go live with our app and I think it's worth giving this a shot because we're not going to be able to get real data from you know users unless our application is live right and so let's just try to see if this would work just go to app um right here app settings in your in your left side barar and then you want to click on the basic settings okay and then go ahead and add your privacy policy page it should be a real privacy policy page okay and then also
go ahead and just select just create an icon if you can't create an icon it's fine uh but just put an icon for me I mean I didn't have to put an icon and it still worked but for you if you need to just go ahead and put that icon and then click on Save changes okay and then once that's done you can try to see if it works for you for me it worked I just went to the dashboard again and I clicked on the um the live button right here and my application went
live okay if it doesn't go live for you then I'll show you what you should do um essentially in here when you click on web hooks you're going to find something called manage right and when you click on manage you'll be able to individually trigger different web hooks okay so for comments or DMS specifically whatever that is there'll be a test button okay next to each and every different each and every type of web hook just click on test and you're set okay but I want to try to see if this works live so that's
why I'm turning my application live so now as you can see I have two different accounts right here and I open up the account and I'm clicking on the post as well and now I can leave the specific comment which is start okay so fingers crossed let's hope this works and also make sure you have your terminal up and running and so that way you can see if anything's going on okay and then now I'm just going to comment start and let's just give this a second okay so it looked like the web hook worked
which is a good sign okay but something seems to be wrong in here and I think it's saying please use user and alternative instead no sure what that means Let me refresh this and see if okay so something might be wrong guys let's go ahead and debug real quick okay this took me forever to research I hate this man I don't know why their API is so hard to understand and why there's absolutely no resources but um well this is how it works with Instagram at least right now okay first the user needs to not
have any privacy settings of course because Instagram really cares about their users right so there's no data that I mean there's no data sharing if you say no data sharing very straightforward so first if the user's account that you use to comment with has any sort of privacy settings the message will not go through that's step number one so let's keep that in mind okay so if you have a private account and you're trying to comment you're not going to get a message just keep that in mind Point number two is how this works is
essentially when someone comments on a post that doesn't mean that they want to accept a message from you right and so for that reason we cannot send a direct DM message instantly okay but I found a workaround and I don't know if this is good or bad but I just found a workaround so I don't know okay don't tell anyone just do it this way all right and so basically first thing we need to do and I had to do a lot of console logs to figure this out right so guys please subscribe okay smash
that subscribe button this took me forever all right so first thing we're going to do is you're going to rename the send DMs message right here so under comments right here you're going to scroll down under message scroll down where it says send DM and just change it to send private message which is another function we got to create okay and then the other thing we need to do is we need to change the second value that we're passing in to value. ID okay so please make this change as well all right and now once
this is done this essentially allows us to send a private message so with many chat you can't actually send a message period okay you would have to send a widget and that widget would would essentially give the user the ability to say yes send me the message they would click on the button and then based on that button being clicked we would have to send the message okay so it's a very complex process but this is just straight in the DM literally okay given that they don't have any privacy settings and you know they there's
nothing in the back that's prev venting them from uh receiving your message okay so change this setting here and then we're going to go into the lib fetch folder and remember the send message uh function right just copy that function all right copy it and paste it down below and then change the name to send private message okay and then the first thing you're going to do is you're going to find one number here right v21.0 go ahead and remove that number all right and then next down here you're going to have the recipient you
want to change the ID to comment ID okay and then you want to change the message actually message can stay as is that should be fine okay and that's it that's all I had to do to make that work and yeah let's go ahead and give it a shot once more all right so now if I comment the word start I should get a link to my website okay so this one you see I already tested it and it worked right and so I'm not going to be able to test it with the private account
but I will send you a screenshot okay I'll put a screenshot on the page so you can see what that looks like but now that I have the start keyword let's gohe go ahead and hit enter and before that let's also open our terminal and so that way you can see what's coming through and then I'm going to go ahead and hit start okay fingers crossed let's see what happens all right there we go let's go awesome and you should see 200 here one more thing that you need to do and sorry I forgot to
mention this a long time ago is you're going to need to set all the responses down here so the bottom ones right set everything to 200 200 here 200 here here and here as well now you want to do this um because if you are sending a 404 or anything other than 200 Instagram is going to think that the web hook failed and it's going to try to refire it and so it's going to do it probably every second or every two seconds I don't know know and you can get banned okay and so I
was lucky I found this last second and I noticed it's it just kept sending web hook response you see it already sent it twice right and so I was like oh something's going on and so that's why I immediately changed 200 and then it stopped okay so please change that to 200 as well all right good job guys we have come so far now we only need to test you know a couple more things um we already tested the comment automation let's go ahead and test the DM automation okay and this is what I did
for the front end as well right this is the DM automation so I set it as 1 2 3 as the keyword and then we're just going to say great it works okay so let's go to the messaging section all right and by the way if you're just doing this for your for the first time ever and um you are not seeing the message show up it's because it's inside the request section okay so inside Instagram go to request and you'll find it in there now I'm not sure if this is going to send because
we are actually well let's try first I don't think it's going to send with this account but it will work okay it should work okay it's working nice all right cool all right that's amazing so that's it guys there you go so now we have the simple DM automation working great now the other bug that I caught here was it was showing get started inside as the keyword when in reality it had a completely different thing right and so that's because we did not complete this section and that's probably because we missed the work in
progress flag okay so you want to go into your automations list in index. TSX component under Global and the first thing we're going to do here is we're going to um create a bracket like this and we're going to say automation. keywords map actually this is small letter okay okay keywords map and we're going to Loop over this and for each of them we're going to essentially return an element so I'm just going to return a div for now okay nice and then let's go ahead and give it a key and this is going to
give us access to the keyword and a key as well or an ID and so here I'm going to say keyword. ID okay and then I'm just going to copy this entire div that I have right here and I'm going to paste it inside here okay and I know I remove removed my key so I'm going to go ahead and pass my key as well which is keyword. ID like this and now this is going to throw a typescript error and let me see why okay we have our key and in here I'm just going
to say keyword. word okay so it's working but for some reason it doesn't what's going on with the typescript here okay so something is wrong with typescript here even though dot map does technically have all the values I don't know why it doesn't recognize it but um I mean it's working so what I can do here is I can say at typescript ignore just for now uh don't always I mean don't do this in production stuff okay but let's see if I can solve this problem okay don't do this in production please um the reason
is because I know it's working and we just don't have a lot of time to sit and fix every single thing right but that's it so now this bug is solved nice let's move on all right so now let's go ahead and test the smart AI feature so I'm going to go ahead and scroll down here so remember where we said the private uh sent the private message right which is under a comment but only for a single message we're going to copy this exact thing right here so copy this one we're going to scroll
down slowly I know there's a lot of code so just scroll down slowly until you find the next send DM okay you're going to find the next send DM just replace that with what we just copied okay and now that you did that it should also send a message to private DMS if required um you know uh from this from this part right here okay and the reason why we don't have to do this the private DM for a standard you know uh message trigger is because we don't have a comment right and the user
is already sending the message so that's going to trigger the first response because Instagram does not want people to just Spam DMS to people who don't want a message right that feels like an it's like an aid driven application then so they don't they don't want Instagram to feel that way they want it to feel authentic and real and so for that reason they prevent people from sending these first messages that happen through automations and so if it's through a comment then the only way to send them a message is through the private DM and
regardless whatever way it is it first goes into their private DMS right and there's also something called a 24-hour period okay this is something that you might want to keep in mind and so um how Instagram sends your DMs and knows that you know this is not it doesn't want it to it wants to keep the authentic feel of Instagram right and so what they do is you have 24 hours to essentially conversate or send a message to the user so let's say they started a conversation with start right you can start the conversation with
AI for example and send a message but if their response to that message was after 24 hours then that automation will no longer work so you will get an error on your end okay so just something to keep in mind so so if you're building like a mobile notification you can send these notifications to you know the um the user or the the content creator saying hey something's wrong you know we couldn't send the message okay just giving you ideas you don't have to send a notification in fact I probably wouldn't do that in the
real world but I'm just saying um you can handle it accordingly okay all right so now that we're done with this let's go ahead and test the AI part so I created another Automation and the keyword is smart AI okay you can create whatever you want and I went into Gemini and I just created a prompt just use whatever you want okay doesn't matter just test it out that's all we need okay and then I'm going to go here into our automations and I'm going to start with smart AI okay and fingers crossed if everything
worked we should get an AI powered response all right let's go all right three two hey look at that hey what's on your mind today about your SAS Journey just saw your post on Instagram um what do you guys do okay let's give it a second check that out man th this is the best application ever okay I love what we built here this is amazing so first of all great job to you you have come so far and you should really give yourself a pat on the back because this is not easy not a
lot of people will accomplish this in fact most of the people probably hopped off this video right they got Tik Tok brains so good job to you if you're still watching this course all the way to the end so there you go it's saying we help SAS Founders do this whatever uh you know proud of University uh what a specific challenge you're facing see it's literally helping the customer out right all right so I'm happy now I'm going to take a small break cuz I'm super drained all right peace out all right guys now the
next thing we're going to do here is we're just going to build out something for our dashboard okay now this is not an important part of the application I mean in fact you probably don't even need it for your MVP okay MVP is only the features that you need for your application to run that's it okay that means what is your customer looking for only build a features that will serve your customer with that specific purpose and then as time goes your users will tell you exactly what they want and only then will you build
stuff okay so the dashboard is not too important but I want to have something in here because right now it looks like there's nothing there right so let's go ahead and do that so first thing I'm going to do is I'm going to grab my browser and let's bring it into the code okay and now we can go to Local Host and let's also go to the homepage so we can see what we're building and there we go okay nice so first I'm going to say class Flex like this um Flex why is it oh
the div okay Flex D column Gap Dy of 10 and then next I'm going to create another div inside this and inside this I'm going to say class name and I'm going to set the following Styles and then inside here we're going to essentially create another constant so I'm going to open up my folder structure go to constants inside um I'm going to create another page called dashboard. TSX or sorry. TS and then in here I'm going to say export const dashboard uncore so Dash boore cards and we're going to also set some props on
this and we'll get that in just a second and this is going to be equal to an array of those props okay and the props are going to look like this so just to save some time because we have a lot of stuff to do I'm just going to create copy pastes it's just ID label sublabel and description okay and they're all strings and then inside this I'm going to go ahead and create the object and I'm going to copy and paste please pause the screen and type this out okay or if you grab the
uh the GitHub you can also just copy paste with me me so now I'm going to import V4 and then these components are just going to look like this right something like this just to give an idea of what the dashboard can look like right and so let's go back there where is our browser okay all right so I'm just creating those cards here so label I'm just going to say setup auto auto replies so please pause and type if you want or if you have the GitHub you can just copy paste everything okay and
now let's go back here and now we need to import that dashboard okay so I'm going to say like this and we're going to say dashboard cards. map okay and for each of these we're going to return a card and down here we're going to return a new component called double gradient card okay so I'm going to say double gradient card like this and right away I'm just going to pass in the key cuz it's going to need it anyway which is the card. ID and then everything that's inside the card is going to be
passed in here okay now let's copy this so that we can create this component I'm going to go into my globals folder right here and I'm going to create the double-g gradient Das card and then index. TSX and let's go ahead and return a component and let's rename the component as well okay now this is going to need some props so I'm going to grab those props as well which is label subl and the description and let's just quickly destructure all of these okay now let's go back and let's import that double gradient card okay
now inside this component all we're going to do in here is we're going to return a div okay and this div is going to have the following Styles and then inside that we're going to have an H2 and a paragraph Okay so first create a container which is a div and then a an H2 and a paragraph inside that okay next we're going to create another div right after this so hit enter here and this is going to have the following Styles okay and we have a paragraph and a button and that button is basically
this little arrow key okay it doesn't really matter just to make it look nice and then let's go ahead and bring in this button component and then the arrow right component as well okay awesome and there we go now we have those three cards okay and then the next thing is after this right here after this button this div you're going to hit enter and now we're going to create those two gradients okay so this is a div right here that's going to create the leftmost gradient and then we have another gradient to create the
rightmost gradient okay and there you go looks amazing right it's so crazy how just simple gradients makes everything look so much nicer all right now let's go back and now that we have rendered these we can hit enter right after this div here and now we can proceed so next we're going to create another div in here okay and this div is going to have the following Styles all right and then inside that we're going to have a span that has an icon and then an H2 and a paragraph that's it okay so I'm going
to say span I'm going to create the icon and then a container for our H2 and a paragraph okay and the H2 I'm just going to say automated activity and here I'm just going to say automation zero Auto One interactions okay and remember we are tracking some data we have counts uh we have we can also count in the database so you can put whatever data you want in here okay I just want to create the basics for you so that way you can go in there and make it look as amazing as you want
all right the next down here after the span I'm going to create another div with the class name of width of full Flex actually let me copy this all right okay there we go pasting it somewhere else all right so inside this div now we need to create the chart right so I'm going to create a div that essentially is like a container for this component and let's go ahead and create the chart component now okay so open up your folder structure scroll down to Global and we're going to create oops sorry guys um actually
this chart is going to be used nowhere else other than this component right and so what I'm going to do is inside this folder I'm going to create an an underscore components folder and inside that a chart component okay and let's create an index. TSX and let's return that chart component like this and now let's go back and let's import the chart okay and now we can do whatever we want in here so this does not need any props so we're good to go but this is going to be a card component so let's go
ahead and say card like this which comes from our components UI okay and then we're also going to need stuff for card so we need card component card content as well so I'm just going to import that as well okay and now inside the card content which we're going to render in here so card content like this first let's also set a class name and this is going to be padding of zero and yeah inside this we're going to have a responsive container okay and this is a component that essentially comes from chatsi and UI
okay U sorry guys not from shats and UI it comes from another package called recharts so I'm going to say responsive container like this and I'm going to give it uh actually have to import it first and we're going to bring that in and then I'm going to give it a height of 300 and a width of 100% okay this has to be a string let's go ahead and do that as well okay nice and then inside this we have to provide something called a chart container so I'm going to say chart container okay and
make sure it's coming from the right component okay yeah this chart container is supposed to come from chatsi so we're good to go okay and then inside this we're going to pass in a configuration okay and this config is going to be done right up here so I'm going to say const chart config equal to an object with desktop and we're going to set label like this and we're just going to put some Valu I'm just going to say desktop in here and then I made a spelling error there so let me just copy this
okay and then the color is going to be the following color okay and I'm going to copy this configuration and now I'm going to pass that in here okay and now inside the chart config what seems to be seems to be an error here okay so this needs to be a client component so let change it to use client all right and now let's refresh that okay it says cannot read types cannot read type let's just refresh once more okay something looks wrong guys just give me a second okay so that type was basically the
child component really really bad that they're throwing an error for that but I guess well it's a container it needs it right so now we need the area chart so I'm going to bring that in from recharts like this and first I'm going to pass an accessibility layer which is a prop on top of this it's a Boolean and then the data is going to be the chart data which is something we're going to create on top now this does not matter right just put some data for now make it look pretty and then you
can focus on doing whatever you need to bring in valuable data okay but we're going to have month um right here and desktop set to just some kind of numbers basically and guys if you want to learn how to build an amazing dashboard there's another project I created called plura where we built some really really insightful data on this on a on a dashboard and it helps people you know sell products through funnels they get to track how many visitors are on the website there's so many features in that application so if you have a
chance I really suggest you put plura you know in your portfolio or if you want to start it as a side project or a side SAS that would be great as well there were so many students that started you know plura and are actively making money right now so you can do that as well okay all right so now after the chat uh chart area we also have to pass in the data and we also have to give it a margin so I'm going to say margin left of 12 margin right of 12 as well
okay and then inside this chart area right here we're going to pass in another component which is a grid component let's go ahead and import this from me charts and we're going to say vertical set defaults okay you're not going to you're not going to see anything right now but eventually you will okay and then for x axis we're going to say the following it's another component component let's go ahead and grab this as well we're going to say data key is month all right and then that's how it's going to show all the month
down month down here okay and then the tick line faults access line faults and tick margin is eight okay and then the tick form matter we're just going to have U something here that says value. slice we got this from uh we just got this from shatan itself all right so um it's a pretty much the same components and then after that I'm just going to have a tool tip in here so let's bring in that tool tip okay then we're going to say cursor fults and the content is going to be chart tool tip
content okay awesome cool now after this we can now have the area inside it okay so we're going to say area like this and we're going to import it from recharts okay and then there you go okay it's showing some sort of an error that should solve and now you have a beautiful animation for your charts and you can pretty much you know get some information through this tool tip as well looks super cool now let's go back one step and after this chart we're going to create another thing called media card okay a metrics
card sorry so let's create a div in here and I'm going to give this div the same class name that we have in here okay all right and then inside this we're going to say metrix card like this and then let's go ahead and copy this also guys in the next project let me know if you think this might be great um in the next project maybe we could do loading skeletons right cuz so far we've been doing the simple you know loading like this maybe we could do loading skeletons I think that would be
amazing right okay let me know in the comments what you guys think about it and we'll make it work all right guys if you have any requests put it in the comment section we pay attention to everything that you guys say okay if we don't respond that's probably because we're really thinking hard okay because you guys have some really nice ideas and it's very challenging and I mean just like the you know the many chat I had this idea for a very long time and I saw some people saying automation social media Automation and so
you know I thought about it it took me a very long time to decide if whether I should do this or not and then you know over the past couple months I decided okay we should do it and then it took me you know a couple months we built it out okay so just let me know what you want to see next and we'll make it happen okay and if you haven't turned on your notifications I suggest you do because in the next 24 to 48 hours I will be posting a poll and this poll
is where every Prodigy gets an opportunity to share their ideas okay or we'll put out a poll for the next project or a poll for you know ideas that that I think are great and you just have to pick what you want to see okay so don't don't miss out on that opportunity there's it's going to be fun okay it's going to be like a party okay all right so now let's go ahead and create this component so let's open up our folder structure I'm going to go into into the same uh component right in
here and I'm going to create maybe we can change this to metrics right and let's also update it everywhere okay then I'm going to create another component called metric dasc card. TSX okay and let's return a new component and rename this component as well okay all right and now inside this component uh actually let me also go ahead and import it so it doesn't scream at me okay cool and now inside this we're going to do some stuff so first I'm going to set the cu's client okay and then I'm going to need a hook
in here so I'm going to say const data equal to use Query automations not automation it's automations and this is going to return us some data okay and then after this I'm going to get the comments I'm going to say const comments equal to data. data. reduce okay it's an arrow function and we're going to get the current value and the next value and then in here we're also going to get the the value that it's going to reduce it onto right the starting variable and then in here we're going to essentially say return current
plus next. listener do comment counter okay so comment count okay just like this and let's do this all right that's it and now that we have the comments we're going to do the same for DMS so I'm going to say the same exact thing but I'm going to change this to DM count okay and then after that down here I'm going to remove this and return a new div and this div is going to have the following Styles let's refresh the browser I don't want it froze okay there we go okay cool and then now
in here I'm going to lose twice so I got to create an array with two elements map and in here I'm going to say I which is the elements and then we're going to return a div okay like this typing code is very difficult guys I don't know if you know that I can't type all right there we go okay and now inside here first let's pass in the key so I'm going to say key is equal to I okay and then some class names as well so I'm just going to put some styling in
here and then inside this I'm going to say I equal to 1 if so we're going to do something okay so if it's true we're going to return a div okay and this div is going to have an H2 and a paragraph that's it so inside here an H2 with some Styles paragraph with some Styles okay and there you go now you can see clearly and then after this down here we're going to going to hit enter uh sorry we're going to remove this string and if it's not equal to one then we're going to
return a div like this with an H2 saying direct message and then um a paragraph that says on your account okay and then down here I'm going to hit enter and I'm going to say if I equal to 1 if this is true we return something here else we return something here as well and now first what we're going to do in here is we're going to return a div okay with an H3 and a paragraph tag okay that just shows those numbers that we have which is six out of six comments responded okay and
then for DMS we're going to do the exact same thing okay so we're going to say direct messages 100% so four out of four DMS replied just to create some data okay not sure if it's valuable but um you know just want to have a dashboard in here okay great job all right guys now that's stage one of building our SAS application stage stage two is we need to deploy the application so first step is you need to go into your get ignore and you're going to scroll down here and you're going to type. EnV
okay this is really important because you don't want to push your environment file to GitHub okay stage number two is you need to update your readme file to let users know how they can use your code you know um and not violate any of your terms okay so if you are curious these are our terms so please please respect the guidelines of you know our code and respect our time and energy that went into building this project okay and so this is the appropriate use of this code you can use it to learn how to
build sass applications you can use it to build a portfolio or get a job that's totally fine I'm okay with that we want you to win right so this is the least we could do but if you're looking to um run as a you can't um you can't run it as a business okay so you cannot take this code from our YouTube channel you can't just start running a business out of it you can't run a SAS application or if you're trying to make some sort of income using this code that is not allowed as
well okay if you're trying to resell the code or create content or claim the code as your own that is also definitely not allowed and it's against our guidelines and our license terms okay but however we give you the opportunity to run it as a SAS okay you can run it as a SAS but you need to purchase the license okay and so if you are ready to start your SAS I really suggest you use this application as your first SASS and the reason is because it's very easy there's a huge market for this and
I mean there's a lot of people that are looking for Solutions constantly right and so if you use wp20 before December 10th you will get 20% discounts okay so you can grab the license and along with the license you might get um like a uh probably a Google Drive Link where you can download the code okay and yeah then you can make money with the SAS and you know you can sell it to customers and make month-to-month recurring Revenue okay so once that's done once you have instructed um you know how users can use your
code I'm then going to go ahead and move this to GitHub so I already opened up a repository and I'm just going to copy all of these instructions and paste it in here and hit enter okay let's do it for the second one as well and finally for the third one okay and just like that it should uh pretty much create the uh the repo connect the repo and then you can do get add get commit okay I'm just going to say final push that's a really bad name but um I mean that's why you
want to have something like husky right and so if you did choose to get the license we will also send you the code base that comes with the Husky setup okay it's pretty much the same thing maybe some things here and there might be different but the other good thing with that code base is there's a lot of documentation okay we have written code comments for every single line well not every single thing but for most uh you know at least for the API section right cuz I know that's a lot of code so for
the web hook we Lo we wrote a lot of comments so you can use that okay but yeah so once that's done um and you will also get husky with that because it's um it's kind of wired up with a production grade front end setup right it has linters and all that kind of stuff so if you did get the license you will get that with it as well okay so once this is done once we commit I'm going to say get push and we're going to push all of this code to our GitHub okay
and now let's refresh our GitHub repository all right awesome and there you go you can also see your license terms okay nice now the next thing I'm going to do is I'm going to go into versell and I'm going to create a repository or actually create a new project here and then I'm going to click on slide web prodigies and I'm going to import this repo and then now it's just going to ask me for some info I'm just going to forget about that stuff and then it's also asking me for root directory this is
fine let's look at the build output settings okay you can also rename this so you can change this to Bun Run build okay and this should be fine for install command we can change this to bun I okay and for environment variables now we're going to need to go into ourv file paste it in here and we have to update any variables if we need to to the production links okay now unfortunately I cannot show you this file because there's a lot of confidential information I think you get the idea you can just C copy
your entire environment file and just paste it in here and versel will automatically you know separate the keys and values okay so I'm going to go ahead and do that and then once we're done we'll proceed okay so I already went went ahead and pasted it in here one thing to keep in mind is one of the environment variables is your public host URL right and unfortunately we don't have that yet right and so for that reason first we're going to deploy and versel is going to give us the correct URL now if you are
using a custom domain you can direct directly just paste that in there because it's understood that it's going to be hosted on that URL okay so let's go ahead and deploy now of course first thing is we're going to see a bunch of bugs because we haven't built our application yet right we haven't done uh Bun Run build so we might see some errors and this is a great opportunity to go ahead and fix those okay so go ahead and click on deploy and let's just give that a second all right awesome now sometimes you
might see that if you run Bun Run build on inside the terminal itself sometimes it will not catch errors okay and that's why I always like to do it first inside the terminal uh sorry inside versel so it throws some errors that I cannot sometimes catch her and don't ask me why I really don't know why it misses those but sometimes it does okay so there were uh there were no more errors except for this one right here and this also reflects inverse L but I know in one of the past projects it did that
and I was very confused as to what the hell was going on so that's why I would suggest you first do it here and then you can do it in here as well if you want to see okay so um clearly I know there's a direct sync between the errors or this might be only the first error right but all it's saying is your use memo was was rendered conditionally and that's wrong you're never supposed to do that okay and it looks like we unfortunately did that so let's go back here and let's search for
the use memo hook okay and it looks like in here we need the latest variable and data so technically we're going to uh we should be good we can paste this up here okay all right and it also says data is possibly undefined so we want to make sure there's data that exists inside here okay all right so only once this exists then we can use this down here and I'm seeing something else in here which is optimistic uh UI data is possibly undefined okay uh let's go ahead and check this could be undefined or
any and so this might be undefined and so what we want to render out is if this is fults then it's going to render this okay or okay so it's going to render an array but we don't want an array we actually want an object with data so what I'm going to do is I'm going to return an object with data set to an empty array like this okay and that's going to solve our first bug and now let's go ahead and say Bun Run build again and let's see what it does okay so the
next error I see here is it says rout this one does not match the required types of nextjs routes and so so I'm not sure what that means exactly but um It also says something to do with stripe right and so stripe is not a valid route export field so I think what they're trying to say is you're not supposed to export something from here that's not of type get post and stuff like that right and so for that reason also why did I turn this off did I turn it off for fun I hope
not okay so I'm going to keep that one and what I'm going to do here is I'm going to remove this and I'm going to open up my folder structure I'm going to go down to my Libs folder and in here I'm going to create a stripe. j uhts and now I can import this so let's import Stripe from stripe and we can export this from here and now we can go to our to our file which is our route and we can import it from our Libs folder and now let's try to run this
one more time okay and it looks like the same thing happened for open AI as well you might have gotten the same error which is does not matter to requir types whatever it's not a valid route export and so what we're going to do is I'm going to copy the open AI I'm going to remove the export as well and now it's screaming everywhere so let me take a look all right nice and now I'm going to open up my folder structure scroll down to Libs we're going to create another file for open ai. typescript
and now we can paste this in here and let's import open AI like this or let's do it manually so I'm going to say import open AI from open AI okay all right this should be good and now we can go back here where is that which file is that okay I think it's right here right go back right here and wherever we said this open AI thing we can just import it from there so let's import open AI like this from our Libs folder and that should solve that one okay now let's go ahead
and run it once more okay so I see something here which is it's trying to import this from page. TSX what seems to be the issue here integration cards why is this a page. TSX right this is under components and it is not a page in fact it is index. TSX so let's change that and let's update it everywhere else and so it just threw the same error in the console I don't know why right it said that it has a invalid default export so I think it's considering it as a page we don't know
let's see okay and the next error is because we updated our stripe we need to update the Imports as well okay so inside actions user index. typescript if you scroll down here you're going to find another one where we're using stripe so let's go ahead and import that from our Libs folder and let's run Bun Run build all right awesome and there we go if everything is successful and you solved all your bugs then you should see um an output that looks like this and this is basically all of your static pages and dynamic Pages
just kind of cached and stuff okay you don't have to worry about it for now just make sure you get this output and no more errors like this okay now once this is done we can go ahead and say get add get commit okay and then let's put a message in here saying fixed build bugs and then get push okay nice and now let's go back to versel and let's redo this deployment okay so I saw another error but this only showed up inside here okay so let's go ahead and read this and see what's
going on so it says um you need to dis say well no Prisma has detected that this project was built on versel which caches dependencies and this leads to an outdated Prisma client because prisma's autogen autogeneration isn't triggered to fix this make sure you run the Prisma generate command during the build process okay awesome let's go ahead and do that as well and now I also want to show you how you can use chat gbt okay we're all not machines right sometimes we're going to need to get some help and so if you don't understand
something or you're seeing a bug somewhere and it just doesn't make any sense then this is what you should do okay copy that bug so let's say this was the bug we found right uh let me copy this whole thing and I'm just going to say my versel deployment shows this error how can I add this fix to my code okay and we can add it in here and then let's do this also you could technically put the command on the versel deployment but I think you have to do it inside package Json but I
want it to show me so I can you know put it directly in there okay so scripts post install install we need to add this that's what it's saying so let's go ahead and grab this okay and let's go back to to our code and we're going to open up our package.json which is right here okay and then inside that you see we have some scripts here right we're going to need to add another script and this script is called post install so I'm just going to remove everything else okay and let's remove this indent
all right there we go so Prisma generate uh that's all we need to essentially create all the typescript classes and then that should solve that problem I see one more thing right here fail to collect page data for API web hook Instagram hm okay let's see if it's because of this right and then after that we'll fix that so get add get commit fixed the what do I call this post install script get push all right and let's give that a second to rebuild okay there was one more error that we need to consider so
remember we moved the use memo right we moved it up top it doesn't really matter okay I don't think it makes a big difference but this latest variables uh sometimes can be undefined okay and so for that reason we first have to check here so latest variable if it exists then we have to have an and and previously I had a comma here and it did not show me any sort of typescript errors and I don't know why it just let it go past and because of that it was crashing okay so I'm going to
say a latest variable and latest variable is do variable and then and data okay so only if all of this exist will um will it run into this if not it's just going to return this right here okay and so once this is done open up your terminal do the exact same thing which is get ad I think you guys know right so commit that message and push it to your GitHub and then there we go our application is successfully deployed as you can see we have a deployed link on for sale great job okay
and now just to make sure everything is working out correctly I'm going to click on one of the automations I think this was the one with because I have start right there we go guys we can all see the post this is amazing all right so great job to you again there's one more stage which we have to complete soon so go ahead and mess with this and you know just see you know what's going on if there's any bugs or you want to make improvements go ahead and change them as you like all right
guys and I also want to address another question which is why can I not see the published link very stupid question but the reason is because there's so many people on the site you think I'm building this in my basement and posting it guys there are so many people that jump on the site and start spamming the API okay and you don't know what it feels like to be on my side okay people just mess with it and for that reason we just take it down okay the project is out for you just build it
with us deploy it and see it for yourself right and so that's why we remove it and also some of the API keys that I'm using in here are real production API keys right and so for that reason I prefer to hide them and keep them private okay and so that's the reason why this will not be live of course please do not ask me this question okay okay and now once we have deployed our application there are two more things we need to keep in mind the first one is to update one of the
environment variables which is the public URL okay so you're going to go into your project settings so click on this right here and then you want to click on settings click on environment variables and you're going to scroll down until you find the next public host URL and then you're going to edit this URL by pasting the new URL in here okay and you also want to copy this and okay actually uh not all of this stuff guys only till app okay remove dashboard and let's see what we have here okay there's no trailing backslash
so you want to remove everything till app and keep no trailing backslash okay and then go ahead and save that and that's going to update the environment variable okay and then the next thing we have to do is we have to update our environment variables for stripe and for you know Instagram as well so of course I'm not going to go into that and show you because that is my you know production keys so all you have to do is go to stripe and then you have to turn off the test environment get the real
key from the same exact location you just have to turn it off from testing and go get the live Keys take those keys and paste it in here there are millions of YouTube videos that will teach you how to do this okay and then for Instagram uh remember we set up some call back URLs and you know all that kind of stuff right using enro we just have to replace those URLs on Instagram okay so that that basically ends stage two of our SAS which is deployment and now the most important part is promoting this
and getting customers for our SAS and that's exactly what I'm going to be explaining in the next 5 minutes all right guys and there you go I just tested it as you can see this was sent um how can I see the time all right there you go just tested it about 4 minutes ago and everything is working and one thing that I realized that I did wrong was the URL so the URL I copied here was some other really weird URL I think this is the deployment URL or some dashboard URL and it's not
like I don't know why they give you this URL okay so first thing you should do is I want you to go back into the project click on settings and then click on domains and then you can copy this domain okay use this domain everywhere because when I went to Instagram and I pasted the other domain it wasn't working okay it kept saying invalid URL so if you saw that error then the reason is because you need to use this URL right here okay and make sure you're also changing the you know API invoid I
don't think I have to tell you that but make sure you're also adding the right callbacks and the right API endpoints okay and that's it now we are deployed and we are ready to go next step is we need to get customers so let's see how to do that all right guys I hope you're excited because this is my favorite part of SAS which is launching promoting getting clients and the most important part is solving a problem okay and first thing I want to let you know is this is the exact same strategy I'm literally
sharing sauce right now because I want you to win okay you can implement this in the next 24 to 48 hours and you can potentially get a client okay in whatever business you want okay and the reason why I say this so confidently is this is the exact same strategy that I have implemented in all of my businesses that I've ever started okay and at the moment I run three businesses and I make around $60,000 per month okay and so this works and I work in different niches as well right so um this strategy will
work in any type of Niche not just SAS and so my biggest income Source comes from my marketing agency right and so this will work for anything and this is also the exact same strategy that all students in prodigies University are doing and this is how they got results as well and so whatever you're going to learn in the next few minutes is probably the most important lesson you will ever learn in SAS and so if it is the most important few minutes shouldn't we treat it like right and so what I want you to
do is take your computer go to a room lock yourself in a quiet room and focus lock in okay you're going to lock in for the next few minutes and I'm going to try my best to give you as much value as possible that way you can start in the next 48 hours and you can see a change okay so first thing is the reason why I love SAS is you can build it once and sell it a million times it's the only business model where you don't have to show your face it will work
for anybody that means even if you are not a talented person it will still work especially because we have the upper hand we have leverage because we are developers and the other thing is you can reach you can reach out to as many people as possible because you have the power of social media right and so SAS is one of those business models where actually I feel it's one of the only business models where there is no service delivery you build a software and you sell it that's it and I'm not I'm not talking about
just exiting right I'm talking about just genuinely getting subscriptions from users and making money every single month it's pass it's the closest you can get I'm not going to say passive income because it's not nothing is truly passive there's always a small level of input from your side and I always feel there should be an input from your side or it's just you're going to it just changes the way you you operate okay trust me I've done it before I've ran businesses where I've just made money on autopilot and it does not feel nice I
always love being a part of my business and helping people okay and so there's always going to be the small part of you that's going to want to be a part of the business and this is the perfect opportunity okay because you get to code you're a developer you just have to code so that's what I want you to do for the next few minutes lock in and just sit down and focus on what I'm about to say because this is real golden principles okay golden business principles that you can use in any business you
want okay and they are supposed to work because it's worked for all of my businesses for all of the students who who who are currently in prodigies University and for every SAS business I have helped skill okay so let's jump straight right into it so the first thing you're going to fix and I know you're going to want to skip this part but if you don't I promise you you will see a change in your life okay which is your Brokey mindset man you're going to need to change this okay and I'm going to show
you what I mean by this you need to start thinking like an employer or much better like a CEO okay you need to stop thinking like an employee now what means what do we mean by an employee or who is considered an employee developers so if you are a coding nerd then this will just not work for you I'm just being honest it will not work for you unless you're willing to take the steps that I'm going to give you in the next few minutes and implement it okay and so being a developer is not
going to get you money and in the next few minutes I'm going to prove to you and show you why okay so let's first fix this mindset Gap so this is what we call the money needle what is this the money needle is essentially the tasks that you perform in your business okay the tasks that you perform in your business that directly influence the amount of money you can make and so let's just break down all of the tasks that we just performed coding right designing maybe uh let's say we would have to Market so
posting social media content right what else what other tasks do you think we I'm just writing a couple right you can pause this video and try to write up write down some for yourself as well but I'm just going to go ahead and do it kind of like on the fly so you see okay other than posting social media content maybe running ads right you might also want to debug test your code right improve on features by releasing a feature flag um you know something like that right just creating a feature flag right and then
maybe speaking to customers let's say speaking to customers um or strategizing oh that's a spelling error okay strategizing sales and client acquisition there are so many steps right but I'm just going to write a few tasks that you're going to need to perform in a business and this is what an employee or a developer or a SAS developer always leads or you know leans towards coding right how can I design better how can I debug my code better how can I test my code and how can I improve features by releasing a feature flag now
why do we think like this it's because of the education system okay we are built to I mean it's it's it's just how it is okay we are built to think like employees because these are the tasks that help other people move the money needle and quite honestly speaking we genuinely need more employees than entrepreneurs okay that's how the world works because if there's more if there's more businesses then we're not going to be able to sustain okay cuz people also need to work right and so for that reason the education system will focus on
making people employees and so you need to escape this mindset and the way by doing the way to do that is first break this money needle system okay you need to twist the money needle in your in your way and now how do we think about this you need to start looking at business or SAS completely differently okay you need to stop being the employee and the developer and you need to become a CEO let me ask you this question right do you think a CEO of a SAS company is sitting and coding no do
you think they're sitting and designing their beautiful application no why the reason why they don't care about this stuff is because the money needle okay the money needle essentially moves things closer to money and now the problem here is time is not equal how do I write not equal like that okay not equal to money and so all these tasks require time designing takes time coding takes time right debugging takes time all of these take time and so once you stop performing these tasks you no longer can bring money because your time is directly proportional
to the money you will bring when you prefer perform these tasks and so we need to break that cycle so you will no longer perform boring tasks like this in your company okay instead you should take on the task that bring the highest leverage that means the money needle moves in a completely different way which means your time is no longer directly proportional to the money you will make okay and so what does this mean things like running ads the second you stop like you know you stop doing it yourself and the ads still run
you can still make a lot of money right so that is a high leverage task so that is something worth doing what else we also have posting social media content this is something that will cycle forever just think about it if you created a YouTube video today and it I'm just saying best case scenario it went viral right our goal is not to get not to go viral our goal is to just help someone provide you know free value and just show them how they can do it for themselves as well right and so if
if you just posted content like that you are going to succeed and it will be there forever on social media and so this is what we call the compounding effect so if you posted a piece of content today and it went viral it was it's going to go viral for many many months together and so this is why it's a high leverage task so this is something that you can do what else speaking to customers this is an amazing task to perform as well because once you stop doing this you can in a way you
can take that send it to someone else who can do the other tasks right that don't move the money needle and you can focus on speaking to customers even more and then they do what they need to do in order to help you drive more traffic or sell better okay and then what else sales this in my my opinion is the most important skill because as a business owner all you need to do in a business is sell okay and so hypothetically speaking let's say we removed the SAS from this picture we did not have
a software product how would we sell this now through sales right that means we would speak to customers put down an offer see if they're interested in buying and we can make money and that's the next strategy which is called the illusion funnel now this is a strategy that I have created that I have imp implemented in all of my businesses and I've been able to make money before before even creating anything okay so before starting building the SAS or before starting the service itself or you know getting something together we are able to sell
how and I'm going to show you that in just a few minutes okay but I hope this is making sense you need to first move the money needle in the right way okay that means you should stop doing boring tasks that employees should do and you should start focusing on tasks that business owners should do okay which is anything that directly brings you money and nothing else all right now what do you do about the other tasks because these are very important without these your your app is never going to exist right these tasks need
to be outsourced and now you may say parent I need money for this I understand and that's why the illusion funnel will help you okay we'll get to that later because that's a whole different thing we still have more things to fix in our mind cu the education system is so everyone is no everyone's literally having brain rot right now and so we need to fix this problem right this is the main problem nothing else in my honest opinion if if you just figure out how to fix your mindset right here if you just understand
you are so much more capable than just sitting at a computer and typing you will do so much better in life because you will constantly be motivated by the fact that you have more potential and you will not sleep thinking that you could have been you know that that CEO or you could have lived that dream life and so the mindset is the most important part okay so what's the next thing we need to fix in our mind understanding true capabilities okay here's the biggest secret everything will work everything any business you start literally any
business will work and why am I saying this okay now take that with a grain of salt okay not literally but what I mean by this is any good idea is a great idea that means if it has worked before it's going to work again the only reason why it's not working for you is marketing nothing else okay and so if you think this way that means I will win you are going to expect to win and what's going to happen is this is what we call subconscious reprogramming okay when you reprogram your subconscious mind
to believe that you have already accomplished something I'm not not saying things are going to magically fall in your lap and you're going to become successful that's not what I'm saying but what I'm saying here is if you open up the door to believing that you have already achieved something then you are going to essentially open up your mind to receiving suggestions of different solutions and so you are more likely to win compared to another average person who's looking to start a business because you are always looking to seek Solutions and so every solution to
you would look like an option and so you would try it the other person would look at only the solutions that they know and if those don't work they will back away because that's the only thing that their mind is capable of picturing and so if the only thing they can picture their mind with does not work why would they continue to do it right and so how do you reprogram your subconscious mind well I know some of you may not believe but affirm affirmation affirmations are actually a great way okay where you fake it
to your reality you fake it to your own mind telling yourself that you're good at things that you aren't and I have proof of this as well because I'm literally I mean I'm literally an example of it right I did it myself when I first started I was an absolute nobody I had a nine-o-five job I quit my 9-to-5 job and you know I focused on my businesses right but how was I able to do that because I came from a middle class family where everybody around me was telling me to continue with a good
high-paying job and I was getting paid a lot of money let me tell you that I was one of the highest paid uh highest paid front-end developers okay I was getting multiple six figures and you know it was the most comfortable life ever and that's why I believe you know coming from a middle class family is the worst possible outcome i' rather be poor because I have nothing to lose and I rather be rich because now I have nothing to lose again because if I lose I know I can recoup back really quick but if
you're if you're a middle class kid losing once means you lose everything right so it's the it's the biggest barrier to overcome and so you need to fight that with your mind and so think about it this way what if you treated life or what if you treated money like coupons just think about it for a second what do you think would happen if you treated life like v-bucks okay like fortnite v-bucks you would be more than happy to try everything right and so so let's just take the word luck which I hate but I'm
going to show you how I look at luck but I'm just saying let's just take the word luck what is the word luck mean for luck to exist 50% of the time you should win or 50% of the time you should fail it's not luck if you win only 1% of the time that means it's rigged would don't you agree right and so if you simply took this probability which means if you treated money like v-bucks or you treated money without the fear that comes with it and you were ready to try things right you
essentially give your CH give yourself a higher chance of winning and so that's that's exactly how I think as well I am not afraid to lose $3,000 trust me I am not in fact that's exactly this I mean this is how I started all of my stuff as well it was a $3,000 investment that I made on a it was some sort of a not a boot camp okay it was this guy who was teaching people how to make money online okay and I was really scared about it but I wanted to do it and
I did it and it turns out to be a big scam okay he was just trying to sell something that was against the terms and services of some platforms that I unfortunately cannot mention here but I'm just saying that that $3,000 was a huge waste of money but I paid attention to every move he made I saw what he did I learned what he like why he did all of this I saw how he R ran the business and then I understood that if I just treated money the way he treated it I would have
a higher chance of winning and so from that day onwards I just stopped looking at money as something that controls my life instead it's just a tool it's something that it's it literally looks to me like GTA5 that's it nothing else right and so just compare yourself to me right do you think you are more likely to win or me just by looking at money this way I am more likely to win because by the law of probability I have a 50/50% chance right 5050 chance because I also have more attempts you get what I'm
saying and so that's the next thing that we need to fix which is we need to basically reprogram our mind to never fail and to love the process of failure so that every time we fail we get excited excited right from today I want you to literally thank God thank the power of the universe or whatever you want to call it for giving you obstacles for giving you challenges for giving you an opportunity to never succeed because that gives you the motivation to work harder okay so now I said I also want to work on
this luck thing right help you understand how luck works and stuff like that so let's just look at this right this help man this was a book this was a book that helped me pretty Prett much Chang the way I look at luck let me ask you this question if business was luck then shouldn't that mean that business owners should fail 50% of the time right but they don't they win every single time maybe they win five lose 5% of the time but if they're not if they're not losing 50% of the time then it's
not luck it means it's calculated luck they put themsel in a position where they're always ready and so what does this tell us luck is not a magical thing okay sure it can be sometimes right if you're using luck that way but in business it's not a magical thing in fact luck is just being ready when the opportunity comes that's it and so right now I want to ask you a question if you were to make $100,000 a month do you think you would survive do you think your business would run for the next 15
years no and the reason why you won't survive is you are not ready for it you aren't and if the uni if the universe or God or whatever you want to call it gave you that opportunity to hold a business worth $100,000 first of all you wouldn't want it because it feels like you used a cheat code and so you're going to hate the money you have and you're eventually going to hate the business because there's no story to it in fact there's no roller coaster ride that you rode to experience this $100,000 so that's
the first thing that's going to make you want to hate it the second thing is your business will crash because you don't deserve to be in that position and so how can we deserve it how can we deserve this and how can we work towards it first we need to go through the entrepreneurial Journey think about it if you want to be an entrepreneur why do you want this easy story why do you want a story that tells you tells your family members hey you know how your dad started a business I just m i
al went to a bank and they gave me 50K and I started a business and it was successful great job does that sound like a great story no look at my story I spent two years figuring it out I I come from a middle class family and people did not let me start a business because they were scared they were literally scared of me losing my job or you know losing money they in fact I'm not talk talking about my parents okay I'm talking about people around me right my parents were super super supportive but
um just think about it right people stopped me from doing it people told me not to start a business he said hey just keep your job man you make a lot of money people would die for the type of money you make and so that is essentially people trying to put me back into that bubble and so once you break out of this once you break out of this you'll realize there's a bubble this big it's a square that's not a bubble okay but you get the point there's a massive bubble out there and once
you start making money you'll realize that you are a tiny little fish in the ocean there are millions and millions of people just around you that make unfathomable amounts of money okay so now that we have broken this curse which is the luck thing and also how to look at money and also how you know how to look at luck in general which is just an opportunity now you can learn the skills now you're ready to consume the skills because you know that you want to write a beautiful story because imagine 10 years from now
when your children or your family ask you hey Dad Mom what did you do why are you so successful your story is not going to be I went to a bank instead you're going to show a story that sounds so much more fun okay awesome so there we go we just fixed the mindset Gap what's stage number two stage number two is the strategy that we're going to use to get clients to come to us okay and now first thing I want to point out is this is one of the strategies that we teach inside
automation lead generation for sasc course inside prodigies University okay this is just one of them you can join to learn even more but this will work amazingly well because I have done it they do it and we get customers like this as well okay and so this will work don't doubt us don't doubt the strategy doubt your ability okay and I'm going to give you everything you just need to follow my instructions don't do anything more or nothing less okay and so the first thing is let's understand what is the strategy itself already going to
do is use slide right to promote slide on Instagram and this way we give our viewers and and you know an opportunity to test our software while it's live so they see the outcome of our software that's why this that's why slide is amazing and that's why I suggest anyone who's looking to start a SAS should start a saslik slide it's so easy okay and people it's very easy to convince people because it's just one simple task it's one simple micro problem and that's why it's called a micras okay and so all you have to
understand is our strategy is we're going to create a post where they can test the software by commenting a specific keyword which is in turn going to help us reach more people okay but there's more to that so let's jump into it okay and then the second thing is make sure you just grab the license okay grab the license finish the you know the legality part of stuff that way you don't have to worry about that stuff right so Gra grab the license make sure you spawn up the code with your environment variables and everything
is running right test it out make sure everything is good to go so now that we have this our next stage is you have to create a new Instagram page this should be a new page please just follow my instructions don't doubt this process it's part of the thing okay there's reasons why I'm telling you to create a brand new page so please create a brand new Instagram page with a different email that you have never used in the past and you only want to do this if you have never had another Instagram page or
another social media page go viral on social media okay so if you don't have another Instagram page or Facebook page or YouTube channel with authority or you have some following then do not use that email um and only then create a brand new accounts if you have some past history with these social media platforms then go ahead and use the same email no problem okay so now that we have this new page now we can create the content and all you're going to do in the content is you're going to essentially tell users that hey
test it out you can test it by doing this by commenting a specific word now this the structure of the content should be as follows you have to have a hook you have to have the body and you have to have the CTA where they can test the software itself okay and so what is the hook a hook is in simple terms a way to give a user a viewer a reason to stop and watch our video that's it okay something that gives them a reason to stop and watch the video keep repeating that okay
and so now the hook has to be split up into one uh into two different parts okay most amateurs think about a hook this way they try to just address the problem directly and state the problem to your customer but in reality your customer already knows that that solution to that problem or they know what you're going to say and that's why your hook is not going to work and mine will okay and I'll tell you exactly why so you're not going to think like that amateur anymore okay and how you're going to think about
a hook is first their problem so the first part of the hook is the problem right so you're going to State the problem but you're going to State it in a way that goes against their biggest objections and this is why my strategy will work and I'll give you an example and you will literally see it live right now okay let's take Fitness let's take Fitness as an example the amateur an amateur would create a hook like this are you looking to lose fat this is how you can lose fat today boring hook because I
already know what you're going to say eat well sleep rest all this other right now take a look at this solution here's how you can lose fat without eating a strict diet without working out and using Nutri nutritional supplements how amazing is that in your mind you're thinking to yourself how is that possible there's no no way this person can give me a solution that I have not tried in the past and you know of course not gotten results from that right so there's physically no way they could do that and so that what that's
what makes the customer want to stop and watch cool right it's amazing stuff when you really think about it and so that's what you guys are going to be doing create about 21 21 variations of this I'll tell you why 21 later okay but you want to create 21 variations of this and now the reason why I'm not giving you direct you know examples for slide is because if I do the million millions of people who are watching this video are going to use the exact same strategy and I don't want that for your business
please I'm not going to do that to you okay and so that's what I would I would suggest you know I I would rather have you learn the strategies to learn how to fish than give you the fish itself okay so now that we have this hook the next part is the body what is the body very straightforward You're just showing them how to access the software so you're going to show them which website to use which um you know domain to go to whatever all that stuff right and how to click how to create
the account how to connect their Instagram account sorry how to create the Automation and how to set it live that's it and then all you're going to do is create an example post right create an example post that is already wired into slide okay this is your post so create a post that's wired into slide with an automation keyword that the viewer can then use to test it out okay and so then for the CTA section in your video all you're going to do is you're going to use that keyword and say comment the word
test if you want to see what it looks like that's it and so you're giving them a way to test the software okay so if they type the word test you can fire off the Automation and they get to experience it right and then in the automation you can you can the uh the message you're sending them you can say something like hey this is the automation hope it's cool if you're looking to get started here here's a link to the website okay and this is the most important part do not have a free trial
never do this mistake okay and the reason is because I mean we we have we have worked with so many different type of business owners and specifically in SAS we see this problem a lot which is when you have free trials usually you're going to have you're going to have a lot of failed payments okay I don't know why this happens I don't know if customers deliberately cancel it or they block it or the more obvious answer might just be their payments are from a country other than your own right so it's they're not able
to capture the funds and so that's probably why so never have a free trial instead have a free tier okay a free tier on the other hand guarantees your money and at the same time um you know guarantees your money when they decide to upgrade right and at the same time it gives you a way to create a problem even if a problem doesn't exist so you could limit the number of automations and that's going to create another problem or you're going to limit something that's going to create another problem and that's what your free
tier should solve okay that's how your free free tier should act which is solve a small problem which is going to create another problem okay so let's say if you were creating a video game you would essentially want if you're trying to create a demo of it right you would want to limit the number of maps the user could use so you could just have one map that's really boring but gives every single thing that they came for right and it's a demo version and then you can use the maps as a way to upgrade
so you know you can you can basically imagine what your customer would want to experience in different Maps create different maps and then lock all of them so until they upgrade they're not going to get access so that's how you can do that okay so I hope you understand please do not create a free trial you're going to have a terrible experience okay we've seen it happen a lot and we don't want you to do go through the same pain all right and that's it that's literally it and the reason why I said 21 different
variations of this is you're going to post now for 21 days consistently and you're never going to skip if you skip a single day you break the chain you will not go viral okay and what we have seen from well my own channels is 21 days you'll get your first viral viral post okay and when I say viral post I'm not saying zero to 1 million for you it might be 1 million but for most people it's going to be in the tens and thousands or thousands okay and now if it doesn't go viral do
not blame the algorithm and that's exactly why we created a brand new page because there's no algorithm to test data on so it's you you are the reason why nothing went viral so fix your strategy work on your skills improve on them improve on your public speaking improve on the hook improve on every single thing you possibly can and what I want you to do is when you're creating 21 different variations of each and every post improve on the next post by improving 10 of the possible variables in that video and what are variables in
a video variables in a video can be background lighting the way you talk the way you look everything okay try to include as many um you know as many strategies as you possibly can to improve the next video okay awesome that's all you have to do and so you have zero excuses to start if you don't start now I can gladly gladly tell you you will never start for the next 10 years okay so I'm just here to push you that's my job as a mentor and I want you guys to succeed and that's why
I'm giving you so much free value because I know for a fact you're going to want to learn more than just this right because if this strategy is so good imagine the other things that you could do and the best part is inside prodigies University we will essentially show you what's working today right more updated strategies not just this one this is just one of them right we have 100 in there and we'll essentially show you what you can do that best suits your given scenario and it's up to date that means we are constantly
updating the data the outputs of you know our experiences and this is somewhere you can you will never get this right you would have to spend two to three years just to test different um you know social media strategies and I have over 13 plus years of social media experience okay so that's why I just wanted to give you all this value so you hopefully get your first client and then eventually I would need try and then I can help you scale to the moon and so if you're genuinely serious about starting running and growing
a profitable SAS or a business or just quit your boring 9o5 web development job then I'll leave a free course in the description below and in this free course you will learn about every single step that you need to take in the next 24 to 48 hours to get started with your journey okay and the strategies that you'll be learning in this free course is a exactly what I use in my business today not just me every student in Prodigy University as well and so this is exactly what David did to go from 0 to
$144,000 in less than 3 weeks of joining prodigies University and all he did was implement the illusion funnel with a high ticket month-to-month recurring Revenue SAS model in his business and here's Dereck who made $3,000 through high ticket Services here is Michelle who left a really big and nice message here's Joseph who made $3,000 here's Daman made $ 750 here's mon who made $1,000 here's Amin who made ,400 and then again 250 50 here's sakam who has never sold a single thing online but got his first client and made $200 in less than a week
and so you might now ask well what about the average student right and so 32% of the students who join Prodigy University make their first dollar in less than a month and so the results speak for itself this works well let's take a look at fonnie fonnie made actually not $8.40 he made $1,200 now in less than 3 weeks plus month-to Monon recurring revenue from a high ticket SAS model and then here's Asher who got three leads through social media through an inbound automation strategy in less than a week or let's look at Shimona who
went from a 9 to-5 job to a full-time entrepreneur and again the list goes on and on and the reason why these students saw results so fast is because we don't just focus on courses like other mentors and uh you know content creators out there they try to sell you courses instead we focus on the most important thing which which is taking action through mentorship that means every week there are two weekly coaching calls with me you can hop on calls with me and my team and we'll essentially break down a plan for you tailor
to your current given scenario so that way you can reach your goals as fast as possible let me ask you this question right if courses were the secret to everything why would you be watching this course that proves that courses do not help you achieve success it is action right and that's why all of my YouTube videos have actionable items challenges and we push you to take the next step and so the only thing that is stopping you from moving forward in your career is having a mentor that can guide you in the right path
that means someone who has already done it and the most important part who's actively doing it right now as well and so if you are looking to join or even even if you're not joining please focus on getting a mentor okay this is the only reason why I learned what I learned today keep this in mind December 31st is your last chance to join prodigies University at the lowest price point because after this enrollment period we are increasing the price and so we only have limited spots for December's enrollment period so if you're looking to
join I would suggest you click the link down below and join as fast as you can because these spots are going to run out in less than 2 hours because last time we ran out of spots so fast and that's why so many students reached out saying they wanted to join but they didn't have the opportunity and so that's why we opened up 100 limited spots okay so if you want to join prodigies University please join before December 31st all right prodigies and that's all for today's video I hope you learned a ton in today's
course and I hope you take action take the things that you learned in today's course and implemented in your SAS Journey okay and that's all for today and I will see you in the next one
Related Videos

20:48
Breaking Up with Next.js 💔
Piyush Garg
46,579 views

1:47:53
Artificial Intelligence Explained: How to ...
Earn Your Leisure
233,380 views

27:11
You're Probably Wrong About Rainbows
Veritasium
3,687,608 views
6:30:15
How To Build A $1,000,000 SaaS In 7 Hours
Web Dev Simplified
93,944 views

7:41:05
Build a Thumbnail Generator SaaS: Next.js,...
Andreas Trolle
8,110 views

1:38:06
Best Fails of the Year | Try Not to Laugh ...
FailArmy
669,975 views

22:45
Beat Ronaldo, Win $1,000,000
MrBeast
114,558,531 views

1:30:43
Evolution of software architecture with th...
The Pragmatic Engineer
6,158 views

16:42
This Video Will Take You From Junior to Se...
uxpeak
78,993 views

21:01
I Built The DREAM Office Setup!
Mrwhosetheboss
2,681,726 views

28:57
What can you build in 4 hours with Google ...
Learn With Jason
80,619 views

9:49:51
SAAS LMS With Custom Domains & Affiliates ...
Web Prodigies
85,896 views

21:16
How To Make The Most Out of Your 20s
Y Combinator
32,744 views

19:35
Vite 6 is important, here's why
Theo - t3․gg
81,307 views
3:52:17
Build and Deploy a Full Stack E-Commerce A...
JavaScript Mastery
701,122 views

11:33
I Deployed the Same App on DigitalOcean an...
Arif Logs
5,818 views

26:52
Andrew Ng Explores The Rise Of AI Agents A...
Snowflake Inc.
128,697 views

14:14
How to Set Goals as a Christian Business O...
Paul Daley
1,994 views

3:42:45
I made a website that makes websites
Harkirat Singh
66,952 views