Curves vs Levels in Photoshop: Learn The Difference
26.47k views4642 WordsCopy TextShare
PHLEARN
Stuck deciding between Curves and Levels for image adjustments? This tutorial helps you understand t...
Video Transcript:
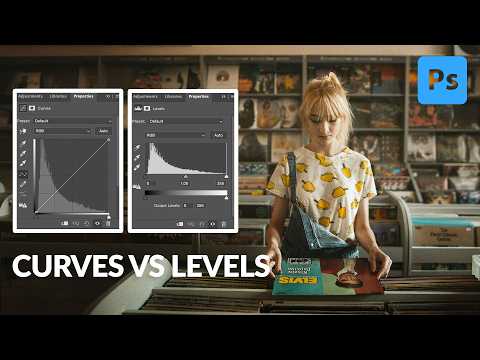
today we're going to show you the difference of two of the most powerful Tools in Photoshop this is going to be curves versus levels plus some surprise hidden features so we're starting off here in Photoshop now I have a background layer there's actually a couple ways that you can apply curves and levels the first way is to apply it directly to a layer and the second is to make an adjustment layer so let's do both and kind of talk about the pros and cons so if you want to apply it directly to a layer you
can go to image down to adjustments right over here and then we're going to go to Curves fantastic now just as a real quick example I'm going to take this dark levels and make it a little bit brighter just kind of like brightening up the shadows of my image and we hit okay now that's kind of okay but it applies that adjustment directly to your background and let's say I want to make a change later I don't have that option because it's literally like it's baked into that background image so that's actually not the method
that I would suggest using I suggest using adjustment layers instead so let's hit controller command Z for undo here's what I want to do we're going to go to layer down to new adjustment layer and then you can choose levels or Curves we're going to start here with curves all right let's hit okay here and click on our layers so as you can see now we have our background but we also have a curves adjustment layer now this is really cool because I have a layer mask with my curves adjustment layer which means I can
make it visible in only certain areas of the photo if I want to and and I can simply double click right here get into my properties window and then I can do the same thing that I just did I basically just brought my Shadows up a little bit brighter but check this out if I want to go back and change that at any time let's say I'm back in my layers I want to go back and change that simply just double click right here and I can change it at any time so rather than going
to image down to adjustments and then over to Curves I suggest going to layer down to new adjustment layer and then doing curves or levels Okay so so that's just a little bit of house cleaning out of the way now let's talk about curves versus levels so let's go ahead we're going to keep this curves adjustment layer you can see it say curves right there in my properties window I'm going to go right down here to the bottom and reset that okay so it's going to go all the way back to the original nothing has
changed here let's go to our layers now there's two ways you can make adjustment layers in Photoshop first one we already showed you go to layer down to new adjustment layer and then curves or levels you can do it here okay or you have this little icon right down here bottom of your layer panel you go right down over here boom and then you can click on curves or levels okay and it's the exact same thing uh it it just two different ways of getting to the exact same uh result okay so we have now
A Levels adjustment layer and a curves adjustment layer each with their own layer mask okay so let's kind of talk about the similarities first and then we'll talk about the differences between them okay so let's start with levels because levels are a little bit more simple curves get a little bit more Advanced okay with the levels you have two graphs two sliders okay you have your top which is your input there we go and then don't forget this bottom slider here as well a lot of people don't know about this bottom slider but it's really
powerful okay so up here at the top basically what it does you can take this point here and this is your black point so what it does this is your histogram by the way you see this light information here that's your histogram okay so when I take this point and move it over to the right hand side basic basically what it's doing I'm setting my black point here it's going to take all of this information here on the left hand side all this and it's just going to make it pure black okay see as I
keep going and going and going it's just making more and more of my image pure black okay now as you might have guessed the opposite side is going to be Pure White so if I take this and start to bring it over from the right to the left all of this information right here on the right hand side that's just going to get pure white okay let's bring that over and now this is our midpoint it's basically just going to push the midpoint lighter or darker okay so that's basically how this works don't forget you
can go down here and hit reset at any time this little reset icon and it's going to reset fantastic now the slider down here this is your blacko but this makes your blacks lighter so if I want the darkest point of my image to get lighter I can do that right here with my output levels okay there we go you can see now it's just like a light gray for the darkest point over here on the right hand side it's going to take my lightest point and it's going to make that darker there we go
so that's a crash course of how levels adjustment work now you might be asking can you do that with curves and yeah you can so let's show you how to do it let's go back to our layers here so that was our levels right we're going to double click right here where it says curves and this is what curves looks like you have a a slider here and then you know your histogram here as well now here's a little uh uh cheat sheet just a little tip curves and levels are they basically do almost the
exact same thing uh it's basically just a different way of representing the same information you still have your histogram here you have your darks you have your lights uh curves are a little bit more powerful you can do a little bit more but basically you know you're you're editing the same amount of information there's no like pixels or color or information that one can access over the other it's like they're both literally accessing the same light and dark and color information okay now remember here with levels where we made our black point you know we
moved that over to the right okay and that's going to make the darks darker or we can make the darks lighter and over here we can make our white point over here basically pushing more of the image to white or we're going to take our white point and make that darker so we can do that here with curves as well it's just all going to be in the same exact graph okay so what we're going to do we can take this point here this little slider here and we're just going to bring that over from
the left to the right and you get it that's your Black Point moving over it's basically taking all this information making pure black now if you want to make your Black Point lighter you just take this icon here this little square you just take this and make it a little bit brighter okay so I've done both of these at the same time I've brought my black point in basically making more of my image pure black but then I'm taking my pure blacks and I'm making them a little bit brighter okay there we go on the
right hand side you can do this by making more of your image Pure White it's going to take all this information make it completely white and then if I want to make my lights darker I can do this simply by dragging that down as well okay so it's basically I can do pretty much the same thing here with both of those with the levels you know you get your blacks and then how black dark your blacks are going to go your whites and how what light your whes are going to go this is going to
be in two different sliders and then curves is going to be one slider me personally I find levels just a little bit easier to work with uh curves gets a little bit more complex but let's go ahead and redo this and we'll continue talking about the similarities okay now we're back into our levels adjustment layer we started off with RGB okay red green and blue It's a combination of our three color channels basically and when you edit in RGB right over here it's just going to edit light and dark but if you want to go
in and say I want to edit just the red channel for instance I can do that and now if I click on this slider you can see it's going to give me more red in my image and the opposite of red is going to be cyan okay so I can say more red or my more cyan of course I can do that here with my shadow levels there we go I can put Reds in my shadows as well fantastic let's just reset this and I have access to my other color channels here so my green
Channel I can push and pull more greens if I want my blue Channel I can push and pull more blues if I want there as well so can I do that here with uh curves well yes I can let's go ahead and make sure uh put that back where it belongs go go home okay fantastic so yes I can do that with curves as well let's just double click right here on the curves adjustment layer and then I can go to for instance my red Channel now there's not a point here in the middle but
you can click and drag to make it more or less Reds here in your midtones there we go you can do the same thing with green click and drag up or down to make more or less Greens in your midtones by the way if you want to get rid of one of these points you can hold control or command and click on it it'll go away or like let's say you go up here you just click and drag that all the way off the graph and it'll disappear as well okay or of course you can
hit this reset now back to the blue Channel again I can put more or less Blues in my midtones and of course I can do that with my Shadows if I want you know less Blues in my shads but then I want to kind of like recover some blues I can do that too all right fantastic so let's go back to levels and we're going to talk about our eye droppers because these are kind of important so your eye droppers are going to allow you to choose your Black Point your midpoint and your white point
so for instance you don't have to use these sliders I could say like okay this right here I wanted that to be pure black or maybe this right here boom so I click there and that becomes pure black and like literally it adjusts my histogram okay now this midtone slider I can click here and say yeah that I want to be my midtones and what it's going to do is it's going to try to neutral out the color too so wherever you click you want to make sure that's a Target neutral like if I click
on a yellow it's going to try to compensate by making my whole image blue right so I want to make sure I click on a Target neutral something that's actually like gray in the image itself and that's going to work a little bit better okay and then the same thing with our lights I can click on something that's supposed to be white there we go there's not much white in this image but I could click right there and you kind of get the idea okay let's go ahead and reset here all the way back to
the beginning and then back here on the curves yep you have access to the same exact tools surprise surprise you have your black point you know can click there you have your midpoint you can click there and you have your white point and you can click there all right so we've seen how similar curves and levels are are there differences between curves and levels basically curves are a more advanced version of levels with levels okay let's go back here to our layers let's double click here on the levels with levels you basically have these sliders
okay you have five different points in which you can manipulate right but I can't add individual points right in here if I wanted to okay like if I want another point right here I can't add that if I want another Point here I can't add that either so with levels we're limited to five different points now with curves let's go back to our curves adjustment layer curves I can add points anywhere I want to along this entire graph so let's do it now there's two ways to do this you can literally just click on this
graph keep in mind your shadows are here on the left and your highlights are going to be on the right so if I click here and drag up I'm going to be making my Shadows a little bit brighter but I can go over here and make my highlights a little bit darker at the same time okay I can make my you know strong highlights even darker over here I can bring this up I can bring this up again and I can bring that down I can add as many points as I want through here to
kind of change the light levels with my image okay so this is a lot of different options a lot of like creativity you can do here as well now when you're looking at this it can be a little bit confusing of like how do I know if I want this dark to be lighter or whatever like you know I'm just looking at a graph I don't know if I want this point to be lighter or darker so let's go ahead and hit that reset button they make it a little easier for you within curves you
have this icon here if you click here this is actually really nice because then you can go over to your image and you can click and drag up or down on your image and it's going to find the light levels of wherever you click and it's going to to adjust those there so if I want to say oh you know what I want to make my Shadows a little bit brighter I'm going to do that there we go I want to make my highlights a little bit darker click and drag down I can do that
as well okay let's go ahead and reset that and show you one more time so I'm going to go here and I'm going to click and drag to make my Shadows just a little bit brighter okay and then I'm going to click here and make my highlights just a little bit darker and I'm basically reducing the amount of contrast that's in my image now if I want to increase the contrast I can click and drag down and say make the Shadows darker and make the highlights even brighter and then I've increased the contrast so you
can see it's pulling the Shadows downwards okay and it's making the highlights a little bit brighter okay now this is a really really handy tool that's available in curves it's not available in levels so that's the first main difference now check this out you can do this when you're on RGB of course which is going to edit your red green and blue basically just your light levels when you combine red green and blue it's going to work on your light but you also do this with colors for instance if you go to your red Channel
you can use this same exact icon and you want to say you know what I want more red right over here in my highlights there we go just you know put a little bit more red in our subject skin cool it'll find that area of light now keep in mind this is not selecting the subject this is selecting the light level where we're clicking okay so I just add a little bit more red into our subject I could go to the green I can click here and drag up and down and say oh you know
what maybe something like that looks good and go to the blue click up and down and I'm using this to kind of like color correct my image so my subject skin looks good and meanwhile it's creating these little points here in my curves adjustment there we go so when I turn this off and on you can see I've kind of color corrected this so my subject skin looks a little bit better here's the before see how her skin looks a little bit green a little bit desaturated in the after her skin has a little bit
more red in it has a little bit more vibrancy to it so I've done that using curves there we go double click here and this icon with my different color channels now of course you can go into your levels and work with your different color channels but I I can't add a point right here for instance okay and there's no hand icon okay I could just go to my midpoint and add more Reds to the midpoints of my entire image but I can't choose a specific Shadow level or a specific highlight level and add more
or less colors to those areas so that's just one thing to think about okay now that's where we see like kind of the real power of Curves versus levels let's go ahead and reset all of these couple more things I want to show you uh don't forget about Auto because it does a really good job you click on auto and basically what it does is this can increase my shadow levels and just kind of like bring the exposure of my image just a little bit better so there's a auto button here within curves and there
is an auto button within levels as well okay so both of these have curves and levels sorry both of them have Auto there we go let's reset them and the last thing I want to show you here is the presets so these presets are built in to photoshop like if you just go to lighter okay like literally all it does is it just makes a point and makes that a little bit lighter you know you could have like strong contrast and it's going to make a couple different points in there and increase the contrast so
this can be a good place to start with like uh let's say uh cross process boom see what it does there so it's actually working on the green channel it's G working on the blue Channel and the red channel it's doing all three of those and it's kind of increasing contrast in all those so in these like little uh you know presets and things like that they're not that useful in my opinion in terms of like are you actually going to do this like probably not you know like some of these are just going to
be way too strong but it can kind of be a learning tool and show you like okay what is it doing to these curves or these levels all right there we go and then I'm going to just click on back on auto and anything you do here can be reset at any time just click on this reset button and of course back in levels you have basically all like very very similar uh presets light in Shadows you can see there's like contrast stuff you know there we go and midtones brighter and things like that and
of course you can go into your different color channels and add more color and things like that too all right so so where does this leave us like what is what's the big takeaway here if you just want to do simple light adjustments I think levels are kind of a bit more straightforward and a little bit easier to understand in my opinion if you want to work with color curves are definitely going to be the best way to do that because you have this little hand tool and you can go in and say you know
in the red Channel I want to click and drag just a little bit more Reds into the skin I want to go to my blue Channel you just have to remember that red and Cyan are opposites green and magenta are opposites and blue and yellow are opposites so like if you want more yellow you need to decrease the amount of blue you know something to memorize but you got to if you're in your blue Channel and you click and drag down it's going to increase the yellows that are in your image okay so I think
this little icon combined with your color channels if you're going to be using curves for color Corrections this is going to be huge huge hugely powerful okay but for light and dark work I think levels are great okay the last I want to show you is just some like color toning that you can do here okay like one of my favorite things to do is I like to go into the blue Channel and then pull up the amount of Blues that are in the shadows okay so I'm literally just adding blue to the shadows I'm
making the Shadows a little bit lighter but I'm also adding blue okay just a little bit like that okay and I'll go over here to the right hand side and pull this down a little bit and this is just going to put some yellows into my highlights right so there we go you see if I go too far that's what that looks like okay so I'm going to put some some blues into my shadows and yellows into my highlights and then I turn this off and on and you can see we have like a really
cool color tone image of course you can lower the opacity there as well okay now if you want to do that with levels as well yeah go to your blue Channel click and drag this slider to get more Blues in your shadows and this slider to get more yellows in your highlights so you can see I'm I'm achieving essentially the exact same thing in curves and levels all right and the last thing I want to show you let's say we just want to like brighten up uh your you know your image here maybe add a
little bit of uh contrast there we go fantastic last thing I want to show you is that yes you can definitely use layer masks with these as well so for instance uh right now I have my levels adjustment layer okay I have a layer mask it's completely white making it visible everywhere but if I hit controller command I to invert that layer mask it's going to make the layer mask black and it's going to be invisible everywhere okay then I hit G for like the gradient tool there we go I'm going to go to the
gradient there we go let's go to the classic gradient and then I'm just going to go from uh white to black there we go and let's use a radial gradient so I'm going to just do a radial gradient for my subject out just like this okay and basically I'm just editing my layer mask so I'm saying yes this levels adjustment layer made the entire image lighter but then with my layer mask I'm now telling it to just be visible or just be lighter where my subject's faces okay and then of course I can still go
in here and make some adjustments if I want to lighten or darken specific parts of the image and we can do that the same thing if I hold alt or option I can click and drag copy the same exact layer mask and then of course if I want to do curves I can do the same thing let's just reset that curves and then take my central point and drag it up there we go so you can see I can achieve the exact same thing with curves and levels using a layer mask and now I'm only
affecting a certain part of the image well I hope that helped that was a big crash course on the difference between curves and levels main takeaway is they do almost the exact same thing so it's whichever one you feel more comfortable with and for color correction I suggest using curves because you can get in there with that hand tool and like actually click on your image and drag that up and down to increase or decrease the amount of colors and then if you're just working with light levels uh levels the levels adjustments are an easier
way to go and then don't forget there's two ways you can apply these you can just go to like I'll just show you you can go to image there we go let's click on there image adjustments and then curves or levels okay but this applies it directly to the layer so you you don't really want that pretty much almost ever just go to layer down to new adjustment layer and then do curves and levels from here that's going to be a little bit better because you can change that setting at any time thanks so much
for watching I hope you enjoyed this video if you did give us a big thumbs up and if you want to get more free tutorials click on that subscribe button thanks again and I will learn you later bye everyone [Music]
Related Videos

18:37
Curves in Photoshop – The BEST editing too...
The School of Photography
31,176 views
17:25
How to Dodge & Burn in Photoshop
PHLEARN
31,394 views
19:30
How to Create a Carousel for Social Media ...
PHLEARN
21,988 views

14:51
Photoshop Basics: Three Ways to Use Blend If
PHLEARN
50,901 views
3:32
Photoshop Quickies: Removing Skin Redness ...
Mastering Portrait Photography
22,388 views
5:25
Why Pros Use This Curve in Photoshop?
PiXimperfect
118,467 views

16:21
How to Use Levels & Curves in Photoshop | ...
PHLEARN
231,742 views
25:45
🔥 What is the DIFFERENCE? 🤔 (Gradients v...
Photoshopeando
2,733 views
16:04
How to Select Subjects and Refine Edges in...
PHLEARN
24,889 views
25:02
Levels or Curves in Photoshop: Which One I...
Sean Bagshaw
16,972 views
16:28
8 Reasons to NEVER Use Levels in Photoshop!
PiXimperfect
326,754 views
8:58
THE PRO HACK to get the PERFECT EXPOSURE e...
Simon d'Entremont
120,353 views
14:36
Eliminate Dark Circles and Brighten Eyes i...
PHLEARN
54,796 views
23:41
How to Use CURVES vs LEVELS in Photoshop +...
Sid V Photo
27,816 views
20:48
Powerful COLOR GRADING techniques in Photo...
Todd Dominey
5,720 views

22:58
Master Curves from Start to Finish in Phot...
PiXimperfect
1,757,862 views

21:23
This CHANGED My Editing... Learn Lightroom...
Signature Edits
604,905 views
14:00
How to Create a Speed Effect in Photoshop
PHLEARN
9,682 views
18:45
Levels vs Curves: A Photoshop Showdown
Joshua Cripps Photography
66,029 views
14:31
How To Cut Out Hair From COMPLEX Backgroun...
Brendan Williams
18,048 views