Everything You need to know about Drawing Fundamentals
61.05k views3271 WordsCopy TextShare
S. Michael Hampton
Proko course: https://www.proko.com/s/FLC2?af=543975
My Book:
https://www.amazon.com/Figure-Drawing...
Video Transcript:
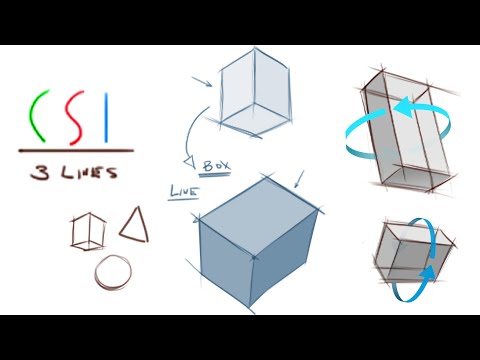
this section we're going to talk about is just you know some basic things that might help you understand the potential challenges that come along with the perspective drawing or perspective drawing with your figure we're trying to address the foundation practices to build a greater awareness of how they impact what we do with figures being comfortable with boxes you're all probably rolling your eyes like really we really doing boxes yes we are uh and you're going to like it so you know let's just take this one thing and then explore what's here as a as competencies
to start so if I'm drawing a box what do I need to understand yeah all the stuff about perspective sure right all that stuff's important vanishing point this that but what is really involved in drawing a box what's how good are you at making a straight line really you know because with a box what I'm deciding on is a height a width and a depth um so in could tilt and move in in any number of direction right but the most important thing is that I'm confident putting down a straight and then matching that to
other straight lines so sometimes in Foundation drawing practices what what I'll do with students is actually the first week what I'll do with students is uh fill up you know a page where you're plotting points and then practicing ghosting pushing or pulling whatever you're comfortable with your pen across the paper or pencil across the paper or stylist from one point to the other so I might practice this a few times and then throw the line and then you know you could go through a process of being very critical like well I get a little bit
of a wobble there and um you know at the end it kind of hooks and so this would be a way of really trying to refine and better your ability to show and demonstrate perspective and it's not that you can't draw boxes or you can't understand perspective it might just be that you need practice on your pend another one that we talk about in a foundation class would be you know start with a center point and then draw a series of lines through it that are all equal length right and and the goal is to
try to get them uh to all be the same and kind of all go through the same point and so what you're doing with this one right where this one might be more structured in the sense that like you're plotting the points probably in a way you're going to be more comfortable with an exercise like this this makes you challenge the mechanics of how you make a line by moving your hand in multiple different directions and if you want you can you can spin the paper or the page if if that helps uh but this
would be kind of the anatomy of trying to understand the drawing angle of what goes into the box or the perspective of the box so this is a really common form that I would use in figures um and primarily I would use it you know as a represent ations for the rib cage and pelvis right so when I'm when I'm getting to that point in my landmarks drawing uh with the figure I'm off often trying to determine what the proportional size of a box would be that matches that rib cage structure and I'll plot that
later in a way that I think will be easier to understand U Next Step would be to kind of now try to see them all as if they're made of glass like in these first two I just showed you one side so in this one I'm trying to see like what what's the other side doing what's the back of it doing and it's not something you always have to do but I think to get started it can be helpful and then I do I would use a box also for a pelvis so my pelvis would
be going this [Music] way and um of course when I'm drawing a figure I don't plot Vanishing points because it doesn't there' be too many and they'd be too far from the paper so instead I'm always just kind of doing my best to turn and maneuver these forms in space so let's say that you're you know at the fundamental or the kind of the anatomical level of line that you're comfortable making a box um that would be where I I mostly find myself critiquing student work is that um and you could check your own for
this but the most common error I see is that when students learning basic perspective for figures start out here they make lines that go slightly different directions are a little bit wobbly right and just don't kind of match up it's always encouraging because you could see that people understand how to do the the idea of the box but it always comes back to this issue of the technical side so what always has to happen is if I'm making a box one or in most cases a one or twoo perspective I just want to make all
of the lines going in the same direction parallel right and then just get that easy you like easy looking kind of straight direction to it so one would I think the first kind of iteration I do there war is Warped it just feels like it's um melting or it's distorting and that makes your figure look distorted right CU nobody cares about just the look of a box what we care is how it supports the line and the information that we stack on top that ultimately hides the Box we want to keep all of the perspective
qualities but make no box present and that's you know that's the goal at least of I think direct drawing so few things about that right another would be um you know how comfortable are you drawing spheres I do the same thing right I would ghost like I'm ghosting this I you could see my um stylus moving or the the mouse moving I kind of get into what I want the sphere to be and then kind of drop pressure and I'm not saying that all of mine are perfect perfect cuz they're not they're often pretty bad
the goal is just to get as good as we can with them so different exercises would be see if you can make concentric you know ellipses or spheres that get smaller but kind of maintain that size throughout or filling up sketchbooks right like um on sometimes on Sketchbook Pages for warm-ups you can just fill up rows right where you're trying to get your spheres or your ellipses which we talk about next accurate or as accurate as you can get them if you struggle with spheres which you know I certainly do and a lot of people
I know do you can try to work them from a plane so if I have let's just say I'm I'm using a a plane which would be a box I can carve it into halves so a vertical and a horizontal half and I can do the same thing with my diagonals and what am I practicing here my straights right so everything comes back to what are the rot mechanics of drawing so we went beyond the three the three lines into our geometric forms when we started talking but all of them are just made from these
so you know a sphere is just continued C curves or three four more C curves combined to make that that object or that form so you know getting the the three lines and your level of comfort developed with those is everything but back to this if you want some help right the outer edges of my sphere would hit those points and you could do the same thing well it's it's also going to hit these points too and then that gives me like training wheels to help me see and kind of spend a little bit more
time developing accuracy it's not to like it's not a competition you know it's just for me so one thing I'm noticing is like all of my spheres the line uh pressure is heavier in the bottom left I don't think I've noticed that before so that's like a that's bonus you get that you know bonus element there that you learn what I'm bad at so that's something I I should probably work on right because it means that as I'm making my my eggs well let's say my spheres I have a tendency to maybe push more line
quality down here okay so I'll just keep that in mind you know that there's more of a pressure in that area or I seem to hit that a little bit harder but for the most part I want to just kind of be comfortable with the idea of being able to have something that resembles a sphere of different sizes which isn't too wobbly right it's not it's not too far off the mark it doesn't look too much like an egg here CU I'm just practicing my spheres so that would be you know in terms of our
roster of shapes you know if we go back to our dictionary or sorry our well maybe dictionary but alphabet or vocabulary of form let's just to re review the idea that we have these three lines they can generate this range of perspective forms we've talked about a box and a sphere and then the last one that I use would be the cylinder so what is a cylinder other than a couple ellipses with some straights and that's that's all it is so first part would be well ellipses are hard so how can I practice those and
any number of of exercises right like you could do the same thing as I did here so let's say you have um so just to give you a more concrete example let's say you have a Sketchbook you like to keep and sometimes in a Sketchbook I'll just I'll put some I'll practice my Straits and I'll do some Straits here and then I'll make them broader every time and then I'll just use these as practice sheets so maybe on this upper um row here I'm just going to practice ellipses at this angle and I'm going to
try to match every ellips as I go across you know so you can see I'm not I'm not nailing it but the the practice is what's important so what am I looking for when I do these in terms of the ellipse so first let's say what's an ellipse well an ellipse would just be this idea right the circle but turned in perspective right so if let's say I'm going to turn this plane because we're going to start out drawing it right so I'm turning this plane so this is flat now it's going away in space
I could try to break it up the same way half half diagonals here's my points so all in ellipse is is a just a sphere in perspective so that's it right all I've done with these is give them a tilt so if we were to give a few more kind of terms the long axis of the ellipse is called the major axes and the short ax is called the minor axes so those axes are important and they're useful and that's kind of why we started with them here is they give you those points of reference
but they're more useful in terms of the ellipses because let's say I take this this out when I have or I'm thinking that major axes that angle or that tilt when I'm drawing the ellipse I'm trying to maintain a symmetry to it right so that there's an even amount of of um space on each side and when I come back can double check these ellipses I can put this major axis through there and see how well I've done so some are good some are bad you know and that's okay and then maybe halfway through I'll
I'll change maybe I'll try to broaden the the minor axes and then make some go this way and just challenge myself to draw ellipses from different angles or sizes so I'll fill up pages with that and then maybe in this one we'll do we'll do like a curve to separate this and I'll use this to challenge myself with spheres so I want to fit spheres in here but as they get now I'm going to have to try to make them smaller to fit and then maybe going back this way so what I'm showing here is
not uh anything new and you can find this information uh with probably more extensive explanation on you know draw a box for free or you know Peter hans's YouTube videos or um Scott Robertson's books have a greater technical quality that they bring to this in the explanation mine is much looser and more kind of drawing forward right or or just practical kind of get it get it out there less information on the the heavy-handed perspective stuff which I'm not knocking at all um and then here another we could just fill in a few more like
maybe maybe I'll try to do this way but thinner but one thing you can notice or try to pay attention to when you're doing these is that you likely will have a direction that you're comfortable drawing in like I don't seem to be very good top left here but I'm also now trying not to ghost as much I'm not I'm trying not to lay it in slowly and then drop blind pressure here I'm trying to be a little bit more direct see if I can sweep that one line around and so I could see all
these areas where you know I still have some some practice that I could be doing um another one we could do here would be we split this and then maybe I'll do that exercise and see how well I can do keeping those spheres concentric maybe I'll use that as a grid the basic idea as far as the ellipse goes is that when I'm using them in terms of now the cylinder what I want is um a basic understanding of how they're describing and demonstrating space so as far as a cylinder goes let's say I take
like this is the same basic ellipse but we'll make it horizontal the only thing I want to avoid especially when it comes time to doing the cylinders is too much of like a football shape right so getting kind of like more like that if tends to break the ellipse a bit now to get the cylinder two straights off the side whatever this is you cap it on the other side du so the ellipse is if you want if it's helpful to you you can draw all the way through you I don't I don't always remember
to do that but it's fine and you can double check um on both of these the anatomy of how the ellipse is made can double check your major and minor axes and even if and how these are symmetrical so that one's a little off but not by too much when I go on to make drawings that kind of demonstrate more of a perspective with these the the only thing to keep in mind as they apply to the figure is that this is always going to be established the width at something slightly larger than the bone
right so I don't want that to change and I notice that people do that a lot in their cylinder drawings where like this gets really big and then it looks distorted relative to the back so all I ever change in my cylinders once I've determined the width is the minor axes if I want to demonstrate a difference in space so let's say I want to tilt this forward to you or forward more to your eye or the camera I'm going to keep the same width but open this distance so my intention was that this would
be the same but that the minor axes gets bigger so that when we see now the the cylinder now maybe we lose some of the height but this would be descriptive more of a form or a cylindrical form seen from above whereas this is more eye level and then conversely right if we keep going you know eventually like let's do another one over here it just becomes a sphere again so maybe this maybe this one what we'll do is converge a little bit just to kind of force the camera angle and then here'd be the
bottom there but the main thing in these is do your best to try to copy this to this right if you if you lose that then I usually refer to this in drawing like let's say this is one so we have this cylinder and then uh I kind of make this like go like that that looks like toothpaste to me so describing the same form or a sympathetic form to what a tube of toothpaste would look like not bad if you like toothpaste it's good I don't dislike toothpaste I just don't want it my figures
the problem would be it's one side remains volumetric and the other side is cinched so I lose form there for me in terms of the figure these like I said with the boxes they're all intended to be built over use line or value um or anatomical detail to conceal the perspective while Main containing the same illusion of the of the form and the volume there so that's it right box sphere cylinder are the main ones that I'm going to play around with um the ones I'll use in the figure I don't really use cones and
pyramids and figure construction that often um you know a cone would just be a cylinder with straights a pyramid would be a plane with Straits U but that's that's pretty much it so let's say you're comfortable with these right you're feeling good you know you don't have all the problems that I do and you'd like an exercise to try to push the way that these interact uh well I think one of the best exercises for that would just be um form intersections so in this next part what we're going to do is use some of
these volumes to take a look at um how we can start to combine modify sculpt add subtract um in the abstract still so that we can take that technique take that skill and then add it to our figures hey guys if you like this lesson this is part of a larger course on the fundamentals of figure construction check out the link in the bio for more info thanks
Related Videos
9:09
The Secret of Simple Forms
Proko
118,258 views
30:30
Head Drawing, Part 1: Gesture and Construc...
S. Michael Hampton
42,749 views
29:17
GESTURE: How to Master Dynamics of the Fig...
StartManga
106,178 views

18:44
Why Anatomy Is Easier than you Think
S. Michael Hampton
18,041 views
18:03
A Plan to Greatly Improve Your Drawing in ...
Love Life Drawing
65,699 views

15:57
Anatomical Head Construction - Drawing Tips
S. Michael Hampton
9,834 views
13:54
The ONLY Box Rotation Exercise That’s ACTU...
The Art Of Nemo
66,817 views

12:29
Simple Tools For Perfect Perspective Drawing
Proko
165,186 views
34:36
Foundation Sketching: Part 1
S. Michael Hampton
14,504 views
35:23
Systematizing Art Styles
Ryan Nein
58,203 views
12:50
How to Simplify - Or, what do I do with al...
Ian Roberts
628,367 views
10:58
Drawing Exercises Guaranteed to Improve Yo...
Drawing & Painting - The Virtual Instructor
333,842 views

8:26
Train Your Eyes to See Values
Proko
204,575 views
12:02
Basics of Comic Composition
Proko
1,021,297 views

30:32
The ONLY Beginner's Art Guide You Will EVE...
Celtic Manga
149,422 views
21:12
Drawing Fundamentals: CONSTRUCTION
Jazza
4,564,705 views

21:03
5 fundamental lessons for beginner artists...
Tyler Edlin
194,492 views

25:47
Introduction To Perspective
David Finch
779,969 views

16:19
How To Draw Literally Anything
goblish
1,868,207 views
15:02
The 11 Steps to Great Gesture Drawing
Love Life Drawing
330,849 views