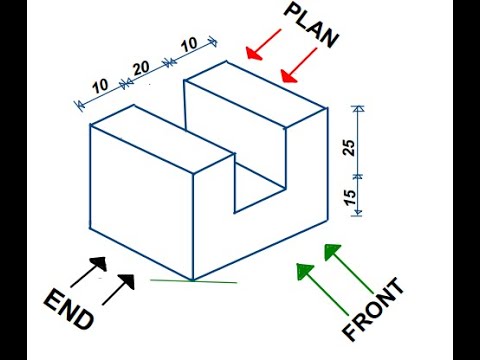
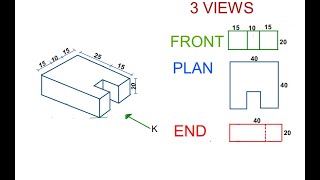
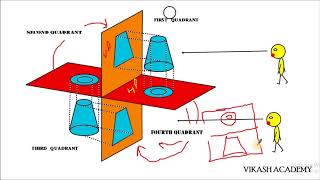
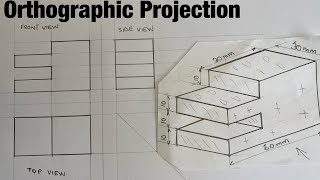
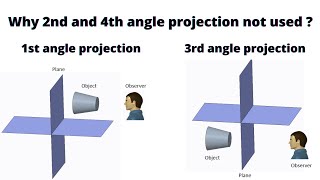
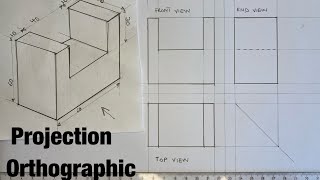
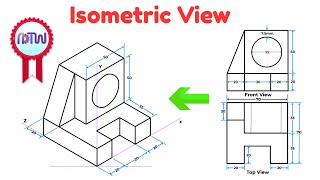
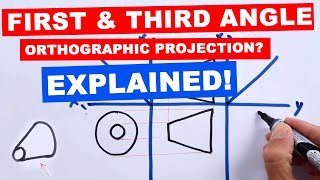
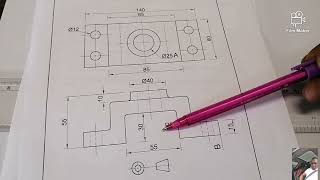
[Music] orthographic projection the given block is drawn in isometric which is a pictorial form and in this video i'm going to show how to draw it in third angle projection with the front elevation looking in the direction of arrow x so we have the dimensions as follows we have 10 plus 20 plus 40 that gives a total length of 40 mm then the width is 30 mm and the height is 15 plus 25 that gives a total of 40 mm and don't forget that the question says we should take our um front view from the direction of x now there are three main views peculiar to an object so the first one is the front view the front view is the part of the view that is in that is positioned just directly to you so you are zoom you're standing here and the path that is facing you is called the front view then the plan is called the top layer that is the layer that is above the giving block then the last part is called the end view from there we'll move on to bringing out the views the first thing we will do is to bring out our front view now when you study this isometric block you see that the front view that says the path that is directly facing you is just this the shape so it looks like you like letter u so now we can see it and it's dimensioned as 10 plus 20 plus 10 that gives 40 by a height of 15. from there we bring out the plan which is the top layer now the position you took in bringing out the front view is still the same position you will maintain to bring out the plan so i will assume that i'm still standing at this point if i'm still standing here which is direction x this is the given direction x so i will still stand here to pick the top view i will see that there are three rectangles at the top so we have one two and three and is dimensioned as 10 by 30 20 by 30 and 10 by 30. the third part is the end view when you look towards the end view you will see a rectangle what is not an ordinary rectangle is a rectangle with thin short dashes so i'm going to fix the tin shot that she's at a distance of 15 because when you study this block it is not and it is not a full cuboid the keyboard a part of it has been removed has been taken out so from that point where the the block was removed or was cut out we placed the thin short dashes which is used to indicate eating details so i'm going to place my 10 shots that she's at 15 mm it is used to show eating details now the third angle arrangements is as follows we have the plan placed above the front and the end view then besides the plan is an angle of 45 degrees to the horizontal so now we have the three views all we need to do is just to position them in the um orthographic plane so the first thing i'm going to draw because i want to draw in third angle is to position the plan i already have all the views i need to just place them one by one so i'll bring out my ruler places after you have finished drawing the vertical and the horizontal axis these are the two the first thing you need to draw the vertical line and the horizontal line then you bring out your ruler place it by the side of the vertical axis by the side of the vertical as is at any point on the vertical axis measure one centimeter inward this is one centimeter you pick your pencil put it dot then look locate another point locate another point that's my first dot look at another point on the vertical axis measure one centimeter inward put a dot again remove your ruler now i have two dots i'll bring out my pencil using construction line i'll join the two dots together and i'll take them all the way to the horizontal line i'll pick up my ruler once again place it on the horizontal line then i'll measure one centimeter inward from the horizontal line pick your pencil at any point on the horizontal line make it dots take it to another point measure one centimeter away from the horizontal line make a dot remove your ruler i have two dots on this point so bring out my thin line again i'll connect the two dots together i'll connect the two dots i'll take it to the vertical line i'll take it to the vertical line now you can see that the two lines are meeting at a point so i have the first one which is this and i have the second one which is this they meet at a point so the point where they intersect is where i'm going to start my drawing the essence of drawing these projection lines is for the three views not to touch the vertical and the horizontal line so i'm going to represent my plan the plan reads 40 by 30.
so from this construction line i'll just place my ruler to bring out the first part which is 30 this is 30. at point 30 i can erase the line now i have 30 so measure the horizontal line i must get 40 but all my drawings must start from the point of intersection as you can see i'm starting from the point of intersection to bring down 40. so this is 4 cm i will erase the remaining part okay since my first cm is divided into 3 i have 10 by 20 by 10 so i can divide directly from the ruler so just put a dot at point 10 another dot that's 20 check out your ruler connect the points together then you have your first view so you can use your thick line to bring out the views as you can see i've been able to bring out 30 by 40.
after that i'll project lines from one two three four points i count again one two three four points i'll take it down to where i need to draw my front view this is projection two this is three and this is four okay so now i want to bring out one centimeter away from the horizontal axis in this case i don't need to bring out one centimeters from the vertical because it's already projected so just come to the first line pick my pencil put a small dot to show one centimeter to save my time i'll go back to the last line pick my pencil make a dot at one centimeter so i've been able to draw one centimeter away from the horizontal line so from there i'll pick my rule again join the points together so i've been able to establish my one centimeter away from the horizontal line and in this case i don't need to draw from the vertical line so the next thing is to bring out the front view since the arrangement is planned front and end so to bring out the front i need to draw i need to measure 40 by 40. so this is already 40 then i'll take it down by 40. with my ruler i'll measure the 14 which is the vertical height of the front view i've got since 40 i can just erase my construction line at both end at the same time if my line is very thin i don't need to do that i can just join it together so since this is 40 i'll connect it together with the last one then take it up and to bring out the shape i'll have to measure 15 15 from the b's a measure 15 from the beast upward so i'll still need my ruler place it at the base pick my pencil measure 1.
5 this is 1. 5 so the 1. 5 should be measured on the second and the third line it should be on the second and third line okay 1.
5 then i'll take it to the third line to mark 1. 5 this is 1. 5 okay so i've gotten my 1.
5 so from there i can just join join from the top as you can see this is the ship it goes this way horizontal vertical horizontal vertical horizontal so i'll start i'll close this up as a horizontal line take it down vertical up to 1. 5 then from 1. 5 close it up with a horizontal line take it up again close it up with horizontal line so this middle line is open is a thin line i want to open it up so that you can see it's clearly so i've been able to draw my plan and the front elevation the last part is the end view to draw the end view i need to project lines from the front view towards my right hand side um i will also draw an angle 45 degrees beside the plan so the first thing i'm to project one two and three points points one points to point three then i'll bring out my protractor place it this is my protractor the 90 degree part which is at the middle should be positioned where the vertical and the horizontal lines meets then you count 45 degrees [Music] now i'm starting so this is 10 20 30 40 and 45 that's quantum i'll put a dot i can now remove the protractor then i'll join the 45 degree line to the middle point so this is my 45 degree line after which i'll come back to the plan this is my plan then i'll project two points one and two i'll project those points to the 45 degree line one and two i'll stop at the 45 degree line then i'll take it downward they are construction lines okay after this i'll bring out the last part which is the end view so just use my thick line bring out the rectangle and fix the 10 shots dashes which is at 15 mm so it's already established it's already here now after this i'm going to dimension the the views using change style of dimensioning now when you're using chain style of dimensioning just leave a little space after the view draw a projection line or a dimension line make sure it's thin dimension lines are thin lines puts the projections or the extension lines one and two fix your arrow fix around the other side this is the plan so we can take the measurements from here the height of the plan is 30 so i'll come and write 30 position the 30 at the middle of the line let it sit on the line so the next part i'm going to dimension is the front view using the same style of dimension please ensure that your dimension line starts from the beginning of the view to the end of the view then this one i can break it because it's divided into two sections i have 15 and 25 fix your arrow the arrow edge and place the numbers so this is fifteen by fifteen one five and the second division is 25 that gives a total of 40 mm right so i'm going to dimension the base the base of the front elevation is 40.
i'll place my dimension line fix the arrow edge so all right so i have the same this is giving us 10 10 20 10.