n8n Ai Agent: Build a Self Learning Agent! (n8n tutorial)
51.95k views5647 WordsCopy TextShare

Productive Dude
✨ Join Ai Foundations: https://www.skool.com/ai-foundations/about
In today's n8n tutorial, I teach ...
Video Transcript:
In today's video, I'm going to show you guys how to build an AI agent that has the ability to store long-term memory. Oftentimes, when you're chatting with an AI agent, it can keep the context of the conversation when you're in a single chat. But what if you had a chat with it 10 days ago and now you want to reference back to some of the insights that it gained from that conversation?
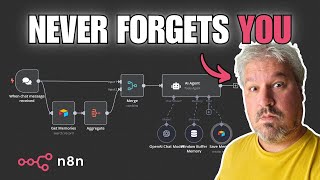
That's exactly what I'm going to show you how to do in today's video, and I'll show you how to build this workflow inside of n8n. Now, this workflow basically just uses a Telegram trigger, which you can see over here. This is where I'm triggering the agent by sending either a voice note or a text note to it.
Every time that I send a chat through, it's querying this Airtable database right here that has information about me. It can even add new memories in real time using this memory tool here, so that it's actually self-improving. I'm even going to show you guys the secret sauce: I'm going to give you the system prompt for this AI agent if you stick around until that portion of the video.
But before I kick this off, let's show you how this agent works! So, I'm going to go ahead and send it a voice note: "Hey there, what's your name? " Now this automation has triggered, and it's going to reference this row of the database.
As you can see, it says, "My name is Super Wizbot. " Perfect! It grabbed that from right here.
I want you to store a memory in your long-term memory that reminds you that you were part of an amazing YouTube video where I shared how to build you, Super Wizbot. And if you watch down here, it should add that memory momentarily. Just a quick refresh on my Airtable database, and as you can see, it added in that memory: "Carter was part of an amazing YouTube video where he shared how to build Super Wizbot.
" Now, the exciting thing about this agent is you can actually ask it to improve its memory. I can just say, "Hey, what are some things that you need to know about me and this overall system in order to improve your memory? " The first question that it asks here is: "What are some specific personal or professional goals you have for this year?
" Then it says, "Are there particular hobbies or interests that you're currently pursuing or would like to explore more deeply? What topics or themes resonate most with you in your reading and learning beyond cryptocurrencies and AI? "—which it got from right here: "cryptocurrencies and AI.
" All right, so it asked me some questions here so that it can improve its future context on me. So, I'm just going to give it a quick reply: some personal goals that I have for this year are to get more fit and to get better sleep. I want to aim for 7 to 8 hours per night, and a professional goal of mine is to reach 100,000 subscribers on YouTube.
Some hobbies or interests that I'm exploring more deeply include collecting records and learning more about deeper disciplines like engineering. I also am interested in scaling up my small town and making it more of a prominent town in the area, and just improving the quality of life for people around me. So, I sent that off, and it should now go and add some memories here to the Airtable, and then it'll come back with a reply.
As you can see, it's adding all of these memories right here; it's adding my professional goal for the year, some themes that I'm resonating with when learning, it's also sharing some hobbies that I'm exploring, and some of my other goals and interests. It covered my health goals right here, particularly that I want to improve my sleep. So now, even after this chat session is complete, it's going to have access to the past 50 memories in my Airtable database, and it's going to sort them by the date that they were created.
So, look, guys, I'm going to show you how to build this entire thing today for free on YouTube—it's my gift to you because I want you guys to be able to implement this for your agents. But if you want to take the community aspect of your learning up a notch, and you want to network with people who are fired up about AI, and maybe you even want to share some of your own insights, or maybe you just want to learn this stuff in a more structured way rather than jumping around YouTube videos, if any of those cases sound like yourself, then I highly recommend investing in the AI Foundations community. At AI Foundations, we do regular weekly Zoom calls for both support and just general community interaction and networking, and we've even just implemented a new course in our classroom on how to master n8n.
This tool is going to be vital in the future for agent builders. So, if this group sounds interesting to you, if it sounds like a place that you'd want to hang out, then I highly recommend using the link in the top pinned comment or the description below to join AI Foundations today. All right, now let's go ahead and dive into building this n8n agent.
To kick things off, we're going to head over to n8n, and we're going to create a new workflow. I'll just create it in Personal, and we'll kick things off by adding our Telegram trigger. So, I'll click this plus button in the middle, and I'll type in "Telegram.
" I'll click on Telegram, and we want to go with "on message. " So, this is the trigger for "on message. " So I'll hit on message.
If you don't have your credential in here, then you can just click on "Create Credential" here. But I'm going to click the drop-down and hit "Create New Credential. " Then it brings me to this screen where it needs an access token.
To get this access token, I'm going to open up Telegram, either on my computer or on my phone. On the computer, you can just click up in this corner here, create a new channel, and I'll just call it "Test. " I'll hit "Create," and I'll make it a private channel and hit "Save.
" I'll skip adding people for now, and the first message that I'm going to type in here is "@BotFather. " I'll hit enter. Next, I'll click on the link for the BotFather, and I'm going to type in "/start.
" After sending off "/start," it's going to give me a list of commands here. So I'll do "/newbot" and I'll hit enter. Now it's asking me what I want to call the bot, so I need to give my bot a name.
I'm going to call it "Super Memory Bot," and I'll hit enter. Now it needs a handle for the bot, so for this one, I'm going to go "supercorememory" and end it with "bot. " I'll hit enter.
Ah, this username is already taken, so let's try "supermemory" as one word, followed by "bot. " That one's taken too. Let's try "ultracorememorybot.
" All right, that one worked! It says "Done! Congratulations on your new bot," and it gives me this access token here.
If I click on this access token, it'll copy it to my clipboard. We can come back to our Naden account and paste that token right here, and then hit "Save. " Now I'm going to close this window, and I'll hit "Back to Canvas.
" So now we have our Telegram trigger. When we send a message, it's going to come through right here. Now we need to wait for this bot to access the ongoing memory.
For that, we're going to be using Airtable. So I'll click "+" right here, I'll type in "Airtable," and I'll click on the Airtable icon. What we want to look for is "Search Records.
" I'll click on "Search Records," and I'm going to create a new credential for my Airtable. I'm going to use the access token to get the access token. I can just come over to my Airtable account, get logged in, and then I can click on my account in the upper right-hand corner, go to "Builder Hub," and from here, I can hit "Create New Token.
" I'll give my token a name of "Test," and then under access, I'm going to hit "Add a base," and I'm going to select "All current and future bases in all current and future workspaces. " Just for testing purposes, I'm going to add all of these scopes. You can decide to limit these if you want to, but just to get this through and make it work, I want to give it everything so that the agent doesn't run into any issues when it's accessing this token and accessing my workspaces.
This is basically just all the permissions that the agent has. Here, "C data and Records," this is probably the only one I need for this step, but later, I'm going to need to write to the records as well, and I just want to leave it wide open for the agent, especially in this testing ground. Later, I can come back and refine this for security purposes.
But I'm going to hit "Create Token," and I'm going to give it this token that allows Naden to access my Airtable account. So I'll copy it and hit "Done. " Then I'll paste that access token here and hit "Save.
" It should say "Connection tested successfully. " Now I'll click "Close" on this pop-up window. Make sure your resource is set to "Record," your operation is set to "Search," and we want to select a base.
But right now, we don't have any bases for the agent to access, so I'll head over to Airtable and hit the blue "Create" button in the bottom left-hand corner. I'll select a workspace. I'm just going to go with my first workspace, and I'm going to hit "Start from Scratch.
" Then we need to give the base a name. I'm just going to call it "Agent Memory," and I'll call the table here "Memory. " I'll hit "Save," and for the name column here, I'm going to rename it to "Memory.
" I'm going to make this a long text in case the memory gets a little bit longer than the single text can handle. Then I'll hit "Save. " I'm going to delete these other default fields it gave us, and I'll delete these initial records.
In the first record, I'm just going to give it a test memory so that it actually has something it can pull from this database for testing purposes. So I'm just going to say the user's name is "Carter," and that's pretty much all you need for the memory database. On the base, you're going to make sure it says "From List.
" You're going to click on the drop down, and I'll type in "Agent. " I should see my "Agent Memory" base here. I'll click on that, and for the table, we're just going to make sure it's on "From List.
" I'll click the drop-down, and we're going to click on that "Memory" table that we created. Now, when you're passing memories to your agent, you don't want to return all, because if you were returning everything, the responses would get too long as you add up your memories. So you can either.
. . Set a filter for certain memories that you want it to bring into context for your agent.
As a basic way of managing the length of the memories, you can just turn "return all" off and then change the limit to make sure that it's not going to be too many memories that it pulls in. I'll just change the limit to 50, and then, if this makes my agent bug out at a certain point, you can lower this a little bit if you want to. But you can just play around with the limit to get the right amount of memories in there and to make sure that your agent isn't dying out because you're overwhelming it with information.
Now I'll go back to Canvas, and the next step is to aggregate this data because it's going to send it through as individual items. However, we want to turn it into one array that has all of the memories in it. To do that, there's a handy node that you can set up in NADN, and it's the aggregate node.
So I'll just hit the plus button here, and I'm going to type in "Aggregate. " Then I'll see it here: it's just this little tree—this little orange tree. So I'll click on that, and I'll make sure Aggregate is on individual fields.
Then, for the input field name, I'm going to enter the name of the field for our memories, and that's right here in our Airtable. It's just called "memory," so I'm going to use that to pull it through. We'll type in "memory," and I'll go back to Canvas.
Now, the pathway for this chat needs to go straight to our AI agent; it can't go through these other nodes here. So what we need to do is create a merge node. I'm going to hit the plus button right here, and I'm going to type into the search nodes "Merge," and I should see this little blue tree here.
I can click on that one, and I'm going to change the mode to "Combine. " Then, for "Combined by," we'll change that to "All possible combinations. " I'll go back to Canvas; now we can drag our Telegram trigger to go through and be input one or input two.
It doesn't really matter how you do this; it would actually probably be better, though, if this was input one and then this one was input two. There we go. Now it’s merging those two pieces of information together.
When that Telegram message is sent, it's going to grab all of the memories that are currently in the Airtable, merge them into a single item using the aggregator, and then it's going to take the text that I sent through Telegram and put that into a single item. Then we can pass this special packet over to our AI agent. This is the fun part; this is where we're going to add in our AI agent.
So I'll hit the plus button right here, I'll click on "Advanced AI," and I'll click on "AI Agent. " Now I'll go back to Canvas, and I need to send some test data from our Telegram trigger. This will allow me to map the chat to the AI agent.
So I'm going to copy the name of my bot, and then I'm just going to type in "@" I'll paste that bot in and then hit enter. Now it gives me this hyperlink for the bot, so I'll click on it and hit "Start. " Now I'm able to chat with my bot.
Now, for now, what we're going to do is delete this connection to our AI agent, and we'll bring it back in a moment. I’m going to right-click and deactivate my AI agent for now so that it doesn't trigger an error. Then I'll hit "Test Workflow," and now Telegram is waiting for me to send a message.
So I'm going to send a message to that agent that we've connected over here. I'll just say, "This is a test," and I'll hit send. All right, and what you should see is the items move through here.
So it pulled our Airtable memories and it also pulled through the chat that we sent to Telegram right here. Then it merged those into one item that we can pass to our agent. So now I can connect this back to the AI agent; I can right-click it and activate it.
Then we can click into that AI agent, and I can pass in all of the variables that this agent needs because I now have them here. I see our memories right here, and since there's only one right now, it's just showing one, but they would list out right here, and I could just drag this memory in. It would have access to all of those.
But the first and most important thing to map in is this text right here—this is the actual conversation text that I sent through over here. So I said, "This is a test," and as you can see, it's passing that variable right here. So we'll change this prompt source to "Define below," and then all I have to do is click and drag that text into the text field over here, and now that agent should be able to receive my messages.
Next, we need to add the system prompt for this agent so that it knows how it works. So I'll hit "Add Option," and I'm going to click on "System Message. " It starts by default just saying, "You are a helpful assistant," but we're actually going to delete that, and the first line of the system message.
. . That I'm going to give it is the current time and day.
I need to change this to an expression here, and once I change that to an expression, this expression right here, just the curly brackets around the money sign, is now going to pull back in the date and time, so that the agent always has the current date and time. Next, I'll enter down just a couple of lines, and I'm going to paste this next section. So this next one says, "You are a helpful assistant with the ability to add and read memories about the user," simple as that.
I'll enter down again, and for this next part, I'm going to tell it how to add those memories. So let's go ahead and open this up in a full window, and I'm going to paste this next bit of text here. So I just say, "To add a new memory or insight to the top of your list of recent memories, you can use the memory tool.
" I'm telling it the name of the tool, so we haven't created that yet, but we're going to. All right, and it says, "which allows you to add short, one-sentence insights about the user to your memory for the future, in order to help you customize your response output. " We'll go down to the next line, and I'm going to paste in this next bit of information.
So this next line is just more generalized instructions for how I want it to add those memories, because if I don't give it instructions like this, it's just going to go crazy adding memories, and it's not going to be relevant to the way I want this agent to work and the way that you probably want this agent to work. So now I just say, "You don't have to always customize based on the memories," because I don't want it going over the top, right? If it has these memories, I want it to be able to access them when they're handy and when they're useful, but I don't want it just implementing the memories.
Like, if I say I have a dog, I don't want it to implement that I have a dog into all of the responses; I only want it to bring that up when it's relevant. So I said, "But if there's a good reason to customize your response, you can use the memories below to do so. These are memories that have been added by you.
If you need to learn more about the user for the future, you can ask questions in order to take note of their preferences. " Now, for this next line, I'm going to say, "Use your current memories of the user to recall past insights about them. " Then I'll paste in this next line where we have the curly brackets around this "Jon memory," and it says, "Read your most recent memories here.
" As you can see on the preview of the result over here, it's showing the memory that we have in our Airtable database that it pulled through using that search step. Finally, I'm going to add some last instructions here, so I just say, "Tailor your response based on the relevant memories if you find that a memory is relevant to the response. " A bit redundant, but I like to add that here.
And then this one is a little bit of my own secret sauce for how I like to get the agent to talk to me, so I just say, "Always output your final response as a conversational piece rather than a list or blog post. If you must make a list, keep it simple and don't add too much hierarchy; only share the most important notes. After thinking of your response, consider the TL;DR version, or 'too long; didn't read' version, and always give a conversational, cheeky, fun reply while remaining assertive, helpful, and not too playful.
" Then for this last line, "Give a meek tone to your response. " I really just like how it responds when I tell it to give me a meek tone, but I like pairing it with these other kind of keywords as well, and that gives it a really good balanced response from my experience. I'm going to close this window now, and we'll jump back to the canvas.
Now we need to add a chat model, so I'm just going to hit the plus button right here. I'll go to OpenAI chat model, and here you need to connect your credentials for OpenAI. So I'll just hit "Create new credential," and now it needs an API key from OpenAI to get this.
Just go to platform. openai. com, create an account if you don't already have one, and then click on the settings.
You'll go over to billing and you'll add some billing details—just $5 to $10 to test with if this is your first time and you're just trying this out. Then you'll go to API Keys, create a new secret key, and I'll call this "test. " I'll select a default project and hit "Create secret key," and I'll copy my key, paste it, and save.
Now it should say "Connection tested successfully," and we'll close this popup window. From here, you can choose your model. I like just using GPT-4 Turbo because it's pretty inexpensive.
I'll go back to canvas now, and next, I want to add a memory, so I'll hit the plus on this memory right here and I'll click on "Window Buffer Memory. " We'll change this to "Define Below. " I'll go to mapping, and for the key, we're going to want to drag in the chat ID.
Then you can select the context window length, so this is how many past inputs from the chat it's actually receiving in its context window so that it can provide you with. . .
A better response: I'll leave this on Five for now, and I'll go back to Canvas. This is where the real magic happens. Now we're going to give this agent a tool that allows it to log to this Airtable database, so that it's basically recursively improving its memory here.
Add this tool. We can make it so that it can add new memories. I'll click on the Airtable tool, and first things first, I'm going to add a name to this Airtable tool, and we're just going to call it "Memory Uncore Tool" and hit rename.
Just like I had in the system prompt, you should be connected to your Airtable credentials here, so that shouldn't be a problem. Tool description can be set automatically, or you can set it manually and give it more instructions on how to use the tool. I just set it automatically, and that seemed to work fine.
For the resource, we're just going to choose "Record," and you're going to have to change this operation from "Get" to "Create. " Then, just like we did earlier when we were searching for the memories and pulling in the most recent memories, we're just going to click on this "From List Base" drop-down here, and we're going to go find the agent memory right there. For the table, we'll drop that one down; I'll type in "Memory," and I'll click on the memory table.
This should be set to "Map Each Column Manually," so I'll change this to the expression tab on my memory, and I'm just going to paste in my expression. I'm just using the "From Ai," and then I'm putting in a name for the tool. Now this "From AI" expression is going to allow the agent to write its own memories right here.
Now I'll go back to the Canvas, and now this is getting really close to being completed. Now we just need to send the message back to Telegram, so I'll hit the plus button right here, I'll type in "Telegram," and I'll click on Telegram. I'll search for "Send," and you should see "Send a Text Message.
" I'll click on that. I'm going to paste in this expression that I already have here; it's just calling for the Telegram trigger, and it's pulling in the chat ID from that Telegram trigger. So that's just referring to this, and it's pulling the chat ID that this outputs, just like we had to put the chat ID in the window buffer memory here.
So if the name of your node is "Telegram Trigger," this should work. And again, I'm referring to this name right here, "Telegram Trigger. " So we'll go back into "Send Message.
" This one's going to be an expression as well, and I'm just going to paste in this expression "json. output. " So this is just pulling the output from the previous node.
So if you see a dollar sign and it's not referencing a node like this, it's just pulling it from the previous node, and all it's doing is grabbing the JSON object output from this AI agent node when it's done outputting. So I'll click back in; now I'm going to go ahead and test out this entire workflow. To do that, I'll activate the workflow and hit "Got it.
" I'll make sure it says "Saved" up here and everything looks pretty good. So I'll open up my Super Memory Bot here, and I'm just going to send it a message and just say, "What do you know about me? " Let's see if it can figure out that my name is Carter.
All right, perfect! It came back and said, "I know that your name is Carter. " I didn't tell it that; it's not in its context.
The reason that it knew is because this Airtable record right here sent in that memory that I added to begin with. Now for the next experiment, we're going to head over to Airtable. While we still have Telegram open, we can see here it says, "User's name is Carter.
" But if I wanted to add a new memory to the memory database, I can just say something like, "I have a dog named Reese," and I can say, "Send that off. " As you can see, it sent a response here. It says, "That's great to know!
Reese must be a wonderful companion. If you want to share more about your dog or anything else, I'm all ears. " Furthermore, it added this memory in here: "Carter has a dog named Reese.
" It can even add multiple memories at once. So if I just said something like, "I live in Michigan," and I'll add another list item here, "My favorite Starbucks order is a caramel latte with a double shot of espresso. " So we'll send that off, and boom!
You saw that add those in real time: "Carter's favorite Starbucks order is a caramel latte with a double shot of espresso," and "Carter lives in Michigan. " It gave me this beautiful response right here. Now, if I wanted to make this a voice agent, our community actually has a plug-and-play way to set up this Telegram voice agent.
So I'm just going to go to the classroom in AI Foundations, I'll go into the NADN Mastery course, and I'll scroll down to "Communication Mediums. " On "Communication Mediums," we show you guys how to connect to all these different platforms like Slack, Telegram, WhatsApp, Open Web UI, and it's a growing list. My brother Drke actually made a Telegram Text Plus Voice automation right here that allows you to plug this into any of your agents.
So I'm just going to go ahead and download the JSON for this, and then I'll just paste it straight into NADN. I'll show you how simple that is, so we'll download. This file, and I'll just open it up in a text editor or VS Code, and I'll copy all of this JSON here.
Then I can head back into n8n, and I can just paste it right above my automation down here, and we'll drag it up. I don't need all of this, right? I already have an AI agent, and I have a lot of these things set up.
But what I can do is I can just pull the important components out of here. So I have my Telegram trigger; what I don't have is the Switcher right here. So I need to remove this and connect it to the Switcher.
I need to delete this connection here because it created a connection. I'll delete this too, and I'll add that back in in a moment, but we need edit fields, and we need this edit fields to go into the merge. I'll just drag this out so it's a little less confusing.
Here, now I'll go into this Telegram get file, and I'll make sure that my credential is connected here. I'll go back to Canvas, and now you see that there's no more warning on that one. When you get this file from Telegram, you need to add an OpenAI transcriber.
So I'll go OpenAI transcriber recording. I'll go back to Canvas, and now that this transcriber recording is in here, I can drag that into input one as well. Now, to get the window buffer memory updated and the input variable for the AI agent, I can go into the memory of this template automation and copy the key.
Then I can go into my window buffer memory here, and I can just paste that key in. The reason this doesn't work is because his was named Telegram trigger one; mine is just named Telegram trigger. So I'll just delete that one out of there, and now it's pulling through my session ID so that it can keep a short-term memory of the conversation.
I can go back to Canvas, and I'm going to delete the rest of this information since we already have it. There's just one final step to get voice working with this AI agent. I just need to make sure that the variable maps in properly, because it's not pulling the text directly from this Telegram trigger anymore; it's pulling it from either one of these fields.
To get this variable, I'll make sure that this is active. I'll hit save, and I'll go back to my super memory bot, and I'm just going to send through a voice note. "Hey there, this is just a test voice note to map the variables properly.
" So now it's going to send that voice note through; it's going to go down this voice route. It'll transcribe that recording into text, and then it'll pass it into the merge here. Now, that execution should have gone off in the background, so I can go to executions, and I'll see that there's an execution here that has an error.
The reason that it has an error is because you can see that it went down that voice route here, and it went into the merge. But once it got to the agent, the agent didn't understand this response that was coming in because it no longer had the input field from this Telegram trigger. It went down this voice route, and it's a different input field now.
So I'm going to hit debug in editor, and this is going to pull me back to the editor with the information passed through. I can open up my AI agent now, and instead of this JSON message text, we're just going to remove that text, and I'm going to drag in this new text property. Now, if I go back to Canvas and I hit save, and we'll go into our execution here, and I'm going to unpin it and hit back to Canvas once more.
Now we'll send off a new test. "Hey there, what do you know about me? " As you can see, it came back with the proper response.
If I go into executions on n8n, you can see that it succeeded here. So if I click on that succeeded one, you can see how that response played out. I hope you guys enjoyed building this agent that has long-term memory using Airtable and n8n.
If you want to improve your knowledge around AI agents or just the basics of artificial intelligence and surround yourself with a community of like-minded individuals, then again, I recommend you join AI Foundations. I hope to see you inside!
Related Videos

47:37
N8N Tutorial: Building N8N Ai Agents (Begi...
Productive Dude
57,693 views

14:26
Build A Self Learning Agent WIth Long Term...
Monika AI
2,750 views

30:13
Node.js Project Folder Structure with Cont...
Thank Code
13 views

25:59
AUTOMATING Research with AI Agents in n8n!...
AI Foundations
21,955 views

24:47
How To Build a Startup Team of AI Agents (...
Simon Høiberg
128,913 views

3:43:24
FREE DeepSeek-R1 Course: Build & Automate ...
Julian Goldie SEO
59,036 views

57:31
How to Build an AI Appointment Setter on V...
Quincy McCants | AI Automation
362 views

51:23
This is Hands Down the BEST Way to Build A...
Cole Medin
43,104 views

16:27
This RAG AI Agent with n8n + Supabase is t...
Cole Medin
133,591 views
14:47
N8N Tutorial: Build N8N Whatsapp Chatbot! ...
Productive Dude
21,035 views

49:46
n8n Ai Agent: Build a Blog Writing Agent! ...
Productive Dude
9,228 views

27:40
OpenAI o3-mini is a BEAST
AI Search
291,349 views

47:13
n8n Automation: Insane Youtube Automation!...
Productive Dude
6,546 views

24:27
How to Build Effective AI Agents (without ...
Dave Ebbelaar
272,992 views
17:30
Build an AI Agent That Actually Remembers ...
Leon van Zyl
17,713 views
43:33
I built an AI Agent in 43 min to automate ...
Greg Isenberg
127,767 views

24:57
Perplexity Full Tutorial: WILD Ai Research...
Productive Dude
22,294 views
31:43
N8N Full Tutorial: Building AI Agents in 2...
AI Foundations
51,069 views
23:05
Build Anything on AI Agents, Here’s How
David Ondrej
78,803 views

13:12
Make vs n8n: Which one should you choose??
Productive Dude
2,331 views