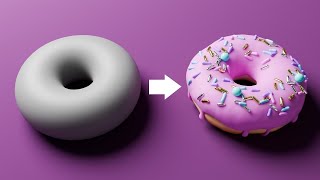
Beginner Blender 4.0 Tutorial - Part 5: Shading
1.41M views4296 WordsCopy TextShare

Blender Guru
Add colors and a textured marble countertop 🍩 Part 6: https://www.youtube.com/watch?v=TLrA6eJOfqk&l...
Video Transcript:
this is where we finished at the end of the last part um and we are ready for some materials before we continue do a check over though because I looked inside my dut and I saw this which shouldn't be here obviously so make sure you don't have any hidden meshes that should definitely not be there you've only got your camera your donate your icing and your light okay okay so materials let's do some materials if we jumped into our render mode that little uh button that I showed you on the first part that takes you
into rended View mode you can see we've got a lamp and it's lighting our dut in a very depressing cold gray so let's give it a material down here the little material Tab and then we're going to hit new so just like before the one thing we're going to change is the color let's make it a nice pink color and that looks pretty good the other value that you typically want to change um for a lot of objects is the roughness value so you can see the further I go all the way to the left
hand side the more it becomes a mirror so all the way at zero is basically a mirror um and then all the way to the right is your like most porous object uh like a brick or something like that basically something that looks like it doesn't have a reflection although everything does um the roughness is uh is just merely ipating that reflection um everywhere so it appears as though it doesn't but anyways so we're going to go with like a point uh yeah 3 something like that that's pretty good and then for the base of
our donut we're going to give it uh another material and let's go with a nice orangey yellow which we will change later on so it won't matter anyway um but that's good great look at us we've got a donut by the way we'll add some subsurface SSS later on uh to make this look a little bit more milky but for now this is good now we want to put put our donut onto a marble countertop so first of all we need that countertop as a separate object so shift a and the one we're looking for
is again under mesh and we're going to go with a plane so a plane is just a square um that's literally made up of four vertices it's the simplest object but the most versatile that you use it all over the place and I'm going to make this look a little bit bigger so let's just scale that out with s and then click okay so we want to make our donut rest on to the countertop so if I selected my donut base and moved it up well there's a problem right we need to have both of
these move together so if you want to have one object basically attached to another object while still being its own separate object um you parent it so the way we parent it is first of all you select the object that you want to follow the other object so the child um and then you select the parent so holding down shift I'm going to now click on the donut base and then to parent its control p key okay or again if at any time you don't know what it is just hit F3 for search and then
we can just type in parent now by the way with uh with parent you get a number of options here uh the one you actually want is keep transform if you just do object it means if you've ever moved the object like off its base or whatever like that it'll then like clear its position so it's actually not the one you want most of the time so it's keep transform now that I've done that if you've done it in the correct order you should be able to select the base and then move it and the
icing should go with it if it doesn't it means it's probably parented the other way so again make sure the the object you want to follow the other one is selected first and then the parent is selected last okay so now I'm going to move that up along it Z axis so G and then just a middle tap and pull it up till it's resting on my counter haha lovely now don't worry about this looking like cartoonishly bad in terms of realism I'm going to show you um a button later on which is is going
to make this look phenomenally realistic um that's going to be in some later Parts uh but for now this is fine just whilst we work and uh piece the scene together so for our countertop here we need to give it a new material and then underneath the base color you can select not just a color by clicking the the color but the Little Dot next to it that little yellow thing doesn't look like a button it is if you click that you get this uh this pop up or pop down in this point uh which
uh just gives you a number of options and the one that we're looking for is image texture so essentially it's replacing that input from a flat color to an image texture property and it's now black and it's asking you what image texture so we need an image texture now we could go to uh just Google images and just find any old marble texture download that uh the problem usually with uh textures on the web is that what most people call A texture is not ideal for 3D most textures are good for websites but for 3D
we need extra information to tell the 3D software how the material property looks like how does it reflect light uh what are the bumps look like across the surface and all that information is never available on these sites so to find those texts you have to go to a separate dedicated website and the website that I recommend is polygon and the reason I recommend it is because it's mine it's my website it's why I recommend it uh no I started eight years ago because I was uh pretty dissatisfied with the quality of the texture websites
that were available at the time so I used my YouTube money to invest in a team and some high-tech equipment we went out into the world and we scan stuff to a very high quality standard and over the years we've grown it to include uh models and hdris as well and obviously a lot of this stuff is paid um but we also have a free range and obviously we're going to be using a free Texture for this part so this is the free Texture this is the one we're going to use use and first of
all although it is free you need to sign up for an account so you can just sign up with Google that's usually the easiest one it's a couple of onboarding questions uh I would like to actually know how you uh you know are you a professional are you a student that's kind of interesting to me to know that and then when you get to here just going to say continue with free account but pal through that um and if you click the link in the description again this is the marble and we just want to
hit download and you'll see in the bottom right hand corner it's downloading it is a large size but this because it's 8 K and we've got maps that like 16bit depth um to get all of that accurate information there but once it is finished it'll just appear in your downloads then you just unzip the zip file as you would normally and then finally you should see some glorious high resolution images and ones with extra information like roughness very very subtle but we'll come through when we do the rendom so back into blender where we've got
that image texture we're going to click on open then navigate to where you unzipped it and then just click on the one that's ends uh with C in the name and then just hit open and here it is okay and it looks great up close only problem is of course look at that reflection so Bland so fake and as I mentioned before fake is the enemy and you need to uh squash it by just adding variant so that's where our roughness map is going to come in and while we could try to add it in
here this section on the right hand side it's actually not where you do most of your material work because this is kind of like a simplified dumb down version it doesn't really it's it gets a little bit complicated when you try and add too many things to it cuz there's like too many menus and drop downs and all that kind of stuff so instead if you go to your shading tab at the top of the screen there this will change the layout of the screen to something completely different we haven't seen before and lots of
Windows actually too many I never actually need this one on the right hand side so where you just Mouse over where you've got the divider and then just right click and then say join areas and then you want want to join it to the left to close it and then I'll do the same here cuz I've never needed those on the left hand side so I've just got my view at the top here and then this one here and the Reason by the way this looks different um than what we had before is because this
is the material preview but you can change it back to what we had before by clicking that so material preview by the way it's the same it's it's a rendered mode but it's using uh lights a Different Light setup basically just an hdri which is like a fake kind of light and reflection map just so that you can quickly preview materials and really you could use either or um they both kind of show the material but yeah let's use this one okay but the bit that we're looking for is here so this section here is
your node setup and it's actually an exact duplicate of what we did over here because this on the right hand side is the simplified version if you're just doing like a quick change you might want to use this but over here this is what's actually happening to it underneath the hood right so you can see as I change this on the right hand inside that is also changing there so they are linked so the way nodes work is basically a left to right function so we start over here with our image texture it goes into
our Shader which is the material for uh this plane and then it comes out into a material output and that's what is fed into the final uh Shader so essentially we could put we could do anything like for example and this is one of the value of nodes is between these two nodes we could add another node like for example I could hit shift a to add again same hoty works everywhere and then I could add in like a hue saturation value node and then I could change the Hue of my marble to look blue
right or or something else um so that's the power of nose and you could just keep going adding in adjustments and everything you want um so nodes very very flexible um they do look daunting because they get all these like you know squid looking lines going everywhere um but it's very very convenient very customizable okay but we want to add something to our roughness so so that we don't have a flat uh single value roughness which is what that is currently we want to use that map that we just downloaded so uh one you could
hit shift a and then add an image text this way but actually we could also just drag out from that input there and then just do a release and it'll now say what do you want to add in this input and we could type in image texture color and then hit uh enter Then here go to that same place that we unzipped it and then we're looking for the one with roughness in the name so Ness in the name and then hit open okay so this is better right you can kind of see we've got
some detail there but it doesn't look quite right something is not going right um it's because when you add an image texture um blunder doesn't really know what type of information it is yet and by default it's looking at the color information is though there even though there isn't really color there so instead we need to tell blender this is a special map and we're just looking at the values right so essentially the color space here we need to change it from srgb where it's a standard photo color to instead non-color data or just non-
color I guess they've changed it um but now you can see that looks correct right so look at all that we got scratches we got smudges it's infinitely more realistic uh than what we had previously so beyond that though we could also add in little tiny bumps okay so bumps are in a place you would not expect there's not a bump value here it's actually under normal so normal you hear that word a lot in 3D it just basically means the face which direction is the face pointing right so if this is your face of
the plane you're pointing this way that's the normal right but you can change the normal information to kind of tweak it to pretend like there is detail in that okay essentially we can plug in a specialized map called a normal map okay so we're going to drag out from that normal map and then relas release and then image texture that's the last used thing that's the one we want I'm just going to click color then drop and then hit open go to that same folder and then this is the one the purple one it's the
weirdest looking map you always know you're looking at a uh a CG texture map directory cuz it's the purple one and it's got nrm in the name for normal and hit open and just like before it's not going to be correct because it it thinks this is a color image texture just like for photos so we need to change it again to non-color data and now you would think that would fix it but no it looks even worse what did we do the problem is is we need to convert this image texture into something this
can read so we need to put another node in between here so the node is found under shift a a for add then Vector normal map so click and then just drop it here so it highlights between it and then just drop it and it will now finally be correct and if I go full screen with control space I didn't mention that before but yeah control space and then you can uh Go full screen and you can see we've got very subtle little little chips and divots across the texture along with those smudges and uh
it just looks way more believable means you don't have to worry about this part of your scene it's just going to work and you're going to get all that detail for free and um just makes life a little bit easier but it is a lot of work like what you've just made is a PBR Shader and yeah it's it's a lot of work all those little maps and everything and having to know which setting is which um but it is a very common thing to learn so that's why I wanted to include it in here
um if I could plug my own website again though I will say we did hear you cuz a lot of people say that so we actually made an add-on called the polygon add-on which I'll actually show you how to install later on cuz that is actually important for 3D cuz you use a lot of add-ons but to plug it very quickly it actually does all of that without you having to leave blender so it'll download the texture for you there we go see it's uh downloading it's actually faster through the add-on and then once you've
got it you just hit apply and then it will do all of that node work for you in the background and it'll just apply it to the mesh for you um so you don't have to do all that all the time and in fact most people I think if you're working on Big scenes you're using libraries uh you're using add-ons like this so you don't have to do it all manually all the time but it is important to know the process so that's why I wanted to show it but anyways this was our material and
we are happy with it well done let's go back to the layout tab and now we're going to do one more thing so you see our dut base here let's just isolate this doughnut for one moment here by hitting forward slash which I mentioned previously okay when you're in forward this is isolate mode which means it's literally turning off everything including the lamp which is why it's dark but if you turn on material preview then you get this so this is okay uh but if you look look at real references of donuts you'll see that
it's typically whiter around the middle and the reason for that is as I mentioned before the way it Cooks right it's only like half submerged and then it's flipped and it means that the bits that are closest to the surface are cooked less so there's usually like a whiter part around the rim and I mean really this is just an excuse to show you another part of blender which is texture paint so at the top there click the texture paint tab and again let's go into isolate mode with our donut there um why are we
not seeing okay there we go so what texture paint uh does it lets you paint directly onto your mesh but if we try doing it you can see nothing's happening and it does give you a warning at the body missing textures detected so to paint you're painting into an image and the image doesn't exist yet so we have to give it one so go to the material Tab and then here where we got base color we set it up as yellow but we're actually just going to override it now so click that little yellow dot
again and then say image texture so now it's black doesn't have an image so and instead of clicking open we're going to click new so we're going to be creating a brand new image and let's call this donut base we could make this higher res if we want but don't this is more than enough for a donut base that's fine and uh this will just save us time to color this will just fill the uh it'll fill the the the image for us with a flat color so going to go for something pretty similar to
what we had before a nice yellowy color like that and by the way make sure you're all the way bright otherwise your donut is uh is going to be a little bit dark so yeah there we go all right and then hit okay and once we've done that you should I mean it should be over there on the Le hand side but if it doesn't pop up you can just select it from the drop down donut base and there we go so now we're in this state look what I can do ooh fancy so I
don't know why I said it like that um but we can paint directly onto our mesh so to understand this because it's kind of weird you can also paint directly over here and you might be thinking like well how does it know like how do I know which part over here is actually going to be painted over onto the donut there you might not care but it's uh it's actually good to understand how it works so basically this mesh here it has to be unwrapped over onto this left hand side here cuz that's the only
way to uh have a 2d texture 2D flat image be applied to a mesh is to unwrap it in some way I mean there's projection I'm not getting into that uh to unwrap it and unwrapping is essentially like there is a meme actually that that explains it um but if you have like a chocolate right that is wrapped in some tin foil if you flatten it out that is essentially UV unwrapping there are are little places in that wrapping where there had to be a cut right and then that cut was wrapped around the object
that's what uvon wrapping is so the reason this works for us is because the cuts are actually already in in place for default objects so this Taurus is already perfectly UV unwrapped so we don't have to do anything I did want to mention it though because it's important to understand UV unwrapping anyways so we could actually paint directly on here as I mentioned white is a little bit too extreme though so I'm going to click that and choose a color first of all I'm going to select the eye dropper and then not click over here
cuz that's got shading information I'm going to click on the left hand side so we get the exact color and then I'm going to make it closer to White so not fully white cuz that'll be too far but closer to White and I'm also going to change the strength of my brush uh yeah I'll make about halfway and then now I can do paints across it and this will enable you to get a much more natural feel um because you'll have just like in fact I might even go a little bit softer and that way
you can kind of just paint across it and this is very forgiving because we've got icing that's going to go over the top of it um but that's good we don't want it to be too too extreme let's just make it I might go the other way make this a little bit more saturated anyways that's basically all we need to do we just want to just dab our toes into the field of uh texture painting I would say texture painting by the way it's one of the weaker areas of blender it's actually due for an
update at some point in the future um but it doesn't do like you can't paint into like the uh the height information or the roughness information at the same time like you can with substance painter but it's it's got basic functionality now importantly this is an image but it's not saved into your blend file it still needs to be manually saved so see at the top leftand corner there it's got image with a star if you see that star it means you've got changes that haven't been saved so we need to go image and then
save and specify where are we going to put our image because if we don't do this uh we're going to lose it so it has to be saved somewhere so I'm just going to save it yeah anywhere it has to be saved somewhere because it will not be saved as part of the blend fob very important to know that otherwise you can lose texture paint work that you've done but there we go so now to bring back everything remember if it looks like where's the rest of my seene gone see the top left hand corner
local means it's isolated mode so that means you just have to hit forward slash again and it brings back everything and there we are so that's the extent of uh this part of the tutorial as I mentioned the uh some of you might be wondering when are we going to make that lovely uh subsurface scattering we're going to do that in the future after we do the sprinkles cuz it's too hard to see at this point so there we go guys join me in the next part and I'll see you there
Related Videos

24:20
Beginner Blender 4.0 Tutorial - Part 6: Ge...
Blender Guru
1,128,925 views

23:10
Beginner Blender 4.0 Tutorial - Part 7: Ge...
Blender Guru
898,881 views

16:02
3D Modeling Bread and Butter in Maya | Sha...
Shashank Keshavamurthy
219 views

14:55
Why The Blender Conference Blew My Mind AG...
Kaizen
167,027 views
6:49
Why Do Big Video Game Studios Avoid Blender?
The Cantina
712,847 views
15:01
I Recreated Arcane With $0
Noggi
1,699,626 views

24:43
How Not To Make An Environment
caponeart
29,548 views

19:46
Beginner Blender 4.0 Tutorial - Part 4: Sc...
Blender Guru
1,495,251 views

1:55:27
Worst Fails of the Year | Try Not to Laugh 💩
FailArmy
2,132,615 views
27:32
Hard Surface Modeling in Blender is EASY O...
JL Mussi
40,884 views

19:48
10 Minutes vs. 10 Years of Sculpting
Isto Inc.
813,276 views

12:55
I created a Deadpool Anime... in Blender
Noggi
551,840 views
19:29
10 Minutes vs. 10 Years of Animation
Isto Inc.
1,466,898 views
17:57
Blender Tutorial for Complete Beginners - ...
Blender Guru
6,082,907 views

15:42
I Made a $100,000 Commercial in 24 Hours W...
Smeaf
631,989 views

19:10
I Redesigned the ENTIRE YouTube UI from Sc...
Juxtopposed
947,393 views

20:34
Beginner Blender 4.0 Tutorial - Part 3: Mo...
Blender Guru
2,296,980 views

3:14
The 5 Stages of Learning Blender
Artin Azarnejad
304,797 views

22:19
Ultimate Guide to Creating Game-Ready Hair...
PixelicaCG
13,738 views