How to Study Anatomy Correctly - Construct the Body
451.53k views4591 WordsCopy TextShare
Proko
In this critique, I go through several student examples and talk about the importance of constructin...
Video Transcript:
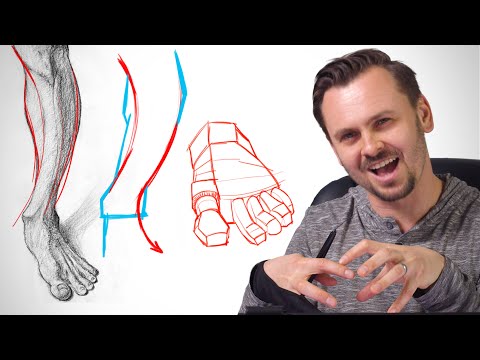
Hey guys, welcome to another critique episode I'm gonna be covering the lower legs today and primarily I'm gonna focus on the subject of Constructing the body so when we're studying anatomy instead of looking at the photograph and just copying the shapes We really need to study the anatomy. So studying the underlying forms studying the three-dimensional forms that make up the thing that we're looking at instead of just copying shapes copying values copying edges when we're shading because Constructing the body is a much more useful exercise We learn more from that than by just copying you guys like this video I'm gonna have the full Critique session available in the premium course where I go through a lot more students so you can get that appropriate accom Anatomy and it comes with a bunch of other stuff 3d models ebooks extended lessons assignment videos extended critique videos So if you want to dive into anatomy and really get serious on studying that go to proko. com/anatomy Alright, so let's dive in this first one is from Bill burrows Allright So be like I could see you took the skin off on this one and you tried to study all the muscles underneath That's good.
I like that. Okay. Now let's take a look at your drawing over here.
It's pretty good I mean your shading is starting to get three-dimensional definitely you like up here in the quads Very 3d. You know, you've got a clean shadow shape going down there You've got nice sharp edges in areas. Your shading is starting to mature.
It's getting good. What I would improve is the fact that this is an anatomy study and you didn't really Show off the anterolateral muscles This right here this whole thing is very vague You kind of applied the you know the drumstick Effect to it where you got the meaty part at the top and then you're thinning it out at the ankle where the bone is And you know you're showing off the bones down there And so it's a very simplified form and you're shading that you're shading that part successfully It looks like a rounded form, but you're not studying the anatomy. Let me show you mine What the approach I took?
Notice how much more detail I put into it. I actually studied every muscle in this area because that's the part We're actually studying. This is the part that we want to learn about.
So look at the parts that I have That I've clarified from the photo and the things that you're missing like in here I made it very clear where the bone is And where the muscle is And where the tendon is right here, and this is bone again, and then you got two muscles here I don't see any of that on yours, right yours is just a very soft and plain and Then in here I have Very subtle, but it's there indication for the head of the fibula Peroneals or the peroneus longus Right there big bulk of it and see how it's flexing and so it it doesn't just continue as one cylinder all the way down Instead. It's a flexed one you get that indentation right here and Then the peroneus brevis form starts here. And then the longest actually shoots its tendon you can see the tendon right there and Then you got the soleus and the gastrocnemius over here and then all through here You have the tendons of the extensor Shooting into the foot so I'm showing all of that, but I'm not showing it linearly with all these outlines I'm showing it with my shading I'm trying to show the three-dimensional forms that all these muscles make so that's what I wish you did as well in your shading I could see you know how to shade But now let's study the anatomy.
Let's study The thing that this lesson was all about by making it just a little more clear Than the photograph itself. So that's the difference between studying the photograph and constructing it versus Copying the photograph. Let's take a look at your second page.
Okay, so Looks like you're constructing some forms here on the left. You've got a study of the Primary forms, which is good. It's definitely the place you want to start You want to think of the whole leg as a cylinder or the foot as these planes?
Good. This is a great start and Actually a really nice job of shaping that cylinder. It looks very three-dimensional and also on your leg I could see you're starting to indicate Some muscles you got a flat part for the bone Now where I think you could improve this is?
As you go down into the foot it looks like looks like you studied the simple forms on the left But then when you approach the drawing on the right you approach that by drawing the contour lines Like pretty much just outlining the whole thing and then trying to shade inside of it and that's not gonna give you three-dimensional forms I mean sometimes it could if you're really good at shading but What happened with yours is it ended up just looking like a bloated foot with very vague shading inside of it? Because you know in here you're missing all the overlaps, right? If you think of these as three-dimensional forms, and you construct them as forms instead of a contour You'll see how much more three-dimensional it starts to look because of all the overlaps because of the plains all the way throughout that edge Let me just let me show you.
Okay, so here we got that foot and Notice actually first of all how much more activity there is along the edge It doesn't look like that bloated Form that you drew There's so many more shapes in here And what I just drew along the edge here, that's not what I'm suggesting you do. I wouldn't just draw a bunch of little Triangles and rectangles coming out. I would actually think about what it is as what three-dimensional forms are actually creating these bumps So let's start with the toe right in here.
You have this kind of cylindrical form and Then once we get to that fat part of the toe It expands quite a bit And then the knuckle you can see this whole part right here the knuckle kind of gets thick again and it's a little bit boxy and so I would think of this as Another plane that kind of expands out So I would think of these as interlocking forms one form, it kind of locks into the next form This one is all boxy that and this is a kind of a front plane it widens out from that cylindrical form right here and then from there again, we're gonna get a Kind of a cylindrical piece for the for the long part of the bottom from there. I'm not actually going to think about that I'm actually gonna start thinking of the side plane of the foot as all of these bones Create it's you know, one major form so I'm gonna think Playing here plane here Plane here going down where and you can very clearly start seeing that if you know what to look for You know and then each one of these other toes can be thought of as Kind of curved cylinders as well and some parts of them can be boxy like the little knuckle areas See how I'm I have the effect of three-dimensional forms all throughout here, but I don't have any shading yet I've constructed three dimensionality Just with line width overlaps by indicating planes with these, you know with corners with the way my lines are meeting It's one way of creating three dimensionality, right you got perspective linear perspective and then you got light on form And both of them should come together when you're drawing it's not one or the other but it definitely starts with linear if You're if that's the way you draw is you start with line and then you add tone on top of it You definitely have to make sure that your lines are already starting to reveal these forms So you might say well hey I was doing that like I thought about the three-dimensional forms here. Look at my primary forms I've I thought about the three dimensionality.
Yes, you did Now what I'm saying is you think of the secondary forms on top of that primary form. So if you remember I talked about Many times previously You have three different types of forms primary secondary and tertiary your primary forms are the things you're showing here You got your cylinders your blocks of the the main mass The secondary ones are the ones I just showed you here, you know The foot is broken up into this blocky form or it's simplified into this blocky form And then the secondary forms on that are you know? the the block of the joint the cylinder of the the shaft of the toe and then another blocky form for the head of the toe and you start breaking up into these still they're still like very big shapes they're just on a Smaller scale it's each toe now instead of the whole foot And then after that you have your tertiary forms as well It'll be the veins that are running across it the the tendon that runs across that big toe You know, I haven't thought of that yet.
You have the fingernail That's al its own little own little form there that creates little bumps on the skin You know the skin kind of pinches in towards the the toe. That's all tertiary That's another level on top of that that you can add Usually I'll add that stuff while I'm shading the tertiary forms Indicating all of that linearly as well. Just creates kind of a messy Laying it says I got way too many lines everywhere showing way too much detail And I can't even see my primary forms anymore because it just lines everywhere But showing that these secondary forms is actually a good idea unless your drawing is really small and your foot is like that big on your page Then yeah just start with like a quick one and then maybe indicate like one just a big toe You just don't have room to develop that stuff But you know, it doesn't look like that was the case with your drawing The foot is actually quite big you were already drawing outlines for your toenails And so there was definitely enough room to indicate the secondary forms, so I would definitely do that.
So anyway, thank you Bill Let's move on to Georgiana Okay and Georgiana, it looks like my advice to you is very similar to Bill's. It looks like you're drawing The the contours like you're starting with this With these shapes on the outside And then you go inward and you start shading Shapes of value, right? And even though sometimes are very vague That's a way to study shading.
Yeah, just by looking at it and by copying shapes and values and edges But it's not a way to study anatomy If we're gonna study Anatomy if we're gonna if we're gonna try to figure out what all these forms are We need to actually construct the body instead of copying the photograph because shading isn't just a way To finish the drawing and make it look pretty Shading is a way to reveal the forms just like linearly I just showed how I revealed all the forms of that You know the big toe and the foot I did it with planes I showed the edges of each plane linearly and it revealed its form shading does the same thing? value changes and the edge between those values Tells the viewer what that form is and So when you're shading you need to know what form you're shading So that you you can reveal it with your values and your shapes and your edges If you're just looking at the photograph and you're trying to see what shape is that That's the wrong approach in this case when we're studying Anatomy because that's what it looks like You did like for example in here when you're when you're looking at this lower leg It looks like you just kind of looked at this triangular shape and you shaded it in because you saw some Triangular shape in there, but you didn't think oh, that's the soleus and it's got this rounded form and so now I'm going to cry a Tone in that area to show the form of the soleus doesn't look like that's what you did In fact, everything in here is very vague. It does not reveal the forums.
It just reveals kind of a 2-dimensional outline of that shadow, so I want to really make this concept clear to you that There's two ways of showing form There's the linear approach So if I want to draw a box, I can do it like this You can tell that's a three-dimensional form Because I'm using perspective To create the illusion and I did it linearly now. I can do the same thing I can show you the same form without any lines at all. I could use only tone Okay, so I'm gonna start by kind of creating a background Okay, and then if I got that same box in this environment the lights coming from the top Kind of towards the right this whole left side is gonna be in shadow and so we could just draw that as a shadow plane without any line And then this whole plane is a halftone and then the top plane has light coming down on it the most and So it'll be lit Now we can actually think about maybe some cast shadows in here And that makes that illusion even more obvious But anyway, you get the point you have linear and you have tonal ways of showing the form Hopefully you're going to combine the two and your drawing and you can you can think through it.
You can develop your drawing Linearly with the forms and then you can go on top with the shading and develop it even further Adding even tertiary forms on top, but remember when you guys are doing this Make sure that you keep that hierarchy the primary form should be clear even After you've added the secondary and tertiary forms on top of it So all those details of the veins The tendons the wrinkles on the toes the toenail all that stuff you've added it the basic form of the foot should still be obvious that that whole side plane is a Side plane even though it's got the knuckles and all this other stuff and that top plane is still a top plane now big area The primary forms are primary They're the most important and they're the simplest secondary forms are second in importance and second in Their size and tertiary are third in importance and third in size. So keep that hierarchy in mind When you're doing this All right. So this submission is from plio and it's nice.
I'll I actually really like your shape design I like how you've mapped in your core shadows You've clearly shaded the shadows in there's another thing related to this this idea of constructing the body I want to talk about how it's not just about looking at these surface forms on the photograph and Simplifying them into primary secondary and tertiary when we're studying anatomy. We have to think about all the layers We have to think about the bones underneath and so we can construct the body From the deep parts and then add things on top That's another part of constructing the body that I didn't talk about Earlier. So for example, the reason this applies is is pretty clear in this drawing over here You have this exaggerated gesture For the tibia, which is fine, I think I did that on my drawing as well.
I curved that quite a bit But when you do that when you exaggerate the gesture of a bone, you got to make sure that that bone Still has a real form underneath that you didn't just curve it in a two-dimensional space That it actually still makes sense And so when you curve the bone here you have to curve the bones on the other side as well and you have to extend the muscles out a little bit so that they make room for that bone that you just pushed into the leg and so what you have to do now is Add the muscle out here push the muscle this way like that and so now there's room for that bone all in there and it's a more dynamic leg that you've Exaggerated the gesture of and so you have to study the bones that's why we started each part of the body with the bones because you have to Drw them enough so that you can just kind of imagine what they look like under the surface You can feel their thickness in there You can feel where they are. So that you make sure that all your muscles are based on the bones So you're thinking about how? It's right there.
There's that tibia Right. There's the the platform There's V And then this is the fibula right here that you've indicated Here's the head of the fibula. And so if we connect Those So with the fibula being right there and the edge of the tibia being right there now we don't have room for that tibia and then for a gap In between the two because remember let's look at the bones Here's a 3d model of it we can't just leave room for the bones themselves.
There's a gap in between them Right, they're not touching and Yours doesn't have a room for that. So you have to push it out That's why I'm saying you have to think about the thicknesses of the bones Not just you know think of the gesture and then shade on top of it. Let's move on to Awahd okay, we got this submission from reward and I'm gonna continue that concept of gesture because gesture and structure are related and they should also work together and so it looks like Robot you you're looking at the shapes on the photograph, which you should but you're copying The shapes as flat shapes and you're exaggerating them from what they look like in Two-dimensional in space like you're copying the outlines and you're exaggerating the outlines instead of exaggerating the forms so you're like looking at him you're like oh, there's a little triangle shape and you're just extending that and then there's another one and there's another one and then that And you just kind of like extruding all these angles out and what happens then is that you miss?
the main gesture the flow of how the shin flows through here and then it comes in and then It's got this s-curve all the way to the toe by extruding all these little shapes You've you missed that whole flow. So when you design shapes design them based on the whole gesture and Don't lose the structure. There's that balance in this case I think you've lost both really you didn't really show any structure by exaggerating the two-dimensional shapes so you didn't really capture that but you also just lost the gesture because of it and then the shading kind of saves it because Your shading is it's pretty good like I could I only feel the plane changes through here.
So it definitely adds some Some value back into the three-dimensionality of it. But as far as the way you're designing your shapes and your overlaps It does not help to show the structure or the gesture. So be careful of how you exaggerate all of these Two-dimensional shapes along the the contour think of them as three-dimensional forms.
Like how does this triangle here? actually connect to the top of the neat because that's You know that that's the tibia, right? That's And it needs to have a plane there and it needs to continue back up and connect to The knee and then this is the the fibula and that needs to connect back up here And so think about that in your head.
How's that happening instead of just drawing an exaggerated triangle? and I know that that you know thinking about that much stuff can actually Hurt your drawing. Sometimes you're thinking about so many little details About the anatomy that then the anatomy becomes a crutch That's true When you're just doing other projects that are not Anatomy studies, but when you're studying Anatomy the goal here is to learn Anatomy It's not necessarily to get the best possible drawing, you know, when you're a professional and you got an assignment your goal there is To get the best possible drawing and deliver the the best thing that they can get It's not necessarily to get anatomical accuracy Here we're studying Anatomy.
And so our goal is to learn. It's not to get good drawings. And so that idea that Thinking about too much.
Anatomy can make your drawing worse I actually don't care in this case if we're taking one step back by making slightly uglier drawings at First in order to learn anatomy - then take ten steps forward and make really good drawings because our Anatomy is now intuitive and we can focus on the other stuff that may Drwings good while still keeping your Anatomy accurate and even helping to make the drawing look better So I think it's okay in this case Okay back to the idea of gesture and structure and kind of balancing the two this drawing on the left You have a very gestural drawing. It's very dynamic like this curve man, you really accentuated it right the curve of the tibia and Even the muscles, they're mostly just flowing all this way. You basically have this Shape like that Then you have the muscle Very subtle to not break the flow.
That's what you got and that's great for for gesture But now you you've already shaded it you at this point you should have already added all that structure back in there It should feel like it's solid and I just don't feel like you did and let me show you what I mean So instead what I would do is start with that same gesture That you have started with as you know, a lighter line a light thin indication because the gesture is always a starting point It's not the final form and then the parts of this gesture that really stay stay here and kind of reveal itself at the even at the end is Right in here you have this part of the knee and It overlaps and then it kind of goes away or you got little half tones along the tibia and then it comes back down here And even all along through here in the calf it it kind of follows that and Then you have structure you have this Going against the form a little bit By adding that corner here and keeping these a little bit straighter It adds a little bit more of a structural element to it, even this that corner here a straight through here would definitely help solidify this whole ankle area as it locks into the foot a Corner in here would help These can be very subtle these these little Corner plane changes even in them where the muscles are can still make the muscles feel rounded But they add a plane to them and that plane adds Structure so that not everything is noodley, okay so basically you we still have that feeling of gesture through these red parts all through here and Actually right in here that tendon carries it back through here that way so that gesture will carry over But then you got all those blue parts which balance it out and add structure to it So the combination of the two and so you got to look for both of those Which parts can I? Keep the flow going. And which parts can I make it feel solid?
sometimes some lines do both they'll They'll go with the direction of the flow and they add a three dimensionality to it. So this is another way to Not just copy what you're seeing but to observe it analyze it and and then draw it In a way that shows that you understand what you're doing and by doing that you understand more you learn things about the body Okay, I think that's my whole rant about Constructing the body there's a lot of elements there and hopefully you guys will start applying this because I think not copying photographs is a Huge step forward and just into learning the body if you change your mentality in the way you practice It makes it much harder for you it you'll you'll probably get frustrated because you'll realize how much you don't know And when that happens when you realize that you have no idea what's going on in this you don't know how to construct it what you need to do is Hold first take a deep breath and then open up the books We watch a lesson Go back to an e-book and flip through and see what what is going on there You have to learn the information fill in the gaps Go back and try to draw it again. It's a long process It's it can be very frustrating because there's so much to learn and so much to juggle at the same But try to approach it in a fun way.
The human body is a puzzle It's a really complicated puzzle. And if you like puzzles, this could be really fun for you. You hate puzzles Can be the most complicated puzzle you've ever tried to put together So try to enjoy it so Anyway, I hope that helps if you guys want to see the rest of the critiques I got a whole bunch more in the premium section at pro catacomb slash Anatomy And of course you get a lot more than just more critique.
So you get full lessons You get premium only lessons much more detail and just all the anatomical information You get more assignment demonstrations ebooks. We create PDFs reviewing all the lessons so you can print them out They're really good ways to review all the information from each lesson 3d models of all the muscles and bones that we learn you can rotate them all in the browser You don't have to download any software. So look, of course, it's over at proko.
com/anatomy Alright guys. Bye.
Related Videos

14:23
How to Draw Feet
Proko
253,580 views

13:35
How to Combine Gesture and Anatomy
Proko
424,097 views

17:52
How to Draw Arms and Legs From Any Angle
Proko
216,095 views
14:17
How to study anatomy
Bluebiscuits
246,306 views
1:05:13
How to Draw Hands - Human Anatomy Class Sn...
The Art of Aaron Blaise
139,978 views
19:31
The 16 Line Gesture Method
Proko
41,867 views

45:52
How to Learn Anatomy - Draftsmen S1E10
Proko
271,551 views
28:19
Anatomy Quick Tips: Arms
Sinix Design
209,892 views
10:00
The Drawing Lesson That Changed My STYLE 😳
Stephen Bauman
127,220 views
24:47
How to Draw EVERYTHING in PERSPECTIVE (FUL...
TINI
35,224 views
7:22
A line-drawing exercise you never knew you...
Alphonso Dunn
329,664 views
14:04
Learning anatomy with reference photos
HamRib Art
823,653 views

33:49
History Professor Answers Dictator Questio...
WIRED
1,474,530 views

28:09
Training Yourself to Draw From Imagination...
Proko
2,036,166 views

22:14
The Secret to Drawing Overwhelming Detail!
Stephen Travers Art
1,983,745 views

12:04
How to be so charismatic people start ques...
Stravity
34,679 views
31:13
How To Draw Figures in Perspective
David Finch
1,129,974 views
26:07
6 Steps to Draw Anything
Proko
2,975,194 views
16:19
How To Draw Literally Anything
goblish
1,950,550 views

30:45
Unlock Your Imagination with These Art Exe...
Draw Sessions
620,985 views