Fizemos um CARRO ELÉTRICO MOVIDO A PILHAS AA!
9.05M views3309 WordsCopy TextShare

Manual do Mundo
Saiba mais sobre as pilhas Super Alcalinas Fusion
http://www.rayovac.com.br/superalcalina/
Const...
Video Transcript:
Woe, woe, woe; Iberê, I was born for this! I was born ready! Slowly, very slowly.
Today, we received a challenge from Rayovac, which is to do the most amazing thing possible using the new Fusion batteries. For those who don't know, Fusion is the new battery from Rayovac, the same brand that produces the yellow ones. But this one is a super alkaline battery.
It lasts much longer than yellow and regular alkaline. And the yellow ones are used in equipment that consumes little, like a wall clock and TV remote control. Alkalines are used for equipment that consume more, such as drone remote control, electronic toys, wireless mouse and keyboard, baby monitor; The super alkaline ones also serve for all of this, with the difference that they last much longer.
That is, they are batteries that will be changed much less. The first idea that we had and that many people suggested was that we could connect appliances using AA batteries. Which is an awesome idea by the way.
it's a cool idea. But the appliances here at home have 110 volts, right? They require 110 volts.
And several amps. Remembering that this battery here has 1 and a half volts, and 2. 7 amps, right?
So, if we organize the batteries in a special way, we can increase these volts, this voltage, and we can also increase the amps. Oh, then go there. Let's try to connect some things here from Manual do Mundo with a battery holder that we made with wood.
Look how cool. We put 16 batteries and they are connected in series and in parallel. What is this?
In parallel is when we put the batteries negative with negative and positive with positive. So these stacks here are connected in parallel. In this case, they still have one and a half volts.
It just increases the current. Increase the amps. When we connect this way, this set with this one, we are connecting the positive of one with the negative of the other.
Then we can add the voltage. Add the volts. So here's 1.
5. When you add it to this one it gives 3, it adds it to this one it gives 4. 5, 6 volts.
So in this set here we have 6 volts. Then we made a direct connection to the aluminum here, you can see that it is not cut. So continue here.
But here the piles are upside down. So it will give: 7. 5, 9, 10.
5, 12 volts in total. Which is more or less the same voltage that we will have in a car battery. The voltmeter here, we can see, it reaches almost 13 even.
Now our battery holder has 12 volts. But no appliance works with 12 volts. only with 110 or 220.
What are we going to do? He's going to put an inverter in our battery holder. But what is an inverter?
An inverter is a piece of equipment, this one is made for a car, which transforms 12 volts into direct current, which is what's in the car battery, into 110 alternating current. Which is what we have at home. Does that mean I generate energy like that out of nowhere?
It doesn't generate energy out of thin air. There is nothing that generates energy out of nothing. There's always a little change there.
What is the exchange that the inverter makes? It steals the amps. So it increases the volts, it increases the voltage, but you lose current.
You lose amps. It means that there will be fewer electrons passing through 110 than there were through 12. Okay, translating for Mari to understand, right?
Battery holder, it has 12 volts and how many amps? Many. Here it will be 5.
4 amps. 5. 4 amps.
A lot of amps. What does the inverter do? Put the volts up there and lower the amps.
Decrease amperes, it will reduce the amperes a lot. Now let's start with the clean Iberê fan, which is very weak. Clean, Mari ; Do you think that inside the studio there will be anything clean, especially the fan that suffers from all the dust from our wood cuts?
Look, there's a plug in the back, look. 1, 2, 3 and. One, okay, two okay, three, okay!
The fan turned easy, huh! It turned easy. The next appliance is a little more powerful.
We're going to have to put in a few more batteries. 24 batteries, versus a 200 watt drill. Here, 24 batteries, let's see if you turn on the television.
Oh, putting the television connector here. the light turned on Ah Mari! !
! Oh! !
Ah, that beautiful drizzled image. Just missing the steel sponge here on the antenna. Look, there will be people who will say that there is a wire connected here behind the television.
Just for you to see. There's nothing. Just her thread.
But all this was very easy. Now let's get to something more hardcore. Jig saw.
Does it rotate? We are going to put some more batteries, in total there will be 40, because the jig saw consumes more energy. It's all on the table here huh.
There's nothing in the socket. Ah Mari! Stay away from me with that stuff!
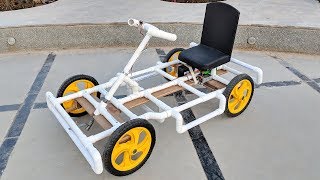
Ok, we saw that Fusion can connect practically anything. But let's step up. Let's try to make an electric car, Mari.
Yes! But hey, Iberê is good at building things, but he's a bit of a Sunday driver. So I'll let him build the car now and then I'll come back here to test it.
I'm going to build this car, making it very clear that Mari drives well, and you want to call me a Sunday driver now, Mari. Let's go. We will see.
Because I drive very well. You are a good driver. Let's see how well you can drive this battery-powered car.
You've already seen this screwdriver here in Manual do Mundo, we built a boat engine with it, the proposal now is to remove the original battery, which won't last long in a car, and put it here as a car engine using a Fusion pack as a battery. We just need to build the car. Look how beautiful.
Our cart chassis is already here, a cedar plank two centimeters thick, one meter and thirty meters long and 30 meters wide. We've already made a little pout on it, and back here we've also opened a space of 6 by 15, which is where a bicycle star will pass. The wheels will be these forklift wheels here, there are 4 of these, but the other two are not here on the table.
It already has a bearing inside. And the shaft is going to be this threaded rod that's 65 centimeters long, and it's 7-eighths in diameter. To rotate the axle, we have to fasten it somewhere.
We made a bearing, which is this rafter that is drilled in the middle. It goes around the axis, but to protect the wood, we're going to put these two pieces of aluminum pipe. First thing I'm going to do is take the piece of aluminum pipe and put it inside the rafter that is already drilled.
Then I'm going to fasten this rafter on the side of that hole we made there behind the cart. These are going to be the bearings, the parts that hold the shaft. The wood will be glued with white glue, but in the middle I'll take a little bit and put super glue, which is just to make it stick faster so we can work.
Now that we have the rear axle bearings, we can make the transmission, which is what transmits the energy from the engine, the movement from the engine to the wheels. So here, on the axle of the wheels, I'm going to put a bicycle star that has 40 teeth. And I'm going to put it on the engine, it's going to be attached to this bicycle ratchet, which has 16 teeth.
This ratchet will have an axle, you can see that it is welded to a washer, this washer here is called a tinker washer. We ordered soldering now. The axle is going to be this half-inch threaded rod.
Half an inch because that's the maximum the drill can have, it can get there in the mandrel. So this here will run inside another bearing, which is this little piece of wood here, which is coated with a little copper pipe. And it will run inside.
Alright, let's get this set up. First then I'm going to put a nut on the end of the axle. Then there's a washer, the star, or bicycle crown, another washer, another nut, and the bicycle chain.
Then I have to screw all this here on the axis that is going through. I realized that to align the crown right in the middle of the axis, it's better to put a little masking tape so that it becomes a little chubbier and then it will fit exactly in the center. Let's press this here.
To attach the wheels, there is a washer, two nuts plus a washer, the wheel, a washer and a nut. And it's time to tighten this right here. If you were in doubt about how this was going to work, look how cool.
Cool, right? But you have to line everything up so you don't let go of the chain. Now I have to attach this bearing here to the cart.
It will hold the ratchet shaft. The detail is, this here has to be very well attached, but at the same time it has to be adjustable, so I can tighten or loosen the chain. There was a problem with the Manual do Mundo boat that time, remember?
The chain started to loosen and there was no way we could stretch it. The solution we gave here was to attach a board behind the axle, and then attach a triangle to it to reinforce it. The bearing is attached to this wood with a type c clamp.
Which is something that we can remove and put on whenever necessary. We noticed that the axle nuts are running a little, so we are going to make a hole in the nut, along with the axle, and pass a wire. This wire we call cotter pin.
Attaching the drill will be very simple. A rectangular piece of wood is attached to a triangle. I glue it all back here, I make a hole, and then I pass the zip tie.
The good thing is that she already has the game. The engine already has that natural damping. This one will be the front axle, look.
This wood joins the two wheels, and here we have the bearing. Only this time, the axle is stuck, okay. The iron shaft is attached to the bearing.
it won't keep turning in there because the wheel has bearings, so, look. everything is stuck and only the wheel is turning. So let's go there, a little bit of white glue with super glue, and let's fix the bearing on top of the shaft.
If you imagined that I was going to attach the wheels to the front as if it were a ball bearing cart, we will do much better. This rafter will be on the tip, as if it were on the tip of a ship like that, on the tip of the cart. Here we are; Here it was a castor wheel where we removed the wheel, so we're going to have this bearing here, so the wheels can go to one side and the other.
but at the same time, on the side, I need to hold this here, look. Which is the cart's steering axis. It will have direction.
And these boards will help me. At the same time ; There are the shaft bearings, which are here. It also has an aluminum tube, a copper tube that goes inside the rafter.
And at the end of that thing is my wooden steering wheel. So I'm going to fix it all here. Dude, I'm not going to narrate this whole story, every screw I'm putting, you'll get sick of our electric car.
You know what I'm doing. Putting everything together with screws and white glue. Perfect.
The flywheel is as follows. I cut this beautiful piece of wood, I attached it here to the end of this half-inch screw. Here we already put a nut that is punctured and has a cotter pin, which is for it not to move at all.
And in the middle of that, here's this piece that is a really crazy spool that will wind a string, and you'll understand what this thing is for. I'm going to put a washer on the steering shaft, and thread the shaft through the first bearing. Then here I put a nut, a washer, and this set of woods.
To close here too, there's a washer and a nut. At the end here is a washer and a nut already drilled where we are going to pass a cotter pin. To lock, I pass the wire here in the middle.
Then I give the spool a squeeze so that it is attached to the steering bar. The next step is to attach the string to the spools. But there's a really cool detail, I'm going to attach a roll in one direction, and the other roll in the other direction.
This means that when you roll one you unroll the other. To pass these strings I'm going to use two pegs, and then close to the wheel I'm going to fix the string on two other pegs. It has to be stretched very well.
Look how beautiful this is working. While you were distracted watching that beautiful flywheel mechanism work, I cut the drill. What have I done?
I took all this bottom part and separated. So, look. We have here where it turns on and off.
Working remotely. Only here is still with the original battery. What did I do?
Let's remove the original battery, then we dismantled an extra battery that we had, and made an adaptation here. Here it is simply the positive and the negative, and one more wire that controls the battery charge. We connect this here to 12 volts, which is how the drill knows if the battery is running low or not.
So I'm going to plug this in here where the actual battery would go. It's connected here. And these wires I need to connect to a battery pack, AA batteries that I will have to make.
The drill uses 20 volts. So, as we have batteries of one and a half volts, we need to put one battery in front of the other connected in series, until we reach 20. There are 13 cells connected in series.
But at the same time we need a lot of current. So we need many stacks connected in parallel, one next to the other. So the solution is to make a set similar to the one you saw at the beginning of the video, but with a lot more batteries.
Here we are connecting 24 in parallel, and there will be 13 sets in series. Look how beautiful. Despite the number of batteries, here we only have six volts.
Because it has 1. 5, 1. 5, 1.
5, 1. 5, . But we have an absurd current.
Lots of amps. I mean this here is very strong. But to give 20 volts I'm going to have to connect more of these here one after the other.
So I already left this aluminum here, which I will fit in the next one. Now we already have theoretically 12 volts. Let's go short on these two ends to see if this is really strong.
And here we have 20. 8 volts. Perfect for powering the drill.
Of course, now we have to turn this into a package. So I'm going to plug in a negative here. It has to be well secured.
The 12 volt output at the middle and the positive at the end of the battery pack. To give it a nice look and at the same time be safer not to have any exposed contact, we're going to close everything with EVA foam. I'm going to attach the drill and one thing I forgot to show is that we put a board here, look.
Underneath the drill, because when it turned it tended to bend. So this board is serving as a support. Let's put the comfort items.
The backrest is a place to put your feet. After all, Mari is going to step on the little cord over there on the steering wheel if we don't put this here. For a change, a little white glue with super glue to fix it quickly.
And here at the back, I'm also going to screw it in, because if Mari pushes it, this support will break. To give the final touch, let's put some stickers on our car. We're going to leave in a little while to test the car, Mari's going to drive it.
And I'm going to tell you something that I won't tell her. I don't know if you've noticed, but I've put this together backwards. When I turn right, the cart goes left.
When I turn left the cart goes right. Let's see what time she realizes this. Iberê, I was born for this!
I was born ready! Throttle is here, steering wheel. But this steering wheel is the opposite.
Oh oh! She discovered! It was a design mistake Mari, but you can do it!
We will see. Now you showed confidence in me! I like it that way.
Go, Mari. You can pack! Goodbye!
Damn it! I'm still getting the hang of it here. I'm getting the hang of it.
You can pack. Did you press it all the way? The drill isn't holding up, no.
But the batteries are good. Batteries, yes. But the drill.
. . Mari, it's your fault.
It's not my fault. This drill is to blame here. We made our pit stop here and found out that the problem that happened has nothing to do with the drill or anything here.
What happens is that when we were accelerating the cart, when it was moving, the nuts that hold the axle would close, they would lock the axle more and more until there came a moment when it was all tight, locked in the back and it didn't spin anymore. So what did we do? we put cotter pins in everything that is sow here.
Coupling is that little hole in the nut with the wire inside, in a way that it can no longer rotate on top of the threaded bar. Another thing we did is fix the steering wheel so that Mari can have a more pleasant ride. Let's get this thing on the road.
This time it will work. Today will work. Shall we?
Yes. Now go! Yes!
Accelerate that cart, Mari! Run, Iberê! Run, Iberê!
Damn, dropped the deal here. Calm down, Mari! It went far, it dropped a piece of wood that was holding the drill.
The support of the drill that loosened everything. But we have glue to fix it. But do you know what that is?
Curse from Iberê, because he doesn't drive well. But it drived! And I ran over here.
Me taking off on the asphalt. We did a radical test here with the Fusion, but you can also test it at home. Then there's the baby monitor, remote control stroller, wireless mouse and keyboard, anyway.
Anything that uses a lot of energy. You will see how powerful it is. Hurry up, Mari!
Related Videos

14:42
We made a GIANT MAGNIFYING GLASS that exce...
Manual do Mundo
8,947,600 views

18:21
Como fazer um bicibarco - o barco de 2018 ...
Manual do Mundo
7,510,811 views

24:28
INFINITE RANGE ELECTRIC CAR - DIY Build
Drew Builds Stuff
2,898,258 views

14:59
THE PERFECT MATCHSTICK BALL?
Manual do Mundo
1,790,159 views

17:58
Gas powered electric guitar
Mattias Krantz
2,450,423 views

45:06
construindo um Go kart caseiro de Drift (...
Motorizando
6,039,223 views

17:57
Gearless Magnet Bike
Tom Stanton
5,939,885 views

16:46
Como fazer um barquinho a controle remoto
Manual do Mundo
4,752,637 views

17:53
Building a HIGH SPEED Rocket Plane
ProjectAir
1,701,050 views

35:28
Homemade Off-Road Car Project - Full Video
CHERAL AUTO
8,241,514 views
9:52
How to Make a Go kart / Electric car using...
Navin Khambhala #crazyNK
47,822,387 views

13:30
INFINITE energy through PERPETUAL movement
Metal Projetos
1,101,577 views

11:54
É SURPREENDENTE como esse FOGUETE de ÁGUA ...
Manual do Mundo
359,966 views

14:49
OS REALISTAS MINI CARROS QUE FUNCIONAM DE ...
BelotoPlays
2,092,340 views

11:44
Metralhadora de elásticos de PVC: 100 tiro...
Manual do Mundo
5,490,248 views

23:50
Man Builds Hyperrealistic RC Plane at Scal...
Quantum Tech HD
31,077,844 views

15:47
Buil a Electric Go Kart at Home - Electric...
KST HACKS
7,691,150 views

23:11
BICYCLE with SCOOTER engine
Metal Projetos
1,040,279 views

58:01
Making an atomic trampoline
NileRed
4,403,879 views

13:49
Fizemos a bike elétrica de furadeira do Ce...
Manual do Mundo
3,347,301 views