От постройки Турбо Реактивного двигателя до полета - всего один шаг
22.72M views3553 WordsCopy TextShare
Игорь Негода
Проект Реактивный самолет закончен !
ПОСЛЕ БЛОКИРОВКИ ЮТУБА ИСКАТЬ МЕНЯ
Канал Яндекс Дзен. Назв...
Video Transcript:
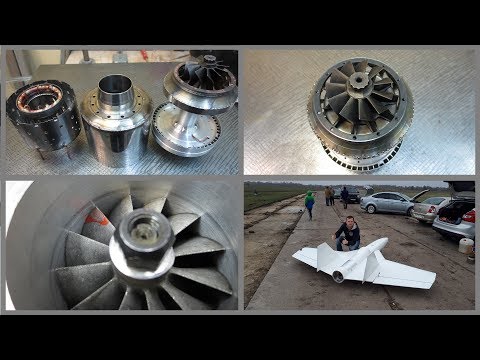
Hello, everybody! Dear friends, we're beginning to make our turbojet engine. There are two such turbines, here's the impeller I'm going to dedicate a month or two to all this staff.
Now I'm going to clean the turbines and start to disassemble them. Here's what we have. Everything have I disassembled.
Here's my set of details for constructing We came up to making the most complicated part of turbojet engine. At least specialists say so about model engines. It'll be the straightener blades .
. . and a part of the engine's frame.
Drfted a figure for this impeller and for this pancake. Need to remove some metal from the outer side. Lathe work for this detail is done.
And now my task is to engrave blades on these details. The fraise is 5mm in diameter, 1200 roundies per minute As a result of all manipulations we have. .
. such a wonder. And it's, guys, the very beginning.
Most of the interesting things are waiting for us. Making this stuff took two days of work. Half of day spent for creation of this drawing.
It was necessary to draw everything, at least approximately, to make bearing knot. I check. Let's try as it rotates, at least "approximately".
As we see, there is no beating. Meanwhile very exact processing. It pleases.
Well everything, children. The knot in assembly is ready. Here and so it smartly looks.
Here everything is already collected, with a spring. With pressing. In total as it is necessary.
Now I will sort and I will show you that there inside. We remove. Here still did not cut a carving because did not get screws.
There is a plug which enters the bearing. Here is how the spring works. I take out.
There is such plug. There is a spring. Spring inside rests against a side as here in this plug.
Here such heap of details) Compressor details are ready. The impeller is adjusted here here, very densely. Here gap of 0.
2 mm from all directions. Everything is twisted, everything is adjusted. I bore through a hard-alloy drill.
I increase an opening. Shovels all are made and numbered. In such type of a detail arrived on a welding table.
So there is a process. Roasting on the furnace to remove all residual stress after welding of a detail. Heated to such state.
Here he is an impeller. I will make a ring around and I will collect and try that turned out. Cut out a strip.
I will use rollers to make it round. It is possible to weld. The session of welding is finished.
Perfectly. Now I will collect everything. Here the turbine is inserted.
Here still there will be nozzle details, which will repeat turbine bends Also will begin everything to work as it is necessary. It is necessary to make decent quantity of details. It is flame tube, tubes of power supply of the engine on gas and on kerosene To complete supply of oil and the case.
Beautiful stainless steel. Details are ready for processing on rollers. I level a round leaf.
Carefully I prepare the place of future joint. This drawing which I made is also a template for a threading. There are openings.
Here I planned diameters what drill they will need to be drilled. Collected a design without welding. It is possible to take and look now.
My God, what beauty. Here so it looks in my execution. Тhe flame tube is almost ready One.
Two. And combustion chamber with the guide vane look so. We do vaporizing tubes here from this donor.
Here tubes heat resisting. Preparations for tubes. And it.
. . .
. (threw) It is densely inserted. It is good.
Friends, two key details are ready. Let's weld them in a single whole. Long adjusted.
I will weld. Welded on edge completely. This part is taken out Here it is separately flame tube.
At the moment such quantity of details is ready here. Чтобы сделать систему питания и подачи масла у меня есть небольшой набор медных трубок. Also I bought it (syringes).
Here they are small openings. I will try to solder tubes here now. Very well.
So, the first fiery tests. The engine is actually ready. The appearance it is almost completely created.
So this engine handsome looks. Yes, there are a lot of forces and works it was spent. Start 1 Start 2 Start 3 Start 4 Such first starts were.
Disassembled the engine. Improved the combustion chamber. There was an opening 0.
5 mm smaller here, than it is necessary. They have to be so drowned here. Also have to be large diameter.
I did not consider it when made calculations. Start 5 Start 6 So, friends, I partially once again disassembled the engine. In the last starts I already gave fuel mix with oil to a tunnel But it does not save.
I understood that the guide vane will not work. Understood how almost made it. Therefore anew I will make this part.
So, friends, already the first fast start-up with the new nozzle device. Start 7 Such feeling that somewhere there was a contact(graze) when it heated up. I want to sort, look and we will test further.
Again something went wrong. Sorted and solved still it to improve. As the engine becomes the worker, it is possible to eliminate something and more densely to twirl details.
It wedged, I turned on it the new plug(sleeve,bushing). Here she is old. The following improvement processing of the straightening device.
Rounded off corners,polished, that there was more streamline. That the compressor worked better. Also gave more than pressure.
The straightening shovels have a profile now. Made tight the combustion chamber. Made the input device with a carving.
Wow Collected such installation, I want to try start. Start 11 with cylinder with propane As you can see, works at self-sufficiency. Did not follow, overheated an impeller.
Cooled with fuel bearings, because of it there is a lot of smoke. Here so the turbojet made by me looks. Everything well rotates.
Collected gas-turbine installation. Collected the system of supply of oil. Made assignment of pressure of the case.
That is inside pressure is created by the compressor. Compressed air will come to a bottle and to pump oil in bearings. I do not know what temperature But the engine works, friends.
It is fantastic! ! !
! Made the next installation with new supply of lubricant. To 70000 it was succeeded to disperse on pure propane.
The gate opened on all. Further dispersal is possible only on kerosene. That day when we completely test the engine came.
The place of dislocation is unknown where. There is a grass which will show as the turbine blows. And nobody will prevent us here.
Let's start here. This camera will watch draft. The kerosene pump is ready to work.
Gives up to 11 atmospheres. Surely we put a mirror. Mirror not to burn the engine.
Start in the manual mode. I untwist slightly the starter. Ignition.
I switch off a candle and add gas. I add turns. The engine came to the single mode.
32000 turns 500 grams of draft on these turns. I increase gas. Drft of 1.
5 kg. The impeller is normal, nothing is heated. We give still fire 5 kg of draft, friends!
90000 turns. Oh, oil only also left. I thought thought and solved.
. . To do the plane under this self-made jet engine.
Decided to use fan jet. This small plane very well flies. like that Wow My task to somehow launch this engine into the sky.
To do some flying a little. And it will already be the finished project. It is necessary to make the plane big.
Naturally in this small model you will not put the engine. I want to increase this plane in sizes There is a drawing. There is a process of copying of profiles.
Took the sheet of cardboard. I put to a profile so that it was turned most in. All 3 profiles are copied, now they need to be increased to the huge sizes.
Look, guys, 4 o'clock in the morning and I draw the drawing. Not difficult calculations. I increased all sizes by 3.
7 Entered everything in the table. Then transferred to paper and connected them. Ready.
6 pieces. Remained 2 huge to process. Marked openings.
Openings of 28 mm. Tubes will be mounted there. We receive preparation.
Such size, friends, there will be a part of a wing. Wings are ready. Let's compare to the primary source.
Only increased by 3. 7 times. Pasted a pipe.
I will putty polyfoam. While the wing dries, I make frames on the fuselage. I use for this purpose compasses.
self-made I insert a pencil and draw a circle. Here what turned out. All frames weigh 350 grams.
Facilitated ribs of a removable part of a wing. Keel will look so. Cut out from polyfoam, pasted a tubule.
It will serve as a longeron (spar). Made fringings of a balsa. Front and back edge.
Drw a profile outline. In front the bevel angle is more, behind the bevel angle is less I spread a working film not to soil a table. Decided all fastenings to paste then.
Prepared sheets of the burned fiber glass fabric. Until it was strongly absorbed I take similarity of the pallet in polyfoam. I begin to distribute.
It is visible what becomes impregnated instantly. Fiberglass was very well annealed. So far crude, I cut the edges.
In such look I leave to dry. I cut an opening under this throw. It will serve as a front edge of an elevon.
And back edge of its fastening. In such a way it is possible to paste any strengthening in polyfoam before a covering. The plane grows heavy.
. . Gains weight.
. . And durability.
. . For management I will use 20 kg of a serva It will be basic plywood.
It is necessary to strengthen from above and from below that pulled out nothing. And on this detail from a linden the rocking chair will fasten. Already I adjust.
. . by means of a servatester.
How do these look a well? Bottom I pasted 3 mm from plywood. Serva I will attach on this panel.
Servatester has 3 provisions. One of them - average situation. On it I adjusted the middle.
Also there is such mode. . .
shows them in work. Also there is a mode initial Here it is possible to twist the handle. It is possible to saw off.
Everything is good. It is prepared for covering. I will paste over with one piece in 2 layers.
I cut out 4 pieces at once. Yes, the fiberglass consumption sharply raised, friends. It is good that not expensive fiber glass fabric.
And large supply of epoxy resin. So everything is normal. There will be a multilayered design.
Here and here (on a sock) there will be 4 layers. All covering 2 layers. Also I will lower 2 layers I will put under a longeron.
We start, friends, everything is already cut. Here such puff pie turned out at the moment. .
. Now I will cut off all superfluous. Loops will be ordinary.
I will put them much - 8 pieces. The main thing in it was put very well to impregnate with glue, because if we will just smear also we will insert it all will be squeezed out and will paste nothing. In total exactly and beautifully.
Exposed at a small angle. It is ready, friends, it is possible to paste. You look, already works from the equipment.
These are ailerons. these are steering wheels heights There are such affairs. .
. I hope, will well fly. In my opinion it already flies up) I do the channel for carrying out conducting for servo-drivers.
Soldered very long wires about 2 meters. They can already be put on the place. These wires mechanization of a wing will connect namely elevons with the radio control receiver.
It is also necessary to arrange normally all tubules that it was convenient. I will start from this party. Therefore there has to be a convenient access to the starter.
Fastened the tee, put the check valve. This tube needs to be passed through all fuselage as everything will be sewn up here. I do not know how to be with a tank?
The tank will remain inside also it is necessary to make very reliably all connections that nothing proceeded. At once I will make an exit for gas. Added durability more to a longeron.
Connected by carbon thread, wound around that in the middle did not crack. And that there was no crack that there was no loss of rigidity. Also started to a tank insert.
Pasted details in front and behind from a balsa. The drainage tube will be is removed here. Luke decided to strengthen carbon fabrics.
Laid 3 threads, now it is possible to cover with fiberglass. Smeared with an epoxy, I wait when becomes impregnated. Cut segments on top.
. . One, two, three, four and five segments.
The fifth segment is a hatch which already dries Segments from polyfoam. From below it is ready. It was necessary to make a nose.
There is a plate. Inside tank. The most interesting - the air inlet.
It is made so that air smoothly entered. And air went to the engine. Well and the input device nice turned out in my opinion.
The nose already too began to grind. I take out the plane. There was the 4th-faced design Became 8-faced.
Such smooth nose turned out. Everything, tore off. There was a glue.
It will be an integral cover. It is already ready. All superfluous will be cut.
Here made an opening under an account tank. It will be big, constantly full and heavy. 400 grams will weigh Also will positively influence centering.
The nose will need to be loaded strongly. Because very heavy jet engine will stand. Processed glue this compartment and pasted an account tank.
Inside there are a lot more fiber glass fabric layers. as in a cocoon there is a tank. It is made all for durability.
Everything turns out hermetically. Strengthened layers of carbon fiber. Now it is necessary that all this exactly dried.
Therefore here I will enclose a film Put freight Also we wait so far pitch will stiffen. Then it is possible to be engaged in the hatch and all the rest. The film easily is removed.
Plain surface. Made brains for the engine. As the pump I took the collector motor.
The brain is mix of the servo-driver and PWM of the regulator. PWM the regulator of 6-12 volts on an entrance. At the exit 0-6 to 12 How does it work?
Everything is powered from radio control. There is a receiver into which the serva is inserted On the 3rd canal on management of the engine. Also it is powered via the battery The regulator is powered by PWM via the battery too.
The equipment is already adjusted and we watch what occurs. . .
On slightly I add the trimmer and it is possible to add the gas handle. it is also possible to add gas already in flight directly and so. And you will see, the engine is so started on big turns I hope, there will be enough maximum.
Covering time has come. From above already fibreglass. Made the dryer of an aviation lamp.
Made the dryer of an aviation lamp. And epoxy does not want to dry. It fragile and it is necessary to dry it at high temperature.
Did experimental installation with a wheel. One hand I could not even press through. So far the chassis becomes we will make small tests.
We want to assemble the plane and to go And to start it in a grass. I want to adjust centering. Vigorously.
I show centering. . .
Here we take and outweighs nothing at us. Centering somewhere in this place. As well as has to be.
Here is how. What, was pleasant to you? YES The first start was, guys)))) go excellent.
It is heavy to throw it! I continue to do the chassis. After all manipulations on the milling machine and simplification, 2 details turned out.
Shaving, guys. Started assembly. I will weigh a rack.
215 grams 2 pieces weigh 400 grams Wheel about 200 grams For this reason I wanted to do without chassis because weight increases. Here on a rack I made the extender that it was possible to connect a spring. The place turns out a little therefore made so.
Here it is so calculated that the wheel goes along an axis. It is not displaced anywhere. There are 2 racks Drlled openings.
Now and this detail is ready. Installed the chassis aboard the plane This capsule will be built in here. You watch what turns out.
. . It is possible to be wrung out, friends.
I think, will sustain all this. I will do a front strut of the chassis. It will be a fork for a wheel.
After simplification this detail turned out. The rack is made with a bend The axis of a rack does not match arrangement of an opening. It is made to remove a detail there because it under an inclination And the wheel moves for an axis.
If is exactly, it would move stronger. Therefore I made a bend in this party Also I on a rotary table ground a clip under a spring. The spring is inserted easily.
Time. Fastens a small screw 4. Here it - a rack, friends.
Works. We put here and from a reverse side. Enters this detail.
It was necessary to drill an opening and thread. I cut a small carving of m3. It turned out.
In rubber openings are drilled too. It remains to pick up the screws. Well, that's all, the new wheel is ready.
Inside there is a plug. We can put on the plane. Tests of the plane with an impeller I do not know what will happen today.
We'll see. We arrived, guys. Now we will measure wind.
There is almost no wind. Today there was a calm a half of day. Now small wind.
Wind of 1. 7 m/s Everything was collected, we adjust the equipment. Radio control, steering wheel setting .
. . And setting up the elevons Let's try to roll The plane specially costs at an angle.
Flew a little bit guys wow decided to fly higher See strong - Did you check everything? -Yes Charged the batteries to the full and decided to start off. The aircraft weighs 17 kg Giant airplane in the sky huge wow first landing guys Let's look at our indicators.
The speed was 90 km / h maximum Height 108 meters. Takeoff approximately 50 2. 3 km he flew So, friends, who were interested .
. . subscribe to the channel.
Support likes. And we will paint. Bought paint and proceed, my friends, to the painting work protected shoes.
The paint will be white There is already a stripped wing. Primed keels. I will not prepare much because it will add weight to the plane To make you understand, the keel primer has added 60 grams of weight getting started This important point is coming, guys.
Take 20 liters of cerasin and pour a liter of oil aeroshel500 We get 5% oil Now we have a whole jet fuel canister The plane is ready to launch with the turbine. Turbine installed. The launch will be in manual mode.
To have less flame, put the valve. The valve, if you connect the battery, is always open But with a button you can cover it. To smoothly switch to kerosene I will need to press it periodically.
once once once once And the engine should go to idle mode and go to work on kerosene We are going on the sly. So packed the plane. Refuel.
Now go to the main. Then you need to kick out the bubble . .
Friends, jokes are over. We start. Come on!
Let go. He still flew with a homemade jet engine! Friends, this is fantastic!
Soot, has been flying for a long time. I smell kerosene Fried Fine. -Well, how do you feel, is there a craving?
-Enough to fly. The smoke is coming . .
. The engine is very hot, guys. At full throttle, he flew .
. . We must run faster!
The smoke is coming, and we relaxed here. Normally, warm. Just hot kerosene warmed up.
Everything is normal there. Oil a little there. Friends, you have been waiting for this and I did everything to make it happen.
Let not quickly, but he flew. We look at our measuring device. 0 is the speed at the moment.
161 km / h is the speed that was. Maximum. 4 is currently the height.
104 meters is the maximum height we have received. Flew 4. 5 km Everything inside is in place.
Need to turn off to the next flights. That's it, guys. Let's go home.
I will remove the turbine and put it on the shelf . . And this plane will live with other turbines.
I have 8 kg and 18 kg turbines. With them the flight will be more epic. So friends who are interested subscribe to the channel support like.
Related Videos

1:03:04
It took me 700 hours to build this gasolin...
Rocha KRG
3,367,303 views

55:30
How the Lockheed SR-71 Blackbird Works
Animagraffs
4,398,536 views
3:09:40
World top 20 DIY Motor making
American Tech
657,300 views

59:36
A Japanese craftsman who has dedicated his...
Amazing JAPAN
1,600,878 views

1:35:57
JET ENGINE FUNDAMENTALS
Nick Maverick
318,636 views

15:51
I Built The First LAMINAR FLOW ROCKET ENGINE
Integza
2,417,893 views

1:15:51
Top 6 Most Inimitable Recycling and Making...
Asian Skills Media
120,884 views
1:41:42
Truly a master craftsman's skill! Top 5 ma...
プロセスX
441,530 views
13:23
Jet Engine Evolution - From Turbojets to T...
driving 4 answers
751,358 views
48:35
1400cc DIESEL MOTORCYCLE BUILD / FIRST RUN...
BelarusCustoms
467,320 views

55:30
How a Helicopter Works (Bell 407)
Animagraffs
1,656,497 views

38:01
Watchmaking: Machining the Heart of a Watch
Chronova Engineering
752,344 views

59:28
ANODIZING ALUMINUM - Breaking Bad -subtitles
Игорь Негода
2,681,020 views
47:07
TOP 6 Stunning And Fantastic Mass Recyclin...
Mysterious Things
81,348 views
20:24
Jet Engine Thrust Test - Fuel Experiment (...
Warped
9,488,294 views
36:24
How a Steam Locomotive Works (Union Pacifi...
Animagraffs
3,667,896 views
3:19:23
🔴TOP 500 Practical Woodworking Inventions...
UWOODWORKER
2,470,771 views
8:38
Miniature Turbofan Engine Assembly & RUN!
inventor KR
2,639,797 views
54:09
I made a 3 Cylinder engine, used from the ...
Le Dan
3,629,020 views

1:13:48
Video Compilation of 5 Top Electronic Prod...
SatisFactory Process
604,150 views