Approach to the Exam for Parkinson's Disease
1.5M views3398 WordsCopy TextShare
Stanford Medicine 25
This video is brought to you by the Stanford Medicine 25 to teach you the exam to diagnose Parkinson...
Video Transcript:
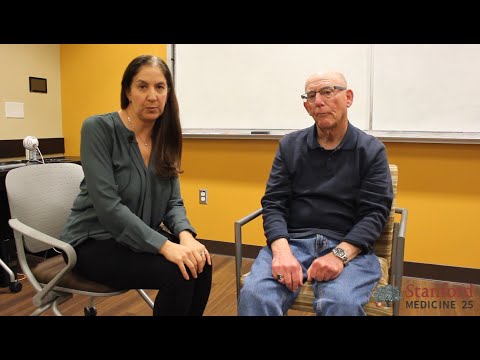
I'm Dr Kathleen Poston from the Department of Neurology here at Stanford University. I'm a Parkinson's Disease specialist, and today we're gonna be talking about approach to the Parkinson's Disease exam. I'm here with my patient Larry who has graciously agreed to be part of this teaching session.
So today, we're gonna be talking about the approach to the Parkinson's Disease exam. We're gonna be focusing on the four primary elements of the exam. The first one is bradykinesia, and it's the first and most important because you have to have bradykinesia in order to give a diagnosis of Parkinsonism.
The other three elements: rigidity, tremor, and gait and balance problems also are very important, but you don't have to have them to make the diagnosis of Parkinsonism. You have to have bradykinesia, and one of those other three. So we're gonna go through all four of the elements and break them down into their parts.
We're gonna be talking about the four main elements of the exam, but a fifth part of the exam is observation. And this is a really important piece because you want to look at all of the movements that are happening when the patient isn't performing the exam. This is when they're giving their history or you're asking questions.
You're gonna closely observe . Are there spontaneous movements? Do they have normal eye blink?
Are they fidgeting and crossing and uncrossing their legs? Are they using their hands to gesture? Do you see tremor coming out?
Observation is just as important as the interactive parts of the exam, and it should start the moment that the patient walks into the room. So the first part of the exam we're gonna look at is bradykinesia. Again, this is the most important part to catch on the exam, since it's required for the diagnosis.
When you have patients do the rapid alternating movement, it's important to have them go both as big as they can with the movement and as fast as they can with the movement. If you don't give them those instructions, they might go really big, but slow, or really small, but fast. You have to have them do both, or you'll miss some subtle changes.
You also want to look at the change in the movements. So do the movements get slower over time and do they get smaller over time? Which means you have to do enough of the movements to catch that.
Usually 10 repetitions is enough. So I'm gonna demonstrate that here with Larry. I want you to follow my instructions: tap your thumb and index finger as big as you can and as fast as you can.
Good. Let's try the other hand as big as you can and as fast as you can. Very good.
You can relax. Okay, so now we're gonna try a different maneuver. So sometimes when the patients have arthritis, they can't do the finger taps properly.
So there are a couple of different ways that you can do this. One of them is fist open close. So Larry will go ahead and make a fist for me.
Open all the way, keep going big as you can and as fast as you can. Good. And with the left hand the same thing: big as you can and as fast as you can.
Very good. Another movement you can do is pronation supination. With the right hand, put the hand out flat like that: palm up, palm down, palm up, palm down as fast as you can.
Good. The left hand, the same thing: up down up down. Very good.
You can relax. So as you see through the entire movement, there's a slight reduction in the amplitude and a slight reduction in the speed. That's what you're looking for.
Okay, so you can also look for bradykinesia in the lower extremities. The most sensitive maneuver to do is toe tapping. So what I want you to do Larry is put your feet a little bit closer to here.
Perfect. Keep your heel on the ground and with your right foot, I want you to tap your toes big and fast. Good.
And now let's try the left one. This one's a little harder. Good.
That's the most sensitive thing to do for the lower extremities. Another maneuver you can do is heel tap. With the right foot, I want you to tap your whole foot on the ground and with the left foot the same thing.
Very good. You can relax. You'll notice the toe tap was much more sensitive to picking up those differences.
So if you just have to do one, I'd stick with the toe tap. It tends to be a little bit better. So again, the three movements you can do is: finger tap, hand open close, and pronation supination.
Of those three, the finger tap tends to be the most sensitive movement. The smaller movements in Parkinson's tend to pick up the bradykinesia the most, but it's good to have the other ones available in case. Again, you either don't notice it on the finger tap or someone has arthritis or for some reason you just want to clarify to make sure what you're seeing is really bradykinesia.
Alright, so the next element we're gonna look at is rigidity. So this is muscle tone. A lot of you are probably pretty comfortable looking for spasticity, which is oftentimes what you see in patients with upper motor neuron lesions like in stroke.
But rigidity and Parkinson's disease is a little bit different. It's not velocity dependent. So whether you go slow or fast, you get the same amount of resistance.
And it's not directionally dependent, you get it both with flexion and extension. Some people refer to it as lead pipe rigidity, but it's usually not that tight. A lot of times it can be very very subtle early in disease or when patients are well medicated, you're not going to notice it.
So I'm gonna teach you a activation maneuver to bring out subtle rigidity that you might need to catch if you're just diagnosing someone new. So the key thing here is getting the right amount of relaxation, which we all know can be very difficult. So Larry, I want you just to relax your arm as much as possible, and I'm literally holding the weight of his arm in my hand.
I can feel the weight of the arm, so I know he's really relaxed. The most sensitive place to look for rigidity is actually in the wrist. And so I'm gonna do a circle wrist maneuver while I'm holding the arm, and again, this is completely loose.
I don't notice anything, so I need to do an activation maneuver. Larry, with your left hand, I want you to tap on your knee. Right there.
Nice big taps for me. Big big big taps. And there.
That's when I catch the rigidity. I can also catch it in the elbow here a little bit, but I have to do the activation maneuver because his medications are working so well. With the lower extremities, it can be a little bit more difficult.
So a way to get the patient relaxed is to literally put the weight of their leg onto your arm. And here I can tell that he's completely relaxed. Again, I'm gonna look at the ankle movement, and I'm gonna look at the knee movement, but this is completely loose.
So I'm gonna have him do an activation maneuver. Larry, with that left hand, can you do nice big taps on your knee for me. There.
And I catch just a little bit of resistance to the movement with the taps. Thank you. So when you're doing rigidity testing, there are a couple different things that you're feeling for.
The basic one is just resistance to the movement. What you're gonna try to do is get a full range of movement. So here, I'm just gonna take your arm, have me relax it, and I can see that I can get a full range of movement.
And there's absolutely no resistance to that whatsoever. I can get nice full movement here with no resistance. Rigidity, you're gonna feel that resistance to the movement, so you still might get a good range but there's a resistance that you feel.
With that left hand, tap nice and big for me. And here it's just a little harder for me to get that full range of movement but I'm able I'm able to get it. Go ahead and relax.
Sometimes you'll feel a tremor within the rigidity. People refer to that as cogwheel rigidity, and all that is is the tremor superimposed in the rigidity. So if someone doesn't have tremor, you don't get the cog wheeling.
So then the next element of the exam is tremor. So there are a couple different ways that you look at tremor. The first one is rest tremor and remember we've been observing during the entire exam to see any tremor, but you actually want to get the patient's hands in a better position.
And that's sort of in on the side where they're relaxing their hands a little bit more. The reason for that is that they can actually do things to suppress the tremor by the positioning of their hands where they can hold their hands, put their hands on their lap, even sit on their hands, and you might not see tremor. We'd want to just observe here while we're talking to him or doing other parts of the history or the exam to see whether or not we get any rest tremor.
We basically would see a small movement in the thumb, or in the fingers, or rotational movement might come out while we're in this position, but this is a good position to look for hand tremor in. The next thing we want to do is look for postural tremor, and the way we do that is we have the patient put the hands in front of their body like this. Spread their fingers wide and hold them up there for a few minutes.
Postural tremor doesn't always come out immediately. Sometimes, it reemerges when the hands have been out for a few seconds. The third maneuver we do is action or kinetic tremor, and this is looking for tremor during the continuous movement.
And we use finger-nose-finger most typically for this one. So to look for kinetic tremor, I'm gonna have Larry take his index finger and touch my finger and then touch his nose and then touch my finger and nose-finger-nose-finger-nose. Go ahead, you can relax.
So a couple things there. I'm having him reach his hand completely out because that will bring the tremor out more. I'm keeping my hand in a fixed position, so I'm not trying to see whether he can touch it in space.
That's more of an ataxia part of the exam. What we're- I'm really just focusing here on his tremor. I also need him to go slow enough that I can actually see the tremor, so I'm not trying to have him go as fast as possible.
You might actually miss the tremor if you have the patient go too fast. So when we're doing the kinetic tremor. Let's go ahead and do it one more time with your left hand.
Touch my finger nose. This is how we do it for the Parkinson's exam to see the kinetic tremor. If I was worried about ataxia, I might do the maneuver a little bit differently.
I'd actually move my hand around in space and have him go back and forth to see whether he can hit the targets. Let's try that version of the finger nose finger exam. With this finger, touch my finger and follow it around.
Very good. Parkinson's disease is more common to have rest tremor with less postural or kinetic tremor, and patients with essential tremor classically have more postural and kinetic tremor and less tremor- less of the rest tremor . There's so much overlap between these types of tremor.
PD patients who have rest tremor usually have some postural and kinetic tremor, so the gait and balance part of the exam is really important . Because oftentimes you'll notice some changes in bradykinesia, rigidity, tremor on exam, but it's not really bothering the patient. And if it's not bothering the patient, you won't necessarily change your medications or do any intervention.
But if you see changes in the balance and gait part of the exam, you probably want to at least do an intervention of physical therapy. If not, rethink about your medications. And the reason for that is that if you see patients who have more difficulty with their walking or some balance problems, that obviously puts them at higher risk for falls, and you want to be more in a preventative mode.
So this is one of the most important parts of the exam from Parkinson's Disease: fall prevention perspective. So there are three different things that we're gonna look at here. We're gonna look at standing up from the chair, we're gonna look at just free walking, and then we're gonna look at balance with a provoked pull test maneuver.
So when we look at standing. What I want to see is can the patient stand from the chair without using the strength of their arms? So to do this, I have them put their arms over their chest, and then try to stand up in just one movement.
Very good. Excellent. Go ahead and have a seat.
Notice I kept my arm behind the patient just in case he had some difficulty standing up and he fell back into the chair; he wouldn't hit his head against the wall. If the chair's next to the wall, that can sometimes happen, so you want to make sure you always have the hand behind the patient when they do that just to make sure it doesn't happen . So the next part is just walking, and really this is just watching the patient walk back and forth up and down a hall.
It's best to have at least 10 feet of hallway to really get a good enough walk, but you want them to walk back and forth several times observing the turns, observing the step length, seeing if there's asymmetries between the steps, looking at the heel strike. Are they picking their toes up or are they shuffling and scuffing their foot? And you want to look at the arm swing.
So what you might see is an asymmetric step where they're kind of a flat foot on one side and a heel strike on the other, or they might just be taking small shuffled steps like that. So you want to look at step length. You want to look at the heel strike when they're walking.
And again asymmetry is oftentimes helped. Which you also might notice is arm swing. What you might see is an asymmetric arm swing where the person is swinging one arm, but not the other, or you might see no arm swing at all.
So let's go ahead and do some observation here with our patient, Larry. And here's an example of symmetric step and reduced arm swing. And here's an example of some shuffles from Parkinson's.
So the last part of the gait and balance exam is the pull test. There's a lot of misconceptions about this test. What a lot of people think it is is that I pull the patient, and it's abnormal if they take a step or two.
That's not what you're looking for. I can actually pull anyone hard enough that they would be forced to take a step. What I actually want to know is that if I pull someone off their center of gravity, can they correct their balance in one or two steps?
As we all know, as people walk around the normal world, they're gonna get a little off balance every now and then and again. And what happens is that when someone gets off balance, they can usually take one or two steps to catch themselves, but they're at risk for falling if they can't do that. So what I'm looking for is whether or not someone can be pulled off their center of gravity and then catch themselves in one or two steps.
When I do this test, there are a couple of key things. First of all, I always make sure there's a wall behind me. You never want the patient to catch you off-guard, lose their balance, and then they fall on the ground.
If something happens and the patient gets off balance, I grab them and we both fall into the wall, and no one falls onto the ground. And it's a really safe way of doing this, so that nobody gets hurt. The other thing I do is coach the patient and make sure they understand what I want them to do.
So Larry, I'm gonna give you a tug backwards on your shoulders, and what I want you to do is take one or two steps back to catch your balance. The first one's gonna be practice. On the count of three, step backwards.
One two three step. Perfect, that's exactly what I want you to do. This one's real.
I'm gonna give you a tug. I'm gonna want you to take one to two steps to catch yourself, and I'm right behind you. I won't let you fall.
Ready? Good. Now I'm gonna pull you a little harder.
Good. One more time. Excellent.
So as you can see, Larry was able to catch his balance in one or two quick steps. If someone takes more than that and their center of gravity gets too far, they might take three or four or five steps, but still be able to catch their balance. But that makes you a little worried that they might be at risk for falling.
Other patients might take a couple short steps, but their center of gravity gets so pulled off that they can't catch themselves and you need to stabilize them in order to keep them from falling. Those are things that you're looking for on the exam. So we've looked at the movement disorders exam, and we really use this exam to understand how the patient's doing, not just for diagnosis, but also when we're following them over time.
We look at this whole exam and how it changes, and we make a lot of treatment recommendations based on what we see. But the most important question isn't just do I see bradykinesia, rigidity, or tremor on the exam? It's how those things are impacting my patients' day to day life.
So if I see worse tremor today or worse bradykinesia on exam. If that's not having an impact on Larry's life and he's able to do everything he wants to do, I won't necessarily change the medications at all. Because right now, these are just symptomatic medications that help patients improve their symptoms, but it doesn't change the disease course in general so we just treat symptomatically.
We're a little more aggressive with gait and balance. We want to be preventative, and so physical therapy is critical. But even before there are any gait and balance problems, it's really important that even initially when the patient's diagnosed, they get into an aggressive physical therapy or exercise program.
Exercise helps to improve patient's gait and balance before they have any problems, helps to prevent falls, and there's some suggestion that it might even help to slow the progression of the disease. Well, thank you for watching this video on Parkinson's Disease exam. And Larry, I want to thank you specifically for being part of this, and for helping us teach all of these students and physicians about the importance of the Parkinson's Disease exam.
And if you want to learn more about Parkinson's Disease or other important exam skills, please visit the Stanford 25 website where there's lots of great information to learn about Parkinson's Disease or any other exams that you want to learn.
Related Videos

5:05
Cerebellum Examination (Stanford Medicine 25)
Stanford Medicine 25
1,115,362 views

52:11
Parkinson's Treatment: 10 Secrets on Vital...
Norman Fixel Institute for Neurological Diseases
363,340 views
23:34
Demonstration of Teaching the Reflex Exam ...
Stanford Medicine 25
236,579 views

48:18
Lesser Known Symptoms of Parkinson's Disease
Greenville Area Parkinson Society
415,943 views

25:11
What is Parkinson's? (Explained)
Parkinson Voice Project
70,679 views

15:16
Is Parkinson's Becoming a Pandemic? | The ...
TVO Today
2,396 views

1:35:22
Neurologist Reveals the SHOCKING ROOT CAUS...
Jesse Chappus
1,076,319 views

26:07
The Parkinson's You Don't See: Cognitive a...
Davis Phinney Foundation for Parkinson's
1,247,805 views

48:08
Pain and Fatigue in Parkinson Disease - 20...
Norman Fixel Institute for Neurological Diseases
461,250 views

26:29
Neurology - Topic 12 - GP - Clinical exami...
UCD Medicine
113,377 views

53:44
My Father, My Brother and Me: The Quest fo...
FRONTLINE PBS | Official
311,685 views

28:57
Morning Medical Update - New Parkinson’s T...
The University of Kansas Health System
22,898 views

24:28
A Ketogenic Diet for Parkinson’s Disease: ...
Nick Norwitz
49,312 views

22:42
Managing hidden Parkinson's symptoms
Parkinson's UK
233,721 views

41:12
Latest in Parkinson's Medication & Pump Th...
Norman Fixel Institute for Neurological Diseases
9,517 views

20:11
Understanding Off Episodes and Dyskinesia ...
Access Health
100,805 views

1:13:57
Michael Okun - Ending Parkinson’s Disease:...
TheIHMC
52,226 views

1:16:03
J. Eric Ahlskog - Parkinson's Disease Prog...
Parkinson Association Santa Barbara (PASB)
5,367 views

8:55
Diagnosing Parkinson's Disease by Dr. Stev...
Stanford Medicine 25
138,619 views

1:10:57
🔴 "I Ate ONLY ONE Food And My Parkinson's...
Anthony Chaffee MD
533,155 views