The Easy Way to Draw Hard Poses
134.8k views1757 WordsCopy TextShare
Proko
FREE eBook on Rhythms! Get my handy guide teaching you how to draw the rhythms of the body - https:/...
Video Transcript:
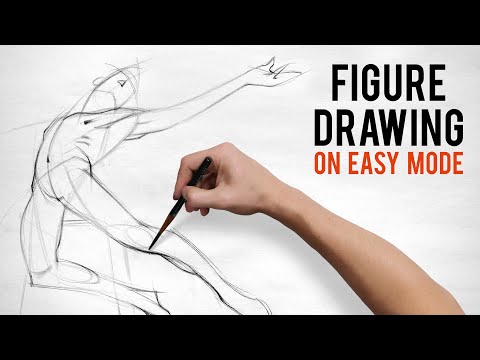
This extreme angled pose is gonna challenge your understanding of foreshortening and rhythm. I'll show you how to capture the dynamic action while keeping accurate proportions. We're gonna have to pull out several tricks and techniques to get through this one.
We got a very exciting pose here. Difficult but exciting. So, what makes this one difficult is that we're not seeing the full length of the torso.
We're talking about a little bit of perspective here. Okay, head. Little oval.
Now, he's looking up. We're seeing the bottom of his jaw quite a bit. So, we're seeing some of that triangle or that little sweep this way, right?
Like this. There's a little center line and then look at how close the tip of his nose is to the top of his eyebrow. That's how much perspective and foreshortening can move things around.
And look how low the ear is. By the way, I just released a free PDF ebook and that includes all these head indications that you can use as templates while sketching. The ebook is a handy little guide on drawing rhythms of all the body parts from any angle.
So, you can download that for free from the link in the description. Okay, and then a rhythm for the neck this way. And we're not seeing the neck on this side, instead we're seeing the chest and the shoulder.
So, right from here, I'm just gonna find that angle, ignoring all the bumps. I'm seeing a lot of waviness to the muscles and stuff. Just ignore it for now, let's just get that placement in.
Now, I'm doing it lightly because maybe later I want to add a few indications of some of those muscles. But for now, no way, no way. I'm just drawing through these forms All the way up to the hand, like so.
Okay, so now I have to do the torso but it's so foreshortened, meaning because it's going away from us, the length of the torso is being shortened. It's really important for me to figure out how long is it visually. It's really short.
If I measure the distance from the top of the chest here, down to where the leg is kind of intersecting, that length is pretty much the size of the head. It's like here, crazy. And then but I mean, horizontally I'm way off.
So, it looks like it's just like over here. So, just now finding this rhythm. I'm seeing it going through the armpit and over this is a rhythm I'm kind of just making up specifically for this pose.
There's a really good example of that where I'm ignoring this arm and I'm just seeing a nice rhythm where the lat goes into the armpit and then we can pick it back up with this shoulder curve. Really nice, unique rhythm to this pose and it helps me find the placement of the rest of the torso. And actually, the fact that he's wearing underwear or thong or whatever that is, is helping me because it's giving me a nice angle.
Look at that, it's going over and then a nice rhythm over to the other side of the hip. You usually won't get that easy of a hip angle kind of just given to you. You usually have to look for anatomical landmarks to figure out, you know, how do those two hips relate.
And so, you have to kind of know a little bit more anatomy. You have to be able to see you know, know what you're looking for. It's helpful to know the anatomy.
Sometimes it's pretty easy to just be like "there's the other hip". You know, you know where the bones are usually and you can feel it on yourself. But this line visually there for you, it just shows you how steep it is, okay?
And then this chest comes out and over like that. I mean, look at that shape. It is so different from a typical torso shape.
It's very compressed. And so, if you are trying to get accurate proportions as you're doing these, which you should, you're gonna have to really look for these key marks and connect them with the rhythms before you think too much about the flow. It's difficult to do them both at the same time.
That's why I look for the placement first and then I connect them with the lines. Right now, what's going through my head is I'm trying to decide which leg to jump to. I'm gonna jump to this one because this angle is a lot easier for me, it's a lot clearer.
It's just kind of like down to here. The length of that seems to be like similar to that. I'm just I'm not even measuring, I don't want to measure.
I'm just visually going off like yeah, something like this and then find that curve. Yes. The knee here, we're not going to be able to get away from that.
Trying to just curve it right through, you're going to lose some accuracy. I'm definitely putting that knee corner in and then where does it end? Well, I know the angle is like this, somewhere like right there is where the toe is.
And with this one, I could curve it all the way through, but those toes are curving so much that I think I actually just want to capture that tension in the toes. Right here at the ball of the toe, the big toe, I want to capture this. You see that shape?
That built up energy in there. Straight against the ground. Again, very similar to what we were doing with the seals.
This is just an abstract little shape. Like if I cover that up and we don't look at anything up here, like what is that? That doesn't look like a foot at all.
It looks like a nice curvy shape but it doesn't look like a foot. Probably won't even look like a foot even after we add the heel on. But once you attach it to a leg, it will definitely be a foot.
Sometimes if I really want to get fancy, I'll even put a big toe in there. I'm probably compressing this too much, like I feel like I squished it all but whatever. Okay, I'm gonna ignore the calf for now.
I want to move along. Ignoring the hamstring, even though it's large, it's really overpowering this. I'm gonna be disciplined here and just find the flow.
Okay, so right through here. This is where I want to lead or end that toe. It's where the toe is right up against the ground.
So, I know the knee is here, the toe is here. Well, let's get the foot in and the shin. Voila!
Got a nice curve straight, corner straight. Sometimes I'll just look at a leg and I'm like "man, I really I'm feeling like by removing that completely, I'm just missing something". It just feels like there's a missing muscle.
Sometimes it feels good, sometimes it just feels like it's missing. So, when it does feel like it's missing, I'll add it back in and like we saw earlier, because you still have these outer points connecting like this, you still have that inner curve, It feels like it's flowing with the overall rhythm. One thing I didn't do, which kind of mad at myself that I didn't, is put a center line in early.
The center line starts in here and then it kind of wraps around. We're not seeing the center line between the pecs. The pecs are just way back behind because we're really low.
The camera is like almost at the ground looking up and then the chest is pointing up and so we're not seeing that side. So, I'm going to start the center line here and then bring it right through into here, right between the two legs. And find a nice simple curve and make sure that the neck follows a similar curve.
I want all of this to be flowing together. Okay, let's get the arm in. Okay, so see how I'm combining all of this whole mass here, separating the pinky because I felt like it was important enough to separate and then the thumb obviously is, you know, it's usually gonna be a separate form.
But the arm itself is a very simple C-curve, there's not much to this one. Nipple. I don't just put a circle, I try to find a direction to it.
The direction is basically like which way is the pec muscle stretching. If it's not stretching, if it's very just kind of relaxed, I'll either do horizontal or I'll do it at the angle of the torso itself. So, I'll just try to figure out what's the gesture of this area, what's the motion and help that motion with the shape.
Same thing that I do with the belly button, right? That will motion that way. Maybe just a few fun details.
Oh, one more thing. Sometimes when you have some kind of structural support like a chair, I do like to include that because on its own, it looks like he's falling or something. Like he's on his feet but or all the weight of his body is over here and so it looks like he's flying forward, which actually isn't bad.
That looks kind of cool. I kind of enjoy that. But if I want to show that he's actually just resting on a chair or well, I'm going Once again, I have a free ebook that you can download now from the link in the description.
It's a really easy guide to rhythms that you can use for each body part to capture dynamic poses. It's free but it's also part of the drawing basics course at proko. com/drawing.
Premium students of the course get access to extended lessons, additional demos, projects to help you practice and get good at the stuff and critique videos to help you identify things to improve. The full course covers all the fundamentals that you need to start learning the visual language and be able to draw anything from reference or from imagination. Please help support the creation of more free videos like this by enrolling in the course at proko.
com/drawing and if you enjoyed this lesson, tell your friends. Thank you all, I'll see you next time.
Related Videos
6:08
Thinking in 3D
Proko
285,880 views

15:24
Draw ANY Pose From ANY Angle
Proko
340,445 views

13:35
How to Combine Gesture and Anatomy
Proko
423,998 views
19:31
The 16 Line Gesture Method
Proko
40,533 views

29:00
Breaking Technical Barriers in Drawing
Proko
201,048 views
15:20
4 Professional Techniques to draw Perfect ...
Draw like a Sir
78,870 views

14:55
How to Draw Gesture - Step by Step
Proko
2,211,008 views
15:02
The 11 Steps to Great Gesture Drawing
Love Life Drawing
351,021 views
31:06
How I sketch poses from imagination!
qrbits
73,350 views

31:34
How To Draw Heads Using The Loomis Method
David Finch
1,026,173 views
18:52
How to Master Structural Gesture
Proko
152,313 views
19:35
Draw Better Hands Now
Marco Bucci
1,906,699 views
37:52
How To Shade Anything
Brent Eviston
698,239 views

17:52
How to Draw Arms and Legs From Any Angle
Proko
216,030 views
16:21
Draw ANY Pose in 1 Minute! Gesture Drawing...
Jess Karp
283,204 views

38:37
this is the easiest way to draw from imagi...
brokendraw
80,742 views

18:22
Drawing Heads - Just Get These 5 Things
Love Life Drawing
81,485 views
40:58
You Don't Need Talent.. I'll Prove It!
Proko
102,241 views

11:27
Step by Step Gesture Drawing
FORCE with Michael Mattesi
11,264 views
21:37
Break Out of BORING POSES
David Finch
171,631 views