Perfect exposure and colors every time.
68.54k views1569 WordsCopy TextShare
Blaine Westropp
F1 Film Emulation: https://juiceboxstudio.store
This is how you get perfect exposure and colors out ...
Video Transcript:
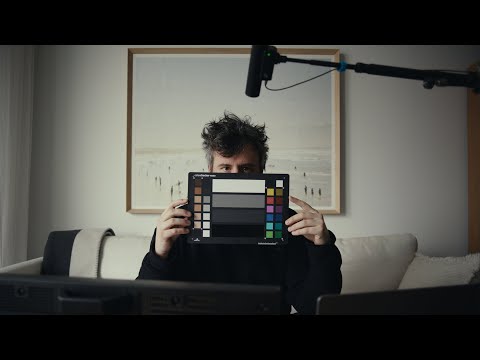
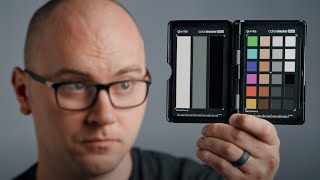
you know how when you don't have something or you start doing something that you haven't done or you get something that you haven't had and you realize how could I have ever lived without this thing there's a couple things that I have had that experience with and this is one of them I've known about this forever I've used it a million times but I used it the other day in this room right here and it really hit me how quick it made the colors perfect so I want to show a couple ways to use this
that you might not know and how to get your exposure and colors to a perfect starting point in post and in camera right now we can see this clip as it was shot on the camera and with the color chart so I didn't set the white balance in the camera it's daytime outside so I set it to 5600 Kelvin and that's usually what I do there's no tint or anything but there's green cast coming through the windows we can see how green the image is right off of the camera so I just want to show
you a couple things in the in the workflow of doing this first I will white balance to this this looks good right here I have a look on the camera and that's the same look that we will look at in post but for now we have our white balance set so that's a good starting point but we will also see our white balance set and utilizing the color trecker in post we can see that the exposure changed there and I want to show you a perfect part of this workflow that you should use that you
probably aren't using that helps out tremendously so there's two approaches with the exposure we have the white balance set we can toss this in doesn't have to be in focus and there shouldn't be any glare on the bottom so that looks good and that will do for what we need to do and resolve in a lot of scenarios I overexpose we're a little bit Overexposed right now wide open on the lens and no ND so I will just check and there's no clipping in there so we're good there I don't mind that we're Overexposed because
I like to bring it down to just make a bit of a cleaner image but if we wanted technically accurate exposure we could bring this up and this will be different on each camera but I'm going to turn on false color and we want this one green and I'll just do this through the iso but I'll drop our ISO until that turns green sorry I said this one but we want this one that is the middle gray and we were One Stop Overexposed so we went down to a 400 and this on the monitor right
here is looking like accurate exposure what it looks like off of the camera and with the color checker so we can see our exposure didn't change much there I'm going to overexpose and go back up to 800 and I will throw this in here one more time and I will see you in Da Vinci resolve this is the first instance of the color chart I have a look on the timeline and this was when the camera was just at 5600 Kelvin so the first thing that we'll do keep in mind we are working underneath a
Rec 79 L the first thing that we'll do is select the same color chart as we have here and if it doesn't automatically come up here I'm going to click color chart and just get this to line up with this chart I want to stay in log C in this part of the process I want to make sure that footage still stays in the same format that it was shot in in terms of color and Gamma so we will select source as a log C and our Target as log C and our Target as Ary
Alexa and I'm just to click match we can see what that did so this was before we adjusted our exposure and before we adjusted our color temp it brings down our exposure and balances out our Colors by default this is set to 6500 which gives good results but we can see what 5600 looks like and that kind of warms it up a little bit but I'm going to go back to 6500 and we will move forward a little and we can see with the click of a button in a room that has green coming through
the windows how quickly this gets us to A Perfect Exposure and perfect colors also this is just with the standard a 709 look okay now we're to when we wi balanced I will disable this correction and we can see this is where we were before and then we wipe balance to here and then threw up the chart and I will just make sure this is still matching up enable it and hit match two more more things to look at and the last one is probably the most important for this workflow we'll first look at when
we reduced our exposure so this is when we reduced our exposure to get accurate on middle gray and I will line this up enable it and hit match so we can see that we were spot on here by exposing to Middle gray no exposure changes but we can see the color change so if we were to hit accurate exposure with a gray card every single time we could still benefit from using the color chart to get us more accurate colors I never operate in a way where if I'm moving from one place to another that
I'm putting in a gray card to get the exposure right in all digital cameras now you can be above and below your accurate exposure by multiple stops and be totally fine I typically overexpose and then have it brought down in post so I am making things look good to my ey in the monitor or overexposing or shooting with a l in the camera that makes the exposure look lower but really I'm Overexposed so bringing this out bringing this color Checker out and exposing to Middle gray is not a part of my workflow so to not
have the color Checker adjust your exposure when your exposure was not perfectly on middle gray you can do this so I will disable this I will add a node before and this is just going going to be our exposure node I'm going to map it to the Alexa and I'm going to do our color Checker one more time this will as we have seen expose the camera to where it thinks is proper which is spot on and we have this exposure so what I want to do is take a still of that command shift G
and then I'm going to turn it off and then I'll bring up our still and in our HDR I will match our our exposures there looks good and I will turn off the still turn back on the color Checker and hit match so now we have a scenario where the color Checker is just changing the colors and not the exposure so we can have control over our exposure in one node instead of having the color Checker adjust the exposure and having us adjust the exposure because for example if I'm here and let's just say I
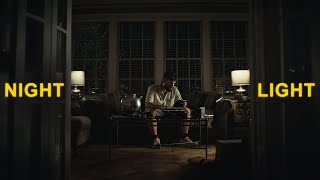
wanted this to be darker but the color Checker already did an exposure adjustment I'd rather have more precise control and just one node as for the overall exposure and I can move this around how I want here without battling against this one so the light has changed a little bit outside I will add this in one more time hit one button and resolve and be looking good and I'm holding a lav mic to my mouth despite my last video but here's a scenario where it's just house lights there's a light light on outside of the
bathroom studio and a light on inside so we'll see how much daylight we're getting and these are just house LED lights so we get a little bit from the one out here and a little bit from the one in here I have set the camera to 3200 Kelvin with no tint and on the monitor this looks fine but we need the colors to be accurate and sometimes when you're in a certain lighting scenario your eyes adjust and might everything might look normal but it might not be so I will place this color Checker in here
and I'm just going to tilt it a little bit to make sure that there's no glare on that bottom and we'll see how that looks and I want to shoot one more pretending that we really messed up at 5600 and we'll do the same thing place this in hope that there's no glare and we should be good there okay I think that's it for now peace
Related Videos
16:58
The film look, with a film camera.
Blaine Westropp
70,251 views

13:20
How Cinematographers Set Their Exposure
In Depth Cine
280,923 views
13:34
Things to know about color grading.
Blaine Westropp
14,250 views
14:56
how to fix it in post... lazily
Blaine Westropp
10,962 views
33:22
X-Rite (Calibrite) ColorChecker Video Tuto...
Korro Films
30,925 views
34:34
How to Use a Color Checker Passport Photo ...
Mark Wallace
26,016 views
9:15
Nail Your Exposure Every Time
Mark Bone
113,886 views
9:26
Know your camera.
Blaine Westropp
5,616 views
13:39
Get Perfect Color and Skin Tones With This...
DSLR Video Shooter
378,250 views

20:03
I’m 40. If You’re a Filmmaker in Your 20’s...
Luc Forsyth
35,110 views
12:19
Lighting night interiors
Blaine Westropp
23,767 views
11:28
Nailing Exposure Perfectly Every Time in V...
MarkusPix
54,099 views
12:02
Power Windows in Davinci Resolve
Blaine Westropp
29,852 views
11:17
GET THE PERFECT EXPOSURE every time.
Simon d'Entremont
409,483 views
14:29
The Secret to Cinematic Exposure (Game Cha...
Jared Films
433,431 views
8:33
This free tool changed my Color Grading fo...
Yuval Aloni
86,952 views
1:02:50
Every Hollywood Colorist Uses This (Live t...
Cullen Kelly
18,761 views
35:14
How To Color Grade Like a PRO
Jimmy on Film
18,937 views

12:49
Your Color Grading Sucks, Not Your Footage!
Sightseeing Stan
69,080 views

8:01
This SIMPLE White Balance Hack will transf...
Sam Holland
89,196 views