OpenAI Realtime Voice API: A 7-Minute Getting Started Guide
26.68k views1473 WordsCopy TextShare

Developers Digest
In this video, I guide you through setting up the new OpenAI real-time API, which promises new inter...
Video Transcript:
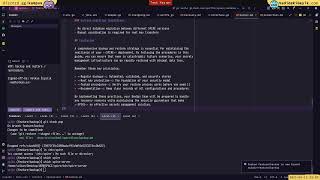
in this video I'm going to be showing you how to get started with the new open aai realtime API by the end of the video you'll have an idea on how to set up this repo and begin to play around with an application and a potential idea that you might have for using the new capabilities with this realtime API open eyes realtime API opens up a lot of possibilities for developers to create interactive applications you can interact with it without even pressing any buttons like you would with potentially other that were out before this and the interesting thing with this is especially within the application they really illustrate exactly how it works the difference with this API is it's actually set up with websockets if you look within the interface here you see the client and the server here you can see this number increment that number incrementing is sending all of the little packets across the network of everything that I'm saying that as soon as I stop talking the network already has that whole payload that it can begin to process that's really interesting using websockets for this API allows for Real Time two-way interaction which is great for applications that require instant updates now the other cool thing with this application is it also demonstrates how you can use function calling if I say something like what's the weather in New York City it sounds like you can trigger a function call to get the weather information for New York City would you like me to demonstrate by fetching the current weather there yes the current temperature in New York is 17. 4 De C with a wind speed of 9. 7 kilomet hour now the other thing that's really cool with this is you're able to have a stateful API before this what we would have to do is we would have to continually send in the state of the chat completion essentially the chat history of all of the different messages so that the llm would have the context of what was previously discussed but now since it stores the state you're able to say things like yes to the previous questions and it understand what it's talking about so if I say what's the weather in Toronto as well as set some memory for my grocery list tomorrow to pick up apples bananas and oranges so we have the weather in Toronto and then we also have this set memory function this is a great starting off point in terms of starting to learn how to use this real-time API one thing to know with this is that this application does still require additional steps if you're looking to deploy this this is really going to be something where you're going to have to add some layer of authentication to be able to actually deploy something like this and in an upcoming video I also plan to show you how you can use something like this in a more production environment if you're interested in that just stay tuned to the channel I hope to put that out over the coming week or two so the first thing that we're going to do is we're going to get clone this repository and then once we have it I'll just go within the directory here and then I'm just going to open up this within a new cursor workspace here we'll open up our terminal and what we can do from here is we can go ahead and pnpm or npm install everything and while that's installing what we can do is we can set up a EnV what we'll need is an open AI API key so we can just open AI API key equals and then to get your API key you can just head on over to their platform you can go to dashboard and then on the left hand side here you'll see API keys so once you have that you can paste it in here now the other thing that we're going to set up is a relay server and this is going to be how the back end of our application communicates with the websocket connection from open AI here we're going to set it to Local Host 8081 but you can change this out to whatever your relay server is or if you have it on a different port and what have you once you've saved that out you can go and start the front end of your application so you can npm start there we go we have our front end working and then to run our backend we can just pnpm run relay and then we see it's listening on Local Host 8081 and if I go back to our application now that it's all wired up we can test it out we can click connect here hello I'm here and sounds like you're testing the connection can you hear me okay set within memory to buy eggs tomorrow all right I've set a reminder for you to buy eggs there you see that it does have the reminder within the Dom element there and now if I ask what's the weather in Chicago it seems like I'm unable to retrieve the weather information right now would you like to try again later the interesting thing with this that I have noticed is sometimes the function call output comes after the assistant has already responded that's one thing to be mindful of with the websockets is sometimes the function invocations can take a little bit of time and if it triggered to respond back it might not have the context until I ask it again so now if I ask what's the weather in Chicago the current weather in Chicago is around 17.
9 de C with a wind speed of about 10. 6 km per hour that's just something to be mindful when building out your application in terms of next steps there is some good information within the read me here within here you'll be able to see how it's streaming back the audio but probably more importantly what a lot of people will be playing around with and setting is how to add their own function calling capabilities here is how we append tools to the websocket connect and what you can do here is you can just establish with natural language what the function call is doing and in this case it's using a free no API to get the weather endpoint and then it's returning that payload in terms of next steps this console page.
Related Videos

8:03
GPT-4-Vision: Convert Screenshots to Code ...
Developers Digest
26,353 views

29:52
OpenAI Just Changed Everything (Responses ...
Dave Ebbelaar
48,451 views
54:08
TEST
Vadideki Geyik
10 views

3:32:55
OpenAI Assistants API – Course for Beginners
freeCodeCamp.org
665,854 views

7:33
Client Side Tool Calling with the OpenAI W...
Cloudflare Developers
40,698 views

19:40
How to Build an AI Agent Using OpenAI Real...
Bo Sar
15,065 views

29:46
OpenAI DevDay 2024 | Multimodal apps with ...
OpenAI
34,038 views

20:43
How to build a real-time AI assistant (wit...
Underfitted
71,799 views

10:53
Using OpenAI Realtime API to build a Twili...
TwilioDevs
54,792 views

39:41
my local, AI Voice Assistant (I replaced A...
NetworkChuck
860,403 views

1:27:58
AI Dev 25 | Justin Uberti: Introduction to...
DeepLearningAI
1,365 views

14:05
OpenAI Realtime API - The NEW ERA of Speec...
All About AI
49,236 views

28:05
How ANYONE Can Use OpenAI’s New Realtime A...
Mark Kashef
5,422 views

19:39
How to Connect OpenAI’s Realtime API to a ...
Mark Kashef
4,173 views

17:04
Realtime API with Tool Chaining. ADA is BA...
IndyDevDan
48,098 views

17:50
Tool Calling in React Native with the Open...
Supabase
5,929 views

24:50
Part 1: How to Build an AI Voice Agent usi...
Bart Slodyczka
49,963 views

25:54
Make An AI Agent with OpenAI’s Advanced Vo...
Adam Lucek
2,466 views

11:00
Using OpenAI Realtime API to build a Twili...
TwilioDevs
24,561 views

4:21
Real-Time AI Notes (OpenAI's New API is IN...
Creator Magic
56,698 views