How to build a cable-free dream desk
2.44M views2391 WordsCopy TextShare
Run The Joules
I needed zero cable clutter. So I made it happen with a few mods. If you found the video helpful, co...
Video Transcript:
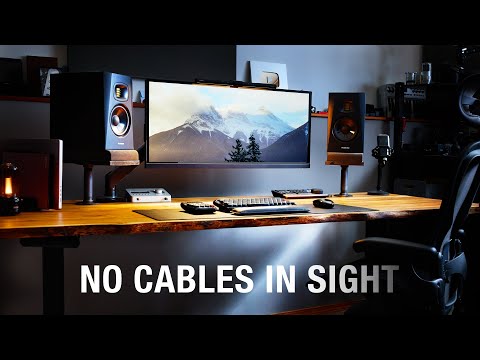
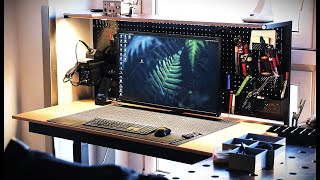
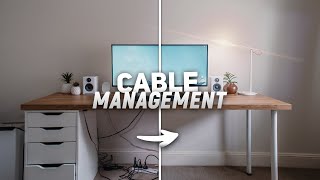
that desk behind me is made up of 17 pretty long cables but with a few simple tricks I figured out I've made them all invisible all while at the same time making an incredibly functional desk with zero compromises so let me show you exactly how I did it [Music] I Am Naturally kind of a messy person any kind of tidiness that I could lock down is a good thing for me and maybe you can relate so if you ask me the two biggest things that clutter up a person's desk are the Monitor and the audio
monitors but I'll just call those speakers from here on out I've got both of them lifted off the desk which visually makes a huge difference and gives more room to work and two you can't see any cables so let's start with the speaker stands first so I'm sure you figured it out by now I have run the cables through this pipe down underneath the desk and that that's going to be a running theme throughout this whole thing and so once I figured out exact placement for the speakers on my desk I drill the holes into
the desk itself and went out and bought these one-inch inner diameter pipes now these are just from the hardware store these aren't anything special and they came in that sort of raw silver metal color and so I went out and got some I think it was Rust-Oleum just some like matte black paint that I knew would help with any potential rust in the future I sprayed them black cut some pieces of wood that were roughly about the same size as the speaker itself and put a hole in that as well so I went and got
a few custom cables made from a company called Pro Audio La down in LA and I also bought a replacement power cable off of Amazon that had that 90 degree Bend and so both cables on the back side take an immediate turn and go straight down under the speaker and then down through the pipe under the desk and even with that one inch inner diameter I still had to shave just a little bit off the ends of the power cables to make sure everything fit through properly and I really tried to cover my bases here
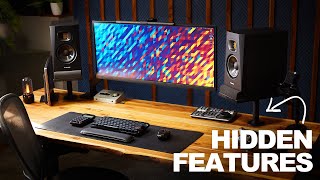
so I even made sure to have that specific bend on the XLR cable so I wouldn't block that unbalanced line input for the future just in case I need to hook up something to that at the same time but I absolutely love this setup it clears up so much space on the desk and I made sure that where I'd normally sit at the desk I'm right at that sweet spot for catching all the highs and all the lows from those nice atom audio speakers and yeah it just looks clean I think all right arguably the
number one cause for clutter and cables all over somebody's desk and just taking up space on someone's desk is the monitor itself now this is a pretty big Monitor and there are a lot of cables going to and from it but I found this one monitor stand that solved all of my issues and more like this stand really allowed me to take everything a step further let's check it out so from what I can tell this monitor stand is actually kind of a generic monitor stand this one happens to be labeled Prime cables but I've
seen a similar one sold by other companies online now it's a a heavy duty monitor stand which is why I can easily hold up the weight of this Ultra wide monitor now having an arm that can extend long enough over to the side was really important to me I personally feel like having as much clean space underneath the Monitor and kind of having that floating look not only gives you lots of space right in front of you as you're working to place different things but it also just visually and psychologically looks so much cleaner and
lastly with that and maybe most importantly for this video it allows all the major cables to run all the way across and down sort of out of the line of sight down underneath the desk so as you can see with this arm it's got what looks to be pretty standard cable routing it's actually better than most that I found because it actually runs through a channel basically the entire way and as it runs down the second part of the arm I actually flip this arm upside down I realize you can just flip it and if
I did that it would allow me to run at least one cable straight down underneath the desk which is really cool I wasn't able to fit the power cable down there but uh hey I'll take it now also with a lot of monitors these days it has some connectivity of its own there's a little extra USBC Port right there just in case I need to connect anything or charge anything and that's just running straight into the monitor itself so kind of a freebie there and all I had to do was buy one of those little
sticky cable holder things right there and uh smack it on the back of the monitor see the main reason why I bought this monitor arm is because I noticed that there's sort of some ports on the front and the back there's a spot on the back that you can see here that just barely fits four cables perfectly without any pinching or binding and then on the front you'll notice there's two little holes there well I actually drilled those two holes in but even though it didn't list it in the ad this is clearly set up
to have cables running through it they just decided not to open up those ports from the factory foreign [Music] so this front cable is going right to the laptop I run a MacBook Pro it's also worth noting that this monitor arm does have like a regular clamp that you could just clamp around the back of your desk but I don't know I had this whole thing where I wanted to keep the whole thing totally clean and clear so I decided to go with the bolt through option now over there in the corner is my microphone
of choice it is a lewit lct440 pure microphone and I had another custom cable made from Pro Audio LA with that bend in it so they can stay nice and close to the stand itself wrap around the stand and right underneath the desk through a little hole that I drilled and another great way to keep cables at Bay is to have wireless components so this is my low free black gold kit from them it includes a really nice clicky keyboard a calculator a mouse that little pad the big pad underneath and a lamp and a
speaker so uh yeah pretty nice little kit very matchy-matchy all right you've seen what's on top of the desk now it's time to get to the even more important bit what's going on underneath of it foreign as it turns out trying to film the underside of a desk in a half decent way kind of tricky and here we are and all like I said in the other couple of desk build videos I chose these legs because they were more set back which allows more leg room it also allows me to tuck everything really nicely and
neatly behind the this Center support so my goal with this was to have absolutely everything all the wiring and cabling and the Hub or the dock all this kind of stuff had to be slim enough and tightly organized enough to fit behind this so that you couldn't see it from the front and we got there so this part right right here this is the OWC Thunderbolt 4 Dock and this is kind of the main hub for the entire system it's not cheap but I knew that it would have enough power to run absolutely everything I
wanted to and have the speeds like Thunderbolt 4 speeds out of multiple ports from this thing it allows me to Future proof the situation a bit and I've had not one single problem with the unit it's just worked day in day out every single day and attached to that is my little Western Digital working Drive I usually just try and run the programs off the computer then have all the data on one of these slash on a backup array which is behind me over that way so running this OWC dock allowed me to run enough
power to my M1 Max MacBook Pro I think it's got 96 watts of power delivery which is obviously the laptop can take more but basically 100 Watts it's plenty I got a nice slim power bar that has room for expandability if I need it there's also some USB outlets on there just in case for some reason somehow I run out of USB ports to charge things with everything else I don't think I ever will but hey may as well and everything under here all the cables you'll see there's lots of these little tiny Clips stuck
to the desk itself and those have been absolutely amazing for making sure everything is really nicely tucked up underneath the desk because this is an oiled desk I did have to use a little bit of just a little tiny dab of Super Glue wherever I stuck them to the desk themselves just to make sure they won't fall off later and it's been 10 months and not one has popped off so far so that's really good now with the two heavier items which is the dock and the power bar I'm using double-sided Velcro on it with
sticky bits on both sides the stickiness wasn't sticky enough enough for both of these probably because they both heat up a little bit too which wouldn't help things but so those ended up hanging down one day and I just had to put a little bit of super glue in a couple of choice spots to make sure they stayed up and they've been fine ever since and you can see up under here uh where this metal plate is that is where the monitor arm is and all the main cables come right through this little slot that
I drilled into the desk here and I bought a couple lengths of these uh I don't know cable runs I guess uh to stick them underneath there and I'm running lots of the power cables through there I will say at one part just when I thought I was going to be done this whole project I thought I had screwed the whole thing up royally and that's because I didn't take into account the big old giant power brick for the dock itself which is right here I had wired everything up and it was at there's absolutely
no more space for anything essentially along that back row so I wasn't sure what we were gonna do but we figured out a way to to attach it up over this way run the cables around and it's been perfectly fine and again I've got those like little Runners cable Runners here I have one for power and one for the audio cables because just like The Offspring ones you got to keep them separated out of all these peripherals and all these things running on this desk I have two cables running off of it and only one
really needs to be running off of it but anyways uh there's the one main power cable and there is one very very long USBC cable running to my backup array you can also see the mic cable coming down from the top there so you can see I've got one more sort of cable organizer cable Runner thing just so that I can keep the cables all nice and tidy and neat right behind this leg of the desk so I don't see it when you have the legs that are set back then these are closer to the
wall which means when the when the cables finally do exit down at the bottom there they're really close and tight to the wall and you don't really notice it and everything's just nice and tidy okay so what would I do differently with this desk um two things come to mind actually one I would make that mic cable just like two inches longer because when I unfurl it to do some voice over it's a it's a little bit short I kind of have to lean in a little bit much pretty nitpicky um the other thing is
I would think I would spend the money to get the actual proper BenQ monitor light because this one does not actually fit doesn't clamp onto the monitor it sits there just fine but if I ever bumped it it's gonna fall off and that's kind of a mess with a little bit of planning to begin with I feel like I was able to create a desk that really suits my needs perfectly and keeps it it's clutter free and it's cable free as possible honestly I couldn't be happier with it all the products shown here are linked
down below and if you want to see the initial build video for the desk itself and the reasons why I chose certain things and how I got this crazy desktop for literally thousands less than I probably should have you can click right there and if you want an overview of all the products on the top of this desk the Monitor and the speakers and the keyboard and all that kind of stuff uh click this video right there thanks so much for watching everybody have a good one
Related Videos
15:23
My New Hybrid Mac & PC Dream Desk Setup 2024
Chris Wilmshurst
500,506 views

14:41
I Built My Dream Desk Setup (Gaming Desk /...
Ideal Idea
221,768 views
7:36
I Tested Linus Tech Tips Cable Management ...
BTODtv
279,858 views

27:30
Building the ENDGAME invisible PC
DIY Perks
3,696,050 views

25:07
Architect's TOP 10 Desk Setup Mistakes (& ...
Daniel Titchener
333,905 views

19:23
Cheap, DIY Cable Management—Like a Pro!
Snazzy Labs
317,424 views
9:45
Building the Ultimate Desk Setup for 2025
Peter Georgiou
527,016 views
27:58
Building a Feature Packed Standing Desk wi...
Phil Vandelay
356,452 views

32:50
How to cable manage your PC like a PRO!
JayzTwoCents
2,993,538 views
12:18
The Ultimate Cable Management Tier List
BTODtv
473,617 views

Deep & Melodic House 24/7: Relaxing Music ...
Monstercat Silk
14:32
Home Desk Makeover on a Budget: Before & A...
Lauro Dominici
579,242 views

6:23
A Cozy Desk Setup You Can (Probably) Afford
Luda
779,192 views
13:34
My Clean, Modern Desk Setup for Productivi...
Run The Joules
128,510 views
7:30
The Ultimate Cable Management Guide!
Sam Beckman
2,679,309 views
9:38
DO NOT Buy Cable Management Products Until...
BTODtv
9,954 views
13:51
How to Build a Budget Desk - Step-by-Step...
DIY Creators
409,740 views

21:52
ULTIMATE All Black Dream Desk Setup & Offi...
Ideal Setup
576,769 views
20:08
Building My Dream Gaming Room RGB Desk + O...
Chris Maher
69,701 views

10:25
Why I only use one monitor
it's jepi🧑💻
110,137 views