Holographic Optics Break My Brain
317.17k views4260 WordsCopy TextShare

The Thought Emporium
Head to https://go.nebula.tv/thethoughtemporium to sign up today and upgrade your viewing experience...
Video Transcript:
this is a defraction grading it's a special piece of plastic that has a whole bunch of tiny lines carved into it one of the reasons defraction gradings are interesting is that when you shine a white light through it the light is split into a rainbow similarly when you shine a laser through it which is only one color to start with you get pairs of spots that are kicked off at a set angle from the main beam now this on the other hand is a dick fraction grading instead of simple lines this one is a funky
wavy pattern and when you shine a laser through it you get a dick butt the really wild part is that this pattern is totally customizable so by only changing a couple lines of code you can generate a pattern that'll allow you to project whatever image you want you may have seen similar things in the past if you've ever bought laser pointers or those laser based holiday decorations Sometimes they come with special diffractive lenses that you can put on the front to Project Specific patterns today we're going to learn how you can make one of these
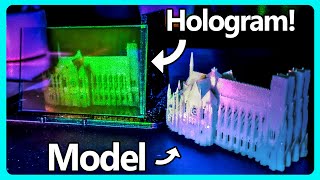
for yourself using only an old school film camera but along the way we're going to explore a whole bunch of weird and wonderful ways that you can bend and twist light that will lead us to even more interesting projects down the line so let's start at the beginning I've been obsessed with holograms for a long time and this video is the next piece of a puzzle I've been trying to solve I want to make chocolate Holograms this concept has actually already been explored by some other YouTubers First Tech ingredients demonstrated that you can make defraction
gradings with chocolate and and then Ben from applied science showed that you can extract castable Holograms from commercial products but both of these examples relied on commercially made stamped materials that could then be molded rather than making the Holograms themselves stamped holographic materials are everywhere and rely on patterns formed on their Surface by hot pressing to produce the holographic effect but making the original Metal Master stamp is the hard part and normally requires a very expensive machine and special materials I've been exploring and experimenting with a bunch of different methods to make Holograms suitable for
this but in my research I stumbled onto the transmission Holograms we're going to be talking about today this will be the first example of a computed hologram on this channel but more will follow in future videos instead of using a physical object as the reference to make our Holograms like I showed in a previous video we're going to directly compute the correct pattern which can then be transferred to film but to understand how these work we need to understand defraction defraction is a property of all waves and is something that happens whenever a wave hits
an obstacle or passes through an aperture every time this happens some of the Waves energy is redirected around the object or through the aperture and affects its trajectory this applies whether it's waves in a pond sound waves or light waves we actually see defraction all over the place without realizing it it's what gives CDs and Opals their amazing color we use it to analyze atoms and molecules and it's also the reason why nearby star stars in images from either Hubble or the jwst have their distinct four or six line Spike pattern each telescope has supporting
arms that hold the secondary mirror of the respective telescope some of the light entering the front must pass around those arms to get to the camera sensor when this happens a pair of defraction spikes ends up forming in the final image and you get one pair for every obstruction jwst with three arms has six lines while Hubble with four arms would technically have eight spikes but they overlap because it's symmetrical so there's only actually Four to see how this works let's start with a super simple example and a little simulation we have a wave coming
from the left and passing through a narrow slit you can see that where the wave meets the slit you sort of get a new wave that starts at the location of the slit and propagates outwards when you have two slits the same thing happens but now the two new waves can interfere with each other and you'll get areas of increased or decreased intensity where either the Peaks or valleys of the two waves line up as you add more and more slits the effect only becomes more pronounced as more waves interfere with each other with enough
slits you start getting nice pairs of bright bands that we're used to seeing from defraction gradings just like with the telescopes this also works with the edge of an object if I place an object into the beam you can see that part of the wave now has been redirected behind the object but look what happens when I place the object so it's completely enveloped by the incoming wave you get DEF fraction at both sides and in the middle there seems to be a distinct albeit weak focal spot now throughout this video you're going to be
seeing a lot of simulations of light and waves but it's one thing to simulate and another to experience and see the thing happening in reality as the expression goes if it disagrees with experiment it's wrong so let's prove that this part of the simulation is a very real effect I've got a little setup here that will help me demonstrate it's made of a piece of aluminum Extrusion acting as a rail a light source and these little holders that are designed to hold either individual film negatives or other small pieces of plastic at the far end
I've placed a camera the light source we're going to be using is a white LED flashlight though it'll be hard to see this properly if I just used the flashlight normally so I've removed the lens from it and covered the end with aluminum foil then I poked a tiny hole in that foil this produces a bright spot of light that'll be much easier to use for the experiment one of the reasons for doing this is that now I can place an object into the beam formed by the PIN hole and completely olude the light source
for this I've put a little circle of copper tape onto some clear film to act as our obstruction this way the only way light can get into the camera is it's going to have to bend around the obstacle then as I adjust the focus of the camera you can see that there is a very distinct bright spot in the center of the object and this happens pretty much regardless of how far away the obstruction is from the camera you can always make this focal spot this is called an arago spot and is why the center
of a shadow is always technically the brightest part and it is a clear example of both defraction and the wave properties of light if light was purely particles that moved only in straight lines you couldn't explain this Behavior it must have wave properties for this spot to be here now you might be thinking wait a second if this is focusing light to a point does that mean that this little dis is actually sort of a lens well actually yes several years ago Cody from the channel Cody's lab demonstrated this effect using first a coin and
then a pasta jar lid both to great effect this Arrangement is called an AO scope and it's a type of telescope that only uses defraction and Cody was able to resolve an image over a 100 yards away using a coin of course there is an obvious caveat to using this effect to make a lens in general blocking most of the light from your light source is a way to make a telescope and while there have been proposals to use this effect to make a giant unfolding telescope open space they never went anywhere because of this
huge limitation but if defraction is an edge effect and you want more light what if you add more Edge Well turns out that totally would work now you don't want to use evenly spaced repeating concentric Rings because that's basically just a round defraction grading and each ring will have a different focal length so instead of a nice image you're just going to get a mess the trick comes down to a little bit of math if you use this equation and pick a wavelength you can calculate the radius of the start and end position of each
ring this gives you how thick and how close together each successive ring should be this pattern is known as a frel Zone plate just like before this works remarkably well in the simulation and you can see that there are actually multiple focal points these are called the nth order focal points and is a quirk of this type of lens we wrote a little program to generate the correct pattern with however many rings we want and then printed out those images on normal printer paper in our last video we explored how we can use an old
school SLR film camera to take printed patterns like this and Shrink them down to Tiny sizes in that video we were focused on making these tiny secret messages called micro dots that were used for covert communication during the Cold War but I also mentioned that there was an ulterior motive to that project and that was making the very defract of Optics we're using today while I'd highly recommend watching that video the cliffnotes version is this when we take a picture with a camera it shrinks the image we see in the viewfinder down to 35 mm
the further away from the printed image we set the camera the smaller the pattern will end up being on the final film negative and we got things tiny our smallest micro dot was only 1X 2 mm though most were bigger and We Shrunk down code text and my personal favorite We Shrunk down one of the asteroid neuron array posters that we carry in our store while we're not currently selling the micro do version you can grab one of the full-size posters or any of the other amazing things we carry at the thought emporium.com plate loaded
some film into the camera and then shot away after a lot of experimentation it seems that being well lit from the front is more than sufficient and we don't need any other fancy lighting setup also this is something that we only found out after the last video went out but it turns out that it's very helpful if you put the battery into the camera the right way around last video I mentioned how hard of a time I was having getting my exposure settings correct and needing to leave the aperture wide open to get enough light
turns out I'm an idiot and just had the battery in wrong when it's fixed it's actually super easy to get the lighting right and I can close the aperture by a few steps to get a much Sharper Image whoops anyway for now like last time I'm shooting with ilford iso50 film and blaz Andel as my developer with the ilford Stop and fix Baths on many of y'all's suggestion I also picked up a bunch of roles of Ado's CMS 20 it's supposed to be some of the highest resolution film in the world and needs its own
special developer but to my absolute shock the Holograms and defraction patterns were already working so so well with the ORD stuff that I just haven't gotten around to trying it yet but it will be useful for the next project that needs film coming up anyway we hung the picture of the frel Zone plate and took images of it and then a whole bunch of other patterns that you're going to see in a moment then I went about developing the film the same way I demonstrated last time so I'm going to skip that part for today
once fully developed washed and dried the negatives could be cut apart into individual frames and loaded into the holders you saw earlier and of course labeled so we know which is which it's basically impossible to tell by eye which one is the Hologram and which one is the company logo so it's rather important that we don't confuse the two all right let's try out our new Zone plate as before we're using a white LED for a light source with a pinhole aperture but this time everything is maximally out of focus on the camera this way
the only way we're going to see a focal spot is if the Zone plate works the way it's supposed to when everything's lined up but the Zone plate is out of focus we don't see much except sort of a silhouette of the Zone plate but as move it back and forth and close to the camera we start to see a bright spot develop near the middle and it changes color dramatically as it sharpens to a fine point to really drive the point home pun absolutely intended I took the lens completely off the camera now it's
just a bare sensor I'll need to move the Zone plate to reposition the focal length but once again when it gets to the right place a bright spot appears this means that it really is working like a lens but to demonstrate that it does all the things that a lens does let's use use it to resolve an actual image I poked a few more holes in the foil to make a little happy face and then put the lens back on the camera to make this easier to focus this time when I move the Zone plate
to its focal distance a lovely rainbow smiley face shows up but importantly it's been flipped upside down because that's what lenses due to an image and you can see that as I move the Zone plate back and forth you can actually mess with the magnification of the face and its colors obviously this is a pretty crude example and our aperture is is tiny but we're going to come back to this concept in a future video and give it the full treatment because I want to make a proper telescope using this method and thanks to the
amazing Optics Channel hugan Optics I learned about a more advanced version of Fel plates called a photon Civ but that I'm going to have to save for a future video one last thing to address before we move on though is that funky rainbow remember that equation that we used to generate the ring pattern it took a wavelength as an input value this means that every wavelength if shot through the same Zone plate will focus to a slightly different depth this is one of the major limitations of a diffractive optic like this while they give you
incredible control over where the light goes it gets much more complicated when you're not working with a nice clean pure light of a laser but we'll talk about ways to get around this when we make that telescope now thus far we've mostly been talking about using defraction to focus things to One Singular point or at least one plane but let's see more interesting examples and build up to the Holograms this is called a batov mask anyone into astrophotography is probably familiar with these and they're a great tool for focusing your telescope they're basically three very
coarse defraction gradings arranged in such a way to produce three nice defraction spikes but the trick is that they only line up properly when the telescope is perfectly focused when the focus is a little bit off the central Spike moves off center making it very easy to quickly focus a telescope precisely just by eye next is a tri batov mask same idea but there's now three sets of three spikes again as you move the focus the lines move back and forth allowing you to clearly see where the perfect spot is the most important thing to
notice about all of these patterns is that adding more defraction gradings adds more spikes If instead of three or nine gradings what happens if we add more and more little patches of grading each one should make a new Spike right and if we were using a laser instead of white light those rainbow spikes become singular dots this means that if we could calculate the right pattern we could make as many dots as we want and since defraction is controlled by the distance between the lines and their angle you can control exactly where those dots go
and build them up into an image now there are a bunch of ways to do this mathematically but they all revolve around the same basic concept the computer takes a guess at what it thinks the correct pattern might be this guess is going to be wrong but that's okay it then goes around and around tweaking the pattern until the output matches the desired input thankfully I was able to find an absolutely amazing repo on GitHub that not only does this hard work for you but is also unbelievably cool in and of itself it's called defract
Sim and like everything we've talked about there'll be links to it below it was written by a gentleman named Raphael Fuente and it was made to simulate the propagation of light through a specific aperture or lens amongst many other things it allowed me to generate these amazing animations of light propagating through space it'll also do a longitudinal profile which if I use our fernel Zone plate pattern as the aperture it shows that the light really is focused to a very clear focal point one of the coolest features of this program though is of course the
Hologram generation now the program is meant to generate what are called phase Holograms rather than defract of ones instead of diffracting the light off of fringes the idea with these is that each color corresponds to a time delay normally to make use of these you need a special device called a spatial light modulator they're basically a special LCD display that you shoot light through instead of using them as a screen instead of controlling RGB values like a normal screen all each pixel does is adjust its index of refraction the refractive index of a material is
essentially a measure of how much light slows down when it enters that material the higher the refractive index the more it's slowed relative to how fast light moves in a vacuum by carefully slowing down different parts of the light beam you can precisely control the interference pattern that is produced and project whatever hologram you want at whatever distance you want now there is a pretty obvious problem with this and that is our utter lack of a space light modulator and the fact that we can't really control the phase of the light using film at least
not using this method so how do we go from this rainbow phase hologram to a black and white diffractive pattern well I mean I'm still working on figuring out an elegant way to do this but thus far just changing the output in the program to grayscale works surprisingly well even though this was supposed to be a phase hologram our pattern is still encoded in there so if we just use it as a diffractive pattern patter we still get an image however if we do that and run a simulation of what the pattern will end up
looking like we find that we now have a Double Image layered on top of itself this is the price of using defraction and this hack method of making these Holograms after some experimentation I realized that the image was being mirrored along the diagonal so if I just changeed the image I was feeding into the program so that my pattern is in a corner out pops a perfect hologram with no overlap or you just use something that is mirror symmetric so that it doesn't matter if there's an overlap I'm going to keep working on this after
this video goes out to try and figure out a more elegant method of doing this but for now the results are surprisingly good so it seemed Worth showing off and if you do know a more elegant way of doing this please let us know in the comments one of the cool things with these Holograms is that they project properly almost regardless of distance to the screen no matter how far away the screen is the Hologram stays sharp the image just gets bigger this is very different from what would happen if you tried just shining a
light through an aperture that was a particular shape for example if you were trying to build a bat signal the way that they show in the movies and TV shows you'd be hard pressed to actually get it to look like a bat in the sky and many YouTubers have attempted this to various levels of success or failure but since this is a defraction pattern it almost doesn't matter how far away you are from the Holograms you'll always get the right projection so this method is one way to make a real bat signal though there is
a reason I'm using a laser for this if you focus a beam of white light so if we use our pinhole aperture from before and just look through the Hologram you see the patterns come out as a sort of blurry rainbow though infinite rainbow dick butts does have a unique charm to it one last thing we tried was to really push the program by running a proper image instead of just a shape I did one of Fineman and one of Einstein but while the simulation showed that it should work when I made the real Holograms
it was clear I was running into some resolution issues next time we talk about Holograms we're going to be looking at proper Emulsion based plates that will allow us to make physical molds of them and with no limit to resolution but I'm also going to keep improving this technique so that I can make my own custom hologram decorations and as I said earlier we're going to be back to make a proper telescope soon so be sure to subscribe so you don't miss any of it but if you can't wait and you want more amazing videos
right now I've got just the thing a little more than a year ago we joined nebula the amazing creator own streaming platform where many of your favorite creators have come together to make and share the content you love without having to worry about advertisers it seems like every day they find new ways to cram yet one more advertisement onto literally every page of the internet so I know that I'm not the only one tired of the constant barrage of annoying ads interrupting everything you're trying to do not only is nebula totally adree our videos are
always posted to nebula first so you can see them potentially days early and on top of that there is a huge amount of bonus content there too our Egyptian mummification video for example came with a bonus 25-minute Deep dive into the recipes spells and hieroglyphs used in that project and you can find Companion videos like that from all sorts of creators Beyond those nebula exclusives there are also nebula Originals like real science's becoming Human series where they explore the origins of the first technological leaps of our species and if that wasn't enough there are also
nebula classes where creators teach you about a wide range of topics I've particularly been enjoying Devon Stone's copyright for Fun and Profit which really helped clear up what copyright law can and can't do nebula is the fastest growing independent video platform and we are joined by so many amazing creators like Nile red breaking Taps strange parts and too many others to possibly list them all here nebula is also helping creators like us Elevate our content and take it to the next level better production value bigger stories all without having to chase the trending tab or
appease the whims of advertisers so if that sounds good then use the link in the description to get 40% off the yearly subscription or snag the best deal of all which is the lifetime subscription for only $300 I can't think of any other streaming platform that is as good value for the price so head on over to
Related Videos
24:40
Making Real Holograms!
The Thought Emporium
801,664 views

20:47
The Genius Behind the Quantum Navigation B...
Dr Ben Miles
215,651 views

26:23
How can a jigsaw have two distinct solutions?
Stand-up Maths
146,940 views

27:33
Making A True Potato Camera
The Thought Emporium
286,658 views

16:30
Introduction To Holography - 1972
LitiHolo
14,774 views

16:52
Dragonflies hunt by predicting the future
AlphaPhoenix
305,167 views

20:39
Why we should go back to writing in runes
RobWords
135,225 views

19:34
Who Approved This and Why Is It Still Bein...
driving 4 answers
41,972 views

26:24
Using a Photomultiplier to Detect Single P...
Huygens Optics
50,632 views

17:26
Recreating CIA Technology Was Surprisingly...
The Thought Emporium
658,452 views

15:51
I Built The First LAMINAR FLOW ROCKET ENGINE
Integza
1,785,251 views
19:19
We should use this amazing mechanism that'...
Steve Mould
2,919,768 views

20:36
It's Happening - China Launches World's Fi...
Dr Ben Miles
1,469,588 views

14:41
How 3 Phase Power works: why 3 phases?
The Engineering Mindset
859,273 views

18:41
A Submarine Sonar Strapped To Your Head
The Thought Emporium
575,130 views

12:41
My Video Got 2 Companies Shut Down! (And e...
The Thought Emporium
5,153,138 views

16:14
Can You Forge Tungsten?
Alec Steele
1,780,042 views
12:26
The experiment that revealed the atomic wo...
Steve Mould
2,620,759 views

9:07
The Worst Hotel in Las Vegas
fern
45,017 views

13:57
The BIG PROBLEM With Wire Cutters Manufact...
OUTDOORS55
685,289 views