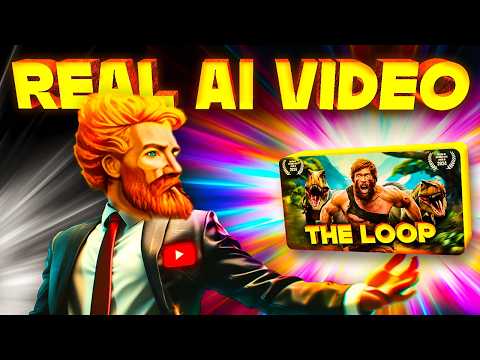
I Tried Making a Viral AI Video!
90.92k views3628 WordsCopy TextShare
Isaac
🎁 Get 50% off your first month with Pikzels! Use code ‘ISAAC’ at checkout: https://go.pikzels.com/i...
Video Transcript:
"youtubers yapping" I hate AI videos. open any social media and start scrolling. half of the videos you'll see are made with AI.
an AI voice commenting on a funny video an AI text that's showing a random motivational quote AI image slideshow a video with AI scrip AI voiceover AI caption AI footage AI music AI character. . .
they're breaking the internet! and I'm not okay with it. because they're soulless boring inconsistent they make us dumb so that they could take over the world?
I don't know. maybe? but it's AI.
. . you know, the biggest revolution in human history since the invention of Bitcoin!
so what? think about about it. isn't there a better way to use it?
there has to be a better way to use it, right? we just need to find it. .
. he was right. so I spent the next few months searching all over the internet.
to find a way to make better AI videos. and after dodging around 1,000 videos teaching how to make 300 shorts in 30 minutes with chat GPT and canva, I think we got something. .
. it turns out it's not a brand new thing. people have been making cinematic AI videos for the last few years.
but they all have some big problems. the art style in each shot looks completely different. the characters don't look the same.
the story is too AI generated, and most importantly, they don't get views. we need to fix them all. here's the plan.
I will try to create a video with AI completely from scratch, upload it to a new channel, and see how many views I can get. before starting this video, I asked you guys for ideas. here are all the cool video concepts that you came up with.
animated scenes with full emotions and add some emotions emotions okay emotions consistent character characters editing show me your editing EDITING! I like pterodactyls. if you have a pterodactyl in the movie, I will watch it.
all right pterodactyls. oh I got you man. thanks to everybody for sending the ideas.
now the next step, wait. what? I know this guy?
nope. now these are great ideas, but we need more context. I wrote the story with chat gpt's ideas and tweaked some parts a little bit.
it turned out pretty well. you can pause to read it, but we're going to see it at the end anyways. so.
. . now I already made a video about thumbnails.
but since we're making a video with AI, we got to make an AI thumbnail too. so, ladies and gentlemen. introducing, the channel's very first sponsor.
Pikzels! it's an AI image generator that's trained specifically on YouTube thumbnails. so that with a single prompt, it can generate stuff like this or this or this.
all right, let's create our thumbnail. our video is going to be about time travel. so create a dramatic thumbnail with turbulent up on a running bearded ginger man centered in the middle on his face has a slight dinos the overall a lot of motiontion going on.
pretty impressive for 10 seconds of work. even if you know how to create it in Photoshop, it would take hours to create something like this. but it doesn't stop here.
you can click this button, and edit the thumbnail with your own words. let's add some muscles to our guy! uh that's a bit too much.
. . perfect!
if you have a face in the thumbnail, like this one, you can replace it with your own face by just clicking this button. you can even search for a thumbnail concept that already worked on YouTube, and just paste the video link here. the AI will analyze it and come up with a slightly different concept.
Pikzels recently released a new feature for helping you generate titles as well. just write what you have in mind and it will come up with really impressive title variations. they're constantly improving the algorithm.
with the new Pikzels 2. 0 update, the results look 10 times more impressive. you can even add a custom text to the thumbnails.
a feature that almost no other AI tool is able to do at this point. it has more features coming soon. like adding your own photos even creating a thumbnail from your sketch.
you can check out pixels with the link in description. and with the code 'ISAAC' you'll get a 50% discount for the first month. or use 'ISAACYEARLY' for 33% on the yearly plans.
it's only valid for the first 200 people so. . .
go use it. while you still can. so thank you Pikzels for sponsoring this video.
now that we got our title and thumbnail, let's move on to the next step. before doing anything else, we need to plan what we want to create. so I used my impressive drawing skills to make this thing called storyboard.
almost every professional filmmaker uses this technique to plan their shots before actually taking it. so why not make it for AI films? the key is that it has to be easy to understand.
after a few hours of work here's what they look like. there are dozens of AI video generators out there. but the most popular ones are called Stable Diffusion, Pikalabs, Runway and Sora.
the results from this one look great, but it's not released to the public yet. so we can't use it. .
. stable diffusion looks like a bit it- makes videos using your computer's G- and the UI looks a bit- okay. .
. it's too complicated. these two are almost the same thing with only slight differences in style.
basically Runway is more cinematic while Pikalabs has more cartoonish vibes. I gave them the exact same prompt and these are the videos they made. I like the Runway style.
though you can try both and see which one works for you. but it's not important for now. because after this video you can use any software with the same principles.
so instead of breaking down all the technical stuff about the software, we will just learn what we need, and focus on turning the ideas into videos. as you might guess you can generate videos in three different ways. from text from an image and from a video.
we don't have a video yet so. . .
text to video is nice for generating quick b-rolls for your videos. but it's hard to predict the results if you're looking for a consistent style and characters. so the plan is, we will generate images using AI and animate it with another AI.
it's going to be a piece of cake. "no God that doesn't make any sense. shine" I'm going to use Midjourney here.
because everyone says it's the best image generator out there. but you can use any software you want. first get a subscription.
go to Discord. create a new server. and add the Midjourney bot to the server.
that way you can see all the images you generate in a single place. now it's time to see what this thing can do. right "/imagine" and.
. . uh I haven't used it for a while.
let me catch up with the updates. I read all the update notes they shared on their Discord. I know boring stuff.
then I watched a few hundred videos on how to use it. here are some cool channels I found the most valuable information from. I tried to apply what I learned to the actual software and to be honest, most of the images turned out bad creepy even kinda suspicious.
. . but with practice they started to get pretty good.
and a few hundred attempts later, here's the strategy I came up with to generate the scenes. first type "/settings" and choose Midjourney version 6 or whatever is the latest version right now. then experiment with the most basic prompts you can think of and see what they do.
at the end of each prompt add "--ar 16:9" if you want to generate them in landscape mode. or "--ar 9:16" for shorts. now after each image we get some buttons below.
the ones at the top increase the resolution. and the bottom line creates slightly different variations. when you upscale the one you like, more buttons appear.
just try them once and you'll figure out what they do. all right these are a good starting point. but it isn't really possible to control much of the results this way.
we need to get more specific. we can tell the AI where we want our character. instead of asking it to generate an image of a bearded ginger man, we can add a background based on our story.
now let's add one more person to the shot. tell where you want them to stand in the shot. and what they do.
after getting the basics, the next step is adding more details. you can do it by adding some adjectives and writing more detailed character descriptions. that was the the last prompt we wrote.
let's see what else we can add. a charismatic 30-year-old adventurer man is watching the Giza pyramid in ancient Egypt while his dog wanders around the man has a lean and ath ging light shirt with black cargo made of glassh. all right let that sink in.
. . we can add much more details to our prompts.
like time of the day, season, color scheme, and so on. most of the characters made by Midjourney lack emotion in their faces. I mean is this guy happy?
confused? confident? none of them.
he just. . .
exists. so it's always nice to specify the character's emotion in your prompt. happy sad scared angry confused disgust jealous guilty curious you know what I mean?
in an actual movie each shot has a certain camera angle. that's what makes them look cinematic. we can get a similar effect by writing some keywords to our prompt.
I like this one. it's all up to what style you're looking for. speaking of styles, you've probably noticed almost every single image has a different style.
some are realistic, others are more animation like or illustration. it's cool, but when we animate these we can't really make them look like a part of a single video. so we need to give them a single style.
AI image generators usually make photos in between realistic and animated looks. I don't know what it's called but it kind of became the signature of AI. if you want to avoid this style, you may go towards either side or try totally different art styles to get something unique.
first let's go with the realistic. you can add a movie genre to give it a certain vibe. fantasy sci-fi comedy I don't know.
or a director name that has his own style. like Wes Anderson who's known for his symmetric shots and weird colors. Tim Burton Edgar Wright James ceron Spielberg or any director you like.
I don't know much about cameras, but I saw most people like to add a camera type in their prompts like that. or we can go the opposite way and get more animated style with words like pixar animation or 3D. other styles can be oil paintings watercolors anime comics 2D cartoons surreal cubism cyberpunk black and white japanese art.
. . there are countless art styles you can choose from.
pick the one you like and add it to your prompt. but wait it's still AI. and AI is not consistent.
even if you write the exact same prompt it will give slightly different styles each time. but don't worry there's a solution for that. it turns out you can give Midjourney a reference image to look for.
so it would generate all other images with a similar style. now I want you to give your full attention to this point. because we're about to get a bit technical.
hey! turn off the music. all right you got this you got this.
let's take this shot. upscale, upscale again, open in browser, download, upload to Discord. now write your prompt as usual.
then just like "--ar 16:9" write "--sref" hit space and drop your image next to it. that was a style reference. it will copy its style to the new image.
we need to learn a few more parameters. "--s" is called stylize value. it shows how much Midjourney can add its imagination to your image.
the default is 100 and the maximum value is a 1000. let's try something like 500. "--c" chaos value.
it's like the unpredictability of the results. 0 makes them almost the same, and the shots get different as long as you increase this value up to 100. "--style raw" minimizes the improvisation and only follows your prompt.
with all this knowledge hopefully you can get any image in your mind with the best accuracy. but but the biggest problem is still there since the very beginning. this is not the same guy!
if we want to make a video out of these, we need a consistent character throughout all the results. yeah that's the hard part. what's your plan?
hey you have a plan, right? look I'm going to be honest. I watched all the tutorials about that.
but none of them gets the perfect result. the images always turn out slightly different each time. and the process is too complex.
I you don't want that. I actually don't know what to do at this point. .
. don't worry man. there's still time.
you can figure it out. can I? yeah I can!
I couldn't figure it out. maybe I should move on to another tutorial. a tutorial about.
. . how I edit.
nah nobody would watch that. having a bad day? yeah I think we had this conversation before.
don't even start. yeah I'm not here to give you a motivational speech this time. just wanted to know how's your AI project going.
uh not good man. it's clear it's not going to work out. it's not the end of the world if I'm not going to check off everything on the list right?
I'll just accept and move on. hey hey hey no! look you have to finish this video you hear me?
otherwise. . .
why is it that important for you anyways? that's not the point. if you were going to quit why did you come this far?
I don't know. . .
you don't know. . .
I know what you want to hear. what? so you're saying, I can't figure out this thing that even idiots are able to do is that right?
what did you say? you're saying, I'm teaching people how to make videos while you're too afraid to finish a damn video yourself? are you really that weak?
so the tools people are playing like a toy is too complicated for you. because you are a man with lower capacity than them huh? I'm not.
. . you know Dave?
this idiot made an AI video in one week. he probably got some help though. doesn't matter Dave is an idiot (sorry if your name is Dave lol).
can't you do what he did? I can. I didn't hear.
I can. louder! I can!
we can finally create consistent characters inside of Midjourney consistent pictures of your character created in any scene you want the best part is we'll be able to keep the same face hair clothing and even body type. that's it! that's what I've been looking for.
I'm glad then. what are you waiting for? get back to work.
yeah let me see how this thing works. good luck (that was close). hey!
thanks for coming man. no problem man. you'd do the exact same thing I'm sure.
it's time to finish what we started. so with this new feature just like "--sref" we can give a reference character to our prompt by typing "--cref" so it can generate scenes with the same character every time. first we need a reference character to use in all our images.
to do that, generate your character based on what you learned until this point. like '90s anime style portrait of a 30-year old bearded ginger man with green eyes the man is wearing a light gray shirt. here's the crucial part.
split into four images shot from different angles. it will give you something like this. upscale the one you like take screenshots of each angle and upload it to Discord.
now it gets a bit technical, stay with me. we can still use "--cref" command and paste each image link one by one. but doing that for every single image can be a bit annoying if you're going to do it 100 times.
so we're going to create our own command. sounds complicated, but all we're going to do, is instead of "--cref" and links next to it, we will create a custom keyword. so that when we write it, it will understand we mean this command.
write "/prefer option set" inside the option box write your character's name click "+1" and select "value" here write the command "--cref" and paste your reference image links. now each time I write-- Isaac it will create the image based on these images. finally!
! of course you don't need to use all of these in all your prompts. but by using as much detail as possible you'll get closer to the image in your head.
which I guess is the main purpose of AI tools, isn't it? anyways I repeated the same process for the rest of the shots and here are the images we're going to use. yeah you better be watching this man.
I got a pterodactyl for you. now we need to turn these into actual videos. uh uh we're a bit behind the schedule.
the video part turned out to be easier than I expected. as I said in the beginning, I used runway for that part. it gives you some free credits, but you probably going to need a subscription after some point.
anyways here's what I did. this is the main page when you open up your account. click on generate videos and choose gen 2 image to video.
after uploading the image you generated in Midjourney, write your prompt. unlike Midjourney, I saw it works best if you write very simple prompts like "the man looking up" because we already did most of the heavy lifting with images. here we need to adjust the camera motion and motion brush tools based on our scene.
camera motion is, well, controls the motion of the whole shot. tweak them slightly based on your image, and move on to the motion brush tool. this is where the magic happens.
choose the specific parts you want to move and brush them with different colors like head hands the entire character dog sky and building. then use these sliders to decide which direction you want them to move. again, don't go too extreme with these, or you might get some extreme results.
before hitting generate tick this check box to get the final video with higher FPS. and. .
. I mean it's not bad at all for a raw video! but it's going to get better.
I repeated the same process for the rest of the images. a quick note from the future. I actually tried animating the rest of the shots, but even though the first few videos were quite nice, as soon as I tried some illustration style images, yeah I mean.
. . what's that?
however when I tried the same thing with Pikalabs, it handled it way better. the settings here are almost the same as Runway. so the learning curve is a few minutes.
so realistic or 3D images for Runway, cartoon or anime style for Pikalabs. now we can continue. and lastly, I used Elevenlabs to get the voiceovers needed for the story.
just like the voice you're listening to right now. and yeah, if you didn't realize it's AI until this point, welcome to the club. there's a link in the description if you want to try it yourself.
now we need to edit them together. I will make a full guide on editing soon. so it's just a quick overview of what I did to edit this video.
step one. put the voiceovers in order, and cut the pauses. step two.
find a nice music that fits in the story, and add it to the timeline. step three. add the AI generated video clips based on the voice over and music.
try to keep the flow between music and the visuals. step four. add zooms, camera movements, and transitions if needed.
step five. add extra details like smoke, dust, or lighting overlays. step six.
add some sound effects to important points. if you're new to this, just use a popular sound effect pack from YouTube. or if you need something more specific, again, search for it on YouTube.
step seven. cover everything with an adjustment layer. and add the "lumetri color" effect on it.
play with the colors to get the vibe you want. step eight. if you want more cinematic look, add a "crop" effect on the adjustment layer.
and increase the top and bottom values. step nine. export the final video.
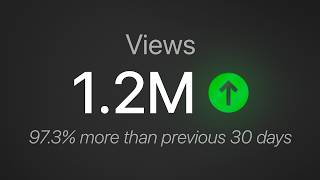
It's Showtime! it's been one week since I released the video, but before showing the results, we need to talk. so the AI video and all that is cool.
but the real question is, where are you going to use these? is making story videos like these a good idea? probably not.
. . wait.
. . so all that stuff was for.
. . nothing?
hey, did you really pay attention to the entire video?
Related Videos
11:21
How I Got 1.2M Views in 30 Days
n8wealth
14,717 views
![How I make ORIGINAL AI videos for faceless YouTube channels [FULL COURSE]](https://img.youtube.com/vi/4bLBwKkr0tM/mqdefault.jpg)
13:02
How I make ORIGINAL AI videos for faceless...
howtoai
94,164 views

1:11:21
How To Win The Game of YouTube (YouTube Co...
MagnatesMedia
397,179 views

19:50
How To Make AI Images Of Yourself (Free)
Matt Wolfe
101,185 views

8:40
How To Create Viral Motivational Shorts an...
Teny Ai Zone
4,561 views

16:56
AI Generated Animations Just Changed Forev...
Emmanuel Crown
223,020 views
20:09
How to Make 3D Animation MOVIE with AI 🤖
Website Learners
1,326,036 views

10:51
Chinese app design: weird, but it works. H...
Phoebe Yu
153,313 views
9:46
How To Make Viral Historical Videos Using ...
Website Learners
390,997 views

13:10
I Built a Transparent Boomerang (it's lethal)
Mike Shake
4,067,313 views

39:05
I Forced 5-Star AI Music Makers To Create ...
ELEVENZ
1,555,331 views

15:42
I Made a $100,000 Commercial in 24 Hours W...
Smeaf
570,997 views
12:25
How I Actually Make Viral Thumbnails
Isaac
541,613 views
17:03
Earn $1,350/Day with ChatGPT & Google Driv...
Chad Kimball
351,358 views

20:32
How I Gained 50,000 Followers In 1 Month (...
Grow with Alex
58,072 views
12:17
How I Actually Make Viral Shorts
Isaac
1,864,680 views
![It took 2 hours to make $220,000 with this AI video [TikTok Shop Affiliate]](https://img.youtube.com/vi/VOxTHGyQzbA/mqdefault.jpg)
21:43
It took 2 hours to make $220,000 with this...
Matt Lorion
964,300 views
7:44
I Made an Animated Movie From AI (Unexpect...
Mr Runthala
3,680 views
17:59
7 Days Stranded In A Cave
MrBeast
87,811,135 views
5:15
Get Paid $4,137/Month With VIRAL AI YouTub...
INSIDER AI
466 views