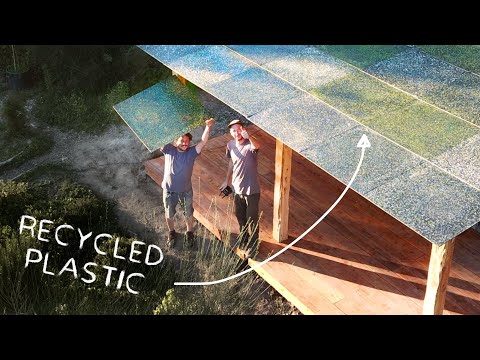
#40 We made a roof from RECYCLED PLASTIC sheets
812.1k views1346 WordsCopy TextShare
Project Kamp
We made a roof from recycled plastic sheets. We got them from a Precious Plastic Sheetpress workspac...
Video Transcript:
Hey welcome to a new Project Kamp update! So we bought this big piece of land and are prototyping a more sustainable way of living. Not sure how it's gonna go but let's see.
And in the previous video you could see us building a roof for our pizza. So we now have a pizza hut. And in this video we're gonna build a roof for our shipping container.
But it's not gonna be just a normal roof, we're gonna do something experimental. Something which I actually have never seen before. We're gonna make a roof from recycled plastic sheets.
No idea if this makes sense or how it would behave in the long term but that's why we're gonna try it out. We'll document it. So it's a bit like a living prototype.
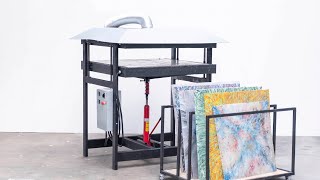
Let's start off with the most important thing first. Getting the sheets. Okay so we want to get our sheets from a Precious Plastic workspace.
In case you don't know, Precious Plastic is a project that provides knowledge and machines to recycle plastic. And it's all shared, open source for free. So you can start your own plastic recycling workspace.
It's kind of cool. I think the project is from Denmark or something. I don't know I'd say check out their website.
And they have this cool map where you can find all their different kind of workspaces around the world. And we need sheets. So we went to the map to find the closest by sheetpress workspace.
In this case it's here in France. So we asked them to make our sheets. Hi, we are Fab Unit and we are going to make roof tiles for Project Kamp.
We're gonna make it from polypropylene coming from industrial waste. We're gonna make 28 of it 10 millimeter thick with CNC. Let's go!
1. Selecting material 2. Preparing the mould 3.
Heating 4. Into the sheetpress 5. Wait and unload 6.
Cooldown 7. Milling an edge 8. Repeat 28 times 9.
Pickup the sheets I think he's right there. The truck won´t drive on our shitty road so. .
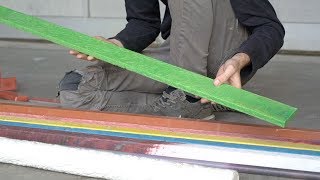
. Parkingspace swap 10. Perfect fit So here we have our sheets.
They actually look super beautiful, very well finished and smooth. A nice CNC cutted edge to make sure we can overlap them and it doesn't leak. It's always nice to see the flaky pattern, to see the yellow blending in the white.
It almost looks like a stone. And you might wonder why would you use recycled plastic in this natural environment. And I think in general if you think about sustainable living you have these two options.
You use more natural materials but also more recycled materials. So using what's already there. This is a test to see how can we incorporate recycled plastics.
And we do this more often. We also have some recycled bowls we're using. Or a brick wall, or a toilet seat.
Just to test out to see if we can realistically incorporate it in our lives. And how it behaves over time. So this is just another one of those tests.
Because we don't know how it behaves with the sun and the UV degradation. Or the rain. How it influences the sheets.
So we're gonna build it, test it out, analyze it, keep track of it and document it. And in the end we might tell you guys never build a plastic roof because it doesn't make any sense. Or maybe it does make sense.
And in that case it will be kind of a useful application. Because there are many roofs to build and a lot of plastic goes into one sheet. So this is 10 kg.
So you can recycle quite in bulk amounts. So this is 280 kg of plastic. But before we're gonna install the roof we first need to build a structure.
So we're gonna do that next. We're gonna build the structure right there in front of the kitchen. And first we're gonna make some space and prepare the ground.
Next we're gonna build a piece of metal to attach the wooden beams under the plastic sheets to the metal frame of the solar there. This is gonna be a bit of cutting, welding, drilling and painting. So let's start!
[Music] The wood arrived. We have a lot of oiling, sanding and cutting ahead of us. This will take us a lot of hours, quite a few days.
But for you guys will be much quicker. Cutting Sanding. Oiling.
Cutting, oiling, sanding. All right, so now we have all the wood cut. As you can see it's kind of a lot actually compared to the size of Base Kamp.
It's laying all around. We have some there, some here. But basically everything is now cut.
Here you can see a lot of sawdust we made. We're gonna use that for our compost toilet. And here the dark brown area is gonna be the floor.
Here the big beams are gonna use as pillars to hold up the roof. And over here this is gonna be for the roof. And as you can see we made a lot of cuts in here.
So it should all just be puzzled and fit together. I'm not sure how it's actually gonna go because all the wood is a little bit bended and warped. But I guess we're gonna see next when we're actually gonna assemble it.
We have a little issue here. This beam goes in this part of the container laying here. But in this side as you can see it's a bit bended.
So we will need to bend it down. Easy. Easy.
-It doesn't work? -It's not working. We're gonna try with a car jack to bend it back.
Let's see. I don't know how it's gonna go. But let's see.
We finally cut a little piece here because the car jack didn't go, and bending this down it's quite impossible by hand. So we cut it and now it fits. So the floor structure is now ready.
It's all leveled, straight connected. So we can walk on it. We added a few points to lift up the wood.
Not the most elegant solution but it works. And the beams itself are clamped in this edge in the container together with this one. Next we're gonna continue building the structure, to make sure everything is straight.
And then we're gonna put in the floor paneling and the roof paneling. The roof is now up, next, the floor. The entire structure is now ready and sturdy.
And the frame on top should hold 28 sheets. So yeah, let's try. So we're now gonna put up the sheets on the roof.
And there are a bit of difference in the pattern. So you have with white flakes and more dark ones. So we're gonna make a nice pattern.
And also we have two different tiles. One are like flush on one side and have the overlap here. So we can put them together.
And the middle ones have an overlap on both sides. So we need to puzzle them together to make sure it all fits. But yeah, it's time to put on the roof.
Finish. Right, yeah, so structure is now ready. And this really felt like the last thing to set up for Base Kamp.
So we have a shady place in the summer. Not in the winter. In the winter it serves as a rain roof.
So now we have a good comfortable setup here. So we can continue being on the land and do all the other work we have to do. But we're gonna stop now because this is the end of season one.
But we're gonna come back the 14th of April when season two starts. So make sure to subscribe so you don't forget to see that video because we have a lot of big things we still have to do. Alright, so that was it.
Thanks for watching, and see you in the next season.
Related Videos
18:11
Precious Plastic - Build a PRO sheetpress ...
One Army
423,132 views

12:43
What *REALLY* happens to 'Recycled' Glass?...
JerryRigEverything
16,794,004 views

21:08
Don't use concrete, do THIS instead!
Fix This Build That
1,267,063 views
7:36
THIS SELF SUFFICIENT FAMILY MAKES THEIR OW...
The Gipsy Journey
2,636,058 views

19:57
I Made a HUGE Mistake Digging My Own Pond ...
Ambition Strikes
742,779 views

29:02
Recycling revolutionary Veena Sahajwalla t...
ABC News In-depth
2,790,464 views

17:23
YEAR ONE. Everything we built on our aband...
Project Kamp
9,475,857 views
9:44
Extrude beams from plastic waste #precious...
One Army
2,405,233 views

22:03
Building Bunker Villa on a budget using Qu...
Kirsten Dirksen
2,392,138 views
27:05
Installing our own septic system (start to...
Ambition Strikes
1,061,064 views

7:06
Turning Plastic Waste into 100% Recycled T...
Brothers Make
333,293 views

19:20
Man Builds Secret Underground Cabin in the...
Quantum Tech HD
14,287,624 views
15:34
The Story of Building my GEOTHERMAL Greenh...
Wineberry Hill
819,551 views
29:33
#69 Shower upgrade with Cement Alternative...
Project Kamp
277,067 views
21:43
How Much Money Can We Make Splitting Firew...
Ambition Strikes
3,132,733 views

29:08
I Spent 30 Days Building a House of STONES...
Lesnoy
11,832,318 views
39:54
#89 Building our improved compost toilet
Project Kamp
265,112 views

34:37
Man Buys 100-Year-Old RUINED HOUSE and Ren...
Quantum Tech HD
7,517,167 views

20:05
Building a Rocket Mass Heater uses 70% les...
Stefano Creatini
822,865 views

1:47:55
Off-grid Tiny House Full Build Start to Fi...
Fowler's Makery and Mischief
2,137,085 views