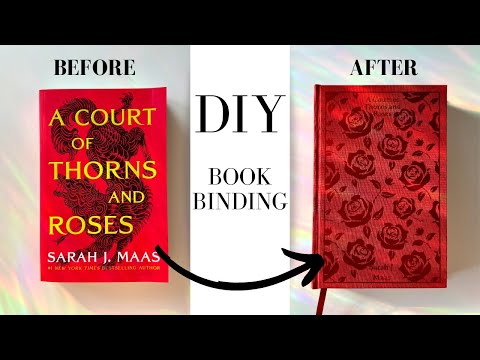
Rebind a paperback to hardcover full tutorial! ACOTAR makeover
122.74k views3534 WordsCopy TextShare
That's My Bookshelf
Welcome to my new rebind tutorial! I hope you find it useful in learning to rebind your own books! T...
Video Transcript:
welcome today we're going to learn how to turn your paperback books into a special edition hard cover like this so This tutorial is going to walk you through all the steps from removing your cover prepping what you call a text block making this case weeding out this design and then casing in which is the process of putting your text block and your cover together so that it looks like an actual book additionally I have a playlist that's about four times as long where I go through each step in great detail so if it feels like
there's something that you need a little bit more clarification on I suggest that you go and watch those they're in vertical format but I wanted to make this as a horizontal video for my page please remember to like And subscribe thanks so much and let's get started need an xacto knife ola's best a bone folder I like using rolling cutter also you need at least one Quirk backed ruler ribbon for a bookmark if you want and bands they sell them in large packs if you want bookboard mole pH neutral PVA glue I recommend this brush
it's the best one it's plastic and so when the glue dries it just rubs off no cleaning required foot cloth you can also make your own and I have a video linked and HTV vinyl um heat transfer vinyl if you want to decorate your covers in such a manner but I have a video about how to decorate your covers without using a Cricut Machine because this uses a Cricut Machine that you can also watch lastly you'll need a book press and this is the easiest way if you don't have any tools and get two pieces
of wood and normally at most hardware stores they do free Cuts so just get it cut down to a more manageable size and sand the edges and that's all you need first thing you're going to do is remove your cover and I like to use the spines as bookmarks so you want to be a little bit careful when you're moving the cover that way so I would suggest opening it up like this see how it starts to H I hold up up like this and just slowly [Applause] inch it off and see now this is
removed it's thin but you can glue this to card [Music] stock you're going to first attach your end papers making sure that they're bigger then the book so these are so I'll just fold them in half and then I do eyeball measurements draw a line try a line there going to glue these down making sure which side you want up so to mark it you'll mark it up front and then if this is up you'll mark this one up back because this side's going to be glued to the case and this is a side you
will glue to the book just get a little bit of glue and just go along this part of the book do glue here conversely you could put the glue along here cuz this is where it's going to glue to a little bit not too much okay I like to put a weight over it for a couple minutes and let it dry so we'll do this and we'll wait for 5 minutes okay now it's dry enough what you're going to do is you're going to go here and Mark which way is up on the book and
then you're going to put it in your book press okay so at this point we are going to add the mole the headbands that go up at the top and the bottom and a bookmark ribbon bookmark ribbons goes first and if you want it to be like the penguin cloth bounds their bookmark ribbon goes from the top and it goes to the bottom however if you want to put a charm on your bookmark you need to glue it to the bottom so that when the ribbon comes up and hangs over then your charm is at
the top then you'll cut your mole down to size your mole needs to be a little bit shorter than the text block and in the end you're going to be trimming it on both sides so it's about an inch or so so it can be a little longer now so that works and then we'll get down our headbands to size okay so the order goes bookmark ribbon and Bands then mold and then an extra piece of card stock on top if you would like [Music] [Applause] we'll take it out of the book press so we
can measure to cut the boards [Music] we're going to measure bookboard and there's a way that you can do it where you just attach card stock to the spine and then the two sides and that's a foolproof way basically to make sure that your cover doesn't have too much of an overhang and that all of your measurements are good and I go over that in my tutorial my vertical tutorial but I don't do that anymore I just cut directly and glue directly so we're just going to go through that way so what you're going to
do the measurements that you need are you need the width exactly so the width exactly you're going to cut onto the board and then you need the height plus 6 mm and those are your two measurements for the front and back board and then your spine I like to do the height of the book plus the height of one book board as a thickness for my spine piece and this is when it's important to have the corkback ruler so that when you hold it down it doesn't slide around just because see how this is sliding
around the corkback side is just safety precaution please make sure if you don't skip on one thing make sure you get this [Music] once you have your boards cut you need to measure your spine I like to do the width of the text block plus one of the book boards I find that's a good medium some people do both of them to just do the textbook so I'll [Music] measure [Music] that now we're going to make our case which means we're going to glue our boards onto our book cloth so first we'll measure our book
cloth for that just put down the pieces that you cut I need to make sure there's a little bit of space each side and then I just make sure that there's like an inch on this side and then I do just a ruler withd on this side and can further trim this down this feels weird I don't know what I'm doing oh well okay we'll tidy these up most important thing at least for me if you're an overg gluer and you don't want to get glue on your cutting mat because it just gets sticky and
gross is you need parchment paper and you need two sheets to get you through this keeping your mat intact they need to be bigger than this [Applause] I'll put both both of them down now put this here so to know where to place our pieces on the board I've bought these tools you get them on Etsy they're called called 3D printed spacers and just search book binding tools 3D printed spacers this one is 15 mm these are 8 mm this is a corner cutter so you're going to line them up CU you want 8 mm
between the spine and the coverboard and I just go like this let's just sort of arrange that so I just I personally just outline them and then you have a preference if you want to glue directly onto your B cloth or if you want to glue onto the bookboard and then place it on the book cloth I normally glue onto the book cloth but I really don't think there's a right or wrong way just do what you want in the past I would also use this this Square to sort of line up so everything is
at least like that we can do that again today it's just an extra way to make sure everything's even normally you wouldn't glue in the middle anyways okay now we're going to turn this around so this is why you need your first finger parchment paper oh okay so turn this around and B folder go over all with a bone folder especially your creases and if you're own overg gluer like me there's going to be glue on this so now we've gone over it so now we're going to take this flip it like [Applause] that and
you always need scrap parchment to just save this F it up so the glue doesn't touch anything okay now we're going to trim so 15 mm all around with a corner cutter these save your life definitely buy this this is why the rolling cutter is helpful you're going to glue here here then these sides and you want to start up here because you're going to be gluing off the page so you start here glue glue glue glue glue pull it down and then you can flip it over and you have glue here but then you
can just slowly work your way down so that's the best way to do it okay so start at the top you don't need much glue here excuse me plant okay so you pull it down a tiny bit take this go like that so you're getting a nice crisp crease edge up here then if you haven't used Too Much glue take your bone folder you'll go over it just to like first I normally if I sometimes I use too much glue so then my bone folder gets all gluey looks like we're good here so oop see
spoke too soon I'm over gluer but anyway so now that my bone folder is gluey I just have to be careful about not putting the gluey inside on to the book cloth because many a case has been ruined that way so anyways okay let's do take that so now see there's glue there so now I'm going to put down a little bit to avoid that glue so now that we've got to these sides we're going to glue again but then we're going to take our bone folder and we're going to poke in the sides poke
in the sides before we fold it over so that there isn't a bump cuz this is where the book rests either the top or the bottom so there isn't a bump so it it lays flat on the Shelf tin bit of glue in there okay so you're just going to poke in the side poke in the side and those Corner Cutters just ensure that you've cut enough that when you fold it over you don't have any book cloth sh then you have a nice on my hands tight little corner and then pretty much yeah so
I'm going do it on the other side tuck it see there we go now you need to press your case to dry so I have bigger boards that I use to press my case this is my fitt it and and you always need to put your case between parchment paper so leave that for a bit I normally leave mine for a couple hours to overnight okay now it's back from the cutter some people like to weed out on this mat but personally I don't like that because it's sticky and so like your hands get sticky
so I take off my HTV and then cut it down and weed it on its [Applause] own okay for weeding there's a couple different tools you can use you can use one of these but someone told me about these they're just it's a teeny tiny prick I like this one a lot more if you never weeded before weeding is pretty simple you just take whatever you're not supposed to have so this is an inverse one so the things I'm going to be taking out are the actual letters you can see so I'm going to take
out the letters and then this background is going to stay so you just poke and yes sometimes you just pull so the middle of that o is going to stay but that's going middle parts first the O's the middles of the A's midd of the RS mid of the E cuz sometimes the letters once they the outside is taken from them they're sort of delicate and you're going to break off it's just it's easier I think if you do the middle of the letter while it's still attached to the rest of the HTV and then
I sort of slowly in those little grooves sort of poke it out so anywhere that I know that the HTV might get stuck I'm just making it a little bit easier for it to come out and then what I've started doing also which you don't have to do but I so I've started going into the middle of the letters and breaking the HTV so that when you pull it it's like not really connected between the two I don't know I found it helpful okay so this is the criet mini heat press I normally put it
to two and looks like there's some imperfections in the case but that's okay because you're going to cover it with your HTV and so you won't really be able to see when it's done I mean you will but it's fine it's your own book so you just sort of line it up where you think I can measure I normally don't um I just sort of viall it and I know that's probably you probably should measure it but I just don't so sometimes it's a little crooked but it's okay so you're going to put it down
and then once this heats up you'll just iron over it most htvs have they have different peel temperature so some you'll peel while they're warm and some you'll iron and wait till they cool and then you'll peel them and on the package for them it will say what it is or online okay let's let's get started and I personally I normally with this one because I have a big heat press but I used it once and something went wrong so I haven't used it since with this I normally start in the middle for two seconds
then I go up and I go down and I go side and I go side and then I go out and I sometimes press it down it's probably need longer than this goodness I hope my boards are dry they might not be dry you always really want to do wait a while until these are dry CU why sometimes the glue will come through especially on homemade book cloth you can also start to see when it melts especially with foil when it melts into the fabric if you don't even can see foil or in this case
the metal HTV from Caesar caer Caesar I don't know how to pronounce it another thing is if you have a lint roller lint roll your case before you do this I just don't know where mine is okay then I start to see if I can peel it and if it will come off or not we think it's looking great okay so I lost an S here so I just cut another one out and then you just weed it out and then you iron it on on top but when you iron it make sure you put
it down and then you have to put parchment paper over the entire thing otherwise you're going to melt your HTV if you just try iron this down without protecting everything else okay so then we're going to go go over the iron and then let's just go over the whole thing with the iron okay we're ready to case in okay the last part of the process is called casing in where you attach attach your case to your text block so for that you just need a pair of scissors two clean sheets of parchment paper absolutely no
glue on them and two pieces of scratch paper along with glue and your brush so the first thing you're going to do is just trim this mole so it's even you can you can leave a lot you can leave a little bit I use leave about an inch okay so then you double check words are up front front so you're going to place your book in you're going to push it all the way back and then make sure it's even on this side and this side this is my favorite thing about this brushes that look
super easy to clean so first you're going to put your scratch paper under between those two pieces and then you're going to glue glue under here every all your glue movements are going to be going off the page in this direction cuz if you glue this way glue might get under here and attach to the other sheet so stick this up tight glue under here then glue on top and glue off the page and then you close it sort of rolling it down grab it so it doesn't move around flip it over and then repeat
the process so let's go [Applause] and some people open it up but I don't normally do that like they'll open it and double check that they'll go over it with a bone folder oops you know what I forgot to put my parchment down my scrap paper look over with a bone folder but um I found whenever I was learning I every time I tried to do that I messed it up really badly and my end papers would come out crinkly so I have just the method that I found from some guy on YouTube I don't
think he even used this um he just glued directly off the page closed it up pressed it and never opened it and so that's what I do and that's after trying probably like I don't know five eight different ways of casing in that's the one that I found that worked for me but if you find something different that works for you definitely do it because this is a lot of trial and error [Applause] okay so now we're going to press it in the press and the most important thing for pressing it is that you're going
to have your boards here and under there but you're not going to you're going to have them stop right before you get to the spine you don't want to squish your spine so your little spine is going to be popping out but that's all everything else will be wrapped in parchment and pressed [Applause] normally I use shorter pieces but this is what I have close [Applause] available going [Applause] to I'm just pressure in here I can just show you what I mean by the spine sticking out see the spine is just a little bit above
the boards so it's not pressing but everything else is pressing okay that's it now we just leave it overnight last thing we're going to do is make a bookmark out of the spine so to do that you find a pach of parchment paper that you want to use and then you're going to cut farther then the fault so it'll go like that you have more room to work with you glue it to the card stock want your card stock to be wider than the bookmark itself but you're gluing it too so take a scrap peeps
of parchment and basically you're just going to glue this put it on here press it because it's going to want to curl up and you want it to be flat and then tomorrow when it's dry you will just cut off the ends it's really quick really easy so what I'm going to do actually is glue this here and have glue go around it which is fine and I'm going to put this on top close this over and then let it dry because if there's more glue here and everything it will it won't matter cuz we're
cutting it offie doie and just remember to um press it until it dries see how it wants to curl up hold them the BLS contained and just pass it over there [Music] this
Related Videos
9:59
How to decorate your rebound book covers w...
That's My Bookshelf
47,349 views

34:13
I Made MASSIVE Leatherbound Books... and g...
Nerdforge
5,413,675 views

26:39
Bookbinding 101 - Make your hardcover
Abound Bindery
164,664 views

16:17
Bookbind With Me: Transforming My Bridgert...
Sydney
10,162 views

20:28
Rebinding The Lord of the Rings Trilogy + ...
TheBinaryBookBinder
2,465 views

58:34
WHY EVERYBODY HATES KATY PERRY
Paige Christie
26,078 views

25:36
Part 3: MAKING THE CASE- Penguin Clothboun...
That's My Bookshelf
47,829 views

A Happy Little Weekend Marathon!
Bob Ross

19:18
I destroyed my Harry Potter books to make ...
Nerdforge
2,700,924 views

24:44
Making a journal for building inner streng...
bitter melon bindery
22,918 views

7:08
DIY Leather Book Binding Tutorial Part 1: ...
Ingenius Designs
187,266 views

11:06
DIY Paperback to hardcover - I transformed...
Extra Cozy DIY
933,538 views

1:23:27
Stunning and UNIQUE Page Elements for Jour...
Treasure Books
57,766 views

30:41
Crafting pocket journals with hand-marbled...
bitter melon bindery
138,295 views

21:09
Converting a Paperback to a Hardcover Book...
DAS Bookbinding
467,262 views

12:17
Bookbinding Tips & Tricks - 14 Helpful Hin...
Four Keys Book Arts
696,337 views
![REBINDING The Harry Potter series Into LEATHER Bound Books! [DIY, Bookbinding]](https://img.youtube.com/vi/LiqU3SDD-uw/mqdefault.jpg)
14:11
REBINDING The Harry Potter series Into LEA...
Designed By Daydreams
836,467 views

10:38
Bookbinding Basics: Chapter 1 - Basic Tool...
Four Keys Book Arts
271,499 views
32:53
How to bind fanfiction at home- In-depth t...
Ally - The Little Key
24,907 views

55:10
Mini Laminated Travelers Notebook TUTORIAL...
KarolinasKrafts
54,585 views