How I Automated Video Creation and Posting Across Platforms! (Step-by-Step)
13.76k views8145 WordsCopy TextShare
SumoBundle
Get the complete automation here: https://www.skool.com/automation-tribe-1042/about
or here
https...
Video Transcript:
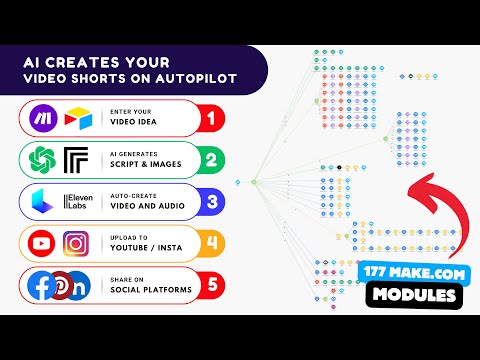
welcome to this step-by-step guide on automating your video creation and social media posting process with make.com in this video I'll walk you through how the system works from generating story ideas creating image prompts and producing a video based on those images to generating a voiceover and finally merging everything into a complete video with just a few clicks after explaining how the system works I'll show you a demo so you can see what it can do in action at the end I'll take you through a step-by-step tutorial on how each part of the automation was built
so you can implement it yourself the blueprint for this automation is available on Sumo bundle.com where you can download it and start using it right away step one generate Story the first step generates the storyline for your video this creates the foundation by developing a narrative structure based on your input step two generate voiceover text once the story is created the automation generates the voiceover text that will narrate your video based on the story you provided step three generate image prompts after the voiceover text the automation generates image prompts these are text descriptions that will
be used to create visuals for your video step four generate images next these image prompts are used to generate actual images which are the visual elements of your video step five generate video Once the images are ready the automation generates a video based on the images provided step six generate audio in this step the audio for the video is generated this creates the voiceover file that will be synced with your visuals step seven save to Google Drive the generated images videos and voice voice over audio are then saved to your Google Drive for easy access
and backup step eight merge video and audio here the automation merges the video and audio files creating a final version of the video with synced visuals and sound step nine post to YouTube the video is automatically posted to YouTube this step handles the upload and ensures the video is published on your channel step 10 post to Instagram reels similarly the video is also posted to Instagram reels the automation handles this step ensuring it reaches your Instagram audience Step 11 generate social media posts in this step the automation creates social media posts related to the video
generating text and visuals for social platforms step 12 publish to social media these generated social posts are then automatically published across your social media platforms and uring maximum reach now let me show you a demo of how to use this automation the entire database for this process is stored in an air table base later in the video I'll explain in detail how this was set up but for now let me show you how I generate a video the first step is to enter a video idea in the First Column for this demo I'm going to
use the mystery of the Lost Roman legion next you'll need to choose a niche I'll select history for this example you'll notice some pre-populated fields in the status field you'll see it set to one- generate Das story leave this field as is for now this is the first step and the automation starts here for the aspect ratio I'll keep it at 9 to6 since I want to generate a vertical video next we have the style field I'll choose photo realistic but if you prefer you can select a cinematic style for a different look now for
the number of scenes I'll choose five scenes which will give me a 25c video you can go up to seven scenes but if you're familiar with modifying the automation you can add even more for this automation you'll need a replicate token which I'll show you how to set up later we'll be using flux to generate the images in the flux version field I'll select flux Pro for better image quality next I'll need a token for my Luma laabs account I'll copy the token I used for a previous video and don't worry these tokens will be
deleted once the video is published so they won't work later these are the steps you need to complete before starting the automation make sure the status is set to one generate story then head over to make.com and click run once the automation will do its magic and you'll see some Fields populate like the video title video description and keywords now we'll need to wait a few seconds for the video title description and keywords to populate in the air table base the text has already appeared generated automatically by the system for step two please make sure
you update the status field to 2- generate voiceover text once you've selected that head over to make.com and click the Run once Button as soon as you do the automation will kick off and populate the voice voice over text field in air table you'll also see confirmation in the status field as it will automatically update to two voice over text generated once the process is complete now let's move on to step three in the status field select three- generate image prompts and run the automation once again in just a few seconds you'll see the image
prompts fill the designated Fields these prompts will guide the system to generate the visuals in the next step keep in mind if any of the prompts aren't quite right you can always edit them directly in air table but for the sake of time in this tutorial I'll leave them as they are now let's move on to step four where we start generating the images since I set up the automation at the beginning to generate only five scenes the system will create exactly five images for us you'll notice that we only have five image prompts which
will correspond to five unique visuals this task might take a few minutes and because image generation can take around 30 seconds per image I've added a wait time in the automation to ensure the process runs smoothly let's wait for the images to be generated and I'll speed up the video for you let's Click on each image and air table to see what flux has created for US based on the prompts this first image shows a misty atmospheric landscape of ancient Britain on the second image we have a detailed map of ancient Britain this is a
dramatic battle scene depicting Roman soldiers clashing with Fierce local tribesmen next we have an archaeological site deep de in the British Woodland finally we have a vibrant depiction of ancient Britain life this is what flux created for US based on the prompts we entered the images are stunning and help bring the story of the Lost Roman legion to life now let me show you the true power of this automation if you're not satisfied with one of the generated images it's incredibly easy to make adjustments simply go into air table select the image you'd like to
replace and delete Del it then update the status field back to four generate images and run the automation again the system will generate a new image for you alternatively before running the automation you can also directly edit the image prompt in the air table base to refine or change the description this gives you complete control over the visuals ensuring they match your vision perfectly now let's move on to step five where we generate the videos in air table update the status field to five generate videos and run the automation once more this step will take
the images we've created and using Luma Labs will apply motion to them bringing the visuals to life this process will take a few minutes so I'll speed up the video to save time as you can see this automation does a lot of heavy lifting for you from generating custom images to creating Dynamic videos it's a great tool to streamline your content creation process saving you time while still delivering professional results whether you're creating content for social media or larger projects this automation offers flexibility and efficiency and don't forget you can tweak the images and prompts
anytime to get the exact look and feel you want it looks like the automation for this step has completed now let me show you the final videos that were generated and I have to say I'm really impressed with the results the first video perfectly captures the mysterious atmosphere of ancient Britain I love how the mist and Landscape create such an eerie and dramatic scene with the Roman soldiers gazing towards the unknown this second video is a detailed map which really helps to set the historical context the focus on key locations adds depth to the story
of the ninth Legion disappearance and I think it turned out great the third video is full of action it's one of my favorites the battle between the Roman soldiers and the local tribesmen is so Dynamic and the energy of the scene really pulls you in this video shows an archaeological site with Roman relics there are some artifacts I'm not happy with and I could regenerate it but for the sake of time I'll leave it as is I like this final video it's not perfect but it will do the job and conveys the essence of the
scene well next we'll move on to generating the audio for our video for this step we'll be using the 11 Labs API in air table update the status field to six generate audio and run the automation again this part of the automation takes the video description and the individual scenes then generates a text file that will be used to create a text to speech audio track you'll need to choose a good voice from 11 labs for this step I recommend selecting one with a slightly faster speaking Pace as these short videos tend to be dynamic
and require an energetic voice to match let's hear how it sounds what really happened to the Lost Roman legion a story so mysterious it could rival the greatest Adventures of History join us as we dive into the fate of the ninth Legion Hispana who seemingly vanished from the annals of time in ancient Britain was it defeat in battle assimilation into local tribes or something even more unexpected with expert insights and stunning reenactments will uncover the truths and challenges they faced in a land they aimed to conquer I made a few adjustments to the automation I've
moved the save to Google Drive step so that it runs after the final video is generated this way we ensure everything is completed before saving so now let's go ahead and generate the final video and once that's done we'll save everything to Google Drive now let's move on to merging the video with the audio for this step I'll be using the Json 2 video module to combine all the videos we've generated with the audio file it's really important to find the right voice that matches the length of the video for example since we have five
scenes in this video it should be around 25 seconds long so the voiceover should also be exactly 25 seconds you may need to try a few different voices or speeds to get the perfect match alternatively before running the audio generation Branch you can edit the text in the voiceover text field to ensure the timing is just right now that we have both our video and audio files ready the next step is to merge them into a complete video to do this go into air table and change the status field to 7- merge video and audio
this step is crucial because it combines the visuals with the voice over bringing the whole project together the Json 2 video module handles this process by syncing the generated video with the audio file we created earlier it's important to make sure that the voiceover length matches the video especially if you've made any adjustments to the scene count or timing once you've updated the status head back to make.com and run the automation again the system will then merge the individual scenes along with the voiceover into one seamless video this step might take a little time depending
on the length and complexity of your video but it's worth the wait to ensure everything lines up perfectly now let's take a look at the final result pay close attention to the small error at the end what really happened to the Lost Roman legion a story so mysterious it could rival the greatest Adventures of History join us as we dive into the fate of the ninth Legion Hispana who seemingly vanished from the annals of time in ancient Britain was it defeat in battle assimilation into local tribes or something even more unexpected with expert insights and
stun now that the video and audio have been successfully merged the next step is is to save all of our assets to Google drive to do this go into air table and update the status field to 8 save to Google Drive and run the automation again this step will take all of the images videos and audio files we've generated and store them securely in a folder within Google Drive the folder will automatically be named after the video title which makes it easy to organize and locate later this process might take a few minutes especially if
the files are large but it's essential to back up your assets in case any links expire once everything is saved you'll have easy access to your project ready for editing distribution or future use now that everything is ready the next step is to post our video directly to YouTube in air table change the status field to 9- poost to YouTube and run the automation this step will take the finalized video and upload it to your YouTube channel automatically the automation handles everything from attaching the video file to adding the title description and any other details
youve set up an air table once the video is uploaded it will update the air table record to confirm the video has been successfully posted this way you can track exactly which videos have been published without any manual uploading at the end of the automation I've also set it to send myself an email with a download link that way I can easily download the video to my phone and post it to Tik Tok now let's run the Automation and get this video Live on YouTube what really happened to the Lost Roman legion a story so
mysterious it could rival the greatest Adventures of History join us as we dive into the fate of the ninth Legion Hispana who see now let's move on to posting the video to Instagram reels in this step we'll automatically upload the video my Instagram account to begin update the status field in air table to 11 post to Instagram reels and run the automation this step uses the Instagram API to create a new real post uploading the video file directly to your account once the video is posted the automation will retrieve the post details using the Instagram
for business module and update the air table record confirming that the post was successfully published this way you can track everything in air table without having to manually check Instagram Legion a story so now let's move on to generating social media posts for all of our Platforms in this step the automation will create customized posts for Instagram Twitter or X Facebook LinkedIn and Pinterest all based on the video and content we've created to get started update the status field in air table to 12- generate D social- posts and run the automation this step utilizes AI
to generate the perfect captions and content for each platform tailoring them to the specific style and tone suited for each one once the automation finishes you'll see the posts created for each platform ready to go you can review and tweak these posts in air table if needed after generating the posts the system will update the social posts generated record in air table confirming that the content has been successfully created for all the platforms this ensures you're ready to share your video with the world on multiple social channels without having to manually write or format each
post now we've reached the last step where I'll post to all my social media networks this step will automatically share the video across Pinterest Facebook pages and Instagram using the YouTube link if you prefer you can easily change the link to the Pinterest URL or any other platform you'd like the automation is flexible allowing you to customize it to fit your specific needs however I won't be running this Branch for now as I don't want to post a history related video on my graphic design focused social accounts but the setup is ready to go and
you can see how seamless it is to distribute content across multiple platforms with just one click now I'm going to walk you through how this air table was set up detailing the key fields that manage the video creation process after that I'll show you how the Automation and make.com ties everything together making content creation seamless let's dive into the details let's take a look at the key columns in this air table setup each playing a crucial role in automating the video creation process we start with the video idea which is a long text field this
is where you enter the main concept or theme of the video allowing for detailed descriptions the niche field is a single line text field where you can categorize the video by its topics such as history or technology next is the status column which is a single select field this tracks where the video is in the creation process whether it's generating the story video or already posted for aspect ratio we use a single select field this lets you choose the format such as 96 for vertical videos or 169 for horizontal ones the style column is also
a single select field where you define the visual aesthetic of the video options could include photorealistic or cinematic number of scenes is another single select field where you specify how many scenes the video will contain typically between three and seven scenes the replicate token is a single line text field where you input the access token for the flux AI model used to generate images flux version is a single select field allowing you to choose the version of the flux model for generating the video's visuals next we have the Luma laabs token which is also a
single line text field this stores the token for Luma Labs used to add motion to the images the video title field is a long text field which stores the video's automatically generated title this is crucial for capturing viewer interest for the video description we use a long text field this column contains the full description generated for the video typically used for platforms like YouTube the keywords column is also a long text field where we store relevant keywords that help optimize the video for SEO the voiceover text field is a long text field storing the generated
script that will be used for the videoos narration then we have a series of prompt fields which are long text fields that store the descriptions used to generate images for each scene there are multiple of these from prompt one through to prompt 7 for the visuals we use image fields which are attachment Fields these store the generated images for each scene and like the prompts there are seven in total similarly the video fields are also attachment Fields storing the generated videos once the images and voiceover are merged the text voiceover column is a long text
field where the voiceover script is stored after generation the audio voiceover field is an attachment field that stores the finalized audio file for saving all assets we have the Google Drive field which is a URL field that links to the fold where all the files are saved next the final video field is an attachment field storing the fully merged video the YouTube column is a checkbox field where you mark whether the video has been posted on YouTube the YouTube link is a URL field where the YouTube video link is stored after posting similarly Tik Tok
is another checkbox field marking if the video is posted to Tik Tok and the Tik Tok link is a URL field storing the Tik Tock link for Instagram we also have a checkbox field indicating whether the video has been posted to Instagram with the Instagram link stored in a URL field next the Instagram post field is a long text field that stores the generated caption for the Instagram post the Twitter X post column is a long text field storing the content created for Twitter or X the Facebook post field stores the content for the Facebook
post and it's also a long text field the LinkedIn post column again a long text field holds the content generated for LinkedIn lastly the Pinterest post column is another long text field storing the content for Pinterest posts this setup ensures that every aspect of the video creation and distribution process is seamlessly managed in air table with each Field playing a critical role in tracking and automating the workflow let's dive into how the automation Works in make.com we'll start with connecting air table and the router in this first step we use an air table module to
search records this allows the automation to pull in all the video data from our air table base such as the video idea Niche and Status once air table is connected the data flows to the router the router helps direct the flow depending on the status of the video creation process it checks the current step whether it's generating the story merging the video or posting to social media and routes the tasks accordingly now let's look at the filters each branch of the router has a filter like this one for Generate Story the filter checks the status
field to ensure the automation is working on the correct task in this case it checks whether the status and air table is set to one- generate story this ensures the automation triggers only the right task at the right time next we connect to open AI for the video creation steps in this section we use open AI to generate the title description and keywords for our video you can pause the video here if you want to copy the prompts I'm using the prompts are tailored to generate the most engaging content for your videos it's important to
note that I won't be covering how to connect to different services like open AI or air table as those are straightforward steps and you'll need basic knowledge of make.com and airable to handle those finally we send the data back to air table once open aai generates the content like the video title description and keywords everything is updated back into the air table base this keeps all your information in one place ensuring you can track each step of the video creation process now let's move on to the second branch which is generating the voice over first
let's talk about the filter if the status and air table is updated to to generate voiceover text and the filter is set up correctly the automation will follow this route the filter ensures that only when this specific status is active the automation proceeds to generate the voice over after the filter directs the process to the correct Branch the open AI module is triggered here we use a carefully crafted prompt to generate a voiceover script based on the video description feel free to pause the video here if you want to copy the prompt I've used The
Prompt asks open AI to create a concise and engaging script it's tailored to the number of scenes ensuring the script fits within the time frame of a short video the voiceover script includes a strong opening some impactful lines in the middle and a clear call to action at the end you can tweak the prompt to match the tone and style you want for your video Once the script is generated it's immediately sent back to air table where it's stored in the voiceover text field when you update air table don't forget to place the dat data
from the open AI module correctly into the generate voiceover field this ensures the voiceover script is mapped back into your database and ready for the next step of the video creation process remember if your status and air table isn't set to to generate voice over text the automation won't proceed down this route so make sure your filters and Status fields are properly set up let's walk through the next step in the automation process for generating images we start with a filter labeled for Generate images in this step we set the route based on a condition
in air table when the status field equals four generate images the filter will allow the data to pass through to generate image prompts this is crucial for ensuring the correct flow of data and triggering the right actions at the right time after the filter I have two replace modules the first one removes any single quotation marks apostrophes and the second one removes double quotation marks these steps are necessary to clean the text before sending the prompts to the image generation API to avoid overloading the API or hitting timeouts I placed a weight module between these
two where the system pauses for 3 seconds next we move on to the HTTP request module where I interact with the replicate API to generate images if you're following along you'll need to create an account on replicate and add some credits for the image generation once you have an account you can generate your API token under the API section on the replicate website keep in mind that this token is sensitive information and you should never share it publicly I'll be deleting my token as soon as this video is released inside the HTTP module I selected
the flux version for the image generation set the method to post and under the header add your authorization token as Bearer your API token here for the body type select raw and set the content type to Json application Json in the request content you'll enter the Json structure that includes the prompt and other parameters like aspect ratio and output format be sure to parse the response so that it can be used later in the workflow the next module is another sleeper weight module where I added a delay of 30 seconds you can adjust this time
depending on your needs but I prefer to be safe and ensure that the image generation process completes after the image is generated we update the record in air table using an update record module this step takes the newly generated image and updates the corresponding field in air table for each prompt I have created seven different branches that follow the same structure each branch corresponds to an image prompt and its related image field in air table finally it's essential to note the filter conditions I set for updating images the first three filters are straightforward please pause
the video to see what I have in each of them starting with the fourth image I've added a condition that checks whether the image field is empty and whether the prompt field is not empty this allows for flexibility if you don't like a generated image and decide to delete it running the automation again will only update the missing images rather than regenerating all of them this ensures efficient use of the Automation and avoids unnecessary API calls by following these steps carefully and configuring each module as described you can automate the image generation process seamlessly just
make sure your API tokens are secured and filters are correctly set to handle various scenarios like replacing images let's continue the explanation of the third step generate image prompts after the filter checks if the status is set to three generate image prompts it moves to a series of open AI modules here each module is responsible for extracting a specific image prompt based on the sequence of scenes in the first open a module I asked it to provide the response in Json format even though I don't actually use it in this format later I found through
multiple tests that generating the response as JS n reduces errors in the following steps this approach has worked best for me ensuring smoother operation in the next modules where I extract specific image prompts each subsequent openai module is designed to extract specific image prompts from this response the module checks the entire text and extracts the first image prompt second third and so on until the final one is captured as you can see in the screenshots each prompt is mapped to a specific scene such as image 1 image 2 Etc these fields will later hold the
image prompts generated by open AI finally each of these extracted prompts is updated back into the air table under the respective prompt field prompt one prompt 2 Etc ET so that they are ready to be converted into visuals in the next steps now that we've handled the image prompts let's proceed with the next steps to generate the images themselves for this next step we will focus on generating videos based on the images that have been processed earlier the automation is triggered by a filter which ensures that this Branch only activates when the status and air
table is set to five generate videos in this step I start with an HTTP request to the Luma laabs API to use this make sure you have some credits in your Luma Labs account without them you won't be able to generate videos I added $5 to my account to ensure everything works smoothly for this example I'm using Luma laabs but in the future I will explore other API providers as well in the HTTP module set the API link as displayed on the screen and use the P method for the header enter authorization as the name
and Bearer followed by your token in the value field I've hardcoded my token but you can also extract this from Air table this is better because you only need to update the token once instead of doing it for each module in the body section choose raw as the body type and select Json application sljs for the content type the request content includes some details like the prompt and key frames I left the prompt empty in this case because I want Luma laabs AI to determine the slight movement in the video you can customize this based
on Luma laabs documentation which gives you flexibility to make various adjustments make sure to check the parse response option to handle the response correctly next after the video is requested I placed a sleep module with a delay of 180 seconds this ensures enough time for the video to be generated you can adjust this based on your preferences but I prefer to play it safe by waiting longer after that I use another HTTP module but this time I switch the method to get to retrieve the video the URL needs the video ID from the response of
the previous module the authorization and token values remain the same like before you can pull these dynamically from Air table for convenience finally I update the generated video back into air table using the air table update record module this way each generated video is stored and categorized appropriately just like in the previous steps I have filters set up these filters ensure that only the necessary videos are generated based on the status and available content in air table for example the filters ensure that if a video hasn't been generated yet it will trigger the video generation
and if any part of the process is incomplete you can rerun it for specific videos this flexibility ensures that you only generate the content you need for the six step six generate audio we again begin with a filter setup this filter is designed to trigger the audio generation process only when the status and air table is updated to the correct value which in this case is 6- generate audio by using this filter we ensure that the audio generation branch of the automation is activated only when the proper condition is met preventing unnecessary execution of this
module in the initial phase we use open AI to refine the voiceover text this module processes the text removing any unnecessary elements such as unwanted spaces strange characters or scene annotations the goal is to format the text so that it is ready for text to speech conversion please pause the video and copy The Prompt I used once the voiceover text is cleaned we update the text voiceover field in air table this helps ensure that we have the formatted text stored and ready for the next steps as you'll need it for the audio generation the 11
Labs module comes next and here is where we generate the audio file using the cleaned voiceover text when using 11 laabs it's important to find a voice that speaks faster than usual this is especially useful because in short form videos you often need more content within a short time frame if you don't want to adjust the voiceover script itself you'll need to tweak the voice settings such as stability or similarity boost to get the tone and pacing you desire here's a breakdown of how to configure 11 Labs voice choose a voice that fits your video
style but ensure it can maintain a fast pace model use the 11 English V1 or any other suitable model text this field will be mapped to the text voiceover field generated earlier stability adjust the stability to 0.5 lower stability can make the voice more expressive but be careful as it can introduce inconsistencies in the output but this can be useful if you want to match the vo's style more closely with a specific tone or personality once 11 Labs generates the audio we move to the Google drive module here we upload the audio file to a
dedicated folder on Google Drive you'll need to configure your Google Drive account and select the proper folder in this case I've organized it under automations SLV video shorts cockpit sltm but you can choose any structure that works for you after uploading the audio file to Google Drive we capture the file URL and update it back in air table under the audio voice over field this allows you to store the generated audio file directly in your project database the automation for merging videos and audio will only start once the correct status is set in air table
in this case the status needs to be set to S merge video and audio this ensures that the workflow triggers at the right moment and doesn't run prematurely for this step there are five different branches and each one is triggered depending on how many scenes you've selected in the air table the first Branch will activate if you've selected three scenes the second one when you select four and so on until the fifth branch which is triggered when you select up to seven scenes this allows for flexibility in how many videos you want to combine in
the final output in this step I use the Json to video module which merges the videos and the audio we generated in the previous step you will need to map The Right video URLs into the module based on the scenes you selected in air table for example if you've chosen three scenes you'll map the three corresponding videos into the Json 2 video module these videos will serve as the core visual content you'll notice that in the Json 2 video module each video entry has Fields like seek which controls when the video starts and duration which
sets how long the video plays in most cases you can leave seek as zero which means the video will start at the beginning and duration set to negative one meaning the entire video will be used now once the videos are mapped you'll also need to add the audio that was generated earlier this audio file will be merged with the video clips acting as the voiceover narration you simply input the audio URL as back background audio and the system will handle the rest seamlessly merging the voiceover with the visual content once all the videos and audio
are combined the next step is rendering after the video is fully rendered the automation uploads the finished video to Google Drive it's important to make sure the right folder and file names are set during this step the video file is then saved and its URL is automatically updated in air table so you can easily track and reference it this entire process selecting scenes merging the videos and audio and uploading the final product is done within the Json 2 video module depending on the number of scenes selected different branches handle the appropriate workflow ensuring that your
video creation process is flexible and efficient the automation will start once the correct status is set in air table this step is triggered when the seven save to Google Drive status is active in air table the purpose of this branch is to save and manage files on Google Drive ensuring that the final video images and audio generated during the previous steps are properly uploaded and linked to air table for future reference let's walk through the process the first Branch focuses on the download final video module where the final video is retrieved through an HTTP module
in this module the correct URL for the final video generated is set ensuring the video is downloaded after this the video is uploaded to Google Drive using a Google Drive upload a file module here I MA the file using the HTTP get a file setting to ensure the video is uploaded correctly then the uploaded video link is updated in air table in the designated field ensuring the workflows Integrity moving on the next branches follow a similar process but focus on the individual components of the video creation such as the images and the audio for example
the download image 1 module will download the first image using the correct URL from the air table database and then the image is uploaded to Google Drive using the same Google drive module with a new file name such as image 1 PNG this process repeats for all the images such as download image 2 through download image 7 ensuring that each image used in the video creation is safely stored on Google Drive the same logic applies to the audio files the download audio module ensures the audio file generated in the previous step is also stored safely
in Google Drive it downloads the audio using its URL and uploads it with the same Google Drive settings mapping the file accordingly this ensures that the audio is preserved and accessible throughout this Branch filters are in place to control the workflows flow for example in the filters labeled stop at 4 stop at 5 and so on conditions are set up to ensure the automation only proceeds if the correct number of scenes or videos has been selected these filters are essential in customizing the automation based on the specific number of scenes chosen in air table ensuring
the proper files are uploaded to Google Drive finally once all files videos images and audio are uploaded and the correct links are mapped in air table the final video is also updated in the respective field marking the automation complete each branch though repetitive ensures that all assets are accounted for and stored in Google Drive with the corresponding links updated in air table for easy access and future use this comprehensive flow guarantees that no no matter how many scenes or assets you use everything will be saved organized and updated correctly with automation proceeding smoothly and efficiently
for the next step the process involves uploading the final generated video to YouTube and other platforms as well as sending it via email this automation will kick off once the status and air table has been updated to reflect that the video is ready for posting the first part of this Branch starts by retrieving the finalized video from the HTTP module using a URL reference to the file once the video is fetched it's ready for posting to YouTube as shown in the images make sure to map the video title and provide the correct category and privacy
settings in this example the category chosen is education and the Privacy is set to private initially if you want to make it public or schedule it adjust these options accordingly the the content for YouTube needs to be carefully inputed including the description any tags and whether or not the video is for kids according to YouTube's policies once the video has been posted to YouTube the next step is updating the corresponding record in air table where you'll input the YouTube video link ensuring it's stored for future reference the final stage involves transferring the video to Google
Drive for safekeeping the video will be uploaded to a designated folder on Google Drive and you'll generate a sharable link from the uploaded file in the Google drive module be sure to correctly map the file using the output from the previous HTTP module that fetched the video you'll specify the file ID and set the role for accessing the file in this case set as reader allowing anyone with the link to view it without needing to sign in lastly an email is automatically sent to notify recipients with a download link for the video from Google Drive
and a direct YouTube link once the email is sent you'll receive a download link directly to the video file hosted on Google Drive as well as a link to the video on YouTube from this email you can easily download the video onto your phone by clicking on the Google Drive Link once the video is saved on your phone it's ready for quick upload to platforms like Tik Tok for the step 10 post to Instagram reels the automation will only proceed when the status and air table is set to 10 post to Instagram reels the filter
ensures that this condition is met before proceeding to the next modules once the automation Begins the first module is an HTTP module that retrieves the final video file this step is essential because Instagram requires the video to be accessible from a public URL the module pulls the URL of the final video from the previous steps and prepares it for upload next the create a real post module handles the upload to Instagram reels here you must ensure that you have connected your Instagram business account to automate this process the video URL is passed to this module
and a caption is added you can map the video title from Air table to serve as the caption or modify it to suit your post a cover frame is chosen indicating the time stamp in seconds from which Instagram will capture the frame for the video's cover image in the next module Instagram for business get media we retrieve the post details after it has been successfully uploaded to Instagram this module helps retrieve the permal link for the Instagram post which can then be stored in air table or shared further as needed following the post to Instagram
an air table module updates the record with the newly generated Instagram permal link this ensures that you keep track of the posts URL for future reference or for sharing across other platforms lastly the automation concludes with storing relevant links captions and video data in air table the Instagram reels video is now available and the permal link for the real can be used across other social platform in this step of the automation titled 12 generate social posts the process will generate a series of optimized social media posts across different platforms based on the final video content
that has been uploaded the automation is triggered when the specific status 12 generate social posts is set in the air table first the content for the social posts will be extracted and parsed from the text Pro provided this will allow the system to create platform specific formats based on the requirements for each network using the open AI module we will create unique posts for each platform ensuring that the message is tailored and optimized for each format whether it's a Facebook post Twitter X tweet Instagram caption LinkedIn post or a Pinterest pin description each platform has
its specific character limits and content Style which will be taken into account for instance the Instagram post will include an engaging caption with a call to action between 200 to 400 characters designed to resonate with users and include relevant hashtags the Twitter at xpost will be shorter ensuring it's concise but impactful within the 280 character limit the LinkedIn post will have a more professional tone and focus on summarizing key insights keeping it under 400 characters similarly for Pinterest the description will focus on actionable tips and search optimized keywords all within 300 characters once the content
for each platform is generated it will be sent to air table where the social posts are stored and ready to be published from this point the generated posts can be shared across Instagram Facebook Twitter LinkedIn and Pinterest ensuring that the message is consistent but adapted for each audience finally this entire step ensures that your content strategy is efficiently automated creating engaging social media posts with minimal effort thanks to the integration with open Ai and make this way your video content will reach the Right audience in the most optimized format possible at this stage the automation
is triggered when the status and air table is set to 13 publish to social here the automation focuses on Distributing the link to the YouTube video across various social networks rather than the video itself first the automation posts on your Facebook page it connects with your Facebook account and the mapped Facebook post content is published including the YouTube link this allows your followers to easily click can view the video on YouTube directly from your Facebook page next the content is sent to Instagram for business the automation uploads an image along with a caption that includes
the YouTube link inviting users to view the video on YouTube this makes the post more engaging with a clear call to action for your Instagram audience the automation then proceeds to Pinterest where it creates a new PIN it uses an image URL adds a title and provides a description ensuring the YouTube link is included this pin will direct users to the video making it accessible across another key platform lastly the status and air table is updated to 13 done posts published indicating that the YouTube link has been successfully shared across all the selected social media
platforms you can download this complete automation from our website and the link will be available in the description below if you found this helpful or learned something new please give it a like and share it with others who might benefit from this workflow
Related Videos

35:37
Automate Blog and Social Media Posts with ...
SumoBundle
11,455 views

4:41
This free Chinese AI just crushed OpenAI's...
Fireship
2,637,984 views

8:27
My Plans for 2025 in an AI-Driven Market
Travis Media
67,108 views

24:01
AI Social Media Automation: Post Reels, Sh...
Solopreneur
8,219 views

9:29
Post Automatically to Tiktok, YT, IG and o...
Topster
540 views

17:52
My Automated Social Media System - Every Step
Futurepedia
63,306 views

29:43
How to Automatically Turn Any URL into an ...
SumoBundle
1,894 views
14:56
AI Social Media Automation: How to Post Da...
Solopreneur
31,703 views

19:29
How I Built an AI Agent with DeepSeek AI t...
Andy Lo
114,765 views
19:39
This Social Media AI System Creates Unique...
Helena Liu
966,179 views

19:16
How to Automate Social Media Posts with AI...
Website Learners
65,994 views

29:03
I Used AI to Clone a $19K/Month Channel an...
Cash-Coach
72,546 views
24:26
Your 100% Automated AI Clone Makes Talking...
Sabrina Ramonov 🍄
15,003 views

18:04
Arnaque au faux Brad Pitt : la victime, An...
C l'hebdo - France Télévisions
220,410 views

10:11
You're Not Behind: Become AI-Native in 2025
Jeff Su
314,351 views

1:03:03
NVIDIA CEO Jensen Huang's Vision for Your ...
Cleo Abram
227,167 views

28:05
I’m Starting an Ai Agency From $0 To Prove...
Charlie Barber
122,213 views

15:42
How I Use AI to Automate Content Creation ...
AI Master
52,724 views

26:52
Andrew Ng Explores The Rise Of AI Agents A...
Snowflake Inc.
506,201 views

17:46
Create Hormozi Style Reels in Seconds with AI
Kevin Hogan
21,082 views