Complete GoHighLevel Agency Setup Tutorial (5 Hours)
27.23k views81632 WordsCopy TextShare

Jasper Aiken
Learn everything from the agency business model, GoHighLevel account setup, getting clients, and kee...
Video Transcript:
go high level is the Ultimate Software to grow and build your agency but it can become very confusing and overwhelming with all of the different features and all of the different business models you can run with the software I've been using high level for over 2 years and I've scaled my agency to over $440,000 per month so in this video I'm going to be walking you through everything from the offer to setting up your go high level account to getting clients and keeping those clients happy literally everything you will need to be successful in your
agency using go high level you've probably heard of high level by now but if you haven't you can build websites with it you can build funnels with it and we can sell these websites and funnels to local businesses small businesses and we can also charge them a monthly subscription because we're giving them access to a software suite that will manage automations communication with all of their leads and contacts their appointment booking and a lot of other really cool things that we can basically automate the entire process for these businesses after we built out their website
or their funnel and as you can see over here on the right these are all the different features that the highle software offers if you were using other softwares like the ones shown on this chart you you would be paying like $7,000 a month for all the features that go high level offers but high level only costs $297 per month so it's a very low operating cost to run your entire business it's a fixed fee you can get unlimited clients for that $297 per month and so super low operating cost to run a business of
this scale the pricing that we're going to charge to our clients on average is going to be a $1,000 setup fee to $2,000 setup fee depending on how big of a website or a funnel they're wanting and then we have a monthly fee so you guys can start making some monthly recurring income income um the $97 per month the $197 per month so it's not a huge uh you know monthly fee the setup fee is a bit larger but we're building them a full-blown website for the most part and so we can charge those setup
fees no problem and the monthly subscriptions are going to be for like hosting their website making any changes on it that they might need and then also we're going to give them the software along with it so they're getting a full software suite with their website so it's a it's a no-brainer super super good offer really easy to sell to businesses and very few businesses have this in place already and they a lot of them have really bad websites or no website at all and so they get access to these features that you can see
here on the page and and the setup fees are based on how big the websites are that we set up for them the niches that we're going to be targeting for this offer as seen on the screen here they're typically are low ticket appointment businesses so Spas wellness centers pet groomers vets you know salons businesses like the ones here because these ones we can build a website or a landing page for them we can set up a booking system that's completely automated and we can automate their Google review requests that send out after the appointments
happen and so we can help build their local rep utation through Google reviews and we can save them a ton of time with the automations from building their website their client's book all the way till that Google review request is sent out to the client afterwards so these are the best types of niches to go after so start kind of maybe thinking or or or brainstorming which one you might want to go after because later in this course we're going to be picking a niche and we're going to be focusing on that Niche or just
a few different niches and so go ahead and start thinking and maybe brainstorming of which one you might want to go with right now and then here's our 5- month game plan um this is a very conservative game plan this is assuming you're probably working a full fulltime job right now and you're doing this on the side you know 2 or 3 hours a day and so this is very concertive if you have a full 8 hour workday you could scale way faster than this chart is showing here but basically in month one we're going
to assume we can get two new clients which is our free trial month by the way when you sign up with high level you can get a 30-day free trial and so we haven't even paid anything yet this is while we're still on the free trial we can get two new clients let's say we don't even charge setup fees yet cuz these are our first clients and we don't want to maybe we're not comfortable charging that $1,000 or $2,000 setup fee so we build them two websites um you know we get two clients we do
Char the monthly that we charge the $97 per month just to cover hosting and and some of our cost our 297 that we have to pay at a high level so our first month we're making $194 a month and that's our profit because this month we don't have to pay for that subscription yet it's a free trial so we're in the red or in the green already making $194 a month month two let's say we get one more client so we get three clients total on top of the previous month so now we've got five
clients total this month you know we're charging $500 setup fees cuz now we're a little bit more comfortable we've gotten our first two clients in month one we're just charging the $97 per month on average and so we're making $1,500 in setup fees for the three websites or or landing pages that we're building we now are making $489 or sorry $485 per month in semi-passive income for the software and hosting fees that we're charging and so month two our profit after our go high level subscription because now we have to pay for high level which
is 297 per month after that our profit is 1,688 bucks for month two so really not bad we're scaling pretty good here month three we get four clients um so now that's four plus 3 plus two um I think that's nine yeah nine clients so we're now charging you know we're comfortable charging these larger setup fees now we're getting better at sales better at talking to these business owners so we're charging $1,000 setup fees now on average maybe we're not Char quite comfortable charging 2,000 yet but $1,000 now we're charging the 97 to the 197
like we showed on that pricing page before so now we're getting more comfortable charging these higher monthly monthly fees setup fees that we're going to be making this month four new clients times 1,000 so $4,000 in upfront setup fees that we're making and then monthly recurring Revenue we're now making $926 per month because the revenue Stacks you know from the client previous and previous months is stacking on top we're adding new Revenue to that that we're going to be making monthly so now um our total profit after our high level subscription of$ 297 is $
4,629 in month three month four we're getting four clients again you know we're just saying let's get one per week which is definitely like super doable really really easy to achieve ,000 to $2,000 setup fees now so now we're comfortable charging that full $2,000 setup fee just depending on how big the side is Right some people might charge a th000 some people 2,000 uh and then we're charging the 97 to 197 per month subscriptions Now setup fees on average you know we'll make about $6,000 on four clients between $1,000 and the $2,000 setup fees monthly
recurring Revenue we're now making $1,514 a month on average and so profit after our high level subscription of 2297 per month that we're paying is $727 month for so now we're making you know projecting about $100,000 a year a little bit less less than that $80 to $100,000 a year just four months into this this would be a great time to quit your job if you if you can live off of $7,000 per month most people can um and so this would be a great time that you'd now be able to quit your job or
cut back on your hours whatever your situation is you could probably put in fulltime into this and you could grow it even faster and just scale even more so that's where month five comes in now we get five new clients which is averaging about one a week a little bit more than one a week ,000 to $2,000 setup fees you know we're comfortable charging 97 to 197 subscriptions our setup fees will make about $88,000 off of five new clients monthly recurring revenue is now $2,249 per month that we're making in semi- passive income there's a
little bit of work to upkeep it but very few like very little work um just a few hours a day and then our profit for month five after our high level subscription is 9,952 bucks so we're making almost 10 grand a month that's that's basically our game plan right there in five months to making $10,000 per month very conservative um you could scale much faster than this I know I did when I first started and so you guys could easily scale to this amount in 5 months and uh there's your game plan in the next
video I'm going to be showing you guys how to navigate the community how to post how to access you're already in the course so you've already learned how to do that and uh some really cool bonuses and prizes that you can achieve as you're scaling and going through different levels in the community and as you achieve different levels I'll be giving you guys some really cool freebies basically and bonuses so make sure to check that out in the next video and I'll see you guys there if you haven't signed up for high level already you
can get a 14-day free trial through their website at go high level.com but I'm an affiliate of high level and so they've given me an extended 30-day free trial that you can sign up with so instead of 14 days you get 30 days free so it'll just give you more time to learn the software see if this is something you'd like to do and even get your first couple clients in those first 30 days before you have to start paying for the software so you can already have made money and gotten paid by your clients
before you have to pay that $297 per month subscription so it's a no-brainer definitely go through the 30-day free trial if you haven't signed up for high level already there are other Affiliates that offer the 30-day free trial but if you use my link here I'll give you access to a special community on school called highle Vault which gives you access to jump on multiple Zoom calls with me a week I give you some free bonuses that I don't offer in high LEL Quest but all the course material and tutorials between high level Vault and
high L Quest are the exact same so if you're not my affiliate you can still set everything up step by step inside of high level Quest absolutely free but a lot of people starting out on High level including myself need some extra additional help to get everything rolling and just have some extra motivation and just get a little bit more handholding and a lot of people who are not my Affiliates have been reaching out to me on social media asking me for help and asking to jump on free Zoom calls with me and so by
popular demand I've created another option for non Affiliates to get access inside the Vault to my resources and to all of my zoom calls it's just $97 a month to get access if you're a non-affiliate but remember if you're an affiliate and you sign up with my 30-day free trial link you'll get free access to the Vault so I'll drop the link down below to my affiliate link to get the 30-day free trial and I'll also drop the link down below for my non-affiliate so you can get access to the Vault for $97 a month
if you are going to go through my link here and get the 30-day free trial just make sure you turn off any vpns or ad blockers on your computer so go up here to your top right and like make sure all the VPN and ad blockers are turned off or else it won't track the affiliation to my link um and so just make sure you do that reload the page after you've turn those vpns or ad blockers off and then sign up um and so you're just going to go right here start an extended free
trial you're going to put in your business name doesn't really matter just put in your name for now if you haven't picked your business name yet put in your full name I'll just go ahead and fill in some info right here web juice AK and just to show you the second half of this form right quick and then you'll put in your phone number make sure you put in a number that you can receive text messages to they do a text verification go to step two and then on the second half you can pick your
plan so this model really only requires the $297 per month plan you don't have to go with the 497 plan it does have some additional features I won't go over that in this video but basically you guys really just need to start on the 297 plan so go ahead and select that one you can upgrade later if you want to the 497 plan but uh just go ahead and get started there the $97 plan doesn't really give you access to fully set everything up the way that we need to for this model and it doesn't
allow you to get unlimited clients it limits you to three clients and so we can't white label and put our own logo on the software and do all that kind of stuff on the 97 plan we'll need this 2 97 but it's a 30-day trial so you put your card info in right here it's not going to charge you anything today um it'll give you 30 days and like I said if you hit this business model before the 30 days are up just make sure to cancel your account you won't be charged for anything but
uh these videos are really going to help you guys out help you scale your agency so you won't want to cancel because we're going to help you get your first couple clients in the first month before you even have to start paying this $ 2297 so you go ahead and click complete order right here and then it should take you to a page that's like a little button that says complete account setup and then it'll take you to this page right here we're going to go ahead and fill in you know what does your industry
business serve um doesn't really matter right here um we can just put in whatever um it it is required so I'm just going to say let's type in or let's see if uh software just do software because that's basically what we're offering um what would you like to use high level primarily for to manage uh White labeling and reselling so we're going to select that option how many customers do you currently have I don't have any customers yet it doesn't really matter you have a website we just say no for now hit next billing address
go ahe and type in your address here I'm going to goad and type in mine uh just don't just don't send me anything um and then select Idaho that's where I'm based out of and then postal code A3 442 you intend on reselling high level you'll select yes right there I agree to their terms of service awesome let's get started and then it says what tools are you using currently we can just skip this part um click next and then click do it and then you can create your password for your account so I'll go
ahead and create mine really quick all right make sure it meets all these requirements and then click set up account and then this will actually take us into our highle account uh well actually first we got to do this part say please enter your email address the one you signed up for will paste in there automatically and then you'll have to go check your email to get this verification code I'll just jump over my email real quick there it is I'm going to copy the code copy too much there jump back in paste that code
and then verify and it's going to verify through your phone number so make sure to pull your phone out let me see if I got this text message real quick there we go got it texted to me so then you'll just type that in hopefully I type that in right and then verified I haven't done this in a long time I've been using high level for like two years so I haven't done this in like two years but basically it'll take you right inside the dashboard of your account um so that's the full setup and
getting signed up for high level going through this course I'm going to show you how to set everything up inside of your account step by step so make sure you watch all the videos and preferably watch them in order unless you feel like you've already set up this before in like another course that you went through or something you can skip to where you need to go and like what you need help with most but if you're starting out brand new make sure to watch these videos step by step they really will like they they
need to be watched in order or else some of the stuff won't make sense and you won't be able to set future stuff up if you haven't set up the things before it and uh if you need to watch these videos on a faster speed like at the bottom right of this video you can select the little gear icon and you can play it at 1.5 times speed I know I'm a slow talker so if you don't to speed these videos up and watch them faster and get through everything quicker just make sure to toggle
that switch on it or turn that uh speed up so you can watch these quicker and anyway once you're inside here we're good to go we're good to jump into the next video so I'll see you guys there e when Helen the most beautiful woman in the world was taken by Prince Paris of Troy her husband King manelis of Sparta called for help the greatest heroes of Greece answered led by King agamenon they gathered at the Port of Alis there Warriors like Achilles known for his strength and the clever adicus prepared for battle they prayed
to the gods for help and made sacrifices to win their favor just like the ancient Greeks from the story prepared for battle against Troy in this section we are going to be preparing our business for the Battle of scaling our agency the first step in setting up our business with high level is to come up with our business name if you're like me I don't have a creative bone in my body so coming up with business names is insanely hard for me that's why I use chat gbt that's why I've got it pulled up here
on the screen um I use chat gbt to come up with my business name which is web juice. I know coolest name you've ever heard sorry it's taken but you guys can come up with your own uh business name using chat PT pretty easily like I did you can just say give me 10 business name ideas related to websites software um Automation and whatever else you want to throw in there but those are the main three things that we're offering right like websites software automation that kind of thing and then just hit enter and it'll
generate US 10 examples super quickly web Works automation soft stream Solutions autosite innovators some pretty decent names here um if you want single word uh names you could try re romping it again and say give me single word names and then it'll spit out a list of a bunch of single word ones webify softmate autogen codec sight flow softbot and you guys can prompt it with whatever you want from here you kind of keep playing with it say I really like you know one and three and five give me some more examples similar to those
ones and it'll spit out even more and just kind of go back and forth with it until you find one that you like be careful though with the single word ones a lot of those will probably be taken because we need to buy a domain and if the domain's taken by somebody else then you might want to rethink the business name so I'll show you how to buy the domains in the next video but yeah you might want to go with one that's a little bit more obscure because you'll have a better chance of finding
that domain with do on the end when we go and buy your domain but yeah this is the process that I used to come up with my web juice name and my previous name as well was Advanced selling systems that was my old brand and uh yeah I used chat BT to do it so a great tool it's completely free to use and uh yeah come up with your business name that's going to be really important and have fun with it like take pride in your business name spend some time on it because like you
want to have something that you really like and you're really prideful about and like you can take pride in the name of your business and you think it sounds cool when you say it to people you know get excited about it and uh all of this will just help and drive momentum for your future success in your agency so there you go the next step in setting up our business is to buy our domain our website domain in the previous video we hopefully came up with our business name already now we can buy a domain
that corresponds to our business name so in the previous video we were using chat TBT to come up with a name let's just say we like this one like Auto web Dynamics as our business name so I'm going to copy that bring it into GoDaddy which which is where we're going to buy our website domain GoDaddy has cheap domains it's really easy to use and it's really easy to hook up to your website that we're going to build later on in the course and so I recommend GoDaddy but you can buy your domains anywhere with
like Google domains HostGator name cheap Cloud flare there's a ton of different options and places to buy your domains but they're all relatively around the same price and GoDaddy has good prices so I'm just going to go and paste this one in here Auto web Dynamics and then I'm just going to try to go for the Doom domain I doubt this one's taken oh man what the heck this one is taken um if if your domain is taken it'll it'll say domain taken um but we could try instead ofcom we could try doio and see
if this one's not so yeah this one has an exact match it said it's available it is $39 for the first year so it's a bit more expensive usually doio orai domains are more expensive so I I would recommend trying to find aom domain just so you don't have to pay as much but um there's some other examples it'll give you some other ideas down here too that you could use Auto web Dynamic without the s.com that one's really cheap so anyway just play around with it until you find one and then once you find
one that you like I'm going to try a different one let's do cod's Technologies make we'll just find one that's like really cheap and we can find the.com of it take this space out there put do I doubt this one's taken there we go there's one that we we found so I'll just click make it yours and then it'll open up your cart over here I believe yeah it says added to cart just click no thanks down there and then just go to your cart and then click continue to cart well right here actually we're
going to switch this to one year we don't need the full three years we can just do one year um because it'll be cheaper and maybe we don't want to use this domain after a year because we switch the name of our business or something like that so we can just hit continue now and then it's going to say do you want full domain protection or whatever we can click no scroll down and then just continue to cart and then we can check out right here once this loads make sure it's just a year should
be around 12 bucks for the first year so really really cheap and then it renews at like $22 a year after that they give you a good deal on the first year um but yeah that's everything you need to know about the domain just click I'm ready to pay pay for it and then I'll show you how to add this to your website later on and you'll also need to know this process so you can hook up website domains to your clients websites and funnels that you build out in the future so I'll show you
how to do that in a future video in the course but this is the video for buying your domain this is how to do it and just play around with it until you find one that you like that matches your business name and yeah see you in the next video next up on our to-do list for setting up our business is to create our logo inside of level we can white label the platform and we can put our own logo on it so when our clients are using it it won't have high levels logo it'll
just be the logo of whatever your business is so they'll have no idea that they're using high level so it's a really cool model but basically we need to create that logo one place we can do that is inside of canva which is a software uh this this one that you see on the screen here but basically we can click create design we can go to logo right here excuse me and then over here on the left it already has a bunch of pre-built logos some of them that have the crown next to them are
part of the Pro Plan if you want access to some of these you have to pay like 15 bucks a month for the canva pro subscription if not there's plenty that have like some cool logos without the Pro Plan and so anyway you can kind of go through here and see if there's any that you might like the only problem with these is there might be somebody else that's using them because canva only has a specific like certain limited number uh and so there might be other people pulling from this pool of canva logos but
you can kind of add your own flare to it and combine different logos together and different text fonts and things like that so this would be the first place let's see you want this one it's like planet or whatever as your logo this could be your logo right here um basically you want the uh logo to fill the entire box and you can actually change the dimensions of the logo this would be like for a square logo so this would be good for like a little fabcon like the logos you see up here next to
the tab in Google but uh for high level we want to have like a longer logo that's going to fill the entire space and I'm just going to show you how to create the logo in this video I'll show you in a future video how to add the logo into your high LEL account but uh yeah you want it to like we can just resize this one um I'm going to go to custom size right here and then the width let's do like uh 400 and then the height let's do 200 I don't know how
this will look but let's see and then we can just hit continue and then we'll do just resize this design there we go that should be pretty good and just make sure the logo fills the entire space so you know if it's this one this L right here looks like they're all kind of separate Pieces Just make sure the logo fills the entire space before you export it because then it'll look better inside of high level and it'll fill up the entire space up in high level so then we can make this larger so this
is probably a good Dimension like 200 by 400 and then we'll make this one larger as well that was probably really stupid of me I could have just done that all together let's go back CU inside of canva you could just select all of them yeah I'm stupid but uh anyway we could just have done this boom there we go now it's filling kind of this whole box right here and I just kind of make sure it's centered or whatever so I'm going to make sure it's lined up right in the middle there boom good
to go and then when you hit share uh you'll just hit download and then you'll download it with a transparent background that's important because you don't want this black background to show up inside of high level when we upload that logo in there you'll want it to be transparent and then you'll just download it and uh also one thing to note inside of high level the background color is either going to be blue or you can change it to White so make sure the color of your logo will look good on that like darker blue
background or if you want to change it to White make sure your logo is black so it actually shows up on the white background make sure it's not white or else it'll blend in with the background just going to keep that in mind you can play around with the different colors but uh yeah that's how to create the logo that's one way another way we can do it is through a software called mid Journey um as you can see here these are how I generate the course thumbnails so you guys caught me that's my secret
but a mid journey is a Discord server that you can join it's $15 a month and you can create AI images it's similar to Dolly um if you're using us chat BT dolly is free so you could generate your logo with dolly for free but mid Journey can create like way better designs in my opinion way cooler logos and so all you have to do is type in down here in the chat back slash imagine and I'll put a link down to Mid journey and canva below so you guys can sign up with them if
you want um then you could type in whatever prompt you want a minimal let's see minimalistic logo for a web design software company and let's see what it gives us this will give us a square logo because um Mid Journey usually by default will'll give you like four different variations like you can see these ones of like this Army up here it'll take a minute to generate usually about 20 to 30 seconds it'll show a percentage of how much it's generated so far it's at 32% it's really fast um but it'll give us four different
variations so we can pick from them so let's see what it gives us uh we might have been better off if we said like black background or something like that oh it looks like okay it's it's pretty good so I mean pretty solid right you could add like this into canva and then you could put text next to it so it'll be like the logo with the name of the business or something like that but yeah this will make sure that your logo isn't like copied by somebody else you get like your own logo the
only problem with this is you can't like really get super customized on it like you can't tell it to change like a small little section you kind of have to make it regenerate the whole image and it might change it or look different but if you're like hey I like this first one right here this first quadrant but I Want A variation of it you could do like V1 and it'll give you four variations of this first quadrant if you just liked number one and you wanted that one and it was perfect you could just
click U1 and it'll upscale number one and put it by itself and then you can just right click on it and then hit save image and you can save it and then go and use it um but right now it's still varying it's it's loading but it's going to vary and give us four different variations of this one right here because that's what we told it to do V1 you can do the same for all different quadrants quadrant 2 is this quadrant quadrant 3 so u3 u4 um that means upscale and then V means vary
so you can vary any of them that you want or you can redo the whole thing and just have it regenerate four brand new different ones that you know are completely different so yeah you know here's our four different variations of that first quadrant so anyway mid journey is pretty cool um I used mid Journey for my web juice logo so it came out really good and uh I just had to play around with it mess around and change the prompts up and everything but uh yeah if you wanted like more of the long logo
you could do a different aspect ratio so by doing this you could copy this one and you could do back slash imagine again and then you could say the same thing but then you could do these two little dashes and then type A for aspect ratio then you could do 16 by 9 so now it'll generate it like vertical it'll be or sorry not vertical horizontal it'll be longer and it'll give you like a longer logo um or at least it'll put it on a longer canvas U not that it matters too too much but
anyway once you get it here you could bring it into canas and then finish off the rest of the logo inside of excuse me inside of canva and uh yeah those are really the two softwares that I would use um for my logo is either canva by itself totally fine you can use Dolly which is by chat gbt by open AI or you can use mid Journey um Dolly is free canva free unless you pay for their pro version uh mid Journey does cost like $15 a month so but yeah get excited about your logo
your logo is like the face of your business the name and your logo that's what people are going to see when they go to your website and your different social media platforms if you decide to create socials and so take some pride in this have some fun take some time and uh really just find that perfect logo that you love and then let's run with it from there next up in setting up your business is to create your LLC this is for if you're based in the United States if you're not based in the US
you don't have to do this step but in the United States it's typically best if we form an LLC which just costs on average a filing fee of like $100 to $150 and it's usually just a one-time fee in most States but some states in the US do require you to pay that $100 every year but it's just $100 a year $150 a year filing it's not that much and so you can use a site called biz.com which I'll link down below um but basically it'll allow you to file your LLC completely free they will
try to upsell you on some things along the process of getting it all set up you just decline the upsells and then it'll just cost the basic fee of like the $100 or the $150 depending on which state you're in uh but yeah this is the easiest uh most convenient place to follow your LLC rather than going through your State website or whatever it's a little bit more tricky that way um just use business decline the upsells like I said and it'll get set up within a few hours um the the form that you fill
out only takes like a few minutes but uh everything will be filed and you'll get a document of of your organization of your LLC back within a few hours and so super convenient but the LLC is necessary because it stands for a limited liability company which basically just means it protects you if anybody were to ever come after your business or sue you or anything like that it keeps your business assets separate from your personal assets and so they can only sue you for what's inside your business accounts and things like that another thing along
with your LLC that would be smart to set up would be a business bank account so if you have Bank of America like I do you can go into the bank or you can do it online and you can have them create a business bank account for you usually it's at no additional charge which is really nice for most banks um but yeah you can start getting paid to your business account and then from your business account you can pay yourself out to your personal accounts and then spend the money from personal accounts um but
it's all going to be all your income is going to come through a payment processor that I'm going to show you in the next video how to set up called stripe um but yeah having the LLC set up is definitely a good way to go some businesses won't even work with you unless you have the LLC set up like some businesses might say are you an actual LLC and they might search you up in the state and if you don't have an LLC they might not want to work with you so it just makes you
more official more legit um you're actually like a US taxpayer now you have a business um ID like an EIN number employer identification number that you can use for different use cases and so um go ahead and set up your LLC it'll be pretty important and uh it also is just one of those action steps that you want to take like form the LLC because then you'll take everything going forward more seriously and you'll definitely find more success if you just make the jump pay $100 pay the $150 get the business started officially legally and
uh it'll just be all up from here so I'll see you guys in the next video in our business we need a way to be able to process payments from our clients and the way that we're going to do that is through stripe stripe is an account that we can create and basically it processes the payments brings them into stripe holds them there and then from there it'll deposit into our bank account our business bank account or a personal bank account every 3 days 5 Days 7 days two weeks you can set it to different
increments and pay yourself out every so off but yeah stripee takes like a 2.5% transaction fee on every transaction so if you're getting paid $100 by your client stripe will take $2.50 which really isn't that bad um and so stripe's going to be the best option it's a really nice payment processor to use really easy to use um and very little problems with like getting paid out to your bank account U very reputable payment processor if stripe is not available in your country if you're not in the US there's some other countries that stripe is
not available outside of the US it is in a lot of countries but some countries it's not you'll have to use pay pay as your payment processor so go ahead and create a PayPal account but if you can use stripe um do some research figure out if it's available in your country if it is it's going to be the best option for sure you're just going to go to strip.com click Start now if you have an LLC already you're going to it's going to ask for an employer identification number an e number which you'll get
when you form your LLC through bsy or just wherever you file it it'll you'll get an EIN form with your EIN number and so it'll ask for that if you have an LLC already if you don't have an LLC already and you just are acting as a sole proprietor then it'll ask you for your social security number and you'll put that in instead if you're outside of the US I don't know which number It'll ask you for exactly um but yeah it'll ask you for your either your EIN number or your Social Security whether you
have an LLC or you're just working without an LLC so anyway go ahead and click Start now go through the process It'll ask you for some personal information as part of setting up the account once it's set up um you're good to go and we can jump to the next video the last step in getting our business fully set up is going to be to create a Google workspace email this is going to be an email that has like your name on the beginning so for me it'd be like Jasper webu doio so it has
like my actual domain on it when we're business owners we don't want to be using gmail.com emails I mean it's fine if you do at the start but like you want to eventually have a professional email and Google workspace is the best place to do that each Google Workspace Email costs like I think it's like $14 a month and then they also have like a more basic option that's like $7 a month and so it's really not very expensive to get a professional looking email that you can use for any inbound emails from your clients
and outbound emails to your clients you could create one that's like info@ whatever your business name is.com or Jasper you know you can put your name on it info replies whatever you want you can hook it up and set it up the way that you want but you're going to go to workspace.com I'll link it down below to take you to this page right here and you'll click get started and it's really simple just take you through some simple setup steps you do need to buy your domain first because as part of setting this up
it's going to hook it up to your actual godaddy domain or wherever you bought your domain so make sure to buy that domain first and then go ahead and hook that up here and get everything set up and then you'll have a professional working email with your own email inbox just for your business that you can message and and communicate with your clients and leads back and forth um but yeah make sure to get that set up you can also do this through Outlook if you want um Google workspace I think is just a little
bit more uh easy to use user friendly and more reputable in my opinion so go ahead and get that set up and uh that's everything for the business setup we can now jump in to the next course or the next section and uh start setting up things ins out of high level so I'll see you guys there King MOS of cre driven by a desire to prove his favor with the Gods embarked on a quest to gather the golden apples from the garden of hesari with determination he navigated treacherous seas and confronted Fierce Guardians upon
reaching the garden he skillfully outwitted the dragon Laden and pluck the coveted apples from their branches Victorious MOS returned to creit his prize a testament to his bravery and divine favor the golden apples symbols of immortality and power cemented his legacy as a favored King of the Gods just like mos in this section we are embarking on a quest to set up our highlevel agency account right now we're inside of the agency account the agency account is where we set up some main settings and any of the settings that we set up in here reflect
on all the sub accounts the sub accounts are where we will set up our agency that's where we'll build our website that's where we'll set up our automations and run our agency from is from a sub account and all of our clients as well we'll give them their own sub accounts so the majority of the business is run from the sub accounts we do just have to set up a few main settings inside of the agency account which is where we are right now and so we're we're going to start off by going down to
the bottom right here under settings and then we're going to go under the company tab you're going to get this red banner up here I'll show you how to fix that in a minute but first off this is where we can change out our logo inside of high level we have this logo at the top this is just the default go high level logo but we can change that out with whatever logo we want whatever logo we've designed in canva or mid Journey from a previous video in the course and so we can go ahead
and upload that right here I'll go ahead and upload one uh just for sake of the video Let's see if I can find one here in all of my maybe I'll just do like the Zoom logo all right so I just updated it with the zoom logo obviously not going to be your logo but it'll pop up up here one thing to mention when you're updating your or building your logo in canva make sure the logo fills the entire space this Zoom logo right here did not fill the entire box that it was in um
I don't know where I got this logo probably just offline somewhere on zoom's website but make sure that logo fills up the entire box inside of canva before you export it and then it'll fill up this space up here a little bit bigger um it looks fine you know it's a little bit small though so just make sure that fills up the box so that your logo shows larger um up here at the top left and then update any of your settings in here make sure your company name is updated your company email um company
phone number website if you have bought that domain already go ahead and put your domain in there select your Niche uh for us we could do like website designer or we could do like software whatever probably website designer would be fine and then um everything else over here should be good I'll show you to set some of this up in some later videos you can change the theme of your go high level account so right now it's dark by default but you could change it to light and so let's see if we change it to
light there now it's white so you could do a white background and make the whole layout of go high level look white or you could just do the default this like darker blue color either way once you make those changes just hit update company right here and your logo will be saved and updated there at the top make sure all your company address information is correct here and then um we're going to go ahead and toggle on a few things inside of here we're going to toggle on the template Library um enhanced security we don't
really need to mess with anything there and then we could also toggle on beta features go high level is always releasing new beta features and they're usually good we want access to those whenever they come out and so if we toggle on beta features here we can get access to those as soon as they come out and so we'll definitely keep that on daily updates product guides MPS surveys you don't really need all this if you want a product guide to kind of walk you through go high level you could toggle that on it'll give
you kind of like little things that you can click on to like navigate through go high level and learn it but um you don't need those I'm going to teach you guys everything you'll need to know and then yeah that's everything on the setup and Logo but up here we're going to update this tax ID information so we don't keep getting this red popup which is super annoying we're going to click resolve right here and then it's going to ask us right here for our tax information we are hopefully we filed our LLC already um
informed that and so that's what it's really going to ask us for here um so right here we can scroll down and we can find where it says Ein I may have skipped it already there it is us EIN number um you could also say I don't have a tax ID if you have I guess that' be the option you'd go with if you didn't have your LLC setup and they didn't give you that Ein yet let's try going with that and then we'll just save this and uh yeah I guess we won't get that
Banner anymore so just go with that if you don't have the LLC if you do put in your EI number you'll be good to go that's everything in this video and I'll see you guys in the next one in this video we're going to be setting up our white label domain which is the domain you'll see up here at the top app. l.com is what it will say by default in your account but we can change this to say app. whatever our domain is that we bought from godaddy.com so it could be like app. for
me it's web juice. so app. web. we can change that to be your brand so whenever your clients log into your software it'll be through your domain not through the go high level domain so they'll have no idea that they're using go high level then when they log in they'll see your logo and everything so it'll be completely white labeled so the way that we do that we'll go under settings this is all inside of our agency account by the way and then we're going to go under this company tab right here scroll down to
where it says white label domain right here and then we can type out our white label domain app dot make sure to put the app dot on the beginning of it and then type your domain out so mine I'm going to be using uh is the one that I bought for this community highl quest.com but make sure if yours is a doom domain a. AI make sure it matches whatever domain you bought perfectly if it doesn't match then it won't propagate correctly so then we're going to click add domain and then we're just going to
go to add record manually I found if you do it the like the automatic way sometimes it gets messed up so we'll just do it manually so you guys can see how it's done and then you need to jump into your GoDaddy account or your cloudflare name chep wherever you bought your domain you need to jump into that account and we need to add this DNS record right here so I'm going to goe and jump into GoDaddy um I went into my DNS records uh for this highle quest.com domain and uh I'll show you kind
of how to get there if you go back out to the main page um in your account or the homepage you'll just go up to um my products you'll click on your little icon up here my products and then it'll show all your domains I've got a bunch of them so I need to scroll down to the very bottom to find this one because it was just P just purchased recently I think it should be right around here there we go highle quest.com you'll click DNS and then this is how I got to the DNS
records then from here you'll click add new record um in go high level it says it's a cname record so we need to make sure it's a c name here the name it says app so we'll go ahead and type out app and then the value is this value here I'll just go ahe and click this copy button and then we'll paste this in here and then TTL stands for time to load we'll just keep this at half an hour you usually want to keep it at the lowest one possible and then click save says
success awesome and then we'll just look at it make sure it's there C name app and then for some reason it says TTL is 1 hour we set it to half an hour so I'm going to go back and make sure it's only half an hour probably won't mess up anything if it's an hour versus half an hour but there we go now it says half an hour I'm just going to refresh the page just to make sure everything is is propagated and added correctly all right still there cool now we'll jump back into high
level we'll click verify records and it'll take about 20 to 30 seconds and it'll tell us if we've added everything correctly or not and so we're just going to wait for this to load really quick there we go it rerouted us out of that box that loading box or whatever and then it has our domain right here and it's locked now so that means we've added it correctly just make sure to go down to the bottom real quick click update company just to make every make sure everything was saved properly and now we can go
and open a new tab so you'll notice it didn't change automatically it doesn't change automatically if you were logged in previously at app. gooh high.com it's going to stay like that we need to then go into a new tab and typee in our new wh label domain so mine's app. highest.com so I'm going to go ahead and type that in app. highlevel quest.com hit enter and then it'll load you to a login page so now you can see this is your login page that your clients can log in at to access the software see their
contacts it's their lead see their appointments that have been booked on their calendar all that good stuff you can see your logo will be up here at the top left and so yeah you're just going to go ahead and log into your account now so I'm going to go ahead and log into mine and then it'll it'll send you like the code or whatever I'm going to have it texted to my phone check that really quick all right and then confirm the code and then it'll log you in to your account and it will say
app. highest.com whatever your domain is you can see now it's changed we'll jump back into this one that's app. gooh high L we'll go ahead and close out of this one and now we can just use our app. highest.com or whatever your domain is.com um white label domain so that's everything you need to know for this video I'll see you guys in the next one in this video we're going to be connecting our stripe account so that we can start processing payments from our clients this little Banner is popping up after I created the white
label domain from the last video I'm just going to click update now really quick it says there's some billing information they just need your first name and then your last name and then just go ahead and save that so that Banner quits popping up if you guys have that Banner go ahead and do that if not totally fine and then to connect our stripe account we're going to go down to settings here at the bottom left inside of our agency account and then we're going to go I'm going to move this thing out of the
way real quick and we're going to go down to where it says Stripe Right here we're going to click connect to your stripe account and then it's going to ask us to log into our stripe account mine's under this email go ahead and submit that it's going to ask you for your password hopefully I type that in right then it's going to send you your verification text message there we go and then it's going to ask you which stripe account if you have multiple um I have a couple so I'm going to connect this one
I just created for this uh course purpose of creating this course but if you guys just have one just select the one you want connect it and then it says lead connector partner with stripe for secure Financial Services um says use your saved information or you could create a new business I'm just going to go ahead and connect this one this is connected to my LLC when I created my stripe account and then we'll go ahead and save that all right and then it says show customers your climate Community um I'm just going to say
no thanks to this um know when and where you need to collect sales tax just click not right now you don't need to worry about this scroll to the bottom agree and submit if you need to edit anything here go ahead and edit that but everything should be good if you set up your stripee account properly and then it'll say it'll reroute us back and it'll say you know web juice LLC right here it's all connected now and then we can go back out here and now our stripe account will connect right here and it'll
show all of our income from our agency Revenue last month monthly recurring Revenue it's going to be zero right CU we haven't made any money yet um but in the future it'll show like all your customers that you have and so you can kind of see all your income right here um we're also going to have to connect the stripe account at the sub account level which I'll show you how to do in the next course section um but that's how to connect it to your agency account and so everything will propagate here in the
agency dashboard whenever you make income for your agency and so I'll see you guys in the next video in this video we're going to be connecting our agency email we're going to be creating a dedicated sending domain so that we can send emails from our agency account and so we're going to do that by going down to settings right here I'm going to be moving this out of the way right here we're going to click email services and then we're going to click create dedicated domain so we have we have to create a domain connected
to our uh website our website domain that we purchased on GoDaddy already hopefully and we can uh create a domain an email that we can send out from so whenever we get people that sign up for a sub account in our agency or get clients it'll automatically email them with these automated emails um that say hey you've been added to this account here's how to log in and it'll do that AO all automatically for them and so we can add that right here I like to do mine with info on the beginning so we'll do
like info Dot and then you can create whatever your domain is that you purchase right here so m is highl quest.com just make sure you can do info you can do your name so if I can do like jasper. highest.com make sure it's a DOT though and make sure this matches your domain perfectly if you have a AI domain orio domain make sure that's on the end and then you can just click add and verify right here we can automatically connect it and have it set it all up for us sometimes it gets messed up
though so I'm going to go ahead and add record manually and show you guys how to do this manually just just in case it doesn't work for you if you do it um automatically but there's five different records here that we need to add in for our email to be completely set up properly and so the first one is a txt record I'm going to go ahead and open up my GoDaddy account and hopefully I'm logged in already we're going to go into my products inside of your account we're going to go to the DNS
records for your domain so I'm going to go back scroll back down all the way to the bottom where I have my domain and it's right here going to click DNS then we're going to click add new record like I said that first one is a txt record the name on it is this so we're just going to go ahead and copy this paste that in there the value is this required value right here we'll goe and copy that paste that in all of them are going to be half an hour so we'll go ahead
and save this one make sure you find that one um for some reason it automatically defaults to an hour I think an hour is fine we'll just keep it at that we're going to click add new record again the next one is txt this one says in so we're going to add another txt record info the value string is right here go ahead and copy that paste it in and save it so now we've got both of our txt records down here awesome next one is going to be a cname record with this host name
on the beginning of it the value is going to be right here mail gun. org and then half an hour save it well I didn't choose C name there we go and we'll click save oh didn't paste that in for some reason there we go now we got it and so that one was added awesome MX record it's going to be info for the host name so I'll go ah and copy that add a new record this one will be MX so we'll need to go to MX right there the name info priority it's going
to be 10 this is the only one that MX records have a priority you just need to do 10 for both of them the value is going to be this mxa and then half an hour then we'll do one last MX record it's going to be this info again and then mxb I'll just go and copy that one so I can just type out info right here priorities 10 value mxb so they are slightly different this one says mxa and then this one says mxb but other than that it's like almost the exact same for
both the MX records all right so everything was added successfully now now we'll jump back in high level we got all five of those added in I'm going to go ahead and just refresh GoDaddy real quick just to make sure everything is good on that end and then we'll click verify records so it looks like most of them were verified right off the bat looks like this one's not verified yet so we're going to click verify domain again real quick and then it'll reroute us out here if it doesn't just keep clicking verify domain or
click back out click back in verify domain again mine worked on the first try so I got lucky but sometimes it doesn't do it on the first try so just make sure you kind of click back and forth and verify the domain again and eventually it'll reroute you out to here it'll say SSL pending we want this to say SSL verified so now I'm going to click verify now and make sure it's all good to go here and then uh this this is one other record we can add in as well um so I'm going
to go ahead and add this one in it's this DeMark it's not like required but it is better for deliverability for your emails to actually like not land in spam so it will be helpful um but it says optional right there so I'm going to go ahead and add this one in I'm going to copy this real quick we're going to add a new record it's going to be a txt record I believe it said right yeah txt the uh name is this uh Demar that's actually going to go in the value box here the
name looks like is this I'm just going to go ahead and copy that and then think we should be good we'll just go and save that one in there all right and then we'll jump back in we'll click verify domain right here one last time and then it'll say SSL issued so like I said it doesn't always work perfectly the first try you might have to go back and forth and like you may have to go back in and um try to verify again and and hit back to you know and go back out of
it but as long as you get the SSL issued at the end then you're good to go and now we can send out emails from our agency account whenever people are added to our sub accounts and stuff we can send that automated email that says hey you've been added here's your username and password here's the link to login it'll do that all automatically for us U we can also add this at the sub account level too which I'll show you how to do in the next course section but yeah that's how to do it in
this video I'll see you guys in the next one in this video we're going to be configuring the phone system inside of our highle agency account we're going to do that by going down to settings here at the bottom left then we're going to click it says phone integration right here and then this one's really simple all you have to do is Click use LC phone system and then it's going to make you check this box confirm that and this is the easiest way to do it you can use twilio which is another kind of
third party but lead Connector phone is actually the same as twilio go high level just has like an Enterprise account with twilio so they make it really easy for us to set up with the click of a button right there and then if we click to sub account settings um we're just going to click switch all sub accounts to LC phone we don't have a sub account setup yet I'm going to show you how to do that in the next course section but um we're going to basically just acknowledge that right here and so going
forward all of our sub accounts we would have one for our agency and then we will have our client sub accounts each of them will have their own sub account all of them will automatically be connected to this phone system and the reason we have the phone system is because each text message that sends out or each call that we make we can make phone calls and send texts with these phone numbers that we get inside of high level each of them costs a certain amount of like it's like a half of a cent per
text message or or 3/4 of a cent per text message and then it's like three cents per minute calling people and so it just needs to be able to be hooked up this way so that it can charge us appropriately for the texts and the calls that we make and so that's the entire setup right there just make sure you follow those steps and you're good to go this is the last video and the last step of setting up our agency account before we can move on to setting up our sub account in the next
course section but basically it's this little favicon logo up here we're going to be adding in a square image a square logo that looks better up here and doesn't look so jumbled next to our business name um by default it'll paste the one that you put in right here um just your white labeled logo but sometimes the that you put up here is going to be more horizontal and you want a more square logo up here so it doesn't look so bad and so we're going to be updating that in this video we'll need to
do this inside of our sub account we need to grab the link for this logo I'll show you in a sec but we need to access to the sub account in order to do that and so if we switch into our sub account you might have one already if you click here to switch this is our first sub account you might not have that set up already and if you don't we can go ahead and create one but if you do just go ahead and switch into this one um I don't know how this got
here cuz I never set this up but maybe it just by default sets up for for us so I think you should have this so we're just going to go ahead and assume you have the sub account if you don't just click add sub account go from a blank snapshot put in your business address right here at account manually and go ahead and fill all this information in on this page right here first name last name the name of the sub account you're creating all this info and then click save and then you'll have created
your sub account but you should already have one so we're just going to switch into it should just be the name of your business and now um this is our first time in the sub account this is what the sub account looks like but basically we need to go down I'm going to move this out of the way to our sites Tab and uh it's kind of interesting how we have to get this link but basically we need to go into a website for example I'm just going to click new website from blank I'm just
going to call this like um fabicon and we can literally delete this right after we just need to paste in a logo or a square logo onto this website so that then we can get the link to the logo so it's kind of a strenuous process we're going to click add page and I'm going to show you how to use the website builder later this is just for this favicon we're just going to call it favicon back SL favicon none of this really matters but we're just going to go ahead and create this page so
we can get our favicon link um and add it to our account so we're just going to click create from blank right here this will pull us into the website editor the website builder inside of high level we're just going to do a full width column add a row add a column and then add an element we're going to add an image and then over here on the right we can upload this image in here so we're going to click this little image icon we're going to upload from media library and then we're going to
click okay right there we're going to upload a file from our computer so I'm going to try to find one that's like a good square logo I'm going to use this Loom one I've already used Zoom as my white label logo now I'm going to use Loom as my favon logo just for uh fun I guess that one's file size exceeds the recommended limit all right that one didn't work so now I'm going to try something different um I'm going to look for a good square logo maybe I can find my web juice one in
here somewhere there we go I'm going to use my web juice logo right here this Square One upload it in it's uploaded in now we're just going to double click on it right here and then boom it pasted onto our site the only reason we're doing this is because we needed this link right here so now that it's pasted in here we have this link that we can then copy make sure you're copying the whole link like drag the mouse just in case all the way to the end till it says PNG or jpeg or
whatever your logo is copy it and then we can go back out of here we don't need to save it we just need that link and we can go ahead and honestly delete this site you don't need this we goe and delete it because this is it was just to get that link for our logo which you can't really get anywhere else has to be a specific go high level like logo link and then we'll switch back to our agency view which is our agency account where we can upload this favicon or change it up
here at the top left so I'm going to go down to settings to get there then we're going to go to company and then down here at the bottom we have this box that says custom JavaScript down below this video I'm going to paste this script it's going to be all of this from here to here um don't get intimidated by this it's just you just have to copy and paste it into this box and then right here in between the these two little lines ellipses I don't really know what these are called it says
paste logo here this is where right between these two little ellipses you're going to paste in that link that we just copied of your logo and so now it's in there and make sure you do it between the ellipses don't delete the ellipses and then just leave everything else the same and click update company we're going to click proceed right here and then if we refresh the page real quick it should update with our new logo there we go so now you can see my web juice logo is up there looks like a lot better
um it's just a square logo so have two different variations of your logo in canva I should have told you that earlier but um now you know so have the the long horizontal version for right here and then have a square version of your logo for the favicon and yeah that's how to set up the favon that's the end of this section now we're going to be jumping into setting up our sub account which you guys should already have created cuz we had to create it to set up the fabicon and yeah we'll just jump
into that see you guys then the ancient hero thesis renowned for his courage and strength embarked on a perilous quest to slay the f some minitar this monstrous creature half man and half bull dwelled within the Labyrinth of King MOS on the island of creit where it demanded a yearly tribute of human sacrifices Theus armed with only sword and shield given to him by Princess ariad ventured into the maze with cunning strategy and unwavering determination thesias navigated the labyrinths treacherous passages confronting and ultimately vanquishing the minitar his victory not only liberated his fellow Athenians from
the minitar terror but also established thesis's Legacy as a legendary hero of of Greek mythology just like thesias Vanquish the Minotaur in this section we're going to be vanquishing and setting up our sub account in high level if you haven't created your sub account already I'm going to show you how to create sub accounts in this video but we're going to need to create a sub account for our agency and this is going to be the sub account that we use to run our entire agency build a website inside of it run our automations inside
of it this is where our contacts and leads will live and our conversations back and forth with them so we're going to be doing and running everything in our agency inside of our sub account and so you should already have a sub account if you've gone through the previous courses um but if you don't and you don't have anything pop up here whenever you hit click here to switch and there's no sub account that's named after your agency then you'll create one under sub accounts right here this third tab down I'm inside of the agency
account by the way right now and then you'll go to add sub account and then you'll go from a blank snapshot for now and then you'll put in your business address so I'll just go ahead and put mine in real quick you'll select it and then you'll select this little uh button over here saying that you got the address right and then it'll ask you for all this information you'll put in your first name your last name your email um right here it'll default to the address just change it to your business name whatever your
agency name is mine is you know web juice and then you'll put in your your street address should be there already all this information put in your phone number right here just your cell phone number is fine put in your website domain and then make sure to select your time zone time zone is important because this is how the calendar system knows when to like time things and book things and it knows how to like someone books in a different time zone than you it knows how to like sync it up properly so make sure
the time zone is correct or this can cause problems later on and then just click save once you click save it'll look like this you'll be able to see your sub account now you can either just click here and switch to sub account and it'll switch into it or you can go up here and click from here so either way I'll just click from here and then now you're inside of your sub account this is where we're going to be setting up everything inside of this course section and so um you'll need the sub account
in order to go through the rest of the videos in this section and so that's it for this video I just wanted to show you guys how to create the sub account and that process is going to look identical when you create sub accounts for your clients as well so you can create unlimited sub accounts on the $297 plan that you guys are on with go high Lev and so really really cool that we can have all those sub accounts for each of our different clients we can keep everybody's lead separate everybody's website separate and
just give each person their own suite and platform that'll look just like this with your logo your white label domain your favon so they'll have no idea that they're using high level they'll think that they're using whatever your software company is called or whatever your agency is called so I'll see you guys in the next video in this video we're going to be configuring the basic account settings inside of our sub account the one that we're going to be using to run our agency and it's going to be the same process and similar process for
every new sub account you create for your clients as well but this one is going to be specifically for our agency so inside of our sub account now you can see it says web juice if you're inside of the agency account it'll look like this it'll say click here to switch but when you're in the sub account you'll know because it'll say the name of your business and so we're going to go down to settings here at the bottom left and then inside this business profile tab you can go ahead and upload your logo so
I'll go ahead and just upload I don't know we were using that Zoom logo as our company logo before but I'll just go down and find the web juice logo that I had I'll just use this one right here this won't change anything up here the one that changes up here is inside the agency account we've already done that this is just for like um if you want to sign off on emails with your logo and stuff that you send out to people um that's what this is for but basically just make sure your friendly
business name is like whatever your business name goes by or whatever the nickname of your business is and then legal business name for me would be like web juu LLC cuz that's like the official legal name that has LLC on the end make sure your email your business email that you set up with Google workspaces right here um you know put your domain right here your website domain um same thing for this one would also be Business website and then select your Niche uh so you guys can select like website designer and then just make
sure to update this information right here business information you can also you know business type um if you're LLC or you know Corporation um business industry that you're in registration ID type which would probably just be Ein if you have an LLC and then you know you could also say my business is not registered if you haven't done the LLC route yet so you could check this off right here and then just check the country that you're located in um this stuff doesn't matter too too much but just to make sure everything situated for like
tax purposes and all that um you can upload a voicemail right here so we're going to get a phone number in a later video in this section but you can upload a recording like an MP3 file of your voicemail so when people call you and you don't answer it'll leave that voice voicemail whatever you upload right here so you can go ahead and do that and so you can say hey this is Jasper with web juice sorry I missed your call feel free to text me or I'll call you back as soon as possible or
something like that and just upload that in right there up here at the top just make sure your business physical address is right here so go ahead and type that out um you know where your business is located if if you don't have an address for your business just use your home address or whatever address you used for your LLC when you filed that for me it's just my home address that's what I use make sure the time zone is correct like I said before if your time zone is incorrect here it will mess with
your calendar bookings and everything and so just make sure you have the correct time zone here in this section so just go through and find the one for your area and then um you can just do like English for this as well if you speak English or if you speak a different language um and then click update for that authorized representative you could just put in your first name your last name because you're going to be the representative that's authorized over your sub account job position you can just do like CEO or whatever and then
your phone number update that info right here there are a few things that we can toggle off right now um whenever you have a new account with go high level you can only send out on like level one you can send out 100 text messages and until you send out that 100 you can't unlock level two level two you can send out like 250 me um this is when I say messages I'm talking SMS like text messages level two is like 250 text messages per day once you've sent the full 250 then you unlock level
three which is like 500 per day until you ramp all the way up there's like eight levels and level eight is like you can send up to 5,000 cold uh not cold but 5 ,000 SMS messages text messages per day using the go high level phone system and so we can't toggle this one off but eventually we do want to toggle this one off cuz this one will have a compliant message at the bottom of each of our texts that say reply stop to unsubscribe which we don't want to have that on our text because
it just kind of looks spammy and looks like it's an automated message which we want to make our messages look like they're not automated this one make SMS compliant by adding sender information this was just say thank you and then web juice whatever the name of your business is it'll paste it in at the bottom of each text as well we also probably don't want that once you're through that ramp period go ahead and start sending some text messages so you can get past that ramp period where you have to like send 100 a day
and then once you hit that limit then you have to wait till day two and then you can send 250 once you've hit that limit then you so you have to send the full amount in order to unlock the next level so you can send more texts and then make email compliant by adding an unsubscribe link we do want to keep that for sure but these two eventually we want to check off and turn them off so our text messages don't have these two messages on them right here uh we'll just keep this toggled off
um enable disable uh deprecated features we'll just we we don't want to mess with this and then right here we can enable Miss call text back should already be checked on by default this is when ever somebody calls you in your business and you don't answer the phone we can send them an automated message that say hey sorry we missed you um and it'll be a text that'll send right to their phone so it can just kind of help capture people that maybe we missed calls of potential leads of our business that are looking to
work with us this is really valuable for the businesses that we work with like like home service businesses or just service based businesses in general that don't want to miss out on potential customers calling them but maybe they're busy doing a job so they couldn't pick up the phone we can automate a message back that says hey this is and it'll paste in the name of the business for me it'll put paste in web juice I saw that we missed your call how can we help so it'll start a conversation through text message if you
miss call so that's pretty cool and you can just type out whatever you want it to say here and then save it um but yeah that's everything inside of the business profile tab um another thing we're going to do is we are going to make sure you are added as a user on the sub account level and so the way that we do that is we're going to go switch back to our agency account really quick we're going to go down to settings we're going to go to Team and so when you come in here
you should see it might just say your first name right here if it doesn't have your last name we'll go ahead and update this information right here but this is how we're going to add yourself because if you're in the agency account right now we need to add you as a user to the sub account um because it'll unlock a few different things but we're going to click edit over here on this pencil and then if you don't have last name make sure to put in your last name right here first or else this won't
work it won't save at the bottom then we'll go down to user roles and then we're going to go ahead and click where it says add sub accounts and we're going to add your to your sub account there should only be one um if there's multiple just make sure you're adding yourself to your agency sub account the one that we just set up and then you'll click save right here so now you've added yourself as a user to this location so now it should say whatever your business name is right here that means you've added
yourself to that sub account and then if we switch back into our sub account there's going to be a new tab that we didn't have before if we go under settings we'll now have this my profile this wasn't here before but now that we've added oursel as a user and we're logged in up here as that user cuz now we're logged in as ourself or and and this will show all the different clients you have if once you start getting clients but if you're logged in as yourself you'll have that my profile and you can
edit your profile here so um later on we can update your calendar right here and then your language the platform language that you want the platform to be in and then down here we can also you know configure calendar settings this is for you specifically and you can have multiple users like if you have an employee who works for your business you can add them as well to the sub account and they'll have their own profile tab here that they can configure their own calendar um they can specify their availability of when they're available for
appointments and things like that um you can also do email two-way syncing so this is where we can connect our Google Workspace Email that we created so you may have created one that's like John whatever your business name is.com if you created that Google Workspace Email like I showed you in the first course module you can go ahead and click this and click connect and then it'll ask you to log in to your email and you can connect it so I'll go ahead and connect my Jasper web J.O email hit continue here um we're going
to give access to everything make sure everything's selected hit continue and this will also help you connect to your Google um calendar as well if you have a calendar connected so you can see now it's connected and so now it'll two-way sync my emails if I get an email to this one it'll sync it into go high level so it'll show in my conversations tab inside of high level um so it's pretty cool but yeah that's everything you need to do is just make sure you've gone through the business profile updated all the info in
here switched into your sub account added yourself as a user which will will then unlock this my profile tab right here and then you'll be able to set up your specific settings as yourself as the user cuz each sub account can have unlimited users you can have like 10 users on a sub account because they're all different people who work for your business but they each have their own profiles here with their own settings with their own you know email hooked up to it with their own calendar so anyway that's how you set up everything
um for the sub account settings and then lastly we're going to go down to Labs down here and this is where you'll have all of the different um beta features that go high l is releasing maybe it's not fully out yet for everybody but it is for if you togg toggle on these switches right here so you can say I want access to all these different baa features so just so our accounts are all the same go ahead and toggle all these beta features on so that you have access to all these new features that
go high level is rolling out with and just make sure all the ones that aren't toggled you turn on so that as we set up the rest of the videos in this uh section everything will be the same for my account and for your account but anyway that's everything you need to do in this video I'll see you guys in the next one in this video we're going to configure the email setup inside of our sub account we've already done this inside of the agency account so if you haven't gone through that video in the
agency setup module for the email setup go through that one first because you'll need to do that one before you can set up the email in your sub account but once you've set that one up inside of our sub account we can go down to settings and then we can go right here where it says email services and then under this tab It'll ask us if we want to create our own dedicated sending domain basically our own dedicated email for our sub account we don't need to because we've already set it up for the agency
account and it can we can just use that one that we've set up in the agency account for the sub account for our sub account and so as you'll see here it's already set up this one is what the one that I set up from the agency email setup video and it's reflecting into the sub account so now we can just use this same email we don't have to set it up twice in two different places it'll just be the one that you've set up already on the agency side and then up here we can
go to reply and forwarding settings U you don't really need to mess with anything here but you can go down to here and you can have a different reply address so the emails whenever we send them to our leads and our clients will come from this email through go high level if we send it from go high level but we can have people reply to a different email we can use our Google Workspace Email for that if you've set that one up already so mine's Jasper web. and so I can have people reply to this
one CU this one I like using better and so I'd rather have them reply to this one and it come into like my Gmail inbox rather than message back and forth just straight through go High Level under the contacts Tab and so just go ahead and save that and put your Workspace Email or your Outlook email whatever email you use for your business uh queries and things like that and then under here you can see email analytics how many you've sent delivered Open click and this is like your overall analytics for this email right here
of how of all those different numbers and then risk assessment will show you if your email has been like blacklisted or banned or anything like that if you've been sending like way too many emails and they've all been going to spam and things like that so it'll show like the health of your email and How likely it is to like deliver and go to the main inbox versus the spam folder but that's everything you need to know about the email setup like I said if you haven't set up the agency side email on the agency
account and you haven't gone in here and gone under settings and then gone under email Services here and set it up here do that first and then it'll automatically input this one into your sub account like I was just showing you so anyway that's everything I'll see you guys in the next video so you've already connected stripe at the agency account level now we need to connect it in the sub account so we're going to go to payments right here and then inside of payments we're going to go over to where it says Integrations and
then we're going to go to stripe and we're going to hit connect if you couldn't create a stripe account you can also connect PayPal um if you're in a different country I know some other countries don't allow stripe and you can't create a stripe account but but uh if you're going with stripe just go ahead and click connect right here and then hit connect with stripe and then it will tell you log in just like we did before we did this in the agency setup videos um but we also need to do it here in
the sub account so I'm going to go ahead and log in and then once this loads through it's going to send me a text confirmation there we go and then we'll just connect this one right here and then it reroutes us back and then one thing we can turn on is to be able to collect Apple pay as well um whenever we create like forms on our website that people can check out through and purchase our services from us through our site we can allow Apple pay so I'm just going to hit yes confirm right
there and then we are good to go so that's how you connect stripe at the sub account level we need to do that so we can create products so inside of our sub account we can create different products and things like that that we can then charge our clients really the products we're selling are the setup fees that we're charging and then the monthly subscriptions that we're charging our clients as well so now that we've connected stripe we can create those products inside of our sub account we're not going to do it in this video
I'll show you how to do that in a future video but we can create those products and then we can um charge people and collect payments right through our stripe account so that's everything in this video I'll see you guys in the next one in this video I'm going to show you guys how to import my Snapshot into your sub account a snapshot is just everything that I have set up inside of my account and I can give it to you guys it's just a link that you copy into your account and it'll give you
everything it'll give you my calendars that I already have set up it'll give you my pipeline under the opportunities tab it'll give you all my automations that I use to run my entire agency it'll give you guys my sales funnel that I use to show pricing to my clients and show them what we offer it'll give you everything like everything you guys need plug andplay to run your business and so down below this video you guys can copy my Snapshot link it's just a link that you'll see It'll say Jasper's highle Quest snapshot go ahead
and copy that link and then you're going to open up a tab right next to where you have your go high level tab open a new tab and just paste that snapshot Link in there hit enter and then it should come up just like this it'll say do you want to import this snapshot into this account you'll click yes import now if it doesn't take you to this page it'll take you to another page that's like a 14-day free trial of high level you don't have to sign up for the free trial you can just
click member login at the top right log into your account and then it'll take you to this page so but it should just take you to this just like it did with me hit yes import now and now we're importing the snapshot into the agency account but now we have to apply it to the sub account so we have the snapshot now well let's see there we go it says Jasper's High LEL Quest snapshot and it's under the imported tab under the account snapshots tab inside of our agency account next we're going to go to
this tab right here that says sub accounts then we're going to go to and click on our agency sub account I'm just going to click on web juice right there it'll open us up into here and then we'll click actions and then load snapshot we're going to select this one right here which is the one you just imported it should be at the top and it'll say Jasper's highle Quest snapshot you're going to click proceed and then we're going to select everything so just don't touch anything here select all of it proceed and then we're
going to click proceed one more time and then we'll click okay now the snapshot should be fully imported sometimes it takes a few minutes for everything to import in we're going to switch into the sub account now and I'll be able to show you guys some of the stuff inside my Snapshot so the first part is going to be under calendars and then if we go up to the top here calendar settings you'll see my two different calendars if you guys have three calendars delete the one that's already in here by default it' be like
booking requests or something you delete that calendar by clicking over here and click delete these are the two from my Snapshot support calls and website consultations the website consultations calendar is for people who haven't worked with us yet but they're jumping on a consultation called a c and and see if they're a good fit or we're a good fit to work with them and then the calls are for people who are active clients that need maybe tech support using the software or they need something changed on their website they can book calls with us through
our support calendar and uh and just use the two separate calendars one for new clients one for current clients the next part of my Snapshot that you'll get is my pipeline it's very simple right just four different stages a appointment booked is the first stage that a lead will come into once they book with us appointment noow if they don't show up to the call appointment showed but didn't buy so they showed up but they didn't buy our products or Services yet so we have some followup we can do for them send them some texts
and emails automated and then we have paying client so we're trying to get them from appointment book all the way to paying client and this will have leads under it so once you start getting people booking in and you start collecting and creating leads inside of your account you'll see their names here and you'll be able to see which stag is there under just to kind of keep everybody organized um next up will be automations right here you get my five different automations that I use to run my agency this one is for when people
book appointments um on that consultations calendar when people are looking into getting a website done with you appointment no showed if they don't show up to this appointment then um we have this no-show meaning we just trigger it by a tag so whenever we tag a lead with this no-show tag it'll send them through this automation which has automated text messages emails that'll send out to these leads and just try to get them to rebook a time with us because they didn't show up to the appointment that they initially booked with us um to tag
those leads I'll show you real quick if you have a contact created I've got myself created as a contact right here if you want to tag Jasper let's say he's the person that didn't show up to your appointment and you want to send him through that automation you'll just go down to tags under his contact info and you'll tag him with the no-show tag so that's the tag I was just showing you that will trigger off that automation right here this one is triggered automatically when you book an appointment so anytime an appointment is booked
on this website consultations calendar this one will send out confirmation email confirmation text reminder emails reminder text at 24 hours before the appointment then an hour before they'll send out another text and another email just reminding them and uh yeah anyway anyway that's how that one works and then the third one here is if they showed to the appointment you had a great call with them but they weren't ready to buy it they're like hey I need to think about it I need to talk to my business partner this one is triggered by a tag
as well we'll just go into their contact information we'll tag them with this tag called showed but didn't buy so all we have to do after the call is just place that simple tag on them and we can do that just like I showed you can go to their contact let's say this is the person that booked with you they showed up you had a great call but they didn't buy from you we want to have some followup you know the week after so that they you ultimately will'll make a decision to buy we have
an automation setup that will send text and emails and just follow up with them on autopilot so that you guys don't have to remember to like keep track of them and you you know you'll have other calls that you need to jump on so you'll be busy so you don't want to have to remember hey I need to text this guy back in a few days the automations will do it all for you so you'll just tag him with the showed but didn't buy tag and it'll send him through that Automation and then lastly here
or second to last we've got this paying clients automation this one's triggered off by tagging somebody with the paying client tag so when you when you tag them with this it'll send them a welcome email and a welcome text message and it'll update them in our pipeline to the paying client stage automatically so anyway everything in my Snapshot is used by tagging leads that's like the simplest most easy way if you just press the lead tag them with that tag and it'll automatically send them into these automations and Trigger off these automations I'm going to
show you in a later video how to build automations for your clients and that kind of thing but these are the ones you'll use for your agency and then lastly this one is for those customer support calls these are for paying clients when they book an appointment on your support calls calendar it'll just send them you know know confirmation email confirmation text reminder email reminder text to make sure that they show up for the appointment and it'll but 5 minutes before the appointment it'll send you a notification saying hey make sure you jump on this
call in 5 minutes just to remind you as the agency owner so a few things uh well also I'll show you this website under the sites tab you'll get access to my sales funnel that I use with my pricing and everything so has a homepage a checkout page a thank you page and a privacy policy in terms and conditions page all these different pages I mean really you're mainly going to be using the page to show your clients so I'll just open this up real quick and show you guys a preview basically you know you
guys can edit this inside of the funnel Builder if you want change the the text and what it says and everything but it basically talks about high converting funnels you know targeting leads helping them out streamlining their marketing powerful automations and then down at the bottom it shows our pricing we've got our starter plan and our Unlimited Plan $1,000 setup $2,000 setup and then 97 a month and 197 a month so you guys can use this funnel here for whenever you're on calls with your clients to show them the pricing show them a little bit
about our off and um it also has this checkout page right here so whenever your client is ready they can go and click sign up and you can do this in front of them on a zoom call with them you say hey let's go ahead and get started um we'll go ahead and get started with this uh $11,000 setup plan and the 97 per month is if that's what they have agreed to when they click sign up right here it'll redir redir redirect them excuse me to this page which is the second page of the
funnel the checkout page where they can put in their business name their full name their email I'll just show you real quick and then their phone number and then they can go to step two and then they can fill out with their card information we don't have any products connected to this yet so we need to connect the products first that's why there's nothing showing on like worth of prices and everything so I'll show you how to do that here in a sec but that's the basic funnel and then after they check out here it'll
have that thank you page then the privacy policy and terms and conditions page this is necessary because we need to use this for whenever we set up our a2p verification which is our phone number we need to verify with the US government and Canada if you're in the US or Canada so we have to have this on on the website for that to get approved so we can start sending text messages using our go high Lev phone number and so this is the funnel that I give you guys access to and then that's like basically
the entire snapshot if you guys are one of my Affiliates or if you're in the high level Vault and you're paying member of the highle Vault you'll get access to my Premiere or my affiliate snapshot which has a little bit extra in it um that you guys don't get if you're just in highle quest it has this website inside of it that has all these different training videos and so these are training videos that are completely wh labeled you guys can show them to your clients and basically you can have these like software tutorials to
show them you click here and then it has all these videos that I filmed they're all white labeled so whenever you click on one of them when you're first getting started they don't have my logo on them they're just say John Smith's account so you guys can use these for your clients to show them how to use all the different features of the software so that y'all don't have to spend as much time with them so I taken my face off of it my logo so you guys can all use them as well there's a
video there's like 54 of them videos on every single top topic every single feature of high Lev so that you guys don't have to like spend as much time with your clients and so I give those to you as part of my affiliate snapshots if you guys want to get that snapshot you can either join the highle Vault for the $97 a month if you're not an affiliate of mine and if you are an affiliate of mine just reach out to me in the vault and I can send that to you you should get it
though as soon as you sign up with my link it'll email it to you then it has all these other um courses in it like if I if I go back to this main page it has a local SEO course Facebook ads course just different courses on marketing related topics that we can give to our clients just to help them out with their marketing a little bit more just an added bonus we can throw in there for our clients and so yeah you get that as part of my Advanced affiliate snapshot and then you get
all those courses again under the memberships tab here they should be here you get all of them here so you can use them as lead magnets so if you guys are posting content on social media and you make a video saying Hey it comment the word Facebook and I'll send you my free Facebook ads course and people have to put in their name email and phone number to get access to it so you can start capturing leads that way as well using these as lead magnets for your social media content um but yeah anyway that's
really the only addition you get as part of my affiliate program um but I spent like tons and tons of hours filming those videos so it is very valuable if you guys want those either sign up with my affiliate link or just join the Vault for the $97 a month you'll get access to that and an awesome Community um but yeah inside the snapshot we need to go to settings real quick and we need to do this we'll need to go to this tab right here that says custom values and we need to change a
few of these right here so so the first one that we need to change is going to be um might be on page two here our Zoom link so we need to paste our Zoom Link in here if you guys use zoom or you could also use Google meet that's totally fine as well but to get your Zoom link basically you're going to open up your Zoom account I'm going to go to zoom. us I'm going to go ahead and uh log in real quick to my account I'm going to sign in with my with
Google CU that's how I think I'm signed up with zoom there we go and you go to this tab called profile right here you'll scroll down and this is going to be you're going to click this little eyelash button and this is going to be your permanent Zoom link that you're going to use for every consultation call every support call it's that's the easiest way to do is just use the same permanent Zoom link so you'll just get it make sure to click the eyelash so it expands the link and then you can go back
into high level and you can click edit over here edit custom value and go ahead and put that Zoom Link in this is important because this sends out an automations that are in my Snapshot and if you don't change this right here the SN snot whenever it texts the leads saying hey here's your here's the zoom link for our Zoom call on Friday it won't send anything because I'm using a custom value right there you need to paste in your Zoom link so it updates in all the all the automations that I have set up
that send out text and emails to people who' have booked appointments with us so we'll go ahead and update this one the zoom link that one's really important to do and then once this updates on this first page here um we need to update our calendar link right here so this one we're going to hit go back we're going to go to calendar calendar settings and then we're going to go to website consultations we're going to click uh share right here then we're going to copy the scheduling link of our website consultations calendar then we're
going to go back into custom values down here then we're going to go to calendar link we're going to edit this one paste in our calendar link this one's important because if somebody no shows us this is the link that we'll send to them to get them to reschedule after they know show us in appointments and that'll send out all automatically in my automations all you guys have to do is update it here and it'll automatically update it in all the automations that are there and then um everything else inside of here isn't super important
you guys don't have to update these and so just mainly those two are the two that we need so that all the automations are firing off properly sending the right appropriate text messages the appropriate emails we update them here and they'll update in all the text and emails that send out in those automations that I've given you as part of the snapshot so that's everything as part of the snapshot um so you guys have everything there that you'll need to get rolling obviously keep going through the rest of the videos cuz you'll still need to
learn how to use high level still need to learn how to sell clients and and onboard them and all that kind of stuff but you guys have everything really in your sub account now that you need to run your business smoothly just like I run my agency and so you guys have the keys to the kingdom and I'll see you guys in the next video in the last video you guys imported my Snapshot and it had a sales funnel in it that you guys can use to sell your clients and show them kind of what
you offer it's under the funnel section sales funnels it's this one right here that kind of shows our basic offer and then at the bottom it shows our pricing and so this is what you can kind of show your clients on Zoom calls when you jump on sales calls with them um but now we need to connect a domain to it CU by default it just has this like generic go high Lev domain we can connect and hook up our own domain to it and use this kind of as our website or as our sales
page we don't really need a full-blown website for this business model it's not super necessary even though we are building websites for our clients we can just use a funnel as our main website and you guys can use this one you guys can edit it inside of the funnel Builder here you uh sorry that was preview you can open it up by clicking edit and you can edit each different page of the funnel I'm going to show you guys how to use the funnel and website builder later on um in another section of the courses
but you guys can edit different things inside of here and change these images and logos and just really make it your own put your logo at the top whatever youall want to do but anyway we're going to connect a domain to this so you guys can actually publish it and it can go live and it can be searchable on the web and so we're going to go down to settings down here we're going to go to the domains Tab and then we're going to click add domain I purchased a domain called theas slab. you guys
will put in your domain right here whatever that is and then you'll click add record manually I don't like to use the automated one through go high level sometimes it messes up and doesn't work so I'm going to click add record manually it's just two DNS records that we have to add into GoDaddy or wherever we bought our domain um an a record and a cname record so I'm going to go ahead and jump into GoDaddy here I've already got my the SAS lab.com domain pulled up and I'm in the DNS records I'm going to
click add new record and then the first one's going to be that a record the symbol is going to be the at sign and then the value is going to be this box right here I'm going to go ahead and copy this paste this in one thing to note before you save this if there's another a record in here with the at sign next to it and there's one that will probably say like parked or something right here go ahead and delete that a record that has the at next to it cuz you can't have
two of them so delete that one and then hit save on this one and this one should save in no problem boom there we go and then the second one there will also be a cname record that has www next to it like that's the one we need to add so if there's another one in here that says cname and www go ahead and delete it over here because we can't have two of those either so I'm going to go ahead and add it I already deleted mine earlier www the value is this one right
here I'm going to copy this box paste it in there and then save it once those are both saved successfully and we are good to go we can go back into high level we can click verify records and it'll take 20 or 30 seconds to verify that we've created those two DNS records in GoDaddy so it's basically running a diagnostic to see if we added those in properly and if it's linking up correctly so we're just going to wait that out right here and then if you get an error like this saying it wasn't good
maybe go back into GoDaddy real quick refresh it make sure everything's good in there and then click verify record again sometimes it can take a few tries before it'll go through all right there we go that time it worked and so now we can select the domain that we want to link this to and so we can select this sales funnel or sorry not the domain the actual funnel or website that we want to connect it to this one right here you guys are like I said if you're my Affiliates um you get the access
to this training courses for your clients if you're not you'll just have the sales funnel in here so just make sure you connect it to the sales funnel and then connect it to the homepage and under the additional options you can connect it to the sales funnel home H page as the 404 error page as well hit link domain and then everything should be linked up properly just to make sure we'll hit go back we'll go to sites and uh under your funnel here you'll click on your sales funnel you'll go to settings make sure
the saslab decom is connected to your funnel and then we can actually type it in so we could just go to a new tab and say the sas.com and then boom our funnel is published if it doesn't work right away just wait 10 20 minutes sometimes it can take a little bit of time before it'll like be searchable on Google um but yeah it'll have your funnel now it'll be connected to your domain and uh yeah this is where you can send your clients or show them on a zoom call hey this is our pricing
these are our two different packages and just have something to show people if they ever ask you hey can you send me your website or can you send me more info you can just send them this right here so that's everything you need to do to get your domain hooked up and connected to the funnel in my Snapshot like I said you guys can create your own funnel you don't have to use mine if you don't like it or you can change it up make it your own and um yeah hopefully this was helpful and
I'll see you guys in the next video in this video I'm going be showing you guys how to add products to your funnel here so whenever your clients come to check out on the second half of this order form we'll have products connected to it that they can actually select from put their card information in and pay and so inside of high level we're going to go down to the payments tab right here you need to integrate stripe first so if you haven't done that already from a previous video you're going to go to Integrations
right here you're going to click uh right here and it's going to say connect if you if it says manage you're good that means you've connected already if it says connect though you need to go ahead and connect your stripe account and then this will work so then we're going to go to the products Tab and we can create our first product our two products are basically going to be uh the two setup fees CU that's what we're going to charge people um whenever they buy from us is first the setup fee later on will
come the monthly subscription I'll show you how to charge clients that monthly subscription later after you built their website out but first off we just need to charge we have our starter um setup fee which is 1,000 bucks as we saw on the funnel earlier and so we're not going to be charging them 1,000 bucks though what we're going to do is we're going to charge them 500 it's going to be a onetime setup fee we can skip all this part right here we can add a description if you want but you don't have to
um the amount is actually going to be500 what we're going to do is we're going to charge our clients $500 on day one as a deposit we're going to build their website out it's going to take about a week or so to build the website out and then we're going to charge them the second $500 so 1,000 total after the website is done that will have been paid out the full th000 and then after the website's done we will also charge and start the monthly subscription of the 97 or the 197 per month so this
product is for the starter plan we're just charging $500 half the setup fee whenever we close them and so we don't want to put 1,000 here just 500 but just half of that and then we can just hit save down here hit go back and we'll see that we've added our starter setup fee now we're going to create our um unlimited setup fee you guys can name these plans whatever you want you can change them on the funnel Min or just starter unlimited and then this one is going to be $1,000 cuz it's a $2,000
total setup fee for this one we're just going to charge them a th000 up front and then the second th000 after we've set up their website one time fee and then we'll hit save here so now we have these two different products that we can add to our funnel and like I said we're just charging these half of half of the setup fees on this funnel whenever we are on a sales call with them we get them to pay us this is all we're going to charge up front so we're going to go back to
our sites tab we're going to go to our sales funnel we're going to click on the checkout page right here because this is the page that has that form where they put in their card info then we're going to go to products and then we can add those two products so we've already created the products now we can just select from them so we'll do the start one first so it shows at the top and then we'll select the price 500 bucks we'll click save make sure it says one time and it's green right here
and everything that means your stripe has been connected properly and then add another product and this one's the unlimited the price is a th000 which is half of our setup fee of the 2,000 then we'll click save so now I've got these two products on this checkout page so now if we preview this checkout page I'm going to go to overview I'm going to preview it well I've already got it previewed here I'm going to refresh it well it might not work I'm just going to do this I'm going to put in my info here
just like your client or your potential client would be whenever they're checking out and you're doing this on the call with them right you're not going to let them just pay on their own you usually want to get them to pay on the call um and then put in our number real quick and then on step two now we'll have those two products so they can select or we can do this in front of them and just take the card over the zoom call with them either way but we can select the product if they're
going with the $2,000 plan we're going to charge them the $1,000 setup fee if they're going with the $1,000 setup fee plan we'll just charge them the $500 today so anyway just select the one they want to go with or they or let them do it and send them the link to your site and let them select it and then they can put in their card info the expiration CVC all this good stuff um if you want to give them a discount you can create coupon codes inside of the payments tab up here um you'll
do that under coupons right here and you can have different codes that give them a certain percentage off if you want um but anyway this is what you're going to set up right here and uh we'll create a coupon code real quick because our first couple clients like we said at the very beginning of this course we're not going to charge them these full setup fees because they're just our first couple clients maybe we wipe the setup fee completely and so we'll create a quick coupon just for your first couple clients so you don't guys
you can show them hey these are our normal prices but we're going to give you no setup fee for this deal just because you're one of our first client so the coupon name could be like um 100% off and then the coupon uh enter coupon code just like 100% off could be or we can just call it 100 um free website I'll just call it free website I cannot type awesome free website is the coupon code that we need to type in to get that 100% discount coupon type it's going to be a percentage coupon
discount 100% start date we're just going to start it today start time we're going to just start it like right now it is currently 300 p.m. awesome and then end date um let's see limit the total number of times the coupon can be redeemed limit the coupon to selected products end date we can just do I guess we have to select an end date um we could just put it out super far into the future you know we're only going to give this discount to a couple clients just like our first two or even just
our first client and so doesn't really matter but anyway um also apply to recurring future payments if applicable no we don't want to do that uh limit to one use per customer we'll definitely do that limit this coupon to selected products and offers uh we'll just this is fine um limit the times it can be redeemed no we'll just do this create so now I've created this coupon so now if our client is on this checkout page and they put in the coupon free website or you put it in for them it'll give them 100%
off and it won't charge them anything but we still want to take their card because we're going to be using their card later on to charge them for the monthly subscription but that's how you create that coupon code so you can get your first couple clients 100% off the setup fee and we'll just charge them the monthly and then after your first couple clients you don't want to use this free website promo code anymore because you want to start charging people setup fees so you can make some money on the setups um but yeah that's
how to connect products that's how to create that coupon so when you get your first few clients you can give them 100% off on the setup fee and um in a future video I'm going to show you guys how to charge people for the monthly subscriptions we're already going to have their card on file so we can automatically just start a subscription plan for them we don't need to get their card info again cuz this is going to get us their card info from the setup fee we can charge them the second half later after
the site's done and we can charge them the monthly subscription I'll I'll show you guys how to do that in another video in this video I'm going to be showing you guys how to add custom menu links all of these on the left are menu links but we can add our own custom ones down here and just give our clients some additional things the first one is going to be a um connection basically to our in this video I'm going to be showing you guys how to add custom menu links so over on the left
inside of our sub accounts we have these these are all called menu links each of them that you can click on to get into different features and services and things like that at the bottom though we can add in our own custom menu links um with specific things that will take our clients to specific places that are custom that aren't default already inside of high level so the first one we're going to add is going to be our calendar so under calendars calendar settings we want to give our clients a link over on the left
that they can book support calls with us right from inside the software so if they're working in the software they're like really confused about something or don't know how something works then they can book a support call with us so we're going to go ahead and click on the three dots here you should have this supports call calendar already set up if you guys have uploaded my Snapshot if not go ahead and upload my Snapshot it's like a couple videos before this one you're going to Click Share right here you're going to copy the scheduling
link and then we're going to jump into our agency account so these custom menu links are controlled from our agency level we're going to go down to settings and then we're going to go right here where it says custom menu link and then we can create our first one we're going to click create new it's going to be some sort of calendar we'll just use uh this one right here um so that's the symbol we're going to be using that's going to be showed over on the left next to it and then the link title
we could call it um book a support call and so they know like if they click on it that's where they can book a support call with us the link we're going to paste in that calendar link that scheduling link that we just copied and then everything else down here we're just going to click save all right so now we've added that custom menu link now if we switch back into our sub account and this will be the same for your client sub account they won't be in yours here but they'll have their own sub
account they'll have this book a support call Custom menu link that we just added and when they click on it boom it takes them directly to your calendar where they can book a call with you for a specific time you can set your availability to whatever you want it to be inside the calendar settings um I'll show you how to do that in a later video but yeah you can have this available for your clients to quickly be able to book calls with you so they can get the help that they need um it's not
going to be often that they book calls it's is a very simple offer that we're giving them so that doesn't require much upkeep but you do want to give them the option just so they don't end up like canceling on you because they needed help and couldn't get it so that's the first custom menu link we added in here the second one is if you're an affiliate of mine and you have my affiliate snapshot we have these training videos right here that we can embed as a custom menu link and so it'll look just like
this but inside of high level where your clients can see oh I need help with this software so let me go to the software tutorials and they'll have access to all these videos that are wh labeled and they'll teach them how to use the software and so we can add these training videos as our own custom menu link down here below the support calls and so we're just going to click this little preview button on the training page which is the homepage and then once we're here we can just use this link right here we
don't actually have to connect our own link to it we can just copy this one go back into our agency account then we can go down to settings and then go to custom menu link and then under here we can add another one this one could have like a video icon like this YouTube icon the link title could be training videos the link we go ahead and paste in there and then keep everything the same we'll go ahead and save that and then if we switch into our sub account we'll be able to see it
all of our clients whenever they get into their sub accounts they'll be able to see it this video training tab right here training videos when they click on it boom it opens up into this and then they can click get started and then they can access all these different training videos so those are really the only two custom menu links you absolutely need really the support calls the one you need this one's just an addition you know an extra for my Affiliates or people who are in the highle vault but um yeah it is a
nice thing to have for your clients to quickly book support calls with you and have training videos that will help them learn the software and understand everything they don't really have to work in the software a ton our offer is going to be really simple where they don't need a ton of this training and they really probably won't end up using it too too much cuz the offer is very automated for them they don't have to touch it very much but in the case that they do want to use the software and use all the
amazing features that high LEL offers they can have these videos to walk them through it anyway see you guys in the next video in this video I'm going to show you guys how you can buy your phone number in your sub account and how you can get it a2p approved so that you can start sending text messages with it so inside of your account in your sub account you're going to go down to settings and then you're going to go to this tab right here that says phone numbers and inside of the phone numbers tab
we can first buy our phone number so we're going to click add numbers up here we're going to add a phone number and then we can buy a local phone number in our area code unfortunately you can't hook up your personal cell phone number to go high level or anything like that we can forward calls to our cell phone but we can't send text messages as our cell phone using the automations and go we have to get one of these local numbers and so you can select your country right here the countries that are available
are really the only ones that are available if it's not on this list then you're unfortunately you have to buy number from a different country that you're not located in um but there's lots of different countries that are available you can go to filters and you can go to search by digit or phrase so I'm in a 208 area code here in the US so I can type in 208 and then where it says match to instead of any part of number I can do first part of number so I want the first part of
the number the first three digits to be 208 and then I'm going to toggle off toll-free cuz I don't want a tollfree number I want a local number that can send texts um pictures and voice messages and then you can click apply and then you could see if there's some available phone numbers in your area it's not always going to be available if you type in an area code and nothing pops up here then there's probably no phone numbers available you could try refreshing a few times and see if one pops up but you might
be out of luck you may have to pick a different area code in a different city in your state which is still fine you'll you'll be totally fine even if you have a an area code from a different state or a different uh City or whatever but it's still the same state it won't really matter too much but anyway I can go ahead and buy one of these phone numbers I can pick the city that I'm looking for um doesn't really matter I'll just do Mountain Home Idaho and then I'll hit proceeded to buy it
will char charge you $1.5 a month to host that number and keep that number and then you do also have to pay for the text messages each text is 0.7 cents per segment and Which is less than a cent per text message so they're really really cheap you can basically send a th000 text messages for $7 I'm pretty sure that math is right so um and each calling minute is 3 cents so you could talk a th000 minutes on the phone for 30 bucks so it's really not very expensive to text and call people using
go high level um but now You' got the number here um you'll see it right here it's your default number now we need to do this a2p registration this is a new law that came out a few months ago in the US and Canada if you're not in the US and Canada you don't have to worry about this so don't do this if you're not in the US in Canada so you're just doing extra work that you don't have to do but if you're in the US and Canada you have to go through this little
registration form and they have to approve your number and then you can start texting from the number you can't send texts in your with your number until this is done and approved you can make calls with the number but you can't text until this has been submitted so we're going to go ahead and click Start now and then we're going to go to uh this start registration now um is the business entity registering located in the US or Canada yes if not then you can just leave this you don't have to do this um does
the business you're registering have a tax ID if yes if you have an LLC and you have an EIN number then say yes if you do not then say no if you don't have an LLC yet you can say no but I'm going to go ahead and say yes for mine because I do have an LLC and an EIN number we're going to hit continue it's going to post the legal business name so it'll pull it in from your account settings under the business profile or my profile somewhere in here and uh you'll put it
your business type um mine's a limited liability company um so I'll go a and select that business registration type I have an EIN employer identification number I'll go ahead and paste my social security or not my Social Security my EIN number right here because that's what I had um specified right here um I don't even know mine but I'm just going to put in some random numbers until it gives me the clear all right cool and then business industry select the industry that you're in um you might be able to find one that's like marketing
or media we just do online or media either of those should be fine I'll just do online and then the business email make sure to put in your email there website make sure you put in your website that you've connected to our funnel you have to have a website in order to get approved for this first so make sure you've already bought your domain you've hooked it up like I showed you in a couple videos ago how to connect the domain to your website or to your funnel go ahead and put your domain in so
mine is https and then colon backback theas lab.com that's the one I was using in the example a couple videos ago and then just make make sure you select US and Canada hit continue country United States if you're in Canada select that state of Province I'm in Idaho so I'm going to select Idaho and then street address go ahead and put in your actual address and then City I in rig zip code 83442 continue first name put in your name Jasper my last name aen my email address is just Jasper web. phone number is 20836
and then your job position you can just do CEO right there and then you can hit continue right here you do have to pay $20 to register this is just a onetime $20 we can just select this low volume standard click acknowledge and then continue it'll charge to your agency card that's on file that you're paying for go high level with um but you do have to pay it unfortunately every time for yourself and for your clients when you do this registration you have to do this for every client by the way as well not
just yourself so inside of their sub account when you get a client they have to go through this process to be able to send automated text it's a headache it's not a highle thing it's just a nationwide law now that all businesses have to go through this so anyway now we have to give some use case descriptions of how we're going to be using this phone number um we can click C examples and we can just copy this one um from here I'll just copy the second one cuz it's short it'll say this campaign will
be used to reach out to customers who sign up for the updates via SMS maybe you copy a few of them because this one you know sends confirmation reminders appointment information all this kind of stuff I make sure where it says company name go ahead and fill in your legal business name so make sure it's like web juu LLC make sure to include the LLC and everything so they want to see like legal business name on here not just friendly business name so I'm going to go ahead and web juice LLC and I think everything
else in here is good just make sure any of those filler type words you fill in with the actual information this next one sample message we're going to copy this one the sample message must include the lead's name your name and a business name and opt out language so this is a sample message a sample text message that you might send to a lead is basically what it's asking you to put here so we're saying hey John this is and then make sure to put your name right here Jasper from make sure to put in
your legal business name I'm going to put in web juu LLC our appointment is scheduled for this time please reach out to and I'm going to switch this CU this isn't an actual number I'm going to say to our or to this number because we're texting them this so we can say re reach out this number in case and then make sure it says please stop to unsubscribe on the end we need that then it's the sample message number two I'm just going to see example copy another one from here um I'm going to copy
the second one CU it's shorter hello this is Dr Lee we need to include the lead name so this one actually is non-compliant we need to add in like hello John this is and then I'm going to say Jasper again I don't know if it matters the name you put in or the names the the first the lead's name doesn't matter for sure I don't know if the name of the you know business owner matters but we're confirming your appointment tomorrow at 9:00 a.m. please reply stop to unsubscribe um we need to also say this
is Jasper with web juice LLC because they do need the um business name in there so this message isn't compliant in the example you need to add a few things to it even so anyway um this message will include embedded links maybe some of them will so we'll check that the messages will include phone numbers we'll check that gate age gated contact or content no the messages include content related to direct lending now if you're a lender check this one okay if you're in the mortgage space or the banking world you will need to check
that but these two are usually sufficient for most uh for us for sure and then for most of our clients as well hit continue and then how do lead context consent to receive messages we're just going to see this example here we're going to copy it and then we're going to paste it in here and users opt in by visiting HTT www. we need to put in our link right here so we're going to say www. minus theas slab. comom yours is whatever domain you've hooked up to that phunnel and filling in their details users
check a box to receive notifications promotional me messages additionally and users can also text start to and then just say our number right here and then leave that and then opt-in message uh we need to just see the example copy this paste that in have you have successfully opted in to receive notifications and promotional SMS from and then we'll paste in or I'll type in web juu LLC make sure it's your legal business name if you had an LLC please reply stop if you need to opt out in the future so that's everything we need
to do um basically you need to have a terms and conditions page on your website in order for this to work so I'm not going to submit this because I don't need this is a fake account that I'm just doing for video tutorial purposes um but you'll basically submit it and then once you've submitted it it'll say approved right here after a day or so and then the campaign usually takes 3 to 5 days and you need both of them to say approved once they're both approved it'll say approved up here and then you'll be
able to send text messages but what I was saying before is you need to have a terms and conditions page on the website that we put on there on that form like we do here in my sales funnel from my Snapshot this terms and conditions page right here it has a privacy policy and terms and conditions of showing how we're going to be using people's contact information that we collect on our website and so we need to make sure that's included or else your a2p uh campaign will get rejected so make sure you have this
if you built your own website out if you're using my funnel awesome you already have this and you have everything you need but if you built your own website or funnel and you connected your own domain to it and everything make sure you have that terms and conditions page and uh yeah anyway that's the full like phone setup and if I'm going back into phone numbers here we have our phone number and it'll say once you're approved next to your number it'll say default number and then it'll say a2p verify that means you're good to
start sending text messages text message system is weird with high level when you have a new account you have to ramp up your text you can't just send 5,000 texts on the first day to a big list of leads you have to kind of work your way up they're making us go through kind like a level system where you can send 100 a day to start once you've sent that 100 a day in like one day then it'll wait till day two then you can send 250 in one day and you have to send the
full amount in that day period to unlock the next level which is like 500 a day then you can send the 500 a day if you send all 500 you reach the fourth level and you can send you have to kind of work your way up to being able to send mass texts all at once which we can do at high level you just have to kind of work your way up and do it over time but I'm going to go into here we're going to go to edit configuration and we're going to enter our
phone number right here so it's already entered in forward calls to this is where you can put in your cell phone so I'm going to put in my cell number right here um and this will forward calls to my cell phone so if anybody calls this high level number it'll forward directly to my phone and it I'll pick it up it'll say you have a new lead press any key to connect the call you press one and it'll connect you with the lead and so that's how you'll know the calls coming in from a high
level from your high level number if it has that robotic answering machine and it'll basically warn you hey this is a lead press any key to connect the call press one and it'll connect you with them so that's I would put your phone number there your cell phone number it could also be a l line number either way so you can forward the calls to yourself so you get those calls on your phone you don't have to answer them through the desktop here on your computer and then everything else is good here pass n caller
name as caller ID you do want to select this one so you can see people's names if you have them saved as a contact when they call in it'll put their name on your phone so you can see who's calling you and then we'll just hit save right here and that officially is everything you need to do inside the phone number set up um you need to buy the phone number you need to verify it through a2p um if you're getting a toll-free number you don't have to do a2p if you do like a shorter
registration form for toll-free numbers those are the numbers that start with like 888 or 855 they're like non local area code numbers they're just like generic numbers and so you can do it's a little bit easier with toll-free numbers but most yourself and your clients will probably want a local number with like the local area code on the front of it and so you have to do the a2p in order to get those kind of numbers get approved and then you can start sending text messages anyway hope this was helpful and I'll see you guys
in the next video in this video I'm going to show you guys how to download the lead connector mobile app which is go high levels wh labeled app that you can use on your phone they call it lead connector because it's basically an app that connects you with your leads and it's wh labeled so it's not you know go high Lev branded so your clients can download it as well and they can use it and they'll have no idea that they're using go high level and so inside of your sub account and also inside of
your uh sub accounts for your clients you'll have this tab right here called mobile app if you don't have it you can switch to your agency V really quick and then you can go down to where it says mobile app and just make sure it's toggled on inside of this page here like this and then make sure it says lead connector generic brand and then click save preferences right here then switch back into the sub account and then this tab will show but it should just show by default you should have it already mobile app
and then when you click on to it it just kind of gives you a preview of what the mobile app looks like over here on the right it shows you the features of the mobile app you can converse with your clients through text email um you know call people from the mobile app you can message them on Facebook and Instagram DMS all of that all from one place you know you can uh look at your appointments and book appointments and see your calendar um you can do invoicing from the mobile app and send people invoices
for certain products or services that you've done for them um you can manage your reputation your Google reviews Facebook reviews those kind of things and then um you can manage leads from inside of the mobile app so those are like the main features it doesn't do everything that you can do on the desktop on the mobile app um like editing your website and stuff like that you would want to do on a computer anyway but it's some of the main features um and it makes it really easy for your clients just to do everything on
their phone whenever you get them set up with this off they don't even have to log into the desktop version of the software if they don't want to which is a lot more complex and complicated so anyway you can send the link out to people it's for them to download the mobile app let's say Jasper he's the only contact I have right here you could type in your lead's name or your customer's name and you could select it and then click send and it'll send them an email invite with the link to the Apple App
Store and the Google Play Store to either download it if they have Android or Apple and then they can log in to the mobile app just like they log into the software with their username and password you'll log in the same way if you want to use it for your agency and your business um you'll log in just with your normal username and password that you use to log into your go high level account and that's it so it's really simple really easy to do and your clients can go right here or you can send
them invites to uh invite them to download the software but it's a really good way to get them stuck with you and paying you for longer because if they have your services integrated on their phone which is usually like everybody's phone is an attachment of their hands nowaday and so if you can get that in front of them all the time and they see the app on their phone all the time it'll keep them using it which will ultimately keep them paying you for longer and so it helps just make your offer more sticky if
you can get them to download the mobile app so um that's how to do it and I'll see you guys in the next section during the prolonged Siege of Troy the Greek army unable to penetrate the city's defense devised a cunning plan to infiltrate its walls they constructed a giant wooden horse and concealed a select group of Warriors inside its belly presenting the horse as a Parting Gift the Greeks then retreated leaving the horse at the city's Gates deceived by the apparent Victory the Trojans brought the horse within their walls as a symbol of Triumph
under the cover of Darkness the hidden Greek soldiers emerged from their concealment opened the city Gates and ushered their waiting comrades into the unsuspecting City this ingenious strategy famously known as the Trojan Horse ultimately led to the downfall of Troy and secured victory for the Greek forces just like the horse was the secret weapon for the Greek army our secret weapon to making money online is the website plus SAS business model you may be asking what is website plus SAS I thought the best way to show it to you guys would be to show you
an example of one of my clients websites here so the first part website obviously we're going to be building websites or just basic landing pages for clients for businesses um typically small local businesses in our area that are service-based businesses so companies that offer a service in return for money and so this is an example of a medical spa website that I built for a client out of Nashville we're going to be setting up a website and then on that website we're going to give them a few different ways that they can capture leads the
first one is going to be this little chat widget bubble here at the bottom when we click on it their leads or their customers can go they can type in their name their phone number and they can send a quick message to care Nashville this medical spa and ask them questions but whenever they send this message in we can then automate a text message to send back to that lead or to that customer and we can say hey we just got your message on our website somebody will be with you shortly or we'll reach out
shortly and we can just automate those messages that send out to those leads and clients to make sure that they know they're going to be helped and that they don't go to the next Medical Spa in the area and try to reach out to them we want to win their business and we got to be really quick to respond to them and so we can automate that message that sends to them the method number two if we go to menu up here and we go to contact us we've given them this contact form that their
leads and clients can also go to their site and fill out for just different queries and things like that or questions that they have they can also go and fill out a form or if there's other businesses in the area that maybe want to partner with care Nashville or become affiliates with them then they can fill in info here type out a message of whatever they're looking to do or whatever it is and they can send this message in this we can also trigger off automations from so when somebody fills out this form with their
full name phone number email and then send a message when they click Send right here we can text them we can email them we can put them into drip campaigns that put them on our email list that send out weekly emails like we can just gather their information now we have their contact info that we can remarket to them and send them different discount programs that we're doing or just promotions things like that and so another great way to collect leads through the website pretty B basic though right most websites have a form a lot
of websites have you know this chat widget but the third thing that we're going to be giving them um that's going to help their business and this is the biggest selling point that we're going to be offering them is this booking system so inside of high level we can create these uh group booking systems like this one right here that have all these different types of appointments and this business has a ton you can see they've got like uh like 12 or 13 different types of appointments that they offer and so a customer or a
lead can go to their website and if they know they want to book a stem cell therapy appointment they can click on this one it pops up with the stem cell therapy calendar shows the availability it's loading because it wants to pull in all the availability of care Nashville and the different time slots they have available and then they can pick a time or date and then a time and then they can select that and then they have to fill in their name email phone number any additional notes they want to tell Karen Nashville before
they book it and then they can schedule a meeting so this is really powerful because now we can automate text messages that send to them saying hey we just got your booking and we just wanted to confirm for Monday at 3 P.M or whenever they booked and then an hour or two before or a day before we can send out another text and another email saying hey just want to to remind you really quick of your appointment in a couple hours see you then and we can just have these automated reminder text and emails and
Confirmation text and emails send out to these clients after they book an appointment just to make sure that they actually show up another cool thing we can add to these forms here this business didn't want to do it this way but we can add payment right here so they actually have to pay on the website for this stem cell therapy appointment in order to book it and so they have to put in their card information which now will eliminate a lot of no- shows because they actually have some skin in the game they paid us
on our site for this appointment and so they'll be more likely to show up and it just makes it easier to collect all the payments for these appointments for K Nashville this client of mine um because we can put that payment right on the site we don't have to worry about having people pay in the clinic when they actually come in just another added value this business didn't want that feature but that's totally fine and then another cool thing is after this appointment happens so this person books a stem cell therapy appointment for Tuesday at
at 10:00 a.m. on Tuesday at like noon a couple hours after the appointment happens we can automatically send their client a Google review request saying hey thanks for coming in a couple hours ago for your appointment we would be honored if you'd leave us a Google review it really helps our business grow and we can have a link to that to Ken Nashville's Google profile so they can leave a Google review we could also do it for a Facebook review as well wherever these businesses want to gather reviews and whatever wherever would be best to
help grow their business we can send that review request out to their clients automatically it's an automated text we could also send it as an automated email and we could have some sort of a program where hey if you leave us a Google review that's four or five stars we'll give you 20% off next time you come in just to incentivize them to leave those Google reviews which will also help this care Nashville business rank higher on Google because the more Google reviews they get the more positive Google reviews they get the higher they're going
to rank on Google on Google Maps and uh more people will be able to find their clinic and they ultimately get more business and so we're basically automating the entire process from booking all the way until that Google revieww request is sent out after the appointment happens for these businesses and uh it's a huge value huge time saer and ultimately to help them grow their business and so this is basically the full offer that we're giving to these clients to these local service-based businesses to help them grow and that's why we're charging them a setup
fees for the website that we're building here this entire website that I built out for them I charged them $3,000 for this and which is something you guys can easily charge and then for the monthly fee I charge them $200 a month or $197 a month is what I charge them and so you guys can do the exact same thing with your clients and work with these small local businesses in your local area or you can sell this to businesses all over the country I'm not physically located in Nashville I'm in Idaho and so you
can sell to businesses all over the country doesn't matter give them a really good-looking website give them a really good system that runs on their website with the booking system with the chat widget with the form all the automations that run with it I'm going to show you guys how to set all those up in the next section in the onboarding client section but I just wanted to give you this quick overview so you guys kind of understand what we're going to be offering and what the website Plus SAS business model is and uh it's
really really powerful a a service that so many businesses need but don't have I think the statistic is like 30% of businesses don't have a website or it might even be high it might be like 40% of websites don't or businesses don't have a website at all and then of the ones that do have websites very very few of them have a booking system like the one I showed you here with all these different types of appointments that can be booked with the automations that run behind them and so that's why we can justify charging
that monthly fee as well of the $200 a month because uh we're giving them all this autom this entire system and there are other businesses out there that that do these booking systems and charge way higher prices per month than what we're charging so we're giving them a really good deal building them an awesome site and we can do all of it through high level so that's the basic overview and I'll see you guys in the next video in this video I'm going to give you guys a better idea on which Niche to go after
for this business model so in my experience the best niches to shoot for are the same day appointment businesses so what I mean by that are just the niches that are on this list here Spas barber shops medical spas wellness centers pet grooming vets tutoring centers salons photography places car detailing cleaning companies golf courses massage therapy mobile phone repairs and coaches Consultants any type of business that has an appointment somebody comes in for the appointment or do they do the appointment through Zoom uh if it's like a coach or consultant if they do online coaching
or consultant but anyway the appointment happens and the person leaves that same day or they get off the appointment that same day these all these businesses they do the service usually within a few hours and then the person is leaving that same day the reason these are the best niches to go for are because we can automate their entire booking system for them and that's a huge value ad a huge bonus for these businesses to have on their website is that booking system like I showed you in the video right before this where people can
book all the different types of appointments so for like a spa they might do facials they might do uh back massages they might do um you know eyebrow lace uh threading or whatever it's called they have all these different types of appointments that they offer and we can create a booking system that gives options for all of them the the client can go to the website they can pick whatever type of appointment they can pick a date a time they can choose from their technician whoever they like working with the best from that spa and
then they can book the appointment and they can actually pay for it through the website there whenever they book it before they book they have to put in their card info and all that really really valuable service for these businesses and a lot of them don't have it in place already and so we can fill that need build them a website put that booking system on it and then we can automate all the text the emails everything that sends out between when the book appointment is booked and when they actually show up for the appointment
then we can automate the Google request that sends out after the appointment happens now it's kind of hard to do this if we're working with let's say um these niches right here like real estate agents Home Service businesses medical lawyers Ecom mortgage uh rentals these types of businesses are harder to build that booking system for and the reason for that like a real estate agent for example whenever they get a new lead that lead could be working with them for months before they buy or sell the home and so we don't really know how to
perfectly automate everything whereas with these businesses we know when appointment is booked when the person's coming in when they're leaving usually the appointments only take an hour or two and then we can automate that Google review request that sends out we can automate everything we don't have to touch it the client doesn't have to touch it and so with these businesses though there's a lot of variables that can mess up when those automated text send out and everything and when to send that Google review request out automatically like we don't know when that real estate
agent and their client are going to close on that house that they're looking to buy could be months could be 6 months you know could be a few weeks we never know and so home service business business are the same you know some of those home service projects let's say it's a landscaping business some of those projects could take a week maybe they take two weeks maybe normally it's only supposed to take a few days but there were some rainy days and so they weren't able to take those uh go out and help that person
at their house a couple days and so it prolongs the project just a lot of variables that make it hard for us to integrate that booking system like we want to so that's why I said go after these same day appointment businesses um to best pick one because we really do want to focus on one it'll make your life so much easier because when we reach out to these clients we want to say hey we built your website already can we show it to you that's like the best way to do Outreach and so if
we pick one Niche we only have to build one template out and use one template to do our Outreach but if we're working with like five different niches we have to build five different website templates and then we're reaching out to all these different types of businesses and we just get out of our Rhythm out of our flow if we're working with one business we'll be able to better learn that business speak their lingo be able to communicate know their struggles know their pain points and it'll just make scaling your agency so much better um
if you just pick one maybe two Max um in my experience I would pick one that you know the most about um or maybe you've worked in that industry previously um or maybe you have some friends or family that own one of these types of businesses that you could get as your first easiest client ever and so that's what I would kind of take into mind or one that maybe that you're just really interested in and you would really love to help maybe if you're a girl and you go to the spa all the time
focus on Spa because you'd be able to really connect with them you could even you know pitch the person the spa your favorite Spa in your local area on this service and land your first client that way if you're a dude and you're always going to the barber shop you know maybe you go after barber shops cuz you're really tight with your Barber and you can get him as your first you know really easy client um and so just kind of keep some of that stuff in mind try to pick one maybe two Max and
then we're just going to focus on those one or two niches and and it's going to make scaling so much easier we're going to know the process know the setup it's going to be the same every time because we're working with you know Medical Spa every single time so we know that the websites that they like we know all the automations that they need and we can easily replicate the onboarding for our clients when we get them so start thinking try to dial in your Niche um and figure out which one you want to shoot
for and go after and then stick to it it's okay at the beginning if you don't know your Niche maybe you could try out a few of them at the beginning but ultimately you do want to Niche down so it'll make your life so much easier make onboarding clients easier and uh yeah so hopefully this was helpful there's others on this like I didn't give the full list right like these are the ones I could think of that are same day appointment businesses but if you can think of any others that are like businesses that
have appointments the person comes in and then they're leaving that same day then you can use one of those like they're these probably definitely aren't all of the niches that are on the same day appointment business realm so um definitely um you know do some research and do some brainstorming maybe there's some on this list that are like even like really really Niche like maybe that nobody's going after and those would be really good ones to focus and Target on so anyway I'll see you guys in the next video in this video I'm going to
be showing you guys what we're going to be offering to our clients obviously we're building websites for them so you guys know that part of the offer I'm going to show you more of the software side of the offer the SAS side uh which is going to show you here between these two different plans so the first one is the starter plan we charge a $1,000 setup fee for this one we give our clients a three-page website so a three-page website would be like a homepage and a about page and a contact us page um
that would be a basic three-page website over on the right side we've got the unlimited plan it's a $2,000 setup fee but now they're getting a four page website so they get the about page the booking page the contact page and the uh uh about page so they can pick which Pages they want doesn't necessarily have to be those four specifically um and then we've got the monthly subscriptions right below so there's the $97 per month plan and then the $197 per month plan so the $2,000 setup fee right below it has the7 it doesn't
necessarily mean the 197 plan has to go with the four page website that's $2,000 you can intermingle these and they can mix and match them so the 197 plan could go with the $1,000 website setup fee and the $97 per month plan could go with the $2,000 website setup fee so you can mix and match them it doesn't have to go with the one that's right above it the features that they get are underneath so on the $1,000 setup on the starter plan they get on page SEO which is just basic research that you can
do to figure out all right what are the keywords we need to include on this person's website to see you know how to rank them best on Google in their local area I'm going to show you that in the onboarding client section on how to do that keyword research to figure out and best uh optimize their website for onpage SEO uh the next thing they get is SMS and email automations so whenever a a client goes and fills out a form or message them on a chat widget on their website we can send automated texts
to those leads and automated emails to those leads automatically atically the next one is Miss call text back so we give them a number for their business that's going to send those automated texts and people can also call in to that number and so we're giving them a phone system essentially as part of their website if a lead calls and the business doesn't answer then we can automatically text that lead back saying hey sorry we missed your call we're out we're busy doing something right now but how can we help you and it will start
a conversation with those leads automatically through text message if our client doesn't answer the phone we also give them the lead management app which we've covered in a previous video in the last course which is the lead connector mobile app which we give them access to it on the phone so they get they can manage all their contacts conversations appointments um Google reviews invoicing just different things like that from their phone and that's something a lot of our clients really like and it makes the offer more sticky for them because now they have this this
app on their phone that they're using all the time and so it's hard for them to cancel on us and cancel our services and then the last one under the starter plan is a contact form and a chat widget so we're just giving them a basic website with only a contact form and a chat widget so in a like two videos ago in the same course I showed you guys that website that I built for the medical spa they're only getting that little chat widget bubble where people can send in messages and they're getting a
basic contact form we're not giving them the full booking system with the calendar built out and everything on this starter plan that is moving into the unlimited plan so going to the unlimited plan 197 per month they get everything from the starter plan so they get all that stuff that we mentioned there and then plus they get Advanced SMS and email automations so what I mean by Advanced SMS email SMS and email automations versus just the basic SMS and email automations on the starter plan plan Advanced ones would be more text messages more emails so
basically when a lead is captured through their site let's say through a form or through that chat widget we're going to be sending multiple text messages out to that lead multiple emails to that lead and put them into like an email drip sequence basically that'll send emails over the next like month so it'll send like an email a week or two emails a week so that would be more advanced automations meaning we're just doing more follow-up through text and email automations for all of their leads that they capture through their site Google reviews automation that
one you guys is pretty straightforward after their customers come in for appointments we can automate a Google review request that sends out to those customers an hour or two later saying hey thanks for coming in earlier we'd be honored if you'd leave us a Google review here's a link where you can leave that and we can text that to them automatically we also will give them Payment Processing so now they can process payments through their site for their different services and people can put in their card info and buy these products or it' mainly be
services from these businesses and then we'll also give them the calendar booking system where we build out a system with all their different types of appointments if it's a barber shop maybe they've got a basic haircut maybe they've got the advanced haircut maybe they've got the haircut and shave just the shave so we can add all these different types of appointments that they offer to their site their customers can go to the site pick the type of appointment they want pick the date and time fill in their information put their card info on files so
that they can be charged for that appointment and yeah we can fully build that booking system into these uh clients websites so that's what's offered on the 197 plan but if you find a client that doesn't need that booking system or doesn't want it they just want the basic $97 plan they can go with that that's the big up sell for the 197 plan is is the booking system that we give them that connects into their website and sends out automated text and emails and Google review requests afterwards another cool thing about this offer is
if your prospect already has a website that they really really like and they don't want you to build them a website we can wave these setup fees and we can still give them all of the features on both of these plans and we can just charge them the monthly fee and we can integrate a lot of this stuff onto their current website we could just charge them a smaller integration setup fee what I mean by that is we can integrate their contact form from high level onto their if they have a WordPress website or a
Squarespace website or a Wix website we can integrate the contact forms from high level onto their WordPress website we can integrate the chat widget from high level onto their WordPress website we can also integrate the calendar booking system onto their WordPress website so it doesn't have to be a highle website that we build for them if they already love the website they can keep it we can integrate our system into their website which I'm going to show you how to do in the onboarding clients course section um but basically we can integrate and still charge
them a monthly subscription and still get them as a client even if we don't build their website or their landing page for them and so there's really an offer for everybody that we talk to most people if they have the website they love they're probably not going to have some of this stuff that we can offer them with the automations and everything and if we integrate this form chat widget booking system onto their site anytime somebody fills that form out messages on on that chat widget or books an appointment the automations in high level still
work the exact same they'll still send those texts those emails those Google review requests automatically so we can still tie this in to our clients websites even if they don't don't want us to build them a new website and just charge them a monthly subscription and still get them as a software client so that's what we're offering hopefully that made sense and um these are the prices that we're going to be offering that at I'm going to go in depth on actually how to set all this stuff up in the back end inside of high
level in a future video in the next course in the onboarding clients course so you guys will see that there um but hopefully this is kind of churning and starting to spin the gears in your head okay this is what we're going to be offering and uh it's a very simple offer really easy to set up very automated so after you set your clients up you don't really have to touch this much it's just going to run for them and they're going to pay every single month because it's a super valuable service that will save
them time and make them more money in their business so I'll see you guys in the next video in this video I'm going to show you some different lead generation methods so y'all can actually start Landing clients for your agency the first one is networking what I mean by this is you're going to go into your phone into your contacts and you're going to look for anybody that you know friends family acquaintances doesn't matter anybody in your contacts that owns a business and owns maybe a business in whatever Niche you're going after or if right
now you haven't picked your Niche yet just reach out to all the business owners that you know and have in your network on Instagram any friends you have on Facebook um and then everybody in the contacts on your phone you're going to reach out to them first this is going to be your easiest first client for your agency cuz like we said before we're not going to charge those setup fees starting out and so if you're giving your friends or family or just somebody that you know a good deal they won't feel like you're just
trying to make money on them you're going to be like hey I'm literally doing this for free for you I'm not charging you a setup fee I do have to charge the monthly subscription because I have a fee that I have to pay for the software that we use to set everything up for you but I'll just charge you the software fee the monthly fee and I won't charge you any setup fee so those first couple clients you can easily land through just networking in your local network or family friends people you know and so
start by doing that first I promise you it'll be your easiest first client that you'll ever get people who know you and like you trust you they'll be made way more likely to want to work with you um and they'll be more lenient if you make mistakes along the way on the onboarding process and the setup and maybe take a little bit longer than you're supposed to just cuz it's your first time they'll be understanding because they're friends and family and they won't be as like strict on you as a business owner so that's your
first way to go number two are Facebook groups so back about two years ago when I was starting out in high level I joined a Facebook group I was selling to mortgage loan officers um and so I joined all the loan officer groups that I could find on Facebook there was this one group it was called the new loan officers group it had like 30,000 loan officers in it a lot of them were brand new to the industry had just gotten licensed and so I sent and posted in that group and basically I just posted
some sort of free message or something like that just hey I'm doing this for free and I have a software that can really help loan officers I wasn't selling websites at the time and I just posted in the group it got like 250 comments of people saying they were interested and I dm'd each of them individually on Facebook Messenger got booked appointments with 50 of them jumped on 50 calls and then out of those 50 I closed 25 clients from a single Post in a Facebook group so it just shows the power of these groups
it'll have your entire Niche all in one place a bunch of business owners you can find groups not only for loan officers but for like any Niche you can think of you could type in um you know Medical Spa business owners Facebook group on Facebook and I guarantee you there there will be at least a few groups in that Niche that are business owners you can join them you have to be careful you don't want to make you want to make sure you're not posting stuff that comes off as too salesy um or threatening because
then people can actually ban you from the group the admin of the group can ban you but one strategy you could use is you could go to the group admin because whenever you join a group you can see who the admin is you could DM them say hey this is my intention I just want to help people out give them websites help them with this software that can really help their business is it cool I post in your group if they say no you could say hey I'll give you a free account in our software
suite and go high level if you allow me to post in your group or I can pay you money to be able to post in your group it'll be worth it just to pay them you know $100 $50 a month whatever they want to charge and be able to post in their group because these are really great places to make sales and just uh post and you can get tons of eyeballs on your stuff so Facebook groups that would be number two number three is cold calling or sorry cold DMS um cold DMS you can
send out on Instagram Facebook LinkedIn um those are probably the top three platforms to send cold DMS on on Facebook you can send about 50 per day 30 to 50 depends on how old your account is Instagram you can send 100 per day and then LinkedIn I think it's 100 as well so between the three of them you can send a little bit over 200 DMS per day to businesses and you can literally just type in in the search bar like landscaping business or for our case you know uh barber shops or medical spas or
pet groomers whatever Niche you're going after and you can um just DM them shoot them a DM and the DM script we're going to be using is hey we built you guys a new website for your pet grooming business and wanted to see if we could send it over to you or show it to you um ultimately we want to get on a call with them so if you ask them if we can show it to you that'd be better I'm going to post all the scripts down below this video like all these different methods
in the scripts that I use so you guys can see all them there I'm just kind of running over and brushing over each of them and how they work um but yeah that' be what you would do for cold DMS so try to send as many cold DMS as you can per day you know to send 200 cold DMS it might take you an hour that's not to be able to send 200 DMS and you're just waiting for people to reply back when they reply back you can start conversations with them get them onto a
book call and close them as a client I've gotten a ton of clients this way number four lead scraping so I was going to show you guys if you guys want to get leads and you're looking for businesses cuz all these below lead scraping cold calling cold voicemail cold email you'll need leads in order to be able to send those and call those leads so we do that through or I personally use this guy on Fiverr I go to fiverr.com it's a place where you can hire people from other countries that will do work for
really cheap and there's this guy named almond Mayer that I like to use he'll gets you 10,000 leads of business owners for 45 bucks super cheap by the way he'll get you 50,000 for 75 bucks and then $100,000 for $125 so really really cheap leads he'll get you a huge Excel spreadsheet of names business names their a lot of their emails all their phone numbers their address how many Google reviews they have what their average star rating is um their websites if they have them if they don't have them that field will be empty on
the list so it can get you tons of leads you can also if you don't want to pay the money starting out you can also go go through Google Maps and so you can just literally go to google.com/ maps and you could type in you know Medical Spa and it'll pull up all the medical spas in your local area and you can just go through this way and find leads but if you go through somebody who can scrape them for you they can get you a much larger quantity of leads that we can then import
into our highle CRM under the contacts Tab and then we can go through them a lot quicker and easier and they'll all just be like on top of each other versus with Google Maps sometimes it can be kind of jumbled maybe you make calls one day and you're coold calling these businesses but then you come back day two and you forgot where you left off and it's kind of harder to manage it this way if you get the leads and you have somebody scrape them for you then you can get a lot more and it
you don't have to spend as much time um looking at Google Maps and things like that so I recommend omit I'll paste the link down below to his fiber account so you guys can hire him if you want it and then the next one is going to be coold calling so like I said we'll need leads in order to be able to make those Co calls because uh who else you know we have we have to have their phone number in order to call so cool calling what what I like to do is I like
to say hey is this business cool this is Jasper with web juice I was just call him because we put together a new website for your pet grooming business and wanted to see if we could show it to you we noticed on your Google profile that you guys didn't have a website or we noticed that you did have one but you guys didn't have like a few key features like the booking system and um things like that um and just yeah kind of go through that pitch but the pitch we're typically using for all of
these different methods is hey we built you a new website can we show it to you and that's what we do on the zoom calls we show them the website pitch them on a new on the website and uh see if they want a new one and then we can sell them on our services so that'd be the basic coold calling script I'll paste it down below the actual like full coold calling script so you guys can can read that and have that um but yeah Co calling is really effective you can make if you
make about 150 coold calls you can get one client from that on average so not bad you can make 150 coold calls in a day no problem and so technically you get a client a day if you're coold calling full-time voicemail drops these on are pretty cool so go high level has a feature where you can send out a voicemail to thousands of people at once and you pre-record it on your phone you upload it into high level and then it'll send this voicemail out to a bunch of people it'll ring on the phone one
time for them and then it'll go straight to their voicemail and they'll have a voicemail waiting in their inbox from you so it's really cool um but basically how it works in high level Oh wrong page it's uh you can create an automation for it so I'll show you real quick kind of how this automation works so inside of your sub account under the automations tab you can create this automation it's triggered by tag so you're going to use the trigger event that's called I'll show you real quick it's called Contact tag right here so
you add this one I've already added it right here and then you add a filter so right here you'll just add this filter add tag and then you can use a tag you can create one that's called voicemail drop I already have one created so I'm going to select it here and this tag basically if you tag it on a customer or a contact in high level it'll send them this recording of your voicemail which is the next step of the automation here's the recording where we add that MP3 file in this isn't an actual
MP3 of me this I just put a filler one here it's like a song I think but um basically you can upload your mp3 in here and it'll send this voicemail out to you could do it to a thousand people at once if you wanted to I wouldn't recommend doing a th at once um if you want to do a th000 tags on like a thousand different contacts maybe you got a huge list of medical spas and you want to send these out to them you can do this in drip mode as well so you
can add a drip step right between here and before the voicemail drop and you could do batch sizes of like 100 every you know couple hours so it doesn't send them all at once because then you're if you get send out a thousand voicemails at once it rings on their phone it shows as a Miss call you're going to get tons of calls back way too many to handle so if you drip it you can send out 100 at a time over every two hours and that'll make it a little bit more manageable but the
reason this works really well is not because the customer is going to listen to your voicemail and be really interested because on the voicemail you'll say hey this is John with ABC web web design whatever we built you guys a new website for your medical spa and wanted to see if we could show it to you let me know if you're interested you can call me back at this number text me here happy to help out um or happy to chat so you're going to say just a quick 20 to 30 second voicemail recording but
they're probably not going to even listen to the voicemail most people don't listen to their voicemails too often but they are going to see that they missed a call from your number and so because they see that they missed that call they're going to call you back they're going to think you're a lead or a potential client of their business they're going to say hey this is blank uh company we were just calling cuz we saw that we had a Mis call from you and then you're going to say oh yeah this is John with
web juice you know we were calling we left you guys a voicemail did you get that and they'll say no no worries um we just built built a new website for your nail salon and wanted to see if we could send it to you or show it to you and uh you can continue the conversation that way but because they were the one that called you now their guard is much lower and so you'll have a much better conversation with them because they were the one calling you and um sometimes they'll call you back even
if they they'll actually listen to the voicemail and they'll call you back because they're actually interested maybe they were in the market to buy a website or get a new website done and so they're guard as much lower you can have a much better chance of booking them in and then also um if you're getting calls in it's 100% rate of like you get on the phone with them every single time cuz they're the one calling you versus if you're coold calling when you coold call 100 leads you're only going to get on the phone
with about 30 of them because the answer rate is typically around 30% from my experience and so you you have like 70 calls that go unanswered so you're wasting your time calling 70 people that aren't going to answer out of that 100 that you call with this method they'll call you so you get to talk to everyone and then while you're waiting for the people to call you back you can be working doing your thing sending your DMs for the day texting people that you know that own businesses reaching out to them that way and
when you get calls you're talking to business owners of people that you tagged with this voicemail drop tag that sent that voicemail to them I'll show you kind of how to tag people so inside of your contacts tab over here you can select all your leads like I've got 25,000 leads I wouldn't want to send voicemails to all of them obviously because that'd be way too many but we can click um this little button where is it at uh it's this tag button I can't see right now tag right here so add tag and all
you'll do is you'll add that voicemail drop tag you'll select all of them and then you'll add this voicemail drop tag name the action you can just name it like today's date so you know when you place that tag on them and click add when you add it'll send them all through that Automation and it'll do drip mode like we set up in the automation it'll drip you know just a 100 at a time every two hours but it'll send out a ton of voicemails uh to these people and uh yeah it's really powerful um
a lot of my students um that work that I work with in Affiliates they get clients like this all day every day just doing voice smell drops every day and it's cool cuz you don't have to be the one coold calling them they're the ones calling you now and so you you kind of have the advantage that way um next up on the list is going to be cold email so cold email we need a list first so we can get that list from Amed that guy Fiverr that I showed you we can plug it
in high level import those contacts and we can start sending email campaigns out um cold email is is not super effective by itself um you do have to send like over a th000 cold emails a day for it to be effective so your lists need to be pretty big if you're sending anything less than a th000 it's probably not worth to do um the response rate is less than like half of a percent so it's like really really low the people that will actually reach back out to you that are interested in the website that
you built for them because we're going to say hey we built you a website blah blah blah let me know if you're interested I can send it over to you so that's going to be our cold email script like I said I'll paste all the scripts for all these different methods down below that you can use but um yeah cold email is good if you combine it with cold calling so if you say hey we built your website is it cool if we send over the link to that website and so you can check it
out if they say yes to that email you can then send them the link link to the site that you built for them and then you can Co call them right away and say hey this is Jasper I was the guy emailing you about the new website that we built for your medical spa I just sent you the link to the site I don't know if it got there are you able to check that real quick and they can check it they'll say oh yeah I just got here I see it's from you Jasper cool
while I've got you on the phone um I'd love to jump on a call with you and kind of show you the website it's hard to show you everything just by sending you a link so I'd love to jump on that call just to kind of show you how some of the automation tools work with the site how we can integrate some different things to really help your business business grow and help you save time um would you be available either later today or tomorrow and so you can mix cold email with cold calling and
you're only cold calling the people who have said yes to your initial email to send the link to your site and so you're calling on warm prospects now because you're combining the cold email with the cold calling so it's better than just cold calling on on its own because now you're calling people who have already been chatting with you through email and they're much more likely to book that appointment because they already remember that they've been emailing with you and so cold email combined with coold calling super effective method that I've used to get a
lot of clients for my agency and then the last method that I'm going to cover in this video is organic content so if I were you and if you're comfortable on camera post on Instagram Facebook Tik Tok and create reals so create 30 to 60c videos about what you offer give people free tips free advice you can use uh the strategy that I use is hey at the end of each of my videos I say comment the keyword start and I'll send you my free course on whatever topic I'm sending them and so in my
Snapshot in my affiliate snapshot um if you you guys are an affiliate of mine or if you're in the highle vault Community with me you get access to all of my free wh labeled courses I've got one on running Facebook ads on how to use AI to grow your business on how to run Google ads you can use those as lead magnets for whenever you post content you could say comment the word Facebook and I'll send you my free Facebook ads course and I've already built it out for you guys so you guys can use
my course and just send it over to them and when they access it they have to put in their name email and phone number so now you capture their information you can remarket to them and turn them into a client organic content is very slept on a lot of people don't do a lot of people aren't comfortable on CA but if you are and you can just push through it and push through the pain of of being embarrassed of posting cold or or sorry organic content is very effective and you can get hundreds of thousands
of views on a simple reel that took you a couple you know 30 minutes to make so anyway these are all the best methods for my experience on growing your agency without having to pay any money without having to run ads you can always run ads later on but I recommend doing these free methods um first and then later on you can scale with ads but uh yeah hopefully this video is helpful know it's super long I'll see you guys in the next video this is the sales framework that I use to close clients and
that you'll want to use to close clients as well it's just a three-part framework before this we have already reached out to the client we've told them that we built them a new website we wanted to show it to them and now we're on a zoom call with them and we're going to show them the website that we built for them and we're going to show them the automations and how that kind of works and everything like that but basically this is the the three-step framework that we use it's really simple there's no slideshow presentation
or anything like that the first step is just to ask our client or our potential client evaluation questions so questions like we can start with is it cool if I ask you some questions about your business to see if what we offer would even help you we kind of want to set expectations hey we just want to see what your business is about what your goals are things like that is it cool if I ask you some questions and they'll say yes and then you'll go forward and you'll say you know how long have you
guys been running your business have you guys seen steady growth since you're started and you just want to write these down as you're asking them so it shows them hey I'm actually putting in some effort and writing this down and they'll appreciate that what is your biggest goal for your business this year how do you get the most of your clients these are just some examples right you guys can figure out some questions that that you want to ask them specifically but these are the ones that I typically ask um and then eventually I'll share
my screen with them and I'll say um I'll pull up their current website if they have one if they don't then I don't do this but if they have a current website I'll say you know what do you like about your current website and I'll just kind of have them show me as I'm sharing screen with them and showing their website and then I'll say uh what do you love about your current website you know there's something some things that you really like and you wouldn't want to change if you got a new website and
then um are there any website examples you love from other businesses in your Niche you maybe some competitors in your area you really like their website or if there's another nail salon in another state that you've you've seen and you really like their website can you show me some of those and they'll usually give you a few examples which is really helpful for us because then we can start kind of getting an idea of what this business is looking for by the way record these calls so you guys can reflect back on them and see
what was said in the call so you can better design the website after you close them because ultimately this this framework here is going to help you close almost every client that you jump on a call with actually it's closer to probably 50% but still a really good closing ratio and then after you've kind of gone through that you shared screen looked at their website asked them what was good about it what they don't like about it checked out some other websites that they really love then you can say you know it sounds like there
might be a few areas that we can help you in your business is it cool if I show you what we have to offer they'll say yes you're basically asking them permission to pitch them and if they say yes they're giving you the go to pitch them on the service and so they'll say yes then we go to step two phase two of the closing framework which is to show our offer so we're going to start out by showing the website that we put together for them because ideally we're going to build that template out
first inside of high level and show them the template that we put together for their Niche on High level so you'll explain that it's a rough draft right and if they want it completely changed we can do that if they hate it um and you can kind of say like you know show the websites help helps them capture leads through the chat widget through the forms through the booking system the calendar system that we can incorporate on their site you know show how the automations work the SMS and email automations um so whenever you're showing
them this you could say hey I'm going to fill this form out on the website right here with your information and whenever I fill it out you'll see you'll get a text message I'm going to put your name email phone number in right here and they can check their phone they'll see they got a text message right away and you can say hey that's how the automations work your leads will be getting those text and emails from you on autopilot and it'll just help nurture them and make sure they turn into clients of your business
so you can demo that for them on the call just really quick and then um you can explain how the SEO on their website will help them rank better in their local area for different keywords bring up the side examples they shared from earlier that they really liked um and explain how we can replicate those sites or some of the things they liked on those sites while still giving them the lead captures the you know chat widget form calendar booking system and all the automations that run with it so we can give them their perfect
ideal website lookwise and functionality wise we can give them all the Automation and Lead captures and really just help them get more leads get more business and then we'll show a few of the tabs inside of high level we'll show them like the conversations tab um calendars tab contacts opportunities and then the sites tab if they ever want to like make updates to the site you can show them how easy it all is then you could um even show them you can't really show them the mobile app over Zoom by sharing your screen but you
can explain to them hey these are the main features inside our mobile app as well you can do everything from your phone you don't even need to log into our desktop software to really have the functionality of our system and be able to manage everything and then this is phase three of the framework we're going to show them the pricing so it's literally just evaluation questions show them the pitch you know what we're offering and then show them pricing so we're going to show them the two different packages that we have uh the starter plan
the unlimited plan you know explain how the setup fees work and they're based on how big of a website they want and then the software subscriptions are based on the features that they get and then ask them which plan they think would be best for them and whatever plan they pick agree with them so yep I think that would be a great fit for you guys looks like that would be the best option and then right there if they're like you know after you ask them what pricing or which plan they would want to go
with that's where they might have some objections so you can kind of come over overcome some of those objections right there you know if it's a price objection or I need to talk to my business partner I really am not the type that like to be super pushy whenever people have objections I like to definitely probe at the objections and see kind of what they mean and that all that kind of stuff but you could definitely land clients even if you don't close them on the initial call you can say yeah we'll follow up with
you in a couple days if they're like uh I need to think about it or I need to reach out to my business partner and talk to them about it that's totally fine we can still close them a few days later um because the offer we have is so good that it can close deals even a few days after the call doesn't have to necessarily be right on the call but it is better if you can close them on the call for sure you know and we explained that the setup fees are broken up into
two payments right we don't charge the $1,000 day one we're only going to charge $500 today and the $500 after we've built out their website or if they're going with the unlimited plan in the $2,000 setup fee we'll only charge them 1,000 today and the 2,000 after we've built out the website which usually takes about a week or two on average back in fourth and then the monthly fee starts 30 days after the second payment so we built their website it's gone live we've connected their domain to it 30 days later will be the first
payment of $197 or the $97 per month explain the process takes about two weeks to have the website and software fully set up uh for their business and then say you know I'll go ahead and send you over the payment link for the X option whatever option they go with and we can go ahead and get your product started today and completed in the next two weeks so you just kind of want to assume the sale assume they want to do it they've been showing you all the cool examples of websites that they like they've
been telling you what they want on their website what they don't want on their website so you're basically assuming all of this is going to segue into them getting a new website cuz that's what we've been talking about the entire time you've been kind of playing with their emotions a little bit getting them excited showing all these Cool website examples and and then we can just assume the sales send the payment over which is our funnel page which you guys have already set up in a previous video in a previous course but that funnel page
where they can check out and pay the first half of the setup fee to get the project started and rolling so that's the entire sales process you don't really need like I said any big long sales presentation or slides or anything like that um this is just what you're going to do it's very simple very conversational it's just more natural then if you were trying to show somebody this long presentation that might not even be pertinent to them you just kind of want to based on the questions that they answer to or the an the
answers they give you to the questions at the beginning here um you want to kind of cater the pitch to that hit on those pain points that they're facing in their business the places they're trying to get to and the things they're trying to achieve and use that as ammunition to help make the sale but yeah that's the entire closing framework super simple and um I'll see you guys in the next video in this video I'm going to be showing you guys how to set up products on your sales funnel from my Snapshot so that
you guys can actually charge your clients for our services that we're going to be offering them and so you're going to go to your payments tab inside of your sub account we're going to go up to products and then the products tab by the way you should have integrated your stripe already if you're integrated it should say manage right here if you're not integrated on stripe already um from a previous video that I showed you go ahead and connect your stripe it'll say connect right here you'll click connect and then go ahead and it'll log
into your stripe and then you'll be all connected and then we can create the products so then we'll go to products right here we'll hit create product and then our first product is going to be our $1,000 setup fee we'll just call it $1,000 setup plus and then we'll do $97 a month so that's our first one you guys can name them whatever you want to name them I'm just going to name them this for the video sake um and y'all can too um this will make it really easy for your clients to kind of
visually see when they're checking out but this is our basic plan right our starter plan with the $97 per month we're going to create four different products though because we can mix and mingle the two different um plans we can do the $2,000 setup with the $97 per month or we could do the $1,000 setup for our clients and charge them the $197 per month with $1,000 setup Fe so your clients can kind of choose from different options so we're going to create four this is our first one we're going to go down our pricing
type is going to be recurring the amount is going to be $97 recurring and then right here build monthly trial period we're going to give them a 30-day trial of the 97 we're not going to charge them the 97 monthly until 30 days from when we sign them up because we don't want to start charging them the monthly before we're even done with the website usually the website will take about a week or two to complete and we'll just say hey we'll just we won't charge you the 97 until well after your website has been
completed we'll just charge it 30 days from now and so you give them a 30-day trial of the 97 but what we will charge them today is the $500 setup fee which is half of our $1,000 setup fee so going to charge them half of this now half of it after we're done building out their website this makes it a lot easier to sell clients if you break in break your setup fees into two payments especially because we haven't even delivered the product to them yet so people are a little bit hesitant on paying the
full $1,000 setup fee or the full $2,000 setup fee before they've even gotten the final product and so we just charge them half UPF front half later it's a much easier way to make the sale and get people to buy from you and so that's all we need to set up here we can just skip this part this part you could upload an image for it but you don't really need to just do everything that I did here click save and then and hit back just make sure all right so we've got this first product
next one is going to be a $11,000 setup fee so but this one is going to be for the 197 plan so $197 per month so you like I said you can mix the $1,000 setup with the 197 plan because the setup fees are based on how big of a website the client gets the ,000 setup fee we give them a three-page website and then the $2,000 setup you we give them a four-page website so if they want a three-page website but they want all the features of the 197 plan then can do that we
can kind of mix and match like I was saying we're going to go down this is going to be recurring again this amount is 197 per month this uh trial period 30 days setup fee is going to be uh this one's going to be 500 as well and then so we're play like like I said half of the ,000 up front is what we're charging them 500 I'll show you how to charge them for that later and then save that one so now we've got two products now we got to add our two for the
unlimited plan so this one's going to be uh $2,000 setup plus and then the first one's going to be $97 per month scroll down amount uh is going to be 97 for the monthly it's going to be recurring actually so make sure to switch it to recurring trial period 30 days so start up our setup fee for this one's going to be uh did we do yeah 2,000 so the setup fee for this one is going to be a th000 which is half of 2,000 and then we will leave all the other stuff blank save
that one and then we've got now four products and now we're going to create our last one here which is going to be $2,000 setup plus and then we're going to do the 197 per month plan and then we're going to scroll down the amount or type is recurring amount is 197 the setup or trial period 30 days setup fee 1,000 which is half of our $2,000 and then we can save it so now we've got all four of our products that we need here for all of our different uh setup fees and monthly subscriptions
and now we're going to go down to the sites Tab and we can add these products to our sales funnel from my Snapshot um if you guys are using my Snapshot make sure to go to the checkout page of this sales funnel this is where they will actually pay you on the funnels from the checkout page you'll go up to products right here then we can add those four products so first we want to kind of add them in order of price so the first one would be the th000 at at $97 a month um
price right here and then hit save next one is going to be this $1,000 plus the 197 per month but like I said it says 1,000 here but we're really only charging them 500 you'll see I'll show you the checkout form after I've set these so you guys can kind of see what I'm talking about but the next one is the 2,000 at the one at the $97 per month we'll save that and then lastly the 2,000 at the 197 per month and then save all right so now we've got all four of our products
now I'm going to go back and go to overview I'm going to click the little preview button down here so we can see this page I'm going to fill in my information real quick and then I'm going to put in my phone number real quick going to put in a fake phone number it looks like it's not taking it let me do a different one there we go and then we'll go to step two and now our products will all show here so you can see all right $1,000 setup plus7 per month it says you
know $500 setup fee with 30-day trial and 97 per month after the trial period so it kind of gives you a description so if your client's like I want the $2,000 website I want the 4 Page website but I but I want the 197 plan as well you can give them this plan if they're like I want the $2,000 setup fee but I want the $97 plan you can go here and it shows the actual price that they're paying today right here so you'll see it doesn't show a th000 right here it only shows 500
cuz we set it up that way to only charge half of the setup fee on day one we'll charge the other half on uh whenever we finish the website usually that's about a week or two after we close the client so anyway that's how to add those products to your web page um and your client when you're closing them I'll just show you from the main page you'll be showing them your pricing right at the bottom of this funnel page you'll be say all right let's go with this option cool um I'm going to go
ahead and we'll go fill this in for you so you'll just do this as you're sharing screen with them on the closing call you'll fill in their information for them you can do it for them or you can send them this link to your funnel they can do it themselves and then boom you're saying all right I'm going to select this plan for you what's your card info they'll give you your card their card info over the phone or like I said you can have them do it themselves they don't want to give you that
over the zoom call and they can put in their card info themselves and then yeah it'll charge them the $500 today 30 days from now it'll charge them the $97 per month and that'll charge them automatically every month you don't have to do any like manual invoicing or anything for that I'll just pull out of their car card every month and then I'll show you in a later video in the course on the onboarding section course how to charge that second half of the setup fee automatically um but yeah that's how to add those products
to your funnel so you can start charging your clients for your services in this video I'm going to show you all how to charge your clients and actually accept payments from them so you're on the zoom call they want to move forward they want the website plus the software subscription and so they're ready to go we're going to go to our funnel first and hopefully on the zoom call you're on the funnel already which is the sales funnel from my Snapshot right here and you're going to be on the funnel showing them the pricing and
then they're like yep let's do the $2,000 setup plus the 197 per month awesome we'll click sign up right here which will take us to the form you'll fill out the form with your client's information you'll be sharing your screen showing them all this information you're putting in um or you could send them the link to this funnel you could send them the your domain that you've hooked up to it and they could do it themselves but make sure to try to do it on the call um we don't want to do it later on
or else the chance of making the sale will go down so try to get them to pay on the call and then we'll put in their email let's say their email is you know Jasper gmail.com whatever their phone number and then we'll go to step two and then you'll select the plan that the person wants to go with your client wants to go with and so they want to go with the $2,000 setup plus the $197 per month and uh like we did before in a previous video in the sub account setup course we said
we can add a coupon code if we want to give them a discount on the setup fee um but we also set that up in the uh other video in the sub account setup course it's like adding products to funnels that's what it's called if you haven't G gone through that video yet and you haven't hav gotten all this setup already go to that video it's in the sub account setup course under the uh funnel adding products to funnels video once you've added that you'll see all your products in here we're only charging half of
the setup fee today so we're going to charge th000 today and then we'll charge the other $1,000 so 2,000 total we'll charge the second half after we've built the website which usually will take about a week to two weeks back and forth with the client it's not taking like two weeks straight worth of like building the website 8 hours a day but you will have some back and forth with the client you'll send them the rough draft they'll say can we change this and say yeah and then they'll say can we change this so it'll
just be some back and forth waiting time through email before it's fully complete anywhere between a week to two weeks and then so we're charging them a th000 today they'll go ahead and put their card information in CVC country zip code and they'll hit complete so it'll charge them 1,000 bucks and then we are going to that's how you get the first half that's how you start the project right that's how we get the deposit the first thousand bucks the 197 will start automatically after 30 days so we give them a 30-day trial after 30
days the first $197 will charge to their card and it'll charge automatically every 30 days from then on out and then we can charge them the second half of the setup fee after the website is complete um we can do that through the the payments tab right here and so inside the payments tab here first we're going to go up to products click on products we need to create two more products just two one time one for $500 and one for $1,000 CU that's the second half of our setup fees so we're going to create
first this one's going to be called um second sorry I can't type second half of setup [Music] feed or we'll just call it starter so that's our first plan whatever you want to name your plans you can starter second half of setup fee it's going to be a one-time payment it's going to be $500 cuz 1,000 is the total we already charged them the first $500 already now we're charging them the second $500 and then we're just going to click save right here and then we need to create our second product so we've got our
starter second half of setup fee and then we're going to create our unlimited and then second have of setup feed this one is going to be a th one time make sure it says one time right here CU this is just a one time setup feed and then we're going to click save so now we've got those two products right here these ones are going to be easiest if we just send an invoice to our client we don't need to have them check out through our funnel again or anything like that these ones we can
just send an invoice so we're going to go up to invoices now we're going to create two different invoice templates that we can save and use for all of our clients so this one is going to be the unlimited we'll do the starter one first charger second half of setup fee for 500 bucks we'll just click save and that's all we need to do and then we'll say We'll name the template up here this one will be called starter call it like second half of setup fee I'm going to copy this for my next one
and then we'll save the template so that's for the second half of our starter plan setup fee and then we'll create another invoice for the unlimited second half of setup which is $1,000 which is half of that $2,000 so anyway we are going to name this one unlimited second half of setup fee and then we're going to save this one as well so now we have two invoice templates that we can use when we invoice our clients after we've finished building out the websites to charge them for the second half and we're going to click
use one time and then we're going to go and it says who is this invoice for so we have to add in our client they should already be a contact in our sub account so we'll already have them in here let's say it's Jasper right here we can add him in and if he has his email and his his phone number in here which looks like he had his email when we selected him like we can see his email his phone number then we click um it already has the product in it and then we
just click Send and when we click Send It'll ask us if we want to email it to them or text it to them or both I recommend doing both so it sends the invoice to both places their email and their phone number and then it will send that invoice and then they can click it whenever they look at it it'll look like this and they can click view invoice and then they can pay it right through their email or the text message that you send to them so it makes it really easy once it's paid
it'll say paid whenever we go back out of here it'll show down here and it'll say paid right now it's a draft um but that's how you send it for the $1,000 and it's the same for the $500 so if you wanted to send the $500 one you'll just go to your template that you've created for the starter plan 500 bucks use one time and then you will you can name the invoice just name it the name of your client just to keep it all organized add them in you know add your client in here
from your client that will show right here all the list of your clients you can type in their name if you can't find them right here if you got a lot of clients and then yeah you can just hit send and then send it out to their email and their phone number text it to them and email it to them send the invoice and boom they pay that and then everything is good they've already paid the first half whenever they first were on the zoom call with you they paid there now they paid the second
half through this invoice and then the monthly recurring will start 30 days after the initial day that you signed them up and they paid the first half to set up you 30 days later so at this point you know a couple weeks from now they'll be charged to 197 just let them know that then then the 197 will be charge to their card every single month from there on out and that's it that's how you charge your clients hopefully this all made sense and I'll see you guys in the next video in this video I'm
going to be showing you guys how to set up a demo sub account so that you can show people when you have potential prospects that want to jump on Zoom calls with you we can actually show them an example website that we put together for them and we can test out some of the automations that are tied to that website and demo it on the zoom call with them and so we're going to switch back to our agency view to do this because we need to create a whole new sub account so under our sub
accounts tab right here we're going to go to add sub account and then we're going to create a blank sub account and we're going to just put in a random address we'll just click add account manually we don't need to put in an address because this is just going to be a demo account doesn't really matter it's not an actual client sub account we're not going to use it really their CL our clients aren't going to use it it's really just for demo purposes when we jump on those Zoom calls and we say hey we
built you a website can we show it to you and so this is where we're going to build that website out for the just demo sake and so first name you can just put your info in right here I'm just going to put in all mine I'll just yeah it doesn't really matter business name we can call this one Whatever your Niche is going to be hopefully you've decided on a niche by now um but this would be like your let's say our Niche is Medical Spa demo account so we'll just call it Medical Spa
demo account and then street address we'll just do 1 2 three Elm Street doesn't matter we'll do New York country United States all right and then state in Providence it's going to be New York ZIP code I don't know the ZIP code let do 1 two 3 4 5 phone number we'll just put in our phone number website we will do uh just random jasper.com and then the time zone we'll put in a time zone right here of just put in your time zone so there we go and then click save so then you'll have
created this demo account now we need to do some stuff inside of it to get it ready to show our clients so the first thing we're just going to switch to the sub account now this medical spa demo account you'll know you're in it because it'll say the name of the sub account right there Medical Spa demo and when we're inside of it here now we can go down to sites websites and the first thing we'll do is we'll go ahead and set up a website for our clients and so I'm going to show how
to build the websites in a video in a later section which is going to be under onboarding clients I'll show you how to fold use the website builder in that section um but basically right here we can create a new website we can go from templates and then we can type in see if they've got any medical spa templates looks like they don't we could just do a normal spa and we could customize it to the medical spa Niche but go high level is cool because they've got like a thousand website templates we can choose
from um and let's say we like one of these templates here let's say this one right here MedSpa I guess they do have a MedSpa template we can preview it by clicking on it you can see all the kind of how the go high level is built it out already and has it set up and then when we like the one that we want to go with we can hit continue and from here we're kind of going to like spice up the website a little bit like I said I'm going to show you more in
depth how to use the website builder in the onboarding clients course section there will be a specific video on using the website builder but we want to build out a website just a generic one doesn't have to have a logo on it or anything just one that we can show our clients when we're on these Zoom calls with them um and so you'll see has just the generic logo here that's fine we can leave all this stuff all the text and everything is fine um if there is any laurum ipsum text we probably do want
to change that text on here um to actual like English text and you can use AI to write that and so um over if we double click on the text we can click Ai and we can have ai generate text for us on our websites but anyway we just kind of want to have this website set up here and we want to connect a basic automation to it to be able to demo this site and so let's see if if we switch between Pages here there should be a let's see a booking page right here
and it says you do not have a calendar yet so we'll go ahead and build that calendar out real quick we'll create a quick calendar and we'll throw it on there save it we'll go back out we'll go to the calendars tab real quick and we'll just create our first calendar we can call it we can just do a normal simple calendar we'll call it Med Spa or we'll call it Med Spa appointments we'll call it right here Med Spa appointments this is how to set up the calendars you need like a widget on the
end of it that isn't taken by anybody else that's using high level so you need to make sure you put one in here that's original and then doesn't really matter though what it says 30 minutes um let's say Monday through Friday 8: a.m. to 5:00 p.m. meeting location you know you could do 1 two 3 Elm Street ultimately this will be the location of the actual Med Spa when we're setting it up for a real client we'll hit confirm and then we'll close it now we've got a calendar set up now we can go add
that calendar to our site so we'll go into our websites tab Medical Spa we'll go to our booking page again we'll just click on it to edit it and then where we had that block right here where it says you do not have a calendar yet you can click on that and now we can select that Med Spa appointments calendar that we just created and boom it'll paste it right in and now people can book through this calendar and so we just kind of want to have this on the site so we can show our
clients our potential clients hey this is something we can add onto your side a uh calendar we can also do a group calendar with different types of appointments um not just this single you know calendar we can do all your different types of treatments that you guys do at your MedSpa and then we'll also want to throw a chat widget on here which I'll go more in depth on the chat widget in the other section of this course on the uh onboarding clients course section but chat widget is right here under the sites tab just
go to chat widget um we we can edit the chat widget which like I said I'll show you in another video I'm just going to copy the code for now of this chat widget copy it and then we'll go back to our website click on MedSpa website we'll go up to the settings don't jump into the site yet go to settings then under this body tracking code section we'll paste in our chat widget code and then save it and now if we preview the website we'll have a chat widget on there so you can see
now that chat widget pops up on the site so cool now we've got this website and you guys can customize anything on the site that you want um just to make it look better but now we've got this you know chat widget if they go to the um let's see make an appointment page when they click here take them to our calendar and then one other thing we could add is just like a simple contact form which I'm also going to show you guys how to build forms and use them um and create them but
we're just going to create a simple form for this video so you're going to go to the sites tab into forms where I'm at now we can call this one Med Spa form and just asks for first name last name email phone number I can send receive text messages blah blah blah um we can change this message by clicking on it and I'm going to delete everything from here down and then I'm going to change the button I'm going to click the button it's going to say not button but we'll say submit and I'll change
the background color of the button to like that reddish color of the site that we were just looking at um that's probably close enough and then we'll save this then we'll go add this form onto the website somewhere we we just want to show all three lead capture methods to our potential client we want to show them the the form the chat widget and the calendar booking system CU those are three things we're going to include on most of our clients websit so we'll go back to websites now go to MedSpa um we could do
I don't know we could put that form somewhere on the services page let's see if there's already one on here um yeah this one might not be this one kind of shows all the different types of appointments and things that happen they can click here and it'll go to the booking page where the Calendar's at um let's put it on a different page we'll go to the about page and we'll put it on there some websites would have like a contact page right and so you can put that form on here um we'll just go
click this little Orange Box plus sign right there and then we'll go down to where it says form I think maybe I passed it there it is form then it says over on the right we can right here it'll pop up we can add that Med Spa form and then boom that form will pop up there so that's just another thing we could show our clients hey we have the chat Widget the form and the calendar booking system to collect leads and this is also something right here this first name last name email phone number
we can hook up an automation to this just for demoing purposes now in this sub account we haven't gone through and done a2p yet which is the under like the phone system we have to do that registration that a2p registration like we saw in a previous video since we haven't done that we can't send texts from the sub account but we can send emails so we can create a simple email automation just to show our clients how the automations work whenever somebody fills out a form on the website so we could just do a simple
automation we'll start from scratch we'll call this one Med Spa website form and we're going to go to settings real quick allow re-entry just to make sure this this means if somebody fills out that form multiple times they'll get the email from us every time that we're going to be setting up in this automation I'm going to go over more in depth on all the automations that you're going to set up for your clients whenever you're onboarding them in the onboarding client section that's where the bulk of everything will be on teaching you guys how
to use high level how to set up clients but just for this video um you can go there and then come back to this one to finish setting up this demo website once you've gone through the entire course um but yeah now we're going to go to the Builder the trigger event is going to be formed so submitted CU that's when somebody comes to our site fills out that Med Spa form and then we have to select from filters right here we've got to click add filter form is and then Med Spa form so anytime
somebody submits this med spa form we can then have an action that takes place which we're going to add right here which is going to be email send email so we can send them an email from name could be like ABC Med Spa from email we can actually put whatever email we want here so we can actually do like ABC Med Spa or we could do info at abcm medspa.com so it doesn't really matter then we could put any sending email or from email right there and that's what it'll look like it's sent from subject
line uh Med Spa info whatever and then we could say pay and then we can use this custom values tag here we can use contact first name so whatever first name the person puts in on that form on the website we'll paste right there hey Jasper this is is Jasper with ABC Med Spa just saw you submitted the form on form sorry I can't type on our website someone will reach out shortly something like that and then we could sign it off like ABC Med Spa so yeah that's how you do the email automation we'll
save that right real quick right here so it'll send that email whenever somebody fills out that form so when we're demoing the website to our client we'll make sure it's on publish right here now it's active and working we can go to that website when we show it to our client we can preview it just like this and go to that Services page or sorry it wasn't Services page was it it was the um about page we'll preview it open up a preview of it not the editor but the actual preview of the site and
we can be on the call with our client we say hey we just want to show you kind of how that automation Works in real life I'm going to go and put your info in so if your contact client's name or your potential client you're on the zoom call with his named John you can say all right John what's your last name John Smith cool what's a good email for you John then they could say oh it's John gmail.com and then phone what's a good phone number for you this won't send the text but we'll
just put it in anyway cool awesome and then you'll click that and hit submit when you submit that you'll tell John hey John can you pull up your email real quick and then he'll pull it up and he'll say oh yep I got the email and it's the email that we set up in that Automation and so that then you can say that's just how the automations work on the website we also will send text messages too we don't have it set up on this one but it'll send emails and texts to all the leads
that you capture through your website just to make sure they know they're going to be helped and they don't go on to the next Med Spa in the area and you don't lose out on their business so anyway that's the uh basic setup for setting up your clients website template this isn't going to be their final website right this is just an example site you're showing them you can tell them hey we can build whatever you're looking for this is just an example we put together a rough draft to show you that we put some
time in for you and that's how everything works with it but yeah that's really all you need to set up inside of this demo account it's just a basic website template um maybe you have multiple templates that you want to add in here so you can add in you know more if you wanted to and create another one use another template and have a few different ones that you can show your clients uh but that's the basic setup with the basic automation that's tied to it like I said we can't set set up a text
automation an SMS yet because we don't have a2p registered in this sub account um but we can definitely do it with emails which is still pretty cool and then we can also use this account to show our clients a few of the main featur features of high level like you know here's our conversations where you can message back and forth with your leads through text email phone calls Facebook DMS Instagram DMS and WhatsApp here's your calendar where you'll see all your booked appointments that are booked through the website we built for you here's your contacts
where you'll see all your names emails and phone numbers of all your leads that you've collected um and you can just kind of show them those three basic tabs there and then you can also say we can do all this on your phone as well on our mobile app but um yeah that's the entire sub account demo account setup um that we can use to kind of demo for clients on these Zoom calls and um that's it so I'll see you guys in the next video in this video I'm going to show you guys how
to create your client sub account so you've gotten them to pay you you're onboarding them and now you need to create a sub account for them where their website will be built all their automations everything will be set up for their business and so we need to jump back to our agency account real quick and then we're going to go to the sub accounts tab that we're in right now if you've already gone through all the other course videos you'll have your own sub account set up you'll have the demo sub account set up for
whatever Niche you're targeting and then we're going to set up a real sub account now for one of our clients and so we're just going to go from a blank snapshot right here you don't really need to use any of those um other snapshots that are available by high level you're going to type in the name or sorry the address of their business right here so let's say their their address is 919 Jayy Drive RG which is my address for my business we can select that over here and then you're going to put in all
of their businesses information once this page loads right here you're going to put in their business name owner's first name or your client's first name let's say their name is John their last name is Smith their email address is John Gmail .c their business name let's say they are a nail salon so their business name is a BC Nails just make sure to put in all their appropriate information here all of the address and everything their Niche that they're in um you just have to find that scrolling through here it's not necessary you actually don't
have to put that in um but then their phone number make sure you put in the business owner's phone number or their just their business number in general is fine there as well so that's going to be required to create the account and then their website hopefully they have a already or one in mind that they're wanting to buy and so we're actually not going to buy the domains for our clients we're going to let them buy their own domain through goad if they don't have one already the majority of the clients that I've worked
with have already had their domain purchased on a previous site that they used or they just bought it and never built a website or anything and never put it to use but if they don't have a website domain they'll need to buy one and you'll have them buy that because usually people want to own their own domains they don't want you to have control over that as the agency so let them buy the domain make sure that's an instruction you tell them to do it's like hey go to goaty buy your domain it'll be like
$14 per year really cheap um so anyway let's say their website is ABC nails.com and then make sure you put in their correct time zone their time zone not yours let's say they're in this time zone this is my time zone um but yeah make sure to put in their correct time zone CU if you have a incorrect time zone it'll mess up the calendar booking system so make sure that's all correct and then under general info right here you could go ahead and put in um well we've already got all that I meant social
profiles that's where I was meaning to go if they have a Facebook page Google LinkedIn go ahead and put all those links in right here if not that's totally fine and then we'll just go ahead and switch into our sub account and now we're inside of our client sub account you'll see the name of the sub account right here just to signify that you're actually in the correct sub account but the basics are going to be their business profile here you'll want to make sure um you've added their friendly business name legal business name their
email all this information here here and then added their voicemail so uploaded their voicemail in here tell them to record you know 20 second voicemail and send it to you as an MP3 file you can upload that in here or they can themselves make sure their business business physical address is all correct time zone and then put in the name of your authorized representative which will be John Smith your client and then everything here will be the same Miss call text back you can set this up for them whatever message they're wanting to send um
to their clients if they miss calls and we want to automatically text them they can say whatever they want here by default it'll say hi this is ABC nails I saw we missed your call how can I help um so you could change that or your client could change that to whatever they wanted to say um but yeah make sure the business profile is set up so this is really all we need to set up in this video is just create the sub account add in their basic information under the business profile tab I'll show
you guys how to do everything else in the sub account setup throughout the videos in this section but um yeah that's how to do that and I'll see you all in the next one in this video I'm going to be showing youall how to create website forms so I'm going to kind of break down each portion of the website before I get to the video showing you guys how to build the actual websites inside of the website builder using high level I'm going to show you guys some of the elements that will go onto the
website because because they're in different places throughout the software like on a website we'll have a form a chat widget a calendar booking system that we're all going to set up and put on the website of our clients all of those are done in separate places throughout the software like the calendars are set up here the forms are set up under the form section here under the sites tab the chat widget is set up right here and we need to put those all onto the website that we're building so I'm going to show you how
to do the forms in this video then I'll have a video on like the chat widget on the calendars and each individual piece but um yeah anyway I'll eventually show you guys how to actually build the websites does design them and all that make them look good but we're going to go to forms in this one we're going to go to the form Builder this is all under the sites Tab and we're going to click add form we're inside of our client sub account so you guys have your client already you're going to be setting
up the forms calendars chat Widget the website all inside of their sub account not your agency sub account but their sub account that you've already created for them and we can name the form let's say this is going to be on their website and let's say this client is a medical spa so we could call this like uh Med Spa form and then boom all right so that's the name of the form just so we can keep it organized CU When we go to add this form to a website it'll it'll have a drop in
it'll say which form do you want to add and you need to make sure you know which what the name of it is so you're adding the correct form onto the website and then we can customize the websites and we can add whatever want over we can add whatever we want excuse me over on the left you can click this little plus sign and there's all these different elements we can add to our websites move this out of the way first name full name first name last name date of birth phone number email we can
add a button to it it already has a button right here um collect payments through forms you can add you know an address line to ask people for their address their city state country postal code website their organization um you can have a text box that they have to fill in and type something out in um we can add images a capture source and then TNC this is all TNC right here any of the elements on the site though or on the form we can customize so we can click on first name we can change
the name of the label which will say something else right here if we if we change that we can change what this uh TNC text says right here maybe we don't want it to be so long so we just like delete the second half of it from like here down let me select that delete all that so now it's kind of shorter and then um we can change the button instead of button we can say submit and then also we can change the color of the button The Styling of the button um we can click
you know and change the button color to like be blue instead of green uh we can change the Border we can make it have like an actual border around it so we do like a three pixel border and make it black so now it kind of we'll have a black border around the button um and of the form itself if we just click this little we click off all of the fields inside the form and we click this button up here we can style the actual form itself and so we could have the form background
color be like a different color to match the the color Vibes of the website um we can make it have a border as well so we could have a five pixel border U it looks like that made it kind of shrink in a little bit so we put that back out a zero yeah so you can kind of see the difference that that makes there um border type you could do like a dotted line border and um you can make the corner radiuses I guess the dotted line I don't know really what that did but
we could just do a solid line one and then the corner radius makes the corners more rounded so if we did like 10 it'll kind of round the corners of the form so you really can like style this however we want there's a ton of different things you can style it with over here on the right to make it look different um we could take like this section off if we don't want that and um anyway you can style the entire form over here themes they actually have different templates we can use so if you
like these templates here in their template Library you can use one of these as kind of like your guideline maybe this uh I don't know let's see this form looks pretty cool I'll use this theme and we can apply this theme to the form that we've already built out so now it kind of makes adds some styling to it rounds the boxes and uh all stuff we could do on our own but they've already got some templates built out so anyway that's kind of how you set up the forms we can add custom fields to
our form so let's say our client on their website they want a special field on the form and let's say we just click this little dot over here we can go to custom Fields um I'll just show you I'll click add right here and we can add all these different types of custom Fields a single line text a multi-line a text box a number a phone you know monetary value drop down so let's say it's a drop- down um multiple that they want so it's like a drop down that looks kind of like this and
it has different options that people can select let's say they want something like that we can then go click next and we can name this field so let's say this is a medical spa and we could ask them what type of treatment um they're looking for so we could call this this field treatment um or we could call it like desired treatment and then it'd be basic contact information under here under the object and the group would also be a general info because if we're asking somebody what desire treatment they're looking for that's not going
to be part of their main contact info main contact info would be like name phone number email their address stuff like that this would be general info about the contact and then we can give different options for the drop down options so the first one could be like laser therapy I don't even know if that's a real thing but uh we're going to pretend like it is laser therapy we're going to do IV therapy and then we're going to do um I don't know what's another therapy that that Med Spa do we'll do like um
cool sculpting or something like that so these are the three different therapies that they offer and then we can click save and now we have our own custom field over here on the right it'll take a second to populate there we go we can click this and we can drag it onto our form and then we can click on it and then we can style it over here so if we click on it we can say we want the label to say desired treatment but this one doesn't have a label because these types of forms
with this template are in the inside of the box so we need to place desired treatment we need to copy that and paste it inside the placeholder so now it'll say desired treatment and it'll have a drop down we can make it a required field so they do have to put it in before they can submit the form or else it won't let them submit it and so we can make any form field required by checking the box so all these will probably make them required just cuz we don't want people to skip out on
these CU we want them to fill in all their information and then we can preview this form so I'll show you kind of what that drop down looks like now if we preview it so we can put this form onto our website It'll ask for first name last name email phone number all the ones with stars are required so that's when we check the required that's how we know they're now required we have that star next to them and then this one will be see laser therapy IV Therapy cool scoping those are all the three
different custom fields that we added to our form that now this medical spa can ask from their clients when they go to the website so anyway that's what the form looks like we can kind of preview it at any time and see what it looks like and then once we're done with it we can click save and then if you go back out just make sure once you saved it uh it should show up right here and you can go back in click on it and edit it at any time and if you edit it
while this is currently published on a site like if you have this form on a website already and you come in and edit it it'll also change on the website you don't need to like change it in both places you just change it here in the form Builder and it'll also change automatically on the site it'll make update with those changes and so anyway that's how to build forms like I said I'm going to be showing you guys how to build the different elements of the site and pieces and then at the end I'll show
you guys how to build the actual websites and put all these different elements onto the website that we're setting up separately well that's how to build forms and I'll see you guys in the next video so you're in your client's sub account and you want to create a calendar system for them that you can then put onto a website I'm going to be showing you guys how to create those calendar systems where we can have multiple different types of appointments set up for our clients that they can then put on their website and their clients
can go to it click on the type of appointment they want and then they can book the appointment with that business so we're first going to have to actually create and add users to the sub account before we can create the calendar so we're going to go to under the settings of the sub account for your client you're going to go to my staff and then we need to create a few different users let's say this is a barber shop and the barber shop has two different hair stylists John and Jenna so we're going to
create two users one one for John one for Jenna and we're going to add them to the software so we're going to click add employee we're going to do John let's say his last name is Smith or myth I can't type but we're going to do John gmail.com his phone number I'm just putting in a random phone number here hopefully it works then we're going to scroll down under user permissions you can give John agenna permission to whatever we'll just leave this for now assume they get everything we'll make them uh an admin roll that's
fine and then we will click save all right so now I've added JN as a user now I'm going to add Jenna cuz she is our other Barber Jenna let's say her last name is Smith I can type it right this time Jenna at gmail.com her cell phone number and then we're going to go down and we're going to make her an admin as well it can be users it doesn't really matter users admin admin is somebody who has the highest level of authority in a sub account and us user is somebody who has less
Authority so if the owner wanted to just be the admin like the owner of the barber shop and he wanted John and Jenna just to be users and they don't get access to as many things he could do that but we'll just make them both admins um I'm assume they get access everything all right so now we have Jenna and John as both of our users now we can create a calendar and we're going to go to calendars in the main settings or just in the main sub account Pages here we're going to click go
to calendar settings because we don't have any calendar set up for them yet and we are going to create our first calendar we're going to go to calendar up here where it says create calendar and then we're going to do a service calendar the first one is going to be a we we'll just call it the uh basic cut right like basic haircut staff member let's say um both John and Jenna do the basic Cuts so we can add both of them to this calendar and it's going to be cool cuz their clients can pick
from JN or Jenna as their hair stylist later on I'll show you how it looks but um anyway this could be called like basic if I can typ basic cut and yeah I just have to put a an ending to the URL right here just make sure it'll say it's taken if it's taken already by another high LEL agency but if it's not taken then you're good to go service duration let's say this basic cut takes 30 minutes Monday through Friday they're available times 8:00 a.m. to 5:00 p.m. um and then we can click on
advanced settings and we can get a little bit more advanced on our calendar setup we can add a service logo for the basic cut a description of what the basic cut is um and then we can change the different event colors inside of our calendar how it looks based on the type of appointment let's let's say the basic cut we want to be red availability we can go and we can change it by day so if like the basic cuts are only available Monday Wednesday Friday or whatever we can change the days and the specific
times on those days so we can change all of that inside of here service intervals every 15 minutes we're going to do 30 minutes service duration 30 minutes minimum scheduling notice let's say the person has to schedule at least 2 hours before the appointment starts if they try to schedule an hour before it won't let them book date range let's say we give them a 30-day date range so they can book all the way till like 30 days from now if they really wanted to schedule their haircut out that far buffer time we don't really
need a buffer time because let's say John and Jen are really good at getting the cuts done in 30 minutes and then we can go to forms and payments we're just going to do a default form on this one which will ask the customer for their name email and phone number before they book the appointment and then a consent check box here we don't really need to change anything here if you have a stripe account connected to this sub account like let's say this ABC Barber shop sub account this is says ABC nails but let's
say it's a barber shop if they have a stripe account they can connect it under the payments tab just like you connected your stripe account earlier for your agency and then they would be able to accept payments and they could actually make somebody pay $30 for their basic haircut and so anyway we're going to leave it to to say no payment for now and they'll just pay after they come get the haircut um all of this you can just kind of keep the same you don't have to edit anything here customizations can upload an image
for the service um for like maybe somebody getting their hair cut you can customize the color of the calendar so instead of this blue color you could change the primary color to something else and the background color to a different color just whatever colors match the theme of the website that you're going to be putting this on and then um rooms and Equipment you don't really need to mess with that cuz that's more for equipment rentals and room rentals which we're not doing as a barber shop then we can just click save so now we've
created the basic cut calendar and those are all the settings for the calendar you can change some of them and edit them based on the availability of the business and then we're going to click uh close so now we've got our basic cut calendar we're going to go ahead and add another calendar U we're going to call this one we're going to be a service calendar again CU we're working with service based businesses so we're pretty much always going to be building these service calendars this one's going to be called Advanced or we'll call it
basic cut and shave so they give you a haircut and a shave so this is a separate product that they offer a separate service we can say John and Jenna both do this one as well we can call it basic cut and shave as the ending of the URL let's say this one takes 45 minutes and then Monday through Friday uh let's say they're available Saturday as well 8:00 a.m. to 5:00 p.m. I'm just going to go ahead and confirm this one you could go into the advanced settings like we did on the last one
and change whatever you want to change for availability and buffers and all that but we're just going to confirm it and quickly create this one close it so now we've got basic Cuts basic cut and shave now let's say they have one more service that they offer and it's called the advanced cut and I don't know what that would even entail but we're going to assume it's a real thing we going to add both John and Jen to it they both do that service um calendar we're going to do Advanced cut looks like it's available
or else it would say it was taken let's say this one takes an hour so we'll do like 60 Minutes for this one Monday through Saturday 8:00 a.m. to 5:00 p.m and we will confirm that all right so now we've got three different service calendars that we've created for three different types of appointments that this business offers now we're going to go to groups and we're going to group these three into their own group and this is going to be called called let's assume this place is called ABC Barber that's the name of the business
we'll just call ABC Barber as the group name so you can just name it after the business um group description we don't need to put anything there Neo select that and then the widget will be ABC Barber hopefully that's not taken all right we're good to go we'll create a group now and now we're going to add all three of those calendars to this group all right so we've got our group created under groups we're going to go back to calendars and we're going to go to our basic cut over on the right we're going
to click these three little dots we're going to move it to our group and we're going to move it to the ABC Barber group that we just created we're going to do this for all three of them so I got the basic one you'll see it's under group now it's been added to that ABC Barber folder group I'm going to go over and do it for the basic cut and shave move to group ABC Barber you got to click little check box here select that and then under advaned cut we're going to do the same
thing so we're going to be adding these into a calendar group and I'll show you what it looks like after we're done with it um there we go and then advaned cut we're going to now add to that ABC Barber group as well all right so now we've got all three of them added and now we can go over to groups we can click the three little dots next to group and I'm going to show you a preview of what this will look like on a website and what it will actually show like so we're
going to copy the scheduling links just so I can open up a new tab and show youall what this looks like if we were to put it on a website so if it's on a website it'll just be this kind of outline box right here we can paste it anywhere on the website we want it'll look just like this it will show all the different types of services that this business offers advance cut basic cut and shave and then the basic cut by itself it'll show the duration of how long that appointment takes we can
also add images to each of these so it could have an image right here that shows like what this type of service is and uh we would add that in the calendar itself that we were setting up earlier where I showed you could add the image in to the calendar and so let's say they wanted to go with the advanced cut they could click on it and then boom we've added JN and Jenna and then boom we've added both JN and Jenna to this calendar so they can select if they want their haircut done with
JN or if they want their haircut done by Jenna so they can select we can add images for both John and Jenna I'll show you how to do that in a sec let's say they want JN and then boom it'll show Jon's availability right here and then it'll they can pick a time day and then they can fill in their first name last name phone number email additional info if they have any additional notes and then we could also like I said connect that payment processor right here if they've got a stripe account connected and
they want to take payments on these appointments they could add a card right a card um where somebody puts their credit card information in and then they can schedule the meeting so this is what it will look look like on the website as I said before as I promised I'll show you guys how to add an image to the calendar um and so or I'll show you how to add both John and Jenna's you'll go to my staff and let's say Jenna Smith right here we'll go click edit on her profile and we can add
a profile picture to her user under my staff inside the sub account and so let's say this is Jenna's profile picture I'm just going to use the Trojan Horse from this course and then we're going to click save and then we'll add one for John as well and I'll show you when we go look at that calendar group again it'll have their pictures whenever somebody goes to select the stylist that they want so I'm going to add one for John for him we're going to do the night fighting the Minotaur and then we're going to
save that ideally you'd put their face right their head shots right here but we go back to that calendar group now and if we go to calendar settings we go to our group we go to our ABC Barber group once this loads we go over to the right click copy scheduling link again open it up paste it in there and then somebody picks from the calendar uh type of appointment they want and then boom John and Jenna's picture is popular right here so they can actually see a face of the person that's going to be
cutting their hair which is pretty cool and then we can also add those images to these right here which I'll show you how to do as well you'll do that under the calendar so we let's say the basic cut we want to add an image to that one we can go to click edit inside the uh settings here um it's going to be the service logo upload right here so we'll upload an image in right here let's say it's uh the Knights preparing for battle image there we go square logo you can make it a
square or a circle however you want it to show up on the counter I'll do square and then we'll save this and then once this is saved if I go back to our calendar group I'll just do it for this one I don't have to do it for all three of them you guys get the gist of it then we go back to our calendar group here and then we copy that scheduling link again that basic cut will now have an image with it and so it's just kind of nice when you have images for
the people's faces of the people who are cutting the hair and also an image for the actual service that's being offered so the person that comes to the website can kind of get a visual of the type of service they're going to be getting when they come in so we'll copy the scheduling link again paste that in and um looks like the basic cut was not updated it might be in a different section we might need to go to basic cut again edit customizations and I think you have to add it right here actually so
we'll go and add that logo there add it in both places just in case um but we'll go ahead and add it here as well under customization so we'll go ahead and save that and add it under service details I added it in both places so now we should be good so I'll go ahead and close out of here we'll go back to the groups and we'll go to the ABC Barber group copy the scheduling link for it there we go copy the scheduling link and now that image should be on here there we go
so now you can see basic cut we have that image of the uh Knights preparing for battle and uh you can add an image for each of these different types of haircuts this is something just really cool to kind of customize and build out for your clients to put on their website so that their customers can go and book pick the technician they want their haircut with say it's John pick the time and under Jon's like if Jon's availability is different than Jenna's availability I'll show you how to update that so under my staff you
have your basic General calendar availability when you set up the calendar but if Jon's availability is different than the overall calendar availability CU maybe he only works a certain couple hours every week or certain days of the week you can go under his his profile over here under my staff you can click this little pencil button and you can go under where it says user availability and you can customize John's specific availability since his is going to be different than Jenna cuz he works different days of the week or something like that and so anyway
we can change Jon's availability if we change it here it'll only show his available times on that calendar and if we change Jenna's it'll only show her available times for that calendar if there's no available times that day it'll say that sorry there's no available times left to go to the next day um but anyway that's how you set up their availability so let's say John's only available on Monday he only works Mondays I'm just going to do 8 Monday let's say he works from 8:00 a.m. to 5 p.m and then we'll do 5:00 pm
all right and we'll update that and save that so now if we go to that calendar again we'll go to the calendar group we go to calendars calendar settings group and then we'll copy the scheduling link of our ABC Barber I'm just using this scheduling link because we haven't put this on a website I'm going to show you guys how to assemble the website and put the form on the website the calendar and the chat widget all onto the website so you'll see that under the website building video in this section but I'm just pulling
this up just to show you guys so now for the basic Cuts if we pick John only Monday should be available yeah see now only Mondays are available even though the overall calendar availability that we set up on these calendars has much more availability because the person selected John see like this is overall availability that calendars like 800 a.m. to 5:00 p.m. Monday through Friday but because John's specific hours are only on Mondays it's only showing Mondays from 8:00 a.m. to 5:00 p.m. like we just set up for him so anyway that's how you set
up the calendar systems for your clients you can do this for all different types of businesses Barber Shop salons car detailers pet groomers create all of their different types of appointments because a lot of these offer different price points for their different types of appointments that they offer and different services that they offer and so creating a system like this with a really clean looking calendar booking page like this on their website is a very valuable service and we can automate everything connected to this so whenever somebody books sending out those texts those emails to
them and yeah really really valuable service but that's the full calendar setup hopefully it made sense and I'll see you guys in the next video in the realm of ancient Greek mythology the Valiant hero bapin embarked on a perilous quest to confront a fearsome Dragon dwelling near the fiery depths of a volcano armed with a mighty sword forged by the gods bapin journeyed to the Dragon's Lair where the air crackled with heat and sulfuric fumes with nerves of Steel he faced the dragon in a fierce battle amidst the volcanic landscape despite the dragon's fiery breath
and great strength bolan's courage and skill prevailed with a well- aimed thrust he struck the dragon down bringing peace to the land and earned eternal glory as a legendary dragon slayer in Greek mythology just like Bolin defeated the mighty Dragon we too can defeat the onboarding process for our clients in this video I'm going to show you guys how to create and customize the little chat widget bubble that goes at the bottom right of your client's website it'll pop up it'll say hey do you have any questions and then their leads can go fill out
a question put their name email phone number and send it into the business through their website just another great way for businesses to capture leads on their website so we're going to go inside of our client sub account down to the sites tab then we're going to go up to where it says chat widget and this is where we can customize that chat widget so by default yours should be blue I don't know I think I changed mine to Green earlier um but you can enable the chat bubble or disable it so if you just
want it to be the little bubble and not the message you can do that um if you want it to have the message as soon as the website loads then you can but some people might find that distracting so you can also turn that off if you'd like the message that it says you can type that out and change whatever you want it to say here the image of this girl you can change to whatever image you want the owner of the business the logo of your client's business whatever they're wanting there you can enable
a custom greeting for people who return to the website for the second time it'll say their first name that's if they filled out the chat widget previously or a form somewhere on the website if we have their information stored if we don't then it won't send this message or have this welcome back message but you can decide if you want to enable or disable that the chat widget type this one's pretty important so you can do SMS or email chat which basically means whenever they message you on the chat widget over here it'll start a
text message conversation or an email conversation with the lead if you want to do live chat this would be if uh your customer your client wants a website and they have like a big support team that can handle 247 chat support through their website most small businesses don't have that in place so typically SMS and email chat is going to be your best bet the business can decide if they want to message that person through text or email and start a conversation there and then we've got this widget window right here um we can you
know it says have a question at the top we can change that enter your questions below we can change what it says here we can add email in if we want to include email on this form um the client has to put in there or the customer or the lead has to put in their email as well as their phone number in order to send in the message I like to add emails it's just another form of contact that we can reach out to these people on and then call to action says send and then
the legal message which is the little check box down here you can change the chat widget color to whatever color you want say we want to do like this lighter green color awesome click done right there and then the language you can change it to different languages if your client's in a different country then you can have this branding right here show powered by web juice at the very bottom if you wanted it to so it'll say powered by whatever your agency is called even though it's on your client's website it'll say it's powered by
web juice or whatever your agency name is most of your clients probably won't want that um they'll just want their chat widget unbranded so that nobody knows who it is and so you can probably turn that off for the most part and then down here the acknowledgement settings it'll say you know thank you and then that you can put your phone number email for someone to reach out to you at and then one of our Representatives will contact you shortly so anyway you can put your customers your clients uh phone number email right here and
then whatever they want this message to say you can kind of customize it but this is pretty good as it is then after you've updated it and changed it just click save and your chat widget will be saved and yeah I'm going to show you how to implement and put the chat widget on your website in another video on the website setup video when we piece everything together the form the calendar the chat widget we put it all into the site but um yeah that's how to customize the chat widget and uh just make sure
to customize it to your client's liking to their branding and color and make sure to change this image and everything for them if they want that and yeah U that's it for this video I'll see you guys in the next one in this video I'm going to be showing you guys how to use the website and funnel Builder inside of high level so you'all can actually build some websites for your clients the funnel Builder is identical to the website builder the funnel Builder is just mainly for people who have a single offer maybe it's just
one calendar and after somebody books on the calendar it takes them to a thank you page and that's it it's like a simple two-step funnel if your client doesn't need anything crazy if your client wants the full website with like three or four pages that people can navigate through and check out all the information about the business that's when you would use a website so most of our clients are going to be website clients but occasionally you might find a client that just needs something super simple and so you can just build a funnel for
them and it'd be easier to set up that way we're going to go inside of our client's sub account we're going to go to the sites tab you want to make sure to build a site inside of the sub account for your client don't build it inside of your agency sub account you want to put it in their sub account so it's all tied together with their contacts their conversations you know their appointments on their calendar all that good stuff so we're going to go to the websites and I'm going to show you how to
use the website builder first off go high level has a ton of templates we can choose from so if we click new website right there we can go to from templates and hit continue I recommend building your sites off of a template the templates aren't going to be the the best right like they're they're a solid foundation for what we're looking to build um but it'll give us a good like Foundation to kind of build the rest of the website off we can customize off of a template just to make everything a little bit easier
so we could type in the niche um so if the niche is I don't know let's say Medical Spa we could use this med spa template if the niche is let's say Spa then they've got a couple different Spa templates we could choose from let's say pet health uh pet medical coverage pet insurance so I was looking for pet groomer but anyway they've got a lot of different templates it doesn't necessarily have to be the niche right maybe your client really likes one of the spa templates but they're actually a pet groomer so you can
kind of customize you can change all the elements on the website so you can change out the images the headlines the paragraphs like everything so I we'll just go ahead and we'll move forward with this pet health coverage one we can preview it real quick we can click this expand button check it out and uh you know looks pretty decent to me can definitely change some things on it we'll hit continue and then it'll load the template into our website library and we can start editing it and changing things up on it so I'm going
to show you like a lot of the really good detailed um details and everything on how to use the website builder um how to change different things how to add different elements and we'll piece together because in previous I showed you guys how to build that chat Widget the forms the calendars and I'll show you how to put those onto the website here first off one thing to note we can look at it in desktop view like here and then we can also up here at the top switch to mobile view whenever you're making changes
make sure if you make a change in desktop view you check it out on mobile view as well just to make sure that that change doesn't look weird on mobile cuz sometimes it can look bad on mobile but look really good on desktop and vice versa so just make sure you're going between the two and checking between the different views to make sure what you're building out still looks good and doesn't look weird on one or the other first thing to cover is there's going to be larger sections which are these green boxes you can
see I have my mouse hovered over a green box right now so it has the green box selected and that's this large like background image of these this husband and wife with their dog and then inside of the green boxes we have first uh purple boxes and then inside of the purple boxes we have orange boxes um then occasionally you'll find like a blue box inside of some of these like this one right here this is kind of like a larger section and we can add these different elements just by clicking on either right here
and we can add one below this screen section we can add another section and you can do a full width section A Wider a wide section that's not quite full width on covers the whole screen medium and then a small section so you can kind of do different size sections and then the rows are the um I believe they're the blue boxes and then the elements are the orange boxes all these little orange things like the headlines then we have the paragraphs we've got the buttons all of these pictures photos all of those are the
elements so we' got got sections rows elements so you kind of want to keep that in mind as you're building sections are the larger sections and that's where we can put our background images on top it's kind of a layering system on top of the sections we can put those rows then on top of those rows we can add elements and so we can make multiple WID like our rows can be multiple columns so I'll add a full width element right here below this section of this family we'll do a full width so now you
can see I added a green section here now I can add a row and if I want the row to be multiple columns because maybe I want to have a like bunch of pictures like kind of Str across the page here we can add like a five column row right here then we can add individual elements inside of these and so then we can click add element right here and then we can add all these different types of elements headlines sub headlines paragraph bulleted lists a button a form blog post category navigation um we can
do image sliders videos images FAQs custom code if you want to add your own custom coded elements if you know how to do that um you can add surveys which are similar to forms you can add your calendars right here a map of your location an SVG image a Google reviews widget where it'll show all the Google reviews that you've gathered from your clients and it will update them live as more people leave Google reviews on your Google business profile um countdown timer Minute Timer day timer navigation menu navigation menu is what's up here where
it shows the different sections and when people click on them it'll take them to different pages of the website and then we've got a divider if we want a page like line to kind of divide the page progress bar showing somebody how far they are in the process usually you would use that on more of a funnel rather than a website um image feature kind of has like an image with a paragraph next to it I'll click on it and show you so it has like a little image you can add here and when you
add the image it'll get bigger it's not going to be this small then it has like the headline so like you're featuring an image and so you have an image and you can explain what that image is about um and then we can also add you know social media icons that look like this if it's not five columns then it'll kind of spread out better but since we added it in one small column there they kind of stack on top of each other like that um but yeah anyway we can do twostep order forms it's
like a form that asks for somebody's name email phone number address and then on the second half it asks for their payment information and they can purchase products just like we have on our funnel for our business um and then we could do like a single step order form which just has everything on one and then an order confirmation we could put onto like a confirmation page um but yeah all these different elements we can add to our sites um and so these are the basic building blocks of the website and elements we can add
any element that you do add let's say we added an image right here well actually I'll just click this image that's already here this dog image right here over on the right is where you can style the different elements so this is where all of the um padding you can do margin like if you want the top of this picture to have some more space above it you can add to the margin on top and uh anyway I'll put that back to zero so it doesn't look bad and then you can do a padding or
margin on the bottom just to kind of make it shoot up a little bit more um and then you can also change the image if you want you can just click right here and you can upload your own image or you can create images is using AI with high levels image AI it does cost per generated image like a couple cents or something but if you just have your own images you can click upload from media library um and I like to use stock footage on Adobe stock that's where I typically will find images for
our sites um you can also use mid journey to create AI images that look actually really good um Mid journe is $15 per month and I showed you guys that in the logo video when we were first creating our logo for our agency but you can upload images and upload files from your computer right here and yeah anyway you could select this image right here if you wanted to once it uploads into the folder into our images folder we'll then see a preview of it once it loads over here and then we can double click
on it and we can switch out our image right here um just like that and then we can make the image sizing larger right so we can do like 300 tall if we want it to be smaller the default settings were okay but maybe let's do like 600 so now it's larger let's try 800 so it does cap out eventually looks like 800 or 600 was about the largest it's going to get but then you can do um you know width and height and height and all that so height you know you could change to
like 100 and now it's like really squished but you probably wouldn't want to do that but anyway that's kind of how that all works there um maybe we'll redo this to 400 now it's like really long um so you got to kind of find that sweet spot here but by default it'll just paste the natural image then you can change the width and height if you want image actions you can actually when somebody clicks on an image on your site you can make it go to a certain page or a certain website URL so you
could have it go to a different page of your website or you could have it open up a popup so the pop-ups are actually up here underneath um let's see it's going to be this right here pop-up settings this is a popup that was already built into this template but it's basically just like a form and so we can upload our form into here um I showed you guys how to build forms in that other video and so once you built the form you can then select that form right here and so this form I
have go to or actually let's see redirect button actions you don't have any forms yet oh here it is this Med Spot form you select the form up here right here is a redirect after the form is filled out where you want it to go so you can direct it to a certain website URL and you can type that out here um but right here we can do this MedSpa form that we built out earlier and so obviously this is for a pet groomer or a vet but we have that Med Spa form already set
up from our last video and so you can put your fors right here and whenever somebody clicks we can exit out of this whenever somebody clicks on this image if you wanted that popup to come up you could say image action open popup and so whenever somebody clicks this image the popup will pop up so I'll show you real quick we'll save this and then I'll preview it just to show you what that would look like anytime you want to save it um just go click save up here and when you save it it'll just
save it here in the in the website editor you want to publish it and actually publish it live to your site then you have to click publish but if you just want to save it for now and you're editing some things and you wanted to come back in and edit some stuff later before you published everything just don't click publish until it's ready to go live on the web to the link that you've hooked up your domain that you've hooked up to the website but I'm going to preview real quick by clicking that little eyeball
button pops up with our website and you'll see here I click on this and boom the popup comes up with our form somebody can fill it out and then submit the form whenever the people submit a form it'll automatically create a lead or a contact in our CRM and go High Level under the contact tab so anyway it just gives a great way to collect leads and so any element on the site here you can change like headlines you can change the color of the text by uh styling right here with the color options you
can change fonts so we could do a custom font and then we could go to the font library and go high level has like a ton of fonts like probably a couple hundred of them that you can choose from and so lots of different options there for fonts you can also change the fonts of the paragraphs um but yeah if you're going off a template it's kind of really it's pretty simple I youed to do is change out the background images to better images that you would you would like or your client would like change
out their logos U maybe add some sections like I showed you here with some different elements um but yeah color schemes you know you can change background colors this one's blue so we can change it to Green if we wanted to um it looks like maybe this is actually an image background so that might not work but anyway we could change the image right here of the background instead of this blue right here we could change it to you know a different image of our choosing say we wanted to add this image again and uh
looks like we would there we go doesn't look super great right made the section really long but um that's how you would add different background images and then under the advanced settings there are some additional settings like for this background right here um we could click Advanced and then we could add like a border to it full border now has like a kind of a black line all the way around it and then we could do bottom border all that kind of stuff I'm going to take the Border off then we could say if we
want it to be like wide it'll kind of shrink it in full width so we can mess with that under advanced settings and then if we want this image to show on desktop but not on mobile we can toggle it off on mobile so right now if we switch over to mobile we'll see it has that background image it's kind of harder to see on mobile because everything in Mobile stacks on top of each other so if you have a column with or if you have five columns on desktop like this in Mobile they'll stack
on top of each other because that's the way mobile view looks like it has to kind of Stack you can't just have five columns it doesn't work that way in Mobile and so just whenever you add five columns like this in desktop just know they're going to stack on top of each other in mobile view but what I was saying before is like if you want this background to show on desktop but not mobile you can toggle it off on mobile so now if we switch to mobile now that background image disappears now it's just
a white backg cuz sometimes images look great on desktop but not great on mobile and so you can toggle on and off things that you want to show or not show and vice versa if you edit something on mobile and you like the way it looks on mobile but maybe you don't like it on desktop like this background image now we can take it away on desktop and now it's gone so that's how you kind of change elements between the two and uh kind of get the Sweet Spot of like all right this is what
we love on mobile this is what we hate on desk love on desktop and you can take off those certain things and and hide certain things this way through the visibility and then I'm I'm trying to think what else I mean that's pretty much everything um you can switch between Pages up here at the top you can click here and we can go to different pages of our sites now we're done maybe editing the homepage we can go to the contacts page just make sure to save your changes first it'll it'll pop up with that
if you don't save first all right now we've saved now we can go to the contacts page of our website from this template and we can change everything we want on the contacts page and you can kind of navigate through your different pages of your site easily like that um right here we have different layers uh you don't really need to mess with this too much this just kind of shows like the different layers of your website um if you're comfortable using Wordpress or web flow this is kind of how what they look like um
when you're editing in those other website building software so I think High L added it in there for people who are used to Wordpress and webflow um we can add our own custom code if you have custom coded elements that you want to add in the heading or the footer um you can do that and then um custom CSS typography um you can add in like a overall font to your website and so if you want the overall font of your site all the headlines and then contacts to be one or content to be one
font right now it looks like they're using this robotto which is the font type for the headlines we can switch it and it'll switch all the headlines across the entire site which is really nice and easy because typically we're going to be using like the same fonts for the entire site and so you can easily style it that way and it'll change across the whole site which is really nice backgrounds um you can change the overall background so I mean you have these green box backgrounds but then even behind that you have an overall background
of the entire site so you want the entire site as people scroll to be like one background color or a gradient fade or something like that you can add that image in right here or that color that you want the entire background to be that's even a deeper level Behind These green boxes and so you can add those popup settings if you want a popup on your site if you don't want the popup you can disable the popup um it's somewhere over here um disable popup and so if you don't want that to come up
at all on your site for your client you can just turn it off right there and then I'm going to go through SEO metadata this is where you can update the SEO of your client's websites so you can add in um this is what the SEO preview would look like if somebody typed you in on Google and found your client's website the content you can add a title to your website and you want to use different keywords um that your clients are trying to rank for so if your client is a med spa or sorry
we're doing a pet groomer so if your client is a pet groomer in Nashville Tennessee you could do like pet groom or Nashville as the title or you could just do the title being like the name of the business description that's where you could put like we are a pet groomer in Nashville Tennessee blah blah blah blah blah and uh maybe use some of those keywords so when people type in pet groomer Nashville they find this business because it's in the SEO metadata keywords you can plug in keywords that you're trying to rank for specifically
and just separate them by commas so you would do like pet groomer and then you would do like um dog nail trimming if that's another keyword they're trying to rank for CU maybe that's one of their most popular Services um you could do like pet grer Nashville so just different keywords like that a keyword doesn't have to be one word it can be a phrase as well so pep groomer Nashville would be maybe something that people would commonly type in to find that business in their local area then we can put in an author so
like an owner of the business could be the author of the website we can add an image so when people when you send it as a link in a text message it'll actually show up as a image on like iPhone and Android rather than just a bare link if you add the social image in there which is nice and then link tags you don't really need to mess with these and then the language of the website you can switch it between different languages most of our clients probably be English and so that's how you update
the SEO metadata that's for on page SEO that's how to help these businesses rank you need to add in the appropriate keywords that they're trying to rank for title of their website or their business description of their business all that good stuff and then Google will be able to better read what this website is about and help rank this business there's a lot more that goes into SEO and we're not typically going to be offering SEO for our clients unless we want to charge them like $1,000 a month plus that's where it could be worth
it to like update blogs every week on their website and do a lot of backlinking and off-page SEO for them but we're just really offering them that booking system form chat widget and then we're charging them the monthly subscription for hosting SL software that we're giving them with the automations and so I'm going to show you now how to add like a calendar so let's see there should be a booking page on here um appointment now we'll switch over to that page I didn't really change anything on here so I'm not going to save it
move myself back over so here it says you do not have a calendar yet um I don't think yeah we did we added these haircut calendars so let's assume one of these haircut calendars is our calendar um but actually we want to add our group calendar that we created back in our calendar video where it shows all the different types of appointments and so in order to do that we'll actually need to copy some code onto our website so I'm going to save this real quick I'm going to go back out to our calendar so
we can copy our calendar code so we'll go back to our calendars if you guys haven't watched the calendar setup video yet in this section go back and watch that I showed you guys how to create these different these group calendars that look like this I'll show you real quick um but basically they look like this where it shows the different types of appointments that the business offers they click on it then they can select their stylist between John and Jenna um ignore these images those should be pictures of John and Jenna but they're fake
people so I just added those profile um those um pictures there those filler pictures and then they can select their time from like John's availability right here they can switch to Jenna if like Jenna has different availability they can select their date and time and then fill in their information and schedule the meeting so anyway we're going to embed this entire like system right here this thing onto the website not just the individual calendars cuz if we picked one of those from the website builder just individually it'll only show that one calendar we want to
show all three options so we're going to go over to our group here inside of our calendar settings we're going to click copy or sorry get embed code or copy embed code right here now that it's copied we can go back into our website we can go to the appointment now page we'll just click on it to open up the website editor again and then where this box is I'm actually going to delete this and I'm going to add an element myself and this one's actually going to be code we're going to paste in that
code there and so now we have that code block there over over on the right in the styling of this box we can click open code editor and then we can paste our group calendar code right here and then it might look really bad inside of this small box maybe we should have had it fill the whole page but I'm going to save it really quick it's not going to show any coded elements in the editing view we need to preview it in order to see those and so now we can see all right here's
our I think it's stacked pretty nicely it looks pretty good here's our ABC Barber appointments Advanced haircut basic cut and shave basic cut we can select here we can pick our stylist or hair cutting stylist or dog groomer for this case I know we're kind of mixing barber shop with pet groomer right now but you guys get the gist of it they can pick the time of John or if they want Jenna's availability they can see her availability specifically U but yeah make sure if you haven't gone through that calendar video go through that that'll
make this will make a lot more sense how we set all this up but anyway pick the date and time and then put in their information to schedule that appointment so anyway that's how you add the calendar um I'll show you I already showed you how to add that form we did it on the popup right here um but basically basically we just go over click where it says form and we add that form element by clicking on an orange box here we can click the little plus sign if we want to add something directly
below it we can scroll down to where it says form which should be right here add a form and then we can select the form we have only a MedSpa form created in the form building video If you haven't watched that form building video already go back and watch that just a few videos back and then boom we can add forms just like that that people can now fill out um and then I'll show you guys how to add the chat widget cuz we already covered that video on how to style the chat widget and
customize it but now we can actually add it to our website so we're going to click back out of here we're going to go up to our chat widget where we were editing that earlier in the previous video and then once you've pick uh customize it the way that you want with the text and the color of it and all that good stuff that we showed in that other video we'll click get code and then we'll copy the code of our chat widget and this one actually doesn't go inside the website where we were just
editing it goes on the outside so we click right here instead of clicking onto a page we're actually going to click into settings because we want the chat widget to show on all pages not just one single page and then we can go to this body tracking code and that's where we can paste in our chat widget code and then we can click save and now if we go back to our website once this saves we can go to the homepage we can preview it real quick and then boom now our chat widget comes up
here at the bottom so now we have all three lead capture methods on our website we've got the calendar booking system if we go to the book appointment page got this calendar um if we go to the popup I don't think the popup will come up cuz I disabled it but the pop-up had that form we could put a form also just without a popup we could just put it somewhere on the page at the bottom or maybe we could create a contact us page right here and on the contact us page we could have
that form right there that' probably be a good spot for it um and then we also have the chat widget so giving our clients three different ways they can collect leads through their website and we can hook up automations to all this I'll show you guys in in a another video it should be coming up soon here um in this video course in this section um how to do the automations and connect them to these different calendars chat widgets forums so to send the leads text messages emails and really just nurture them any leads that
your clients capture through their website so that's pretty much everything you guys need to know about the website builder um if you ever have any questions feel free to drop them in the group here and ask questions and help people out but yeah it's pretty straightforward really simple to use just us kind of those blocks to kind of build everything out U make sure to switch between mobile view and desktop view make sure the website looks good um and yeah that's uh everything you you should be good to go and should be able to build
some awesome looking websites for your clients but I'll see you guys in the next video in this video I'm going to show you how to connect your client's domain to the website that you built for them in high level so that you can publish it and it can go live on the web this is going to be the exact same process that you did whenever you connected your own domain to your website for your agency but we're going to do it for your client and there is one extra step we might have to go through
which is going to be getting access to our client's GoDaddy account so here I'm inside of GoDaddy um your client will buy their own domain with GoDaddy or with cloudflare host Gator name sheep a lot of the time I'd say 80% of the time my clients have already purchased their domain when I've reached out to them and and gotten them as a client so they already own the domain they just need to hook it up to the site um but out of those you know 20% of people they don't have the domain yet and so
you're just going to tell them hey we want you to own your own domain we don't want to own that for you so we'll let you go buy that and I'd recommend just godaddy.com to go buy that domain and find one that you like once you get that domain we can then add me as an a delegate admin access so that I can go in and connect the domain for you so this is the way your client's going to do it for you you could be on a zoom call and show them how to do
this with them but basically we're going to go into your client's goad account or they're going to do it and uh we're going to go into our products so we're going to go down to my products this is in your client's GoDaddy account not yours by the way so I would recommend jumping on a call with them and getting this done with them so they don't get confused we're going to click on this one I'm going to use this domain for this example right here mugs mobile detailing and then once we're inside of here we
should be able to go to the DNS we can go to like manage domain and then go to DNS right here when you click on DNS or when you're inside this page we'll see settings over here then we can click on delegate access so this is where your client can give you access to your go to their GoDaddy account so you can go in on their behalf and manage things they don't need to send you their username or password or their GoDaddy account they don't have to go through that they can just add you as
a delegate access as an admin and then you can make those changes for them so they're just going to click invite to access they're going to put in your name here and then they're going to put in your email so if they put in this for me right here and then they clicked products domains and purchase and they click invite then it'll send me an email I'll get a link and then when I click on it I can just go right into their account and hook up their domain for them so they need to they'll
need to give you that access just like that so you could show them how to do that since now you know and you watch this video once you've done that then you can go hook up the domain we're going to do that inside of high level um we're going to do that in their sub account make sure you don't do this in your sub account do it in their client sub account that you've created for them click set settings then we'll go to domains right here and then we'll click add domain that domain I'm going
to be using for this example is mugs mobile detailing.com and then I'm going to add the record manual I found it's easier and sometimes it can bug out if you hit continue and you go through the automated DNS adding that go high level does for you and so we're just going to add these two records an a record and a c name record all right so now I'm going to go back and find that domain that we were looking at before that I'm going to hook up for our client so now we're inside of our
client's account right they've given us access I'm going to go to my products you're going to find their domain that they want you to hook up to their website and I'm going to be using this one down here this one right here so we're going to click DNS and then we're going to add first an a record the name is going to be at right here the value we're going to go back to high level we're going to copy this real quick go back in paste the value there half an hour save and then the
second one is a cname record www is the name name make sure there's no wwws or if the a record didn't add in make sure there's no other a records with the at symbol next to them or else you need to delete it first and then add the a record but then the C name record we're going to paste in this value right here and then save this one as well all right so now both of those are saved we're going to refresh this real quick just to make sure everything was loaded in properly then
we can go back to high level we can click verify records and it'll take 20 or 30 seconds to verify so we'll just wait for this to verify real quick all right and there we go and then then hopefully you've already built the website by now if you're connecting to domain you can select from the website so I was building that Health pet health coverage website previous in the last video and so we can go and connect that one you want to connect it to the homepage CU that's the page you want it to load
to when people land on the website and then you can just do the homepage for the 404 error page then click link domain and then boom your website will be linked sometimes it can take a few minutes 5 to 10 minutes to propagate everything correctly we'll test it out really quick we'll just copy this real quick open up a new tab paste it in and and then boom it loads us right to the website that we built for our client so let how you hook up the client's website to their domain and I'll see you
guys in the next video in this video I'm going to show you how to set up the phone number and phone system for your client we did this in a previous video for yourself and your agency and your agency sub account but now we're going to do it for the client it's pretty much the exact same process I just wanted to show it to you guys again now that you have a client that you're going to be doing it for so you're going to be inside of your client's sub account make sure it's in their
account you're going to go down to settings and then you're going to go to this tab says phone numbers and then inside of this tab we're going to buy them first a phone number hopefully or usually they're going to want a local phone number um if they want a local number make sure uh we get them a local number in their area we'll do that by clicking filter right here and then we will search by digits so let's say their area code is 385 because they're in Utah and then if you're going to filter by
first part of number because we want the first part of the number to be 385 and then we can click off of tollfree Cu we don't want tollfree numbers typically we want to get them a local number click apply and then it'll show us all the numbers that are available in that area code then we can just buy them one whichever one they want or we can if they're cool with you just picking one that's a three five area code then we're good to go we'll just click this they're it's a15 so it's not going
to break the bank and that's per month that it charges that and then proceed to buy and then once you bought it it'll say it's the default number over here and now we have to do the a2p registration like we did for ourselves in our agency on your client's website you'll need to add a terms and conditions page and so this one doesn't really have a terms and conditions page but it has this Linkin bio page we can turn into a terms and conditions page I just wanted to make sure you guys set this up
because you need this on your client's website in order to get approved and so we can just call this like terms and conditions and then we can delete all this stuff we can do the dog here that's fine but we'll delete this purple box now the dog got deleted with that that's fine we can just call this terms and conditions for this one there's actually a terms and conditions page on one of go high Lev's website templates we can steal and we can just replace this text with it so we're going to go back out
real quick I'll I'll show you where that template is it's under the websites go to new website go to templates and then type in SAS right here and there's this SAS website template right here that has a really good terms and conditions page we'll just preview it real quick we don't actually need to upload it into our website templates but we can go to this terms and conditions right here and we can copy all of this terms and conditions I already have the headline so I'll just copy from here to the bottom and and then
we can go in back to our real website go to that Linkin bio page which we can rename right here by clicking three dots go to settings we can call it terms and conditions and then the back slash will be pack slash terms and conditions think I spelled that right and then we'll click update so just rename the page so we know what that page is about and then we'll click on it and then we can paste that in right there that we just copied it's going to be really long that's fine though so now
we've got all that terms and conditions there then we can add another headline we can call this one privacy policy it doesn't have to look pretty um obviously you're nobody's really going to go to this page very often I'll put a little bit of spacing on top just so it kind of spaces out and then we can paste in the privacy policy with some paragraph text as well right here we're going to go save this real quick go back to our privacy policy I know this is a lot of hassle just to get approved for
your phone number but they need to see how you're going to be using your clients's information so we'll go back go to that template again we're going to type in SAS it's going to be the SAS template that has that good example of a privacy policy in terms and conditions page the template you're using might already have a terms and conditions and privacy policy just make sure to check if it does you're fine if not you'll have to come to this website template and copy these we'll go ahead and copy this privacy policy go back
into our website go to our terms and conditions page which we can also just put the privacy policy on this page it's fine I've done it this way before it's got gotten approved every time and then now we got a privacy policy so we'll delete this form at the bottom and then we can go ahead and save this so anyway that's how you can create that terms and conditions page on your website make sure this terms and conditions page is also accessible from like the footer in the homepage so I'm going to go to the
home page real quick and down at the bottom we can add another one right here under like phone number and we can or we can just duplicate it actually I'll just duplicate it real quick duplicate this we'll call this one terms and conditions did not spell that right and then we can create make this like a link so we can double click on it and then click where it says link and then we can paste in the terms and conditions page which would just be https backb ABC nails.com back SL and then we name that
path terms and conditions and then you would just keep it in the current window and then save that and then it'll take you that'll be a clickable button now you can see kind of underline there and now it'll take people to the terms and conditions page if they ever want to check it out very few people ever actually go to that page but when we do a2p they need to see it there and so yeah that's the process of getting the terms and conditions page all set up you can steal it from that SAS website
in the go high level template library and now we have to do the a2p registration like we did for ourselves and our agency we have to do this for every client which is a little bit unfortunate takes a couple minutes every time but um it's something that's necessary and it's a law required in the US and Canada if your client is not in the US or Canada you don't have to do this you can just get them a phone number and you can start sending text messages right away but you can't send text messages in
the US and Canada unless you've gone through this process first so we're going to click start registering now you're going to it's going to say is this business entity you're registering Lo in the US or Canada yes and then are they registered business typically they're going to be a registered business and they're going to be like an LLC or an incorporation or something and so you're going to typically say yes for this if they're not an LLC then you're just going to select this option and go through the same steps we're going to hit continue
make sure to put in their legal business name right here so if their ABC nails LLC and that's their legal business name make sure to include the LLC on the end um I've had problems with clients where they don't give me the correct business name CU they go by something else but they their actual LLC that they filed with is a different name and it's like a holding company and it's a completely different name so make sure you get the actual legal business name that they filed with the government on whenever they created their LLC
or their incorporation or ES Corp whatever type of business they have make sure to include the LLC on the end though um if if it's an LLC anyway business type you'll just select for this one it's going to be limited liability company this will be the most common type of businesses you'll run into in the US it's going to be an LLC for the most part business registration ID for llc's it's going to be an EIN number and employer identification number and then business registration number I'm just going to do 1 2 5 6 7
8 9 till it gives me the go that's not actually the EI number make sure you get the actual EI number from your client because if it is incorrect and you put it in wrong it will kick back and it won't approve your registration for ATP here so this needs to match with the EIN number that they have on file if these don't match up you're going to get kicked back so that's usually the most common problem you'll see with the brand registration that we're doing right now the industry that they're in um you know
whatever I think it might be like Hospitality if it's a nail salon I'm pretty sure put in their business uh email could be like info ABC nails.com their website hopefully you've already set that up because we're going to need to set that up first when they need to have their website published with a terms and conditions page on it it has to have that terms and conditions page and if it doesn't then it will get kicked back so make sure when you build a website for your client you've already had that terms and conditions page
on the site showing how we're going to be using our our leads information when we capture it on our website they need to be able to see that so we're going to do ABC nails.com say US and Canada and then we're going to click continue and then United States Idaho let's just say this is all correct here we'll continue first name let's just say it's my name for this case but this will be the name of your client that you want to put in right here um their email address this is an actual like authorized
representative so just put in their email address so mine will be like Jasper web juice. for mine but this will be your client's email obviously put in their phone number and then their job position you can just say like they're the owner CEO hit continue this one's going to be low volume standard um this is something we do pay for on behalf of our clients it's a $20 onetime charge um and it's just something you kind of build into your setup fee so normally we're charging $1,000 $2,000 setup fee so this is just coming out
of our profit a little bit it's just 20 bucks though and it's only one time so not a huge deal we'll hit continue and then we're going to do low volume mixed right here we got to use paste in a use case description we're going to click C example we'll go ahead and copy this first one we'll paste it in here go high level makes it really easy um this campaign sends appointment information confirmation reminder messages to customers once they have booked an appointment with then make sure to put the legal business name of the
company in right here ABC nails LLC on website and opted in to receive promotional notifications and SMS from and then put in their name again just make sure it's the legal business name with the actual like LLC part on the end and everything next up we can go to sample message number one we can copy this first one here we just need to show ATP or the governing body that reviews this how we're going to be like the types of messages we're going to be sending um hi John this is Jane from company name so
we'll just put in ABC nails what where it says company name um and it must include the lead's name your name and the business name and an opt out message so hi John this is Jane from you can put in the name of the business owner right here as well I'm going put Jasper from ABC nails LLC all right so we're good there we've got the lead's name John my name Jasper and the business name ABC nails LC appointment has been confirmed for 11:00 a.m. please reach out to and you can replace this with our
number because that's not actually our number in case you need to reschedule reply stop to unsubscribe all right so that one's good next we need to do another one so we're just copy this box right here paste it in hey Brian this is and then I'll do Jas again from we'll paste in ABC nails LLC I see that you weren't able to make a fre your appointment would you like to reschedule um and then we can take this link off we don't really need that there then we could say you know please reply stop to
unsubscribe and that one looks good that one's compliant and then down here just keep these two boxes checked if you're in the mortgage industry you'll need to check this one if you do any type of financing banking mortgages but these two are typically the only two that we need to check hit continue how do lead conts consent to receive messages we'll just copy this one right here paste it in here make sure to fill in any places the website right here we'll need to put in the actual website of our client we'll do www.abc nails.com
whatever your client's domain is there and filling in their details us your check a box to receive notifications promotional messages additional end additionally end users can also text um start to just say our number and then that looks good there and then down here optin message we'll just copy this one paste that youve successfully opted in to receive notifications of promotional SMS from paste in the name of the business right here ABC nails LLC and then please reply stop if you need to opt out in the future and then you'll just submit and once you
submit it it'll charge the 20 bucks and it'll take a few days usually 3 to 5 days on average to verify and approve everything and if you didn't get approved the first time it'll say a reason that you got rejected so I'm not going to submit this I don't want to pay this fee for nothing but it'll say like rejected right here usually the brand is pretty easy to get approved within a few hours the campaign is what takes a few days some sort of a governmental body has to review it in the US in
Canada and then they have to approve it and so it'll say the reason you got rejected right here if you did get rejected and then you can resubmit it and change whatever it said that you did incorrectly but if you follow the video then it'll be good you'll be fine and you you should get approved every time unless there was some sort of error in the information of the business that you put in and this will say like in progress now youve submitted it I didn't submit mine but we go to our phone number we
can set up a few things here for our client we can edit the configuration we can say forward calls to this is our go high level number but if someone ever calls the number we want it to forward the calls to the owner of our our client you know the one who we built the website for and so we can put in their cell phone number or their office phone number right here and it'll forward all the calls to that number so you can just go ahead and put in their phone number here and let
them know hey all the calls that come in from this high level number that we get for you or this number that we get for you in our software will go to your uh office phone or to your cell phone whatever they prefer and then we'll just check this one pass called numbers as caller ID and that's all you need to do is just change those two things click save and now all the calls will forward to their office line but calls will work before your a2p verified right here but text messages will not send
so you need to make sure um that it's a2p verified and it'll say a2p verified next to where it says default number here when it's verified and then you can start sending text your client can start sending texts and the automated text that you set up for them and the automations will start working but that's everything for the phone number setup I'll see you guys in the next video I'm going to show you all how to set up the automations for your clients that are attached to their website that'll basically run their entire business on
autopilot we have our two different pricing options here in this $11,000 setup fee or just really the $97 per month right here is what we base the features off of we give them access to the SMS and email automations the Miss call text back which really technically isn't an automation it's really easy I'll show you how to do it um so I'm going to show you how to set up the these automations which are just the more basic automations and then I'll show you guys how to set up the advanced automations um that we have
in the 197 plan but first we'll do the $97 plan so SMS and email automations and Miss call textback are the two that we're going to give them access to and on these websites we only give them a contact form and a chat widget so they don't get the booking system with this price so we'll jump in and we'll go to automations real quick and so the first one is going to be off of that form that's submitted on their website so we'll just start from scratch and this one's really simple we'll just call this
one website form submitted and this is all inside of your client sub account by the way don't build these in your sub account put them in your clients we are going to go to settings we always like to turn on allow re-entry if it's not on already that means if a lead comes to their site fills out a form it'll send them the automations and if they come back fill out the form again it'll also send them the automations again if you don't have this on it'll only work the first time and send the automations
the first time to that lead but we like to do it every time and then we go back to the form Builder or the uh automations Builder and we're going to add form submitted as our first trigger event and then we have to tell the automation which form that it is that's being submitted so we're going to click add filter form is and then we're going to select our MedSpa form we're going to assume this is our MedSpa client we built this form we put it on their website already we went off over that in
all the past videos and then whenever somebody submits this form with their name email and phone number we want to then send them a text message and an email so first we're going to add that text message and the SMS and this one is going to be pay and then you can just do contact first name so it'll paste in the name of the person uh who filled the form out so hey contact first name this is I don't know you could say the owner's name or whatever if the if your client's name is James
you could say this is James with um ABC Med Spa just saw you your form submission on our website I will reach out shortly to help something like that just something really basic we're just giving them some basic automations for this $97 plan this just lets the person know hey we're going to be helping you um and just kind of assures them that like we're not just letting they're not just filling something out that's going to be forgotten and they're never never going to get back to or never going to get contacted and so we're
just letting them know and this will hopefully assure that they don't go to the next Med Spa cuz that's the like if if you call one Med Spa in the area or lead calls one Med Spa or goes to their website and that Med Spa doesn't reach out to them they're probably going to go try to hit up another meds spa and be like ah screw these guys they're not reaching out to me so anyway which want to let them know they're going to be helped so that's the first message and then the next one
is going to be an email so we can send this email real quick we can do the from name could be like a b c MedSpa or you could be like James if that's the owner's name James ABC MedSpa and then from email it be like James abcm medspa.com Um this can be any email you want you can actually mask over the email from the sub account that we set up in the email settings we can mask over this with whatever email we want so it doesn't really matter what you put here whenever the person
receives it it'll look like it's sent from this email even though it's not technically sending from this email it's sending from our dedicated sending email but it doesn't matter and then subject line could be form submission on ABC on our site maybe something like that uh you guys can be more creative than I am here but down here is where we'll actually type the message out so we can say hey and then we could do contact first name this is James with ABC MedSpa and we're basically just saying the same thing that we said in
the text message saw you submitted a form on our site I'll be with you shortly to help out or something like that and then you could you know sign James or whatever we already said I'm typing Jasper James and and then save that so anyway that's a basic automation for a form submission and that's what we would include on the $97 plan now I'll show you one more automation um we'll save this one also we'll publish it remember those text messages won't send in this automation unless you've already done the a2p registration which I showed
you in the video right before this to make sure their number is a2p verified first and then these texts will send in this automation the next one we're going to do is a chat widget automation when somebody messages us on our chat widget bubble on our website we want to have a text and an email sent to them as well so this one's going to be called chat widget just call it that and then make sure re-entry is toggled on and then we'll do uh customer replied as our trigger event we'll click add filters we'll
put reply Channel and then chat widget so anybody who messages us inbound on our chat widget it'll then trigger this automation off so we'll then add a SMS to send to them and we can say hey always use you know contact first name just saw you message just or you could say just saw your message from our website chat um all answer your question in a bit or something like that usually they're going to be asking a question um just to let them know hey we're going to be helping you so it's going to send
them this as a text message we could also send them an email as well usually like to hit people up in both places just in case they didn't check their phone for the text messages or they're they're not checking their email they have it in both places whichever one they prefer from name could be James at abcm spa and then from email James abcm medspa.com subject line um message on our website and then you can just copy I'm just paste in what I said in the text message right here um then you could sign it
off James then save it all right and that's really it that's all you need um the chat widget and the form are the only two lead captures that we're going to be giving them on their site so just make sure to publish this save it and that's all we need to set up for the basic automations this SMS and email automation the Miss call text back that's done through the sub account and under the settings under this business profile tab it's not an automation that we have to create it's just a setting down here that
we have to check on make sure this is checked on right here and then you can type out whatever message you could you can consult with your client and say hey what would you want to say if somebody called you to your number that we give you in our system and you didn't answer like what would you want a text message to send and say to them and you can have them tell you what they want to say here and you can change this and then just hit save and that'll work that you don't have
to have an automation for this one this one just works automatically go high levels made it easy for us to use this one in this feature they do have to have a highle phone number though under the phone numbers tab in order for this one to work and the call has to come in to the highle phone number that you've purchased for the client it can't come into their like business line or the land line they've been using for years like you have to do it through this one um or else it won't work but
anyway that's how you set up the basic automations now I'll show you guys how to set up these more advanced automations so really we're going to use these first two so we're going to give them these two the chat Widget the it form um but what we can do on this website form is we can create conditional branches and the same thing on the chat widget so we can do a weight step right here and we can add to this and this is for the advanced automations um just to be clear we can do like
wait 20 minutes and then we can do a instead of a time delay we can do a contact reply and then we can say to this SMS if they don't reply to it after I don't know 20 minutes that's what we're doing here so we'll just jump up this to 20 so after 20 minutes if the contact doesn't reply then we have what's called an if else statement and we can create the first Branch we can call this one replied and then um we can add another Branch we can just uh have to do this
one first I guess we'll do contact reply replied true meaning they did reply then we can add our second Branch this one's didn't reply we don't have to put a question mark after this so replied and then we have this one didn't reply this one is contact reply replied message or contact replied and then false so if they did not reply um I mean we really don't even have to do this Branch but I'll just show you when we save it and now we'll create these different branches two of them that our clients can or
leads that we capture through our site can go down if they reply to this text message within 20 minutes it'll go down the replied Branch if they don't reply to this text message within 20 minutes it'll go down the didn't reply Branch if they've replied we can just leave it we don't have to add anything here if they didn't reply that's where we want to follow up with another text message and say um hey and then contact first name CU our first message we said like somebody will be with you shortly and then if they
didn't reply to that then we can have like another follow-up message hey contact first name were you wanting to book an appoint at our Med Spa and then something like that and just kind of start a conversation with them that way if they did not reply to this first one if they did reply it'll go down here and it'll stop then the owner can manually jump in and message back and forth with them on the mobile app or from the desktop either way but if they don't reply then we can do this and and what
might be even better is up here instead of just saying like I will reach out to you shortly you could ask them is there something I can help you with and ask a question so then it prompts them to answer and if they don't answer within 20 minutes boom we're hitting them up with another text hey or you wanting to uh or you could even take this part out cuz we already said their first name in the first text so now they're going to get another text from us or you wanting to book an appointment
at our Med Spa really just trying to follow up make sure we're helping them like we don't want them to go to the next Med Spa in town like we want to keep them coming to our Med Spa and so any that'd be a more advanced automation for the website form submitted and after this one you could do another like weight step and then another condition if you want to follow up like a day later you know maybe we send another text the next day and so we can literally just copy this one right here
and do copy all actions from here and we can paste it down here and so now to wait we have to switch change this one now to from 20 minutes to like maybe wait one day and then we'll reply to this SMS message right here which this is the one um it's this one and then we'll do like one day so now it'll wait one day and if they don't reply we can then have another follow-up message um did you get all the help you [Music] needed from our Med Spa and just kind of leave
it at that you probably don't want to hit them up much after that but um anyway that's kind of a more advanced automation that'll automatically follow up with more text messages you could also add an email in here if you wanted to add an email and a text message in each of these um but yeah that's the more advanced website form submission automation that we can include on this 197 plan and then really just set it up once and you don't have to touch it after that it runs on its own and then the chat
widget we can do the exact same thing um we can have a follow-up message we can do that weight step here and instead of a time delay it's going to be a a contact reply delay um SMS right here oh shoot wait it does have to have a weit step this one will be wait like 20 minutes or you could do 30 minutes whatever you feel is necessary um it's going to be contact reply they rep to our initial SMS which is this one if you name the SMS in the SMS box then it'll say
the name of the SMS so you can kind of keep it organized a little bit better and then time out 20 minutes save that then we do the if else statement which is that Branch um like I said we'll do replied for this one and this one we'll say didn't reply you actually don't have to create a second Branch you can use this none Branch as the didn't reply branch that means they didn't do anything they didn't reply to us respond to us us and so then we can do contact reply replied true and then
this one will automatically default to false so you can just do those two branches for this one so they replied great we don't need to hit them up anymore if they didn't reply to this text then we're hitting them up 20 minutes later with another SMS and and then we say the same thing you know did or were you wanting to book an appointment at our Med Spa and then save action there and then you could follow up and do another one and you can copy this like we did in the last one um and
one other cool thing you could do if you wanted to is you could do a conditional Branch here so we can do another weight step every conditional branch has to have a weight step before it like a time delay so we'll do contact reply to this SMS right here then time out we'll do maybe I don't know one day for this one so now we have this wait I'm going to name it one day so we can see that and then right here we can do the IFL statement again this time we could sayl replied
yes this one would be replied well actually this one will be none we'll leave that one so this one we can do a specific reply if they say yes or if the reply is positive we can go to contact reply replied intent type is positive so any if they say yes yeah why like the letter Y anything that's like positive yes yeah for sure go high level can read that and it'll send them down the replied yes branch and then we can add another branch replied no and then we could do contact reply intent type
is and then negative and then we can keep this nun Branch if they didn't reply yes no maybe they just said something else randomly we could go down the nun Branch here so now if they reply yes and it goes down this yes branch that they're looking to books this text says where you wanting to book an appointment at our Med Spa you could then have a another text message that's automated that sends to them awesome here's our booking page to book an appointment with us at your convenience I don't know if I spelled that
right probably not there we go and then you could paste the link to the website and you could do like abcm medspa.com booking if that's the booking page then you could save that so it automatically send them a text message um with the booking link if they replied yes to this message if they replied no you can just leave it at that you don't really need to hit them up after that if they're not looking to book or you could say you know was there something else we you needed our help with and you could
send that text message to them usually text is better than email on the initial form submission we send an email but then after that usually we're working in just text messages but yeah you could say was there something else you needed help with if they said no and if they didn't reply at all or or anything after one day it'll just go down this numb branch and it'll stop after that we usually don't want to hit them up too too much if they're not replying to us um but yeah that's how you can kind of
create those different branches and make more advanced automations and then lastly the last automation will include on here is our calendar booking system automation that's mixed in with our Google review Automation and so that's actually just going to be one automation we have to create for that one so we're going to go ahead and create it select a recipe there's actually a recipe in here like a a go high Lev template automation that we can use it's going to be appointment confirm plus reminder plus survey plus review request we're going to use this one it's
already like almost fully built out for us which is really nice and we could just do we could rename it to like ABC calendars or ABC MedSpa calendar or something like that and then this one triggers off of an appointment being booked one thing we do have to add here is the specific calendar group that's being booked in and so we need to click add filter right here we keep these two the same right here though we need to say in calendar group and select our ABC Barber group so this was the one we built
in a previous video on the course the ABC Barber calendar that has the three different types of haircut appointments so if anybody books on that calendar then it will send them a confirmation email and we can customize this confirmation email however we want right here the message we can customize it too but this is a pretty good default message it has some custom values it'll say hey contact First hey John your appointment has been confirmed for start time you know 3 p.m. on Monday appointment time zone so they'll say the time zone that the person's
booked in if this time does not work for you please let us know some rescheduling links here that they can click on and scheduled so we can you know customize that 24 hours before so that's this weight step you know one day before um this one is based on a wait step based on an event slappointment time but it's already set up for you and then it'll send another email and then another text message and it'll say or this is our first text message let's say your hey contact first name we could also throw a
text message up here if we wanted to so I could just copy this one and then I could paste it up here so whenever they book it sends a confirmation text and email not just an email um and we can say hey contact first name your appointment has been booked for and then we can use a custom value that's appointment start date time so it'll say Monday at 5:00 p.m. see you then and then you want to sign it so they know who it's from ABC Med Spa all right and then 24 hours before it'll
send them another email another text message and then one hour before this one is a wait step that says one hour before it'll then email them again saying hey just a quick reminder appointments in an hour the text message will say the same thing and then one hour after the appointment down here we can delete all of this um we're just going to delete from here on um I don't know if I deleted it let's see delete action there we go and then we can also delete this one we really just need this wait 1
hour after appointment I like to set this to like two hours just in case um because we're going to send a Google review request after the appointment so now we set it till after we'll set this to 2 hours after their appointment we want to send them a text message with a Google review request and we can just there's a a step already in here it's called send review request and this we can send as an SMS usually SMS review requests get the best or the most people to actually leave a Google review and this
is configure this Google review request that sends out is configured under the review reputation settings inside of high level um that's the entire automation I'll show you real quick where this Google review um request cuz you you'll see you can't actually type anything out it's actually done under the reputation settings because we need to integrate this business's Google review um or Google Business Suite first for this to work um I'll show you how to integrate that in another video um it's it'll be a few videos from now it'll be coming up soon um but I'll
just show you real quick where you'll do that you'll go under um reputation right here inside of your client sub account you'll go to this little gear icon and then right here is where you can configure that SMS r view request you can talk this on then you can type out what you want that message to say and it'll automatically paste the review link you could say hey a um hey and then you could use contact first name so we use these little contact. first name and then you could say thanks for coming into your
appointment earlier uh we would be honored if you would I cannot type you would leave us a Google review as it really helps our business grow you could also say we'll give you a 20% off next time you come in if you leave this review and just show it to us when you come in next time you could do something like that to incentivize people to leave Google reviews or you could just leave it at this and then it'll paste the review link automatically once you've integrated this company's Google business profile into the sub account
anyway you just save that and that's the message that it'll send in this automation that we just created this uh ABC calendar automation off calendar booking so somebody books the appointment it's sending all the confirmation text and emails reminder text and emails for the appointment and then two hours after the appointment we're sending that Google review request automatically to that client um that came in for their appointment and that's going to send that SMS message that we just typed out in the review settings and the reputation settings so those are the main automations that we're
going to be setting up for our clients I just wanted to make sure yeah Google review automation we set that up the advanced automations with the different branches showed you how to do that calendar booking you know it triggers off that appointment being booked here at the top so that's everything you need for automations um hopefully I know it's kind of all over the place but hopefully this all made sense if you guys need help feel free to post in the group and ask questions and I'm happy to help there um but anyway I'll see
you guys in the next video in this video we're going to be setting up our client's email sending domain we already did this for ourselves in our account but now we're going to have to do it for our client and their account as well so we're going to be inside of our client sub account we're going to go down to settings and then we're going to go to the tab right here that says email service services and then inside of here you'll notice by default it defaults to your email that you set up inside of
your agency account but we want to give our clients their own sending email that says info. whatever their domain is.com so that they don't have to use ours and so we're going to do that in this video we're going to go to Dedicated domain and IP and then we're going to go click add domain and then we're going to create their own so theirs is going to be info do whatever their business uh domain is.com so for this one I'm going to do mugs mob Feld detailing.com that's the domain I'm going to be using let's
assume this is our client's domain make sure it matches your client's domain perfectly if they have a doom AIO make sure to include that on the end most of your clients will probably beom though and then we're going to click add and verify you'll probably remember this from one of the very first videos in the course when you set this up yourself but we'll need to add in five different DNS records so we're going to click add records manually sometimes if we do it automatically it gets messed up so I like to do it manually
and just so you guys can learn how to do it um but basically we have to add all five these records into our client's GoDaddy account which if you've already done the domain connection video for connecting your client's domain to their website you should have access as an admin to their GoDaddy account already or wherever they have their domain and so you'll want to do this um as you have access to their account already and so let's say this is your client's GoDaddy account you'll go to their my products and then you'll find their domain
if they have multiple domains you might have to scroll down and find the one they're wanting to use but we're going to connect this to their email here I'm going to find that this one right here mug my be detailing go to the DNS records and then we're GNA add first I believe it's a txt record the name on it is going to be this right here so we're going to copy that paste that into the name the required value is this so we're going to paste that into the value and then half an hour
go ahead and save that txt record then we're going to add another one this one is also going to be a txt that starts with info and then this is the value I can remember info so I won't copy that I'll just type that out here record is going to be txt the value string is going to be what I just copied there and save it then the next one is a cname record email. info and then mail.org I'll copy this one um so it's going to be C name it's going to be email. info
the value is mail g.org and then save that then lastly we have two MX records they're both info and then I'll just copy the required value and then we'll go to MX it's going to be info for the name priority it's going to be 10 for both of these the value for this one is mxa and then this next one is almost identical we just have to change one letter it's going to be MX the name is info the priority is 10 and then the value for this one instead of mxa it's mxb and then
mail g.org and then we'll save that and then we'll go back in we'll just refresh this real quick to make sure everything in go go dat is propagated correctly and then we'll click verify records looks like all of them are verify there is this extra record here that it didn't show before so we'll go ahead and copy this one it's a DeMark record or sorry it's a txt record but it's a Demar it helps with deliverability if you set this up it'll just help your emails deliver at a higher percentage so we're going to go
in it's uh one more txt record I believe it was yep txt the name is going to be this D mark right here and then the value we'll go ahead and copy this is going to be go right there then we'll save that one all right so that was added in and then we'll just click verify domain doesn't always work the first try yeah it says domain not verified so we'll have to go back out right here and then we'll go back in by clicking verify now then we'll try it again click verify domain says
domain not verified let's try it one more time we'll go back out verify again and then verified again there we go now it redirected us out you want to make sure it says SSL issued right here if it says SSL pending click verify now again and go back and try verifying again until you get SSL issued once your SSL is issued that means your client now has their own email sending um IP that they can send emails from and like I said before they can mask over this with whatever email they want in the automations
or when they go to send an email manually to a contact they could actually mask over this and make it look like it's sending from a different email like one of their workspace emails or something but um anyway that's this is the main email that's going to be sending out all the emails for our clients and they can send out like thousands of day using these emails that we hook up in high level whereas if they were to use like their Workspace Email through Google workspace or Outlook they'd only be able to send like 50
to 100 emails a day while still Landing in the main inbox of their clients and so this one is is is hooked up for like mass email so it's a really really solid email sending domain um but anyway that's how to hook up your client's email just make sure it now says info. whatever your client's domain is and not yours and you're all set up you need to go to the replies and forwarding and your client could have like a forwarding domain like if they have an email that they like to use like James at
abcm medspa.com or something that they want to forward all these emails to that they get from their clients then they can set that up right there this right here you don't really need to mess with um email analytics where you can check all your email deliverability sent open clicks all that kind of stuff and then risk assessment this will show you if your email is at risk of going to spam or if your email health is good one thing to note when you start sending emails if you were to start sending like a thousand emails
in a day from this email they're all going to go to spam you need to warm up your emails and your clients do as well they need to send a lower volume at first over a few weeks and then once they've sent you know 10 a day five a day for a few weeks then they can start ramping it up and sending you know hundreds a day thousands a day after their email has warmed up and it's seen as like a reputable email from other email providers like Gmail Hotmail Yahoo they'll start seeing that this
is a reputable email cuz it's constantly sending emails and getting delivered and people are opening them and then your your deliverability will be much better so anyway that's the email setup and I'll see you guys in the next one once your client's website automations their account is all set up you're going to want to add them into their account so they can actually log in and start using the different features of high level and so I'm going to show you how to do that in this video so we're going to go down in their sub
account we're going to go down to settings and then we're going to go to my staff um in a previous video I already added in a couple staff members when I was setting up the calendar which is something you'll need to do in order to set those calendars up and add people to them um but that's basically what we're going to do again is we're going to click add employee let's say our client's name is John and then their last name is Smith and then their email is John gmail.com this could be their personal email
cuz it's going to email them whenever we add them in it's going to email them to this email their username and password and a link that they can log in with and so then we're going to put in their phone number here which you'll want to make sure is like their cell phone where they can receive text because when they log in it might ask them if they want to send a text message code to be able to log in to their sub account here and so make sure it's a textable number that you put
in right here um everything else you can just go scroll down user permissions I'll show you how to do that in another video this is just what the features inside of high level that they get access to user roles you want to make sure the owner is an admin any of their employ employes probably will add as just users cuz you want the owner to be over everybody else in the sub account if they have multiple employees um so you're going to do this for all their employees not just John your client the owner of
the business but also his employees if he wants to add them into the software and have them connected to different calendars and things like that for different services that they offer and bookings that they offer um and then under user availability you could add in John's availability if he's going to be on calendars you want to make sure you put in the days that he's actually working right here and that he's available to take appointments um let's say he's a he works for a barber shop or he's the owner of a barber shop and he
actually is a barber make sure to just put in his hours right here and this will override the calendar hours if somebody selects John that they want to get their appointment book with John it'll only show his available hours that they can book with him and then you don't really need to do anything here because we're going to already add him to the calendar under the calendar settings and that's everything you need to do um and then you can just go down to the bottom and click save and you can add John in and um
say this a this user with email already exists because I already added that email right here with this guy John myth and so that's why it's not letting me add him cuz I already to use this email for somebody else but anyway that's how you add people um and once you add them like I said it'll automatically send them an email from your agency email it'll say hey you've been added to web juice whatever your agency is called you'll be added to you've been added to web juice um to an account and then it'll give
them a link to log in um let them know that that link will be coming and they can also um it could go to spam potentially so just make sure they check their spam folder well it'll ask them to create a password and everything they can log in and it'll take them right here and that's the same username their email and then the password that they create that they can log in on the mobile app as well that we talked about in a video in the last section and so anyway that's how you add users
um and I'll show you a little bit more about users and how to give them certain permissions and things like that to different features inside of the software um but that's how to add them in so that they can log in start using the software they can start using you know conversations the calendar booking tab the contacts they can just kind of manage all their leads that they're capturing through the website that we built for them um and anyway I'll see you guys in the next video in the last video I showed you guys how
to add users to their sub account so they can log in and start using the software in this video I'm going to show you how to change user permissions so they can't access all of the features of the software so they don't get overwhelmed and confused about all these bells and whistles we can just give them the core features that they actually need that are connected to the website that we built for them so we're going to go down to settings we're going to go to my staff I already added these two users in I'm
just going to add in myself really quick so I can show you kind of what it will look like but I'm going to go Ahad add in Jasper last name then I'm going to put in my email make sure this is an actual email that people can receive um an email to because they're going to get an email from you after you add them in as a user it's going to say hey you can log into your account create your password and all that and I'll show you kind of what that looks like in a
sec but I'm going to add in my phone number uh hopefully I didn't use that already um but yeah we'll go down under user permissions this is what I was talking about so you can give them certain permissions the permissions that they're going to need are going to be um dashboard stats we don't they don't need campaigns they don't need triggers they need opportunities they do need contacts online listings they don't need they don't need settings well the owner would the owner of the business will need settings the users if they're just a user like
an employee of the business then they don't need the uh online uh they don't need the settings um but the owner will See's the one that can manage the different staff members and things like that so if they're an admin make sure they have settings if they're not an admin if they're a user just toggle that one off so I'll pretend I'm a user I'll toggle that off and then tags um we don't really need marketing we don't need this we don't need uh call reporting we can give them access to they'll have a phone
number with them they might want to track their calls and things like that a agent reporting will'll keep on workflows we'll keep on cuz that's where the automations we build for them out if they want to edit those they can affiliate manager we can turn that off payments we can leave that on if they're Payment Processing through their website on the calendar if they're not using that we can toggle it off I'll just keep it on um invoicing they don't need payment refunding all this ads manager no cancel subscription record payments no no no um
attribution reporting um potentially this is basically reporting to see who's active inside the software of all the employees that you've added in under my staff over here it'll show like how many texts each person has sent how many appointments each person has had all that kind of stuff so that would be good to have just for reporting purposes Facebook ads reporting you don't need website you do need they they'll have access to edit that if they want lead value they don't really need certificates no memberships no reviews they will they want to track their Google
reviews so we can leave that on conversations yes they'll need to be able to communicate back and forth with their leads and clients funnels we'll leave that on just in case they want to build a funnel or if we build a funnel for them instead of a website bulk request yes that's how they'll send bulk text messages and bulk emails to their lead list if they want to and then appointments yes so all these that I have on leave on for your clients um the only one that's different is if you have an admin and
you're adding in like the owner of the business make sure they have the settings option right here but any users will not um so anyway that's how you do that and then everything else is good we've already set this person up we don't really need to change anything here their availability we already showed you how to do that in the last video video when you add users make sure their calendar availability and the days that they work are shown here and then we'll just click save and then now that I've saved myself in as a
user I'll get an email so I'll go ahead and open up my email real quick and you'll see web juice I got an email activate your account this is what it will look like for your clients the this obviously the zoom logos is here because that's the logo that I threw at the top of the software whatever logo you put up here is the one that will show on this email so it looks like a an email directly from your software company and then you can say click here to log in and then I'll be
able to go and create a password so that's my username is the email I added the new password I'm going to go ahead and create one real quick I don't know if I typed that in right all right and then confirm it so this is what your clients will do just the same they'll create their password continue to log in and then they'll be able to log in to your software page then they'll get a or an email confirmation I'll do text message since I have my phone right next to me all right and then
now that I'm logged in I'll it'll log me in directly to the sub account so your clients won't be able to see the agency account you can see they can't switch to agency account like you can I'm logged in as Jasper Aken the user that I just added into this ABC nail sub account and over on the right you can see a lot of the features have gone away cuz I edited the permissions of this user so Jasper a can the employee of this business can only see conversations calendars contacts payments and then automation sites
reputation reporting and some of these other custom menu links we added so you can see how it limits the features just so we don't overwhelm our clients and give them all these features that they're not going to be using and just confuse them we just want to give them access to what they'll actually need and so that's how I set everything up and showed you how to toggle on and off those different permissions those are the ones you'll want to give to your clients um just these core features right here um and if I click
on settings you'll see it I I'm not able to edit any of the settings I can just go to my profile right here and that's all I can edit um I can't edit all everything like the admin or the owner of the sub account would be able to like the owner of this business um because I just added myself as a user anyway that's how you set everything up and um super simple just give them those different permissions like I showed you here I'll open those back up one more time so you can look at
those again um it's going to be under right here but yeah these are just the main ones that your clients will need they don't need all this extra stuff for our offer it's very simple just giving them the website automation Google reviews that send out afterwards and that's about it so I'll see you guys in the next video in this video I'm going to show you guys how to integrate your client's Google my business profile their Facebook profile their stripe account if they want to process payments through their booking page and then also their Google
account and so we're going to start by going to their Google business profile right here we're going to click connect we can do this with our clients that's probably the easiest way to do this is on an onboarding call with your client because you're going to need their username and password for their Google business profile so we're going to click connect right here and then it's going to ask us to log in to their Google account whatever Google account they have that's connected to their Google business profile that they have set up for their business
um when I say Google business profile that's the place where they can get and capture Google reviews from their clients show a little bit about their business anytime you go to Google Maps if you see a business that's active and local located on Google Maps that means they have a Google business profile so um typically we want our clients to have that so we can automate their Google reviews and that's another service we can offer them is the Google reviews automation so we're going to connect it I think I have a Google business profile connected
to my email here and so then you're just going to allow all permissions and you're going to be doing this with your client and then as soon as you log in and accept permissions it should say connected after a couple seconds here once this loads and then it'll pop up with a page like this and it'll ask you if you want this account and then if you want Google business profile call tracking we'll toggle that on Google my business profile messaging awesome and we'll connect it and it looks like it's completely integrated the way we
can kind of check on that is if we go to the reputation tab right here um we'll be able to go to this and then at the top we should be able to select Google business or Google reviews on Google and it should say the name of the Google business profile so this is my Google business profile web juice and you'll just click save so that's how you know and it'll say connected right there so that's how you know if it's connected just go check under the reputation tab then go to the little gear icon
and if it says connected you're good to go so Google my business profile is all connected next we can connect Facebook so I'll go ahead and click connect there and then we can integrate a goo uh Facebook business page and so you'll just have them log into their Facebook account that they have that page it can't be a personal Facebook profile it has to be a business Facebook profile so underneath your like my personal J breaking account I have multiple pages that I've created and I can create those pages for different businesses that I own
and so that's what we're going to be connecting is the page a business page not their personal profile and so but you will log in through your personal profile which has the pages underneath it so I'm going to go ahead and try to type my password in and then I'm going to do a code from my authentication app right here and like I said ideally you'll do this with your clients because they don't want to have to send you all of their username and passwords and everything um CU that's personal information so you'll either do
it with them or you can have them and show them how to do it and they can do it themselves pretty easily like I'm like I'm showing you here it's super simple um to get this all set up so there we go got it and then it'll ask me which Facebook page I want to connect because I've got a lot of different Facebook pages under my profile so I can select from all these different pages that I have underneath my profile I'm just going to go with this web juice one right here since that's the
one I'm using in this example and we'll click done so that's how you connect their Facebook page now any DMS they get through that web juice you know Facebook page will come in to the conversations right here and they'll show up as Facebook messages inside the conversations tab so it's like really cool and if if they have an Instagram page connected to that Facebook page that we just connected it'll also show their Instagram DMS in the conversation they can send DMS straight from inside the software or on the mobile app on the lead connector mobile
app so it makes communicating with clients really easy and puts all their communication from text email Facebook DMS Instagram DMS calls all in one place um so it kind of consolidates everything like that next up they would integrate stripe that's if they want to collect payments through a calendar system so on a calendar um if we go to our calendar settings and when we create a calendar we have an option to integrate payment Gateway so basically we can make people pay for appointments that they book with us so we go to like one of our
calendars we have to do it on all of them we would click edit right here and then we would go to forms and payments then down at the bottom we can toggle on accept payments and in order for this to work we have to integrate a stripe account so if your clients want to accept payment stuff to integrate stripe which they can do back from our Launchpad tab right here and so I'm going to go ahead and connect mine pretend like it's my client stripe account so I'm going to go ahead and type mine in
and I'll go ahead and integrate it so you guys can see what I'm talking about on the calendars how to add that payment to it and of course I'm going to have to type in a code as always there we go and then I'll just connect this one right here or or actually I'll connect this one this most recent one and then it should return us back to high level and should say connected now for stripe yep gave us the little check mark um so now that's connected now if I go to my calendars and
if I want to add payment to one of these calendars or all of them I can go to each one individually click edit go to forms and payments and now I can toggle this on and now for this like basic haircut appointment um that's what this calendar is called I could charge like $30 and uh we could put USD or different currencies here accept partial payment now I will'll leave that off description then just turn it live when you want it to work and then save it and now if we go to our calendar group
the one that's going to be on our client's website we site go to our group here and we go to preview it and I'll copy the scheduling link and show you we can integrate that payment Gateway onto their calendar so they go with that basic cut right here it says $30 next to it now so like I said these ones I didn't add the payment to yet we would need to go in and add the payment for those two but I showed you how to do it for this basic one they can pick John as
their their Barber and then they can select the time that they want to go in for and then boom they have to put in their card info right here and pay for $30 right here in order to book this appointment so your clients can have this option if they want if they don't want to collect payments on the website they don't have to they can just collect them after their client comes in for the appointment that's totally fine but that's I just wanted to show you guys how that looks um and then the last thing
we're going to want to integrate it's actually not out here in the Launchpad tab for some reason high level puts it under the settings so if you go in the settings inside of our client sub account and then go down to this tab that says Integrations right here and once we're inside of this account we can integrate someone's Google account looks like mine already got integrated when I integrated my Google business profile so actually you guys might not have to do this one um if you integrate Google business profile I think this one automatically syncs
up but this one is sunk up to the client's like Google uh calendar if they use Google Calendar so you can connect their Google Calendar now now that their uh Google profile is integrated right here so looks like we actually don't have to do that one it's integrated automatically when the Google business profile is connected but you'll see over here you know Facebook's connected and then we can select the Facebook page um right here we already did that looks I think we connected it to web juice but we'll just go ahead and do it again
just in case and so I'll go to this web sub juice one right here and then it'll say Instagram is available for this account and then we can connect the Instagram and the Facebook page together so I guess just go in the Integrations just to make sure everything's connected Facebook and Instagram and then connect it right here and then it will redirect you back out and it'll say it's all connected up and uh you can connect an ad account we don't really need to mess with this that's for if you're running Facebook ads but yeah
that's everything you need to integrate um in this video that's everything that we offer to our clients and they'll all be ready and set up and ready to go um with Integrations once you get those three things integrated there and then like I said just go check under Integrations just to make sure that Facebook and Instagram are connected properly and yep your client will be good to go here's how to send your client an invite to download the mobile app the lead connector mobile app which is how they can use high level from their phone
you're going to go into right here where it says mobile app inside of your client's sub account and then your client can also click on this and do it themselves but I think it's easier if you send this to them so that they know that there is a mobile app and they actually use it but basically you're going to type in or or find their their user because you've added these users into your sub account already hopefully you've added them in already I showed that a couple videos ago but basically you'll select from your users
here so if it's Jasper right here it'll send him an invite to download the mobile app so I'm going to send Jasper an invite which is really myself but I'm going to pretend like I'm the client and uh Jasper in his email he'll get this email right here from ABC nails which is the sub account that I was just in with the ABC nail sub account and now it gives me you know a little quick message dear Jasper for the mo the app is designed to revolutionize the way you manage your customer relationship and explains
what every the app what it does and then I can either download it on the Apple App Store or the Google Android play store ideally I'm going to be doing this on my phone right but anyway that's the message your client will get when you send them that invite and they can download it either way but it's completely white labeled it's just called lead connector it's not called like go high level or anything like that so your clients will still have no idea that they're using high level they'll still think it's your brand whatever you
call it and yeah that's how to send them the mobile app you can send it to each of the employees of the business not just the owner but everybody can use it and it'll help keep your offer more sticky because if your clients are using the software from their phone all the time they'll never want to cancel because it'll basically have everything they need in one place so anyway that's how you do the mobile app and I'll see you guys in the next video another thing that we do charge to our clients directly is the
text and emailing and calling credits that they use inside of their sub account so we give them that phone number right they can send text with it they can call with it and then we also hook up their own email that they can send as many emails as they want with each text message costs 0.007 cents per segment and each segment I think is like a 150 characters so 150 letters if it exceeds that then it'll count as two text messag if it's like a really long text that they're sending to people sometimes it could
count as two texts but in either way it's only 07 cents so it's like 3/4 of one penny of one cent per text each email is 0.003 cents so a third of a cent per email and then each minute calling is three cents per minute so really really cheap your clients on average if they're just using a normal amount will probably spend like $10 a month $15 a month on these texting emailing and calling credits but it is really important to let them know when you close them say hey we charge the monthly subscription of
the $97 per month or the $197 per month and then on top of that you do have to pay for your own texting emailing and calling credits with our system but just tell them on average it's about $15 $20 a month Max that's if you're sending a lot of messages and let them know you can send about a th000 text messages for $7 so it's super super cheap anyway I'm going to show you how to add their card information in so that it'll charge them directly for those credits and so you'll do that under the
settings inside of their account and then you'll go to the uh company billing tab right here and then you'll add in their payment method and if they've already paid you which they have you can say I already have this customer in stripe which they should have already paid you for the setup fee and um hopefully the second setup fee because you've already finished their website so that if they paid you the full th000 or $2,000 for the setup fee so they should already be a customer in stripe um unless you were doing like a free
website for them and you haven't charged them anything yet and then you can search from your stripe customers right here so let's say Jasper was the my client I could find him right here and I could just click on his profile and it would automatically add his card to this account if you haven't gotten their information you could also um just go to request via email and you could just send them an email like this and so you could send it to one of your users here uh whoever your client is make sure to send
it to them whoever is going to be in charge of this account the owner of the business usually and make sure to send them a request via email or via text message if you want to put in or have it send them a text message and they can put put in their card info there um but once you do that then it'll add their card on file it'll show like this right here and your client can see their card that they have on file they can always remove it and change cards if they want to
and they can see their total balance of how much money they have to spend towards those credits and how this works is it'll automatically charge to your card so you'll actually see like these $10 coming out so you can say autore recharge with $10 when balance is lower than zero so when it hits zero it'll automatically recharge this client's account with $10 worth of credits to be able to send more text email and make more calls it'll charge your card for that $10 right here but then it'll reimburse you the $10 from your client's card
to your stripe account so you get paid out to your stripe account for this $10 right here it's a kind of an interesting process of how high level has it set up but yeah now that you have your client's card on file like this right here it'll charge them they'll be able to see their invoices of not only the credits that they're spending but they'll also be able to download their invoices of the monthly subscriptions that you're charging them every month and they can go download them from right here um and it'll just default and
charge directly to your client card every month then once your client's card is attached I did it in this medical spa sub account let's say this is my client's sub account we added in their card already we'll then switch back to our agency View and I like to give my my clients a $10 credit just to start them off then every uh all the credits after that will charge directly to their card so I can go do that by going into this medical spa demo account I'm going to pretend this is the one of my
client and click on it and then we can go to rebuilding right here and then I can give them a $10 credit just to start them off and then after that it'll charge from their card but I can click add balance right here and I can give them $10 this will charge my card since it's just the first balance that I'm giving them and then I can click proceed it'll charge my agency account card which is going to be the card you signed up for high level with and then after that every time they run
out of credits down to zero it'll recharge and charge their card the $10 but you can just start them out on a good foot with $10 um just it'll come out of your setup fees that you charge them but then after that they'll pay for all of them but just let them know that you're going to be paying for that they're going to be paying for those credits but also let them know you'll give them the first $10 worth of credits on you as part of the setup fee and then after that they'll them on
their card if your customer previously had another CRM with a bunch of their clients in it or a bunch of their leads in it and they want to transfer it over completely into your software so they can stop using the other platform I'm going to show you how you can do that in this video and so hopefully their other software has the capability of exporting leads onto an Excel file with all their names emails and phone numbers once we have that Excel file we'll really need a file like a CSV file which is an Excel
or Google Sheets file we'll need that file so that we can import those leads and bulk into high level we do that under the contacts tab right here inside of their sub account and then what we'll do is we'll click import contacts right here and then it'll ask us to import that CSV file I already have a file right here that I can import really quick it's got a lot of leads on it I think um but anyway make sure the file size is less than 50 megabytes if it's bigger than that um then it
won't except you have to break it into smaller pieces and import like two or three different files and then we can click next once we've imported our file and then we just want to map the fields inside of here um and I'll show you once this loads it'll have like contact ID first name make sure it equals first name last name last name just map the fields over here make sure each of these is equal to the actual information that's over here on the left and then once you've done that you can click this little
don't import data in unmatched columns and then click next and then you can name this import we could just call it like bulk import of leads for ABC nails let's say that's the name of this business and then we can just click uh submit right here and it'll go and import all of the leads oh we have to confirm this first then we hit then we hit submit and then it'll import all the leads into the contacts right here it'll take a few minutes um if it's a lot of them but you can try refreshing
the page and then you'll be able to see all your leads just like this names phone numbers emails and it still looks like they're slowly importing CU I think this lead list had a couple thousand at least but yeah it'll take a little bit of time for all them to import so give it a few minutes then refresh it and they should all be imported however many you have 10,000 20,000 it's pretty quick on how fast it Imports them you can see it's kind of still importing them but yeah that's how to import their leads
in the next video I'm going to show you guys how to run a reactivation campaign for your client so that they can actually take some of their old leads that have been in their system for a long time and we can try to rekindle some business back into the pipeline for our client this is something we could throw in for them as an addition but I'll show you that in the next video another cool service you can throw on top of what you're already offering to your clients you're already giving them a website the automations
the entire system we can also to sweeten the deal throw in a reactivation campaign just a onetime campaign to all of their previous leads and clients and we can send out a bulk email campaign to all of them or B text message campaign to try to rekindle and get them back in the door of this business to bring back more money into the business for our client and so we can import all their clients I showed you how to do that in the previous video right before this and so once that all of their clients
have been imported into the contacts tab we can select all of them and so we can select all like 18,000 if they've had 18,000 previous customers or clients that they've worked with in the past or just leads in general select all of them and then you can click Send email and email is going to be the best way to do this cuz when you first create an account for a client they're not going to be able to send a ton of text messages yet they kind of have to ramp their way up so they can
only send like a 100 a day to start and then like once they get past that 100 a day then they can ramp up to like 200 a day and it kind of goes up in increments but if they want to send a bulk email they can so we can click okay proceed right here and then we can type the from name so it can be from the business name ABC Med Spa that's their business and then from email we could do like info abcm medspa.com we can put any email right here doesn't matter it'll
override and mask over the true root email that we set up a few videos ago and the email subject line so there's two different ways we can do these reactivation campaigns we can reactivate old leads and try to get them to come back in maybe do some sort of discount program say hey this week at our Medical Spa we're doing a 20% off deal all of our appointments all of our different therapies are 20% off so you can do that to try to get people in for appointments or you could do it for Google reviews
so if all these previous thousand 10,000 leads that these are customers that these businesses had in their CRM we transferred them into high level if all of them were previous customers of the business we could ask all of them and send out an invite to leave a Google review request because they've all been to the clinic already and so we can just help these businesses get a lot more Google reviews really fast in uh on their Google business profile which will help them rank a lot higher on Google and just get them more customers overall
and build their brand reputation in their area so we could do it for either of those two a discount program or a reactivation campaign to get a a bunch of new Google reviews that only works if they have a huge database of previous clients or or a couple hundred at least um and the uh this method with the 20% off would work really well if all their old uh clients or all their old contacts and their old serum just a bunch of leads people have never been in before can't really ask them for a Google
review if they've never been into the clinic but we can ask them to come in for the first time and give them a 20% off discount so either way that the email subject line would be like 20% off your next visit at ABC MedSpa or it could be um leave us a Google review to get um a $500 gift card usually the best way to get Google reviews really fast is to do some sort of incentive program or prize so say hey if you leave us a positive Google review we'll enter you in to win
a $500 Amazon gift card or Visa gift card and you could do a give giveaway like that so you'll just type out the email subject line the actual email copy and like what it is and what it entails and how they can get the reward or the discount or whatever it is and then we can either we we don't want to send them all at once we'll probably want to send them in drip mode so that they don't send all at once and a lot of them will go to spam if we send them in
drip mode it'll be more likely to land in their main inbox and so the action we can just name it like uh let's say this was for Google reviews we can call it Google review views and then we could do today's date so we know the date that we sent it out 6 6 and then 2024 and then we could do start on and then we could start today at you know this time which is this that's the current time for me and then we could do batch quantity we could send out like 300 per
day to our list um or we could do like 500 per day but if this is a brand new account you probably want to only send like 200 to 300 a day just to make sure deliverability is still good and then we could say repeat after and then one day so every one day it'll send 200 emails and then it'll hit up our list Monday through Sunday maybe we don't want to hit people up on the weekend so we turn off Saturday Sunday and only send Monday through Friday and we can start it between like
work hours so we could say we want the emails to start sending at you know 8:00 a.m. in the morning and then we want them to stop around like 6:00 p.m. we don't want to keep hitting people up in the evening with our emails and so we could do that and we could click Send email and then boom our email campaign will start sending to all of these leads that we had selected over here um we can do the same with text message but like I said you can only do 100 a time to start
so if you're going to do a text just do a 100 so just select a 100 of your leads so just like go through make the page size um 100 and then just select one page so it says 100 records are selected this is if you want to select all your Le I've got like 18,000 in this account here but if you want just 100 then you could just select 100 and you could send a text message and you could ask a bunch of people for a Google review or say hey we're doing 20% off
discount um all that good stuff so anyway that's a reactivation campaign when do I recommend doing this only if you're client really needs a push or your prospect cuz you're going to be jumping on the zoom call with them showing them the website showing them all the automation showing them your core offer if they're like really hesitant and you need some ammunition to make the sale and you're like hey I don't normally do this for everybody but we'll take all of your previous clients because it sounds like you guys have been in business for a
while and probably have a lot of names emails and phone numbers of old clients and we'll do a Google review reactivation campaign for you or we'll do a um you know a discount reactivation campaign for you to get a lot of customers back in the door quickly to spark your business help you make a lot more money and if it's for Google reviews you can say it'll help you build your brand reputation and get your ranked higher in your local area on Google um and if that's what it takes then I would definitely offer this
it's something that takes like 5 minutes to do and it'll get all their leads back into the system too which is really nice um into in high level so that they're not in their old CRM they can cancel their old CRM they can just use ours now and uh yeah it's it's just a really cool thing to add in there if needed you don't have to offer it to everybody a lot of people will buy from you just with your core offer cuz it's already really good but if they're really hesitant you say don't usually
do this but we'll throw this in for you this reactivation campaign just to sweeten the deal um if you guys will go forward with us and buy with us today and that'll get a lot of people push forward because this is a really cool offer to just help them respark and get more either Google reviews or more clients coming in the door for their business so that's how to do the reactivation campaigns and I'll see you guys in the next one if we find a prospect that really loves their website but still wants all of
the software features like the automations automated Google review requests the booking system the form the chat widget on their current website but they don't want us to build a new website we can still offer the software to those clients we can integrate the forms the chat Widget the calendar system onto their current side I'm going to show you how to do that in this video so you're going to be inside of your client sub account and let's say they want to integrate the calendar booking system onto their current website but their website is not with
high level you didn't build it it's with like WordPress or Squarespace or web flow just another website builder I'll show you how to do it and how it works with most website Builders so let's say they want this calendar system that we set up um this calendar group right here I'll share I'll copy the share link so you guys can see um what it looks like but let's say they want to integrate this uh calendar booking system onto their website with these different types of appointments because they don't have that on their current site we
can go into their current site let's say I'm using another software called webflow I do build quite a few websites for my clients in webflow not just in high level and this is exactly how we do it so let's say it's this um I don't know there should be a barbershop template somewhere in here let's do this one so we'll just open the designer and the designer will look similar to Wordpress or Squarespace or or most other web designers it'll work the same way but basically um we can go over to this calendar group that
we want to paste onto a website we can click the three little dots we can copy the embed code that's what we need is the code and then we can go over to web flow where our other website is and let's say we want we have like a booking page right here looks like there's already a code block here um but basically the way that we get this code block is we just go up here click the little plus sign scroll down to the bottom and then we just use let's see where it's at code
embed and we just drag it onto our website and that's how you do it and so I'm just going to undo that real quick so it goes back but this is the code block right here and what you're going to do is you're just going to click the little gear icon right there and it opens up where you can paste that code in and then I can click this and I can paste our calendar group code into here I can save it and close it and then it won't show in editing mode we'll have to
publish it um and so I'm going to publish this real quick and then we can preview it after it's published and it'll literally just all we do is paste that code in where we want it where we want the calendar to pop up and it'll pop up on this site there might be some tweaking we'll have to do but um it should look pretty good so now if we open up this site page this booking page it'll pop up with our calendar from high level and the automations that we've set up that are hooked up
to this calendar will work just the same even though it's not on a highle website um same deal with the forms in go high Lev so we can go back we can go to our sites tab let's say this form we created this med spa form and we want to integrate it and put it onto this non go high level website we can go up to where it says integrate inside of the form Builder once we build the form out the way that we like it and it looks good and it'll match the vibe of
the website we're about to put it on U we can then click copy embed code right here on the form we can go into web flow again and let's see if there's like a contact us page or something here's a contact page we already have that form block there but you'll add that just like I showed you over here you'll just drag on this code embed onto the onto the website wherever you want this form to pop up and then you'll open up this and then we can delete this paste in our new form which
it did paste it just looks the same CU we had a high level form on there already we can save it and close it then we can publish the site and then I'll preview it so we can see what it looks like so now that highle form is on there we don't need to mess with a little bit of The Styling in the high level side so it doesn't have this like weird black background and Stu stff like that but anyway that's how you add those forms onto the website and then lastly we can add
in the chat widget uh which I'm trying to remember exactly how we do this I've got a virtual assistant who does this a lot of the time but I think I can figur it out chat widget right here we'll go to get code and then we can copy the embed code of the chat widget once we've built it out the way that we like it maybe we change it to kind of match this Barber maybe we do like a yellow chat widget to match the logo so I'll change this color of the chat widget down
here or it's going to be right here to that yellowish color I'll try to match it as best I can um maybe something like that and then I'll save it then I'll get the code again and you can either get it copy it down here at the bottom or you can copy it up here all right and then we'll go into webflow into the editor um I'm going to go to the homepage of the site and then I'm pretty sure we can just go to the bottom and we can put this code block down here
at the bottom of the site um I'm going to go ahead and add that in here scroll down we're going to do embed code here and this can go this one can go anywhere on the page doesn't really matter and uh we're just going to paste in our chat widget code we'll save it so I just put at the very bottom of the website you won't be able to see it here um it but you'll see um I'll go ahead and publish this now we've added that chat widget and then when we preview the website
again now the chat widget pops up so anyway that's how to do that you can add the forms calendars chat widgets to non highl sites that your client maybe they already had a site they really like and they just want to incorporate the software into it now anytime this you know appointment is booked on this high level calendar or somebody messages us on our chat widget here or they uh book you know they go to contact us and they fill out a form these are all highle EDS so they will still create a contact inside
of the highle account whenever they're filled out they'll create a contact so we'll get those people's names emails and phone numbers into our client sub account still the automations will still fire off like normal and send the text and emails and Google review requests and all that and so everything will work just like normal we can sell and still have an offer for people that don't necessarily need a website but just need a good system with automations built into it so that's everything for this one I'll see you guys in the next one once your
business starts scaling pretty fast which it likely will now that you're at the end of this course you're going to want to hire on some help to help you build out these websites so that you can continue to push sales while somebody else does fulfillment the best place that I found to hire somebody is on a site called onlinejobs.ph which is the site that you see here on the screen it's a website where you can find Filipino virtual assistants that are really skilled in a bunch of different tasks for us the main task that's going
to take the most of our time is going to be the website building and so we can Outsource that to somebody on onlinejobs.ph and they can do the website build outs for us while we continue to help clients with support and we just make more sales in our agency and so that's the first hire that I made in my business and it's helped me a ton and whenever I land the client I just say hey my guy White Mike is going to be reaching out to you's going to shoot you an email with some things
that he needs from you to get the website project started and then Mike does all of my communication from then on out with the client um I set up everything on the high Lev side and then we come together once the website's done and everything is set up and it's just really nice I don't have to worry about all the onboarding for the client because Mike does it for me and so this site onlinejobs.ph I'm going to link it down below where you guys can sign up you do have to pay a monthly subscription for
it while you're hiring somebody it's only like $70 a month I think something like that for their middle plan um and so that's all you need to sign up for maybe it's only $ a month it's pretty cheap and once you make your hire you don't need to pay for it anymore so you you can hire somebody within the first couple weeks pay the first month subscription and then just cancel your account because you won't need it anymore because you've already made your hire um but basically inside of your account it'll look like this you'll
post a job and then you can put in the job title uh type of employment if you're looking for just gig work part-time full-time at the beginning you're probably just going to do gig work because you might not have a full schedule or a full 40 hour work week to give to this virtual assistant and so you could start out by doing gig and then you can tell them hey let's work in into a full-time position as we start scaling more um job description you just say hey I'm looking for somebody who can build websites
in high level or if you're looking for somebody else who can build websites in like webflow or WordPress if you're looking for a different website builder you can type those out as well U wage or salary you can start at like $5 an hour $4 an hour um and then desired number of hours per week you can tell them hey starting out you know it's only 10 hours a week but we can work our way up and and when I say you can tell them this once you post this job you'll get a lot of
applications and you can actually jump on Zoom calls with them and interview them see their resumes all that kind of stuff um put in your email here your name the skills so you could do like website development website design and page layout would be a good one just a couple different things web design related for the skills you can add up to three here and then this box right or this check mark here says send a daily email summary of my job post applicants that's good just keep that one check and then click post job
once you post your job you'll get a bunch of applications they'll all pop up in the messages tab here and it'll show like how much the person wants the job like 1 AP that's not very that doesn't show that they're super interested but if they have something like 5 AP or this person had 10 AP that means they're really interested in my job that I posted and they want to chat with me about it or they're really qualified for the job based on their resumés you can go in and check out each person you can
see their portfolios right here and just see some of the previous websites they've done and you can message them so you can just type out a message once they respond you can send them a zoom link to book a call with you and then you can jump on um some interviews with some people uh the main two things I'm looking for somebody who's done some really good websites in the past so they have a good portfolio and then also somebody who speaks good English cuz they're ultimately going to be communicating through email with my client
after I close them and so I want to make sure their English is good so it comes off professional and uh I I always create their own Workspace Email for them so for my guy Mike I've got his email Mike web. set up so he can email on behalf of the business and have a professional email to email our clients with and so yeah that's the best way to Outsource clients that I found uh Filipino people super hard workers um and they'll work for $5 an hour which is a lot of money for them if
you're paying them in USD um the average salary over there is like a150 an hour and so if you pay them $5 $6 an hour they're making way more than they would make over there and so they're super happy we're super happy and uh they do a really good job and so anyway um if you're ever looking to Outsource I'd say if you if you get three or more clients a week with your website and SAS offer then it's going to start becoming pretty hard to manage all those website build outs so that might be
about time to hire a virtual assistant when you're at about three or more clients per week you can handle one or two clients a week on your own no problem and get like you know eight clients a month on your own and be able to handle that anything more than that though it'll start to get a little bit overwhelming and so it might be a good time to hire somebody at least parttime to start and then as you scale even more you can work them into a full-time position and they'll be super happy you you'll
you'll be really impressed by their work and yeah so I'll see you guys in the next video in the tales of ancient Greek mythology a group of determined Sailors embarked on a perilous journey across the vast Mediterranean Sea as they sailed they encountered a lush and vibrant Island its Shores filled with enticing lotus flowers drawn by the flower sweet fragrance the sailors disembarked unaware of the flowers magical properties with each bite of the lotus their minds became clouded and a deep sense of contentment washed over them lost in a euphoric trance the sailors forgot their
purpose and desire for home succumbing to the Enchantment of the lotus just like the sailors from the story found contentment in the lotus flowers we want to make sure our clients are happy and find contentment in our services finding and getting clients is one thing but keeping them happy and delivering a good service and good results for them is another thing and so these are some steps we can take in order to keep our clients happy and keep them paying us for a really long time the first one is set good time expectations whenever we're
on that Zoom call with them we close them as a client we want to make sure we set good expectations of how long the project is going to take before it's completely set up I used to tell my clients we could get it done in a week it would actually take like two weeks sometimes and if I told them a week they would get mad or frustrated because it ended up taking twice as long as what we originally said and a lot of it was their fault I'll be honest like they said oh can we
change this can we change this and it was a lot of little change orders that made it take the two weeks but everything is your fault as the business owner you need to take full responsibility for anything that goes wrong and so just set good expectations I typically tell my clients now 2 weeks 14 days before the website will be fully up and running and their account will be ready to go which gives me and my virtual assistant plenty of time to get everything set up for our clients number two is communicate throughout the process
make sure you don't just like get everything at the beginning from your client and all their resources and then just like never let them know where you're at in the process when you finish the first draft send it to your client say hey how does this look so far anything you would change anything you really like and you want us to keep doing and then just include them in the process being in communication with them for that week or two week website buildout every other day you know every day if you can honestly just make
sure you're in front of them and you know or you let them know that you're working on their project and it's not forgotten um number three is make changes as required or as requested so if they want those changes made on their website make sure you're changing those things for them and just really letting them know hey that change was made here it is and show it to them and that kind of goes in with number two um number three under promise and overd deliver that also kind of goes in with setting good time expectations
and um you know if you tell them two weeks and you get it back to them in a week they'll be thrilled they'll be like dang that was really fast um but if you tell them one week and you get it back to them in two weeks they'll be like dang you're terrible so over under promise overd deliver and another thing you could do is just like throw in some bonus things for them that you didn't say you were going to give them like if you didn't tell them about the reviews reactivation campaign that sends
out to all of their uh previous customers and helps them get a lot of Google reviews really fast you could just throw that in if you wanted to and say hey we're going to do this for you we don't normally do it but we really like you and we think it could really help your business cuz you have a huge list of previous customers we think we can help you get a lot of Google reviews really fast and so you can always just do stuff like that and overd deliver um and give people extras and
they'll just be really happy with with what you've done and then lastly just take notes on what your clients want when you're on that initial Zoom call I recommend recording it uh one for training purposes so you can see how you did and you can reflect on how the how the sales call went but two you can get a good idea when after you close them you can go back and and see everything that they told you that they're looking for and so you can remember when you start building out the website and you don't
have to like reach out to them and ask them for everything again on an email you like know basically what they want you can start setting it up right away um and so yeah just take notes on what they want because you want to deliver a website that's beautiful and looks good to them might not be what you would prefer but the client you know is always right so anyway those are the five steps here for delivering good results for your clients make sure to do these things and your clients will be super happy and
they'll continue to pay that monthly subscription to you forever another very important aspect of keeping your clients happy is making sure they're educated and understand how to use the platform form on desktop and mobile and so the first one is just making sure they understand the mobile app that's the main place that they're going to be logging in and using the most and so make sure to do a walkthrough with them and make sure you go through the mobile app tab inside of high level and show them how it works and all the features that
it offers and make sure they get logged in and actually start using it that's well some that's something that will keep them stuck in paying you for a long time if they're actively using it on their phone a lot um it'll be constantly on top of their mind and they'll think they're getting lots of value which they are and they'll keep paying the subscription for a really long time this model is already really sticky by itself because we're building that website for them so it's really hard for them to cancel anyway but just make it
even more sticky by educating them making sure they don't get confused and feel like they're not getting enough out of the system that you're providing number two conversations what I mean by it's conversations tab which is on desktop and mobile that's where they can communicate back and forth with their leads and clients make sure they are using that and they know where those conversations are coming into whenever a lead messages them on text email Facebook Instagram DMS um or calls them make sure they know um where they can converse with their leads inside the platform
the calendars make sure they know how to use the calendar system or the Calendar's tab inside of high level on their phone and on desktop so they can see all their booked appointments and they know who that appointment is booked with if they have multiple technicians that work for their business just make sure they understand that calendars tab because that's these are the main ones they're going to be working in on a day-to-day basis next one is contact that's where they can see all their list of leads they can send bulk messages through text and
email to all of them they can import contacts from another CRM or software that they're using make sure they understand how to use that tab cuz that one's very valuable and they can send out bulk text and email campaigns to their clients right there which can help with their marketing and just help them get make a lot more money in their business and then the website tab also is pretty important you can say hey we'll do all the updates for you on your website or you could say hey you can you can go at any
time into the sites tab right here inside of our software they have to do this one on desktop and you can say Hey you can edit stuff on your website and you guys can manage it yourself you can always send those requests to us and we're happy to take care of them within 48 hours but if it's something really simple just like adding a new picture replacing a headline or something like that with a new headline you guys can do that so really easily and you could just show them on an onboarding call real quick
how to do that kind of stuff so that they can go in and update the site on their own in their own time so just making sure they're very educated on the platform so they don't get confused I find confusion leads to people cancelling that's one of the biggest factors of cancellations or or drivers of cancellation and so just make sure they understand aren't confused and are using the software and they'll keep paying you forever and the very last step in keeping your clients happy and paying you for a really long time is communication I'm
not talking about communication during the actual onboarding process we already talked about that in the first video in this section I'm talking about like after you set them up and it's all running for them it's really easy to not communicate with them cuz you're like oh I've already set it up website's done and the automations are running and we don't really have to talk to them much it is true like it's very passive after you set up your clients but you do want to check in on your clients every once in a while I like
to check in with my clients with a bul text message inside of my agency sub account I can select all of them in my contact Tab and I can send them all a text and it looks like a personal text but it's really just a book text message and I say hey how's everything going um you guys need any help with anything any changes on your website or um you know anything tweaked with the automations and just keep up with them because there might be something that's been on their mind but they've just forgot to
ask you and the sell will be like oh yeah we did want to change this and it'll just keep your clients happy and know let them know that you care about them and and are there to help them and then secondly you know update them if something has changed in the software like if if a placement of a certain feature has changed or something in the calendar settings has changed or just anything of the user face that has moved around or the app has changed let them know about those things so they don't get confused
like oh where did this go or stuff like that and then the third one is kind of with the second one but let them know when new features are available and you could potentially upsell them into higher ticket offers or a higher monthly subscription High level's always rolling out new features that are beneficial for marketing and so there could be a new feature that they come out with that you could then upsell to your client and charge them more for and it'll help them out it'll help you out and it'll be a win-win for everybody
and give them something uh that'll be helpful for their uh business and and beneficial for them and helping them grow so that's the last step in keeping your clients happy and I will have one more video just to finish off the entire course but congratulations for kind of going through almost everything I'll see you guys in the last video if you stayed till this point in the video congratulations you now have everything set up and everything you need to have a successful agency with go high level at this point you probably still have some questions
so feel free to join my free school Community down below it's called highle quest it's a great place to rub shoulders with other people who are growing their agencies with high level and if you've watched this entire video and you haven't signed up for high level yet you can get a 30-day free trial down below with my affiliate link if you use my link I'll jump on two free Zoom calls with you every week answer any questions you have help you scale your agency and I'll give you $10,000 of free resources that I've been working
on over the past few years completely free I appreciate y'all for sticking through to the end of the video I love y'all and I'll see y'all in the next one peace
Related Videos

3:43:51
🔴 Build the Uber clone in React Native (...
notJust․dev
950,514 views

1:05:09
Complete GoHighLevel Guide For Agency Owne...
Jordan Platten
118,558 views
![Free Course: Master GoHighLevel in 90 Minutes [Tutorial and Review for Beginners in 2024]](https://img.youtube.com/vi/a_rODaF6uFY/mqdefault.jpg)
1:34:17
Free Course: Master GoHighLevel in 90 Minu...
ItsKeaton
25,348 views
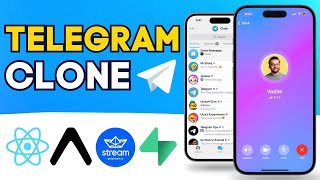
3:59:43
Building a Realtime Video and Chat App in ...
notJust․dev
227,333 views

4:02:02
FREE Course: GoHighLevel & SMMA Tutorial R...
Adham Alkhaja
740 views

3:50:19
Data Analytics for Beginners | Data Analyt...
Intellipaat
2,100,148 views

13:28
The 9 GoHighLevel Features That CHANGED MY...
ItsKeaton
9,544 views

1:50:43
FREE Course: GoHighLevel Step-by-Step Setu...
Gusten Sun
16,855 views

3:22:28
GoHighLevel FREE Training Step By Step Tut...
Pavlo
3,378 views

3:01:37
FREE 3 HOUR GHL COURSE: Step by Step GoHig...
Gusten Sun
28,708 views
![Visual Calculations in Power BI - DAX Made Easy! [Full Course]](https://img.youtube.com/vi/JITM2iW2uLQ/mqdefault.jpg)
1:30:40
Visual Calculations in Power BI - DAX Made...
Pragmatic Works
86,544 views

17:10
GoHighLevel Reputation Management Snapshot...
Jasper Aiken
6,445 views

12:08
I Grew A Strangers Business To $100K/Year....
Jasper Aiken
511 views

1:47:53
Artificial Intelligence Explained: How to ...
Earn Your Leisure
186,257 views

3:49:50
Build a Realtime Chat App in React Native ...
notJust․dev
1,922,870 views

34:45
FASTEST Way To Learn GoHighLevel For Begin...
Jason Wardrop
196,146 views

1:04:35
GoHighLevel Website Design Masterclass (De...
Jasper Aiken
7,452 views
54:20
5 Easy Services to SELL with GoHighlevel
Ray O'Daniel
6,911 views
![FREE Course: Master GoHighLevel in 1-Hour [Tutorial & Review for Beginners in 2024]](https://img.youtube.com/vi/EuDI3utWDoU/mqdefault.jpg)
1:11:16
FREE Course: Master GoHighLevel in 1-Hour ...
ItsKeaton
212,561 views

1:22:24
The BEST Meta Ads Course From Setup to Sca...
Professor Charley T
16,525 views