Smart City End to End Realtime Data Engineering Project | Get Hired as an AWS Data Engineer
74.47k views23265 WordsCopy TextShare
CodeWithYu
In this video, you will be building a Smart City End to End Realtime data streaming pipeline coverin...
Video Transcript:
hello and welcome back to the channel in today's video we have an interesting project to work on together this is our decided by the community and you can look at how the community voted in the community tab now before we continue if this is your first time in the channel and you have not subscribed to the channel don't forget to like And subscribe now let's go back on to the project now this project is going to be a realtime streaming project with a parch spark and let me give you a background use case for this
now we have a driver that is traveling from C London to Birmingham now they want to have an iot device that collects information about the vehicle about the GPS location the weather information the medical uh uh any accident or something that happens on the road all this information are being gathered by this iot or any devices at all and being sent to our system we want to analyze this data in real time and be able to work on this data in real time and as the driver is moving on uh from London central the Central
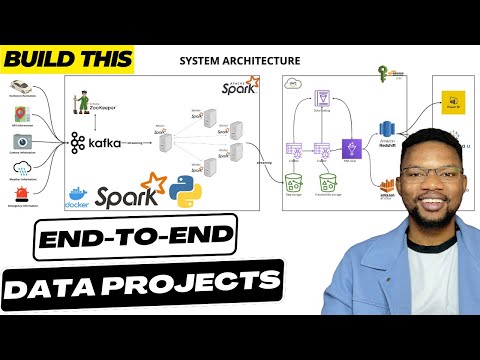
London to Birmingham we are collecting this information alongside now if there's a delay on the road or something like that we get all this information in real time how do we access how do we handle all of this information we're going to discuss that in detail in the architecture section but that's that's the background overview of this uh this project now how we connect the bits and pieces of this system together we also be discussed in in shortly so let's go into the architecture section and discuss how that looks like here the system architecture we
are going to be building today we are going to start by collecting information about the vehicle that is traveling from London to Birmingham uh to put that into context this is how the map looks like so it's going to start from Central London and move on from Central London to all of the steps it takes about 2 hours 30 minutes depending on the time if you have an Optima without traffic and no issues and incidents on the road it's about 2 hours 30 minutes from Central London to Birmingham but interestingly we are going to see
how that applies to our case where we're going to be visualizing a traveler that is moving from Central London to Birmingham in our case we're going to be collecting the vehicle information that the driver is uh is driving then the GPS information of the car so we get accurate information about how the car is moving from Central London and which route it's taking through the latitude and longitude information then we have a set camera information in here which is going to be a screenshot this is going to be a dummy because we don't have an
iot system that is live and listening to uh sending information from live cameras in this case but this is going to be something that is possible if you have a live system that is collecting camera information and sending it to the system it's also possible then whether information is something that we're going to be looking at as well then we have the emergency information if there's a maybe an accident on the road uh the policeman stops you on the road there's a fire there's uh any other kind of emergency information that might disrupt the inform
uh the the traveling from Central London to Birmingham this is what we're going to be looking at as well we're going to be collecting information about that and by the time the the the data is uh collected and uh let's say uh the police arve arrest you by let's say 10:00 and then you were released by 10:15 or 10:10 that also is going to be captured in our data set now once that data comes in it's going to be sitting in our CFA system but before we do that we're going to set up our pic
zook keeper which is going to be the one controlling whatever information is going into CFA and the multiple CFA information if you have multiple Brokers like uh two or three Brokers that we can control zuker is going to help us doing the coordination with that so each of these data that is coming into the into the system is going to be passing through CFA and then we have a consumer with Apaches park that is listening to events that are coming into Kafka once the data is been listen and consumed with a parches spk we're going
to stream the data directly to AWS in this case we're going to be writing into S3 bucket at the end of the day while the data is uh getting uh written into our S3 bucket by the time the traveler gets to Birmingham or before then we can easily write our condition which is going to be our process on AWS glue to extract information from our raw storage uh using the data catalog of course uh we write that into uh with AWS glue we automate the process to get that from the AWS catalog now once the
data gets into catalog it makes it easy uh we we just have an access to connect to Amazon Athena or red shift in this case all of this is going to be controlled by AWS of course uh we have our roles and securities in place and then Amazon red shift is going to be our final destination in this case for the data now we can also visualize the same thing with Amazon Athena but we're going to be focusing so much on a red shift but we're going to have a bystander sitting on Amazon a where
we can just write our query and visualize that but the major thing is going to be done with red shift eventually we're going to be having uh powerbi visualizing Amazon red shift if we have enough time or we use T or Lua Studio that is the entire architecture of the system and that's how the system is going to be looking like so before we continue if you have not subscribed to the channel don't forget to like comment share and subscribe to the channel it is uh with this likes and comments and subscri subscription that uh
keeps motivating the the channel to grow and uh you know to to reach more people as well as uh you know keeping the information fresh and up to date so enough of that let's get into the coding section and start getting our bits and pieces all connected together so see you in there now make sure that you have your Docker desktop installed if you don't have it you have to go to do.com and then get Docker installed on your machine whether you are using Windows Linux or obone 2 or any other maybe Mac OS it
doesn't really matter what matters if you get Docker desktop or Docker engine installed on your machine so you can easily get all of these things that we are doing and follow through along as we could now once your dock instance is set up we are ready to get started with our architecture we are going to come back to these uh producers that are sending data into this uh CF and then our Apache spark uh much later but for now let's set up up this architecture and then continue from there okay now going back into our
py Cham I'm going to be using py Cham in this video so if you are interested you can also use py Cham or you can use any other ID that you like the process is pretty much the same I just like the UI and the layout of py Cham there's nothing special about it really so you can use any ID so just click create create a directory and then you you create a virtual environment and you should be good so in this case I'll be calling this project Smart City now I need a main py
which is what we're going to be working with basically and I'm going to change my python version to 3.9 so for some of you that might miss this part the python version that is being used in this video is python 3.96 but you can use uh 10 as well and I think 11 but it is very dicey to use the latest version which is 3.2 as as of the time of this recording so I would say if you're using 3. 12 you proceed with caution all right let's proceed it will be good to have your
Docker desktop installed and uh up and running before you continue so if you don't do that and you are trying to run the commands that are going to be run uh in a few minutes then you are going to have run into some issues okay so let's do let's continue now it is possible that by the time the system gets up uh you want to be sure that your virtual environment is sitting in the right place so easily if you're using Linux systems or Mac OS or whatever you can do which python it's easy for
you to get where the data is sitting now in my case it's sitting in the VNV which is exactly where I want it to be so now let's continue so let's get to the architecture of the system uh like I said the architecture of the system we are currently working with is uh the Zookeeper with cafka then with a parchas park all sitting on Docker okay so let's get our Docker compos in okay I'll be using Docker compos yl to facilitate the services uh installation all right so let's get that in all right so let's
start so we have a version in this case the version we're going to be working with is version three then we have our services the services we're working with is the zooe keeper all right zoo keeper as well as purchase PK but before we get into a purchase pack let's fix zookeeper and the broker first so we have our image the image that I'm going to be using is going to be the image from confluent Inc I like the image so you can use any other CP any other zookeeper that you like but I'll be
using CP zookeeper in my case and the version that I'll be using is 7.4.0 I find it to be save so you can use the latest version I think there's an updates to that but if you like just keep it as 7.5 uh. 4.0 and you should be good the host name in this case is going to be zookeeper excuse me the container name is going to be zookeeper as well zooke keeper then the ports that I'm going to be exposing uh in this case uh is uh 2181 to I'll just use the double quote
2181 2181 so that's the internal and external IP uh the port then the environment that I'm going to be working in the environment environmental variables mean so we have the zooke keeper uh client client Port G is 2181 all right then zookeeper zookeeper uh TI time it's going to be 2,000 2,000 then the El check in this case I I'll have a test so that each time we are doing an El check because of the dependency we want to be sure that this zookeeper is ready to accept connection before contining so I'm going to have
have a command the command is going to be a bash which is going to be the bash command uh which is Bash C and what that is going to do basically is to say Echo are you okay so are you okay so once this uh returns are you okay and in the Local Host I'll be I should be good all right Local Host 2181 so what that means is is going to be running are you okay in the terminal once that is done and once I receive a response then probably it means that the the
server is ready to accept connection the interval in this case of uh the the test is going to be 10 seconds and the time out is going to be maximum of 5 Seconds the number of real tries before it fails is five so if the Zookeeper doesn't respond after five tries just uh terminates the process itself so I'll call this data Master as my network so let's get in our Network so the network in this case is going to be uh data Mastery lab all right all right so continuing uh hopefully uh this gets us
uh up and running and we should be good okay now our zookeeper has been set up so we've tick this off our box now let's continue with Kafka which is the one that is going to be controlled by zooke keeper and the cordination will be done by zookeeper as well so let's continue now uh we have zookeeper then the next will be to getting our broker the broker is going to be our c car of course image the image is also going to be coming from confluent Inc like I said you don't have to use
the same thing so you can use a different uh zookeeper or Kafka broker which is totally fine so far you expose the same Properties or similar properties you should be good the the container name in this case as well is going to be broker it's going to be depending on the zookeeper in our case and on what condition is the dependence is going to be so the service he condition what that means is until this test returns and healthy condition this broker is not going to get started it's just going to be keep pending if
it fails after five retries this is not going to get created that's what the dependency means really uh in short term and then once the condition is there we have our ports and we're going to have the ports going to be 9092 for the internal external IP external 9101 as well for the I think this is the jmx uh stuff now we have a lot of environment in this case I'll just copy that because it's a lot I don't want to make mistakes and then we keep debugging that before getting into the actual activity all
right I'll just space that into the environment section in here but I'll just quickly go through them so we can explain what each of them do and uh how they function in this in real sense so the CFA broker in this case we're using one broker so the broker ID is broker one and it's going to be depending and connecting to zookeeper on zookeeper 2181 The Listener security protocol map is plain text and uh we're using plain text in this case I'm PL text is also going to be PL text the advertised listener is going
to be broker 2902 which is where is going to be accepting connection from or as well as 9092 all right so these are the two things that is going to be used to we can use to communicate with our broker the metric reporter is this for the Confluence metric rep I think this is majorly uh Confluence related so if you're using any other broker information as your Ser as your broker you may not need to set in set the Kafka metric reporter we also have the C uh offset topic replication factor is one you can
increase this if you have multiple replications uh you want to increase the number of replications but the rest are just uh uh they're just more like confident information in this case we have the transaction State as well then the jmx sport is 9101 the jmx host name as well is Local Host schema registry in this case we're not using it so it's really uh useless so you can remove this but I'll just leave it as it is but it doesn't really Hur if it's there now for the rest is uh this is confluent uh specific
if uh you're using confence you should add this as well this is the metrix reporter bootstrap server and the topic replica and metrics enable we're not enabling any metrics and even if any metric is going to be going out from broker it's going to be anonymous okay now let's put this on a network the network this is going to be sitting on is going to be net networks networks is going to be the master La good all right so continuing I'll just get this here data Master good now continuing we need to get the he
check as well so the Heth check for our broker is similar to what we have before in this case uh this guy I can just copy this and just modify the command really uh just maybe delete this press enter here and paste that in there so this is going to be a bash command as well but instead of are you okay okay I'm going to be using the NC and this is going to be ncz ncz Local Host uh B 9092 so what this is just like doing is more like a doing like a ping
of this 9092 to see if it is ready to accept connection I'll leave the interval and time out and the r r as well as the same now what this means basically is that our our zookeeper and our broker is ready and we can spin them up while we continue with our apach spark installation so let's see if everything is working fine before we continue to do that we do Docker compose Docker compose up and in detach mode now because we not building anything so if you if you have a Docker file and you're building
an image for that you will probably need to get in your Docker uh flag for build otherwise the build is not going to reflect okay but in this case we're just using the normal system we're not building anything so it's easy for us to just doer compose upd in this case all right so if you look at this we are creating the Smart City Network um zookeeper is created and our broker is started so if you look at our dashboard Smart City in this case is coming up I I don't want to click on that
I just want to click on this down and you can see we have a broker up and running and zooke keeper as well up and running so let's continue with our a parese spark setup okay so our we need to get in our spark Master work architecture so to do that we're going to have our spark Master now because the spark Master they are kind of related in some ways the only difference is uh everything is the same system really but you have a the class that is differentiating them as master and worker modly the
the properties are really the same so what we're going to do is we're going to have a small module that we can replicate across the master as well as the worker as well but we just specify where the master is going to be we have a class for that and for the workers as well that are going to be working uh for the master in this case is going to be uh inheriting the same thing from from this small module all right so let's quickly do that so in our Master we going to have image
the image is going to be bitnami Vietnam spark the latest that's the latest uh version doesn't really matter what it is so we are going to have our volumes the volumes is going to be getting information from uh which we don't have jobs right now but we're going to have a job uh which is where we're going to be putting all our spark jobs and we're going to be mapping this folder in our local system to op vietnami not Vietnam vietnami spark jobs all right now the command that I was talking about that is differentiating
the master from the work is going to be coming from bitnami being the spark class it's going to be og. Apache do spark. deoy mastermaster all right now finally the master is set up we just need to expose the port so let's expose the port for the master so in our case we're exposing exposing 9090 all right so let's say 9090 as our local and then in the uh in the container is 8080 all right so internal and external so we have 7077 as well because this is where our spark URL is going to be
sitting on so it's important we expose that as well finally we get in our networks the networks that this is going to be working on is uh data map simple as that good now as data M good now the next thing is to get in what am I doing okay that is fine now the next thing is to get in our worker our Master is fine so to do that let's get in a small module so we don't keep replicating the same thing over and over again so we have xar common in this case uh
this is uh a name that I chose for myself you can choose any name so far it's maybe relatable and you can easily uh relate to that so the variable for this when we want to reference this is going to be spark common all right so the image for this small module is going to be the same same thing as our Master B Nami spark latest all right and the volume we are mounting for each of the workers it's going to be the volumes it's going to be jobs the same way we have it for
in fact I just quickly copy that uh the volumes command and the ports uh I'll just maybe just copy this guy all right and then in the volumes replace that this is fine now for the workers this is going to be the workers so it's going to be different from Master it's not going to be master in this case it's going to be B Spar class um spark deploy worker in this case and worker then we have to pass in our spark URL the spark URL is going to be spark h spark spark master in
the port of 7077 all right so this is where our spark Master is sitting in and we're passing this so This knows that this is where the master is sitting in and when whenever you want to receive information you are receiving it from from there then the final thing is the depends on depends on of course the worker is going to be depending on the master of course so spark master all right now let's setting the environment that this each of the workers are going to be inheriting so we have the environment we have the
spark mode the spark mode is going to be Walker all right the spark uh worker core nodes which is the number of CES the number of CES for each of the worker so if you have enough compute you can increase this course that will be that will mean that your system will be way faster and each of the the workers will be more efficient but two is so fine you can have as many workers as possible all right so memory is going to be 1 gig now interestingly if you reduce this from 1 gig your
worker may not not work so I will recommend a minimum of 1 gig so you can try that out and see how that looks like and give me a feedback in the comment section so I'll just copy this smack Master URL as my sparkmaster URL finally we getting the networks and that's all we need to do networks okay the networks in this case is going to be data Mastery lab good finally we have a variable that we can use now so let's get in our workers so I just get in the first two work and
you can do that you can increase the number of workers if you want so I have spark uh spark worker one in this case is going to be inheriting from a steric spark common all right simple as that for our second worker we do the same thing but change the name of the worker so if you want to have more than two workers you can actually double copy that and then paste that and just change the name three and four all right so what I'm going to be doing I'm going to to start with this
four but I know this is going to give me some compute issues so I'll just comment this out for now all right so let's use this two and see how the system performs under stress let's stress this out all right Docker compose up the tach and takes that for his pin you can see that we have our spark Master created and Spark worker 2 and worker one as well created which is what we have in here which is good so interestingly if you go into the Local Host 7077 you should see something like this uh
we just wait a little while for the master to be ready I think it's still currently running uh what's this exception in connection so I think is still currently waiting something is too large in this case I think I'll just leave wait for this to to finish the initialization I think it's still starting up uh still starting up so we just wait a few more minutes for that to be done and while this is ongoing we just go along with our coding we come back to this much later to test if our spark master and
work architecture is up and running before we uh while we continue all right now interestingly uh even though we didn't create our jobs directory by the time we spin up our spark worker because we map it to our jobs directory we created the job for us and that's one thing you have to be careful about if you map it to a file and you didn't create the file before running it's going to create a folder for that particular file but in our case folder works just fine all right so let's get in our main py
into jobs that's where we need it anyways so and then we do another touch jobs uh jobs and inside our jobs we're going to create a new file which is going to be our spark I'll call this spark City really py so these two files are what we are going to be working with extensively so the main py is where we going to be doing the production and the spark city is where we're going to be writing our spark jobs to uh listen to events from Kafka now for our main. py we are going to
start by installing a few packages which is what we're going to be using so we do peep install we're going to be installing confluence simple Json and pypar so the ppar version we're using in this case is simp is the latest version of course simple Json Confluence CF so I'll just run this to get those uh packages installed and saved into my requirement. txt so if I do peep freeze requirement. txt what is going to do is populate the requirement. txt with this package so by the time we increase we install a new package we
need to add requirement. txt as well as part of the so we can export it to requirement. txt so for those of for those of you that don't know how requirement. txt gets created you do p phase then greater angle greater than angle uh greater than symbol requirement. txt so let's continue so I'm going to be importing OS of course importing confence Kafka uh from here I so from Confluence Kafka import serializing producer because we need to produce our record even though we are not doing that right now so we import simple Json as Json
as well and finally we import our P Spar which is we don't need it right now so let's leave that for now so let's get in the latitude and longitude for Birmingham and London so London coordinates in this case are coordinates it's going to be latitude of course this is a Json it's going to be Lati latitude of course the latitude is the 515 H this is something that I checked and looked up on the map so I don't know it often then we have the what am I doing yeah good so we have the
latitude then we have the longitude of course so minor 01 278 0.1278 okay good now that's for London so let's put this on the same line so to save some space and yeah we do the same for Birmingham as well all right all right the latitude for Birmingham you can look it up on Google of course 52 4862 all right then for the longitude is -89 04 so the logic we are applying to this is by the time we are I'm going to just apply a simplistic value in real sense you want to get the
actual figure that is going to be more sophistic uh sophisticated and it's going to be a representation of actual data right so in our case we're going to have latitude increment increment which is what we are increasing and uh of course the longitude increment as well so we have the Birmingham because from the bottom that's the south is going Northeast Okay so we have the the latitude from here latitude all right we are going to subtract that from the London London coordinate which is going to be the latitude as well latitude and while that is
ongoing we we divide this by 100 we do the same thing for the longitude as well which is going to be uh longitude and uh Birmingham coordinates uh I just uh long longitude longitude I'll just copy that and replace that with is good and that's how we need to do to do the increment the incremental for both latitude and uh the increment for both latitude and longitude all right so that's the process for that now let's get in our environment variable so let me just comment this out and say this is going to be uh
what we're doing basically is calcul calculate calculate the movement uh increment so this is uh where we are doing the calculating in the movement movement okay all right so in real sense you have to you know put the actual value there or get the actual value so the environment variables of course that we going to be using for configuration it's going to be coming in from either the OS or by default so we say Kafka bootstrap Kafka boot strap servers it's going to be you can get that from the os. getm so if that is
set up in the environment all well and good if not we can just default it to our bootstrap uh server okay bootstrap servers it's going to be Local Host 1992 then we get a vehicle topic which is where we are cering for this any information that is coming about the vehicle is going to be going into vehicle topic GPS topic camera topic weather topic emergency topic of course so vehicle topic it's going to be OS to get M get M and that will be V topic if that doesn't exist use vehicle data then for the
GPS use the GPS topic get M GPS topic then we have GPS data for the traffic as well traffic information traffic topic this is where this is just a majorly traffic information whether there's traffic on the road uh we get that as well or you get hold by the driver gets hold by the traffic right that will be going in there it's normally really traffic data then we have the weather so if there it is raining as always in London so we get information about the weather as well weather topic then we have uh weather
top with data finally we get the emergency which is the emergency topic so os. getet EnV and that would be emergency topic if that doesn't exist as well get that into emergency data lovely now once this is done the next thing is to now getting the actual logic I'll just minimize this for now and get started with that so we have our start time which is the time that is going to be the the the d The Traveler is going to be starting the driver all right so I I'll just stick that to the current
time which is the date time. now then the start location start uh location it's going to be the London Co London coordinates that's we just copy that simple as that so let's import our date time it looks like we don't have it so in our here we just say Import in fact from date time import date time there time okay so going back here we have our start location and the time we start so let's get in our different function that is going to be uh used so let's start with the entry point so if
the name if the name is going to be main if the name is main so we can start running from there so let's get in our producer config which is our Kafka information broker information producer config it's going to be uh this is how you you configure uh Confluence CFA by the way so you have bootstrap servers bootstrap do servers reallying then you have the CFA bootstrap server that we already created then if there's any error that will be our error call back we just do a Lambda function Lambda to print that the error for
Lambda is going to be just print print CFA error CFA error and the error is simply error so if you have your CF C maybe hosted somewhere else and uh you have most times if you something like a CFA uh confence confence environment on the CL confence called if you created your producer which is your broker in there you have username and password so you need to get in your sasl information which is the the the username and password for that and if you have a schema registry as well because conference Cloud uses schema registry
so use the schema registry in that case the username and password as well as the host information for the schema registry you put that in the producer config most times you want to put that inside a different configuration configuration file that you can maybe exclude from committing that from your GitHub or something like that so that's that's just a different case entirely but let's stick to this our use case in this case all right so going back to our code we have our producer config set up properly then we have our producer in this case
we brought in our serializing producer if you can still recall from Confluence CFA so we use the producer config to to tag into our cying producers a parameter all right so let's try and catch if there's any error we simulate the journey so let's simulate Journey which is going to be used with the producer and the vehicle we're going to be using is called V code with you code with you I see w y and then maybe one 2 3 all right interesting topic uh vehicle name all right so if there's an error we call
that accept so if you stop the the the journey yourself you say that's a through a keyboard interrupt may be contr C or something like that simulation ended by the user by the user otherwise except uh we have exception as e any other error just uh say an unexpected eror unexpected error or code or code if I can only type or code I think it's dou R isn't it yeah it is all right so let's put e into that and we should be good so let's create our first function called simulate Journey so this simulate
journey is where we're going to be having all information about the vehicle information and at the end of the day we're going to be producing data from there all right so we have a simulate Journey all right so getting the producer as well as the device ID uh which is the vehicle information really device ID so you can change the variable name if you like so while this is true uh what is true in real sense what the true in this case is the Val uh the the driver is still driving from London central the
central London to Birmingham all right so in our case we getting our vehicle data vehicle data which is going to be generate vehicle data how do we do that we use that with the device ID which is our device the the vehicle information so let's let's uh create this function because we don't have it right now so we have generate vehicle data and then getting uh because we just passing the device ID to that so it's easy for us to say we are creating uh a function that just passing device ID into that okay simple
as that here we get in a location which we don't have right now so let's get our simulated location so we say simulate vehicle movement so what this means is the first time the very first time the the driver starts and starts moving towards Northeast from the south what that means is each location is going to be increased or decreased in whatever whatever case heading towards Birmingham in our case so that's what that means when we are doing a simulation so each time we we get an information about our latitude and longitude of the driver
if there's any hold up or something like that on the road then we get the same latitude and longitude on the SP on in the same space for some for quite some time and we can build up our reports based on that to know what time they hold up appens and stuff like that so let's continue so the simulate vehicle movement uh what we want to do basically is to get the information about this vehicle uh which is going to be the latitude and longitude of course so we have death simulate vehicle movement so we
just let's declare this as Global the start location and then we start moving towards Birmingham all right move towards uh birming Birmingham all right so starts location in this case is going to be uh what is it latitude latitude all right then we keep increasing the latitude we the latitude in Latitude increment then for the longitude uh we keep increasing the longitude as longitude as well so each time the latitude and longit longitude gets increased so we just add some Randomness in this case uh let's add some Randomness uh to simulate the actual to simulate
actual road travel all right so it it doesn't mean we are just increasing by two or three every time or something like that all right so I just copy this again then the random is going to be coming from random uh we don't have random imported so import random import random So Random do uniform so we want the the value to be uniform between minus 0.005 and 0.5 the same thing for the longitude as well okay so it doesn't Spike up as it doesn't go too far above 0.5 okay So eventually we just return the
start location I hope you are following me with this kind of picture that I'm trying to paint to you as the as we are moving on we just increasing the latitude and longitude by the latitude increment which was the one that we subtract from the longitude from Birmingham to uh London central then we divide that by 100 we just increase that by by the time we are moving on and the randomness we had is just 0.5 not too big so we don't have a spike in the by the time we are moving on all right
so that's what we're doing here in the simulate vehicle movement basically and once we have our location now the next thing is just to return an object that represent our location so the object is going to be simp ID which is going to be uu ID okay do version 4 so let's import okay automatically imported so we have our device device ID in our case is going to be the device ID so let's get in the time stamp as well time stamp which is the current time at that point in time so let's get the
next time because we want to keep increasing the time as well a comma so we want to keep increasing the time and get getting the iso format for that so how do we do that let's implement this okay so I'll just copy that and I what is it above the simulate vehicle movement I'll just create a new what I'll just copy this and paste that in there so let's uh implement this function uh it's going to be Global uh Global and the start time all right so the start time is going to be increasing because
this is the time we we using to you know keep track of how long it's taking the driver to get to Birmingham time Delta time Delta in this case let's import that import that from date time of course so we just add a seconds the seconds is going to be random does Rand in uh between 30 to 60 uh basically what we're just doing is just uh the simulation of update update frequency really doesn't mean so much it's just the update frequency for the time all right then we just return the start time okay start
time okay so going back to our simulate Journey where is it here we get the iso format of that particular time because that's what we returning in this case okay then we go forward from here once we have our uh the time I just add a comma to that then we have the location the current location of the driver which is the location latitude of course and at the end of the day because we are using a twole all right so location for the longitude as well longitude so this will be encapsulate or enclosed in
a tup all right so we have the speed of travel which is going to be random do un form all right 10:40 so you shouldn't be too slow or too fast so if you are in Central London the maximum speed is about 20 so once you get out of Central London and you are heading up on the highway maybe M1 I think you can do up to 40 or more okay so the direction that we going basically I'll just uh you know put this as by default Northeast all right from our Central London of course
is nor East so what kind information are we getting most times this all all this information will be sent in from a iot device okay so the maker of the car is Toyota I think I prefer BMW really I don't want to use Toyota let's use BMW all right or Posh whatever so let's say BMW cclass uh maybe c500 if that if that kind car exist then the year is [Music] 2024 what the latest model all right the full type if there's any information about that I'll say I'll just call this hybrid really hybrid okay
good so that's enough about our car we can get all information from our iot device that is sending information to us but for now let's just let's just leave it at that if there's any other information you can add to that it's totally fine so I'll just I'll just leave it at that so once we get our vehicle data in this case it's easy for us to say let's print that and see how that looks like before we continue uh so we know whether there's any error that we need to fix and uh or or
something like that so print vehicle data and just break I just need a single record okay so let's run this in our terminal I'll just come to the terminal and then python jobs and main.py so let's see if we are able to get that we get the ID U ID device ID okay the time stamp is this the location is this the speed direction make model year full type good so that means uh everything up to this point is still very good so that's a good sign so let's continue the next thing is to handle
we've handled our vehicle information let's handle the GPS information as well so GPS data all right GPS data and will be collected from generate GPS data all right so what we need to do that is to get the device ID which is the car of course that we getting information for and then we get the time stamp because we don't want the time stamp to be too uh wide apart so we want to get a time stamp so each time we're getting information about the car we're getting all of this information at the same time
so there could be a delay which is fine but if not we should it shouldn't be too wide apart so we just say maybe every 1 minute delay really we handle that in our spark video spark session all right let's continue so our GPS data in here we are using the device ID and a Tim stamp so let's implement this guy all right so coming back to the uh generate GPS information in here we just create what am I yeah I think I just click on one usage in there so def I'll just copy that
and then get in the device ID all right the time stamp and of course our vehicle is private so the vehicle type it's going to be private okay so we're not using a public car of course bus takes a longer time okay so you have uu ID in our uu ID do version 4 then we get the device ID okay as simple as that device ID get a time stamp okay okay and then that will be the time stamp coming from our input our parameter really and then speed it's going to be random of course
we we don't need this to be too wide apart as well should be uniform between 0 to 45 maybe to 40 uh for the GPS yeah that's fine so of course this is going to be in kilometer per hour so shouldn't be too wide apart so comma then the direction is going to be of course East uh maybe maybe not East really I yes let me just leave it as Northeast really uh because that's where we're heading to anyways so the vehicle type I'm trying so much to make this uh look something like a real
time scenario how you can get all the information you can get really okay so that's our generate GPS data and if you go back down we get we have our GPS data in here so the next thing for us to do is generate our traffic camera information so we have our vehicle data we have GPS data let's generate traffic information as well so we come in here I'll say Dev generate traffic camera traffic camera data all right so we need a device ID the time stamp of course which is the current time and the camera
ID that we using to to because there might be multiple cameras so it might be that we getting information from multiple cameras so in our case we just stick to one camera but we can extend this and make it a little bit more sophisticated by having more cameras more vehicles and we can get more information from our system okay so U ID uh do version four then we have the device idid which is going to be coming from device ID the camera ID camera ID is going to be from here that's the camera that is
sending this information to us then we have the time stamp this is happening okay time stamp and this is usually happening uh at a particular time then we have a snapshot this is where it gets tricky all right interestingly I couldn't find any URL that can give us uh the actual camera footage that we can use but what we can do is get just getting our B 64 encoded in here encoded string encoded string so in a case where you have actual uh snapshot or actual screenshot of what is happening what you want to do
is maybe it's a a URL or you want to save it as a b 64 you can easily just use request or gu to do that and then code it in B 64 or you use the actual URL maybe saving to S3 bucket you just get the actual S3 bucket URL and stamp it into this place so that solves the problem for us so because we don't need any picture really we just get the snapshot information like that so let's get the traffic information into our journey as well we have the traffic uh that will
be traffic data isn't it traffic uh traffic dat I think traffic camera data sounds better really from a particular camera okay so we have our device ID we have the vehicle time stamp vehicle data and that the time stamp and the camera that is sending us this information we can give it any name so let's say uh [Music] camera one two 3 uh maybe uh I'll say Nikon uh I don't know Nikon camera uh Nikon cam one 2 3 right so that's the name of the camera it could be anything really so I just I
just that's what comes to mind all right so let's get into the weather data as well so right now we fixed this uh vehicle data GPS vehicle data is taken care of GPS is taking care of camera has just been taken care of we are left with weather and emergency okay okay weather data it's going to be generate uh where where data and in our case we getting device ID the vehicle data and extract the time stamp from that because we want that time stamp to be unique across okay to be the same thing for
all of the data vehicle data even if the data comes in L it's okay but we get the same data across board all right so let's create a function to do this okay so we can just scroll up to the top uh where is it up to the top yeah in here and just getting Dev um we have GPS Dam okay I can get it in here so Dev so I just wanted to look at in sequential device ID uh time stamp and the location so we just return just like we returned before I'll just
get in a uu ID device ID and the location Maybe uh location I think we we should probably add location to the camera information so we have the latitude and the longitude of the camera at what time is getting information to us so we have the location in here and that will be location so let's quickly fix that before we forget so our traffic cam is getting location for us so I'll just get this in and get in the location okay and we should be good good so let's get back to our weather so location
in this case is going to be the location that the data is coming in time stamp is going to be of course time stamp then let's get all this weather information about the area all right that the car is currently in we have the temperature with the the temp temperature will be shouldn't be that high so usually we have a uniform temperature from minus uh I'll say minus 5 to a maximum the maximum we've experienced in the in London to Birmingham maybe let's say 26 maximum all right it could be more but I'll just stick
to 26 really so let's say weather condition weather condition ah temperature not temperation okay you probably saw that so we have the random. choice for the weather condition okay weather random. choice and uh we have the sunny if it is cloudy if it is raining and or it's snowing I think we should probably add a seed to our random so we stick to that random. seed so let's say 42 as our seed all right so once you choose sunny it's always sunny across board so it doesn't change really unless maybe you get to somewhere like
Bermingham and it's maybe Sunny there and uh snowing in London in summer precipitation all right so if there's any drizzling or something like that okay or any precipitation across bone we have uh 0 to maybe 25 I don't know uh the wind speed most times is usually uh windy so let's get the wind speed as well random. uniform in real sense you want to get all of this from maybe a weather API I don't want to make things too complicated that's why I didn't use the weather API really humidity is going to be random do
random integer from 0 to 100 so it's okay the humidity is this is of course a percentage all right so just in case uh you're wondering then we have the aqi which is our air quality index a quality index aqi that would be for of course I I want it to be okay I think it should be uniform let's make it uniform across board unless you know the aqi in central London it's a little bit bad I wouldn't say bad maybe not too but when you move on the road the aqi gets better so I'll
just say uh the aqi value goes here okay so whatever aqi value you want to use uh you can just twg this to get your teste and uh to suit you best okay so finally we get our weather data um which is weather data in this case now let's see what else we need to do before we continue and that will be uh let's let's see I'll just go down I think I should just scroll this down a little bit here I'll just minimize this we have weather data finally we just getting our emergency emergency
incident data all right so that will give us access to generate Emer emergency incident data all right so we just pass in a ID maybe The UU ID which we don't need really you can just use that vehicle data get the time stamp time stamp and that will be the device ID as well device ID time stamp and the location that the emergency app on all right just like before just copy this okay and then we paste that in so let's create the function that help us do that here we have uh weather data so
and then we should get in our emergency uh function okay the function here then we have our incident ID uh I'll say device ID really device ID the time stamp time stamp uh I think this should be underscore so we keep it uh uniform across board time stamp and then location okay you just return a Jon object the ID is going to be of course in string U ID do uu ID version 4 then the incident ID um let's get in device ID first device ID is going to be the device ID then for the
incident inci incident uh ID so that will be a uu ID I want it to be unique across board so I'll use a uu ID for that as well then we have the type in our case the type of incident is going to be a random choice and that would be maybe we shouldn't have uh used the we shouldn't have used uh that random C because once it selects fire for instance it's going to be fire across sport but I think you get the logic really so it doesn't matter what it is so so far
there's a there's an incident and if there's none it's okay we good to go there's no incident okay so time stamp it will be the time stamp from our parameter good then the location is going to be location as well location then the status it's going to be random. choice and that will be between active or result okay what that means is if there's a a police incident if it is still active and you know how long it it is active depending on how long uh the number of records that Returns the active and the
time it takes between the start of the active to the end all right that will give us the to the result so that will give us information about that and if there's any description of course description will come in here most times you may not have this but I'll just say if you have a description of the incent you can put it in here description all right okay finally we are good to go so our emergency in data GPS traffic information all of this has been taken care of now so now let's fire this up
into CFA and see how that looks but before we do that let's test this data to see if everything is working fine before we continue all right so let's just print them I we say print uh vehicle data uh print GPS data print uh traffic camera data and then print weather data finally print emergency incident data good so let's see how that looks like in the terminal I'll clear this up and then run that again to see how that looks is there any error maybe not there's none so let's see what we have we have
the ID in here for the first one I think we checked this out it was pretty much fine let's double check this as well I code with you time stamp is the same across board the speed direction vehicle type is okay then we have this as well B 64 encoded string for our snapshot I think everything is good and we can start writing this to our Kafka all right let's do that all right we are leading to the end of this section so let's quickly get in our um producer and then we produce these data
that we're writing into cfap so let's do that so the easiest way to do that is to create a function that we can reuse for that so we can have produce to produce data to cka uh you can have the producer and then get in a vehicle topic and vehicle data of course then we can replicate this a couple of times about five times then we have the same done for GPS uh done for traffic traffic we do the same for weather we do the same for IM geny topic so we get this GPS uh
traffic we get in the weather and then we getting the emergency okay good now let's get this function that helps that handles all of this for us because right now nothing is being created to be frank with you and in our simulation here above just above this guy we can have our def definition and that will be produce data we have the producer we have the topic and the data we are producing so producer do produce that's uh the Syntax for that so we just get in the topic the key that we're going to be
using for the production is a uid so let's convert that to string otherwise we're going to get a a challenge in that case and the value is going to be deserialized okay uh to be serialized that would be json. Dums so let's serialize that and we seral in the data but if there's any issue this is where we need to handle an edge case the edge case is in the case where we have The UU ID not being passed correctly this is something that can cause a challenge really by the time you are running your
system so it is possible you have that error so if you don't handle this uh Edge case you might run into unable to produce data into CFA so to do that let's quickly change our data in this case um what so in this case let's just have our default serializer just in case there's any challenge fall back to this serializer and I'm going to just say this is a Json serializer and I'm going to encode this into a utf8 format and finally on delivery are get in a delivery report just to be sure that the
data gets delivery report so just to be sure the the data gets delivered uh to Kafka so let's get in these two functions all right the very first one is the uh the the Json serializer we de serialize we serialize any object so if this if the object if uh is uh instance okay if the object is a uu ID so we just get say uu uu uu ID do uu ID so if it is a type of uu ID we just do a return for that particular object that's a string simple as that all
we just have to do is handle this case all right so otherwise we're just going to raise an error a type error that we don't know this error okay uh raise the type error we are raising in this case is uh object of type something something is is unable object do class name dot name of course is not Jason seriz Ser serializable serializable okay Ah that's a mouthful okay so the final thing we need to do is the delivery reports so the delivery report is where uh By the time data gets sent to kfka we
get the delivery report that has been sent so if there's an error if not we get a message okay so if error is not known that means there's an error while sending so we say um message delivery fi and the reason for that is simply because of this error else we just print uh message delivered okay simple as that message delivered to a particular topic and we usually the topic comes in with the with the data really so message. topic gives us actually the me the message and we can actually get the partition that was
it was delivered to uh by default I think it's zero so if you have multiple partitions for your topic you should be good if should be easily and fairly straightforward to distribute that usually in rring uh but it should be good afterward so let's see the delivery Port is done we have message delivered to this topic and the the partition so let's run this and see if uh we just do once we do one data me to produce one data uh first and see if the data gets loaded to CFA so we do python job
of meain and uh nothing is showing here in the terminal is that it so let's see if we have data in the CFA topic I'll just go into the exact Tab and then we do CFA topics if the data gets sent to CFA the topics will be created so we have a boot bootstrap boot strap server it's going to be broker and 292 or 9092 so let's see if we able to list all of the topics so it is still not sent at this time so let's see why that is the case all right so
going back to our code we have our producer in here and we're breaking all right so let's see why that is the case so let's handle one Edge case in this case so because we haven't handled that if if the car or the vehicle gets to Birmingham what happens we need to stop the the loop so if the vehicle data reports for the location uh which is the latitude in this case is greater than or he cross to Birmingham coordinate for the latitude that means uh it's about to go past latitude of uh Birmingham and
the vehicle and yeah and vehicle data location for the longitude all right is less than or equals to Birmingham coordinates for the longitude longitude okay that means the the vehicle has reached Birmingham so we can just easily say print um V vehicle has reached Birmingham and uh let's end our simulation simulation ending and easily we just do break and that's this condition so once the latitude is greater than latitude of uh Birmingham and the longitude is less than or equals to that then of course it's because it's Northeast so the latitude will make more sense
to be greater in that case all right so finally Let's see we don't need this break let's just uh give it some time to sleep and then to um to produce so let's say every second I'm going to increase this a little bit but for now let's leave it at every seconds I'll say 5 Seconds we can reduce this much later but let's leave it at that okay so um finally let's run this uh once we produce data to CFA in here we are missing something we do producer producer the flush so the data can
of course get delivered as expected yeah and I think that's it so let's run it one time and before we we run the full processing in fact let's just I think the process should be good so let's run it and see if everything is working as expected Okay so vehicle delivered to message delivered to vehicle data GPS and traffic good weather and emergency data good so the next time I think everything should be getting delivered together good so let's see how that looks like if we list this again in our uh broker and the docker
desktop you can see we have uh five topics that is producing data and the data is inside them so let's look at the vehicle information in here so if I do CFA console consumer and I get in the topic the topic is this and um what I'm doing is to get the broker as well uh boot bootstrap server the bootstrap server is broker 9092 and I want to start from the beginning okay and uh yeah let's see if that is uh good and you can see the data is getting produced as expected lovely so we
are heading all to Birmingham so we just wait for this to keep continuing until it gets to birmingam and uh maybe we just stop it we delete everything again and we start from the scratch so now at this point at this point we have uh our data that is producing and the vehicle is moving on to Birmingham so interestingly we've not really handled the streaming part of the thing it's just the production now and if you look at our architecture on the in the system you look at the architecture right now all of this has
been taken care of we have our Kafka data set up now but we haven't set up our streaming consumer that is listening to CFA and writing to S3 that is exactly what we're going to be doing next in this video before we continue on to the consumer section so let's configure our AWS because we going to be needing that so I just logged into to my AWS account and uh this is my console home I have uh buckets that has been created called spark streaming data and I was thinking I would create a new bucket
uh for that but I since I already have a bucket that is empty so there's nothing new about that so you they can just create a a unique bucket for you and then you should be good now one other thing that I want to mention is a permission for this bucket so in the bucket if you click on the permissions tab the block up Public Access should be disabled so when you are cleating this bucket it should be disabled all right otherwise you will not be able to access this from outside systems okay and the
bucket policy in this case is just for me to allow all get and put all right so you can access the get request and put object into that that's the only thing that I added to that and this is the structure of that if you want to see that you can check the link in the description uh to get you to all of these codes and all that okay so let's continue so once this uh bucket is set up and then you've set you set up your bucket policy by clicking on the edit and you
know maybe copy pasting this or typing into anyone works fine but once you have your policy and you block all public uh you disable block or public access the uh bucket will show publicly accessible so that means it's easily accessible by anybody and anybody can upload that so far they know your credentials all right now once that is done I also want to mention the user that I'm using is the admin user so it has all the permissions that is required so in my case I just have I have the administrator access Amazon S3 full
access glue console full access uh these are the three access that I have right now and that should be more than enough for me to work with all right so let's go back to our uh code and then continue so because we're going to be needing all of this information by the time we we get to the access and security credentials and all that all right so now in my code you know we already have we already have a job in here so what I'm going to do in this job is create a file that
is going to be holding my AWS credential so I'm going to just touch jobs and then config.py now in this config.py is where I'm going to be having my awx access so I'll just go into the config and have configuration equals to this and I have awx access key which is going to be in here all right that will be here then we have AWS secret key all right then the secret key will also be here so I'll just uh just in the background don't forget if you want to get the AWS access key and
secret key you have to go to I am for that particular user you're generating for so you just come to or you click on this and then click on security credentials once you click on the security credentials it takes you to the dashboard just click on the user and you see the users that you have access to now the I am credentials in this case you just have to come to the security credentials here so if you want to click on the security credentials I'll be deleting this security credentials because of some reason it has
been exposed even though you don't know the key but it's fine I'll delete it once uh it's done so you have the the access key in here and uh because it's active right now so if you want to add another access key you click on create access key and because your application is going to be running outside of aw you click on this uh application running outside of aw so I'll just click on next and give this temporary uh uh a tag temporary key all right and then create access key then you have access to
the access key in in here so if I copy this I'll just use that as my access key uh that will be removed once the video is done so it's okay I'll just copy this as well for the SEC secret key I'll just paste that and we should be good now with this created I'll just close my config key and in uh in my spark City that I created earlier this is where we are going to be writing our SP uh Apache spark uh uh script okay so I I don't know if you can still
recall that when we did our soltion we did uh PE if you look at our requirement of txt I think we already have it in here we have P spark 3.5 I'm still skeptical about 3.5 let's proceed if we have any issues with 3.5 we're going to downgrade this to maybe 3.3 and then we proceed but for now let's continue and let's see if everything is going to work fine or not if not we're going to dowr the pack version all right so let's get in our SQL session from ppar from pyspark.sql import spark session
and um we're going to be needing another thing like data frame but let's stick to this for now and then let's get our Dev main uh this is the entry point uh which is uh the function that will be called I'll pass this for now and if the name if name uh equals uh no equals to main all right then we call the main function so that means we're calling the main function from the entry point yeah that that that sounds soble yeah that's what we're doing basically so in the past we have a spark
which is going to be inheriting or getting data from spark uh spark session and uh we have spark session. Builder so in our Builder we're going to have an app name uh in in this case the app name is going to be uh smart smart uh City uh streaming okay but before we do that before we continue continue I can I can recall that I mentioned to you that we going to be uh uh fixing whatever issues we have with our Master the other time so we have 7077 which is where we are submitting jobs
to but if you click on this for 9,000 uh 9090 this is our spark Master URL obviously the spark master has been running for some time now maybe it's just sleeping somewhere we have two workers that have been created and assigned to this automatically but you can add more workers like I mentioned so for now let's stick to that and we're going to leave it at that for now so going back to our code I just wanted to show you that so the the port that we're accessing is 9090 not 7077 because 7077 is our
spark Master URL where we are submitting our spark jobs into but 1990 is where the UI is where you can see all the running jobs the workers that are collected and the activities that are going on on your sparkk cluster so going back to the code I just thought to mention that all right so when we once we have our spark City uh streaming we're going to have our config uh the config is going to be uh the spark jars so for our streaming we're going to be needing the Kafka jar which you can get
from Maven repository Maven Maven repository I'll just click on that and um you can search in here for SQL SQL Kafka SQL Kafka if you search for SQL CFA you see something like this spark SQL Kafka and then if you come down uh we're using the 3.5 version so if you click on 3.5 you see the group ID in here so you can copy the group ID so I'll just copy the group ID in here okay group ID uh to see yeah let's finish this spark. jazz. packages all right and then I'll just get this
as a string then we have a full column to get in your spark name which is the artifact ID that you're working with so this is the artifact ID I'll copy that as well and paste it in there then we have another column for the version of the artifact ID so this is 3.5.0 I'll copy that as well and uh get that in here good so this is my spark jar I'll just minimize this pronoun uh I have my spark SQL so that means my sparkk can connect to Kafka with this jav file now if
you don't have this you will not have you will not be able to access uh uh spark with the ja okay so that's one the next thing that I want to add is the AWS so there's a package that allows us to connect from spark to AWS so it's going to be uh the one that we're going to be working with in this case so I'm going to have the this type I think about two of them but let's see if we can continue with that first so we have um in this case if you
go to MAV rep repository again and type for Ado AWS and search for that you'll see Ado AWS in this case if you click on Ado AWS and you click on the 3.31 version uh I'm tempting to use the latest version but I'll use this this one that has been tested and working fine even though there are some vulnerabilities here but you can just uh ignore them for now um I'll just copy this o do yeah this one I'll just copy that all right then the Ado AWS which is this one get that in uh
I get this in all right then finally I put another column for the version which is 3.31 so like I said I'm tempted to use the latest version but uh we'll see how that goes maybe at the end of the day we try to optimize this and see if you can use a newer version all right so uh those are the two packages one other package that we're going to be needing is coming from AWS itself AWS Java SDK so let's see how that looks like in here AWS Java SDK so in here it's coming
from AWS so I'm going to be needing this as well and I'm going to be selecting the 1.11 not the 1.12 version H that's a long one so I'll just come down in here and search for 1.11 469 yeah this is the one that I'll be using um so we can like I said we can try to upgrade this for now but I'll stick to these ones that have been tested and I don't want any surprises all right so I'll paste that and then get in my artifact ID which is coming from this guy AWS
Java SDK copy that and then put it in here another full column yep and then finally the version which is 11 1.11 469 all right good yep that should be good for us and then let's configure our our AWS configuration so we have this set up now the Jaz has been set up then we have our config which is the the one that tells adop and Spark how to connect to your S3 bucket so we are going to have this as spark. ad. fs. s3a implementation now the implementation is just the class that this is
going to be calling by the time it wants to do that which is Apache do. fs. s3a s3a file system good and um that's one the next thing is the access key and the secret key of course so we getting the config uh config then let's get in our config spark. addf S3 a. access. key yeah not J key yep good then we have the access key that is coming in is going to be coming in from config in here right so we have um from config import configuration isn't it then in our configuration here
we have configuration. getet and then we getting our AWS access key I hope that is clear though yeah all right I hope hope you are following me though yeah let's duplicate this and then get this access uh uh instead of access key we change this to secret key all right AWS uh secret key see secret key if I can only type secret K okay finally we getting our one final thing which is the AWS credential provider and that is the one that is going to help us uh use the main class that is going to
be uh B a provider in this case so spark. fs. s3. AWS credentials do provider all right now let's get in that guy in so it's here o do not original or. Apache adup ad. fs. S3 a. implementation then simple simple AWS a us cred credential provider isn't it y now that's all we need to do and that's all we have to uh provision in our case so finally we just press that and then get or create now this establish a relationship with um ad dup and with spark with the Jaz that we've just added
to the system good now let's proceed now let's use our spark so we adjust the log level so let's quickly adjust the log level in this case even though this is optional I'll just minimize this the log level that the log level uh this is just to minimize the console output executor on executor really uh to minimize the the console output on executors so just not you don't just uh print out everything in Vios mode so spark do spark context okay simple as that log level and uh we just set it to one and that's
all it's it's nothing too serious really now let's get in our vehicle schema uh if you can still recall we have our vehicle schema in here so I'll just put this on the side and we go into our vehicle schema in here how does it look like vehicle weather emergency vehicle uh no not this one yeah this is it this is our vehicle schema so I get in our vehicle schema from here so we have um vehicle schema so the vehicle schema is going to be vehicle schema is going to be a struct type so
struct type all right and in this struct type let's import that in from SQL types so we have the struct field uh struct field now let's import this as well from SQL do types as well uh sparql types we have the ID which is going to be a string type because a uu ID of course the nullable is going to be true by default is uh I think it's by default just uh like that so have that uh ID then I'm going to just duplicate this a couple of times and just change the value in
there so we have the device ID we have the time stamp time stamp we have the location we have the speed we have the direction we have the make make we have the model and uh duplicate this a little bit more we have the year and we have the F Type okay and uh we don't need the last one in here so for the device ID it's going to be string for time stamp is going to be time stamp time time stamp type isn't it yeah let's bring that in as well location is going to
be a string speed is going to be double yeah let's leave it a double type isn't it yeah then direction is string make is string model is string the year is also going to be integer type integer type so let's bring that in as well import that and import this as well and we should be good with the structure for the schema for vehicle so let's get in other uh structures as well uh we getting a GPS schema uh let's bring that in yeah we have a GPS GPS schema and the GPS schema GPS schema
is going to be the same thing that we did in here just copy that and uh we just uh look at the GPS where is the GPS uh GPS data so we have ID device ID time stamp we remove the location there's no location in here we have the speed we have the direction we have the vehicle type so let's get in that vehicle type and that will be all for our GPS schema then uh I think we still have more uh we have the traffic schema as well traffic schema the traffic schema is going
to be uh traffic schema it's going to be struct uh before that I'll just look at that let's see uh traffic schema we have ID device ID I'll just copy this really everything in here I'll just copy that and paste it in here we have the ID device ID camera ID Tim stamp location so let's get in that so there's no speed so let's uh this is camera ID and that will be a string type as well it's a string type all right time stamp is a time stamp type and we have the location so
the location is going to be location it's going to be a string type time stamp and snapshot snapshot sh good and that's our traffic schema so final thing oh maybe not final we have the weather data so we have uh wether uh weather schema all right we weather schema and this will be wether schema is going to be struct type of course I'll just copy that as well uh this a little bit long so I'll copy this one all right and uh in my weather schema I'll paste it in here we have ID device ID
location time stamp temperature uh temperature let's get that in temperature and uh we I'll just minimize this a little bit all right I reduce that maybe not minimize temperature we have the weather condition um this is also going to be random the choice and the weather condition is a string so uh we have weather condition is a string uh we have the precipitation I'll just copy that and uh it's a uniform so it's going to be a double so double type and we have wind speed all right humidity humidity and a quality index good and
the rest is going to be uh humidity is going to be an integer this is going to be a double because it's a random do uniform and then we have this as well okay good and uh that's start for our weather schema and finally if you are interested we can get in our emergency data as well I'll just uh do emergency emergency schema and then it has ID the device location and I just copy this I think it's about the same size copy that equals to no emeny schema is going to be this and we
have ID device ID in ID so incident ID incident ID we have the location and time stamp which is good and we just getting our snapshot here and uh snapshot is going to be type uh it's going to be a string uh time stamp is going to come in next location status and description so let's get those in uh status is going to be that and the description is going to be this and that will be all really I think it's just comma and we should be good everything is fine now perfect now we have
all our schemas I just get this back into shape all right now once this is done we need to read the data so because there are multiple schemas in here it doesn't make too much sense to keep duplicating the code every now and then so what what makes sense is to have a single function or a single function that helps us with just passing parameters so we can reuse that one of the important thing about coding is Dr don't repeat yourself so let's try to not repeat ourselves so much in here okay so let's go
back into our code and let's uh write that so I'm going to have in my in my uh under emergency schema we're going to have a vehicle vehicle data frame this is going to be the data frame that is reading data from that we're going to have a function called read cka topic and we passing the vehicle vehicle data and then we have the vehic schema and we have the areas for that as uh vle uh read Kafka topic so let's create this function we don't have this function implemented uh we can do that by
just um underneath here we can just say Def and getting our function here so this is going to be topic and the schema and uh what we're going to be returning in this case is going to be the spark which is our spark variable uh read uh stream because we are reading from cafka really uh so I'll just say I'll just put this in here so we can have do format the format is going to be Kafka and uh oh by the way if you are interested in this Kafka of a thing there are a
lot of videos on this channel that helps us to do that or you you can visit data.com and you see more videos that you can uh you know watch uh and get more information about that so we are subscribing to this and this will be the topic all right the topic that we're bringing in uh of course we can subscribe to multiple TOS but that's a discussion for another day and we have the starting off sets and we're going to be starting at the earliest of course yep starting at the earliest then once that is
done we do a load now the loading is going to load the data for us but what we want to do is just quickly change the selection so we don't have to deal with the value Because by the time data gets selected you're going to have a column uh so we just want to quickly fix that so let's do the select expression for that select expression one time uh we have cast and then we have the value as a string now put this as capital and um uh we don't need that we're inside a bracket
already so we say select uh from Json uh let's bring this in from Json and we're bringing in column uh extracting data from the value column and uh using this particular schema that we pass into that and the alas of that is going to be data simple as that really data okay and finally uh we have a selection from the data so do s select okay select data. asterics and then yeah let's bring in this guys all right let's bring in uh from Json which is good Y and we get in our column from as
from that as well good now finally once this is done we want to set a water mark water Mark is going to allow us to set the duration for delay so just in case any of the data gets delayed within a specific window we are able to get the data and the system still recognizes it so that's the reason for our water mark So in our case we can set in 5 minutes 1 minute or as long as uh you you are foreseeing a potential delay so it shouldn't be too long and it shouldn't be
too short as well so let's uh leave it at maybe 5 minutes or yeah 5 minutes should be fine so I'm just going to get in waterm Mark in this case uh yeah I'll get in a watermark water mark with Watermark rather and then the event column is going to be time stamp and if you can recall all of them have a time stamp and that's why it is important to have a a structure that relates to what you're working on so in our case we have a time stamp for all of them and the
delay thres is 5 minutes so maybe for this purpose of this video I reduce this to 2 minutes for maximum delay and that will be all really for our red CFA topic and uh we do the same thing for a couple of uh videos as well uh for the couple of uh schemers so we do our this GPS DF and we just change this to where is it GPS GPS data that's the topic and we have traffic traffic DF and what else do we have if you look at what we have in here uh let's
see all these topics we have vehicle data yeah we have traffic data uh this is traffic traffic data we have weather data and we have emergency data okay just copy that and in here we have emergency uh this is weather DF and this is emergency dfk and let's change the Alias the alias in this case will be GPS this will be traffic and this will be weather and this will be emergency and this is important because we're joining multiple data frames together so it is important we uh we we take note of that so we
don't run into issues all right so let's join all of them join uh all the DFS uh with the with the um with the IDS and maybe time stamp really and time stamp okay good all right so let's start with that so the very first one is going to be let's have our joint DF so interestingly uh this may not be an issue because there are two ways we can actually approach this we can join all of these and write the join data frame into S3 but that would defeat our purpose but because what we
want to do is have this in Silo in AWS so vehicle data frame as it is coming in from our system is going into a S3 bucket directly and then we have ggps and if there's any transformation we want to do in the meantime we do that as well so instead of joining all of them in this SP session I have a and we're going to be pointing that to S3 directly so instead of you know joining all of them it is still possible and I can still show you how to do that maybe for
the first three uh for the first uh three data frame I can do that and uh you can if you are interested you can write all of that all of that and write all of them into S3 as well but let's proceed okay so I'll just uh uh I'll just write this I'll come back to this shortly but let's see if everything is working fine first and we're going to have uh because we're going to be writing the vehicle GPS traffic and all this information uh to S3 so it only makes sense to have a
function that help us to do that as well so we don't have to keep repeating ourself every time and writing the same code over and over again just changing parameters so let's have a streamwriter in this case I'm going to say stream writer this is is the one that is going to be writing data into S3 so we have input uh the input in this case is going to be a data frame and uh let's bring this in yep import that from SQ pack SQ data frame yeah that's it isn't it yeah that's it then
we have input then we have the checkpoint folder uh this is where the the checkpoint is going to be so in Cas a failure you can recover from there and pick it up from there going forward so we're going to be returning the input that we're writing this is an input data frame so it's going to be a right stream in fact just put this on the same right stream so we are writing stream in the format of pet so we have a pet format not pet it's pet then the option in this case is
uh our uh is do format uh the option we're working with is the checkpoint uh which is the one we're working with so we going to have checkpoint location and that will be our checkpoint folder as simple and if there's any option we're going to have option for the output so the path is going to be the location where the data is going to be sitting in so we're going to have output as that then the output mode in this C is going to be a pinned simple as that so finally we just do to
start and we should be good perfect I don't want us to spend too much time on this so that's our streamwriter our stream writer in this case is writing pet to this check uh to this path using this checkpoint of course and the output mode is going to be appended perfect now let's make use of our code in here so we're going to have streamwriter stream writer in this case is going to be vqf then we have in our checkpoint folder which is s3a and I'm going to be calling that if you can still recall
our our spark streaming folder is uh spark streaming data and I'll have this maybe I can rename that I'll leave it at that it's okay and we have the check checkpoints we have vehicle data in that case uh once our checkpoint is secured we have our output as well where the data is going to be stored that's the path where the data is going to be stored really so we have s3a and Spark streaming data for slash I'll put this inside data and I'll tell you why I do that so vehicle vehicle data so that's
what we need to do in this case I'll just duplicate this a couple of times uh and uh we should be good afterwards and uh I think it's about five of them isn't it I just put this one 2 3 4 five yeah this enter enter and uh enter good uh so let's fix this so instead of vehicle data we getting GPS DF in there traffic DF into that and weather DF into this and emergency DF into that so let's fix this instead of of vehicle data we have us uh we have this as GPS
GPS data and that will be the same thing here for the traffic we have traffic data copy that and replace this then the the next one is weather data we copy that and replace this and then finally we have emergency emergency data and uh emergency now interestingly because we have multiple streams how do we how do we automatically write all of them into S3 interestingly before we do this uh you just do wrer just like you have it in this function but the challenge with that is if you join multiple AWA query termination you're going
to have the first one only being acknowledged the rest are going to not they're not going to work and you will think maybe something is broken in your code so I'm going to show you a simple trick or a simple approach where you can write all of this uh at the same time in parallel to your S3 bucket so let's quickly do that okay now since we we already have our streamwriter in here I'll just call this query one okay and uh this will be query two and this will be query three and query four
so we have five queries interesting and query four and query five good so what we're doing in this case if you can recall we are doing a start so it is not uh writing the L yet so at the end of the day the trick is just to get the last one which is the query 5 we termination so what that means is all of these that have been started will now run in parallel and in uh concurrently all right so let's do that and see if everything is working as expected all right so what
I'm going to do basically is to now submit this job to our cluster our SP cluster so I'll just clear this up but before I do that let's let's clear up our broker so we don't have anything uh left hand or residual data from our on our topic okay so we have CFA what is it what's happening to uh exec yeah that's it okay so I'll just clear this up uh yeah maybe not applicable so I'm going to have CFA Kafka topics and I'm going to be pass Kafka topics here delete I'll pass delete to
that then the topic that I want to delete uh well before I do that let's list the topic in the so I can just uh easily recall the topic name so yeah and then I'm going to have instead of topic I'm going to have delete and then the topic name is going to be GP emergency data I'll get that in bootstrap server is the same and I'll just keep changing that emergency data we change this as well to uh GPS data okay no way that's GPS data okay and then we have traffic data okay traffic
data and I'll copy the vehicle data as well uh so we can just delete all of that vehicle data we have weather data as well and finally and uh what are dat so what we can do now is do a list again to see the topics that we created ah so the rest are just our internal topics good so let's start uh by submitting this to our J our cluster and then what we can do basically is to execute into this doger compos and submit to that because don't forget we are already doing a a
synchronization between our local jobs and into spark jobs so we should be good on that and in our spark city so we just do dock exec Docker exec and in here uh this looks like a lot but let's see I'll clear this up and I'll say spark Docker XC at and smart smart city and I'm submitting with all of this information I'm submitting to Smart City and Spark Master spark submit Master the URL and I'm passing the packages all of the packages that I have in here interestingly you see that I had this com. F
faster jackson. so what I'm going to do in this case is just remove that from there okay I'll just remove F Jackson from here and let's see how the system performs or behaves in that so we have the jobs spark City in this case uh that's our jobs directory and we should be good afterwards all right so let's submit this and see how that looks like on our cluster so it's running this and let's see on the UI what our cluster looks like local local host 9090 and let's see that and we have this uh
it's still not submitted yet so let's see what's going on so we just wait a few more seconds for the submission to be done ah by the way we've not started our main so we need to start producing data otherwise we're going to run into issues so let's run this main.py so these guys can can start producing data into our topic otherwise spark is going to say we couldn't find any topic like that that was a nice catch the nick of time so I just list again do we have any data created here good perfect
so now all our jazs are getting downloaded and let's see how that looks like um we just wait a few more seconds for that to be done and still downloading yeah it looks like it's the Java SDK so it's going to take a a short time for that to be done for the first time but subsequently we should be good it shouldn't take this long the next time just load them from memory okay so everything is working just fine and uh I think it's loading all of them now it's loading all of the jars and
uh the loading is done and now the job is running so let's see on the UI if the job is actually running as uh written on the terminal boom you can see uh the application ID is running on four calls the executor is here and is currently running and uh if you click on the application ID you should be able to see the details of that job and these two workers are on there so you can click on the STD out to see and follow the logs but I will not do that can just follow
it from here so it says it's trying to cast values as string there's an error in that case and in our case uh it shouldn't be is it supposed to be values no it's supposed to be value where is it why can't I move this down oh yeah so uh that's a typo really shouldn't be a problem to fix um where are you show yourself show yourself values Val values not this one I was looking in the I was like why can't I find this yeah this is it values it shouldn't be values it should
be value all right so I'll just resubmit that so that failed and uh it's bad I'll just resubmit that again and it's finding all of uh the jazs okay and um good everything is it's fine so it just added all of the files again and shouldn't take more time good all right so it's running you can see now that the job is running another one so this is completed now if I do a refresh we should be seeing the next one all right smart city is currently running no way it's casting value as string I
didn't close the bracket you probably saw that no way okay I'll submit that again oh my God yeah that is getting submitted again let's see okay running running running is this guy has this guy reached Birmingham yet still traveling okay it's a long it's a long way ahead anyways and it says he couldn't find simple AWS client provider and uh that's because of is that an error in there we have Ogo Apache Ado FSS 3A implementation S3 CL there's no implementation there because it's a simple client provider so I'll just remove that and uh submit
again uh this shouldn't take this is taking way too long to to start streaming uh I hope everything is should be fine now and there no typos anywhere anymore um let's see how that looks like I hope everything should be fine now uh try to do M yeah no issues it's a warning uh our executor is currently running so let's see how that looks like okay I think everything is working just fine now all we just have to do is wait a few more seconds once you start seeing a progress bar that means uh the
streaming has started and we can now uh check our AWS for data and right now I think after this we should be good one more key deserializer or not uh it's a warning yeah and we should be good uh yeah that's the third one I think it's about five of them and I think it's writing them now maybe let's see uh that's the fourth one uh let's see what that looks like on the on our spark streaming uh this one we just do a refresh in here and boom we have checkpoints beautiful and our data
yeah perfect we have all of this five individual data and uh the spark meta data is written that's the first one I think it's about right ahead this this is about WR a head log uh this is writing straight into our S3 first before every other data is coming in so I think probably it could keep track of the data that is coming in and maybe uh start again if there's any failure or something like that so yeah you can read up about spark metadata no other and I think all this should be done now
and we should start writing the data by now all right so we have weather data yeah you can see the data is getting written and that is a good beautiful one uh we're good to go now maybe not 100% but at least data is getting written to yeah is written to our AWS Now traffic data as well uh perfect I think the next thing is just to wait a little bit for the traveler to get to Birmingham and I think we're using 5 Seconds aren't we uh maybe maybe that would take a little while but
at least we know that this is working for sure and we're streaming data live in S3 good all right so let's see how that looks like now while this is ongoing the next thing is for us uh we are streaming data into S3 directly as it is coming in from our iot devices it's going straight to our S3 Lake housee which is good so the next you want to do now is have a transformation we know if you can look at the uh the architecture we have uh in the architecture we have we said once
the data comes in here and we are streaming into S3 in here we're going to use AWS glue to craw the data and create a data catalog for that and we can now link Amazon S3 and Athena to that uh catalog okay so let's quickly do that I think that's about the last second to the last B stop of our session and the video is getting way too long now so but yeah let's just continue so let's go to AWS clue now the AWS glue in here I have uh this is a console um you
can see how the new console looks like if you are interested in the hold console I think you can use the the hold Legacy Pages for connection and all this we don't need them but we just stick to this uh new one all right so what we're going to do basically is get a crawler that is going to help us do that now before we proceed and uh run this query to and I think we have a challenge an error in here so did GPS DF in here should be using the GPS schema uh traffic
as well traffic schema uh weather weather schema and emergency schema okay so that gives us the different schemas in here and uh everything should be okay now so the next thing we want to do basically is to structure this in the right way and run this so I'm just going to trigger this up uh spark City and then we run our main as well so while this is running ah no no no this is running on my local system it should be running on the cluster so I'll just do Docker exec uh Smart City spark
master and submit the job with this packages as well as that and then this uh the submission file all right so if I submit this uh let's see how that looks like takes a few seconds yeah it's establishing that and in our main uh just adjust this to let's say 3 seconds and then we run this again all right just run our main so the data can ah yeah I think we should probably delete the data in here so let's delete all of them in here emergency data we delete GPS data as well I think
we should just stop all of this process that is currently running okay I'll just stop that yeah just stop that okay and here I delete the emergency data we delete the GPS data Then followed by traffic data traffic data then vehicle data as well vehicle data and weather data all right so once that is done uh the next thing is for us to now start producing and start our and resubmit our script again so I'll just resubmit this and then start our main on the side as well okay and uh let's run this so you
can start producing so you can list the data in here again to see if the topics have been created and we should see that they have been created right now we have the five topics in here and they should be getting produced to uh to our S3 so we just do a refresh in here and it takes a few seconds for that to be done and we should start seeing data in a few second all right so this is currently running and uh that's a good thing and you can see that on the on the
UI if you want to follow through for you all right I think this is getting written to AWS right now since I think when you can see this uh I think you should probably do a Refresh on your S3 and you should start seeing data in there all right at least the structure should be laid out right now and you can see the checkpoint is here now we have data good and inside the data we are going to start seeing records dropping in a few second and the GPS data is is currently here but do
we have any data uh written already not yet we he only have the right ahead the spark metadata written in there not a bad thing really just wait a few more seconds for that to be done and it's still still running okay so the driver is still heading to Birmingham so we just wait few more seconds for this as well to continue while we also continue on the on the side okay so uh data do we have any data now uh yeah all of the data have been represented correctly here so let's look at the
vehicle uh yeah still loading okay and here what do we have okay um I think we should do a refresh now yeah data is getting written right now and it's a good thing uh let's see if the driver has reached Birmingham yet it's still going there good so it's still on the way so that means uh the data is written in in real time to AWS which is good and uh let's continue I think it's because of the the delay in here that is taking that is reducing the number of minutes but bed on the
delay threshold here so but that's that's on the way uh while this is going on we go to our crawlers and we can start creating our crawlers I think I can just do a refresh in here um we don't have any uh yeah I think we do I just uh Delete all of this uh instead of creating separate crawlers we can use a single crawler to do that uh just Del that and that was the whole crawler that I have so you can create a new crawler and Link it to your S3 bucket so we
can say smart city data crawler okay just like uh if you select that you can use any name so I'll just select browse here spark streaming and then in my data I'll select data in this case so because I want to have access to all of the data in the sub directory which is the subfolders then interestingly because of the spark Master uh uh spark metadata this one we need to exclude this from being crawled by this guy so we just come in here getting our spark meta data I'll just try a couple of uh
uh methods so you don't it don't crawl the content of spark metad data as well and if you are getting in there and getting into spark meta data you don't crawl that and anything that looks like like meta data uh spark spark meta data you don't crawl it as well good so I'll just leave this as uh the different uh pattern that it can be matched so I just add S3 Source in there next then I am R I'll be selecting Smart City it's just as simple as creating a new I am R and giving
it a name if you don't have it before just click on create new am R but I already have one so I'll use that then next then the output where is the output I'm using smart city as my database if you don't have it you can just create a new database by clicking on ADD database and give it a name that's all and in the advanced options in here it says create a single schema for it I think I'll just leave it at that and just click on next if there's any other thing we can
always recall much later but for now I think our craw has been created and the driver should have reached reach Birmingham by now shouldn't take too long our vehicle has reached Birmingham good and now we can run our crawler all right so it takes a few seconds for the crawler to be done about a minute or there but let's see how what the output looks like if we are going to change the content of our crawler or not all right so the crawler is done it's done running takes one minute 15 seconds and let's see
what the table it creates and interestingly it creates them uh as we expected so these are the five tables that have been created are they yeah so they are the five tables that have been created and everything is working just fine as expected so two ways for by which you can proceed now we can actually select the view data from here and it directs us to Athena or you can search you know with a search bar and type in Athena in there you have access to Athena so let's explore the uh the two routes so
if you click on this and click on proceed just just view uh view data uh table data in this case you have access to the Athena editor or you just click on here uh just searching here uh search for Athena and you can you know open this in a new tab as well so you have both actually give you access to Athena so interestingly if you if this is the first time you're accessing Athena on your in your uh Records in here I mean in your system you you will see something like this so you
might see something like set the output so you can come to the settings in here and change the output in this case so the output of my query location has been set as this so if this is the first time you see something like this and you can actually set the output where you want the output to be so I just set that to my output location in there for the query editor so I just link that to my S3 but as simple as just running this we can just run this and see what the
output looks like so we have the device ID incident ID and these are all the emergencies so there's a there's an accident accident police I me this is somehow because a lot of accident happen medical information but let's this is just like a representation of what is going on actually now the next thing is going to be for us to you know maybe visualize the rest of this uh data that we have in here so we have agency data we have GPS data as well um let's see how that looks like here this is how
the uh GPS information looks like which is uh all of this information and you can see the speed direction and all that good and uh what else thing what else do we have we have traffic um let's see this is the traffic and this is the location that it happened uh we have vehicle data uh we have this good and you can see the the information that was sent across and then finally we have the weather data okay weather data and if you run this this is how it looks like so easily we can download
result copy that anyhow you want to do it and it's as simple as that now let's head on to Red shift now and start creating our cluster if we don't have one before but if you have one you can also use that one as well so let's let's create a new one so I'll come in here and type red shift okay red shift Amazon red shift so I already created a cluster but I can create a new one it takes about 15 minutes for the cluster to be done the cluster creation to be done so
what I'm going to do is create a new cluster here then I'll call this uh smart smart City cluster and then I'm not going to be using the four times extra large I'll be using the large and uh I'll be using a single node because I'm I'm not doing anything too crazy so it's is about $182 per month and the user name is going to be aw AWS user I'll delete that once we're done and then I can just add a new admin user in here so the password for the admin user has been added
to that and then we can associate a am row to this so I have a red shift row that I created so but if you don't have this you can actually create a new role in here by clicking on this and it takes you to I am Rose uh I think you can come in here and come to I am Rose so if you come in here and click on rows you see the rows that have been created so right now these are the rows that have been created and if you click on any of
that so let's say I create a new R iws service all right and the use case is going to be red shift okay I click on that then the red shift customizable of course and I click on next then I can now select any activity that I want in here so what I want is the S3 access so I want S3 read only access S3 read only access I don't need to write anything to S3 I just want to read so once that is done this is the the the trust policy that's applied to that
and this is the permission and once that is done I click on uh create R and let's give this a smart uh CT I read shift S3 row okay and I just create row all right now I have Smart City red shift uh S3 R here I can come back in here and Associate I am R to that and uh uh smart C I think we should be able to do a refresh in this case shouldn't we um so what can I do to do a refresh here um it's not added to this list so
I can just do a Reload of this page all right I'll just do a Reload all right so I have Smart C smart C red shift cluster in fact I just call this yeah red shift cluster okay cluster then I'll use the large and the single Noe and uh by the way you can use a trial version of red sh so you should be good if you use the trial so I use SQ AWS user um associate I am R Smart City red shift and then associate that that then additional configurations I don't want to
use the default so I'll select uh I will uncheck that and in my network and security you'll see that there's a publicly accessible in here allow this to be done and there's no elastic IP address that I'm associating to that if you want to add any elastic uh IP address you can do that then in the DAT base configuration everything is going to be left as it is and every other thing will be as they are by default so I just create the cluster and then this is going on in the background um so I
have a smart City test which is undergoing the same process as this one so I'll just wait for this to be done in fact I delete this one I don't need it anymore I'll just delete this cluster and type in delete uh Delete cluster and uh while this is going on we just uh do a quick pause and play to for this to be done and then we load that into our red shift all right uh perfect so uh the red shift cluster is done if if I do a refresh now it should be available
good so if I click on Smart shift red red shift cluster I will be able to see the connection credentials and how to connect to that excuse me now I have the end point I have the jdbc and I have the odbc URL so I'll be copying the jdbc and that's what I'll be using to connect that so if you copy if you go to [Music] um so if you go to the Bava in here uh the baver is my ID but you can use any other ID that you like uh you should be able
to access all of this information in here and if you click on the plus sign to add a new connection here you search for red shift right if you search for red shift here and you click on next then you can use the URL to connect to Red shift in this case just sping the pasting the um URL that you copied earlier once that is done uh you have access to all of this then in the database native section your username which is uh here the one that we use actually to when we were creating
uh I think we should see that in the properties shouldn't we um yeah I think so it's not here uh is there anything that I need to check here I just want to get the user I think is AWS user actually database configurations uh is that not yeah I know for sure you say WS user but I just want to yeah edit admin credent shs and uh the admin this is admin password and do we have any other thing in here yeah AWS user I was looking for this AWS user is the username uh okay
the password that I copied uh or that I typed in earlier I just need to do a test Connection in this case so if you don't have the driver uh the beaver automatically downloads the driver for you and you can use it to connect now once that is done I click on the dev and you should see the databases that is currently available uh the dev is uh the one that I just have access to right now and you can see the schema in this case uh we have public and in public you have access
to this table not and nothing is in here so for us to have access to this and for us to be able to query this you know we already have our data in AWS uh catalog in our glue catalog really in the data catalog of glue so what we can do now is load the existing data cat log that has been loaded into glue into our red shift so we don't have to connect to the AWS U we don't have to connect to separate S3 buckets and start loading data from there we don't have to
do that anymore the have been crawled and loaded into to glue all we just have to do is connect to that so let's do that by creating an external schema we can do we can just uh you know right click on this open SQL script and in here you have Dev and public at Dev so I'm running this against the public uh schema so it's fine because I'm creating a new schema it's fine so I just do create um external schema uh it's it's better you had external because it's not into the into red shift
it's not inside red shift so call this the schema name that I want to give to this I'll say smart smart City all right then once I have the name in here where do I want to load from I want to load from data catalog in this case data catalog I'll type in C data catalog okay now where is the data setting what's the name of the database okay database name is called what's the name of the database name Smart City uh Smart City uh I'll say let's say Dev yeah Dev smart city is the
schema and the database name is schema in this case now we need an AM row if you can recall we Associated Anam row when we were establishing this which is the Smart City rare shift if I click on that I have access to the Arn for theam R so if you copy this Arn uh I think it's AWS r name or something like that you can copy that and paste it in here so I have the I am Ro as this then which region am I working on I think is the US East Us East
one Us East one and if you look at you can double check that to see if you are actually right I'm right right or not and I think this should be uh where is it us it's not yeah Us East one you can see I have us East one here even though this is the name space but there's a particular place where the US East one is sitting uh just yeah this one availability Zone this is it this is my region I'm not using the F but I just leave it as one okay once that
is done I had a semic colum to that and I highlight all of this and run you can see that this uh created successfully and the the updated row is zero or something like that it's not updating anything so for you to see how this reflect you can come in here and do a refresh and here as in the database and do a refresh it takes a few seconds for the uh schema to show and once it is it is shown you double click it and you can see the details of the the data in
here uh you have tables so the tables should show in here but for some reasons it is not showing uh let's see if we can query this uh I'll just try to query this directly I'll say I'll comment this out for now I'll say select star from Dev Smart City I know there's a vehicle data in here so I have inside here what schema do we have yeah that's the schema name rather so I have the GPS data all right so let's see if we able to select data from there so it says access deny
exception this person doesn't have glue get so let's fix that in our I am Ro uh which is this one that we created and added here is it not this one I have only read only access to uh to Smart City this is for S3 alone so let's add a new permission and attach a policy for glue as well so glue uh glue console full access excuse me and uh yeah I will use that and add permission to that and we should be able to access this now hopefully let's see okay I think uh it's
s quaring and perfect so we have been able to access this and if you look at the dev Smart City again and you do a refresh here can you do a refresh here refresh yeah if you do a refresh you can see all of this information being populated so you can see the each of these guys and the location where they are all right in the S3 bucket and the input and output format for each of these data actually is here the the table space row count even though the row count is not here but
you know you understand the data is still pretty much inside there and you can double click on this to see the data actually to see the the content of the data but this is a read only access so it's fine can just do we read only in here and you can see that good okay so that's how to you know query this if you want to now write your complex script against all of this data you can do that and it's easy for you to proceed from here going forward so easily we can connect our
powerbi or visualization tool like T or Lucas Studio to this red shift and we can easily just Dimension and maybe query this as we like all right so but will be on request so if you would like to see that done in powerbi or Luca or Tabo let me know and I'll create an addendum to this video where we have uh visualization for power B blue or Luca as requested so thank you very much for watching but if you have not subscribed to this Channel at this point please don't forget to like comment share and
subscribe because this is uh how I'm able to support this Channel and how this channel is able to create videos for free so so if you would like me to continue for free don't forget to like And subscribe and uh don't forget to share the message and uh thank you very much for watching I'll see you in the next video [Music] bye
Related Videos
2:30:32
End to End Realtime Streaming with Unstruc...
CodeWithYu
20,201 views

10:37
Finland's president says Putin made one of...
CNN
242,673 views

17:52
Hungary, Estonia, Finland l Can Uralic Lan...
World Friends
92,479 views

26:35
Its Finally Over For Devs (again, fr fr ong)
ThePrimeTime
417,708 views

12:13
DuckDB with Apache Iceberg inside AWS Lambda
TheAverageEngineer
315 views

13:51
Apache Iceberg: What It Is and Why Everyon...
Confluent Developer
390,648 views

19:27
Japan Just Broke the Global Economy (Worse...
Andrei Jikh
827,440 views

54:08
How One Company Secretly Poisoned The Planet
Veritasium
12,418,554 views

lofi hip hop radio 📚 beats to relax/study to
Lofi Girl

9:13
csproj is GONE! 'dotnet run app.cs' is Here
Nick Chapsas
52,797 views

31:49
Humans "no longer needed" - Godfather of A...
RNZ
13,125 views

20:14
Finnish l Can They Understand Each Other? ...
World Friends
103,523 views

18:33
Kafka Tutorial for Beginners | Everything ...
TechWorld with Nana
553,177 views

2:17:32
1.2 Billion Records Per Hour High Performa...
CodeWithYu
13,039 views

20:01
Japan's population crisis reaches tipping ...
Financial Times
1,108,847 views

13:31
Every Level of Wealth in 13 Minutes
Memeable Data
1,314,655 views

38:38
Why Everything Is Making You Feel Bored
Johnny Harris
974,031 views

28:19
End to End Monitoring of High Performance ...
CodeWithYu
3,333 views

26:24
SÖIN SUOMEN SURKEIMMISSA RAVINTOLOISSA
Miska Haakana
128,442 views

25:58
From Zero to Your First AI Agent in 25 Min...
Futurepedia
287,608 views