EASY Cinematic lighting setup for YouTube videos!
19.64k views1938 WordsCopy TextShare

Jacob Obling Nygaard
Sign up for the colorgrading course waitlist: https://creatorsociety.io/colorgradingwaitlist
Free Sk...
Video Transcript:
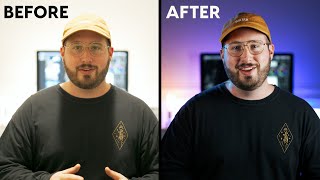
so how do you go from this to this all right guys so in this video I want to show you my lighting setup and I think that the best way to do it is probably to turn off all the lights and then turning it on one by one so you can kind of see what kind of difference it does to my video quality and I'll of course include links to it all down below in the description and then you can check it out and see if that's something you want to grab for yourself and it
is going to be affiliate links so if you decide to buy through my link then you will be supporting my channel so if that's something you decide then I really appreciate it and if not that's also completely fine and I actually also have a couple of things that I want to show you in this video that has nothing to do with lighting but it has a big impact on how it all looks on camera so I also want to show you that because now that you watch this video you probably want to achieve kind of
this look and you can't really do that without those two things so I feel like it's kind of important to go over those two as well but let's save that for later so now let's turn off all the lights and then get started with the first one all right guys so the first light I want to show you is my key light which is pretty much my main light this is the most important one of them all and the light I'm using for that is an aperture 120d Mark I which is really good light but
it's also pretty old I bought it quite a few years ago and back when I bought it pretty much every big YouTuber was using that so that's pretty much what it inspired me to buy it uh but now I think they don't even make them anymore so if you want something similar to this I want you to check out uh apertur sub brand which is made for creators actually and the sub brand is called amaran and they make really really good lights um I don't have one for myself but yeah basically from what I can
hear from other crators they make lights just like this just cheaper I chose to place the light in a 45° angle so it kind of lights up one side of my face and then I have this nice shadow on the other side of my face which I really like and also a really important thing to mention is that I actually chose to close the curtains completely so I can control all the lights myself because the sun isn't really consistent sometimes it's here sometimes it's it's gone and it's just annoying to have that switch in the
amount of light that I get so I just want to be able to control it myself next up we have my Philips Hue Lights that I can control from my phone or with voice control because I have Google home installed in my office so I can just say hey Google 10 luu and then it should turn on the lights right there and I think that gives a really really cool vibe to my video so now let's just try and turn them all off and then I'll show you uh what lights I have from Philips hu
and what kind of difference it does to my uh the look of my video so first off we have a couple of Philips hu light bulbs with color on the Shelf over there and you can see that it adds a little bit of difference to the vibe over there and then we have the big ones which is my Philips U signy lamps which is this one those are definitely my favorites and I chose to have two so it kind of frames me in the video so really cool next up we have a little light strip
on the back of my 49 in LG monitor which doesn't make a huge difference and it's probably not worth the money it's really expensive to buy Phil two lights um but it does make a little bit of a difference looks pretty cool so yeah I just chose to to buite anyway because I like gear so that's my Philips U lights which adds kind of this Cool colory vibe to my video so it's not just a plain black or white background so as you can probably tell it's still pretty dark in here you can't really tell
if it's a black hole or if it's actually those wooden pan panels that I have in the background so to fix that I bought another light from nanlite it's nanlite for 60c really cool light and that I also hooked up to Google home with a smart plug so I should just be able to say Hey Google 10 studio and then it should turn on the lights in the background right there so that kind of separates me a little bit more from the background and then you should be able to see that it's not a black
hole it's actually black wooden panels in the background so yeah that's kind of a drawback from having a black background you need a lot of lights to could be able to tell what it is um but yeah I feel like that fixed it quite uh well and actually the fora 60c light is really cool because it's RGB so I can switch the color of the lights to also be red or blue just like the Philips Sho lamps so I really like that I haven't used it yet but I have the option if I want to
for most people that's probably Overkill to have something that can change colors and stuff like that but again I really like gear so I bought it anyway now I feel like this is already a really cool look but the last touch is my headlight so to separate me a little bit more from the background I chose to have a headlight which shines down on uh the back of my head and kind of illuminates the edges of of me and unfortunately my LS for that is too old to be able to control it with Google home
I even bought a smart plug for that but for some reason it just doesn't turn on when I turn on the smart plug so uh I have to do that man manually at some point I'm probably going to switch it out for another nlight for 60c because I really like those and those I can control with my voice but for now this is completely fine all right so I'm just going to go and turn it on manually so you can see what kind of a difference it does to the look there you go as you
can see it kind of illuminates my head and separates me a little bit more from the background again very subtle but kind of the combination of all the lights I have here really adds up to a really really cool look in my opinion so that's all my light sources but as promised I have a couple of things that has nothing to do with lights that also makes a huge difference to the look so if you want to achieve a similar look then you definitely want to listen to what I'm about to say so I actually
have a filter on my lens right now which is an a variable ND filter from Peter McKinnon with a Mist effect so it's kind of like sunglasses for your lens which is not really that important because I'm inside but what is important to achieve this look is the Mist filter in that filter so if I don't have this filter on it's not going to have this Misty vibe to it it makes my skin a little bit softer and it also makes the lights a little bit softer you can kind of see that it has a
little bit of a Mist vibe to it so maybe I should just try and remove the filter so you can see the difference so as you might be able to tell this looks a little bit sharper and also the lights are a little bit more powerful and it doesn't have this Misty vibe to it so I just feel like this Mist filter gives a really really cool effect that I like so yeah this is probably more of a stylistic choice maybe you don't like the look and you like the more sharp look that you see
right now uh I just think it gives a really really cool vibe to my videos so I just love love using this misted filter so maybe we should just put it back on the lens again and the last thing which probably makes the biggest difference to the look of my videos are my color grading so I don't have my camera set to Auto I always shoot in SL log 3 and if you don't know what slog 3 is it basically means that I shoot in a very very flat look which gives me the ability to
really control the colors when I edit my videos so what I usually do is I shoot in this flat color Profile s log 3 and then I apply one of my Lots which is basically just a preset for color grading I'd always have to adjust it a little bit but mostly I have like 90 95% of the look I want just from a preset that I can apply so it's really really cool but it is actually really hard to figure out how to color grade slog 3 correctly because you have to actually overexpose uh your
footage a little bit when you shot in s log 3 so it's not really logic uh how you need to to do things normally you lose a lot of your image if you're Overexposed but that's not the case when you shoot in slog 3 so it is kind of hard and it took me a while to actually figure this out but I do want to help you the best I can to achieve the same look and kind of learn everything that I learned along the way so I am actually about to build a little course
on color grading so I'm going to teach you everything about exposing slog 3 filming in slog 3 and color grading everything so you can achieve the same look that you see right here so if you are interested then I'm going to link to a weit list down below and then if you sign up then I can see that you're actually interested in grabbing that once it's out all right so now you know how to like your videos if you are really serious about being a Creator and having your own Creator business then I would definitely
recommend that you watch this video next because in that I take you through a really cool exercise that helped me a lot in my Creator Journey so check that out and I'll see you in there bye
Related Videos

9:38
CINEMATIC Video Setup for your TINY SPACE!...
Lila
108,149 views

12:54
Easy Cinematic Lighting Setup for YouTube ...
THAT ICELANDIC GUY.
165,478 views

6:59
One Lighting Tool That Changed Everything
Piero Gianni
155,066 views

10:43
Easy Lighting Setup for YouTube Videos (i ...
THAT ICELANDIC GUY.
33,451 views

4:50
My compact travel filmmaking lights
José Alcoy
1,379 views

4:25
Stop Using Video Lights Like This! (5 Comm...
Think Media
552,886 views

14:35
Welcome To My TINY 9x9 Foot Youtube Studio...
Dunna Did It
464,106 views

12:35
how to create natural ‘cinematic’ lighting
Mark Bone
207,270 views

10:07
This All-In-One YouTube Studio Setup Rocks!
Think Media
296,663 views
14:17
SOLO FILMMAKING: Turn Your Ordinary Videos...
Sam Newton
251,097 views
8:02
EASY Cinematic lighting setup for YouTube ...
Lila
1,310,023 views

14:00
My Entire YouTube Studio on One Desk!
Nate's Film Tutorials
266,636 views

6:12
How To Shoot An INTERVIEW (Or YouTube Vide...
Sjoerd Wess
260,839 views

13:20
How Cinematographers Set Their Exposure
In Depth Cine
299,878 views

13:21
Beginners Guide to The BEST Lights for You...
Philip Lemoine
26,326 views

15:45
My Home YOUTUBE STUDIO & Desk Setup Tour
Joey Helms
53,495 views

17:42
Top 10 Lighting Mistakes Beginners Make
Full Time Filmmaker
606,844 views

6:52
Easy Cinematic Lighting Setup For YouTube ...
Oscar Owen Business
5,913 views

9:38
EASY Cinematic lighting setup for YouTube ...
Lila
334,590 views
5:58
Lighting for YouTube Videos - Make Your Vi...
Ben Johnson
4,450,937 views