How To Make THE BEST Thumbnails on YouTube Using Photoshop!
111.01k views1771 WordsCopy TextShare
Joseph | Video Editing
Join Ultimate Editors (My Online Video Editing Community)
Click Here: https://www.skool.com/ultimate...
Video Transcript:
we all make this big mistake when we first start out on YouTube I'd work for a month literally an entire month on a whole last video offered to end up getting 20 or 30 views then I had the big realization what actually sets apart the big creators from people like you and me is their thumbnails so with that information I improved my thumbnails I went from getting 20 views all the way to 6 000 views all because I used these thumbnails and today I'm gonna show you exactly how you can make thumbnails that get you
used this is the most important thing for sure please waste no time go and research exactly what gets you using your Niche gather at least 10 videos and find out what's in common in their thumbs for my Niche which was video editing a lot of the times there was a character covering half the screen a colorful background and it always displayed what the video was about now after discovering what works well in your Niche you're just gonna take that and copy it while obviously adding your own twist but with all this said there are still
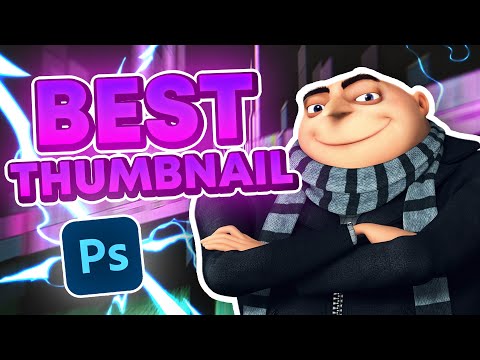
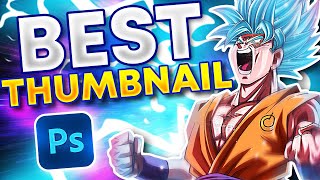
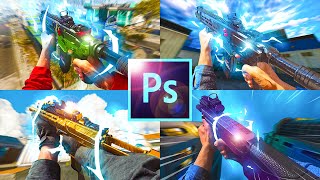
some tricks that you can't see that do make up for a better thumbnail so let's just get into Photoshop foreign Photoshop the first thing I'm going to need is a reference image so mine is this image over here I really like how this thumbnail looks so we're just gonna take it and put it all the way over here somewhere and if we break down this image what you can see over here on the right side we have a character on the left side we have some text and some glowing going on and in the background
we have an editing timeline with this like zoomed in effect since the background is an editing timeline I'm going to go ahead and search Up Premiere Pro editing timeline I'm gonna want one that's a bit vibrant and full of Colors oh this one looks perfect so we're gonna right click and copy the image go to photoshop control V now this shortcut is very important Ctrl D is to transform which is basically to expand the image or decrease its size or whatever you want to do with it so we're just going to control T and then
hold the alt and drag one of the corners out and what else do I see in the Sim the background is a bit dark and there's this zoomed in effect so we're just gonna go ahead and recreate that so first off I'm gonna press Ctrl M and I get this curve over here I'm gonna drop the left side the tiny bit and increase the right side this gives it some contrast aka some glow now I'm going to select the layer go up to filter go down to blur Radion blur and click on zoom and add
in something like 25 yeah that looks nice an expand the size die a bit more I don't want the background to be too colorful because I actually want our subject to stand out and or text so as you can see on the right side of our image here we have the rock steering I'm gonna have someone who's even better than the rock we're gonna have the man the myth The Legend who the is that guy all right now that we have a picture of our subject we're gonna copy this image go into Photoshop I'm gonna
go over here to the left and select the selection tool the selection tool just allows us to select an area and the Photoshop will automatically draw a mask around the object in this area so select the object selection tool and go ahead and select the area inside this white and it's going to automatically select groups now that we have a selection around him we're gonna make sure that we have selected our layer with glue then we're going to press Ctrl J to duplicate it this will only duplicate the selected area which means we're gonna have
a layer with only our subject in it so now as you can see if we delete the layer that's under it there we go so now that we have Ctrl t hold alt expand them and put them on the right side now to make them pop out a bit more we're going to go to the layer and to the right side of it and double click this will open up the layer style then we're gonna go all the way down and add a drop shadow just a very subtle one and then a stroke mess with
the size until you're happy with it something like 20 will do good then we're going to select him control them as well and we're going to add some contrast by dragging the left side of our curve down and the right side a group all the way up again we're going to add some finishing touches at the end to make sure that everything pops out but now we'll need to work on the part that's missing which is the text now I really like how the text looks in this thumbnail so we're just going to mimic exactly
that let's click T and write whatever we want I'm just going to write text now we're going to select this go over here and change the font to whatever we want I'm going to be using a font called mon yup looks perfect again Ctrl T and ALT drag to expand everything let's see if we write in all caps there we go that looks very nice we're going to select our text go to the layer double click on the right side I really like the purple and pink gradient that he's using so we're gonna go ahead
and mimic that so go down to gradient overlay add a gradient double click here and now let's make the left side purple something like a bluish purple color and the right side a bright pink we're going to change this down to -90 and now we'll need to add a few more things so the first thing I'm going to add is a go ahead and add another glow set the mode to Overlay and then we're gonna mess with these settings until they look good so I'm just going to be adding some size keeping the range all
the way at 100 now the next thing we're going to want to do is go on the way down and add a drop shadow then we're gonna bump the spread all the way up and then increase the size tiny bit just so that we have a outline and change the distance change the angle something like 140. I'm gonna mess with the size and until it looks sharp enough and then we're gonna go down to the drop shadow layer and click this plus sign and then we're going to select the drop shadow that's below and change
its color to white now we're going to increase the size now the last step is we're going to add an outer glow to make sure that everything pops out so go over here and go to outer glow change the color to purple or pink both work really good change the mode to screen make video past something like 40 increase the size mess with the spread until it looks good enough and I think that looks really good nice now that we have our text we're gonna add in the words that we want so [Music] collect Photoshop
and let's change our text to best make sure it's all caps Ctrl D decrease the size add some rotation okay I want it to be right around here I'm going to select the move tool hold alt and drag the text down and change it to layer now I'm going to move it Ctrl T and decrease the size and that looks pretty good maybe overlay them just a tiny bit now I like the fact that this is taking up the upper left portion of the screen that's going to allow us to put the Photoshop logo on
the bottom left search up Photoshop logo PNG we're gonna copy this go over here right click our object selection tool and we'll get our magic wand gonna allow us to select these black Corners over here while holding down shift select our eraser and just delete those then Ctrl T and decrease the size time change the rotation put it to the bottom double click on the right side of the layer add a white stroke and decrease the size just a tiny bit we're going to add an outer glow and then we're gonna add an inner glow
and actually this one needs to be strong so that it looks 3D yeah there we go that looks nice if we take a look at our thumbnail there's some lightning kind of exploding from behind the logo so we're actually going to copy that and search up something like anime and we'll just go ahead and add it over here increase the size all the way up I'm gonna double click on the right side of the layer change the blend mode to pink color Dodge would work and I'm going to drag the layer all the way down
to under the text but above our background and I'm gonna Ctrl T move the origin of the lightning all the way to behind our logo and then increase the size maybe a tiny bit more and that should look a lot better now that our thumbnail is finished we're just gonna go up to the top left side click on file and go down to export and Export as select the jpeg format so the quality all the way up make sure it's 1920 by 1080 and click this so you finished up the thumbnail and you followed everything
that's in this tutorial but you're still missing one thing and that's actually good content because a good thumbnail with content is still gonna end up being a video so I'm Gonna Leave content creation tutorials on the screen right now go ahead and click on whichever one you want to watch and thanks so much for your time I'll see you in the next video bye [Music] foreign thank you
Related Videos
14:07
How To Make THE BEST Thumbnails on YouTube...
finzar
1,243,384 views

11:40
HOW TO MAKE REALLY GOOD THUMBNAILS ON YOUTUBE
PewDiePie
5,007,396 views

30:07
how to make a killer thumbnail (for the 20...
Aprilynne Alter
377,304 views
17:48
20 Video Editors Battle for $850 Prize (In...
Joseph | Video Editing
31,976 views

6:29
How To Create THE BEST Thumbnails!
fraziel
3,860 views

36:28
The Complete Guide to Editing like Iman Gh...
Joseph | Video Editing
12,716 views

19:44
How to Make Gaming Thumbnails Like a Pro (...
MidnightMan
119,497 views

24:21
How to Make VIRAL THUMBNAILS like celebrit...
Nour Art
305,546 views

13:54
How To Make YouTube Thumbnails - Quick, Ea...
Primal Video
80,512 views

15:48
I Edited The Same Video on Every FREE Soft...
finzar
428,320 views
14:32
How to edit SO good your viewers get addic...
Learn By Leo
2,317,235 views
24:34
How To Make GOOD Thumbnails (DETAILED GUIDE)
Sandman
47,865 views
16:25
How To Make A Youtube Thumbnail In Photosh...
Vince Opra
106,358 views

14:09
Make Glowing youtube thumbnails in Photosh...
Pixolid
193,239 views
23:14
How To Edit Thumbnails Like Mr Beast | FUL...
JayG
162,048 views

16:44
How to Create YouTube Videos Like a PRO in...
Joseph | Video Editing
15,118 views

16:10
How to Make a Thumbnail for YouTube Videos...
Arti Creator
1,567,128 views

5:49
How To Make Thumbnails With CapCut (iPhone...
Collin Michael
470,477 views
12:10
How To Make A Youtube Thumbnail In Photosh...
Vince Opra
158,381 views

16:32
5 THUMBNAIL EDITING HACKS IN CANVA | Glow ...
Modern Millie
25,375 views