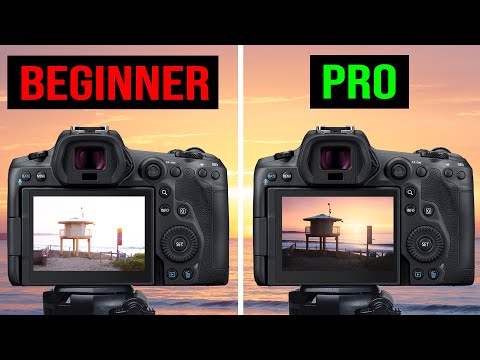
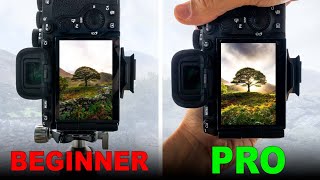
The SECRET To Nailing Your Exposure EVERY TIME
722.22k views1374 WordsCopy TextShare
Steve Arnold
👉 Download my FREE Luminosity Masking Plugin for Photoshop here: https://photomasteryclub.com/plugi...
Video Transcript:
there's something that Pros know about exposure that means they come home from every photo shoot with perfect images and beginners always ignore it so in this video I'm going to show you a simple method that Pros Ed to easily capture perfectly exposed images without ever having to worry about all the complicated stuff like calculating stops ambient light or metering so you never have to worry about missing the shot again first I want to dispel a common myth and explain why using your camera in any kind of auto mode is actually the hardest way to use
your camera and while using it in full manual mode is the easiest so let me explain when you're shooting in any kind of automated mode like full auto aperture priority shutter priority or even manual mode but with auto ISO you're letting your camera decide what the best exposure is and when you leave any exposure decision up to your camera there's room for it to get it wrong and when your camera does get it wrong and it exposes too dark or too light what can you really do about it well you've got just one choice really
and that is exposure compensation this is where you tell the camera okay guess what you think is the best exposure and then take the photo a bit brighter or a bit darker than that but do you see what the problem is with this thing is you're still depending on what the camera thinks so you know what if you point the camera slightly towards or away from a bright subject compared to your last shot or what if the light just changes your camera has to make that decision all over again and given the brightness levels of
the scene it's now faced with who really knows if the exposure compensation setting that you selected for the first shot will still be the right one all up it's a lot of messing around considering You' naturally think that auto means easy so if if you want to take all the decisions away from your camera and capture exposures at the right levels for what you're doing whether that's for single exposures or bracketed exposures then manual mode is the only way but stick with me because I'm going to lay it out in a way that's easy to
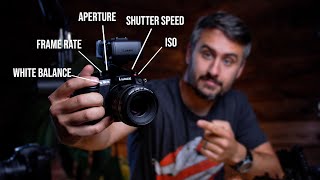
understand and even easier to use when you're out in the field and it's crunch time in fact I've got using your camera in manual mode down to a simple step-by-step process that you can follow and I'll share that in just a minute but first it's important to understand that this one key concept that would dissolve any confusion you may have about apertures shutters speed and ISO so the super oversimplified version is this aperture shutter speed and ISO all affect the brightness of your photo when you turn them up or down with a dial or button
on your camera so imagine you're taking a photo right now and it comes out dark what's the solution well easy you make it brighter by dialing up one of these three settings so at this point you might be wondering how to get that starting exposure you do you need to take 20 test shots to get close to a good exposure in the first place and the answer to that is no because yeah as you're dialing one of your three settings up or down there's an indicator right in your camera's viewfinder that tells you how close
to a correct exposure you really are and then all you have to do is keep scrolling the setting up or down until the indicator gets somewhere near the middle you can take one test shot cuz again this Middle Point is only what the camera thinks and then make Minor Adjustments from there but Steve what s should I adjust aperture shutter speed Oro well as a ballpark starting point I'd recommend starting with aperture between f8 and f11 and having your ISO set to 100 and then you can treat the shutter speed dial as your main brightness
dial why well first because it has the widest range of all three of those settings without changing the quality of your images so with your aperture and ISO set as above you'll usually be able to reach whatever exposure is required to capture the scene properly by controlling the shutter speed now ISO does have a good broad range as well but past a certain point High ISO will cause noise in your images so for now just use shutter speed until you're comfortable with everything that does bring me on to the next important Point that's going to
help you choose which of the three settings to change depending on how you want the photo to look in the end because aperture shutter speed and ISO they each have one other distinct property besides affecting image brightness aperture controls the depth of field or in other words how much of the scene will be in Focus the higher the F number the more will be in focus and vice versa for Landscapes you'll usually want everything to be in Focus so you know if you have anything close to the camera in the foreground that you want to
remain sharp stick to fa and above as a general rule also going higher than F16 May slightly reduce image quality but that's a topic for another day ISO as I mentioned can introduce noise into an image at high values and that's going to vary from camera to camera so you're going to have to test how much noise is too much noise for yourself and your camera but third shutter speed will affect how blurry moving objects are going to appear in your photo the longer the shutter speed I.E the longer the shutter is open the more
blurry they'll be now you can use this to produce some really creative effects like blurring moving clouds or water for example and let me know if you want me to make a video that goes into that in a bit more detail but when you take everything that I've covered in this video and boil it down to its most simple to understand form here is how you can easily get perfect exposures put your camera in manual mode set your aperture to f8 to f11 ISO to 100 and then use your shutter speed as a brightness dial
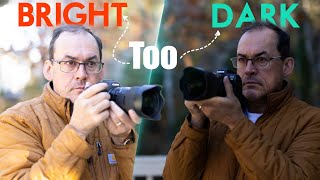
to perfectly dial in the best exposure without having to hope the camera gets it right with its best calculation now a quick side note shutter speeds longer than one 100th of a second they're probably going to need a tripod for the photo to remain sharp however there is a problem that you'll often encounter when shooting near sunrise and sunset and bonus points to you if you're already asking this in your head what happens when there's too much contrast I.E the sun is too bright and the Shadows are too dark and it's impossible to capture The
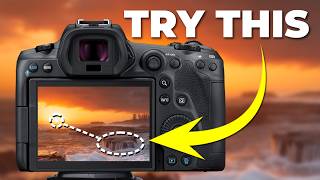
Perfect Exposure in one go well there is only one answer and it's easier than you might think you do exactly what I've already described in this video but instead of taking just one photo take your first shot so that the brightest parts of the scene look good ignoring everything else that might be too dark for now next scroll your shutter speed a few clicks in the direction that brightens the shot and take another photo and then simply repeat this process until your last shot looks good in the darkest shadowy areas and now what you're left
with is a set of bracketed exposures that perfectly capture the entire range of the brightness values in the high contrast scene and all you need to do now is blend them together in Photoshop to turn them into a stunning High dynamic range result and to discover how to do that using a free fre tool that I created that makes it 10 times easier and quicker than ever watch this next video
Related Videos

18:46
STOP using the wrong APERTURE.
Mads Peter Iversen
394,379 views

12:40
Don't make this COMMON MISTAKE in MANUAL w...
Simon d'Entremont
252,879 views
9:11
5 HUGE MISTAKES Self-Taught Photographers ...
Steve Arnold
14,626 views
12:15
How to Shoot Manual in 10 Minutes - Beginn...
Hyun Ralph Jeong
3,869,069 views

10:01
Never Struggle With Camera Settings Again ...
Spencer Fackrell
3,513 views
16:25
The Photography TRAP you MUST AVOID!
Ian Worth
74,458 views

12:24
This Metering Mode is Ruining Your EXPOSURE!
Mark Denney
218,350 views

10:34
7 Photography Mistakes I See All Beginners...
Jason Vong
464,732 views

11:41
The TRUTH about shooting at ISO 100 that t...
Simon d'Entremont
1,995,934 views
10:13
So, Your Photos Aren't Sharp? Here's Why.
Forest Chaput de Saintonge
1,915,033 views
16:15
How Dare They Call My Photography Fake? Ou...
fototripper
81,729 views
14:51
IS RAW BETTER? You may be surprised!
Simon d'Entremont
719,045 views

24:09
These Settings Will Improve 90% of Your Ph...
Mark Wiemels
561,877 views
11:54
EXPOSURE BRACKETING for AMAZING PHOTOS eve...
Simon d'Entremont
215,041 views
26:53
Master Your Camera in 20 Minutes | Tomorro...
Tomorrows Filmmakers
3,981,644 views
20:45
How to Take Photos Like Henri Cartier-Bresson
Frederik Trovatten
878,200 views

21:23
This CHANGED My Editing... Learn Lightroom...
Signature Edits
606,274 views
11:17
GET THE PERFECT EXPOSURE every time.
Simon d'Entremont
438,012 views
8:02
ONE Composition Trick Every Photographer S...
Steve Arnold
15,573 views
19:31
The 7 Photography Mistakes I See All Photo...
Mads Peter Iversen
1,135,989 views