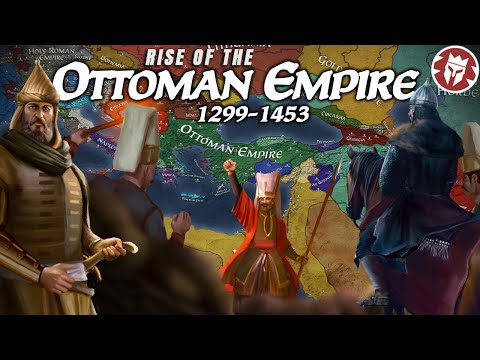
Rise of the Ottoman Empire - From Kosovo to Constantinople DOCUMENTARY
494.97k views58941 WordsCopy TextShare
Kings and Generals
🎥 Watch more than 200 other exclusive videos on youtube: youtube.com/channel/UCMmaBzfCCwZ2KqaBJjkj...
Video Transcript:
Even the largest empires start from the humblest of origins. Such was the case for the Ottomans, who began as the lowly vassals of the Seljuk Sultanate of Rum on the edge of the Turkic world. In this video we will describe the rise of this lowly beylik, as it fought its way to becoming one of the largest empires in history. We will talk about the origins of the house of Osman, its early wars with the Eastern Roman Empire, all the main battles from Kosovo in 1389, which established the Ottomans as a preeminent power in the Balkans
for centuries, to the battles with other Turkic beyliks for the supremacy over Anatolia, to the backbreaking defeat to Timur at Ankara in 1402, to the number of Crusades defeated by the sultans at Nicopolis and Varna, to the Siege of Constantinople that ended the Roman empire and propelled the Ottomans to an even higher status in 1453, and all in between. So, sit back and enjoy, and don’t forget to like, comment and share to grace our work with the favour of the algorithm. For centuries, the hilly mountain ranges of Anatolia had been the breeding grounds of major
civilizations and an integral part of many major empires from world history, like the Hittites, Lydians, Achaemenids, and Alexander the Great’s Macedonian Empire. From the 2nd century BC to the 11th century AD, Anatolia, with its rich natural resources and major urban centers, came under the dominion of the Roman Empire and later its medieval Byzantine successor. Over the centuries, the peninsula also served as a natural fortress for the Romans in their wars against the Sassanids and the various Islamic caliphates of the Middle Ages. However, the Roman hold on Anatolia would decline in the aftermath of the Battle
of Manzikert in 1071, which would see the Great Seljuks under their leader, Alp Arslan, conquer most of the peninsula in a swift military campaign. What followed was a great migration of Turkic peoples into Anatolia, thus forever intertwining the histories of these people with the lands in which they now settled. Within a century after Manzikert, the Great Seljuk Empire would crumble from within after years of decentralization and mismanagement. In Anatolia, a new rump state, the Sultanate of Rum, would continue to carry the Seljuk legacy in the region, with its rulers styling themselves the successors of the
once-powerful Seljuk Empire. During the course of the 12th century, the Sultanate of Rum would find itself at the forefront of European crusader armies and a resurgent Byzantine Empire under the Komnenoi dynasty, which would result in the sultanate losing its military and political influence within the western regions of the Anatolian peninsula. However, with the Latin knights crippling their ostensible Byzantine allies at the sack of Constantinople in 1204 and a new Mongol threat to the east preoccupying the many Islamic states of the Iranian plateau, the Sultanate of Rum was afforded a period of peace from its hostile
neighbors. During the reign of Kayqubad I, the Sultanate of Rum would go through military and architectural ‘golden age’ of its own which would see the state transform into a regional power at the crossroads between Europe and Asia. It is during this period that the Ottoman story would begin. Before we go into the origins of the Ottoman Empire, it is important to remember that many of the events regarding the foundation of the state are shrouded in mystery, owing to the fact that only a handful of major primary sources were written about the Ottomans during this era
and the fact that the Ottomans did not start to record their own history up until the 15th century. Consequently, many modern-day historians are conflicted by the series of events that led up to the foundation of the Ottoman state, so we will instead relay the story as it is traditionally told. During the early decades of the 13th century, many nomadic Turkic tribes from Central Asia and Iran fled their ancestral homes in the wake of Genghis Khan’s invasion of these regions. One of these fleeing tribes would be the Kayıs, the direct predecessors to the Ottomans. Originally from
modern-day Turkmenistan, the Kayı tribe would be attributed by 11th-century Turkic historian Mahmud al-Kashgari as being one of the original twenty-two tribes to come out of the lineage of Oghuz Khan, the legendary and mythical founder of the Turkic peoples of Central Asia. Later Ottoman genealogy from the 15th-16th centuries would cite that the Ottoman dynasty had direct blood connections with the mythical warlord as a way to gather imperial legitimacy within the Turkic-speaking world. However, evidence of this direct blood connection is met with skepticism by modern-day historians. Whatever the case, during the 1220s, the Kayıs, along with many
other Turkic tribes, began their migrations west towards Anatolia. During this exodus, the leader of the Kayıs, Suleyman Shah, would drown in the Euphrates River in Northern Syria in 1227, thus leaving the tribe to his son Ertuğrul Gazi. Before the closure of the decade, Ertuğrul would successfully lead his people into Anatolia and enroll himself and the Kayı tribe in the service of Seljuk Sultan Kayqubad I. During this period, the Sultan of the Seljuks ruled his realm through various Turkish governors and dozens of separate semi-autonomous chiefdoms whose leaders were known as Uç Bey, a title similar to
the Western European margrave. These chiefdoms around the sultanate would supply the state with warriors called ghazis, who were Muslim soldiers who prioritized fighting and plundering in non-Muslim lands in order to gain religious glory and fiscal wealth for themselves. Subsequently, Ertuğrul and his followers too would become ghazi warriors under the Rum umbrella. In order to establish his loyalty to the state, Ertuğrul Gazi, with his 400 ghazi warriors, would fight alongside the Seljuks during the Battle of Yassıçemen against an exiled Khwarezmian Shah. The pursuing battle would end in a decisive Seljuk victory, which would see the Khwarezmians
being pushed out of Seljuk territories. For their services on the battlefield, Kayqubad would gift the Kayı tribe a plot of land at Karaca Mountain, near modern-day Diyarbakir, before permanently settling the tribe near Ankara, placing them near the western frontiers of the sultanate. Now that they had established a home base for themselves, the Kayıs would spend the next couple of decades conducting small raids into the neighboring Empire of Nicaea, joining the ranks of other ghazi warbands and Turkic clans in the process. It was during these raids that Ertuğrul Gazi would seize the village of Söğüt for
the Sultanate in 1231. Once again, for his military services, Ertuğrul Gazi would be gifted the villages of Söğüt and Domaniç by the sultan, achieving the rank of Uç Bey. The ‘golden age’ of the Sultanate of Rum would end alongside the death of Kayqubad I, as the Mongol armies of Ögedei Khan, Genghis Khan’s son and successor, were now at the doorstep of Anatolia. The newly crowned Kaykhusraw II, lacking the martial and diplomatic talents of his late father, began his reign by openly refusing to submit to Mongol suzerainty. The new Seljuk sultan would instead form a Muslim-Christian
coalition against the Mongols in 1243, but in the ensuing Battle of Köse Dağ, the Mongols would decimate the coalition, thus ending any major resistance to their hegemony in Anatolia. Consequently, most of the Sultanate of Rum would be annexed, with Kaykhusraw II becoming a puppet ruler to the Mongols. For the rest of the century, the Seljuk Sultan’s authority slowly deteriorated as governors and chiefdoms around the sultanate started acting more and more independently. As the Sultanate of Rum was going into full decline, the Kayı tribe were slowly settling down in Söğüt, putting aside their nomadic lifestyle for
a more urban one. Being located on the western frontiers of the Sultanate of Rum, the Kayıs were able to avoid direct Mongol military presence, which resulted in the tribe being a haven for Turks fleeing from the Mongols in Eastern and Central Anatolia. Almost five decades after arriving in the region, Ertuğrul Gazi died from natural causes in 1280. His son, Osman Gazi, would take control of the Kayıs in the wake of his death. By the time of Osman, the Byzantine Empire had retaken Constantinople from the Latins, and the Mongol Empire had been divided into four separate
states. However, the Sultanate of Rum continued to be a puppet state to the Mongol successor state of the Ilkhanate. Due to its physical location, the Kayı tribe during this time period had ongoing relations with the various semi-autonomous Byzantine governors of Bithynia, commonly known as ‘tekfurs.’ For one reason or another, during the beginning of the 1280s, tensions between the Byzantine tekfur of İnegöl and Osman Gazi would erupt into a full-on war, which would see the latter defeating the former in a small skirmish near the village of Hamzabey. In the wake of their triumph, the Kayıs would
then capture their first fortified castle at Kulacahisar in 1285 during a surprise night raid, which would give Osman Gazi a base of operations to conduct future campaigns into Byzantine lands. In 1288, the tekfurs of İnegöl and Karacahisar would once again try to prevent Osman Gazi from expanding his reach in the region; however, the ensuing Battle of İkizce would again prove disastrous for the Byzantines, allowing Osman to capture the fortified castle of Karacahisar after a lengthy siege. The next few years would see the Kayıs slowly encroach on Byzantine cities in Bithynia as raids into the region
became more and more frequent. These early successes had earned the Kayıs a large following, as many ghazi warbands from Anatolia began to enlist their services to Osman in order to participate in their lucrative raids. Now that he had acquired a steady influx of ghazi warriors, Osman Gazi would also strive to get the support of the Sufi-Hanafi religious lodges in the region as a way to shore up his political influence amongst the Muslim population. In an attempt to secure an alliance with the Ahis religious order, Osman Gazi would marry the daughter of its leader, Sheikh Edebali,
who was also his dear friend and mentor. According to later Ottoman chronicles, one night, when Osman stayed over at the home of Edebali, he witnessed a dream in which a large tree sprouted from the earth, covering the entire sky with its leaves and branches. The following morning when Osman discussed his vision with Sheik Edebali, the Islamic preacher told him that it symbolized that God had ordained him and his successors to one day rule a worldly empire stretching around the earth. Osman’s Dream would become, in later centuries, a major foundational origin story for the Imperial House
of the Ottoman Empire, and it would serve as a means to justify Ottoman successes in the 15th and 16th centuries as divinely ordained. During the 1290s, the Kayı tribe would extend their reach into Byzantine Bithynia, conquering the towns of Bilecik, Taraklı, Göynük, and Eskişehir from local Byzantine tekfurs. It is important to remember that Osman Gazi’s military actions in the region were not simply just a conflict between Muslims and Christians, as many Christians, even former Byzantine tekfurs like Michael Kosses of Harmankaya, enlisted their services to Osman. As central authority from Constantinople was waning in its Anatolian
provinces, more and more Byzantine tekfurs and Christian soldiers began making individual deals with the up and rising Turkic powers in the region. As the Kayı tribe grew in terms of territory, central authority within the Sultanate of Rum had become nonexistent, as Turkic governors and Uç Beys around Anatolia looked at the puppet Seljuk Sultan in Konya with open disdain. By the end of the century, these Anatolian elites began looking for any opportunities to break their ties with the capital in order to release themselves from Mongol suzerainty. The opportunity would come in 1296 when the Seljuk Sultan
was imprisoned by the Mongols due to a failed plot to gain freedom for the Sultanate of Rum. Taking advantage of this void in power, the many governors and Uç Beys of the sultanate began to declare their independence across the peninsula in droves. During a Friday prayer in 1299, Osman Gazi, too, would declare his independence from Konya, ordering that prayers in his name should be read out in the mosques of his domains instead of the Seljuk Sultan. Now birthed as an independent state, the natal Ottoman nation would be the master of its own destiny. For Osman
Gazi, the beginning of independence meant the beginning of grander ambitions, and in 1301, he would call for a military campaign to strike deep into Byzantine Bithynia. In a swift military campaign, Ottoman forces were successful in capturing the towns of Köprühisar, İnegöl, and Yenişehir. The town of Yenişehir would be transformed into a capital city as Osman moved his administration and personal household within its walls. It was also during this period that Muslim families and the families of ghazi soldiers began to move into the recently conquered urban сenters of Bithynia, thus leaving behind their ancestral nomadic roots
in the process. Before year's end, Ottoman forces had begun blockading the major Byzantine city of Nicaea, a city that the Sultanate of Rum had lost back during the First Crusade in 1097 and had since regained its status as a regional capital for the Byzantine Empire in Anatolia. I n order to understand the military passivity of the Eastern Romans in Anatolia during this period, one must turn the clock by forty years. With the Byzantine reconquest of Constantinople from the Latins in 1261, it first seemed that the fortunes of the Romans were on the rise once more.
However, the scars of the Fourth Crusade from six decades past were still present as the recovery period for the empire was marked by many economic and military crises. The wars of the last half-century had left the Roman capital in ruins, while the countryside and towns of Thrace, Bithynia, and Macedonia were in a state of disrepair. In the west, Bulgaria, Serbia, Eprius, and the Latin lords of Greece were still openly hostile to Constantinople and often clashed with the Romans over land disputes in the Balkans. With his finances in disarray and the Byzantine realm on the verge
of collapsing again, Emperor Michael VIII Palaiologos sought alternative means to save the Roman state. In order to acquire much-needed military and economic assistance from the Western Catholic powers of Europe, the ruler of the Romans submitted to the supremacy of the Pope during the Second Council of Lyon, much to the chagrin of the Orthodox clergy and ordinary citizens of Constantinople. However, by the reign of Michaels's eldest son and successor, Andronikos II Palaiologos, the policy of the Church union with Rome had failed to bear any significant economic and military results and was thus reversed. As a result
of the dire situation he faced and looking at other avenues of gaining income, Andronikos disbanded the imperial fleet, raised overall taxes around the empire, and lessened tax exemptions for his nobility. The official currency of the empire was also debased during this period as the gold contents of Roman coins fell from 18 karats during the beginning of the century to 12 karats by the 1290s. Although the Byzantine economy recovered somewhat, as in the year 1321, the state had raised over 1,000,000 golden hyperpyron, it had come at a high cost in other matters of state. The disbandment
of the domestic fleet would leave the Byzantine realm at the mercy of the naval powers of the Italian merchant republics of Venice and Genoa. Also, due to Andronikos's new cost-cutting policies, a significant number of discharged sailors, underpaid military men, and overtaxed citizenry began distancing themselves from the central government in Constantinople. Many of these disenchanted parts of Byzantine society would instead find new patrons and homes in the Turkic beyliks of Anatolia as imperial presence in the region slowly declined by the end of the thirteenth century. On top of all these economic developments, Roman Anatolia had always
felt distant from their Palaiologi overlords as the citizens of the local region remembered a time when the Laskarids of Nicaea tended to their needs in person against the ravaging powers of the Latins and the Turks. Largely, they saw the Palaiologi as uninterested rulers far off in Constantinople and coupled with the Arsenite Schism and the unpopular blinding of the last Laskarid emperor, Roman Anatolia began slowly drifting away from imperial rule. However, the actual destabilization of Anatolia occurred in the late 1280s when various independent Turkic actors had begun freely conducting military operations in Roman lands without any
jurisdiction from Konya. For the last two hundred years, the Seljuk sultans of Konya had maintained formal diplomatic ties with Constantinople, which saw them reining in their local governors and Uç Beys from conducting rogue operations against their Roman neighbors. During this period of diplomatic relations, official treaties of peace and various trade agreements between the two states were signed as both sides understood they had to play the game of geopolitics for their survival and well-being. However, this would all change by the thirteenth century as central authority had eroded in Konya, which saw many newly independent Turkic figures,
like Osman, begin conducting major raiding operations into Roman lands in Western Anatolia. Not beholden to the many political and economic treaties of Konya and Constantinople and free from the rules of geopolitics, these insignificant actors began taking advantage of Seljuk and Byzantine stagnation as a means to seize new independent bases of power for themselves in the local region. In spite of these developments, such advances were halted during the highly successful Byzantine governorships of Alexios Philanthropenos and John Tarchaneiotes, which saw the pair defeat a number of Turkic armies in Western Anatolia during the 1290s. But with the
revolt and blinding of Philanthropenos, and the majority of troops being relocated to Europe to deal with a new war against Bulgaria, Byzantine Anatolia was left to deal with the ongoing Turkic crisis by itself. But, after years of neglecting his Anatolian provinces and failing to stop the encroachment of multiple Turkic beyliks into his lands, Osman’s blockade of Nicaea was the slap that Byzantine Emperor Andronikos II Palaiologos needed to jump to action . During the summer of 1302, he announced a military campaign to retake the lost Roman lands in Asia Minor. The emperor's son and co-ruler, Michael
IX, had launched a military campaign of his own in the region earlier in the year, however, he was met with failure as his armies were bogged down by Byzantine refugees who were fleeing the peninsula after a series of massive Turkic raids. A 2,000-strong relief force was sent out from Constantinople led by the ‘megas hetaireiaches’, Giorgios Mouzalon, to rendezvous with the forces of the local Byzantine tekfurs in the region and lift the blockade of Nicaea. Being dropped off at the coastal town of Yalova, the relief force would proceed to march down south towards the Byzantine city
of Prusa, modern-day Bursa, where local Byzantine forces of the region were grouping up. However, being aware of a sizable Christian army in the region by his scouts, Osman Gazi and his 5,000 men were able to swiftly intercept the Byzantine relief army near the village of Koyun-Hisar. On the 27th of July 1302, both Ottoman and Byzantine armies made ready for battle on a flat plain near the village. The Byzantine force under Giorgios Mouzalon was solely composed of foot infantry, 1,000 of which were recently hired Alan mercenaries from the Balkans. Meanwhile, Osman’s forces outnumbered the Byzantines by
more than two to one and were made out of mostly light Turkoman cavalry, many of which were from allied Turkic beyliks from the surrounding regions. The battle would begin when a general charge of Muslim cavalry smashed into the Byzantine line. Almost immediately, Byzantine battle cohesion had fallen apart as the Alan mercenaries under Giorgios Mouzalon began prematurely withdrawing from the battle, leaving the regular Byzantine foot infantry at the mercy of the Turks. As a result of the cavalry charge, the Byzantine lines of defense were decisively broken, forcing the remnants of the Byzantine relief force to withdraw
up north towards Nicomedia. The engagement that would later be known as the ‘Battle of Bapheus’ would be the first major victory in the history of the newly established Ottoman state. During the aftermath of the battle, Ottoman forces began spreading out in the countryside of Bithynia, raiding and capturing settlements as they went, even managing to capture the coastal city of Gemlik. A year after the battle, the Byzantine tekfurs of Prusa, Kite, Adranos, Kestel, and Ulubat would begin a military campaign against the Ottomans as a last-ditch attempt to repulse the forces of Osman Gazi and reestablish Byzantine
authority in the local region. Upon gathering up their forces, the Byzantine governors decided to strike at the Ottoman capital city of Yenişehir and then proceed to relieve the city of Nicaea, which was still under an Ottoman blockade. Upon hearing the news of an impending Byzantine counterattack into his newly conquered territories, Osman Gazi quickly mustered a 5,000-strong army and met the Byzantine forces at a nearby mountain pass at Dimbos near Yenişehir. Sources state that the Byzantine army was slightly larger than the Ottoman host, but since both armies were forced to fight in a narrow ravine, the
Byzantines were unable to take advantage of their numbers to flank their foe. The engagement that would be later known as the ‘Battle of Dimbos’ was a bloody affair for both sides, with the Byzantine tekfur of Kestel and Osman Gazi’s nephew, Aydoğdu Bey, being among the casualties. Eventually, the ferocity of the Ottoman troops under Osman and his son Orhan eventually pushed back the Byzantine army, thus resulting in the Battle of Dimbos as a pyrrhic Ottoman victory. After the battle, the Byzantine tekfurs and their forces broke off from one another and fled back to their individual holding
to the west, hoping to defend their territories from the wrath of Osman. However, in the months after the battle, Ottoman forces under Osman and Orhan would quickly besiege and capture the towns of Kite, Kestel, and Ulubat one by one, further lessening Byzantine presence in Bithynia. Ottoman forces in the region would once again resume their blockade of Nicaea and also begin to blockade the city of Prusa. After securing victories at the battles of Bapheus and Dimbos, the Ottoman state under Osman Gazi was poised to follow up their successes with the eventual conquest of Byzantine Bithynia. Within
only two decades, the Ottoman Beylik had transformed from a tiny territorial pocket of two minor villages to a realm of a few dozen towns and major castles. This swift acquisition of new land from the Byzantines would result in a steady migration of Turkic peoples from central Anatolia into the Ottoman Beylik, bolstering Osman’s military and economic capacities to wage wars against his infidel neighbors up north. Further Turkic migration into Ottoman lands would increase in scale during the first decade of the 14th century, as the Sultanate of Rum would collapse after years of internal struggles, leaving central
Anatolia in a state of social and political unrest between the newly established beyliks in the region. Meanwhile, with the last of his Anatolian holdings at risk of falling to the various Muslim powers of the region after the battles of Bapheus and Dimbos, Andronikos II began searching for outside help to fend off the Turkic incursions into his lands. The Roman Emperor would first send letters to Mahmud Ghazan of the Ilkhanate in the hopes of convincing the Mongol ruler to reassert Mongol power in Anatolia after the fall of the Sultanate of Rum. However, with the major Mongol
defeat against the Mamluks during the Battle of Marj al-Saffar, and the further decentralization of Mongol domains in the Middle East, talks between the Byzantines and the Ilkhanate failed to achieve any results. Andronikos II would then turn to the Great Catalan Company, a mercenary group from Western Europe famous for their military exploits in the hilly ranges of Spain and Sicily. Accepting the call for help, the 8,000-strong Catalan Company would arrive in Constantinople at the start of 1303. In an act to bolster morale and loyalty amongst the Catalans, the Italian commander of the mercenary group, Roger de
Flor, would be given the coveted imperial title of ‘Megas Doux’ and would be promised the emperor’s niece in the hopes for a successful military campaign. However, the Catalans would also prove ineffective for the Byzantine Emperor as the mercenary company, instead of focusing on reconquering Byzantine lands in Western Anatolia, indiscriminately plundered the peoples of the countryside, regardless of their religious affiliation, for their own gain, thus alienating the remaining Christian population in the region from Byzantine rule. Gaining nothing from his expensive gamble to retake his Anatolian holdings, Andronikos II, in a disastrous move, would murder Roger de
Flor during a banquet, which would result in a bloody two-year war between Imperial forces and the Catalans in Thrace. While the Catalans had been marauding in Western Anatolia, the Ottomans were forced to withdraw from their blockades of Prusa and Nicaea, but now that the Latin mercenaries had turned upon their former employers, Osman Gazi could resume conducting major raids into Byzantine Bithynia. During this period, the towns of Harmankaya, Geyve, Mudanya, Adranos, Yalova, and Akyazi were slowly incorporated into the Ottoman Beylik, cutting the Byzantines off from their key cities of Prusa and Nicaea. It was also during
this period that Byzantine imperial authority in Western Anatolia became non-existent, as local Turkic beyliks in the region began annexing such Eastern Roman towns as Ephesus in 1308, Smyrna in 1310, and Magnesia in 1313. Only the town of Philadelphia would remain in Byzantine hands as the rest of western Anatolia would swiftly fall into Muslim rule. As a result of the rapid disintegration of Byzantine power in Anatolia and the inept rule of Andronikos II, during the year 1321, a new round of Byzantine civil wars would erupt between the emperor and his usurper grandson, Andronikos III. Wanting to
take advantage of Byzantine civil unrest, the now sixty-year-old Osman began his final preparations for his long-awaited siege on Prusa. Lacking the siege equipment to seize the city, Osman would instead order the construction of two major forts around Prusa to oversee the city's blockade. Upon the construction of the forts, a 10,000-strong Ottoman garrison led by Osman’s son, Orhan Gazi, was installed, thus cutting off Prusa from the rest of the world. As the Byzantine civil war raged on in Thrace between the members of the Palaiologos dynasty, Prusa was left at the mercy of Osman and his armies.
After many years of withstanding the Ottoman army at his gates, on April 6th of 1326, the governor of Prusa would officially surrender the city to Orhan after seeing that no reinforcements from Constantinople were coming to their aid. The city of Prusa would be the first major walled city to come under Ottoman rule, effectively doubling the wealth and population of the beylik overnight. However, the first leader of the Ottomans would not live to see the conquest of Prusa, as he would die shortly before the conclusion of the siege. Osman Gazi, who had fought the Byzantines for
more than forty years and won countless victories for his Beylik, only left a horse, a couple of oxen, and a few flocks of sheep to his name. Unlike other Turkic w arlords who hoarded their wealth, Osman Gazi, according to traditional chronicles, spent all his wealth on his subjects, thus making him very popular with the local Muslim and Christian populace of Bithynia. In the centuries after his death, he would be regarded as the ideal sultan in which all future Ottoman Sultans tried to replicate his reputation as a brave and just leader. Every Ottoman leader from then
onwards would carry the Sword of Osman during their enthronement ceremony as a way to proclaim their reign to be noble and just like the humble founder of the empire. Upon the conquest of Prusa, Osman’s body would be laid to rest within the walls of the city, a wish that he made to his son Orhan during the beginning of the siege. After its capture, Prusa, thereafter known as Bursa, was made the new capital of the Ottoman Beylik. Shortly after this, an issue of succession sprung up between the two sons of Osman. According to a more traditional
rendering of events, the more martially experienced Orhan and more diplomatically inclined Alaeddin agreed on a political agreement in which the former would become the new Bey of the Ottomans while the latter would be given the new political position of Grand Vizier. This political partnership would prove vital for future Ottoman statecraft as when Orhan was off on military campaigns conquering new lands, Alaeddin would oversee running the daily domestic matters of state from Bursa. In the few years after the conquest of Bursa, the new leader of the Ottomans would launch a military campaign into Byzantine Bithynia, reaching
as far as the village of Aydos, thereby cutting off Constantinople from the major city of Nicomedia. By 1328, Nicaea would once again be put under a siege led by Orhan and his eldest son, Suleyman Pasha. That same year, the seven-year Byzantine civil war would end, and a new emperor, Andronikos III, would unite the Byzantine realm after defeating his grandfather and forcing him to retire to a monastery. The new and untested emperor would start his reign off by ordering an official imperial campaign to retake lost lands in Bithynia and relieve the blockade of Nicaea. With the
support of his grand domestic and close friend, John Kantakouzenos, Andronikos III was able to fund and muster around 4,000 infantry for his new grand Anatolian campaign. The plan for the first portion of the campaign was for imperial forces to cross into Anatolia via the Bosporus, force march to Nicomedia, resupply and gather more forces in that city, then march on Nicaea to lift the Ottoman blockade. If all went well and Nicaea was relieved from Ottoman forces, the emperor would then conduct the slow process of pushing back the Turks from Bithynia and reestablishing Roman rule in the
region. As the Byzantines were preparing for their crossing to Anatolia, Orhan, who was still personally leading the blockade on Nicaea, heard the news of the incoming Byzantine military campaign and withdrew most of his besieging forces to meet the Byzantine host before they could regroup in Nicomedia. After many months of anticipation, Andronikos III and his newly assembled army crossed into Anatolia in June 1329. However, after only three days of marching along the shore of the Gulf of Nicomedia, the imperial forces met a Turkish host of 8,000 led by the Ottoman bey himself near modern-day Maltepe, blocking
the main road to Nicomedia. With his foe stationed on a nearby hill and having twice his manpower, conditions were far from favorable for Andronikos. In spite of the great odds, on June 10, the ambitious Byzantine emperor accepted Orhan’s challenge and deployed his forces for an upcoming engagement. The following Battle of Pelekanon would begin when three hundred Ottoman mounted archers suddenly rode down the hill and began harassing their foes with arrows. Being undeterred by the missiles from above, Eastern Roman forces made their way up the hill in a tight formation, even managing to drive back two
waves of Ottoman assaults down the hill. However, as day turned into night, and seeing that Turkish assaults were not ceasing anytime soon, the Byzantine army began to withdraw back to their camp in order to conduct an orderly retreat in the morning back to Constantinople. But during this withdrawal, Ottoman cavalry had managed to position itself at the rear of the Byzantine army and proceeded to charge at the now exposed flanks of the imperial bodyguard of Andronikos III, thus wounding the emperor in the process. As panic arose within the Byzantine ranks due to the unexpected attack, the
rumor of the emperor being slain on the battlefield began to spread among the rank-and-file men of the army—an army that was starting to lose its battle cohesion after being exhausted by multiple hours of combat with Orhan’s host. As the wounded Andronikos was stretched off the battlefield alongside his personal entourage, the morale-depleted Byzantine army scattered in the plain below the main Ottoman hill. Throughout the night into the following morning, Turkish Akinci horsemen picked off the remaining routing Roman forces, thus ending the engagement in an Ottoman victory. The Battle of Pelekanon would be the first direct encounter
between the heads of state of the Byzantine and Ottoman realms. With the Eastern Roman relief army being destroyed during the battle, Nicomedia and Nicaea were on their own against Orhan and his besieging forces. After Pelekanon, Andronikos III officially declared a policy of containment when it came to the Turks of Anatolia, thus ending more than a thousand years of Roman military presence in Anatolia. Within three years of the battle, Nicaea would surrender to Orhan, and Nicomedia would follow soon after in 1337. A vast majority of Bithynia was now under Ottoman control, with the exception of a
few villages and settlements alongside the Bosporus Strait. While Orhan was out conquering towns and cities for the Ottoman Beylik, Alaeddin Pasha from the new capital of Bursa began a series of political and military reforms in order to better legitimize Ottoman power in the region. The Grand Vizier would first establish an Ottoman monetary system in which silver coins were stamped with Orhan’s name, thus legitimizing the Ottoman Bey as a proper Turkic ruler in the region. Secondly, a new Imperial dress code was adopted for governmental and military workers within the beylik as a way to emulate the
Seljuk royal court of old. Lastly, a standing army of salaried soldiers was established in the form of the Yaya and Müsellem military corps, however, many Muslim Turkomans still preferred being granted land fiefdoms called Timars by the Ottoman government instead. No doubt Alaeddin Pasha had many more reforms planned, but sometime during the conclusion of the Siege of Nicaea, he would fall ill and die in Bursa after years of loyally serving as his brother’s right-hand man. Back in the Byzantine Empire, the military and political situation would only get worse as Andronikos III would be sucked into a
three-way struggle in the Balkans between the Empire of Bulgaria and the emerging powerhouse that was the Kingdom of Serbia. During these inter-Christian conflicts, in the summer of 1341, Andronikos III would suddenly fall ill with malaria and die, leaving the imperial throne to his nine-year-old son, John V Palaiologos. A regency was immediately established between the former emperor’s confidant John Kantakouzenos, Empress-dowager Anna of Savoy, and Ecumenical Patriarch John Kalekas. However, when Kantakouzenos left the capital to fend off a Serbian invasion in the Balkans, the latter two regents would conduct a palace coup and named Kantakouzenos and his
supporters as enemies of the state. What followed was a six-year bloody civil war which would see Byzantine society fracture in two as the urban populace of the empire supported John V while the rural lands supported Kantakouzenos. Having lost all support in the major cities of Thrace, with the exception of Didymoteicho, and desertions plaguing his armies, Kantakouzenos would turn to the Turks of Anatolia to bolster his ranks. The Byzantine magnate would first employ the services of Umur the Lion of the Aydinids; however, the Turkic warlord would withdraw from the civil war when crusader forces from Europe
invaded his beylik in 1343. Kantakouzenos would then turn to the Ottoman and Sarukhan beyliks for assistance, even offering the Ottoman Bey his eldest daughter’s hand in marriage to solidify the alliance between their two states. Accepting the offer in a lavish ceremony in the town of Selymbria, Orhan Gazi and Theodora Kantakouzene would be married in front of Kantakouzenos’s family, thus making the bey of the Ottomans the son-in-law to the Byzantine magnate. With the marriage solidified and a couple of thousand Ottoman soldiers being ferried into Byzantine Thrace, Kantakouzenos would effetely change the tides of the war in
his favor, and by 1347, he would seize Constantinople and proclaim himself as senior co-emperor to John V. Even though the civil war was now over, Byzantine territory in the Balkans had been carved up severely by the newly formed Serbian Empire under Emperor Stefan Uroš IV Dušan and the Bulgarian Empire. In addition to major territorial losses, the Byzantine countryside of Thrace was thoroughly pillaged by Turkic mercenary soldiers during the war, leaving the empire in a state of economic and social crisis. While the Byzantine Empire was in disarray, Orhan Gazi, during the year 1345, would take advantage
of another neighboring civil war, this time in the Karasid Beylik. A bloody succession war between the sons of the former bey in the region had broken out, leading to an Ottoman military intervention by Orhan and his son Suleyman Pasha on the basis of re-establishing peace within a fellow Muslim nation. However, by the end of the conflict, the sons of the former Karasid Bey would be put under Ottoman house arrest and the beylik would be formally annexed into the Ottoman realm a few years later. The large Karasid navy, famous for its piratical exploits in the Aegean
and its many talented Turkic soldiers and generals, would now be under the service of Orhan and his successors. Back in the Byzantine Empire, the dual rule between John V Palaiologos and John VI Kantakouzenos had become untenable as the two rulers and their respective factions butted heads in the governance of the state. With the imperial armies in shambles, the domestic economy shattered, and the arrival of the Black Death from Crimea, tensions within Constantinople were at a political boiling point. Gathering up Serbian, Venetian, and Genoese fiscal and military support, in 1352, the junior co-emperor of the Byzantines
would invade the territories of Kantakouzenos’s holdings in Thrace, thus sparking a new round of civil war. John VI Kantakouzenos would once again call forth Ottoman support for his war effort. Now in his seventies, Orhan Gazi would entrust Ottoman military operations to his son Suleyman Pasha. A 10,000-strong Ottoman army consisting of mostly calvary would be transported to Thrace which would result in Kantakouzeni forces defeating the coalition army of John V during the Battle of Didymoteicho by the end of the year. After the decisive battle, John VI Kantakouzenos would declare victory against the Palaiologos family, delegitimizing the
junior-emperor John V in favor of his son Matthew. However, crises would persist as Ottoman forces led by Suleyman Pasha began raiding the countryside of Thrace, occupying the fort of Tzympe in the process. While negotiations for the return of the fort were underway on the night of March 2, 1354, the whole coastline of Thrace was devastated by a massive earthquake. Major towns in the region, like Gallipoli, saw their fortifications destroyed and their inhabitants dispersed. Seeing the magnitude of destruction from the Asian side of the Hellespont, Suleyman Pasha would quickly order the construction of rafts to cross
over the channel and gathered a great crowd of Turkic families to get ready to repair and resettle the towns of the Gallipoli peninsula. Before long, the first Ottoman families stepped foot into Europe, and the fort at Gallipoli was taken over by a substantial Ottoman garrison. Hearing the news that the Turks had crossed into Europe, in an act of desperation, Kantakouzenos offered Suleyman four times the amount of tribute that he had previously proposed in previous negotiations for Tzympe and for the Ottoman withdrawal of the entire region, however, the Ottoman leader shot back, stating that his troops
had merely taken over a number of places that had been deserted by their Greek inhabitants and that Gallipoli had fallen to him by the will of God and not by force. Suleyman Pasha, who had by then taken over the Ottoman military after his father’s steady retirement from public life, would not honor the formal alliance between Constantinople and Bursa but instead opted for a more aggressive posture against Kantakouzenos in order to take advantage of a destabilizing Byzantine Empire. By the summer of the same year, Suleyman Pasha would begin his much-awaited military campaign in Byzantine Thrace, capturing
the towns of Keşan, Tekirdağ, and Corlu in rapid succession. Meanwhile, back in the Byzantine capital, Kantakouzenos’s rule became increasingly unpopular due to the Byzantine policy of containing the Turks in Anatolia failing disastrously. By the end of the year, the more popular John V Palaiologos would be invited back to the capital to rule as co-emperor to Kantakouzenos, and before long, the latter would retire to a monastery in disgrace. Within three years, the last forces of Matthew Kantakouzenos would be defeated in Thrace, thus ending another round of Byzantine civil wars. The bloodshed of the last sixteen years
had devastated the Roman world to the point of no return, as the empire was now reduced to a few lands in Thrace, Macedonia, the Aegean, and the Morea. In addition to territorial losses, Constantinople would not be able to deploy proper field armies anymore like in the past, as its economic and military capabilities were slashed severely. All of this resulted in the remaining Byzantine realm now being heavily reliant on the Italian maritime republics of Venice and Genoa for military, political, and economic support in the upcoming decades. With Osman and Orhan securing early victories against the Byzantines
and capitalizing on the political divisions of their neighbors, the Ottoman Beylik had become one of the foremost rising stars of Anatolia. By 1357, the Ottoman Beylik, under the military leadership of Orhan Gazi’s son, Suleyman Pasha, had managed to create a bridgehead into Europe with the territorial acquisition of the Gallipoli Peninsula. As Thrace was opened to Ottoman raiders and Ottoman families continued settling in the newly captured regions in Europe, the presumptive heir of the beylik would also begin the peaceful annexation of Anatolian towns like Ankara and Bolu with the help of the local Ahis religious order,
the same order that Osman had allied during the days with the Kayi tribe. However, the same year would also see the twelve-year-old Şehzade Halil, Orhan’s son, through his marriage to the Byzantine royal Theodora Kantakouzene, being captured by Genoese pirates during a raid on Ottoman territory. Pleading for the return of his son, the elderly and desperate went so far as to request the help of the newly established Byzantine Emperor John V Palaiologos in the following negotiations with the pirates. In an act of classic Byzantine diplomacy, the emperor agreed to help the Ottoman leader retrieve back his
son from the Genoese in return for declaring the half-Byzantine prince as heir to the Ottoman beylik, paying half of the ransom requested by the pirates, revoking the Ottoman alliance with the Palaiologos-rivaled Kantakouzenos family, canceling all of Constantinople’s debts to Bursa accumulated during the latest civil war, and lastly the cessation of all Ottoman raids into Byzantine territories. Orhan would reluctantly agree to John’s terms, and all Ottoman conquests in Thrace were put on hold while the Byzantines negotiated with the Genoese. After two years of negotiations, Halil would be released and be first transported back to Constantinople, where
the Ottoman-Byzantine prince would wed the emperor’s 10-year-old daughter before being shipped off to Bursa. The whole crisis would highlight John V’s answer to Ottoman aggression by planting the seeds for a Byzantine royal to inherit Ottoman territories and even potentially transforming the beylik into a fellow Christian ally. John V’s plans for the Ottoman Beylik would move further forward when Orhan’s eldest son and assumed heir, Suleyman Pasha, unexpectedly died during a hunting expedition in 1359. Going into grief for his son and heir, the now physically ill Orhan Gazi would appoint his thirty-three-year-old son, Şehzade Murad, to oversee
the Ottoman armies stationed in Thrace, before secluding himself within the walls of the Ottoman palace in Bursa. However, like his brother before him, Murad would also ignore the established agreements between Constantinople and Bursa and began planning for a future military campaign to seize the major Byzantine city of Adrianople. After three years of being inactive, Ottoman armies in Thrace would begin military operations in the region in a two-pronged invasion. The upcoming military campaign would be led by three Ottoman commanders, all appointed by Murad personally, Lala Şahin Pasha, Haci Ilbey, and Gazi Evrenos Bey, the latter two
being former Karasid commanders. The Ottoman prince would first assign Evrenos Bey and his forces alongside the Thracian-Aegean Sea coast to prevent Christian reinforcements from entering the region from the west while he himself would take the bulk of the Ottoman army into Byzantine territory up north. During the beginning of 1360, the Ottoman military campaign would begin which would see Murad swiftly capturing the towns of Lüleburgaz, Babaeski, and Kirklareli, reaching the Black Sea coast, thus territorially cutting off Constantinople from the rest of Europe. That following year, Evrenos Bey would capture the militarily strategic fortress town of Didymoteicho
after a short siege, while Murad was finalizing his preparations for the march towards Adrianople. As panic arose in Constantinople caused by the sudden Ottoman invasion, John V would form a new joint Byzantine-Bulgarian force in the west to counterattack the Ottomans in Thrace, however, the coalition force would be dispersed by Murad during the subsequent Battle of Pinarhisar and be pushed back behind the walls of Adrianople. Consolidating all his forces in the region, Murad began his much-awaited siege on Adrianople during the summer of 1361. Before long, the local Byzantine governor of the city fled from the siege,
thus resulting in the local garrison surrendering to Ottoman forces. Soon after the fall of Adrianople in the spring of 1362, the secluded eighty-year-old Orhan Gazi would die from natural causes. His final words to his son Murad were, “son, I’ve reached the end of my road while you are just starting out on yours. May God the Almighty bless your reign.” Orhan Gazi would be buried in the Ottoman capital city of Bursa, the city that he had conquered thirty-six years ago. Being renowned as “the greatest and wealthiest of the Turkomen rulers of Anatolia” by the famous 14th-century
Muslim scholar and traveler Ibn Battuta, Orhan Gazi’s greatest legacy would be transforming the Ottoman Beylik into a military power on par with the Byzantine Empire and for expanding the state into Europe. Receiving the news of the death of his father while in Thrace, Murad would start his journey back to the capital city of Bursa to secure the Ottoman throne. Upon arriving in the city, the young şehzade would be proclaimed as sultan by the statesmen and the religious ulema of the capital. Meanwhile, in Anatolia, the news of Orhan’s death had brought a period of uncertainty in
the region as the Ottoman garrison at Ankara was expelled by the local officials of the city, and the sons of the former Ottoman ruler, Şehzade Ibrahim, and Halil revolted against Murad’s swift seizure of the Ottoman throne. Hearing of the troubling developments from his Anatolian province, in a quick and successful military campaign during the same year, Murad would reestablish Ottoman rule in Ankara and defeat and execute his two half-brothers, marking the event as the first Ottoman fratricide in history. After stabilizing his Anatolian holdings for the time being, the new Ottoman leader turned his gaze back to
Thrace and made new plans to once again strike deep into the local region in a two-pronged invasion. Gazi Evrenos Bey would take his contingent of the Ottoman army and head west hugging the Aegean Sea, while Lala Şahin Pasha would take his forces up north towards the Rhodope Mountain range and descend into the Maritsa Valley. The Ottoman military offensive started out strong with Evrenos Bey capturing the city of Komotini and Lala Şahin Pasha capturing Stara Zagora before going on to besiege Plovdiv, one of the largest cities within the Bulgarian Empire. After a long siege, in 1364,
the city would fall to the forces of Lala Şahin Pasha and would thus serve as a major military base for the Ottomans in the region. As cities in Thrace collapsed like dominos, Murad would further order another mass migration of Ottoman families from Anatolia to resettle in the newly conquered lands in Europe. After the Black Death, many cities in the Balkans were heavily depopulated. This made it easier for the Ottomans, who were only lightly scarred by the pandemic, to conquer and settle in the Balkans throughout the course of the decade. With the death of Şehzade Halil
and the Ottoman conquest of Thrace, an official peace treaty was signed between the Ottomans and a now rump Byzantine Empire in 1364, which would result in John V recognizing Murad’s conquests in the region and promising to refrain from forming an anti-Ottoman coalition with other European powers. Although there is a lack of European sources on the matter, according to traditional Ottoman chronicles, during the same year the peace treaty was signed a European crusade was launched by the rulers of Hungary, Serbia, Bosnia, and Wallachia against Murad. Marching on Adrianople, which was by then slowly being transformed into
a new Ottoman capital city, the goal of the crusade was to thwart further Muslim expansion into the Balkans and to possibly even push the Ottomans back across the Dardanelles into Anatolia. However, in a series of shrouded events, the crusader army would be repulsed by the Ottoman forces of Haci Ilbey near the walls of Adrianople during the Battle of Sırpsındığı, or ‘Serbian destruction,’ which would see a 10,000 strong Ottoman defeating a far larger European host. The decisive Ottoman victory would help ensure a permanent Ottoman presence in the Balkans for another decade, and would also mark the
first time the Ottomans would fight against an invading crusader army in their history. As Ottoman victories against European powers mounted, another crusade was launched against Murad in 1366, this time under the leadership of the Count of Savoy Amadeus VI. In a short military campaign between 1366 and 1367 Savoyard forces proved far more successful compared to their Balkan counterparts, having recaptured the Gallipoli Peninsula back for the Byzantines before proceeding to raid the Bulgarian Black Sea coastline. With the Byzantine emperor openly working with the crusaders and traveling to Hungary and Rome for military support against the Ottomans,
Murad would renew his war with both Constantinople and the Bulgarians. During the year 1368, the Bulgarian towns of Yambol, Burgas, Samokov, and Sliven were quickly captured by Ottoman forces, and Byzantine lands were once again thoroughly raided. Seeing that European assistance was not forthcoming, John V would send his son Manuel to Adrianople, now renamed Edirne, to plead with Murad and reestablish peace, which the desperate Byzantine Emperor was thankfully granted. With peace once again reestablished, Murad I could now focus on domestic issues such as integrating his newly conquered territories into the sultanate. Like with prior Muslim states,
the Ottoman Sultanate followed a traditional policy of tolerance towards the “peoples of the book,” ergo Christians and Jews, who had the right to protection of their lives, properties, and religions as long as they accepted Muslim rule and paid the special head tax called the ‘Jizya’ in lieu of performing military service. Although mass conversion was prohibited due to the Ottoman desire to retain the Jizya as a major source of income, some sections of the Balkan nobility would convert to Islam during this period to gain the full benefits of Ottoman rule. Perhaps the most major domestic development
to come out during the reign of Murad I would be the introduction of the Janissary military corps into the Ottoman military. After the conquests of the last decade, the Ottoman state and its ghazi soldiers had acquired considerable plunder, including the acquisition of many Christian male prisoners of war. During the reign of Murad, the Ottoman state instituted a tax of one-fifth on all slaves taken in war, and it was from this pool of manpower that Murad first constructed the elite Janissary military corp. With the help of his Grand Vizier, Candarli Halil Pasha the Elder, the sultan’s
first household troops were formed, thus creating the first standing elite military corps in Ottoman history. In the next few decades, the ‘Devshirme,’ also known as the blood tax, would be fully institutionalized within the Ottoman state, which would see the recruitment and training of young Christian peasant boys into various roles within the central Ottoman administration and military. By the time of Murad’s conquests in the Balkans, the two other major powers of the region, the empires of Bulgaria and Serbia, were in the slow process of decentralization and economic stagnation. During the first half of the 14th century,
both states had taken advantage of the rapid loss of Byzantine power in the Balkans by annexing large swaths of Byzantine lands in the region. While the Byzantine world was crumbling, Serbia under Emperor Stefan Uroš IV would reach its territorial, political, economic, and cultural peak, thereby ushering in a mini Serbian Golden Age. It was during this period in which the Serbian Emperor would openly contest and undermine Byzantine authority in the region by proclaiming himself as the ‘Emperor of the Serbs and Greeks’, thereby declaring himself to be the true inheritor of the Roman legacy, in addition to
propping up the Serbian patriarchal church as the head of Eastern Orthodoxy. However, in 1355, the benevolent and ambitious ruler of Serbia would suddenly die, leaving his newly constructed empire to his son Stefan Uroš V. Lacking the political and martial skills of his father and often being indecisive in his ruling, Uroš V would be unable to keep the Serbian nobility under his control for most his reign. By 1365, the most powerful of the Serbian nobles, Vukasin Mrnjavčević, had considerable influence over Uroš and was even given the lesser title of King of Serbia and effectively ruled over
the weak emperor. Meanwhile, Bulgaria under Tsar Ivan Alexander would also go through a period of decentralization which would see the empire being split into three separate entities all ruled by semi-autonomous Bulgarian princes. In the wake of uniting the realm under his rule and seeking to get revenge for the Battle of Sırpsındığı, King Vukasin Mrnjavčević, at the head of a 20,000 to 50,000-strong force alongside much of the Serbian nobility would invade the Ottoman Beylik during the late summer of 1371. Stationed in Edirne and hearing the news of an incoming crusader invasion from the Balkans, Lala Şahin
Pasha would send out letters to Murad who was in Bursa with most of the Ottoman army, to send military reinforcements to Thrace at once while Gazi Evrenos Bey was gathering the remaining Ottoman forces in Thrace to put up a minor resistance against the crusaders. As the crusader army reached near the outskirts of the Ottoman capital, the military decision to halt and encamp near the river Maritsa was taken by the Serbian nobility. According to Ottoman chronicles, the crusader army had begun to feast at night, leaving their encampment unprotected. The Serbian nobility did not believe a major
Ottoman army was in the region since most of the Ottoman army had been recalled to Anatolia months before by Murad. With the element of surprise on his side, Gazi Evrenos Bey and his 800-strong scouting retinue would ambush the crusader camp in the middle of the night alongside Lala Şahin Pasha’s garrison forces from Edirne. Thousands of Serbians were killed in their tents and many drowned in the nearby Maritsa as a large-scale panic engulfed the Serbian camp caused by Evrenos’s sudden night raid. Serbian King Vukasin Mrnjavčević and the bulk of the Serbian nobility would too be slaughtered
in the pursuing mayhem, which would see the destruction of the crusader army. Only by the time the sun was up the following morning it became evident to Ottoman leaders that they had won a major victory. According to Balkan chronicles, the Maritsa was polluted with thousands of bodies and the river ran scarlet with the blood of those killed during the battle for weeks. The Ottoman victory during the Battle of Maritsa, also known as the Battle of Chernomen, would firmly secure Ottoman presence in the Balkans. The battle would also mark the beginning of the end of the
Serbian Empire as the childless Stefan Uroš V would die during the following winter, leaving what remains of the Serbian nobility to establish their own despotates in the former imperial lands of the emperor. Hearing the news of the crusade against him and the victory at the Maritsa, Murad I and the bulk of the Anatolian army would swiftly travel back into Thrace, where he would once again make plans to conduct another major military campaign into the Balkans after the collapse of the Serbian Empire. During the year 1372, Ottoman armies would begin the campaign by marching into Christian-held
Macedonia alongside the Aegean coast, conquering the cities of Xanthi, Kavala, Drama, Serres, Kyustendil, and Veria. In addition to the conquests of many towns in Macedonia, the Serbian breakaway domains of Prilep and Velbazhd both submitted and became vassals of Murad as Ottoman armies approached their gates. With the Ottoman victory at the Battle of Maritsa and Muslim armies now freely marching around the Balkans, the Bulgarian and Byzantine Empires both made strides to reach a rapprochement with Murad to keep their realms intact. In 1373, John V Palaiologos became a tributary to Edirne in return for retaining the few
Balkan holdings he still ruled like the major coastal city of Thessalonica. Meanwhile, the newly appointed Tsar Ivan Shishman of Bulgaria would also negotiate with Murad to become a tributary to Edirne, in addition to also giving the hand of his sister Kere Tamara to the Ottoman Sultan. Within only two years after his victory at the Maritsa, Sultan Murad I, grandson to a lowly nomadic warlord who migrated to Anatolia, had become the overlord of both the Byzantine and Bulgarian empires in addition to large swaths of the former Serbian Empire. After the political treaties of 1372 and 1373,
Murad had successfully built a network of allies in the Balkans from which he could regularly request levies for his ever-growing armies. To shore up the loyalty of his newly acquired Balkan vassals, Murad, during the spring of 1373, would request the participation of Byzantine Emperor John V Palaiologos and a portion of his armies in the recent border skirmishes against the Turkic Jandarid Beylik in Anatolia. Seeing no way to escape his helpless situation, John appointed his eldest son and junior co-ruler, Andronikos IV, to administer the Byzantine capital while he joined the main Ottoman host under Murad in
Anatolia. However, upon the departure of his father, the young Byzantine monarch, who was discontent with being a vassal of Murad, would conduct a successful palace coup against his family and declare himself sole emperor. As the Palaiologos Dynasty was again in civil war, tensions within the House of Osman would also be boiling. By the time of the Byzantine palace coup, Murad I had three sons from his various marriages, the eldest to youngest being Şehzade Bayezid, Şehzade Yakup, and Şehzade Savcı. Perhaps seeing that he had no real chance of succeeding to the Ottoman throne, the youngest of
these sons, Şehzade Savcı, would mirror Andronikos IV, rebelling against his father and seizing the Ottoman capital city of Bursa, where he declared himself Sultan. Hearing the news of their rebellious sons, Murad and John would halt their Anatolian campaign and proceed to march their armies against their respective disobedient children. The simultaneous Ottoman-Byzantine civil wars would see Murad first marching on and capturing the city of Bursa in a short siege. However, Savcı would successfully escape the siege and make his way down to the village of Kite to meet up with the bulk of his newly recruited army.
This host consisted primarily of Anatolian Turkomans displeased with Murad’s policy of recruiting new Muslim converts from the Balkans into the Ottoman army. In an engagement near Kite, the numerically superior forces of Murad would defeat the forces of Savcı, thus capturing the Ottoman prince in the process. Although Murad kindly advised his rebellious son to confess and repent for his guilt for his failed revolt, Savcı responded to him with cruel and harsh words, which resulted in his blinding and later execution on the orders of his father. Meanwhile, back in Europe, with the help of Ottoman troops, John
V forced his usurper son's hand into surrendering the imperial throne after only a one-month reign. Although Murad implored him to blind his rebellious son, John, in the act of mercy, would instead settle for the imprisonment and partial blinding of Andronikos, thus officially bringing an end to the simultaneous Ottoman-Byzantine civil wars of 1373. However, conflicts between the Palaiologos household would persist into the foreseeable future. Between 1366 and 1369, John V went on a series of European tours to gather military and fiscal support against the recently expanding Ottomans in the Balkans. The desperate Byzantine emperor would first
visit the Kingdom of Hungary and seek the support of King Louis I, to no avail. He then made his way west to Rome to meet with Pope Urban V. Proposing to end the schism between the Western-Catholic and Eastern-Orthodox churches as a last-ditch way to gather up Western support against the Ottomans, John V converted to Catholicism in St Peter’s Basilica and recognized the Pope as the supreme head of the church. However, on his journey back home to Constantinople, the Byzantine emperor was detained by Venetians, whom he was in serious debt. The Venetians forced him to concede
the Island of Tenedos, a strategic island near the mouth of the Dardanelles. However, this action would place the Byzantine Emperor in the middle of the Venetian-Genoese rivalry over the hegemony of the Mediterranean, which would strain both crucial maritime trading cities’ relationship with Constantinople. After years of failed promises from the West, being surrounded by the armies of Murad, and facing economic strains at home, the Orthodox populace of Constantinople had begun to feel alienated by their now Catholic monarch. During the March of 1376, ten Venetian ships had arrived at the gates of Constantinople to conclude the long-awaited
annexation of Tenedos in return for paying the emperor 30,000 ducats in cash as well as returning the prestigious Byzantine crown jewels, which were given to the doge back in 1343 by Emperor Johns’ late mother to secure finances during a previous Byzantine civil war. Hearing the news of their rivals’ recent actions to acquire Tenedos, the Genoese, based in their colony in Galata near Constantinople, would engineer the escape of Andronikos from prison and whisk the former emperor over to Galata. After hearing the news of Andronikos’s escape, Sultan Murad decided to play factions in Constantinople off one another.
First, the sultan lent a cavalry force to the escapee Byzantine emperor to overthrow his father. During a short summer siege, Andronikos IV's forces would storm into Constantinople and imprison John V and his second eldest son and co-emperor Manuel in the dungeons of the tower of Anemas. As a reward for their assistance in reclaiming his throne, Andronikos would award the Genoese the disputed island of Tenedos and the Ottomans the peninsula of Gallipoli, which Murad had lost during the Savoyard Crusade back in 1367. With war with Venice looming over him over the issue of Tenedos and facing
supply issues in the capital, the reigns of Andronikos IV and his son and newly crowned co-emperor, John VII, were a time of crisis for the Byzantine Empire. By the end of 1376, an alliance of Venetian warships and pro-John V Byzantine forces would successfully capture the Island of Tenedos in a straightforward military operation before making an ambitious naval attack on Constantinople the following summer. Although unsuccessful, the attack on the capital worsened Andronikos’s hold on power within the city, as Constantinople faced a major food shortage. Events in the capital would only get worse for the Byzantine Emperor,
as in the summer of 1379, John V and his son Manuel II had successfully escaped their captivity in the capital and made their way to the court of Murad as a last resort to regain their prominence. The sultan of the Ottomans would once again take on the role of kingmaker, deciding to help John V, who had offered him a larger yearly tribute in addition to the last remaining Byzantine possession in Anatolia, the town of Philadelphia. Accepting the desperate John’s most generous offer, Murad would supply the exiled emperor with an army. By the end of the
summer, the forces of John V and Manuel II would storm into Constantinople after a short standoff with the city's garrison. However, before the fall of the city, Andronikos IV and his household escaped to Genoese Galata. There, the deposed emperor would continue to press his claim for the throne until a political agreement was settled between the two Byzantine factions in 1381, granting Andronikos IV and his son John VII jurisdiction over the town of Selymbria near the imperial capital. In the following years, Venice and Genoa would also agree to depopulate the island of Tenedos and destroy its
fortifications, thus effectively creating a neutral zone. In the grand scheme of things, this latest round of Byzantine civil wars would benefit the young Ottoman state. It had squeezed major concessions from Constantinople in the form of the Gallipoli peninsula, which would give Murad I the opportunity to once again move his armies freely between Asia and Europe. As the wars in Europe settled, for the time being, Murad would turn his gaze to Anatolia and its complex domestic scene. Ever since the fall of the Sultanate of Rum at the beginning of the century, the region of Anatolia had
been ruled by a collection of Turkic beyliks ranging from the Aegean coast to the west all the way to the Taurus Mountains to the east. Although border skirmishes between states were quite common, a new informal political consensus was formed in Anatolia by these various Turkic beyliks during the century, which assured a steady peace between their ruling families. Initially, the Ottomans were merely one of these petty beyliks among many, but by the reign of Murad I, this was no longer the case. As they now owned large swaths of territories in Europe, the sons of Osman had
become the most prestigious Turkic noble family in the region. By the start of the 1370s, the Karamanid Beylik, who saw themselves as the inheritors of the Sultanate of Rum from their former Seljuk capital of Konya, had begun a series of military operations against their weaker neighbors: the Germiyanid, Hamidid, and Eretnid Beyliks. Seeing an opportunity to make gains in Anatolia without disrupting the informal political consensus of the region, Murad opted to marry his eldest son, Şehzade Bayezid, to the daughter of the bey of the Germiyanid Beylik as part of a pact of friendship. As a dowry
from his daughter to the Ottomans, the Germiyanid ruler, Suleyman Bey, would also offer Murad the towns of Kütahya, Tavşanlı, Emet, and Simav. In addition to creating a steady relationship with the region's most powerful ruler of the Turkic states, Suleyman Bey also gained a physical buffer in the form of the Ottomans against his openly hostile neighbor to the east. During the large wedding reception in Bursa, Murad and his household would be greeted by the major Turkic noble families of Anatolia, many of which sought protection from the Ottoman ruler against the Karamanids. For example, the Bey of
the Hamidids, Huseyin Bey, would also offer Murad the towns of Akşehir, Yalvaç, Beyşehir, Seydişehir, and Isparta in exchange for 80,000 gold ducats and protection from the Karamanids, which the Ottoman leader eagerly accepted. Overnight, the Ottomans would become the guarantors of peace in Western Anatolia, as Murad’s domains now split off the region from the Karamanids. Still wishing to keep the peace in Anatolia, Murad I would offer his daughter's hand to the leader of the Karamanids, Alaeddin Ali Bey. Securing peace in Anatolia for the time being, Murad would once again turn his attention to Europe as he
planned to expand his rule further into the Balkans. Justified or not, Murad believed that his network of vassals in the region was plotting against him and that they were too weak to provide for his armies. Whether or not Bulgarian Tsar Ivan Shishman was still loyal to Murad as his vassal did not matter, for, during 1381, Ottoman raids into Bulgaria were resumed by local Ottoman border lords. This raiding snowballed into a full-scale war between Edirne and Tarnovo. With hostilities declared, the Ottoman sultan personally led an army into Shishman’s territories, defeating his forces near the town of
Zlatitsa, before ordering his much-trusted tutor, Lala Şahin Pasha, to besiege the major Bulgarian city of Sofia. After a lengthy struggle, the city’s garrison surrendered to Ottoman forces in 1382, resulting in another wave of Turkic migrants from Anatolia making their way into Europe. It would also be after this victory that the first Ottoman fiefdoms, better known as ‘timars,’ were distributed in Thrace and Macedonia, thus paving the way for creating a new military class within the Ottoman Sultanate. While Bulgaria was subdued once more, back in the Byzantine Empire, John V’s second eldest son and co-ruler, Manuel II,
had broken ties with Constantinople and seized the empire’s second city, Thessalonica, for himself. Unlike his subservient aging father, the energetic and patriotic Byzantine royal had wished to create a center of resistance against Murad as a means to free the many Eastern Romans now living under Ottoman rule. However, local support in Thessalonica for Manuel II’s ambitions was fleeting as the city was quickly put under siege in 1383 by the forces of Grand Vizier Candarli Halil Pasha the Elder. Knowing the situation was hopeless, Manuel fled the city in disgrace, resulting in the local garrison surrendering to the
grand vizier in 1387, much to the deprivement of an ever-shrinking Roman world. Further Ottoman gains in the Balkans during this period came in Albania when the local ruler of the region, Karl Topia, requested the assistance of Edirne in his war effort against his rival, Balša II of Zeta, over the port town of Durrës. Taking advantage of the power struggle, Ottoman armies entered the mountainous region for the first time in their history and dealt a crushing defeat to the forces of Zeta at the Battle of Savra in 1385. In the aftermath of the bloody battle, the
towns of Krujë, Berat, and Ulcinj were sacked by Ottoman raiders, while the border town of Kastoria was annexed into the sultanate. While the armies of Murad I enjoyed many victories during the 1380s, the sultan also faced his first military roadblock during this period, as the newly formed Principality of Moravian Serbia became the center of resistance in the Balkans against his rule. Born from the burning ashes of the former Serbian Empire, Moravian Serbia, led by its Prince Lazar Hrebeljanović, had become the strongest of the petty Serbian successor states during the aftermath of the Battle of Maritsa.
Having spent the last decade consolidating his territories against his rival Serbian lords, Lazar was poised to construct a great Balkan coalition in order to drive the Ottomans out of Europe. The Serbian prince had already defeated a major Ottoman raiding party during the Battle of Dubravnica in the winter of 1381, proving that the Turkish scourge could be beaten back. However, such plans to build a mighty coalition were to be paused as, in 1386, the highly strategic town of Niş fell to Ottoman raiders after a month-long siege. With Serbia now exposed to future invasion, Prince Lazar, perhaps
in an attempt to buy time, concluded a temporary deal with Murad that would see him supply the sultan’s armies with 2,000 of his troops and begin paying tribute to Edirne. After multiple years of successful European campaigns, Murad’s recently established peace in Anatolia slowly fell apart. The relatively sudden rise of Ottoman hegemony had seen the political scene in the region steadily become unstable, as minor Turkic beys sought to play off the Ottomans against the number two power in the area, the Karamanids. Since the dynastical marriages of 1381, the political borders in Anatolia had not changed except
for the eastern quadrant of the Candarid Beylik, whose beys declared for Murad in 1384. However, the steady peace would be broken in 1386 when Alaeddin Ali Bey began his invasion of Western Anatolia by capturing the Ottoman town of Beyşehir. Hearing the news of his treacherous son-in-law, Murad called forth his banners and formally declared war against the Karamanids. Accompanied by his two sons, Bayezid and Yakup, the Ottoman forces of Kara Timurtaş Pasha, a contingent of vassal troops from Constantinople led by John V, and forces from his Serbian vassals, Murad now had a grand army numbering around
20,000 -30,000 men. In command of the largest force put together in the history of the Ottoman Sultanate up to that point, Murad wintered with his grand army in Bursa before marching on the Karamanid capital of Konya during the spring of 1387. The forces of Alaeddin Ali and Murad I would meet on the Konya plain just near the Karamanid capital itself. The sultan and his retinue of Kapikulu soldiers were positioned in the middle of the Ottoman battle line alongside the forces of Timurtaş Pasha. At the same time, his sons Bayezid and Yakup led the left and
right flanks accompanied by Serbian and Byzantine vassal troops and Ottoman cavalry. The following engagement, which would later be known as the Battle of Frenkyazisi, would begin with a general Ottoman charge on the disorganized and ill-disciplined forces of the Karamanid bey. Within minutes, the Karamanid lines would break from the weight of the Ottoman charge, and a full-scale Karamanid rout was underway. Easily routing the Karamanid army, Murad stormed into the Karamanid capital city of Konya, where his son-in-law had locked himself with his household in the city's fortress. The now disgraced and defeated Alaeddin Ali Bey called forth
his Ottoman wife, Melek Hatun, to negotiate with her father to ask for forgiveness for his actions. After much pleading from his daughter, Murad reluctantly pardoned the Karamanid bey and returned to Bursa after collecting his war concessions from Konya. In a single military campaign, the sons of Osman had showcased to the rest of Anatolia that they were the new premier power of the region. Murad’s victory at Frenkyazisi would also display Ottoman superiority in battle tactics and unit composition based on specialized infantry and heavy cavalry compared to the classical Turcoman style of fighting with disorganized ghazi warbands
employed by the Turkic Beyliks of the region. However, even before Murad had secured his great victory in the region, the sultan of the Ottomans would have to deal with rising tensions between himself and his Serbian vassals, who had accompanied him during the military campaign. During the aftermath of the short siege on Konya, Serbian troops under the sultan’s banner had begun looting civilian property within the city without the authorization of Ottoman leadership. On his march back to Edirne, Murad would respond by executing the Serbian perpetrators responsible for the looting. Outraged with their brethren being executed by
their foreign overlord, a vast majority of the Serbian vassal contingent within the Ottoman army would defect to Prince Lazar, who had by 1387 refused to give his yearly tribute to Edirne, and started to form a large alliance of lower powers against Murad. Momentum would shift further into the Serbian prince’s favor that same year when he defeated and scattered an Ottoman raiding force of 20,000 during the decisive Battle of Plocnik, thus garnering even more support for an anti-Ottoman coalition in the region. With a Balkan prince openly defying him and with the death of his much-trusted grand
vizier during the same year, Murad would once again turn his gaze to the west as he and his armies crossed into Europe during the late months of 1387. The Ottoman sultan would first appoint Candarlizade Ali Pasha, the son of the former grand vizier, to his father’s former post before making military plans against Prince Lazar. By 1388, the Serbian prince had signed a peace treaty with Hungarian king Sigismund, thus securing his northern flank, and began consolidating his forces with the Serbian nobles of his realm and the neighboring Kingdom of Bosnia in addition to the Albanian principality
of Muzaka. Seeing that a powerful coalition was being formed against him, during the spring of 1388, Murad would launch a major two-pronged invasion deep into the Balkans. The first was aimed at Ivan Shishman of Bulgaria, who was said to be in the process of entering Lazar’s coalition, and the second directly at Tvrtko I of Bosnia in the hopes of dislodging him from his alliance with Serbia. Murad’s grand vizier, Candarlizade Ali Pasha, would lead the first invasion. With his 30,000-strong host, he would pass over the Balkan Mountains and descend into the Northern Bulgarian plain in a
swift surprise invasion. The Bulgarian Tsar, caught off guard by the sudden Ottoman attack, would flee from his capital city of Tarnovo to the more secure Danube fortress of Nicopolis, where he planned to coordinate his country’s defenses. However, the fierce and swift Ottoman invasion would surprise many Bulgarian garrisons in the region, causing many of them to surrender in droves, such as the garrisons of Cherven, Shumen, Venchan, Svishtov, and Ovech. With large sections of Eastern Bulgaria falling to Muslim rule, Ali Pasha’s forces would next make their way towards the Danube River and the Black Sea, besieging the
towns of Varna and Tutrakan; however, the Ottoman grand vizier would be unable to seize either city as he lacked the men and materials to maintain a siege on the two well-fortified coastal towns. Turning westwards, Ali Pasha would march on the fortress town of Nicopolis, which Ivan Shishman presided over with the remnants of the Bulgarian military. However, after some time besieging the town, it became evident to Ali Pasha that he couldn’t break through the defenses of the Bulgarian Tsar with his current numbers, so he sent letters to Murad I for reinforcements from Edirne. Seeing that he
was about to be gravely outnumbered, Ivan Shishman tried to bargain with the Ottoman sultan to avoid losing all of his territories to the Muslim invaders. These negotiations were successful, and the tsar relinquished the Danube fortress of Silistra to Murad in return for a cessation of all hostiles, the continuation of paying a yearly tribute to Edirne, and a promise he would not join Lazar’s military coalition. After that, what remained of the Bulgarian realm was a petty collection of lands surrounding Tarnovo and Nicopolis, the Tsardom of Vidin to the west, and the Despotate of Dobruja to the
east. With Bulgaria ceasing to be a threat on his northern flank, Murad would now turn his attention to his second planned invasion of the year targeted at the Kingdom of Bosnia. During the summer of 1388, while Ali Pasha was commencing his invasion of Bulgaria, an Ottoman army of 18,000 led by the Rumelia Beylerbey, Lala Şahin Pasha, would spear through Serbian territories into the domains of Tvrtko I. However, this time the Christian defenders of the region were well prepared against their Muslim invaders, with the Grand Duke of Bosnia, Vlatko Vukovic, ambushing the forces of Şahin Pasha
near the town of Bileca, resulting in the utter destruction of the Ottoman host and the near-death of the Ottoman pasha himself. Despite the various costly defeats inflicted upon his forces in the Balkans, Murad I did not give up his imperialistic ambitions and made plans for a grand military campaign directed at Prince Lazar for the next campaigning season in 1389, which this time he would lead personally. Gathering up his local forces in the city of Plovdiv, Murad would send letters to his two sons, Şehzade Bayezid and Yakup, to muster their levies in Anatolia and meet their
father in the Balkans. Throughout the spring of 1389, an Ottoman host of around 40,000 was formed in Plovdiv. Meanwhile, Lazar was not idle and began preparing for an eventual Ottoman invasion. With all his preparations for the campaign complete, Murad and his grand Ottoman army would start their march to Serbia, first stopping in the lands of his Serbian vassals, the dominions of Marko Mrnjavcevic and Konstantin Dejanovic. Gathering up the remaining Christians who had not already defected to Lazar in these regions, Murad would then make his final march towards Pristina, a vital crossroad town located in the
heart of the central Balkan Peninsula. In the wake of the Ottoman invasion, Prince Lazar had ordered the consolidation of his coalition forces in the Moravian Serbian capital of Krusevac. The majority of the Serbian prince’s army was made up of military contingents from his holdings and the realm of his son-in-law Vuk Brankovic. In addition to his primary host, Lazar would also be accompanied by smaller contingents from Bosnia, Hungary, Albania, Wallachia, and even a small group of Knights Hospitallers. In the first weeks of June, the coalition army under Lazar would begin their march south to meet Murad’s
host with the intent of repelling the Ottoman invasion and perhaps starting a process of kicking the Ottomans out of Europe. On the 15th of June, 1389, on a flat plain northwest of Pristina, the armies of Lazar and Murad would face and initiate one of the most significant battles in Medieval European history. His foe had unexpectedly challenged him to a field battle, so Murad set up his Ottoman host in a defensive formation. On the Ottoman front line was a contingent of around 1,000 archers encamped in defensive positions in between the two armies. Behind them stood the
majority of the Ottoman host, the infantry, made out of primarily irregular light infantry units called “azabs,” who were mainly recruited from Anatolia and armed with axes, maces, bows, and poleaxes. Further in the back stood the Ottoman cavalry, mostly Akıncı light cavalry, and Timarli Sipahi heavy cavalry. Lastly was Murad’s own personal guard, also known as the ‘Kapikulu,’ made out of 2,000 elite Janissaries and 500 Kapikulu Sipahi cavalry. Şehzades Yakub and Bayezid were respectively given commands on the left and right wings, while Murad and his grand vizier, Candarlizade Ali Pasha, commanded the Ottoman center. Although Murad’s army
outnumbered Lazar’s army by 40,000 to 30,000, the majority of the Serbian host was better equipped and armored than their Ottoman counterparts. The strength of Lazar’s army lay with his mounted knights and light archer cavalry, which made up the Serbian front line. Behind them were various contingents of infantry units formed out of Lazar’s coalition members and his holdings. Lazar would command the Serbian center while Bosnian Grand Duke Vlatko Vukovic and Vuk Brankovic were respectively given commands on the Serbian left and right wings. The battle would begin with a general charge of Ottoman Akıncı light horsemen towards
the flanks of Lazar’s host. However, after unsuccessfully trying to harass individual enemy formations, the Akıncıs would retreat to their original positions at the Ottoman rear. After repelling this initial Ottoman assault, Lazar would then attack his own by ordering a general charge of his entire line in the hopes of overwhelming his foe with his numerically superior heavy cavalry. Prince Lazar himself and his fellow commanders on the Serbian wings would accompany this mass charge of mounted knights as hundreds of banners from across the Balkans filled the Kosovo field. As Lazar’s Serbian Knights were making their way through
the plains, Ottoman archers, from their defensive positions on the Ottoman front line, would send volleys of arrow fire into the ranks of the Serbian cavalry, perhaps as a way to dislodging their tight wedge formations before impact. However, this would inflict marginal damage, and the entire heavily armored Serbian line violently crashed into Murad’s army, resulting in heavy Ottoman casualties. Although Prince Lazar and Vlatko Vukovic both made ground pushing through Muslim lines, on the Serbian right, Vuk Brankovic made the most significant progress by pushing back Ottoman forces all the way back into their war camp. At this
critical junction, it seemed like the Ottoman left, commanded by Şehzade Yakub, was on the brink of total collapse, which would have allowed the Serbian coalition to fold up the entire Ottoman army. At this precise moment, historical sources and traditional Balkan folklore on the Battle of Kosovo begin to provide different accounts of the following events. According to Bosnian sources written a couple of months after the battle, a group of twelve dismounted Serbian Knights had managed to break through the crumbling Ottoman left wing before making their way to Murad’s tent, killing the Ottoman Sultan in the process
before being hacked down by Murad’s personal guard. Ottoman sources, meanwhile, also agree that the sultan died but describe his ultimate fate differently. According to them, the death of Murad occurred after the battle. As the sultan was inspecting the dead on the battlefield, a knight who had been previously playing dead rushed towards the Ottoman ruler, fatally stabbing him in the heart. Serbian sources also state that the death of Murad occurred after the battle, claiming that a Serbian nobleman named Milos Obilic, sometimes cited as Lazar’s son-in-law, wished for an audience with the sultan in his tent to
convert to Islam and surrender his arms. However, once entering the tent, the nobleman would draw out a hidden dagger and stab Murad in the chest before being killed by the sultan’s personal guard. Whichever one of these renditions of events was true, the result was the same: the sultan of the Ottomans lay dead on the Kosovo Field. Whether the sultan was dead by this point in the battle or not, Vuk Brankovic’s successful charge on the Ottoman left had begun to stall as reinforcements from the back line had started trickling into the crumbling wing, thus stabilizing the
Ottoman front line for the time being. As the initial Serbian charge lost momentum and thousands of men from both sides were bogged down in hand-to-hand combat, the tides would slowly shift in favor of the Ottomans. In a sudden counteroffensive with his Anatolian calvary, Şehzade Bayezid began to push back the overextended forces of Vlatko Vukovic in a drive which would spiral into a large-scale Bosnian rout. With the Serbian left in a complete rout and Bayezid’s forces converging on the Serbian center, uncertainty and dread began to ferment in the ranks of Prince Lazar’s coalition. With the tides
of the battle suddenly changing in favor of the Ottomans, Vuk Brankovic began conducting an organized withdrawal from the battlefield in a move to save the remaining troops under his command. Perhaps the Serbian nobleman wanted to conserve his forces to resist the Ottomans in the future. However, according to traditional Serbian folklore, it is stated that Brankovic had more sinister reasons to withdraw from the battle as he wished to make a bid for the Serbian throne by secretly working with Murad. Whatever the case, whether Lazar intended to withdraw himself but could not, or his son-in-law betrayed him,
the Serbian prince prepared to make a last stand with Ottoman forces now flooding down both his flanks. After hours of withstanding Ottoman attacks, the remaining Serbian army contingent had either been routed or killed. Lazar Hrebeljanović, the Serbian prince who had tried to reform the former Serbian Empire under his rule and had been a thorn in Ottoman ambitions in the Balkans for years, was captured by Ottoman troops and beheaded. Sultan Murad I, the ruler responsible for the widely successful Ottoman conquests in the Balkans and Anatolia, was also dead. In his 18th-century history on the decline and
fall of Rome, Edward Gibbon recorded the following on Murad’s twenty-seven-year reign, “Osman gathered a race around him, Orhan turned it into a state, but it was Murad who established an empire.” The Battle of Kosovo had been the bloodiest battle so far fought by the Ottoman state since its foundation. Even though the Ottomans had managed to wipe out the majority of the Serbian nobility and their prince in a single battle, it came at a high cost. A large portion of the Ottoman army had been killed along with their sultan during the battle. Now, the House of
Osman’s lands were susceptible to outside invasions from its hostile neighbors in the Balkans and Anatolia. According to Ottoman sources, during the aftermath of the battle, a fatally wounded Murad had requested the audience of his son Bayezid to swiftly confirm the line of succession to the Ottoman throne. In front of the Grand Vizier and other Ottoman pashas and statesmen, the bedridden Murad proclaimed Bayezid as Sultan before passing away. After Murad’s death, civil war became a possibility. The former sultan’s younger son, Yakub, was still uninformed of his father’s death or the ascension of his older brother since
he was still pursuing the routing Serbian army. The pashas, who had experienced the Ottoman civil war of 1373, decided that all threats to Bayezid’s claim were to be eliminated. Upon returning to the Ottoman camp, Şehzade Yakub was called into Bayezid’s tent and strangled to death by a group of executioners, thus continuing the Ottoman practice of fratricide. The reign of Bayezid I would begin with the withdrawal of the remnants of the Ottoman army back into friendly territory. The new sultan of the Ottomans would first visit the capital of Edirne to secure the Ottoman throne before visiting
Bursa to bury his late father and brother. While in Europe, the Battle of Kosovo was seen as a victory for Christendom over the invading armies of Islam as the Ottoman invasion was repelled, and the death of Sultan Murad I was celebrated in many European capitals. However, the reality on the ground was much different, as Moravian Serbia was now in a state where it could not resist its foes on the battlefield anymore due to the losses in manpower it had endured during the aftermath of the battle. The late prince’s son, the twelve-year-old Stefan Lazarevic, would succeed
his father during the days after the battle with his mother, Princess Milica, becoming regent for the minor prince until he was of age to rule independently. While there was a transfer in power in the Moravian capital of Krusevac, the Serbian state under the young prince became ever so surrounded by enemies on all sides. Bosnian King Tvrtko I, now seeing his alliance with Serbia reaching its maximum practicality after the Ottoman withdrawal from Kosovo, had begun planning to seize Serbian lands to truly become the ‘King of Serbia,’ a title which he took back in 1377. Meanwhile, Vuk
Brankovic, having preserved the majority of his troops from Kosovo, had allied himself with Hungary to make a bid for the Serbian throne. Lastly, it was still unknown whether Bayezid would conduct a military campaign of revenge for his father’s death in the following months. During the fall of 1389, the first action against Moravian Serbia was taken with the Hungarian invasion of the principality, resulting in the fall of many border fortresses in the region, such as Borač and Čestin. Lacking any options to repel the northern invasion, Princess Milica submitted to the Ottoman vassalage in 1390 to protect
what remained of the once-large Serbian realm. In addition to paying a yearly tribute to Edirne, the youngest daughter of the former Serbian prince, Princess Olivera Lazarevic, would be sent to Bayezid’s harem to marry the Ottoman Sultan. By the summer of 1390, the Hungarian invasion would be repelled by local Ottoman detachments sent to the region. All of the border fortresses that had fallen to Hungary the previous year were retaken. Even though Vuk Brankovic still resisted Ottoman rule and the rule of his brother-in-law Stefan Lazarevic in Krusevac, the year 1390 would mark the beginning of more than
470 years of Ottoman influence in Serbia. The Battle of Kosovo is an integral part of the story of the rise of the Ottoman Empire. With the submission of the most formidable state in the Balkans, the Ottoman state was now able to expand its domains throughout the local region and beyond freely. Kosovo would also be an integral part of the story of Serbian national identity, which arose during the 19th century as the battle is depicted in Serbian nationalistic circles as the end of a heroic colorful golden age and the beginning of centuries of oppression and slavery
under the Ottoman yoke. With the deaths of Sultan Murad I and Prince Lazar and the destruction of Serbian autonomy after the Battle of Kosovo, a new age started in the Balkans. Even with the Ottoman vassalage of Moravian Serbia during the aftermath of the Battle of Kosovo, a power vacuum had arisen in the Balkans as the armies of both Edirne and Krusevac had sustained heavy losses during the battle. The Ottoman Sultanate under its new sultan, Bayezid I, was in a state of uncertainty as its armies in the Balkans were severely depleted, and its former sultan was
slain on the battlefield. Bayezid had inherited an Ottoman state that was more susceptible to outside invasions from its hostile neighbors in the Balkans and Anatolia than in any previous period in the state’s history. Although the military situation in the Balkans was slowly settling down after the climax in hostilities at Kosovo, elsewhere, the fragile and delicate peace crafted by Edirne in Anatolia was slowly falling apart. During the reign of Murad I, the Ottoman state underwent a major transformation within its military and bureaucratic ranks as the Timar and Devshirme systems were institutionalized throughout the sultanate’s Balkan territories.
With the centralizing Ottoman state relying more on its newly established Balkan political class for governance and war, the independently minded Turkic ghazi warbands of old, who were present since the days of Osman Gazi, began slowly losing political influence in Edirne. Many Turkic groups in Anatolia felt that the Ottoman Sultanate had become too sympathetic to the Christian elements of its Balkan holdings and too hostile to the Islamic-ghazi traditions of old. In addition to the fratricide of the popular Şehzade Yakup and the decline in the Ottoman’s ability to project power in Anatolia after their massive losses at
Kosovo, the ghazi warbands within the sultanate and the other various Turkic beyliks of Western Anatolia began to become increasingly antsy in their desire to throw off Ottoman overlordship. Seeking to take advantage of the region's political unrest and Murad I's sudden death, during the spring of 1390, the ruler of the powerful Karamanid state, Alaeddin Ali Bey, would conduct a surprise invasion into Ottoman territories. He would be accompanied by the many smaller Turkic beyliks of Western Anatolia, whose allegiance regularly flip-flopped between the Ottomans and Karamanids, seeking to play the two major powers of the region off one
another in order to maintain their independence. In a short period of time the newly formed Turkic coalition would capture the Ottoman buffer towns of Akşehir and Beyşehir in addition to Kütahya, thus sparking panic in Edirne. The new sultan of the Ottomans did not stay idle as his domains in Anatolia were being chipped away. First obtaining a fetwa in order to officially declare wars against fellow Muslim states, Bayezid, along with an Ottoman army made out of mostly European vassal troops and his own household troops, would cross into Anatolia with the intent of waging a lightning-fast war
in the region. The Ottoman sultan would also be accompanied by his vassal lords, the newly crowned Serbian royal, Stefan Lazarevic, and the junior Byzantine co-emperors, John VII and Manuel II. In a single military campaign during the summer and fall of 1390, Bayezid and his armies would conquer the Germiyanid, Aydinid, Menteşe, and Sarukhan beyliks in fast succession, absorbing their significant wealth in the process. Moreover, the isolated Byzantine town of Philadelphia, the last imperial town left in Anatolia, was finally transferred to Ottoman rule after a short siege. After wintering in Ankara and resupplying his army, Bayezid resumed
his Anatolian campaign the following spring, which resulted in the fall of the Hamindid and Teke beyliks in addition to the reconquest of towns of Akşehir and Beyşehir from the Karamanids. After capturing large swaths of Anatolia within a short period, mainly due to the exploits of Stefan Lazarevic and his Serbian shock cavalry, Bayezid now had a large source of manpower to call on for future military campaigns into Europe. Seeing that his Turkic coalition in Western Anatolia had fallen so quickly to Bayezid, Alaeddin Ali Bey scrambled to find new allies, entering into an alliance with the Candarid
Beylik and the former lands of the Eretnid Beylik, which was now ruled by an Islamic scholar turned sultan called Kadi Burhaneddin. However, this new alliance would prove futile as Ottoman forces would catch the Karamanid Bey by surprise, swiftly storming into his capital of Konya and capturing the city without bloodshed. Despite his decisive and crushing victories, Sultan Bayezid did not want to further antagonize the Turkoman nobles of the region with his war of conquest. To that end, he concluded a relatively lenient peace treaty with Alaeddin Ali Bey in which the Karamanid ruler would submit to Ottoman
vassalage and his territories reduced to the lands east of the stream of Çarşamba. It was also during this period in which Bayezid, in an attempt to legitimize his claim over all of Anatolia, would brandish himself as the ‘Sultan of Rum,’ a title that was once held by the former Seljuk Sultans of old. With the Karamanids once again submitting to Ottoman supremacy in Anatolia, Bayezid now turned his attention up north to the Candarid Beylik. In yet another lightning-fast military campaign during the summer of 1391, Ottoman forces captured the Candarid capital of Kastamonu and annexed the beylik
into the sultanate. After plundering the former Candarid countryside for some time, Bayezid now turned his gaze to the domains of Kadi Burhaneddin. After swiftly capturing the border towns of Amasya and Çorum during the fall of the same year, Bayezid seemed poised to complete his total conquest of Anatolia. However, after a sudden counteroffensive led by Burhaneddin himself culminating in the Battle of Kırkdilim and the death of Bayezid’s son, Şehzade Ertuğrul, Ottoman forces withdrew back into Candarid lands in defeat. As Bayezid was making final preparations to once again invade the domains of Kadi Burhaneddin the following spring,
major news from Europe had begun trickling into the sultan’s tent. With the majority of Ottoman armies preoccupied in Anatolia, King Sigismund of Hungary and the Serbian nobleman Vuk Brankovic had begun plundering the domains of Serbian ruler Stefan Lazarevic in an attempt to push back Ottoman presence in the Balkans. Meanwhile, Voivode Mircea of Wallachia had also begun a series of military operations in the region by raiding deep into Ottoman Bulgaria and conquering the vital Ottoman Danube fortress town of Silistra. The Wallachian Voivode had also conquered the northern half of the Despotate of Dobruja, thus gaining access
to a number of lucrative Black Sea ports in the process. In addition to these Christian incursions in the Balkans, relations between Edirne and Constantinople were becoming increasingly strained as a power struggle between the various factions of the Palaiologos dynasty erupted in the Byzantine capital city. Since the end of the previous Palaiologos civil war in 1379, the Byzantine realm was held together by an uneasy peace between the political faction of Andronikos IV and his son and co-emperor John VII, who predominantly ruled from Selymbria and the faction of John V and his sons, co-emperor Manuel II and
Despot Theodore I, who predominately ruled from Constantinople and Morea. Ever since the political settlement of 1381, the main-line Byzantine succession from Constantinople was determined to be passed through John V to his eldest son Andronikos IV and then to his son John VII, thus bypassing Manuel II’s claim to the throne. However, with the untimely death of Andronikos IV in 1385, the political settlement of 1381 was brought into question as the fifteen-year-old John VII was now alone in his bid for the Byzantine throne. Distrustful of his grandfather and uncle, John VII would travel to Genoa in 1389
to solicit support for his claim to the Byzantine throne, but it would be the ascension of Bayezid I the same year which would give the young Byzantine emperor an opportunity to seize Constantinople. During the spring of 1390, Bayezid, who distrusted both John V and Manuel II for their open defiance against Ottoman suzerainty, would lend troops to John VII. The Ottoman sultan thought by supporting the most junior claimant to the Byzantine throne that he could gain a more trustworthy and dependent ally in Constantinople. Everything went as planned for Bayezid as John the Younger would swiftly seize
Constantinople, but after only four months of rule, Venetian forces under Manuel II would retake the imperial city, reestablishing the status quo. After seeing that his plans for the Romans had been thwarted, a furious Bayezid would demand both Manuel II and John VII join his Ottoman host for his upcoming Anatolian campaign along with a minor Byzantine retinue of cavalry. During the subsequent Ottoman military campaign from 1390 to 1391, the two co-Byzantine emperors would serve as de facto political hostages to the Ottoman sultan. While Ottoman armies were preoccupied with Anatolia, Emperor John V saw a good opportunity
to shore up his defenses at home and ordered the strengthening of Constantinople’s fortifications, particularly the city’s Golden Gate complex. After hearing of this news from the Byzantine capital, an enraged Bayezid I would threaten John V with the blinding of his son, Manuel II, if he did not cease the construction project at once. The reluctant fifty-eight-year-old would submit to Bayezid’s demands before proceeding to shut himself up in his palace in humiliation. In the first months of 1391, the ailing senior Byzantine emperor would die of natural causes after reigning over what was left of the Byzantine realm
for more than fifty years. Upon hearing the news of his father’s death, Manuel II would slip out of Ottoman captivity from Bursa and rush back to Constantinople before his nephew John VII could claim the imperial throne. Hearing the news of Manuel’s escape from his captivity and his coronation in Constantinople and feeling robbed of the opportunity to pick a Roman monarch of his choosing, a now even angrier Bayezid put forth new demands upon the new Byzantine emperor. The sultan of the Ottomans would demand for the construction of a Turkish quarter in Constantinople in addition to a
Mosque and Islamic kadi to oversee the new settlement. Finishing off his humiliating list of demands for Manuel II, Bayezid would state to the Byzantine monarch: “If you do not accept my orders and do as I command' then shut the gates of your city and govern what lies behind them; for everything beyond the gates belongs to me.” A powerless Manuel II would bow down to Bayezid’s demands and three months later would be summoned to the sultan’s camp in the former lands of the Candarid Beylik to swear loyalty to his new liege lord. Although Ottoman relations with
Constantinople seemed stable for the moment, the same could not be said about the situation in the Balkans as Serbian, Hungarian, and Wallachian incursions in the region continued plunging deep into Ottoman territory. Putting his military campaign against Kadi Burhaneddin on pause, Bayezid, along with a recently replenished Ottoman army, would begin the march back to Europe in the last months of 1391. Meanwhile, in Edirne, Ottoman Grand Vizier Candarlizade Ali Pasha would coordinate limited retaliatory raiding operations into the lands of Wallachia, Hungary, and Bosnia. However, by the turn of the year, Sultan Bayezid I and his main Ottoman
host would enter into Europe after a lightning-fast force march, catching the Christian powers of the region off guard. The Ottoman sultan began his European military campaign by first marching on the domains of Vuk Brankovic, the last Serbian nobleman who had yet to submit to his rule. Retracing his father’s march during the Kosovo campaign of three years past, Bayezid would proceed to swiftly occupy the major Serbian town of Skopje, forcing Brankovic to submit to his suzerainty. With all of Serbia now under his rule, the sultan then turned his attention to Mircea of Wallachia. In a blistering
campaign, Ottoman forces reconquered Silistra from the voivode and the southern half of the Despotate of Dobruja. In addition to these conquests, Bayezid also spent the rest of the year ramping up Ottoman raids into Hungary and Bosnia. After years of fending off numerous Ottoman invasions into his realm, the Bulgarian Empire under Tsar Ivan Shishman had been reduced to a small collection of lands surrounding the Danube fortress town of Nicopolis and the main capital of Tarnovo. Seeking to finally finish off the Bulgarians before they could enter into a potential alliance with Hungary and Wallachia, Bayezid would invade
the tsar’s domain during the spring of 1393. Upon hearing the news of invasion, Ivan would abandon his capital at Tarnovo and retreat to the more formidable Nicopolis, the fortress town that the Murad I had unsuccessfully besieged back in 1388. This time, the sultan’s eldest son, Suleyman Çelebi, led the Ottoman host. With Tarnovo left leaderless and Ottoman forces now converging on the city, the capital’s defenses would be left in the leadership of the Patriarch of Bulgaria, Euthymius of Tarnovo. Ultimately, the city could not hold. After three months of withstanding the Ottoman siege, the exhausted defenders of
Tarnovo would surrender to Suleyman Çelebi, resulting in a mass migration of Turkish settlers into the former Bulgarian capital. With the Bulgarian realm being now reduced to Nicopolis, Ottoman armies would now march on the neighboring Tsardom of Vidin, ruled by Ivan Shishman’s half-brother, Ivan Sratsimir. Before sharing the same fate as his fellow Bulgarian monarch, Sratsimir would submit to Ottoman vassalage, even accepting an Ottoman garrison to be stationed in his capital of Vidin. With large swaths of the Balkans now under Ottoman rule, during the winter of 1393, Sultan Bayezid I would call forth his Balkan vassals to
meet with him in the town of Serres. Having serious doubts about the reliability of his Christian subjects’ allegiances, the suspicious Ottoman sultan wished to cement his authority over his vassals to ensure none were conspiring against him. Those who answered the call were Manuel II of the Byzantine Empire, Despot Theodore of Morea, John VII of Selymbria, Konstantin Dejanovic of Velbazhd, and lastly Stefan Lazarevic of Moravian Serbia. This call to meet spooked many, as it was rumored that Bayezid would round up and murder all of his vassal lords in order to centralize his power in the Balkans
just like he had in Anatolia. This rumor would be false, and after a few days of exchanging pledges and promises to the Ottoman sultan, all of the Christian lords participating in the meeting were free to go back to their own holdings. However, this Ottoman exercise of psychological warfare would be the breaking point for Manuel II, as upon his return to Constantinople he would suspend his ties with Edirne. The Byzantine emperor hoped that the mighty Theodosian Walls of his capital city would deter any future attempt at an Ottoman siege. Upon hearing the news that his Roman
vassal was playing hooky with him, Bayezid would begin raiding the outskirts of Constantinople before blockading the Byzantine capital altogether. In addition to directly waging war against Manuel II, Byzantine Thessaly would be quickly conquered by local Ottoman marcher lords, resulting in a territorial expansion which saw the sultanate expand as far south as the Gulf of Corinth. In addition to the blockade of Constantinople, Bayezid would begin the building of a waterfront fortress on the narrowest point of the Bosporus in order to block maritime traffic from the Black Sea to the Byzantine capital. The construction of the Anadoluhisarı,
or “Anatolian Castle,” and its fast completion in only a matter of months would display the Ottoman sultan’s true desire to become the undisputed ruler of the Romans. However, Bayezid’s sudden blockade of one of Christendom's largest cities would have a rippling effect in Europe. As a result of the siege and Manuel II’s pleas for European military assistance, King Sigismund of Hungary would call for an anti-Ottoman crusade. Soon after, the Popes in Rome and Avignon, who were in the middle of the Western Schism, would proclaim the start of a crusade against Bayezid. As King Sigismund of Hungary
was in the process of forming a crusader alliance in Europe to relieve the blockade of Constantinople, news of a gathering crusader army trickled down to Edirne. Although the European response to the blockade of Constantinople would not be swift, by 1394, Sultan Bayezid I had already begun war preparations at home for the eventual conflict. During this limbo period, Ottoman forts in the Balkans were reinforced and resupplied with new garrison soldiers from Anatolia. Despite these preparations, the sultan was not one to stay idle and wait for the enemy to arrive at his gates. In only five years
since acceding to the throne, Bayezid had achieved what no prior Ottoman ruler could have dreamed of. Almost all of Anatolia had been conquered, all major opposition in the Balkans had been crushed, and a significant attempt to seize Constantinople was underway. Instead of staying idle, the ambitious Ottoman sultan planned on going on the offensive in the region to get a head start in the inevitable hostilities to come. To secure his northern borders from the upcoming crusader invasion, Bayezid launched a surprise military campaign against Wallachia during the fall of 1394. The Ottoman ruler most likely wished to
secure control over the Danube River and create a new regional buffer-vassal state before the onset of hostiles. Crossing the Danube from near Nicopolis, the Ottoman army made their way north to capture the Wallachian capital of Curtea de Argeș. The Ottoman Sultan thought that, through his lightning campaign into the region, Mircea I of Wallachia would have no choice but to bow down to his rule. However, after a few days of raiding and burning the countryside alongside the Danube, no response came from the Wallachian voivode. It was only after Bayezid began his forced march into the forested
interior of the region that he would be met with the first signs of local resistance. As he knew he did not have the men or resources to stand up to the Ottomans head-on, Mircea employed his Wallachian skirmishers to conduct guerrilla operations against the numerically superior invaders. For an entire week, the Ottoman host was harassed by Wallachian hit-and-run attacks while they marched through the unfamiliar lands. Exhausted from the forced march and sustaining heavy losses, the Ottoman army made camp near the Argeș River. Refusing to let the Muslim invaders catch a breath, on the night of October
10th, 1394, Mircea ordered a surprise ambush. Masked underneath the Wallachian forest, the resilient voivode, much to the surprise of Bayezid, descended upon the main Ottoman camp. The skirmish, later dubbed the Battle of Karanovasa or the ‘Battle of the Trenches,’ would be a bloody affair as Wallachian and Ottoman troops were engulfed in a fierce and violent melee over the palisades of the camp. On multiple occasions, the sultan’s own life was endangered as the battle-turned-brawl lasted well into the dawn. Seeing that he was in a precarious situation and having taken on many losses during the course of
the entire campaign, Bayezid ordered the remnants of his army to withdraw back to the Danube into Ottoman territory in defeat. For the first time, “the Thunderbolt” had met his match in battle. Despite this setback, Bayezid prepared to invade Wallachia again during the spring of 1395, as during the interim period, Mircea had traveled to Transylvania to sign a formal alliance treaty with Sigismund for his upcoming crusade. This time around, the Ottoman sultan called upon his Balkan vassals to join him on the campaign. Powerless to decline, Marco Mrnjavčević of Prilep, Konstantin Dejanovic of Velbazhd, and Prince Stefan
Lazarevic of Moravian Serbia would all personally lead their retinue of soldiers into the sultan’s camp in Bulgaria and once again swear loyalty to their Muslim liege. Only the Serbian nobleman Vuk Brankovic, in an act of open defiance, refused to send troops to Bayezid. However, the Ottoman sultan would turn a blind eye to this insubordinate act for the time being as he rushed to cross over the Danube to once and for all crush the forces of Wallachian voivode. This time the sultan invaded the country from the west through the lands of his vassal, the Tsardom of
Vidin. The Wallachian skirmishers once again employed guerilla warfare on Bayezid’s army as they marched on the royal capital of Curtea de Argeș. Perhaps due to the guerilla campaign being less effective this time around, Mircea would proceed to form a great Wallachian army to fend off Bayezid. According to Romanian sources, the Wallachian voivode ordered all able men of his realm to gather up their arms and join his cause in order to defend their homeland from the Muslim invaders. Many settlements were abandoned, and their crops burned as the Ottomans made their way north. Not wanting to be
bogged in a long siege and wanting to resolve the war in one swift blow, Bayezid bypassed the many Wallachian forts in the region and pursued a field battle with Mircea near his capital. However, still knowing that he could not take on the Ottoman host in an open-field battle, Mircea stationed his grand army in the strategic Rovine marshlands south of his capital. The marshlands were littered with small narrow valleys, caves, old ruins, and impassable waterways, making it an idle landscape for a defending army fighting against a numerically superior enemy. As Bayezid deployed his army on the
battlefield, many sections of his host would be bogged down and immobilized in the marshes, such as his heavy Kapikulu and Serbian cavalry. However, this would not stop the Ottoman sultan from pursuing Mircea’s army since, after all, what was one marshland compared to the conquest of Anatolia? According to more dramatic retellings, the following Battle of Rovine would last for an entire week. During the dragged-out battle, multiple Ottoman attempts to breach through the marshes failed, as many were killed by Wallachian archers. It was during one of these attempts to breach the marches that the entire Ottoman vanguard
of irregular infantry would be cut down to pieces by incoming Wallachian arrow fire. Ottoman attempts to flank around the marshes to strike at Mircea’s main camp were also thwarted. As the struggle continued, the Wallachian troops began digging trenches throughout the local terrain as a means to defend themselves from wave after wave of Ottoman assaults to much success. With each passing day, Ottoman casualties rose up as Ottoman corpses scattered the marshlands of Rovine. Amongst the dead were Bayezid’s Serbian vassals, Marco Mrnjavčević of Prilep and Konstantin Dejanovic of Velbazhd. Only after a surprise Wallachian nighttime assault on
the main Ottoman camp did Sultan Bayezid conclude that further attempts to break through the marshes were futile. Cutting his losses short and withdrawing from the battlefield, Bayezid, once again, abandoned his campaign against Wallachia. The Battle of Rovine had ended in a decisive victory for the Wallachian voivode, even if it came at a great loss in manpower as he defeated an Ottoman army multiple the size of his own host. However, not all was lost for the Ottomans after Rovine. In the months after the battle, Mircea I had become increasingly unpopular since his prolonged struggle against the
Ottomans had drastically depleted the principalities’ military and economic resources. Eventually, he was deposed by his court rival, Vlad I. As Mircea I fled to the nearby Kingdom of Hungary, Vlad I submitted before Bayezid, removing Wallachia from the anti-Ottoman crusader coalition, and began to pay tribute to Edirne. Although unsuccessful on the battlefield, Bayezid had, through diplomacy, secured his northern border with Wallachia. Now the Ottoman sultan turned his gaze back to his Balkan holdings, for he wanted to crush all remaining opposition in the region before the onset of the crusader invasion. Upon crossing the Danube, Ottoman armies
were ordered to besiege the last Bulgarian holdout of Nicopolis, still held by the relentless Tsar Ivan Shishman. Back during the reign of Murad I, Ottoman forces had tried capturing the Bulgarian fortress town to no avail, but this time around, more resources were allocated for the siege. After a short and one-sided struggle, Nicopolis fell to the forces of Bayezid, thus bringing a formal end to the Bulgarian Empire. Soon after the siege, Tsar Ivan Shishman of Bulgaria would be first imprisoned, then executed on the orders of Bayezid. After putting an end to Shishman’s realm, the Ottoman sultan
continued down south to his Serbian holdings. The former lands of the two slain Serbian despots from the Battle of Rovine, Marco and Konstantin, were formally annexed into the Ottoman sultanate as they had no male sons to succeed in their seats. In addition to these land acquisitions, during the same period, Bayezid invaded the lands of Vuk Brankovic, the Serbian noble who had failed to supply him with troops during his Wallachian campaign. In a short period of time, the insubordinate Serbian lord would be defeated in battle and imprisoned while his territories were transferred to the more loyal
Stefan Lazarevic. After spending two years in an Ottoman cell, Vuk Brankovic, the Serbian noble who deified Edirne since the Battle of Kosovo, died from natural causes. For the most part, the year 1395 had been kind to “the Thunderbolt.” The last twelve months had seen Bayezid consolidate his power in the Balkans before the arrival of the crusaders. The Ottoman sultan now controlled the major Danube crossing towns of Vidin, Nicopolis, and Silistra. Wallachia had left the crusader coalition, and a pro-Ottoman ruler now sat in Curtea de Argeș. The Bulgarian Empire under its dubious ruler, Ivan Shishman, had
been murdered, and his realm conquered. Lastly, Vuk Brankovic had been deposed, and now the Serbian realm was unified under a loyal Ottoman vassal prince. However, the following year would see Bayezid come face to face with his greatest challenge yet. Since their conversion to Christianity under the Árpád dynasty during the eleventh century, the Kingdom of Hungary had been one of Europe’s largest and most formidable states. The kingdom was mainly located on the rich farming lands of the flat Great Hungarian Plain situated at the crossroads of central and Southeastern Europe. Under the Anjou Dynasty, Hungary had expanded
its reach deeper into the Balkans during the same period in which the Ottoman Sultanate was also making gains in the region. During the reign of Louis I, multiple wars were fought against Bosnia, Moldavia, Wallachia, Serbia, and Bulgaria in order to bring them under the Hungarian sphere of influence. Although many of these states willingly yielded to Hungarian suzerainty initially in order to deal with the growing Ottoman threat, Louis’s death in 1382 would end Hungarian dreams of forming a Magyar-led Balkan peninsula. The late king would be succeeded by his eldest daughter, Mary I, whom herself was married
to the son of the Holy Roman Emperor, Prince Sigismund. In the following years, Sigismund would be crowned king, and with the untimely death of Mary in 1395, he would become the sole ruler of Hungary. With the accession of Sigismund also came the first Ottoman raids into Hungary, and thus military preparations were made to strike back at Edirne. The crusade to come would be a vital opportunity for the young foreign king of Hungary to make a name for himself and cement his rule over his Magyar nobles. While the Bayezid was on a conquest spree in the
Balkans, King Sigismund had been slowly forming a great European crusader alliance against Edirne. Although Europe had been politically divided during the Western Schism between the Popes of Rome and Avignon, Sigismund’s European envoys around the continent were fairly successful in gathering support for the anti-Ottoman crusade. Benefiting from the temporary cessation of hostilities between France and England during the Hundred Years’ War, the Hungarian king had managed to get favorable responses from the two nations to join his coalition. Also, surprisingly, the most powerful man among the French nobility, Philip II of Burgundy, would opt-in to become the principal
financier of the crusade, raising over 700,000 francs for the Hungarian king. Most likely, the Burgundian ruler saw Sigismund’s anti-Ottoman crusade as an opportunity to demonstrate his duchy’s new-found power which had been won in the recent Anglo-French conflict. Philip’s son, son John of Nevers and many other prominent Franco-Burgundian nobles, such as Philip of Artois, Enguerrand de Coucy, Jean de Vienne, Jean de Carrouges, and their personal retinues, would all join the upcoming crusade. Meanwhile, the Italian merchant republics of Venice and Genoa, wishing to protect their lucrative trade routes and outposts in the Mediterranean and Black Sea regions
from the rising Ottoman threat, would also join in the forming Hungarian-led coalition. Along with Constantinople, the Genoese colony of Galata had also been blockaded by Bayezid, an affront that would see the two rival Italian republics, in an uncommon occurrence, unite under the same crusading banner. The Knights Hospitaller of Rhodes, known for their piracy in the Aegean Sea, would also answer Sigismund’s call against Bayezid as they had been in open conflict with the Ottomans since the Battle of Kosovo seven years prior. With the naval powers of Venice, Genoa, and the Knights Hospitaller all raising their banners
against Edirne, Bayezid was now faced with the threat of crusader warships baring down on his coastal territories. The Ottoman navy was still in its infancy during this era, which meant it could not effectively counter the more sophisticated warships of Europe. King Sigismund’s acquisition of European allies would not stop there. Even though he had been recently expelled from his country during the aftermath of the Battle of Rovine, Mircea I of Wallachia still commanded a sizable loyal host numbering around a few thousand soldiers. The Wallachian ruler, perhaps in an attempt to regain his throne and garner Hungarian
support to his claim, would join the anti-Ottoman crusade. Lastly, smaller contingents from Bohemia, the Teutonic Knights, the Holy Roman Empire, Naples, Aragon, Castile, Portugal, Navarre, the Swiss Confederacy, Savoy, Moldavia, Poland, and Croatia would also pledge their support to Sigismund. With a total crusading force numbering around 15,000-25,000 strong converging on the Hungarian city of Buda, enthusiasm around Europe for the upcoming crusade was high. Two years after initially declaring the anti-Ottoman crusade, King Sigismund of Hungary was finally ready to face the forces of “the Thunderbolt.” During the late summer of 1396, the crusader army paraded out of
Buda and began their march down south alongside the left bank of the Danube. Knowing that he could not supply his large army in one spot for any length of time, the Hungarian king opted for a more mobile solution, the pre-emptive invasion of Ottoman Bulgaria. This would be the first phase of his anti-Ottoman crusade, as re-establishing Christian rule in the region would serve as a buffer to his kingdom against Ottoman aggression. After taking Bulgaria, the crusaders likely planned to move further south and lift the blockade of Constantinople. Alongside the main crusader contingent heading south, a smaller
eastern contingent was sent through Transylvania into Wallachia to restore Mircea I to his throne. Capturing the region would give Sigismund control over the northern bank of the Danube, which would play an essential role in his future invasion of Ottoman Bulgaria. Meanwhile, the crusader fleet supplied by Genoa, Venice, and the Knights Hospitaller had begun their naval operations in the Aegean Sea, resulting in the harassment of Ottoman shipping in the region. In addition to these developments, the Bosporus and Dardanelles straits were also blockaded by the crusader navy, thus permanently cutting off Bayezid from his Anatolian holdings. After
Constantinople was resupplied with goods and additional troops, a small contingent of the crusader navy sailed into the Black Sea and then into the Danube River to rendezvous with the main crusader army. Back in the west, the main crusader army under Sigismund crossed into the lands of Bayezid’s vassal, the Tsardom of Vidin, through the coastal town of Orșova. After spending eight days crossing over the Danube, the army found itself at the gates of the regional capital of Vidin. Seeing that a large crusader army was at his gates and witnessing the death of a Bulgarian monarch at
the hands of Bayezid the previous year, Tsar Ivan Sratsimir of Vidin opened the gates of his kingdom to the crusaders. What followed would be the massacre and imprisonment of the local Ottoman garrison in the capital town. During the aftermath of the bloody event, Sratsimir resupplied the crusader army and gave Sigismund free passage into Ottoman Bulgaria through his realm. While the main crusader army began its operations in the local region, the smaller crusader force marching into Wallachia had also secured some gains of its own. The forces of the pro-Ottoman Wallachian usurper, Vlad I, had been pushed
back into the eastern portions of Wallachia while Mircea I regained his capital of Curtea de Argeș. This gave the Hungarian king access to large sections of the northern bank of the Danube, which would be vital in resupplying his vast mobile host, which marched on the opposite bank of the river. However, despite these early successes, not all would go as intended for the crusader army. Tensions between the Western Catholic and Eastern Orthodox churches had been ongoing since the days of the East-West Schism of 1054 and the Fourth Crusade of 1204. Both groups often saw the members
of the opposing church as untrustworthy and, in some cases, heretical, on par with Muslims. These sectarian tensions between the members of the two churches would rear their ugly heads during Sigismund’s crusade. In the following days after Vidin’s submission, crusader forces fanned out across the countryside of the tsardom and plundered the region indiscriminately. As the main crusader army marched east alongside the Danube, they arrived at the strongly fortified town of Oryahovo. Seeing that the odds were heavily against them, the local Ottoman garrison of the town offered King Sigismund terms of surrender in return for their lives
and the lives of the Muslim populace of the town. The Hungarian king accepted the offer as he had plans for the region after the crusade; however, after the surrender of the town, the Franco-Burgundian element of the crusader army, in an act of open defiance, disregarded the terms of peace. The local Ottoman garrison was massacred alongside the town’s Muslim and Eastern Orthodox populace, much to the horror and frustration of Sigismund. Despite the internal religious tensions bubbling up within his army, King Sigismund continued toward the Ottoman fortress town of Nicopolis. In the year after its capture, the
former Bulgarian capital had been strengthened with new fortifications and a well-supplied garrison led by the Ottoman marcher lord, Doğan Bey. The town stood on a high position overlooking the Danube and had been a vital ferry location for the Ottomans going into Wallachia. According to Sigismund, Nicopolis had to be captured if Christian rule were to return to Bulgaria. As a result, during the first weeks of September, the fortress of Nicopolis was put under siege. This time around, the Ottoman defenders stood their ground, for they had most likely heard about the brutal fates of their brethren in
Vidin and Oryahovo. Seeing that Nicopolis would not surrender, the crusader army constructed siegeworks and mines over the next few days while supplies and reinforcements from Wallachia and the crusader fleet arrived from the Danube. During the crusader’s advance, the sultan had been personally overseeing the blockade of Constantinople. Now, he focused on the advancing enemy and began mustering forces to confront his foe directly. Seeing that he had to strike the crusader army before they could gain a significant foothold in Bulgaria, Bayezid gave out orders for his armies in the Balkans, including his vassal Stefan Lazarevic, to gather
in Edirne and Plovdiv. The sultan planned on catching the crusader army off guard by assembling his army behind the Balkan Mountains , far from the prying eyes of crusader scouting parties, then force marching said army to Nicopolis. In the first weeks of September, Bayezid would leave a small force to continue the blockade of Constantinople while he and his 20,000-strong Ottoman host began his march north to meet the forces of Sigismund. The Ottoman response to the crusade would be a swift one. In later centuries, it took an Ottoman army up to six weeks to assemble its
ranks and another three weeks to travel from Edirne to the Danube. However, completing this journey took “the Thunderbolt” only two weeks. Much to the surprise and panic of the crusaders, on the 22nd of September, Bayezid’s host was spotted near Tarnovo by their scouting parties in the region. Only two days later, the Ottoman sultan had established a war camp several kilometers south of Nicopolis. According to Ottoman chronicles, under the shroud of darkness, Bayezid rode to the walls of Nicopolis to inform the local Ottoman garrison of the arrival of his army. The sultan promised Doğan Bey and
his men that come the next day, he would shatter the crusader army beneath the walls of their fortress. In retaliation to the sudden arrival of the Ottoman army at Nicopolis, thousands of the remaining Muslim prisoners from Vidin and Oryahovo were rounded up near the crusader camp and executed. The gruesome struggle for Nicopolis had just begun. Even though they had defeated a minor Ottoman scouting party in the days before Bayezid’s arrival, many in the crusader camp were skeptical about how to approach their current situation. The crusader host was now stuck between the local garrison of Nicopolis
and Bayezid’s large host, and worst enough, they had the impassable Danube River to their rear. In one swift move, the Ottoman sultan had managed to besiege the besiegers of Nicopolis. As a result of their situation, a war council was called by Sigismund during the evening of the 24th of September. The decision to face the Ottoman host the following morning was agreed on; however, the Hungarian king advised to take a more cautious approach. He wanted the Wallachian and Transylvanian contingents of his army to head the crusader assault as they had the most experience in fighting against
the Ottomans. After all, the veteran Voivode Mircea of Wallachia had defeated Bayezid on two separate occasions in the years before the crusade. Meanwhile, Sigismund also advised the Franco-Burgundian and Hungarian elements of the army to support the main attack in the case of an Ottoman counterattack. This advice fell on deaf ears, as Sigismund’s thoughtful strategy was ignored due to internal divisions within the crusader camp once again resurfacing. Many Franco-Burgundian leaders were outraged with Sigismund’s plan, seeing it as dishonorable to enter battle behind the Wallachians and Transylvanians, whom they regarded as peasants. The Constable of France, Philip
of Artois, even accused the Hungarian monarch of trying to steal the honor and glory of the battle for himself. After many hours of shouting and fussing, Sigismund would cave into the demands of the Franco-Burgundian leaders; their Western knights would now head the crusader assault. During the morning of September 25th, the numerically even Ottoman and crusader armies deployed for battle south of Nicopolis. On the crusader side, the mounted Franco-Burgundian knights made up the first line, while King Sigismund and his mainly Hungarian contingent made up the second line behind them. Wallachian troops led by Mircea were stationed
on the crusader left wing, while Transylvanian troops led by Stephen Lackfi were stationed on the crusader right wing. A small contingent of crusaders was left behind to continue the siege on Nicopolis. Unlike their crusader counterparts, the Ottoman army was far more centralized in its command structure. Ottoman Akinci light horsemen made up the front line, while behind them was a mix of irregular light infantry from Anatolia and the Balkans called “azabs.” Behind them were Bayezid’s household troops, also known as the Kapikulu, which comprised several thousand elite Janissaries and Kapikulu Sipahi heavy cavalry. They were led by
the sultan himself and his grand vizier, Candarlizade Ali Pasha. Meanwhile, the Ottoman right wing consisted of Balkan Timarli Sipahi heavy cavalry led by the sultan’s eldest son, Suleyman Çelebi. On the Ottoman left wing were the Anatolian Timarli Sipahi heavy cavalry led by Kara Timurtaş Pasha. Lastly, on the extreme Ottoman left wing were the mounted Serbian knights led by their prince, Stefan Lazarevic. In the hours leading up to the battle, King Sigismund sent scouting parties to locate Ottoman positions south of Nicopolis to find the camps Bayezid had concealed from the crusaders. Due to this situation, the
battle was delayed for another two hours, much to the annoyance of the Franco-Burgundian element of the army. Soon, the waiting became too much for the Frenchmen to bear. Then a battle cry by Philip of Artois was heard as he seized a banner of the Virgin Mary: ”Forward in the name of God and St.George, today you shall see me a valorous knight.” Before a general order to advance was given, Franco-Burgundian knights under their eager commanders unexpectedly charged forward to seek out the enemy themselves, much to the horror of many senior leaders in the crusader camp. After
some time advancing forward, off in the distance, the Franco-Burgundian line spotted Ottoman Akinci light horsemen scouting their positions. Seeing an opportunity to gain glory on the battlefield, the mounted Western knights of Europe proceeded to charge into the lightly armored ranks of the Ottoman Akıncıs, resulting in heavy losses for the Muslims. With the remaining Akinci retreating back towards the Ottoman camp and believing they had won a great victory, the Franco-Burgundian mounted knights continued moving forward to make contact with the main Ottoman line. However, as the knights continued riding forward, they encountered a steep slope topped by
a forest of sharpened stakes. Behind the stakes lay the main Ottoman line of azabs, who were armed with various weapons ranging from axes, maces, bows, and spears. Under immense arrow fire from the enemy, many knights dismounted from their horses to get through the Ottoman defenses uphill, but many Franco-Burgundians were wounded alongside their steeds. Despite this, the poorly armored azabs were no match against the mighty knights of Europe, and many were killed in hand-to-hand combat. Seeing that his front line was in grave danger of collapsing, Bayezid ordered for his Timarli Sipahi heavy cavalry to hit the
flanks of the Franco-Burgundian host while his Janissaries reinforced the Ottoman front line. This stabilized the Ottoman line, but the fierce, bloody conflict for the slope continued as the best knights of Western Europe went toe to toe with the sultan’s own elite troops. As the battle raged on, King Sigismund’s contingent of the crusader army, made out of infantry, had finally arrived on the battlefield. Wanting to prevent the two crusader contingents from uniting their forces at this critical moment in the battle, the now anxious Bayezid played his last hand. Sending forth his remaining Timarli Sipahi cavalry and
the remnants of his Akinci and azab units, the Ottoman sultan ordered the creation of a new battle line to be formed between the two crusader hosts. Meanwhile, the Sultan’s own Kapikulu Sipahi cavalry was sent forward to flank around and charged into the rear of the Franco-Burgundian knights. The latter move brought about heavy casualties for the Western knights as they were now surrounded on both sides by Bayezid’s elite household troops. As the battle for the slope continued, the newly formed Ottoman line crashed into Sigismund’s contingent of the crusader army. Although taking heavy losses, the Ottoman line
successfully prevented the Hungarian monarch from uniting his forces with the Franco-Burgundians, who were at this point in the battle exhausted after hours of fighting under the burning morning sun. With Sigismund unable to break through Ottoman lines to reach the Franco-Burgundians, panic began to spread in the crusader army. Perhaps seeing the day was lost and wanting to preserve their troops for future wars against the Ottomans, both Wallachian and Transylvanian contingents of the crusader host began to withdraw from the battle. Before long, Sigismund’s host was now stranded, and the remaining Franco-Burgundians were surrendering to Ottoman troops in
droves. At this critical junction, Bayezid delivered the final flow of the battle. The Ottoman sultan ordered his mounted Serbian knights, led by Stefan Lazarevic, to charge the flank of the remaining Hungarian army. The following Serbian charge would be decisive as it left many dead on the battlefield, thus resulting in the complete rout of the remaining crusader army. The remnants of Sigismund’s army that survived the Ottoman onslaught made their way up north to the Danube as Venetian and Genoese ships began preparations for evacuation operations. In full panic, many crusaders drowned in the deep waters of the
Danube while the Hungarian king barely escaped with his own life as he was pushed into the river before being saved onto a local fishing vessel by his personal guard. On his way back to Hungary, Sigismund would place the blame for the crusader defeat on the Franco-Burgundians, stating that their pride and vanity had cost them the day. The Battle of Nicopolis ended in a decisive Ottoman victory and was the crowning achievement of Sultan Bayezid I’s reign. Having suffered a few thousand casualties, the Ottoman sultan had defeated and scattered a great European crusader army in a single
battle. The following morning after his victory, in retribution for the massacre of Muslim prisoners of Vidin and Oryahovo, “the Thunderbolt” ordered all those he had taken prisoner in the battle to be killed. What followed would be a general massacre of thousands of crusader soldiers in which many were stripped of their clothing and decapitated. Only a handful of high-ranking noblemen were spared from the onslaught, such as John of Nevers. They were ransomed off to their respective European holdings in the following years. The defeat at Nicopolis caused a wave of shock around Europe, as for the first
time, the wider continent was personally made aware of the impending threat of the Ottoman sultanate. It would take half a century for European powers to recoup and launch another major crusade against Edirne. With the crusader armies scattered on the shores of the Danube and leaders of the Christian coalition fleeing back to their own domains in defeat, Bayezid I now had free rein over the Balkans. The sultan’s victory at Nicopolis would be the highlight of his military career and put the Ottoman sultanate on the radar of powerful states across the entire Christian and Islamic worlds. With
Hungary and Wallachia now engulfed in political turmoil after their defeat to Bayezid, potential Ottoman invasions further into Europe became ever more likely in the years to come. The only obstacle standing in the way of Bayezid and his dream of becoming the true ruler of the Romans was now the land walls of Theodosius. As events now stood, it seemed that in a few short years, the entire Balkan peninsula would fall and submit to ‘the Thunderbolt of Edirne.’ However, no grand Ottoman military campaign directed toward Europe came in the years after the crusader defeat. Even though the
Battle of Nicopolis had been a decisive victory for Bayezid, it had come at a considerable loss, as many Ottoman levies were lost in the conflict. As a result, after the remaining crusader prisoners were transported back to Anatolia, the Ottoman sultan decided to consolidate his forces and focus on the blockade of Constantinople instead of pushing further deeper into Europe. Although Hungary and Wallachia were no longer threats for the time being, before leaving for the Byzantine capital in early 1397, Bayezid stormed into the holdings of Tsar Ivan Sratsimir. The former vassal of Edirne had cooperated with the
crusaders during the Nicopolis campaign and thus had to be eliminated. In a short military campaign, Vidin and its surrounding territories were captured, and the former Bulgarian tsar was imprisoned and later strangled to death while in captivity in Bursa. With the conquest of the last independent Bulgarian holdouts secured, the fortress town of Vidin was installed with a significant Ottoman garrison once more, and its fortifications were strengthened. As the last remnants of resistance were put down in Bulgaria, ‘the Thunderbolt’s war against Constantinople increased in intensity. Bayezid’s blockade of the Byzantine capital had become a full-scale siege by
1397 as occasional Ottoman assaults on the Theodosian Walls began. It is said that during this period of hostilities, the confident Ottoman sultan and his senior officials stood on hills overlooking Constantinople, deciding who would get which palace after the eventual fall of the city. Meanwhile, down south, local Ottoman contingents led by the marcher lords of Thessaly had also struck deep into Southern Greece, temporarily occupying the town of Athens and sacking the town of Argos. During this campaign, the forces of the Byzantine Emperor’s younger brother, Theodore I of Morea, were defeated near the town of Leontari in
a decisive battle. The brutal Ottoman invasion reached down south as Modon and Coron, which saw many inhabitants in the region being taken away into slavery. As remnants of Byzantine Greece were ransacked, Manuel II was left pleading with European diplomats in his court for military assistance as famine once again struck the imperial capital. However, the fortunes of the Byzantine emperor changed in the following years. By 1399, the emperor’s desperate appeals were heard by King Charles VI of France, and a 1,200-strong French contingent was sent to the Byzantine capital by sea after evading the Ottoman blockade. This
small Western host was commanded by Marshal Boucicault, a French military leader who had been present at Nicopolis and was ransomed back to France in the years after the battle. Upon entering the capital, Boucicault was given the title of ‘Grand Constable’ by the emperor and began organizing minor sally-out operations against the Muslim besiegers. However, more importantly than a military solution, the French noblemen brought a political solution to the Byzantine capital as he began reconciliation talks between Manuel II and his nephew John VII who still claimed the imperial throne. John VII had been a loyal vassal to
Edirne for many years, however, with Bayezid’s siege of Constantinople came the violent ransacking of the last remaining Byzantine holdings in Thrace. Witnessing his own lands in Selymbria being sacked and seeing no stop to the violent actions of the tyrant ruler of the Ottomans, John began to reconsider his relationship with Edirne. Being on good terms with both the emperors of Constantinople and Selymbria, Boucicault finalized a political agreement between uncle and nephew by the end of 1399. The junior John VII was to become the official heir of Manuel II, while the latter’s eldest son was to be
next in line for the throne. The Palaiologan dynasty was once more united. With his household in check, Manuel made plans to travel to Western Europe to gather critical military and fiscal support for Constantinople. Declaring John VII as his regent in the capital and giving him command of the defenses of the city, the Byzantine emperor embarked on this visit to the West in December of 1399. Manuel II’s three-year trip would see him travel into European lands that had not seen a Roman Emperor in almost a thousand years. The emperor of the Romans first visited the domains
of his younger brother Theodore I in Morea alongside his wife Helena Dragas and their two infant sons. However, seeing that the situation in Modon and the wider region was in a dire state caused by the recent Ottoman invasion, Manuel and his entourage quickly made for Italy. The emperor first visited Venice and then went through the Northern Italian countryside, reaching Milan by the spring of 1400. Along his journey in the local region, Manuel met with a number of Byzantine scholars who had, by the time of the Ottoman siege of Constantinople, found work in the cities of
Northern Italy as professors of classical Greek studies. One of these scholars included the famous Byzantine diplomat turned humanist philosopher Manuel Chrysoloras who taught Greek grammar and literature in Florence, Rome, Venice, and Bologna, much to the interest and appetite of the educated upper Italian class. During the emperor’s journey around Europe, the two men would keep a close correspondence, often discussing any developments of promised aid to Constantinople, which saw Chrysoloras often relaying news back to the besieged imperial capital. By the summer of 1400, as the seeds of the Renaissance were taking root in the cities of Northern
Italy, Manuel II had made his way to the court of Charles VI of France in Paris. Unfortunately for the Byzantine emperor, the French king had succumbed to one of his periodic fits of lunacy, and thus no help for the Romans was secured in the Kingdom of the Fleur-de-lis. After failing to gather any substantial funds from the mad king of Paris, Manuel embarked on England to visit the court of Henry IV, thus making him the first legitimate Roman emperor to visit the Island since the days of Constantine the Great and his sons during the fourth century
AD. Although treated lavishly with a jousting tournament by the English king and being hosted at Eltham Palace during Christmas celebrations, again, no substantial funds were gathered to defend the Roman capital. The emperor’s visit to England had not come at an ideal time, as the recent death of the Plantagenet king, Richard II, and the recent Anglo-Scottish war had destabilized the new Lancastrian regime of Henry IV. With the English armies preoccupied in Scotland and France, only a sum of 3000 marks was donated to the pleading Manuel II. Returning back to Paris, the Byzantine emperor then sent delegations
to the courts of Pope Boniface IX, Pope Benedict XIII, Margaret I of Denmark, Martin of Aragon, and Charles III of Navarre, but again to no avail. Due to the recent defeat at Nicopolis, the decline of a general crusader ethos in Europe, and a lack of political will to save Constantinople, no significant military or fiscal assistance was given to the desperate Manuel during his travels to the West. With the Theodosian Walls of Constantinople barely holding out against the Ottoman siege and famine hitting the streets of the capital, new developments in Anatolia forced Bayezid to turn his
gaze away from the city for the time being. Aladdin Ali Bey of the Karamanids, in a desperate third attempt to reduce Ottoman influence in Anatolia, had invaded the domains of Edirne once more. By 1397, the Karamanid bey had already taken the Ottoman provincial capital of Ankara by surprise and began to advance through the former lands of the Germiyanids toward the old Ottoman capital of Bursa. Resolved to once and for all put an end to the Karamanid nuisance, “the Thunderbolt” began assembling his armies to meet Ali Bey in Anatolia. The following war between the two Turkic
leaders was to be a short one. After leaving a token force to continue the siege on Constantinople, the Ottoman sultan defeated the Karamanid bey in a one-sided battle outside of Bursa on the nearby Akçay plain. After the short engagement, Aladdin Ali Bey of the Karamanids, the man who defied the supremacy of Edirne for over a decade, was executed. All his remaining domains were annexed into the Ottoman Sultanate. Wanting to further consolidate his rule in the region, that following year, Bayezid launched his second grand military campaign into Anatolia. The Ottoman sultan began by first marching on
and forcibly annexing the minor petty Turkic beyliks of Canik alongside the Black Sea, thus expanding his borders with the Byzantine rump state of Trebizond. With his northern flank secured, “the Thunderbolt” now turned his attention to one of the few men who had defeated him in open battle, Kadi Burhaneddin. However, Bayezid’s lust for revenge for his defeat at Kırkdilim back in 1391 was not meant to be. The Islamic scholar-turned-sultan had been killed the same year during an internal conflict with the Aq Qoyunlu, a Turkoman tribal confederation situated at the edges of Eastern Anatolia. As a result
of the political anarchy caused by the war and the death of Burhaneddin, many of the notables of the region requested Ottoman military assistance against the Aq Qoyunlu in return for accepting the suzerainty of Edirne, much to the delight of Bayezid. After a short and successful military campaign led by the sultan’s eldest son, Suleyman Çelebi, the Aq Qoyunlu were defeated, and many major towns in the region, such as Amasya, Sivas, Kayseri, Erzincan, and Tokat, were incorporated into the Ottoman Sultanate. However, these territorial acquisitions would have unintended consequences for the Sultan of the Ottomans. As Bayezid expanded
his realm into Eastern Anatolia, it brought him to the doorstep of two of the most potent Islamic powers of his age. To his south was the Mamluk Sultanate of Egypt, which held suzerainty over the neighboring Ramazanid and Dulkadirid beyliks. After coming to power during the thirteenth century after the fall of the Ayyubids, the Mamluk sultans of Egypt quickly became some of the most powerful military leaders of the Islamic world. While the Ottomans were still in their infancy during the reigns of Osman and Orhan, the Mamluks had pushed out the last crusader holdouts in the holy
lands with its acquisitions of Acre in 1291 and Ruad in 1302, in addition to driving off the Mongol hordes at the battles of Ain Jalut in 1260 and Marj al-Saffar in 1303. In addition to their mighty prowess on the battlefield, the Mamluk sultans of Egypt also held onto the politically important holy cities of Mecca, Medina, and Jerusalem, on top of hosting the religiously important yet politically powerless Abbasid Caliphs in their capital of Cairo. All of these factors would contribute to the Mamluk Sultanate being one of the most prestigious and established Islamic powers of its age
compared to the newly emerging Ottoman Sultanate. However, this era of dominance was to be fleeting for Cairo. By the time of Bayezid, central authority from Cairo was on the decline after the death of the formidable Mamluk Sultan Barquq in 1399, thus leaving his sultanate in the care of his inexperienced ten-year-old son, Sultan Faraj. Seeing an opportunity to fill in the political void left by the former Mamluk sultan and wanting to expand his domains further into the Taurus Mountains and Cilicia, during the summer of 1399, “the Thunderbolt” launched a military campaign against the beyliks of Ramazanid
and Dulkadirid. The following campaign resulted in an Ottoman victory that saw the city of Malatya being annexed and an Ottoman puppet ruler, Mehmed Bey, being installed as the head of the Dulkadirids. Although militarily successful, the Ottoman campaign into the local region resulted in the severing of ties between Edirne and Cairo at a time when Bayezid needed all the help he could get against his more dangerous neighbor to his east. As the Ottoman sultan’s military campaign ended, a new threat in the form of the Timurids had reached the doorsteps of Anatolia led by their ruler Timur,
also known as ‘Tamerlane’ in the West. Coming to power during a time when Central Asia was embroiled in the turmoil caused by the rapid decline and dissolution of the Mongol successor states of the Ilkhanate and Chagatai Khanate, Timur and his followers would go on to build one of the most formidable Muslim states of the late medieval era. Starting out as the petty warlord of the Barlas tribe, the Turko-Mongol ruler would go on to conquer most of the eastern Islamic world in a series of ruthless military campaigns reminiscent of the Mongol invasions of the early 13th
century. While the Ottomans were preoccupied with Christian armies in Kosovo and Nicopolis, Timur and his followers were on a bloody mission to restore the former empire of Genghis Khan. Beginning with the western portion of the former Chagatai Khanate, over the decades, many regions fell to the war machine of the ruler of Samarkand. By the turn of the century, the Timurid realm stretched from the Armenian highlands in the west all the way to the Indus River Valley in the east, thus making it one of the most powerful and influential Islamic states of its age. As Timur’s
domains now bordered the Ottoman Sultanate, many of the adversaries of Edirne, such as the many disenchanted Turkoman nobility of Anatolia, saw an opportunity to escape the Ottoman yoke. Bayezid’s conquest of Anatolia during the course of the last decade had brought an end to the independence of many local Turkic beyliks of the plateau, and thus their former ruling class were either imprisoned, forcefully incorporated into the Ottoman army as auxiliaries, or were entirely displaced from their holdings altogether. As Timur’s empire in the east grew in strength, many of the displaced Turkoman nobility of Anatolia flocked to the
Turko-Mongol ruler of Samarkand in the hopes of regaining their possessions from the “tyrant of Edirne.” Concurrently, many notables from Iraq and Azerbaijan who had been displaced by Timur’s recent invasions took refuge at the court of the Ottoman sultan. Some of these notables included Sultan Ahmad Jalayir of the Jalayirid Dynasty and Sultan Qara Yusuf of the Qara Qoyunlu. As a result of the policy of hosting political rivals against each other, relations between Edirne and Samarkand began to turn sour by the turn of the century. As an Ottoman-Timurid cold war set in during the spring of 1400,
while Timur was preoccupied with a bloody military campaign in Azerbaijan and Georgia, Bayezid, in an act of defiance against the ruler of Samarkand, took over the towns of Erzincan and Kemah from Mutahhartan Bey, a local Turkoman noble who had defected from Edirne and declared for Timur. Not taking kindly to an open attack on his new vassal, Timur responded to the Ottoman incursion with a military campaign of his own. During the fall of the same year, the Turko-Mongol ruler struck deep into Eastern Anatolia in a surprise invasion, recapturing Erzincan and Kemah, in addition to putting the
Ottoman regional capital of Sivas under siege. Bayezid, who was at the time still leading the ongoing blockade of Constantinople, was unable to respond to the Timurid counterattack. After an eighteen-day standoff, Sivas would eventually surrender, and so on Timur’s orders, its local garrison was horrifically buried alive. After the sack and conquest of Sivas, the Timurid ruler turned south and captured Malatya before heading off to begin his military campaign in the Levant against the Mamluks. While Cairo was still paralyzed by political infighting, Timur, in a short and decisive campaign, brutally sacked and occupied the Mamluk Levantine cities
of Aleppo, Hama, Homs, Baalbek, and Damascus. However, While the Turko-Mongol ruler was preoccupied with his Mamluk campaign, new developments from Anatolia began trickling into his tent. The defiant Sultan of the Ottomans, having decided not to stay idle while his newly acquired lands were ransacked, was on the counterattack. By the summer of 1401, Ottoman forces had marched back into Eastern Anatolia, recapturing the towns of Sivas, Erzincan, and Kemah back from the Timurids. It is from here that the two monarchs of Edirne and Samarkand began their famous correspondence with a series of letters sent to each other’s
courts. Both men accused the other of infidelity and faithlessness to the core tenets of Islam in addition to bringing up the topic of hosting political rivals in each other’s courts. Timur first sent letters to Bayezid urging him to expel the rulers of the Jalayirids and Qara Qoyunlu from his lands lest he bring his wrath upon him. Bayezid responded by stating that the Turko-Mongol ruler should not confuse him with the sultans of Persia and that the helpless armies of Iraq, Khorasan, and the Mamluks were nothing in comparison to the strength of his armies. The Ottoman sultan
also added that Timur’s bloody military campaigns and his sack of many Muslim cities had made him and his followers dishonor the faith. “To fight is our habit, to join in combat our aim, to struggle for the faith our task!” -Bayezid I The Timurid ruler responded likewise, stating that his soldiers were the sons of Muslims, unlike the devshirme ranks of the Ottoman army, and that Bayezid should immediately relinquish his recent conquests in Eastern Anatolia to him. Among other provocative letters, which included Timur comparing Bayezid to an ant, or Bayezid writing his name in large gold letters
with Timur’s in small black letters, and threats to each other’s spouses and concubines. During the multiple rounds of letters, both the prideful and ego-filled rulers of Edirne and Samarkand continued to make their case for being the greater Islamic ruler over the other. With no political progress being achieved by the diplomatic bout and Bayezid unwilling to submit to Timur’s demands of surrendering Eastern Anatolia, it was clear that war was on the horizon. After suppressing a local revolt in Baghdad initiated by Ahmad Jalayir from the safety of Ottoman lands in 1401, which ended with the bloody sack
of the city, Timur officially began preparing for war against Bayezid. First stationing his forces in Azerbaijan for the winter, during the spring of 1402, Timur officially declared war against Edirne and began marching on Eastern Anatolia. In quick succession and without real resistance, Kemah, Erzincan, and Sivas again fell to the Timurid ruler. As Timur crossed into Ottoman territory, Bayezid was startled out from his blockade of Constantinople and began preparations to meet the Turko-Mongol ruler in open battle. First consolidating his Balkan and Anatolian forces in Bursa, Bayezid set out on a rapid march eastward, stopping briefly at
Ankara. There he was urged by his military officers to make camp and prepare for Timur’s arrival, as the local region was well-supplied with water and food and was easy to defend against an attacker due to the hilly terrain. However, loathing the idea of allowing Timur to raid his eastern provinces freely, Bayezid left a small garrison behind in Ankara and sped east to Sivas, hoping to negate Timur’s cavalry superiority in the Pontic Mountains. After a couple of days of force marching his army eastwards, near the outskirts of Tokat, “the Thunderbolt” met and skirmished with what he
thought was the Timurid vanguard and beat them back out of the region. However, in a shocking revelation revealed after the fact, Bayezid and his host had only engaged a diversionary force. While Bayezid was in Tokat, the main Timurid host had cut southwest, taking Kayseri, and was now besieging Ankara. The Ottoman host, in a quick hurry, doubled back to Ankara at full speed under the hot Anatolian summer heat, and as a result, thousands were lost in the forced march. Being low on water and supplies, the exhausted Ottoman army finally arrived on the outskirts of Ankara and
made its camp on the nearby Çubuk plain to the north of the town during the second half of July. Facing a situation similar to the one at Nicopolis, “the Thunderbolt” made plans to relieve his garrison at Ankara by attacking Timur’s host head-on as he did with the crusaders under King Sigismund. The Battle of Ankara was about to begin. The Timurid army outnumbered the Ottoman host to an estimated number of 90,000 to 60,000. Most of Timur’s army was comprised of fearsome Chagatai Turkic horse archers, supported by various subject peoples, such as mounted Turkomen, Iranian infantry, and
Armenians picked up en route. The army was organized with a center, two wings, and a reserve, with a vanguard before each section and with Timur himself leading the center. His left was led by his youngest son, Shahrukh, and the right by his oldest living son, Miranshah. The reserve was led by his grandson and heir, Muhammad Sultan. Ahead of the entire army was a row of 32 war elephants from India, clad in bright trappings, housing archers and naphtha throwers, and with swords fastened to their tusks, they were a living rampart to terrify the enemy. Bayezid’s army,
too, was made up of a diverse set of soldiers encompassing the various regions of his realm. The Ottoman sultan commanded the center alongside his grand vizier, Çandarlızade Ali Paşa, and the sultan’s three sons, şehzades Isa, Musa, and Mustafa. They were protected by the sultan’s Kapikulu guard made out of several thousand elite Janissaries and Kapikulu Sipahi heavy cavalry, in addition to archers and light azab infantry placed in the vanguard. Bayezid’s eldest son and presumptive heir, Suleyman, commanded the left wing, made up of troops mainly from the Balkans and a large body of recently hired Tatars from
the local region. Meanwhile, another son of the sultan, Mehmed, commanded the rear guard alongside a contingent of Qara Qoyunlu cavalry. Lastly, the right wing was composed of mainly Anatolian troops led by the sultan’s late tutor and veteran of the Battles of Kosovo and Nicopolis, Kara Timurtaş Pasha. The Ottoman pasha was joined by the sultan’s loyal vassal and brother-in-law, Stefan Lazarevic of Serbia, who commanded 5,000 of his own retinue of heavy cavalry from Europe. During the early hours of July 28th, the armies of the two most powerful rulers of the Islamic world began their struggle for
Ankara. Sources differ on who attacked first, but we know that the battle was initially joined between the Ottoman left and Timur's right. Fighting was fierce, and troops under Suleyman were hard-pressed but managed to hold their ground despite the thundering impact of enemy elephants and their own weariness and thirst. Simultaneously, Timur commanded his left wing to attack the Serbs on the Ottoman far right while he engaged the Ottoman center. However, the heavily armored knights of Stefan Lazarević not only held their ground and offered fierce resistance against the Timurid attack but were even able to go on
the offensive. After absorbing the initial assault, the Serbian knights gained the upper hand by slashing through the lightly armored lines of the Timurid left, driving them back toward their camp. However, seeing that his numerically inferior Serbians had overextended themselves during their pursuit, Bayezid ordered them to halt and regroup with the rest of the Ottoman right wing. As predicted by the Ottoman sultan, the Timurid left was later reinforced by reverses, and now they began a counter-offensive of their own. Now that he was on the counterattack, Timur pulled an ace in his sleeve and initiated his surprise
plan to surround the Ottoman left wing. The Turko-Mongol ruler had been in touch with Bayezid’s Tatars long before the battle and had persuaded them to join his struggle against the “tyrant of Edirne.” During the heat of battle, the Tatar auxiliaries on the Ottoman left flank suddenly changed sides, joining Timur and attacking the rear of the already wavering forces of Suleyman. Bayezid’s son Mehmed, who was commanding the reserve, responded by attacking the Tatars from the rear, and although the move alleviated some of the pressure on the Ottoman left, the numbers were on the Timurids side, and
Suleyman continued to give ground. With defeat almost certain, the heir-apparent of the Ottoman Sultanate struck back at the Tatars and broke through them, starting his retreat back to Edirne. The news of the sudden collapse of the Ottoman left wing spread through Bayezid’s ranks like wildfire, and as a result, a general panic erupted. Upon hearing the devastating news on the opposite side of the battlefield, the Anatolian auxiliaries led by the former notables of the recently conquered Turkic beyliks also switched sides and began harassing the Ottoman right and center from the rear. It is most likely that
these Turkoman notables saw an opportunity to regain independence from Edirne by working closely with Timur and thus betrayed their liege lord in his darkest hour. As chaos and confusion engulfed the Ottoman army, Timur’s entire army began a general advance forward, resulting in heavy Ottoman casualties. The still loyal Stefan Lazarevic, who had just learned that the Anatolian auxiliaries betrayed their cause, disengaged the battered Timurid left and attacked them from the rear, cutting his way through to Bayezid. Upon arriving at his tent, the Serbian prince urged his sultan to flee the battlefield while there was still time.
However, scorning the advice of his loyal vassal, Bayezid instead retreated to the hill of Çatal Tepe behind the Ottoman lines. There he would, with his Janissaries and some of his household guards, prepare to make a last stand against Timur while the rest of his army retreated from the battlefield. With Şehzades Suleyman, Mehmed, Isa, and now his Serbians gone from the corpse-filled Çubuk plain, the Ottoman sultan, with two remaining sons, Musa and Mustafa, led what was left of the Ottoman army in a hopeless struggle against all odds. Fighting shoulder to shoulder with their men, axe in
hand, the members of the House of Osman fought with vigor and threw back multiple Timurid charges from the hill. This gallant but hopeless defense went on for some hours until darkness began to fall, and Bayezid’s thoughts, at last, turned to flight. With 300 or so cavalry, he tried to break out to the east. Timur's men, fearing that the greatest prize of all might yet elude them, pursued hotly, and the sultan was captured when his horse stumbled and threw him off. With his capture, the Ottoman disaster was complete. By sunrise on the 29th of July, Bayezid
was brought in bonds to Timur, and the garrison of Ankara soon surrendered. The Battle of Ankara was over. The Ottomans lost more than 30,000 men during the course of the military campaign against 15,000 thousand casualties for Timur. The victor of Nicopolis was subject to the whims of the great Emir, leaving his sultanate to suffer a ten-year civil war between his sons. Bayezid had gained the Ottoman throne on the battlefield back during the Battle of Kosovo in 1389, and since then, he had won countless victories in Europe and Asia. However, flash forward thirteen years, and he
now relinquished that same throne on another battlefield. The Sultan of Rum, like the Roman emperor Valerian before him, was now subjugated to a life of embarrassment at the hands of his captives. Although no contemporary source states that Bayezid was held in a golden cage, which is commonly told in popular retellings of his story, major presumed psychological damage had been done to the once prideful sultan of the Ottomans as his wife and two sons were taken captive alongside him. Timur now had free reign over Western Anatolia. The rest of 1402 was spent pillaging across the region.
Bursa, the former Ottoman capital, was taken as many Ottoman troops escaped Timur’s clutches on Genoese and Venetian galleys, happy to accept payment to transfer them across the straits. Overnight, the Timurid victory at Ankara would reshape the entire geopolitical scene of the entire region as it saw Constantinople being saved from the clutches of the Ottoman siege. With the tides turning in their favor, by the fall of the same year, Byzantine envoys en masse arrived in Anatolia and began showering Timur with gifts in the hopes of potentially forming an alliance against the remaining Ottomans. Also, as a
result of the decisive battle, the Turkoman notables who had sided with the great emir were given back their independence from Edirne, thus reverting all the gains that Bayezid won in Anatolia during his thirteen-year reign. With the Ottoman Sultanate paralyzed and with the sacking of Hospitaller-held Smyrna during the winter of 1402, Timur officially concluded his military operation in Anatolia and made his way back to his domains. However, by March of the next year, the former thunderbolt of the Ottomans was found dead while in captivity at Akşehir from either suicide via poison or an unknown illness. Even
though he had died as a defeated man, Sultan Bayezid I was to be one of the most renowned members of the House of Osman in later centuries as his lightning-fast military campaigns in Europe and Asia captured the imagination of future generations. Even with the death of their sultan, all was not lost for the Ottomans as the Timurid threat to their east would subside with the death of Timur two years later, which resulted in the rapid collapse of his former realm. With Sultan Bayezid I’s defeat at the Battle of Ankara and his captivity at the hands
of Timur, the Ottoman realm was plunged into one of the most turbulent periods of its history. In only eight months, the emir of Samarkand had almost undone more than thirteen years of military campaigning and political maneuvers of Sultan Bayezid I. With the House of Osman’s legitimacy shattered and its armies scattered in the Balkans and Anatolia, a power struggle had erupted between the sons of Bayezid, members of the Ottoman military class, and the former vassals of Edirne. A race to seize the levers of power had been initiated, and now it looked like the road to civil
war was wide open. Escaping with the majority of the routing Ottoman army from Ankara, Suleyman Çelebi, the eldest son of Bayezid, had raced westward towards Bursa to escape the wrath of the Timurid onslaught. Crossing into Europe by August 1402, the Ottoman prince was accompanied by his father’s influential grand vizier, Candarlizade Ali Pasha, and the bulk of the Ottoman elite, Kapikulu. After entering the capital of Edirne, Suleyman was declared ‘sultan’ by the religious ulema of the city and his own troops. Having personally served in his father’s military campaigns in Anatolia and the Balkans during the last
thirteen years, the eldest lion of “the thunderbolt” was seen by many as the most legitimate and experienced member of the House of Osman to succeed his father. Upon taking the throne, Suleyman entered into a series of diplomatic talks with the local Christian powers of the region in order to consolidate his insecure position in the Balkans. The newly crowned Ottoman sultan knew he had to secure his flank if he ever wanted to march into Anatolia one day and reunite his father’s former realm. After three and a half months of negotiations with the Byzantines, Genoa, and Venice,
the Treaty of Gallipoli was signed in the first months of 1403, resulting in major Ottoman concessions to the Christian powers. Land concessions to the Byzantines included the major cities of Thessalonica and Nicomedia in addition to their surrounding territories, the Aegean coast of Thessaly, and lastly, a number of settlements alongside the Thracian Black Sea coast up to Mesembria. A series of free trade agreements for Byzantine, Venetian, and Genoese merchants were established, and all tributes from these states to Edirne from the time of Bayezid I were cancelled. The Ottoman sultan was also obliged to defend Constantinople in
the event of a Timurid attack, in addition to releasing all Byzantine and Genoese prisoners to their respective states. Although the treaty was unpopular with many in Edirne, Suleyman had secured peace in the Balkans and now turned his attention to developments coming from Anatolia. In the months after the Battle of Ankara, Anatolia was devastated by the rampaging armies of Timur, which saw major towns like Smyrna and Bursa being brutally sacked. As anarchy reigned supreme in Anatolia, the former Turkic beyliks of the region were restored by the emir of Samarkand to destabilize the Ottoman state further. As
Anatolia was divided back to its pre-1390 borders, the Ottomans were left with only Bithynia, Mysia, the former lands of the Eretnids, and a small strip of land around Ankara. It was from these lands that the remaining sons of Bayezid established their new rump Ottoman states. After fleeing the onslaught at Ankara, Isa Çelebi and Mehmed Çelebi both took their personal retinues and established their own courts in Bursa and Amasya, respectively. Unlike their older brother Suleyman, who had managed to escape the wrath of Timur’s armies by fleeing to the Balkans, the two junior Ottoman princes had no
real military or political power base in Anatolia to resist the Timurids. As a result of their weak positions, the pair reluctantly submitted to the suzerainty of the emir of Samarkand. Despite being an official vassal of Timur, the younger of the brothers, Mehmed Çelebi, spent the rest of 1402 and the start of 1403 campaigning in the lands around Amasya against other fellow Timurid vassals. In a minor skirmish at Tosya, the seventeen-year-old Ottoman prince defeated the nephew of Isfendiyar Bey, Kara Yahya, and in another battle defeated Kara Devletşah, a Timurid commander, near the outskirts of Amasya. Mehmed
continued his winning streak by capturing the key mountain pass settlement of Niksar, launching raids into newly reestablished beyliks of Canik, and defeating waves of migrating Turkic tribes from the east. These early victories attracted many to the court of Mehmed, such as military men and former Ottoman notables fleeing from Timurid rule. In only a couple of months, the third eldest son of Bayezid gained a sizeable following and was now seen by many as a champion for the ghazi warrior tradition of old. While Mehmed was off winning victories in Eastern Anatolia, the last two sons of Bayezid,
Musa Çelebi and Mustafa Çelebi, were held in captivity alongside their father in Akşehir as political prisoners. Never before in its history had the Ottoman state seen so many claimants to its throne. Since the days of Murad I, the ‘sultans of Edirne’ often practiced fratricide toward their male siblings in order to keep the line of succession as peaceful as possible. This meant fierce competition between the five Ottoman claimants even when Bayezid I ruled a united Ottoman Sultanate. The first signs of civil war were already present by the early spring of 1403 when the former sultan of
the Ottomans died suddenly while in captivity, which killed off any potential opportunity for the sons of Bayezid to reconcile their differences. With Timur and his military host beginning to leave Anatolia for the east during the same period, all bets were off as civil war loomed over the greater region. However, before leaving Anatolia for good, the ruler of the Timurids gave permission for Musa Çelebi to bury his father in the former Ottoman capital of Bursa while Mustafa Çelebi accompanied him back to Samarkand. It was to be the actions of the former to lay rest to his
father which evidently sparked a chain of events that engulfed the Ottoman world in civil war for the next decade. In a surprise turn of events, upon arriving in Bursa, a grieving but scheming Musa seized the city and its garrison from his brother Isa, resulting in the latter fleeing to the town of Balıkesir. However, the Ottoman prince was not able to hold the former Ottoman capital for long as he had no real following in the local area, having been the prisoner of Timur for the last year. After mustering troops in Mysia, Isa launched a counterattack and
recaptured Bursa in a short engagement which resulted in Musa fleeing to the court of Germiyanids and then to the Karamanids. It seemed as if, once more, an uneasy peace between the sons of Bayezid was reestablished. Nonetheless, the status quo in Anatolia would once again be shaken as during the aftermath of his victory over Musa, Isa received a letter from his younger brother, Mehmed Çelebi, from Amasya. The Ottoman prince had offered Isa to rule Anatolia together, perhaps in an attempt to consolidate their strength against their more formidable brother in the Balkans. However, the offer of unification
was rejected by Isa as he thought due to being Mehmed’s older brother, he should be automatically subordinate to him. After a series of hotly exchanged letters, the two brothers made ready for war to decide the fate of Ottoman Anatolia. Eventually, during the late spring of 1403, the two armies of Isa and Mehmed clashed in a decisive engagement near Ulubat, which saw the latter crush the forces of the former. With Isa first fleeing to the protection of Constantinople and then to the court of Suleyman, Mehmed entered Bursa and declared himself ‘sultan’ with the backing of the
city's ulema. In the weeks after the Battle of Ulubat, the remaining lands of Ottoman Anatolia fielded loyalty to the third eldest son of Bayezid. With Mehmed Çelebi unifying Anatolia under his control and proclaiming himself sultan, the ball was in Suleyman Çelebi’s court to respond to what he saw as his greatest rival to the throne. By 1404, the ‘sultan of Edirne’ dispatched a rehabilitated Isa Çelebi with a sizeable army to retake Bursa as a way to destabilize the region further. The invasion started promisingly as Isa captured Balıkesir and its surrounding lands while Mehmed was off campaigning
in Eastern Anatolia. However, the fortunes of the Ottoman prince turned sour after his siege of Bursa was lifted when a 3,000-strong relief force from the east sent by Mehmed scattered his army beneath the walls of the city. With the former capital in flames from the recent siege, Isa Çelebi fled to the court of Isfendiyar Bey of the Candarid Beylik, where he recruited another army to continue his war effort against Mehmed. However, this army, too, was scattered near the outskirts of Ankara by ‘the sultan of Bursa’ which now saw Isa flee to the Western Anatolian beyliks
of Saurhan, Aydin, Menteşe, and Teke for military help. The Turkic beys of the region all saw Mehmed as a greater threat to their newly won independence and so supported the weaker side of Isa. After months of assembling a large host, the Ottoman prince once again attacked Bursa but was defeated again in three different engagements between 1404 and 1405. Failing to get military assistance from the Karamanids and having no army left to take Bursa back, Isa Çelebi went into hiding in Bithynia. However, the Ottoman prince was found by Mehmed’s agents during the fall of 1406 and
was killed while at a Turkish bath in Eskişehir. With the defeat of Isa in the east and the Balkan front remaining stable after the Treaty of Gallipoli, Suleyman Çelebi and his grand vizier, Candarlizade Ali Pasha, made plans to launch a massive campaign against Mehmed. The ‘sultan of Edirne’ had with him the bulk of the elite Ottoman Kapikulu core on his side and so had the advantage over Mehmed’s exhausted Turkoman-ghazi army, which had spent the last three years campaigning around Anatolia. Launching his campaign in the spring of 1406, Suleyman and his forces defeated and scattered Mehmed’s
army near the town of Yenişehir, resulting in the latter prince fleeing to the safety of Amasya. In the aftermath of the battle, all of Bithynia and Mysia submitted to the eldest son of Bayezid as his armies now reached as far as Ankara. It seemed like, in only a couple of months, the Ottoman realm would be united under one ruler once more. However, by the winter of the same year, Suleyman’s campaign into the region stalled in momentum when his much-trusted grand vizier passed away in Ankara due to natural causes. Ali Pasha had been instrumental in organizing
the main Ottoman bureaucracy in Edirne to support Suleyman in the early days of the interregnum and had been vital in the military successes of the last half year. The cessation of conflict caused by the grand vizier’s death gave Mehmed some time to conclude an alliance with the Karamanids, which saw him reunite with his younger brother Musa Çelebi, who had lived at the court of Mehmed II Bey since his defeat to Isa in 1403. These new political developments brought new life into Mehmed’s struggle for the Ottoman throne, and so the civil war dragged on. The war
in Anatolia had effectively become a stalemate by the year 1409, so Mehmed decided to employ the very tactic that Suleyman employed on him years prior. Sending Musa to create chaos in the Balkans, Mehmed wished to destabilize Suleyman’s realm like he had done so with Isa against him. Taking a ship from the Candarid Beylik, Musa landed on the Thracian Black Sea coast, where he immediately began to contact the Ottoman marcher lords and Christian leaders of the local region. Before we discuss the fruits of Musa’s diplomatic scheming, let us go back in time to see the political
developments of the Balkans during the last seven years. Like their Byzantine counterparts, the rulers of Serbia and Wallachia had not been idle during the course of the Ottoman Civil War. Ever since the aftermath of the Battle of Kosovo in 1389, the Principality of Serbia under its ruler Stefan Lazarević had been a loyal vassal to Edirne. The young prince of Serbia had fought bravely alongside his heavy knights in the many military campaigns of Bayezid I from Rovine to Nicopolis to Ankara. However, in the aftermath of Timur’s crushing victory at Ankara, Stefan and his retinue of Serbian
knights escaped westward and found themselves in Constantinople at the court of Manuel II. Most likely as a way to establish an alliance between their two states, the Roman emperor bestowed the Serbian prince with the highly coveted court title of ‘despot,’ which was only reserved for the family members of the imperial dynasty. Returning from the Battle of Ankara as the despot of Serbia, Stefan had spooked the newly established feeble regime of Suleyman Çelebi as Ottoman power projection in the Balkans had greatly diminished after the defeat at Ankara. Edirne felt like their Serbian vassal and other Christian
rulers in the region could any day declare war on the Sublime Porte or, worse yet, form another great crusader army. Fortunately for Suleyman’s government, the only power that could greatly hinder Ottoman presence in the Balkans, the Kingdom of Hungary, was too preoccupied with wars in Bohemia and Italy to truly take advantage of the Ottoman civil war. However, with Serbia seemingly drifting out of Ottoman hegemony, Suleyman blocked Stefan’s land route back to his realm, which resulted in the Serbian despot traveling by sea through the lands of his brother-in-law Durad II Balsic of Zeta. Once home, Stefan
was faced with a turbulent political scene as his nobility were split on the decision to free themselves from Edirne’s suzerainty or to support Suleyman in the upcoming civil war. The nobleman Durad Brankovic, the son of the infamous Vuk Brankovic who had fought and abandoned his liege lord during the Battle of Kosovo in an attempt to usurp Stefan, had invited Ottoman troops into Serbia. Tensions turned into open conflict as Durad’s and Stefan's armies clashed at the Battle of Tripolje during the fall of 1402. Being supported by his brother Vuk Lazarevic and troops from Zeta, Stefan successfully
routed the forces of Durad and, in the months after his victory, consolidated his position on the Serbian throne. By the following year, the Serbian despot had renounced his vassalship to Suleyman in favor of fielding suzerainty to King Sigismund of Hungary, thus freeing himself from Muslim overlordship. Likewise, Wallachia also took advantage of the Ottoman civil war. After defeating Vlad I to reunite his realm in the months after Nicopolis, Wallachian Voivode Mircea I had been pushed to the defense as Ottoman Akıncıs plundered his lands in a series of devastating raids. However, after Ankara, Mircea had gone on
the offensive and refortified his holdings in northern Dobruja, launched raids of his own south of the Danube, and even supported a Bulgarian rebellion in the wider region. With another son of Bayezid arriving on the shores of the Balkans in 1409 came new opportunities for the Wallachian ruler to make gains against Edirne. Mircea invited the Musa to his realm and concluded a marriage alliance with his daughter, Arina of Wallachia, to the Ottoman prince. In addition to the newly formed alliance, Musa began recruiting a large army made out of Wallachians supplied by Mircea and Turkomans supplied by
the local Ottoman marcher lords of the region. Vuk Lazarevic also joined Musa’s cause alongside a small contingent of Serbian troops after falling out with his brother after Tripolje . By year's end, the Ottoman prince had already won multiple victories in Bulgaria over the local forces of Suleyman, and by year's end, the Ottoman capital of Edirne fell to him. With his holdings in the Balkans now under threat, a now panicked Suleyman decided to abandon his Anatolian campaign against Mehmed and began withdrawing from the region. To ensure the safety of his crossing into Europe, the ‘sultan of
Edirne’ met with Byzantine emperor Manuel II to obtain assurances and logistical support for his army in return for his presumed heir, Kasim Çelebi, to be sent to the Byzantine capital as a political hostage. To solidify the alliance between Edirne and Constantinople, the Byzantine emperor married his niece to Suleyman in return for military aid for the sultan’s war effort against Musa. By the summer of 1410, the crossing was completed, and the two sons of Bayezid clashed at Kosmidion in what was to be a bloody affair for both sides. The fate of the battle was only decided
when Suleyman and his bodyguard suddenly stormed into Musa’s camp, thus resulting in a full rout of the latter’s army. A month later, the brothers again clashed near the gates of Edirne, which again saw Musa being decisively defeated after his Serbian troops under Vuk Lazarevic prematurely fled the field of battle. While Suleyman heroically reentered Edirne, Musa withdrew north with the remains of his army to Sofia, not before executing Vuk for treason along the retreat. In the months after his victory over Musa, Suleyman Çelebi, instead of pursuing the scattered armies of his brother up north, spent most
of his time secluded in the imperial palace of Edirne. According to later biased Ottoman sources, the overconfident sultan had always been a heavy partier, and now, without his trusted grand vizier by his side, he indulged himself in the luxuries of his harem. Meanwhile, back in Anatolia, Mehmed had recaptured all the lands he had lost to Suleyman back in 1406, along with defeating Hizir Shah of the Sarukhanids and installing his brother Orhan Bey as an Ottoman vassal. Unhappy with the sultan’s leadership, the reversal of fortunes in Anatolia, and the very unpopular terms of the Treaty of
Gallipoli, the Ottoman bureaucracy at the capital, in addition to the Kapikulu elite of the military, began rapidly defecting to Musa en masse. Seeing that his core support was withering away, Suleyman fled Edirne during the cover of night for the safety of Constantinople. However, during his journey to the Roman capital, he was caught and beheaded by a group of villages who resented him as a tyrant ruler, thus bringing an end to the eldest son of ‘the Thunderbolt.’ By the start of 1411, Musa entered Edirne thus, only two claimants for the Ottoman throne were left. In the
days after entering the Ottoman capital, Musa began to distance himself from his subordination to Mehmed and declared himself as ‘sultan’ in front of the city's populace. Now in power and sharing his father's relentless temper, Musa went on a path of revenge and declared war against Serbia and the Byzantines for their past transactions against him. While Ottoman akıncıs began raiding Southern Serbia, the new Ottoman sultan continued his father’s work of blockading Constantinople while he himself suppressed a Bulgarian rebellion led by the son of the late Tsar Ivan Sratsimir, Constantine II. With his capital city under blockade
once more, followed by the sudden fall of Thessalonica and the various coastal settlements of Thrace and Thessaly, Manuel II began negotiations with Mehmed Çelebi to form a united front against Musa. Agreeing to reinstate the Treaty of Gallipoli once he was in power, Mehmed and his army crossed the Bosphorus with the aid of Byzantine ships and clashed with his brother west of the Roman capital at the Battle of İnceğiz in the spring of 1412, but Mehmed’s Turkoman troops were again no match for the elite Ottoman Kapikulu and thus had to retreat back to Anatolia. However, the
determined ‘sultan of Bursa’ played his hand again and crossed into the Balkans with an even larger army during the summer of 1413. By this period, the harsh and impulsive rule of Musa had caused many bureaucrats in Edirne, such as the brother of the late grand vizier, Candarli Ibrahim Pasha, to declare for Mehmed. Many statemen thought Musa’s relentless wars in the Balkans would bring further ruin to the state and thus wanted a quick resolution to the Ottoman civil war. With the backing of Serbia and the elite Ottoman Kapikulu, Mehmed defeated Musa at the decisive Battle of
Çamurlu near the Bulgarian town of Samokov. Having Musa strangled after the battle, Mehmed entered Edirne and declared himself the sole sultan of the Ottoman Sultanate, thus bringing an end to ten years of civil wars. Even though the Ottoman interregnum was over, and Sultan Mehmed I had reunited his father’s realm, dark clouds still loomed over Edirne as a new set of crises reared upon a recovering Ottoman state. The twenty-seven-year-old Sultan Mehmed I began his reign by reassembling the ranks of his personal council by appointing men to positions of power who had supported his cause during the
last decade. The leading groups that benefited from this restructuring in govern ment were the Turkoman ghazi warriors and notables of Anatolia, who had long been neglected during the years of “the Thunderbolt," but had since regrouped around the new sultan. It was these Turkomans who had made up the core of Mehmed’s army during the wars of the last decade, and it would be they who were now to play a vital role in his government for the foreseeable future. The new sultan also reaffirmed the Treaty of Gallipoli with the Byzantines and Genoese, as was his promise to
Manuel II for his military assistance during his war effort against Musa. As a result of all of these political developments, the formally influential kapikulu and devshirme military and political classes were reduced in size and sidelined in the new Ottoman administration as many of their timar holdings were seized and redistributed by the state. With his internal affairs settled at home, Mehmed turned his gaze eastward as he sought to establish Ottoman control over a war-torn Anatolia, a region which had, during the last decade, seen many of its settlements and pastures brutally ransacked. Not wanting to invoke the
wrath of the Timurids as his father did with his speedy conquest of Anatolia during the 1390s, the Ottoman sultan opted for a more subtle form of land expansion through vassalization. During the early months of 1414, the Ottoman sultan personally led an army along the Aegean coast of the plateau, overwhelming the Turkic beyliks of the area in a single military campaign. The Sarukhan and Aydinid beyliks were officially annexed into the Ottoman realm, while Menteşe and the Germiyanids were vassalized. The former ruler of the Aydinids, Cüneyd Bey, who had been a critical ally of both Suleyman Çelebi
and Musa Çelebi during the interregnum, was forgiven for his past actions against Edirne and was given the vital governorship of Nicopolis. After reestablishing Ottoman rule in Western Anatolia, Mehmed marched on the Candarid Beylik of Isfendiyar Bey, who had sided with Timur during the Battle of Ankara, and vassalized his state in addition to the beyliks of Canik along the Black Sea coast. In response to a failed Karamanid siege on Bursa while he was campaigning against Musa in the Balkans back in 1413, the Ottoman sultan declared war against Mehmed II Bey at the start of 1415 as
retribution for invading his lands. However, due to the intense spring rains hampering his siege on Konya, Mehmed concluded a hasty peace treaty with the Karamanid ruler, which saw him regain the towns of Egirdir, Akşehir, and Beyşehir back for the sultanate. Returning to Edirne victorious with much of Anatolia once again under the Ottoman fold, Mehmed began planning out military operations into the Balkans to reassert Muslim power projection in the region after many years of Ottoman military inactivity. First pushing deep into the decentralized principalities of Albania, Mehmed captured the regional towns of Vlorë and Kruje, reaching the
coast of the Adriatic by 1417. Ottoman raids deep into Bosnia, Morea, and Transylvania also recommenced during this period as the sultan sought to please his Turkoman ghazi warriors with the riches of the local region. Mehmed likewise launched a war against Wallachia as its ruler, Mircea I, had been a critical ally of Musa during the interregnum and thus had to be punished. The following hostilities were to a short one as the ailing sixty-year-old voivode wished to keep the peace with Edirne, and so signed a peace treaty that saw him ceding the crucial Danube fortress town of
Giurgiu and the region of Dobruja to Mehmed. In addition to territorial concessions, Wallachia also became an official vassal of Edirne, which compelled it to once again pay a yearly tribute to the Ottoman state. Better yet for Mehmed, by 1418, Mircea of Wallachia, the man who had dealt two defeats to Bayezid within a year and had been a thorn in Ottoman expansion into Europe for over twenty years, had died of natural causes. It was also during this period that the newly emerging Ottoman fleet began conducting major naval operations in the wider region for the first time
in its history. Since the end of the interregnum, many Ottoman coastal settlements and merchant ships in the Aegean had been harassed by various corsair groups stationed in the many island colonies of the Venetians. As a result, Edirne began its own military operations against Venice as a newly built galley fleet headed by Çali Bey raided the Venetian islands of Andros, Paros, Melos, and Euboea between 1414 and 1415. As hostilities escalated during the spring of 1416, the combined fleets of both nations met at the mouth of the Dardanelles strait. The admiral of the Venetian fleet, Pietro Loredan,
had been given strict orders to protect Venice’s commercial interest in the local region in addition to opening peace talks with Edirne. However, once his fleet of 10 galleys entered the strait, he was faced with immense Ottoman opposition from all sides. For over two days, Turkish archers on land and the main Ottoman fleet of Çali Bey stationed at Gallipoli skirmished with Loredan’s fleet. In spite of its numerical advantage on sea and land, the infant navy of Mehmed I still lacked the skills and tactics to go against one of the premier naval powers in Europe. As a
result, a ceasefire between the two fleets was established on May 28th as plans to escort the Venetian ambassadors to the Ottoman capital were being drafted. While the planning over the matter took place, a certain development in the form of a ship would have unintended consequences for the ongoing peace process. On May 29th, a neutral merchant ship from Lesbos had appeared over the walls of Gallipoli, sailing north to the Roman capital, thus provoking the Ventitan fleet into a false pursuit. Believing that the ship was a fellow Turkish vessel in need of help, the Ottoman fleet sailed
out of the harbor in outrage to meet Loredan in open battle as tensions were already high from the previous two days. Still, this move to engage the Venetian fleet was to be a total disaster. In a clash lasting the entire day, the entire Ottoman naval host was to be decimated, with over 4,000 being killed, including Çali Bey himself, and over 1,000 being captured along with most of the fleet. The engagement that was later to be known as the Battle of Gallipoli would end all Ottoman naval ambitions in the Aegean for the foreseeable future. With Emperor
Manuel II now mediating the peace talks in Constantinople, an official peace treaty between Edirne and Venice was to be concluded in 1419, which saw both sides agreeing to the transfers of war prisoners in return for Mehmed recognizing Venice’s overseas possessions in the Eastern Mediterranean. Unfortunately for Edirne, the loss of the war ensured naval superiority for the Republic of Venice in the Aegean Sea for decades to come as the shattered remains of the Ottoman fleet sailed back into the harbor of Gallipoli. In addition to military developments abroad, a series of political developments at home would consume
a large portion of Sultan Mehmed I’s reign. During the Ottoman sultan’s restructuring of personnel in his government at the beginning of his rule, many statesmen who had supported the wrong son of Bayezid were exiled across the Ottoman realm. One of these exiled men was Musa Çelebi’s kadıasker, or chief military judge, Sheik Bedreddin. Being of mixed Muslim and Christian parentage, the military judge had gained a mass following for his utopian syncretic vision for the Ottoman Sultanate, like his views on the legal equality of all followers of the Abrahamic religions and the communal ownership of property of
all peoples. Bedreddin’s views spread like wildfire around the Balkans and Anatolia during the years after the Battle of Ankara, as the vast majority of ordinary Ottoman citizens had been plagued with economic instability and war for the last thirteen years and thus were unsatisfied with the central government in Edirne. These ongoing political developments were a major internal threat to the Sunni-identifying Ottoman state, which saw itself as the authority on political and religious matters within its holdings. Traveling from Nicaea to the Candarid Beylik, then Wallachia to Ottoman Bulgaria, the former chief military judge preached his popular message
to the peoples of the regions, which soon sparked into a full-scale civil rebellion by 1416. In a short period of time, Smyrna, Manisa, and the regions of Dobruja and Sarukhan had revolted against Ottoman rule, which saw tens of thousands of Muslim and Christian peasants, madrasa students, and marginalized kapikulu soldiers joining the ranks of the rebellion. Sheik Bedreddin’s rebellion posed a serious challenge to the authority of Sultan Mehmed I during a period when the leader of the Ottomans was trying to reunite the scattered pieces of his father’s former realm. A military response led by Grand Vizier
Bayezid Pasha and the sultan’s eldest son, Şehzade Murad, was quickly launched against the rebelling regions in Anatolia, and in a short but indiscriminately bloody campaign, all resistance was crushed. Meanwhile, Mehmed launched his own military response against Bedreddin, who was stationed in Dobruja, and won a quick victory over the rebels that saw him capture the rebel leader. After a one-sided trial held in Serres, Sheik Bedreddin was hanged alongside his followers in a show of Ottoman supremacy to the broader region. The first civil revolt in Ottoman history resulted in the Ottoman regime cracking down on religious orders
throughout the state, with Edirne making a direct effort to silence dissenting voices of religious judges and leaders in the Balkans and Anatolia. It was also during this period that a ghost of the past from the Ottoman Interregnum reared its ugly head when the last son of Bayezid, Mustafa Çelebi, made his bid for the throne. Being captured alongside his father during the aftermath of the Battle of Ankara, the young Ottoman prince had spent the better part of the last decade in the Timurid capital of Samarkand before deciding to return to Anatolia. First arriving in Trebizond, Mustafa
traveled to the courts of the Candarid and Karamanid beyliks to seek military and political support against Mehmed. Then, with the help of the Venetians, the youngest son of Bayezid sailed to Ottoman Bulgaria and called on the help of the local Muslim governors and Christian leaders in the region to support his war effort. The former ruler of the Aydinids, Cüneyd Bey, who had been the governor of Nicopolis since his defeat to Mehmed back in 1414, opened his doors to the rebel prince, and the pair began mustering troops in Ottoman Thessaly while Mehmed was distracted with the
Bedreddin rebellion. However, upon hearing the return of Mustafa Çelebi, the Ottoman sultan started a propaganda campaign against his younger brother by proclaiming him as an imposter and a false son of Bayezid as he was a relatively unknown figure by most in Ottoman society. After suppressing Bedreddin’s rebellion in Dobruja, Mehmed quickly marched on the mustering forces of Mustafa and defeated him in battle, which saw the rebel Ottoman prince and his followers seeking refuge in Byzantine-controlled Thessalonica. Sending out a petition to Emperor Manuel II, with whom he was on good terms, the Ottoman sultan demanded the return
of his rebellious brother immediately. In a classic example of Byzantine diplomacy, the emperor of Constantinople instead offered Mehmed to exile Mustafa and his supporters to the island of Lemnos in return for a yearly tribute of 300,000 Ottoman akçe. Knowing that he could not afford to be heavy-handed with Byzantium due to the economically uncertain state he found himself in, Mehmed accepted Manuel's terms and returned to Edirne. During the spring of 1421, while on a hunting expedition near the lush forests of Bursa, the thirty-five-year-old sultan of the Ottomans fell off his horse and was severely paralyzed. Upon
returning to the imperial palace and knowing that his days were numbered, Mehmed ordered for his eldest son, Şehzade Murad, who was the governor of Amasya, to come to the former capital city at once to swiftly secure the Ottoman throne from him. However, the Ottoman sultan, who had received over 40 battle wounds over 24 battles in the last 20 years, succumbed to injuries before his son's arrival. Often regarded as the second founder of the Ottoman state due to his exploits during the interregnum and his reign of stabilization, Sultan Mehmed I would become one of the most
respected members of the House of Osman in future generations. Against all odds, the former Ottoman monarch had managed to pick up the scattered pieces of his father’s realm from the Battle of Ankara and rebuild a state that was once again in control of its own destiny. For over forty-two days, the death of the sultan was kept a secret by Grand Vizier Bayezid Pasha and his personal staff as the fears of civil war circulated in the imperial palace. In an unusual series of events, Mehmed’s body was put in a litter in order to hide the stench
of his decaying body, and during days in which audiences were held, state officials dressed their former sultan in his imperial regalia and hid behind his cloak to simulate the sultan stroking his beard and moving his arms. It was only with the arrival of the seventeen-year-old Murad to the former Ottoman capital of Bursa and his accession to the throne that the news of Mehmed’s death was released to the wider public. The ascension of Sultan Murad II during the spring of 1421 came during a period in which there were many competing claimants to the Ottoman throne. Mustafa
Çelebi and his supporters were still in exile on the Byzantine Island of Lemnos, Orhan Çelebi, the grandson of Suleyman Çelebi from the Ottoman Interregnum, resided in Constantinople, while the future fates of Mehmed I’s other three sons, şehzades Mustafa, Mahmud, and Yusuf were up in the air. The practice of fratricide by Ottoman monarchs had already been institutionalized by the fifteenth century, and thus the former Ottoman sultan had taken precautions against it by appointing his second eldest son, Mustafa, to the far away governorship of Isparta, while his younger sons, Mahmud and Yusuf, were transferred to the protection
of Constantinople. The premature death of Mehmed I also coincided with the deterioration of Ottoman-Byzantine relations as by 1421, the ailing seventy-one-year-old Manuel II had given control of many of the functions of the state to his eldest son and co-emperor, John VIII, who was more war hawkish towards Edirne. With political uncertainty surrounding Murad’s ascension, Byzantium launched the first salvo in open hostilities by releasing Mustafa Çelebi and Cüneyd Bey from their exile on Lemnos as the Ottoman claimant promised the Gallipoli peninsula to Constantinople in return for military assistance against Murad. By the fall of 1421, Gallipoli and
large parts of Ottoman Thrace quickly fell to the rebel prince, while the Karamanids used the occasion of Ottoman instability to reoccupy Egirdir, Akşehir, and Beyşehir. As Murad II was in Bursa busy recruiting an army for the upcoming wars, his grand vizier, Bayezid Pasha, who was already stationed in Edirne, met the forces of Mustafa near the village of Sazlıdere near the Thracian-Aegean coast. Nonetheless, due to a series of mass defections of his kapikulu ranks to the rebel prince, the Ottoman grand vizier was captured and beheaded on the insistence of Cüneyd Bey. Upon his victory at Sazlıdere,
Mustafa Çelebi entered the Ottoman capital of Edirne and proclaimed himself as ‘sultan of Rumelia’ in front of roaring crowds. Many Ottoman peasants of the local region and many in the ranks of the kapikulu had felt alienated by the pro-Turkoman policies of Mehmed I and his brutal suppression of Bedreddin’s rebellion and so favored his alleged younger brother Mustafa instead of his son Murad. However, almost immediately after his initial victory, the newly crowned rebel sultan made a multitude of political miscalculations. He first reneged on his promise of ceding the Gallipoli peninsula to Constantinople and then began an
unpopular invasion of the Anatolian territories under Murad’s control. By January of 1422, Mustafa’s 17,000-strong army began to besiege Bursa, much to the annoyance of his kapikulu contingent, who instead wished to be stationed in the Balkans and not fight in Anatolia. With Cüneyd Bey abandoning him to reclaim his former domains around Smyrna and losing fiscal assistance from Constantinople, Mustafa’s army began mass defecting to Murad, which resulted in the latter efficiently routing the former’s army near the town of Ulubat. With Sultan Murad hotly pursuing him across into Europe and effectively losing his entire army during the military
campaign, the rebel sultan retreated back to Edirne and collected the Ottoman treasury to make a last stand in Wallachia. However, Mustafa Çelebi, the last living son of “the Thunderbolt,” was captured by Murad’s agents on his journey north and was later executed, thus bringing an end to the Ottoman civil war. With the death of Mustafa Çelebi, Sultan Murad II turned his full attention and wrath on the Byzantines for instigating the recent civil war in the first place, officially declaring war on Constantinople. While regional Ottoman marcher lords swiftly seized Nicomedia and Byzantine settlements in Thessaly, Murad and
his new grand vizier, Candarli Ibrahim Pasha, began the dual sieges of Constantinople and Thessalonica. Despite his youth, Murad had already gained much-needed military experience during his father’s reign and the recent Ottoman civil war, so the young sultan was determined to follow in the footsteps of his grandfather by besieging the capital of the Romans. For sixty-three days, Murad II rained hell upon Constantinople as, for the first time, cannons and other explosives were used to breach the Theodosian Walls. An eye-witness of the siege, John Kananos, tells how the sultan built an immense rampart of earth from the
Sea of Marmara to the Golden Horn. From this, his troops discharged volleys of fire and stones from catapults against and over the land walls, and thus, large parts of the suburbs of the capital were burnt down. A much-revered imam in the Ottoman camp called Sheik Bokhari, who claimed descent from the Prophet Muhammad, had foretold that Constantinople would fall on the 24th of August, and so the main Ottoman assault was therefore made on that day. A long and bitter battle for possession of the walls followed. However, the determined defenders of the city proved steadfast in their
battlements as they repulsed wave after wave of Ottoman attacks on the walls. While Murad was occupied with Constantinople, developments coming out of Anatolia would force him to lift his siege of the Byzantine capital. The sultan’s younger half-brother, the thirteen-year-old Şehzade Mustafa, better known in Ottoman historiography as “Little Mustafa,” had revolted and seized Nicaea with the military assistance of the Candarid, Karamanid and Germiyanid beyliks. The sultan’s other two younger brothers, şehzades Mahmud and Yusuf, were also released into Anatolia by Manuel II in an attempt to stir up even more civil strife in the region. Lastly, Cüneyd
Bey had recaptured Smyrna and once more reestablished the Aydinid Beylik. With his eastern holdings in open anarchy and little progress being made to breach the Theodosian Walls, the sultan of the Ottomans abandoned his siege on Constantinople and crossed into Anatolia. Catching ‘Little Mustafa’ off guard, Murad swiftly seized Nicaea and executed his rebel half-brother before also capturing and detaining his other two younger brothers, Mahmud and Yusuf, in Bursa. The pair would die upon a plague outbreak in the former Ottoman capital in 1429. Continuing his war effort against the Turkic beyliks of Anatolia, many of which supported
‘Little Mustafa’s’ rebellion, Murad invaded and vassalized the Candarids once more with the marriage of his sister, Selçuk Hatun, to the heir apparent of the beylik while he himself married the daughter of Isfendiyar Bey, Hatice Halime Hatun. Meanwhile, with Mehmed II Bey’s sudden death during his siege on Antalya against the Teke Beylik, his eldest son and presumed heir, Ibrahim II Bey, took control of the Karamanid throne and resumed peace talks with Murad. In return for Egirdir, Akşehir, and Beyşehir, the new Karamanid ruler married another sister of the Ottoman sultan, Ilaldi Sultan Hatun, and peace between Edirne
and Konya was once again reestablished. Being childless, the ruler of the Germiyanids, Yakup II Bey, surrendered his domains to Murad while Menteşe and the Teke beyliks were fully annexed into the Ottoman Sultanate. Lastly, Cüneyd Bey, the former ruler of the Aydinids who had defied Ottoman rule for over two decades, had been defeated by the local Ottoman governors of the region in partnership with the Genoese and was beheaded by 1425, resulting in the complete annexation of the short-lived reestablished Aydinid Beylik. In only the first three years of his reign, Sultan Murad II had already conducted significant
military operations against the Byzantines, suppressed various rebelling Ottoman princes, and defeated a number of Turkic beys in Anatolia. Although the local forces of the Byzantine emperor repelled the latest Ottoman siege on Constantinople, many other Byzantine settlements had fallen to the armies of Murad in quick succession. Thessaly and Nicomedia, in addition to their coastal hinterlands, were swiftly captured by local Ottoman marcher-lords, while down south, the Hexamilion Wall was breached by Ottoman raiders, resulting in the sacking of many Byzantine settlements in the Peloponnese. More worrying for the joint government of Manuel II and his son John VIII
was the Ottoman siege on Thessalonica, the second-largest city in the empire. During the Ottoman Interregnum, Thessalonica had been given to the senior emperor's nephew and rival claimant, John VII, and his minor son Andronikos V, but the pair had died in 1408 and 1407, respectively, thus bringing an end to Andronikos IV’s side of the imperial dynasty. In the years after, Thessalonica was given to Manuel II’s third eldest living son, Andronikos, who oversaw a lengthy period of relative peace and prosperity for the city. Nevertheless, with an Ottoman army now at his gates and lacking the resources to
mount a proper defense, the Byzantine despot decided to give control of the city to the Venetians in the hopes they would repel the invaders. By the early fall of 1423, the transfer of power between the two states was completed, and a sizeable Venetian garrison was installed in Thessalonica, thus officially ending over 1500 years of on-and-off Roman rule in the city. In spite of newly arrived military aid, tensions immediately rose between the local Orthodox inhabitants of the city and their new Catholic overlords as the latter was accused by the former of curtailing their economic rights and
the rights of the local Orthodox Church. As a result, the population of the once prosperous Thessalonica had fallen to 10,000 by the end of the decade as many Byzantines fled en masse into Ottoman lands, deeming that life under the Venetians was akin to “slavery.” As the Ottoman grip around Thessalonica strengthened, John VIII embarked on a journey to the West like his father and grandfather before him in order to gain much-needed military and fiscal aid. Putting his teenage brother Constantine in charge of the imperial capital, the junior Byzantine emperor traveled to Venice, Milan, and Hungary but
obtained nothing beyond a few empty pledges. Back in Constantinople, local Byzantine representatives signed a desperate peace treaty with Edirne in 1424, thus bringing the three-year conflict with the Ottomans to an end. Much of the gains of the Treaty of Gallipoli signed back in 1403 were erased as John VIII’s gamble to destabilize the Ottoman realm upon the death of Mehmed I had failed to bear fruit. Once again, Constantinople became a vassal state to Edirne and was forced to pay a yearly tribute of 21,000 hyperpyra to Murad II. The lands of the Byzantine realm were now reduced
to a portion of the Morea, a number of the scattered islands in the Aegean, Constantinople, and its hinterland, and a thin line of settlements dotted across the Thracian Black Sea coast up to Mesembria. The following year, the seventy-five-year-old Manuel II died after a turbulent thirty-four-year reign. He would be remembered as a dogged emperor who kept his dying empire alive against all odds, stemming the tide of more powerful rulers like Sultan Bayezid I, Emir Timur, and King Sigismund. With peace between Edirne and Constantinople reestablished for the time being, the tightening Ottoman siege on Thessalonica still persisted
as Murad refused to recognize the Venetian acquisition of the city. War engulfed the Aegean Sea once more as Ottoman raiders plundered a number of Venetian colonies in the region while the Doge’s navies began blockading the Dardanelles Strait. In spite of declaring war on Edirne, Venetian resolve to defend Thessalonica was lacking in comparison to their colonies in the Aegean, as many in Venice saw the former Byzantine city as an expensive and fruitless venture. After seven long years of besiegement, Ottoman forces, under the personal command of the sultan, managed to scale the land walls of Thessalonica successfully
and descend into the city, plundering and slaughtering their way to the fleeing Venetians in the harbor. The 15th-century Byzantine historian John Anagnostes, who was also an eyewitness to the sack of the city, blamed the Venetian garrison for the bloody event as they prevented the local Romans of Thessalonica from peacefully transferring the city to Ottoman authorities as they did back in 1387. Almost three decades after falling out of Ottoman control, the banners of Islam were hoisted over the second city of the Byzantine realm once more. As Thessalonica fell to Murad, a number of Ottoman military operations
were also launched directed at Albania and Epirus. The Despotate of Epirus was one of the Byzantine successor states established in the aftermath of the sack of Constantinople during the Fourth Crusade back in 1204. Ruled by a branch of the former imperial Angelos dynasty, the despotate achieved its military and economic height during the 1220s as the newly established ‘Empire of Thessalonica.’ However, after its devastating and decisive defeat to Bulgaria at the Battle of Klokotnitsa in 1230, the state steadily contracted in land and influence over the next century. Nevertheless, the despotate chugged along during the 1300s under
new Italian leadership, which saw it maintain its autonomy against a number of foes, mainly the Serbians and Byzantines. Fast-forward to the fifteenth century, Epirus, under its new ruler, despot Carlo II Toco, became the subject of much attraction for Edirne. After his ascension in 1429, the illegitimate cousins of the newly crowned Epirot ruler appealed to the court of Murad II for military aid in order to secure their self-proclaimed inheritance over the country. As a result, an Ottoman force struck deep into Epirus in 1430 and captured its capital, Ioannina, with little resistance. What resulted was a new
peace being established between the various factions of the Toco Dynasty, and Carlo II continued to rule from the town of Arta as an official Ottoman vassal. For the last century, the various lords and rulers of Albania had often played off their more powerful neighbors like the Venetians, Serbians, and the Ottomans against one another in order to maintain their autonomy. However, since the reign of Mehmed I, Edirne’s interest in taming the mountains of Albania became evident as more and more military campaigns were launched into the region, culminating in the conquests of Vlorë and Kruje back in
1417. As a result of these conquests, Albanian lords began submitting to Ottoman vassalage in droves and even began sending their sons and heirs to the Ottoman court as political hostages. Meanwhile, the Timar and Devshirme systems were introduced across the wider region, while the unpopular Jiyzya tax on non-Muslims was instituted on Catholic and Orthodox Albanians alike. After languishing under unpopular Islamic rule for years, the war between the Venetians and the Ottomans gave many dissatisfied Albanian lords the opportunity to revolt against their Ottoman overlords, which they did in 1428, forging an alliance with the doge of Venice.
Many of these lords wished to retake their seized lands from the Timar holding Ottoman provincials of the region, and so a bloody struggle began in earnest over the local region. In spite of early Albanian successes, after the fall of Thessalonica in 1430, Venice signed a separate peace treaty with Edirne, thus leaving the Albanian lords on their own in their struggle for independence. Between 1432 and 1436, Ottoman forces systematically defeated the disunited Albanian nobility one by one, and by the end of the military campaign, all of Albania was put under direct Ottoman rule. As Albania entered
the Ottoman orbit, an opportunity to bring Serbia back into the fold also arose for Edirne. Under its ruler, Stefan Lazarevic, the Serbian despotate had drifted out of Ottoman vassalage during the aftermath of the Battle of Ankara in 1402 and had since then acted as a buffer state between the Ottomans and Hungary. However, with the sudden death of the childless Stefan in 1427, the reconciled noble and former rebel Durad Brankovic became the new ruler of Serbia with Hungary's political backing. In return for helping him secure the Serbian throne, Durad promised to surrender the Danube fortress towns
of Belgrade and Golubac to King Sigismund in addition to becoming his vassal. However, before the acquisition took place, the local commander of Golubac, in a surprising act of treachery, had instead sold his fortress to nearby Ottoman authorities for a sum of 12,000 ducats, and soon, a Turkish garrison occupied its walls. Not wanting Muslim forces to have a major staging ground to conduct future raiding operations into his realm, the Hungarian king mustered an army of 5,000-10,000 men to retake Golubac back for Christendom. By the spring of 1428, the siege of the fortress began with an immense
artillery bombardment of its walls, a first in Hungarian history. While the defenders of Golubac were showered with cannon balls from naval ships, the new fortress of Lászlóvára was also constructed on the opposite shoreline of the Danube as a means to further supply the siege. With Sigismund now besieging Golubac from the south, it seemed like it was only a matter of time before the fortress would fall back into Christian hands. In spite of the odds, the defenders of Golubac stood their ground for multiple weeks, and before long, a relief Ottoman force led by Murad II himself
arrived on the scene to the shock of the besiegers. Seeing that he had lost the opportunity to seize the fortress, Sigismund concluded a temporary ceasefire with the sultan and began crossing his army over the Danube into friendly territory. However, during this operation, Ottoman provincial troops suddenly broke the agreement and charged at the panicked ranks of Sigismund’s host, killing many in the process. During the sudden confrontation, the Hungarian king barely escaped with his life by managing to board a ship last second, a scene similar to the situation he faced at the Battle of Nicopolis three decades
prior. With Golubac secured, Murad now turned his attention to Durad Brankovic's recent ascension to the Serbian throne. Seeing an opportunity to push Serbia back into Edirne’s sphere of influence, the Ottoman sultan claimed the entire country for himself on the grounds of his grandfather’s marriage to Stefan’s sister, Olivera Lazarvic, back in 1390. By the summer of 1428, an Ottoman army stormed into Durad’s territories and temporarily occupied the old capital of Krusevac, thus forcing Serbia to become an Ottoman vassal once more. Lastly, wanting to consolidate his power further in Serbia, Murad also married Mara Brankovic, the daughter
of the Serbian despot, in 1435. Not just another wallflower, Mara would become the sultan's trusted advisor on political developments coming out of Europe for the next two decades. The 1420s also saw Edirne reassert its power over Wallachia against the political interferences of Buda. The principality had become a battleground for both states during the decade, which saw the pro-Ottoman ruler Radu II contest control over the country against his cousin, the pro-Hungarian Dan II. The Wallachian throne changed hands seven times between the two members of the Basarab family, which finally culminated in Dan II succeeding in permanently
gaining control over the country as a Hungarian vassal in 1427. However, this status quo was not to last long as the Wallachian voivode would be killed in 1432 during an Ottoman invasion that saw Edirne once again install its own puppet ruler in the country, Alexander I Aldea. In spite of his installment, the pro-Ottoman voivode suddenly fell seriously ill in 1435 and died the following year, thus prompting his half-brother, the pro-Hungarian Vlad II Dracul, to seize the throne. Luckily for Edirne, Vlad's close relationship with Buda was to be fleeting as in 1437, his main political backer,
King Sigismund of Hungary, died at the age of sixty-nine without a male heir to succeed him. With peasant revolts sweeping across Hungary and political turmoil engulfing Buda, the Wallachian voivode decided to reconcile with Murad II and accepted Ottoman vassalage. In order to show his loyalty to his new liege-lord, Vlad II contributed his forces to a great Ottoman raiding party headed to Transylvania in 1438, which saw the sacking of many Hungarian towns, including Sebeș and Brașov. While Murad II had been focused on Ottoman military operations in the Balkans, developments from Anatolia would put Edirne into a
panic as a tremendous Eastern threat once again loomed over the sultanate. By the start of the 1430s, Karamanid Beylik under Ibrahim II Bey had broken the general peace in Anatolia and retook the Ottoman border settlements of Akşehir and Beyşehir for his realm, in addition to launching a significant siege on Amasya. In spite of the sudden outbreak of hostiles, like with previous Ottoman-Karamanid wars of the past, Edirne’s military response was a swift one, which saw it quickly retake the two border towns and lift the siege on Amasya with the help of the Dulkadirid Beylik. However, right
as Murad’s armies were going to launch a final full-scale invasion of the Karamanids, grave news from the east began trickling to the court of Murad II. Shahrukh, the youngest son of Timur and the leader of his father’s former realm had launched a major military campaign against the Qara Qoyunlu in Eastern Anatolia and Azerbaijan. Not since the days after the Battle of Ankara had Timurid armies come so close to the Ottoman border, which put an already paranoid Edirne into a complete panic. The ruler of the Qara Qoyunlu, Qara Iskender, fled to Ottoman lands after being defeated
by the Timurids, thus putting strains on Edirne’s relations with Shahrukh. However, what followed between the Ottomans and the Timurids was to differ from their original confrontation at the start of the century. Unlike the letters of threats and war seen with Bayezid I, letters of peace and homage came out of Murad II’s palace to the Timurid ruler. The Ottoman sultan reminded the Timurid emir that he was still in his suzerainty and that their realms had been at peace since the days of their late fathers. Unlike Timur, the more peace-orientated Shahrukh accepted these Ottoman peace offers and
marched his armies away from the Ottoman border as a gesture of goodwill as negotiations for Qara Iskender began. Soon enough, the exiled ruler of the Qara Qoyunlu learned of the transpiring relations between Murad and Shahrukh and fled to Azerbaijan, where he would be assassinated in 1436. As a result of this latest diplomatic episode with the Timurids, Murad refrained from invading the Karamanid Beylik and concluded a hasty peace treaty with Konya as a means not to upset his fragile peace with Shahrukh. Even though the Karamanids were off the table, the Ottoman sultan did, however, take the
time to reestablish rule amongst the petty beyliks of Canik and annexed the region in a show of power by the end of the decade. For the better part of the last seventy years, the Byzantine Empire had become a small part of an ever-expanding Turkish world. After the military defeats of the 1420s, more Romans now lived outside the control of Constantinople than within. Increasingly, economic transactions in the imperial capital were being carried out in Ottoman currency as official Byzantine coinage slowly became obsolete in value. The Turkish language had infiltrated daily Roman life as many Roman citizens
could now speak it fluently when making transactions with Turkish merchants. When 15th-century Byzantine philosopher and theologian Gennadios Scholarios sought to clear himself from the charge of being pro-Catholic because he knew Latin, he responded that “by this logic, all of us are Muslims, for almost all of us use their language.” Through the means of cultural and economic influences, it seemed to many that the Turkish world would swallow the remains of the Roman world in a few generations. However, even at this late date in their decline, the Byzantines looked for ways to unshackle themselves from the clutches
of the Ottomans. Although expanding at the expense of Edirne was not an option anymore, expansion in Morea against the various Latin powers of the region would prove to be a vital source of much-needed tax income for the central state. The Latin fortress towns of Chlemoutsi and Patras were seized by the emperor’s younger brother, Despot Constantine, in 1427 and 1429, while the latter and his younger brother, Despot Thomas, thoroughly conquered the Principality of Achaea in 1432 and even made diplomatic strides to bring the Duchy of Athens to heel. Even in spite of these surprising military victories
against the Latins, a unified plan for Roman revival was nonexistent as Constantine and Thomas often skirmished against their older brother Theodore over control over Morea as all three men became despot over the same region. Whatever the political situation in Morea, John VIII’s great project during the 1430s was a push for union with Rome in an attempt to gain much-needed military assistance against the Ottomans. Various emperors over the last two centuries, notably Michael VIII, John V, and Manuel II had made significant overtures to the Pope regarding the matter, but all had failed to achieve any meaningful
results. In spite of past failures, John was determined to get any military or fiscal help from the West. In November 1437, the Byzantine emperor, his ecumenical patriarch, and hundreds of Byzantine officials sailed off to Italy to begin talks with the papacy to mend the almost 400-year-old Great Schism. The following Council of Ferrara-Florence lasted almost two years and saw tense debates between Catholic and Orthodox clergy regarding church doctrines, such as the topic of the use of leavened or unleavened bread during communion, Latin doctrine of purgatory, the controversy surrounding the term ‘Filioque,’ and papal supremacy over the
Eastern churches. After some significant theological compromises and John VIII's acceptance of the supremacy of Rome, the union between the two Christian churches was reestablished in 1439 to much celebration in Florence. However, like with previous attempts to appeal to the pope, the popular reaction to the council in Constantinople was primarily adverse. Many in the Byzantine capital still saw the Catholic Church as a foreign tyrannical power and continued on with the local Orthodox practices of their ancestors, seeing the whole event as a papal coup rather than a true union between the two churches. John’s gamble of unifying
the Eastern and Western churches had backfired. Rather than unifying Christendom, it instead resulted in a significant schism in the Eastern Orthodox church. The patriarchs of Alexandria, Antioch, Jerusalem, and even the Rus Orthodox Church disowned the union. Worse yet, the younger brother of the emperor, Despot Demetrios of Mesembria, rebelled against Constantinople and championed himself as an anti-unionist leader with Ottoman backing. Even though the rebelling despot was defeated in 1442, much of Roman society had soured against the imperial palace, but only time would tell if the council was to bring real military or fiscal results for the
emperor of the Romans against Murad II’s war machine. As the Byzantines were left politically and religiously divided after the Council of Florence, significant developments coming out of Hungary would become the catalyst of events to come for the following two decades. The death of King Sigismund back in 1437 caused a period of political instability in Buda as the former king had no male heirs to succeed him to the throne. Eventually, Sigismund’s son-in-law, Duke Albert of Austria, was elected as the new ‘king of Hungary’ in return for conceding a number of political concessions to the Hungarian nobility.
Being faced with a Transylvanian peasant revolt, Ottoman raids from Wallachia, and an unruly nobility at home, the new foreign king of Hungary, like his predecessor before him, spent the first months of his reign placating the local officials of his capital and his realm. This sudden wave of Hungarian instability was not lost on Edirne. Seeing significant signs of political weakness from his main European rival, the opportunistic Murad II invaded his vassal of Serbia in order to solidify Ottoman military control over the Western Balkans. By August of 1439, the newly founded Serbian capital of Smederevo had fallen
after a three-month siege, and soon after, all of Serbia officially became an Ottoman province under the direct rule of Edrine. While Serbian Despot Durad Brankovic fled to Buda in horror, the political situation for Hungary got even worse, as in the fall of the same year, the newly crowned King Albert died of dysentery while mustering an army to repulse the Ottoman offensive. As a result of Albert’s sudden death and the dissolution of his army, Murad began his siege on the Hungarian fortress city of Belgrade in 1440, as its conquest would open up the rest of Hungary
for future Ottoman military campaigns. Even though the five-month siege failed to penetrate the walls of Belgrade, it sent shockwaves across the whole region as a sizeable Muslim army was now at the gates of Central Europe. Back in Buda, the political scene had become even more chaotic as King Albert’s sudden death had caused a power vacuum in the kingdom. Even though the late king’s widow had given birth to a posthumous son, Ladislaus V, much of the Hungarian nobility rejected the infant’s claim to the Hungarian throne, as many preferred a monarch capable of dealing with the current
Ottoman crisis on the southern border. As a result, the fifteen-year-old King Wladyslaw III of Poland was offered the crown by the estates of the realm, thus sparking the flames of a Hungarian civil war. Between 1440 and 1441, the supporters of Ladislaus V and Wladyslaw III clashed all across the country, culminating in the latter's decisive win against the former at the Battle of Bátaszék. As the infant King of Hungary fled to the safety of Austria, Wladyslaw entered Buda and began consolidating his hold over his newly acquired kingdom by appointing loyal men to offices of power. One
such man was a talented Hungarian military magnate named John Hunyadi, whose martial skills had won Wladyslaw the throne at Bátaszék. Being appointed the Voivode of Transylvania and the military governor of many of the kingdom's southern border counties, Hunyadi became one of the most influential and active members of the new Hungarian court overnight. First repairing the damaged walls of Belgrade from the recent Ottoman siege, Hunyadi began his tenure as a major political figure by launching a major raid into Ottoman-held Serbia during the late summer of 1441. In a surprise turn of events, the Hungarian magnate was
able to score a shocking victory over the local Muslim governor of Smederovo in a field battle before raiding the local countryside. As a response to this defeat, Murad II ordered a raiding army to strike deep into Transylvania through Wallachia the following year. However, this army was also defeated and routed by Hunyadi at the Battle of Hermannstadt. In the wake of the battle, the Hungarian magnate was celebrated as a war hero in Buda as he was one of the few Europeans who had proven capable of beating the Ottomans in open battle. It was from these early
victories against the Muslims that Hunyadi was hailed as the ‘White Knight of Transylvania” by not only his own countrymen but also throughout Christian Europe. Meanwhile, as a result of the defeat at Hermannstadt, an ever-so-enraged Murad blamed the misfortunes of his armies on his Wallachian vassal, Vlad II. The Wallachian voivode was called forth to Edirne and was put under house arrest while his eldest son, Mircea II, took control of Wallachia. This move by the Ottoman sultan proved to be a big mistake. Seeing an opportunity to subdue the unstable buffer country into Hungarian vassalage once more, Hunyadi
invaded Wallachia during the fall of 1442 and defeated an Ottoman force near the river Ialomița in yet another surprising showcase of military prowess. In this particular engagement, over sixteen Ottoman marcher lords were killed alongside thousands of Ottoman raiders and Janissaries. After the battle, the cousin of the former Wallachian ruler, the pro-Hungarian Basarab II, was installed as voivode while Mircea II fled into hiding with his loyal followers in the countryside. During his journey back to Hungaryian territory, Hunyadi also sacked and razed the Ottoman town of Vidin as a showcase of strength against Edirne. Hunyadi’s military campaign
into Wallachia had been a major physiological success for Buda, which now saw itself as capable of standing against Ottoman aggression after many years of military defeats. Moreover, for the first time in decades, the war had been shifted into Ottoman territory, thus finally giving a period of respite for the new subjects of Wladyslaw III. In spite of these military disasters, Murad II was determined to respond to what he saw as Hungarian aggression. Hence, he released Vlad II from his captivity and sent him to retake Wallachia at the head of an army. By the spring of 1443,
Bararab’s support in the country had withered away as he lacked the political support of his nobility, and so Vlad quickly seized the Wallachian capital. With Ottoman influence restored in the country, a new agreement between Edirne and Targoviște was signed by the restored Wallachian ruler. He was to pay an increased yearly tribute to the Ottoman capital, supply 500 children for the sultan’s Janissary corp, and lastly, give his second and third eldest sons, Vlad and Radu, as hostages to the royal court of Murad. As events in Wallachia settled down, troubling developments elsewhere began tricking down to the
Ottoman capital. With the Council of Florence concluding with the triumph of Catholicism over Orthodoxy in Byzantine affairs and enthusiasm in the air after Hunyadi's successful military campaigns against Murad II, the momentum around Europe to call forth a crusade against the Ottomans grew stronger than ever. With Wladyslaw III getting political assurances from King Frederick III of Germany that he would not attack his domains from the west, the field was set for another Hungarian military offensive into Ottoman territory. By the start of 1443, Pope Eugene IV published a crusading bull against the Ottomans, and by Palm Sunday
of the same year, Buda declared war on Edirne. Wladyslaw, together with John Hunyadi and a still exiled Durad Brankovic, spent most of the summer mustering a great crusading army. Many in the crusader camp were optimistic about the upcoming campaigning as the majority of the main Ottoman army under Murad had been redeployed to Anatolia to deal with the Karamanids. Upon the instigation of Byzantine and Vencian diplomats, Ibrahim II Bey of the Karamanids launched an invasion of Ottoman Anatolia during the summer of 1443 as he believed that Murad would be too preoccupied against the crusaders in the
Balkans by then. However, a coordinated attack against Edirne was botched as the crusader army was nowhere to be seen, thus leaving the Karamanid bey at the mercy of the Ottoman sultan. Murad and his eldest son, Sehzade Alaeddin, would spend the majority of the summer raiding and plundering the lands of the recently declared infidel ruler of the Karamanids. In spite of a quick military victory, the sultan of the Ottomans signed a quick peace treaty with Ibrahim as he did not want to invoke a war with the Mamluks, who had friendly ties to Konya. The sudden death
of Alaeddin caused by a horse accident during the campaign might have also contributed to a quick peace settlement. Whatever the cause, by the early fall of 1443, Murad had secured his eastern borders. Meanwhile, over in Europe, a readied crusader army of around 25,000 strong had invaded Ottoman Serbia while the sultan was busy wrapping up the Karamanid war. The Polish-Hungarian king led the army, but in reality, John Hunyadi held the most military influence in the crusader camp. The army consisted of 6,500 Hungarian infantry, 5,000 Transylvanian mixed cavalry and infantry, 1,500 Czech mercenary cavalry, 9,000 Serbians led
by the still exiled Durad Brankovic, 1,000 infantry from Bulgaria, Albania, and Bosnia, and lastly, a small Western European contingent of 2,000 led by Cardinal Julian Cesarini. The Hungarian magnate led the vanguard alongside his best-mounted knights while the king and the supply wagons followed a single day's march behind him. Like the Crusade of Nicopolis conducted by King Sigismund back in 1396, the main goal of the new crusade was also to reestablish a number of Christian buffer states in the Balkans while at the same time coming for the aid of Constantinople. The military campaign started strong for
the crusaders as they were able to rout three provincial Ottoman armies near the outskirts of the towns of Niş in a series of three battles. Hunyadi had prevented these Ottoman armies from uniting into a larger force with the help of his newly formed light calvary corps called the ‘Hussars,’ a direct response to the highly mobile Akinci light horsemen of the Ottoman army. It was to be after these defeats that a certain Ottoman governor named Iskender Bey, a son of a former Albanian feudal lord, deserted his post and instigated a major rebellion back in his homeland.
In the meantime, Murad II had crossed into Europe with his Anatolian army and began mustering more troops in Sofia in order to deal with the sizeable crusader host. Perhaps in desperation, he declared jihad on the invaders as a way to quickly fill up his ranks, as much of the Ottoman Balkan army had been disbanded for the winter. However, with the crusader army now marching down south toward the Ottoman capital, the decision to implement a scorched earth strategy was taken by the Ottoman sultan, which saw the evacuation and burning down of Sofia and many other villages
in the local area. By early December, the crusaders, who themselves were low on supplies, entered a depleted and burnt-down Sofia, and to make conditions worse for Hunyadi, heavy snow began pouring down on the soldiers of Christ. Meanwhile, Murad, knowing that his quickly assembled army was no match against the more experienced and armored crusaders, had begun fortifying all mountain passes heading down south to Edirne. The sultan thought that through this strategy, his smaller army could use the narrow and steep terrain to bog down Hunyadi’s larger host. Seeing that the bulk of the Ottoman army was stationed
at Trajan’s Gate, the Hungarian magnate decided to take a detour and head northeast to attempt a crossing of the less-defended Zlatitsa pass. Unbeknownst to him, Ottoman scouts in the region were alerted by this sudden move, and Murad reacted accordingly by assembling his main army at Zlatitsa. The following battle between the sides was to be a bloody one as both sides fought for control over an elevated snowy mountain pass during the middle of winter. While Ottoman cannons from the mountains bombarded the crusader army in the pass below, Hunyadi was knocked off his horse by a stray
lead bullet before retreating to safety with the help of his bodyguard. At the end of the day, the disadvantageous terrain and fierce Ottoman resistance forced the crusaders to begin their retreat back to friendly territory. After achieving a vital pyrrhic victory at the Battle of Zlatitsa, Murad ordered his marcher lords to pursue and scatter the retreating crusader army before they could reach the Hungarian border. But even in defeat, Hunyadi had one final ace down his sleeve. In the weeks after Zlatitsa, the Hungarian magnate had managed to lure his pursuing enemy into a trap near the town
of Kunovica in Serbia. In a sudden counterattack under the cover of nightfall, the overconfident Ottoman host was outflanked and destroyed by the crusaders. More importantly, the sultan's own son-in-law, Mahmud Çelebi, was captured during the engagement. With Hunyadi getting the last laugh, the exhausted crusader army entered Belgrade by the end of January 1444, ending their three-month incursion into Ottoman lands. Although Hunyadi and Wladyslaw were celebrated as national heroes back in the Hungarian capital, in reality, the “Long Campaign” had been a bloody stalemate for both sides. The crusade failed to seize the Ottoman capital and defeat the
main Ottoman army at Zlatitsa, in addition to not getting any aid through to Constantinople. On the flip side, the Ottomans had been dealt multiple defeats during the campaign and were unable to scatter an already exhausted crusader army during their retreat. The Ottoman military class had also been demoralized during the campaign as, for the first time, the capital city was severely exposed to an invading army. Morale in the Balkan provinces was also at an all-time low as the scorched earth campaign conducted by Murad and the sacking of many towns by the crusaders had devested the entire
region. All of these factors resulted in a general sense of doom and gloom by Ottoman officials in the capital, and to make matters worse, disastrous news in the form of an Albanian revolt and a new Karamanid invasion of Anatolia had arrived by the spring of 1444. With multiple military hotspots ravaging his realm, Murad initiated peace talks with Buda. The delighted Hunyadi wished to take advantage of the following negotiations to make major demands from the desperate Ottoman sultan. However, many at the Hungarian court thought differently. In spite of the Hungarian magnate's wishes, many in Buda felt
that the Ottomans were on the verge of total defeat and that war had to be continued. Cardinal Julian Cesarini led the pro-war party as he believed that freeing the Orthodox peoples of the Balkans would bring the two churches of Rome and Constantinople closer together after the Council of Florence. Venice had also shown an interest in joining the crusade due to the military successes of 1443. With the Doges navy, the blockade of the straits could commence, thus depriving Murad of his Anatolian army in the military campaign to come. Everything seemed poised for a great crusader victory,
and so during April of 1444, King Wladyslaw took a solemn oath to lead another crusade against the Ottomans by year’s end. In the meantime, the duplicitous Peace of Szeged was signed between Buda and Edirne in the summer of the same year. In return for a ten-year truce, the Despotate of Serbia, along with its former ruler, Durad Brankovic, were reinstated, and Edirne paid 100,000 gold florins in war tribute. With the signing of the Peace of Szeged during the summer of 1444, many political actors in the Ottoman capital thought the costly and bloody Hungarian conflict of the
last year had finally concluded. A steady peace had fallen upon the Balkans as an independent and neutral buffer state in the form of Serbia had been re-established, and prisoner swaps between Edirne and Buda took place. A ten-year truce had also been established between the two sides, which gave into the illusion that the wars of the last few years had indeed concluded for good. Likewise, peace with the Karamanids was secured in August for the price of handing over the border towns of Akşehir and Beyşehir back to the bey of Konya. Peace in the west and east
had been secured. Now that he was presiding over a peacetime government, Sultan Murad II began taking steps to ensure the future of his imperial dynasty and sultanate. The last twelve months had been personally tragic and militarily disastrous for the sultan of the Ottomans. In addition to the major military defeats of 1443 and the humiliating peace settlement of 1444, he had also lost his beloved son and heir apparent, Sehzade Alaeddin, in a horse-riding accident in Anatolia. While his favorite son was being buried in Bursa, Murad called for his sole living son, Sehzade Mehmed, to depart from
the province of Amasya, where he was governor, and go to the Ottoman capital at once. With a steady peace in Europe secured, the Ottoman sultan wished to abdicate his throne to his twelve-year-old son and retire from public life. The wars and politicking of the last twenty-three years had left Murad mentally exhausted. As a result, he wanted to indulge himself in philosophy and spiritualism at his garden palace in Manisa, away from the scheming halls of Edirne. Many in the Ottoman court initially frowned upon the sultan’s abdication plans, as his successor was a relatively inexperienced member of
the House of Osman. It was only after some political persuasion by Murad, on the basis of securing a peaceful transition of power for the sultanate, that the plan was finalized. Many still remembered the chaotic ascensions of Mehmed I and Murad II and the civil wars that engulfed the first years of their reigns. With the constant threat of Orhan Celebi from Constantinople always being ever-present, Ottoman statesmen and the religious ulema respected their sultan’s wishes to retire. By late August 1444, Sehzade Mehmed had arrived in the Ottoman capital and was proclaimed sultan as Mehmed II while his
father traveled off to Manisa. With the majority of the Ottoman army in Anatolia and a boy sultan now residing in Edirne, the push for another crusade had become incredibly popular within Wladyslaw’s court in Buda. The Polish-Hungarian monarch had already pledged to continue his war against the Muslims even during the peace talks of the summer, but the surprising news of Murad II's sudden retirement and a child now occupying the Ottoman throne had given more life to the young king's ambitions. More good news came at the end of August when a combined naval fleet from the Papacy,
Venice, and Burgundy began their promised joint blockade of the Dardanelles and Bosporus straits. While the Ottoman navy stationed at Gallipoli was perplexed about whether or not an official war had broken out, even more good news arrived for Wladyslaw. During the first weeks of fall, the Ottoman capital of Edirne was engulfed in a destructive fire that saw the destruction of over 2,000 homes and buildings, a sign interpreted by the crusaders as God's approval for the upcoming military campaign. With the Ottomans already distracted by various internal issues, the ball was in the court of Buda to open
the first salvos in the upcoming war. Having already mustered men and materials in the summer, the crusader host of 20,000 under Hunyadi and Wladyslaw crossed the Danube at the border town of Orsova into Ottoman Bulgaria on the 18th of September, much to the shock and horror of Edirne. Although the following military expedition was a crusade on paper, it did not receive military or fiscal help from the other major powers of Europe, such as France, England, the Holy Roman Empire, Castile, and Aragon. Like the “Long Campaign” from a year prior, the expedition was again to be
mainly a Polish-Hungarian endeavor. Attempts to incite Christian revolts in Ottoman lands and to ally with independent Balkan leaders in the region against Mehmed had also failed to bring any results for Wladyslaw. The already ongoing Albanian revolt led by Skanderbeg had no means to march to the aid of the crusaders while fighting an insurgency in their country, while Vlad II of Wallachia wished to keep his country far from the war to come. Only a light cavalry force of around a few thousand led by the latter ruler's son, the formally crowned Mircea II, was reluctantly given for
the crusader cause. Even Durad Brankovic of Serbia, having already regained his lands during the peace talks of the summer, stayed neutral in the crusade to come and paradoxically warned Hunyadi in person that the expedition was doomed to fail. The little help that did come from the local region had also failed to take root, such as John VIII’s release of Orhan Celebi into the Balkans, which failed to gather enough followers to incite a new Ottoman civil war. In spite of these developments, the military campaign continued on as morale was high. Like with the “Long Campaign” the
year prior, the main goal of the new crusade was to reestablish a number of Christian buffer states in the Balkans while at the same time coming to the aid of Constantinople. After spending four days crossing the Danube, the crusader army retraced the steps of King Sigismund’s fabled crusade of forty-eight years past by marching eastward, hugging the southern bank of the Danube. The Ottoman towns of Vidin and Oryahovo were captured and sacked in short sieges, and again, their Turkish garrisons and inhabitants were slain. On the 20th of October, the fortress town of Nicopolis also fell to
the crusaders, thus avenging the events of 1396. Believing that the bulk of the Ottoman army was stranded in Anatolia due to the blockade, the crusaders began their forced march on Edirne by following the Osam River south in order to pass through the Shipka pass. Unbeknown to them, the former sultan Murad and his grand host were merely a week's march south. A month prior, the initial crusader invasion had caused a mass general panic in Edirne as many thought Hunyadi was weeks away from sacking what was left of their burnt-down city. As a makeshift moat was being
constructed around the Ottoman capital, Mehmed II's advisors sent urgent letters to an obstinate Murad who was in Manisa, but to no avail. The former sultan insisted that he had abdicated the throne and that now the current crisis was for his son to solve. Furious at his father, Mehmed wrote a personal letter stating to him that: “If Imperial power and the sultanate belong to you, you are obliged to defend them against the enemy. Otherwise, if these things now belong to me, then it is necessary to obey the sultan and take control of the army.” Accepting his
son’s plea for help, Murad left his secluded garden palace and began gathering the army of Anatolia for war. After a few days, the army was readied, and the march toward Europe began in earnest. Knowing that a quite significant crusader navy blockaded the straits, the former Ottoman sultan decided to take his chances and cross into Europe across the more lightly blockaded Bosphorus Strait to the north. With the help of Grand Vizier Candarli Halil Pasha the Younger, the Ottoman Anatolian army crossed into Europe under the protection of cannon fire from the Anadoluhisarı, much to the dismay of
the Crusaders. However, the crossing wouldn't have been possible in the first place without the transport ships deployed by the Genoese as they were fearful of potential Venetian gains from the crusade, and so supported Edirne’s war effort. The unexpected strait crossing was to be a turning point in the crusade as Edirne now had a proper army and a military leader capable of facing head-on the ‘White Knight of Transylvania.” Meanwhile, in Bulgaria, the unaware Crusaders had begun their siege of Tarnovo, the former seat of the old Bulgarian Empire. However, the following siege of the town was to
be disastrous for the crusaders, as Ottoman sallying out parties seized and destroyed many of their supply wagons. Low on supplies, Hunyadi ordered the army to head east to the Black Sea coast, where the crusader fleet could resupply them, thus temporarily abandoning the march toward Edrine. Along the long and fraught journey, the Ottoman towns of Shumen, Madara, and Provadia were burnt to the ground. By the first week of November, the army had reached the Ottoman coastal fortress of Varna and captured it after a quick siege. It was also during this period that the shocking news of
Murad’s arrival into Europe reached the crusader camp. Mehmed II and his father had spent the better part of the last month mustering a sizable Ottoman army at Edirne and Stara Zagora. Like during the “long campaign,” Murad declared a jihad against the invaders as a means to muster men into the ranks of the army on short notice. By the first week of November, the army was readied for war. Leaving the young Ottoman sultan in the care of the grand vizier back in the capital, Murad marched out of the city at the head of a 40,000-strong army.
For the next week, the Muslim army followed the main road up to Yambol and continued up to Aytos. Wanting to cut the Crusaders off from the west, the former Ottoman sultan crossed the Kamchiya River on November 7th and entered Provadia the next day. By the 9th of November, Translayvian scouts of John Hunyadi had spotted Murad’s grand host marching in from the west toward Varna. Being cornered with the sea to their backs and the supply fleet nowhere to be seen, the crusader council decided to engage the Ottoman army the following morning. In the war council, Hunyadi
declared, “To escape is impossible; to surrender is unthinkable. Let us fight with bravery and honor our arms.” The climactic battle that would determine the fate of the entire military campaign seemed to be on the horizon, and its location was to be at Varna. On the morning of November 10th, both the armies of Murad and Wladyslaw III assembled on a plain overlooking the fortress of Varna. To the east lay the Black Sea, while Lake Varna and the forested Franga Plateau lay to the south and north, respectively. The former Ottoman sultan deployed his men in a crescent
formation across the entire mouth of the plain, stretching for over five miles. Anatolian Beylerbey Karaca Pasha led the right wing of the army alongside the Anatolian Timarli Sipahis, while Rumelian Beylerbey Şehabeddin Pasha led the left wing of the army alongside the Balkan Timarli Sipahis. Meanwhile, the former Ottoman sultan himself commanded the center alongside his heavy Kapikulu Sipahi cavalry, elite Jannisaries infantry, and a small unit of artillery. In the vanguard of the entire army were the light azab infantry armed with maces, bows, and axes. In the center of the army line, they were protected by a
trench and a wall of iron palisades. Lastly, a unit of light Akıncı cavalry was stationed on the far left on the Franga Plateau. The crusader army was half the size of the Ottoman host, numbering around 20,000 men. However, like in the previous battles of Kosovo and Nicopolis, the Christian army made up for its inferior numbers with its superior armor. John Hunyadi’s brother-in-law, Michael Szilagyi, led the left wing, which consisted of Transylvanian heavy knights and light Hussar cavalry. Many in this flank were hardened veterans of the “long campaign” and other military campaigns against Edirne and so
had prior experience in fighting against the Ottomans. King Wladyslaw III and John Hunyadi commanded the center, which consisted of the king’s personal mounted banderium, heavy-mounted knights from Hungary and Poland, and mercenary infantry from Germany. Conversely, Bishop John de Dominus of Oradea led the crusader right wing, which consisted of heavy infantry from Hungary and light infantry and cavalry from Bosnia and Croatia. They were joined by a small group of heavy Western knights led by Cardinal Julian Cesarini and Wallachian light cavalry led by Prince Mircea stationed in the rear. Lastly, behind the entire crusader army was a
line of fortified war wagons crewed by Czech mercenaries armed with crossbows and small artillery pieces. The battle began with a general charge of the left flanks of both armies. Starting on the Hungarian left, Michael Szilagyi led his Transylvanian heavy knights and light Hussar cavalry into the lightly armored ranks of the Ottoman Anatolian army. The following melee was to be one-sided as the Anatolian azabs, and Sipahis were overwhelmed by some of the best warriors Christendom had to offer. As war trumpets littered the battlefield, the Wallachian cavalry under Mircea entered the fray, protecting Szilagyi’s right flank from
an Ottoman counterattack from the center. With the azab light infantry unable to penetrate the heavy armor of the crusader knights and now being cut down by the highly mobile Hussar cavalry, the entire Ottoman right flank began to break into a total rout. Wanting to encourage his fellow men during the heat of battle and spurred on to not retreat in the face of great odds, Karaca Pasha and his personal bodyguard charged into the crusader advance but to no avail. In only a matter of moments, the Anatolian beylerbey was cut down to pieces, and as a result,
the shattered remains of the Ottoman right fled the battlefield. The crusaders decisively won the first phase of the battle, but elsewhere, the battle for Varna was still dragging on. On the Ottoman left, the initial charge of Şehabeddin Pasha and his Akıncı cavalry from the Franga Plateau had seen tremendous success. The Ottoman offensive on the crusader right had resulted in John de Dominus's forces being pushed back to the war wagons in a total rout. Even a cavalry charge led by Hunyadi himself was driven back as the most experienced soldiers in the Ottoman provincial army slashed their
way through the ranks of the crusader right. It was during this retreat that an arrow partially pierced the helmet of the Transylvanian magnate as he fled to safety. Having captured four crusader banners in the initial advance, the Ottoman left continued pushing forward in the direction of the Black Sea in order to finish off the crusader right. However, the pursuing advance was soon to be halted by the immense gunfire of the war wagons in the crusader's rear, in addition to a heroic last stand led by Cesarini and his Western volunteers. It was also during this period
in the battle that reinforcements from the crusader left and center began trickling down to aid the shattered but still-standing crusader right flank, much to the trepidation of Murad. Even the Polish-Hungarian king and his personal bodyguard had entered the fray of battle, thus ensuring the stabilization of the crusader right. Witnessing that his foe now outnumbered him, Şehabeddin Pasha began regrouping his exhausted forces back to the mouth of the plain and the Franga Plateau. Nevertheless, almost half of the forces of the Rumelian beylerbey were lost or routed in the retreat. Despite the fact that the struggle had
been ongoing for only several hours, thousands of soldiers on both sides and their steeds had littered the plain overlooking Varna. The stench of bloodied corpses, gunpowder, and sweat, in addition to the groans of the wounded, echoed across the battlefield. Much of the Ottoman army had either fled the field or were killed in the battle, while the exhausted crusader army had also sustained heavy casualties of their own. As a result of the bloody toll suffered in the struggle for Varna and the hot afternoon sun now shining above the battlefield, a pause in the fighting took place
between the two armies. With the exception of the Wallachians, who were plundering the former camp of Karaca Bey, the bloodied and jumbled crusader army now began regrouping its forces for a final assault on the Ottoman center. During this pause, John Hunyadi, Wladyslaw III, and the rest of the crusader leadership met behind the protection of the war wagons to discuss their next moves. The “White Knight of Transylvania” urged his monarch to regroup and rest the army while waiting for Murad’s exhausted host to either make a desperate attack on their positions or withdraw from the battlefield. In
contrast, the young king’s advisors instead urged their monarch to take the fight to the former Ottoman sultan, as much of the enemy army had already been disbursed. What followed was a furious power struggle between the Polish-Hungarian nobility and the Transylvanian nobility led by Hunyadi over the approval of their monarch. At the end of the meeting, the twenty-year-old Wladyslaw had fallen victim to his own vanity and thus sided with the former group. The king drew up his sword and led a group of around 500 heavy-mounted knights in a charge directed to the Ottoman center. As Hunyadi
had predicted, the former Ottoman sultan was in the process of withdrawing from the battlefield, but upon seeing the enemy king's royal standards charging towards him, he prepared for a final engagement. Almost immediately, Wladyslaw and his mounted knights were bogged down in iron palisades protecting the Ottoman center, in which many succumbed to gunfire and arrows while trying to breach the fortifications. After a short and bloody struggle, a path was opened up over the fortifications, and the crusader knights charged into a group of entrenched azabs and elite Janissaries. Many on both sides were slain in the gruesome
hand-to-hand combat. Seeing the Ottoman royal tent off in the distance during the heat of battle, Wladyslaw and his personal guard broke off from the main group of knights and began their charge toward Murad. However, it was during this charge that a member of Murad’s personal solak guard, a man by the name of Koca Hizir, rose to the occasion and knocked the Polish-Hungarian king off his steed with his battle axe. Laying helpless and dazed on the ground, Wladyslaw gasped his last breath as the guardsmen lopped his head off before putting it on top of a pike.
Hunyadi, along with his Transylvanian knights, were the first to hear of the king's death, as they had been close behind his fateful final charge. The Transylvanian magnate waged a considerable struggle to retrieve his monarch’s corpse all throughout the evening into the sunset but to no avail. Unable to break through the Jannisaries, Hunyadi took his portion of the crusader army and began his retreat up north through the Franga Plateau under the cover of night. Many were killed during the hectic retreat as Ottoman Akıncı horsemen trapped many lost crusaders in the numerous dark ravines of the plateau.
By the following morning, Murad had regrouped his remaining forces with Şehabeddin Pasha's left flank and began spreading the surprising news of Wladyslaw’s death for all to hear. This resulted in many Ottoman units that had been routed the previous day returning to the battlefield as morale in the Muslim camp once again went up. Meanwhile, the remaining crusader army at Varna had camped overnight behind their war wagons, thinking they had won a great victory for Christendom, not knowing the disaster that befell their valiant leader. It wasn't until the reformed Ottoman army had marched up to their camp
and showcased the severed head of Wladyslaw on a pike that any crusader notion of victory over the Turks disappeared. The second struggle for Varna lasted until the evening when the remaining demoralized and leaderless crusader army broke under the weight of a full-on Ottoman assault. While Mircea and Michael Szilagyi barely fled the battlefield with their lives, John de Dominus of Oradea, Cardinal Julian Cesarini, and the rest of the Christian army perished under the heat of battle. And with that, the Battle of Varna was over. The Battle of Varna had resulted in a pyrrhic victory for the
Ottoman Sultanate. Although the war between Edirne and Buda persisted for another half-decade, the victory at Varna ensured Ottoman presence in the Balkans for centuries to come. The crusade of Varna was the last time Christian powers made a major effort to expel the Ottoman Turks from Europe under Papal backing. The battle had also politically destabilized Hungary and Poland, as both nations were engulfed in respective succession crises. The battle had also reestablished Edirne as a significant regional power once more as the state avenged its humiliating military defeats back during the “Long Campaign” in 1443. The news of
Murad’s triumph lifted the morale of many in the Ottoman court and the Muslim citizens of the capital. To many, the invincible aura surrounding Hunyadi and his knights had been shattered. Nonetheless, this period of joy and celebration was to be short as not long after the battle, Murad returned to his life in retirement at his palace in Manisa, handing the throne over to his young and inexperienced son. Moreover, it was not known if Hungary or Poland would initiate a crusade of revenge in the subsequent years in retaliation for the death of their young monarch. Only time
would tell if the feeble and unproven government of Mehmed II had the capabilities to thwart such a threat in the future once again. While Edirne celebrated their military triumph, the remnants of the crusader host under John Hunyadi had urgently retreated north toward the Danube during the days after Varna. However, upon reaching the river, Hunyadi was captured by Wallachian soldiers and imprisoned on Vlad II's orders. As Vlad’s son Mircea had taken place in the failed crusade, the Wallachian voivode originally planned to hand over Hunyadi to the Ottoman Sultan in exchange for reestablishing friendly ties with Edirne.
However, after numerous threats of war from Hungary, Hunyadi was eventually released and brought to Buda by the turn of the year. This whole ordeal had left Wallachia in a precarious predicament as its ruler was now diplomatically isolated from both of his major neighbors, thus facing the risk of potential invasion from his north and south. Unlike Murad’s magnificent reception in Edirne, Hunyadi returned home to political instability and wide-scale hysteria. After Varna, the Hungarian realm was left leaderless, so a royal diet was held in the spring of 1445 to elect a new sovereign. After much debate, the
six-year-old Ladislaus V was eventually chosen to rule, but this decision opened up old wounds from the past. The young monarch's guardian, King Frederick III of Germany, refused to surrender the boy king to Buda without a fight as he was his most prized political prisoner. He also expressed the royal diet's hypocrisy on the matter, as it was the same diet that had denied Ladislaus’s right to become king of Hungary after the death of his father back in 1439. This decision resulted in a bloody war between Hungary and the German king that was to last until 1447.
This sudden outbreak of war hindered Hunyadi’s war effort against Edirne in the years immediately after Varna. However, the conflict did give the Hungarian magnate the opportunity to rise up the ranks in the capital once more as he was declared the official ‘regent’ of Ladislaus by the royal diet, thus informally becoming the ruler of Hungary in the coming years. As Hungary was sucked into a prolonged war, the diplomatically isolated ruler of Wallachia, Vlad II, made plans to strike at Edirne before Sultan Mehmed could retaliate against him. Vlad first allied himself with the Burgundian element of the
crusader fleet, which was still active in the Black Sea. The Wallachian ruler then besieged the significant Ottoman Danube fortress towns of Giurgiu, Tutrakan, Ruse, and Silistra in 1445. The following military campaign proved to be a successful one as the Turkish garrisons of the former three towns were taken by surprise by the Wallachian invasion and were thus massacred to the last man. With Mehmed’s government unable to respond decisively to the Wallachian invasion, a hasty peace was concluded between Edirne and Targoviste. In return for continuing to pay a yearly tribute to the Ottoman capital, Vlad's territorial conquests
were acknowledged by the sultan. Although he had won a surprising victory against the Turks, Vlad’s appetite for expansion did not stop at the Danube. The Wallachian voivode began meddling in the politics of his northern neighbor, the Principality of Moldavia, by supporting the Polish-aligned Roman II over the Hungarian-aligned Peter III during a local civil war. This interference in Hungarian interests caused many in Buda to turn on Vlad, as he was already seen as an unpredictable and unreliable figure in Balkan politics. All of this culminated in 1447 when Hunyadi invaded Wallachia in a short campaign and installed
Vlad’s cousin, Vladislav II, on the throne as a Hungarian vassal. Vlad II Dracul, the man who had found himself playing an unwinnable balancing game between Buda and Edirne for the last decade, was killed during his escape alongside his son Mircea. While the Ottomans were preoccupied with the crusader forces of Europe, a new significant threat in the Western Balkans had emerged in the form of Albania. After the military defeats during the “Long Campaign” of 1443, an Ottoman provincial governor of Albanian descent named Iskender Bey, known today as Skanderbeg, had deserted his command and made plans to
instigate a significant rebellion in his homeland. Originally born as George Kastrioti, Skanderbeg had seen Ottoman armies conquering his country firsthand back in 1417. Being the son of a prominent Albanian feudal lord, he was sent to Edirne as a political hostage at a young age in order to receive a full Ottoman education along with many other influential Albanian boys. It was expected that Skanderbeg and other sons of notable Albanians would become Ottoman military leaders one day and serve in their own local community as symbols of Edirne’s cultural supremacy. However, this was not meant to be for
a particular member of the House of Kastrioti. Following the path of the fabled Arminius, Skanderbeg could not forget about his original upbringing, so he was fiercely determined to free his people from the Ottoman yoke. He began his rebellion by first capturing the fortress town of Krujë in 1443 by tricking its local Turkish garrison into opening their gates with a forged letter from the sultan. In the following months, Skanderbeg captured the surrounding fortresses around Krujë and even began forming a grand military and political alliance with the other disenfranchised Albanian noble families of the local region, commonly
known as the League of Lezhë. Back during the rebellions of the 1430s, much of the Albanian nobility had been politically divided, resulting in the more numerous Ottomans systematically defeating each noble house one by one. But now everything was different. The creation of the League of Lezhë was to be the first time a concerted effort was made to form a united Albanian nation. Upon uniting their combined fiscal and military resources against the Ottomans, the league members proclaimed Skanderbeg their commander-in-chief and new lord of Albania. Soon after, the new Albanian lord reconverted back to his native faith
of Christianity after being originally converted to Islam during his days as a political hostage in Edirne. It was the final action that earned him the nickname of ‘Iskender the Traitor’ throughout many Muslim circles. During the cessation of hostilities with the crusaders during the summer of 1444, Murad II had sent a provincial army of around 25,000 strong under the command of his much-trusted general, Ali Pasha, to crush the Albanian revolt. The general’s target was the town of Krujë, the epicenter of the rebellion. Mustering 15,000 troops to face his first genuine test as a military leader, Skanderbeg
marched northeast to meet the Ottoman host on the narrow plain of Torvioll near the Albanian border. During the night before the battle, he stationed a few thousand of his calvary under his nephew, Hamza Kastrioti, in the forests surrounding the plain. Meanwhile, the overconfident Ottoman provincial army celebrated and feasted into the early morning as they thought an easy victory was already assured. After all, what were a few thousand Albanian peasants turned soldiers compared to the mighty armored soldiers of Islam? By the early hours of June 29th, both armies made ready for battle. Using his time serving
in the sultan’s armies to his benefit, Skanderbeg stationed his army in a traditional Turkish crescent formation overlooking the plain in the hopes of flanking around his enemy. The Albanian lord stationed himself in the center alongside various units of light infantry and archers, while his two flanks consisted of infantry and cavalry. Due to the battlefield's narrow terrain, the Turkish army was unable to use its numerical superiority to its advantage, so Ali Pasha organized his host into three narrow battle lines. The Ottoman general stationed himself at the center of the middle battle line alongside a small unit
of Janissaries with Timarli Sipahi heavy cavalry on his flanks. In the vanguard line were the Akinci light horsemen, while in the reserve line were various units of provincial infantry. The battle began with the first two Ottoman battle lines charging directly into the rebel army. What ensued was a bloody but not decisive melee in which the Albanians barely held out against the Turkish onslaught. This showcase of bravery and defiance surprised Ali Pasha, so he ordered his reserves into the fray as a means to finish off the rebels. Unbeknownst to him, he was falling right into Skanderbeg’s
trap. Seeing that his foe had deployed his last remaining troops into the battle, the Albanian lord ordered his hidden calvary in the surrounding forests to charge the Ottoman rear. In a single action, the entire Turkish army was surrounded. In addition to the surprise cavalry charge, the Albanian crescent formation proved vital in funneling the Turkish host toward the center of the battlefield, better allowing for Skanderbeg’s men to flank around Ali Pasha’s men. What followed was a great massacre of the invader army that saw their leader barely escaping the field of battle with his life. Around two-thirds
of the Ottoman host was killed and or captured by the end of the day. The unexpected Albanian victory at the Battle of Torvioll was to be the catalyst for Skanderbeg’s later rise to fame. In the direct wake of the battle, a wave of enthusiasm spread across the Albanian countryside, resulting in many enlisting their services in the armies of the new lord of Albania. Like John Hunyadi before him, Skanderbeg became well-known to many in the wider Christian world, his name becoming synonymous with bravery and defiance against an ever-growing Ottoman Sultanate. In the following years, his armies
continued to utilize guerilla tactics in the struggle for independence. Seeking revenge for its humiliating defeat at Torvioll, Edirne sent another army into Albania during the fall of 1445, this time led by Firuz Pasha. However, Skanderbeg again defeated this numerically superior army at the Battle of Mokra after trapping his foe in a narrow valley. This time around, the Turkish army took over 3,000 casualties, which included Firuz Pasha himself. Yet another army was sent into the region a year later under the command of Mustafa Pasha, but his forces also proved unsuccessful, with Skanderbeg defeating them at the
Battle of Otonetë, a contest which resulted in over 5,000 dead Turks. What had initially seemed like a minor and insignificant revolt had turned into a logistical nightmare for an already dysfunctional Ottoman government under Mehmed II? With each passing victory, Skanderbeg gained more followers at home and more admiration from Christian Europe. In the two years after Murad II’s abdication, the central Ottoman state was severely paralyzed in decision-making regarding the wars against Wallachia and Albania. This indecision was directly caused by various political factions arguing in the capital over the correct course of action to take after the
victory at Varna. Mehmed II and his close advisors and fellow friends, Zağanos Pasha and Şehbettin Pasha, had advocated besieging Constantinople as they thought the time was now to finally put an end to the Roman state, which had only just recently conspired with the crusaders. In contrast, Grand Vizier Candarli Halil Pasha advocated for making military preparations for another potential crusader invasion in the Balkans. Having personally witnessed the failed siege of the Roman capital back in 1422, Halil thought such a military operation was too risky while Hunyadi was still on the chessboard. According to him, the Ottoman
state could not afford to fight a two-front war in its current economic and military conditions. For over six years, the armies of Edirne had been on active campaign year after year, thus putting enormous strains on the central treasury and the general health of the military. However, the fourteen-year-old Ottoman sultan was adamant about his desire to conquer the Roman capital, which was his childhood dream. Seeing Mehmed’s personal ambitions for Constantinople as a vital threat to the tranquillity and security of the state, Halil Pasha orchestrated a Janissary rebellion against the Sultan in 1446 in an attempt to
restore the Sultan’s father back to power. The state's recent debasement of coinage had already disgruntled many within the ranks of the Janissaries. Thus, its leaders supported the grand vizier as a means to bring down the sultan’s key advisors from power. However, upon raising the banners of rebellion, members of the elite corp began indiscriminately plundering the capital and even stormed into the palace of Şehbettin Pasha. The Ottoman pasha barely escaped to the royal palace with his life as a violent mob chased after him on the streets of Edirne. It had become clear even to the grand
vizier that he had lost control of the rebellion, for some in the ranks had even begun chanting the traitorous name of Orhan Celebi, who still resided in Constantinople as the Byzantine emperor’s political hostage. Knowing he needed to restore order, Halil Pasha sent out a letter to Murad to come to the Ottoman capital at once. Upon hearing the destructive news from the capital, the former sultan rushed to the aid of his son and much-trusted political colleague. Shortly after entering Edirne, Murad reestablished order as, unlike his son, many still saw him as the true wielder of political
authority within the state. The first rebellion of its kind in Ottoman history ended with a pay raise for the Janissaries in return for them retreating back to their barracks. Once the dust had settled, Murad was successfully convinced by Halil Pasha to retake his seat on the throne and once more restore authority to the Sultanate. While his son and his advisors were out on a hunting expedition near the capital, Murad seized the royal palace and proclaimed himself Ottoman sultan for the second time. When he returned from his expedition, a shocked Mehmed could do nothing but kiss
the hand of his father and accept his dethronement. Soon after the political coup, Mehmed and his followers were exiled to Manisa, where the former child sultan continued his education as a statesman by becoming the governor of the local region. With Sultan Murad II back on the throne after his retirement was cut short, Ottoman armies made preparations to strike deep into Europe once again after two years of relative idleness. Back during the Varna Crusade of 1444, the Byzantines, under Despot Constantine of Morea, had taken advantage of Edirne’s preoccupation against Hunyadi by conducting a series of military
operations in Southern Greece. After refortifying the Hexamilion Wall, the ambitious despot launched what was to be one of the last major military offensives in Roman history. Within a single year, his armies conquered the region of Boeotia from the Latin Duchy of Athens, thus forcing its ruler into vassalage. On top of that, Constantine and his recently hired Albanian and Vlach mercenaries preceded to conduct a significant raid into Ottoman-held Thessaly. With Turkish armies preoccupied in Albania during the years after Varna, the Romans were left unpunished for their military transgressions until Murad II's re-ascension in 1446. One of
the sultan’s first decisions after coming back to power was to launch a retaliatory campaign against the Morea during the winter of 1446. Hearing the news of an incoming invasion, the two despots of Morea, Constantine and Thomas, decided to make their stand against the sultan on the recently refortified Hexamilion Walls. However, once Murad and his grand host arrived at their gates, a precursor of future events to come was to take place. For five days, Ottoman artillery bombarded the Byzantine walls with great intensity, leaving a trail of destruction and smoke. As the Hexamilion Walls were reduced to
rubble, Murad led his armies through the fortification’s breaches into Morea. What followed was an indiscriminate mass sacking and looting of the entire region that saw many Romans taken captive and sold into slavery in Anatolia. Constantine and Thomas could do little to stop the situation and were forced to take refuge in their fortress capital of Mystras. Seeing no other way of halting the Ottoman war machine, the pair bowed down to Edirne’s vassalship once more. Next on Murad's agenda was the ongoing Albanian revolt. In the years after his great victory at Torvioll, Skanderbeg had made new enemies
in the form of the Italian merchant republic of Venice. The Albanian lord had entered into a series of land disputes with the merchant republic over the fortress of Dagnum and its surrounding Adriatic coastal settlements, thus sparking a war in the year 1447. With the Venetian doge putting a bounty on Skanderbeg’s head, the stage was set for another Ottoman military campaign into Albania. By the late spring of 1448, Murad and his son Mehmed readied a large host of around 50,000 strong and marched on the border fortress of Svetigrad. Capturing the fort would give Edirne a foothold
in the local region, where it could conduct future military operations against the rebels. Upon hearing of the massive invasion, Skanderbeg began employing guerilla and scorched earth tactics to stall the invaders while he prepared his fortress towns for the upcoming war. Regardless, the Albanian lord’s tactics proved less effective this time around, as he now faced a far greater and more experienced Turkish host. By mid-May, Murad’s army had besieged Svetigrad and began bombarding its walls to much Albanian resistance. The bloody two-month siege only ended after the defending garrison's water supply was sabotaged, resulting in their surrender. The
siege was to be the first Ottoman victory in the region since the start of the rebellion five years prior. But upon capturing and garrisoning Svetigrad, news in the shape of a new crusade had reached the sultan's camp. Back during the summer of 1447, Buda’s war with King Frederick III over the young Ladislaus V had ended in a stalemate that ensured the status quo between the two sides would be retained. Immediately after the cessation of hostilities, John Hunyadi began preparing to form yet another crusade against the Ottoman Sultanate. But this time around, less international help came
to the aid of Hungary, which was again the main sponsor of the crusade. Unlike the Varna Crusade of 1444, the naval forces of Venice would not be present this time around as the doge had signed a peace treaty with Edirne in 1446. Pledged help from Aragon and Naples also failed to materialize, leading to the Hungarian regent writing a letter to Pope Nicholas V stating that he had been severely misled by the fruitless promises of the Western Catholic powers. However, despite the West’s paltry offerings, an official crusading bull was proclaimed in Rome against the Ottomans by
April 1448. This time around, no foolhardy Polish monarch could thwart Hunyadi from achieving his ultimate goal of pushing out the Turks out of Europe. Having mustered his army throughout the summer, the Hungarian regent crossed the Danube into Serbia during the first weeks of fall. This time around, the crusader army aimed to unite their forces with Skanderbeg down south before marching on Thessalonica and then to Edirne itself. Hunyadi’s host numbered around 22,000 strong, comprising 5,000 Polish infantry and cavalry, 3,000 Moldavian cavalry led by Peter III, 4,000 Wallachian infantry and archers led by Vladislav II, 8,000 calvary
from Hungary and Transylvania, 2,000 Czech mercenaries crewing war wagons, and a few thousand infantry from Germany and Bohemia. Durad Branković of Serbia was also invited to join the crusade, but the despot had declined, citing that he was already militarily preoccupied with fighting Bosnia for control over Zeta and Srebrenica. But in reality, the Serbian despot did not want to risk the fragile peace between him and his son-in-law, Murad II. As a result, Durad chose to stay neutral in the upcoming conflict, as he had also done four years prior during the Varna Crusade. Due to Durad’s intransigence,
Hunyadi gave his men free license to pillage and burn the Serbian countryside during their march south. However, the decision to do so was to be a colossal blunder and oversight by the Hungarian regent. This act of brutality against his countrymen infuriated the Serbian despot so much that he began to pass on intelligence to the Ottoman sultan on the whereabouts and size of the crusader host. Possibly even more critical to Edirne’s war effort, he also began blocking the southern mountain passes of his realm to prevent Skanderbeg and his Albanian contingent from uniting with the main crusader
host. By late September, the crusader army had captured Niš, the site where Hunyadi had won three decisive battles back in 1443. Knowing nothing about the Turkish army's whereabouts, the Hungarian regent assumed that Murad was still mustering his troops in far off Edirne or Plodiv, which had been his standard base of operations in the Balkans. However, the sultan of the Ottomans had been very active in the two months after his victory at Svetigrad. Upon hearing of Hunyadi’s intentions to invade his realm, Murad abandoned his campaign in Albania to concentrate his forces at Sofia before the advent
of war. By the time Hunyadi had entered Serbia, the sultan was already on the move, marching his army westward, guided by Durad’s intelligence. Murad also took advantage of Vladislav II’s absence from Wallachia to bring the country back into the Ottoman fold. Having released the teenage Vlad from his captivity at Edirne and arming him with an army, the young Wallachian royal had managed to seize his late father's former throne by October. Crowning himself as Vlad III, the new Wallachian voivode submitted his country to Ottoman vassalage once more before handing over the towns of Giurgiu, Ruse, and
Tutrakan back to Turkish authorities. All of these outside actions were unknown to the crusader host during their march south toward Albania. By October 15th, Hunyadi’s army entered the Kosovo field northwest of Pristina. The location had been the site of the infamous clash between Sultan Murad I and Prince Lazar Hrebeljanović back in 1389. On the nearby Plementina Hill lay the slain sultan’s tomb, which was built during the reign of his son, Bayezid I. In the coming days, the leaders of the crusader host identified the tomb while making camp near the Lab River to its immediate north.
Like many in Christendom, Hunyadi knew about the infamous engagement which had occurred 60 years before his time and took the lives of two monarchs and thousands of their followers. However, what he didn’t expect to see was another Sultan Murad arriving on the field of Kosovo from his rear two days later. The shocked crusader host could have continued their march southwards in the hope of uniting with the Albanians, but such a decision would have removed the army further from Hungary, rendering a potential retreat extremely difficult. In a single surprise move, the Ottoman sultan had blocked his
foe's northern escape, thus forcing them to make battle. Unbeknownst to Hunyadi and his men, they were about to take part in the sequel to the 1389 clash. The Second Battle of Kosovo had just begun. The first day of battle saw the advanced guards of both armies skirmishing for control over Plementina Hill, an advantageous slope on the plain that could decide the fate of the engagement in the days to come. Luckily for the unprepared Hunyadi, his Hussars had managed to quickly drive the Ottoman Akincis off the slope, thus allowing the Hungarian regent to set up his
defensives, namely his war wagons, on the top of the hill. However, this came at the cost of conceding his access to fresh drinking water from the rivers Lab and Sitnica to the Turks. The second day of battle saw Murad II and his son Sehzade Mehmed form up their host of 40,000 to engage with the crusader host of around 22,000. The two members of the House of Osman commanded the center alongside their heavy Kapıkulu Sipahi cavalry, elite Janissaries infantry, and a small unit of artillery. The Ottoman center also employed the same type of war wagons famously
used by the Hungarian regent in the form of the newly created military corp called ‘the Artillery Wagoners.’[1] Meanwhile, the Anatolian Timarli Sipahis formed the right wing, while the Balkan Timarli Sipahis formed the left wing. Light Akincis flanked both wings, while the vanguard of the entire army was made out of light azab infantry armed with maces, bows, and axes. From their advantageous slope, the Hungarian army also formed up for battle. Hunyadi commanded the center along with the main core of his infantry and cavalry from Poland, Germany, Bohemia, and Transylvania. The Moldavian and Wallachian contingent mainly made
up the left wing, while cavalry from Hungary were present in both wings. Lastly, Czech mercenaries crewed the war wagons on top of the hill, protecting the rear of the entire army. Hunyadi’s battle plan was to engage the Ottoman wings with relatively less numerous forces as a means to break his foe’s center with a massive cavalry charge. The lesson the Hungarian regent learned from his defeat at Varna was that, while the Timarli Sipahis were relatively easy to dislocate and rout, success on the wings was not enough to break the Ottomans. The battle had to be won
in the middle, and thus, Hunyadi stationed his best troops accordingly. The battle began with a general charge of both Hungarian wings into the ranks of Anatolian and Balkan Timarli Sipahis. After some bloody fighting, both the Ottoman left and right began being pushed back to their camp. Seeing the tides turn in his favor, Hunyadi launched his main assault on the Ottoman center with the bulk of his core troops. While arrow fire and cannon fire rained upon the crusaders, the Janissaries from the reserve center moved to the flanks, thus opening a gap in the Ottoman center. This
move allowed the crusaders to rush until they were blocked by the fortified Turkish war wagons in the rear of the army, which conversely allowed the Janissaries to strike at their flanks from both sides. Many Hungarian barons and other crusader leaders were killed in the mayhem. Seeing that his assault on the Ottoman center had failed disastrously, Hunyadi ordered his army to make camp for the night. Knowing the battle had been lost, the cavalry contingent of the crusader army, including Hunyadi himself, fled the battlefield under the cover of darkness. Like at Varna, the crusader infantry was left
behind at the mercy of the Ottomans. Throughout the night, Murad ordered assaults up Plementina Hill, but the immense firepower of the Czech war wagons halted all such attempts to take the slope. Only by sunrise on the third day of the battle were the Janissaries successful in breaching the exhausted crusader defenses. According to Western sources, the remaining crusaders all perished to the last man during the final assault. The Second Battle of Kosovo had ended just like the first battle, in an Ottoman victory. The decisive victory at Kosovo was yet another triumph for Murad II, as the
Sultan again repelled a crusader invasion from his lands for a third time. The battle proved once and for all that Turkish battle tactics of repeated deflection, retreat, and rearrangement outclassed the brute strength of heavily armored European cavalry. In the aftermath of the bloody fighting, many crusader leaders were captured while escaping the battlefield and were thus later individually ransomed off by the Ottoman Sultan in the coming months. Hunyadi himself had also been captured during his northern retreat back to Hungary by none other than a revenge-seeking Durad Branković. The Serbian despot had demanded justice for the mistreatment
of his countrymen at the hands of the ravaging crusader army at the start of the war. Justice was finally served a few months later when the crusader leader was ransomed off to Buda for the grand sum of 100,000 gold florins. Broken and humiliated, John Hunyadi would never again go on the offensive against the Ottomans, thus fielding a more defensive posture against Edirne in the following years. With the crusader army decisively defeated, Sultan Murad II now turned his gaze to Albania and Wallachia. In the wake of his retreat from Kosovo, Vladislav II rushed back to his
domains and defeated the newly installed Ottoman-aligned Vlad III in a short civil war. However, this act of open defiance was not lost on the Sultan of Edirne. In retaliation, a large-scale Ottoman raid was conducted on Wallachia during 1449 that saw many of its lands being pillaged and many of its people carried off to slavery. Although Vladislav survived the onslaught and remained a Hungarian vassal, much of his country was left in ruins. With Wallachia removed from the picture for the time being, the issue of the raging Albanian revolt became the centerpiece of Murad’s military efforts for
the next two years. Although failing to lift Murad’s siege of Svetigrad, Skanderbeg had, in the meantime, defeated a Venetian and an Ottoman army at the battles of the River Drin and Oranik during the summer of 1448. The two battles combined resulted in over 5,000 casualties for Venice and Edirne and saw the former sign a peace with the Albanian lord by the end of 1448. Regardless, the Ottomans persisted in their goal of crushing the rebellion and so continued with their war with the League of Lezhë. By early 1450, the stage for another major confrontation between Murad
and Skanderbeg had become ever so inevitable as the Albanian fortress of Berat fell to a surprise Turkish night raid. Mustering between 20,000 and 40,000 troops for his new Albanian campaign, the Ottoman sultan chose to strike at Krujë, the rebellion's main base of operations. As the Turkish army began its march westward during the spring of 1450, Skanderbeg prepared his own armies and fortresses in the local region for the upcoming war. His men once again adopted a scorched-earth policy all along the Ottoman invasion route as hundreds of fields and farms were burned. All along their march to
Krujë, the Turkish army was ambushed by local bands of Albanian peasants on numerous occasions. Night raids were conducted, roads were blocked, and wells were poisoned. Nevertheless, by May 14th, Murad and his son Mehmed had arrived at the gates of the Albanian fortress and began its siege. Krujë’s garrison was around 2,000 strong and led by a man named Vrana Konti. Its soldiers were made up of various Albanians and Slavs, in addition to smaller contingents from Western Europe. Meanwhile, Skanderbeg himself commanded a force of 8,000 outside the fortress walls, three-quarters of which were light hit-and-run cavalry. Outnumbering
his foe by a considerable margin, Murad sent messengers to Krujë and offered its defenders favorable terms of surrender and lavish bribes, but to no avail. What followed was a significant bombardment of the fortress's walls by the newly standardized Ottoman artillery corp. After five days of continuous barrage, a substantial breach was opened, resulting in the sultan ordering his troops to advance through the walls of Krujë. Regardless, the fortress's defenders filled the breach, and the invading assault was repelled. During the same period, Skanderbeg had launched a dusk hit-and-run raid on the Ottoman camp, killing hundreds of the
invaders and destroying their supplies. This vicious cycle of failed assaults and surprise Albanian ambushes lasted for many months as the Turkish army made little progress in capturing Krujë. Attempts to mine underneath the fortress had also failed due to the fact that the fortress lay on top of a steep and rocky mountainous ridge. As summer turned into fall, the situation became dire in the Ottoman camp. Much of the local countryside had already been burnt before their arrival, and what wasn’t had been thoroughly pillaged during the summer season. Running out of supplies, sustaining large numbers of casualties,
and, lastly, the weather now turning cold, Murad decided to lift the siege and head back home. During the retreat back to Edirne, the Turkish army again faced numerous ambushes by local bands of Albanian peasants, suffering heavy casualties. The six-month military expedition for Krujë had failed disastrously. While the Albanians only sustained around 1,000 casualties during the course of the siege, Ottoman casualties amounted to almost half the army. As fate had it, this was to be the last military campaign that Murad would undertake. A few months after returning to the capital, the Ottoman sultan suffered a stroke
and died a few days later at the age of forty-six. Having ruled the state for almost twenty-seven years throughout two reigns, Sultan Murad II was to be remembered as one of the most successful Ottoman rulers in history. By the end of his tenure, the Ottoman state had recovered entirely from the disastrous effects of the Battle of Ankara. Moreover, aside from Orhan Celebi in Constantinople, the House of Osman was firmly united under one flag and one sultan. The sultan had also won countless military victories both in Asia and Europe. The Eastern Romans had again been brought
to heal, Thessalonica and large parts of Anatolia were reconquered, wars against Serbia and Wallachia were won, and three major invading crusader armies from Europe were defeated. In addition to being a brilliant military leader, Murad II was a patron of the arts and often indulged himself with scholarship, poetry, and music during his free time. He promoted the usage of the written Turkish language within the royal court and translated many Arabic and Persian literary works into Turkish. The first Ottoman histories, as well as the histories of the Kayı tribe and the Seljuk sultans of old, were also
written during this period. Lastly, the sultan also opened the famous Enderun school in his capital as a means to establish an educated class of men for the service of the state in the future. Its students were mainly of devshirme origin, and such subject materials included science, mathematics, geography, art, religion, literature, and physical education. Sultan Murad II's death was celebrated all across Christian Europe, as the mighty ruler left his throne to his untested and already once-overthrown son, Şehzade Mehmed. However, little did the rulers of Christendom know that a brand new golden age for the Ottoman Sultanate
was just around the corner as Murad had laid the foundations for his state to one day become an empire stretching over three continents. Over the centuries, the desire of Islamic states to capture the Roman imperial seat of Constantinople was a fascination as old as the Islamic faith itself. Presumably, back in the early years of Islam, the Prophet Muhammad wrote a letter to Emperor Heraclius after a military triumph over the Sassanids. In the letter, Muhammad invited the emperor to convert to the Islamic faith and surrender himself to Allah, or else he would face his master's judgment.
In response, Heraclius is reported to have taken the mysterious letter seriously and even made some inquiries about the new faith and its alleged Prophet. Although the religiously devoted Roman ruler decided to retain the Christian faith of his ancestors, he did acknowledge Muhammed’s claims to prophethood and preserved his letter. A similar letter by the Prophet was also sent to the Shahanshah of Persia, Khosrow II, but this time around, the letter was torn up to shreds and discarded. In an unlikely fate of divine justice, the responses of the two monarchs to Muhammed’s letters would mirror the fate
of their respective realms. Whether these scenes from Islamic traditional accounts really transpired or not, by the 630s, Arab armies motivated by holy war had started to appear on the frontiers of the Roman and Persian empires and began raiding into Palestine and Mesopotamia. Their goal was to spread the word of God not by letters but by the sword. By the middle of the century, these newly assembled armies of the newly formed Islamic Rashidun Caliphate had vanquished the numerous armies of both Constantinople and the Ctesiphon in various battles around the Middle East. While the Sassanid Persian realm
was swallowed whole by the armies of Islam, the declining Roman state was left to withstand the Arab advance alone, albeit at the cost of its Egyptian, Syrian, and North African territories. Nonetheless, within a century after their initial push out of the Arabian peninsula, the followers of the Prophet Muhammed found themselves unable to continue the jihad of their forefathers as they were halted at the stone gates of the Taurus mountains. Although their territories were reduced by two-thirds, the East Romans had proved to be a more defiant and resilient foe than their Persian neighbors, having survived two
significant Arab sieges of Constantinople in 674 and 717, in addition to surviving numerous Arab raids into their core region of Anatolia lasting well into the ninth century. These military setbacks, in particular, the two failed sieges on the East Roman capital, remained a significant psychological assumed scar for the various Islamic caliphates of the Middle Ages for many centuries. Compounded by the fact that many were lost in the two sieges, including the Prophet’s own standard-bearer, Abu Ayyub al-Ansari, the age of jihad and potential world conquest of Islam had also come to a screeching halt. By the tenth
century, the opportunity to seize the Roman imperial seat had long passed as the later Abbasid Caliphate politically fractured under years of decentralization. The same period saw the Byzantines resurging in military and economic power under the Macedonian dynasty, which saw its imperial members go on the offensive in Northern Syria and Eastern Anatolia. Nevertheless, the magnificent dream of one day capturing the ‘queen of cities’ never faded in the minds of various Muslim communities throughout the centuries, including the sons of Osman. On the night of March 30th, 1432, Huma Hatun, one of Murad II's many wives, gave birth
to a baby boy in the royal Ottoman palace at Edirne. Even though his birth saw the Ottoman capital celebrate in euphoria, no one, not even Murad himself, thought the young boy would ever become a ruler in his own right, for he was the youngest of three sons and not likely to become his father’s heir. Regardless of his chances of one day ruling, the sultan decided to name the baby boy after his late father, Mehmed. In the coming years, the Ottoman prince was given an extensive education by the leading scholars of the realm, which was a
part of his father's initiative in promoting the arts at his royal court. After some time, it was discovered that Mehmed had a significant thirst for learning as he would go on, at an early age, to learn multiple foreign languages such as Arabic, Persian, Latin, Italian, Greek, Hebrew, and most likely Serbian. The young boy also showed a keen interest in reading Homer's and Herodotus’s antique classics in addition to studying the famous military exploits of ancient figures such as Alexander the Great and Julius Caesar. However, perhaps most influential to Mehmed during his student years was his Islamic
education under Turkish scholar Akşemseddin, where one line from the Hadith fascinated and inspired him to no end. "Verily you shall conquer Constantinople. What a wonderful leader will he be, and what a wonderful army will that army be.” By the time Mehmed was six years old, he was given the governorship of Amasya, where he continued his education and got first-hand experience of ruling. However, within two years of his arrival, his life was to change forever. The 1440s were chaotic not only for the Ottoman state as crusader armies of Western Europe invaded the sultanate numerous times but
also for the young prince. In only a few years, his two elder half-brothers had unexpectedly died, his mother had been sent away into exile from the imperial harem, and his father had stepped down from the royal throne into political retirement. Being Murad II’s sole surviving son, Mehmed ascended to the throne in 1444, causing much political discontent at the imperial court. Forgoing his young age and relative inexperience when it came to matters of state, Mehmed had also wanted to besiege the Roman capital after the great victory at Varna, a move seen as highly risky by the
senior members of the Ottoman government. With crusader armies roaming the Balkans, many thought such an expensive and risky military campaign would prove ruinous for the state, but the headstrong Mehmed ignored all concerns and objections. The young sultan is reported as saying to his critics, “Either I will conquer Constantinople or Constantinople shall conquer me.” But such a conquest was not meant to be. Alienating his imperial court with his unrelenting demeanor, Mehmed was forced off the throne in favor of his father by a coup d'état in 1446 orchestrated by his grand vizier, Candarli Halil Pasha. He was
then exiled to the town of Manisa, where he was to live a life of humiliation, being the first Ottoman sultan to give up his throne unwillingly without a fight. The whole event would forever alter the relationship between Mehmed and Halil Pasha as both figures and their followers began a tense rivalry within the court of the recently reinstated Murad II. Even with this internal division at the imperial court, Mehmed continued to serve loyally alongside his father on bloody military campaigns in Albania and at the Second Battle of Kosovo. It was in these years that he saw
the struggles and hardships of war for the first time as the sultan’s personal aid. However, his time alongside his father was to be cut short as Murad II died of a sudden stroke in 1451 at the age of forty-six. Although Mehmed had already been hailed sultan back in 1444, the succession to the Ottoman throne was still not confirmed as, according to state tradition, the role of monarch was eligible to all male members of the House of Osman regardless of their seniority. The former sultan had recently sired another son, the nine-month infant Şehzade Ahmed, and unlike
Mehmed, he was present at the capital. On top of his potentially dangerous half-brother, Mehmed’s already proven dangerous second cousin, Orhan Celebi, still eyed the Ottoman throne from Constantinople as a Byzantine hostage. The exiled Ottoman prince had previously tried to seize the throne by inciting a civil war during the crisis year of 1444 but was defeated on his march to Edirne. The race to hold the highest office of the land had just begun. Like with the death of Sultan Mehmed I back in 1421, the death of Murad II was also kept a secret by the imperial
palace until the issue of succession was determined. Wanting to keep the best interest of the state in mind and not wanting to give up the throne to an infant or a Byzantine pawn, Candarli Halil Pasha sent out confidential letters to Manisa informing Mehmed about his father's death and requesting for him to make his way to the capital at once. In only three days, the Ottoman prince and his entourage completed the journey from Manisa to Edirne, crossing the Dardanelles in total secret. Before the wider world knew anything of Murad II’s death, Mehmed was crowned sultan in
the courtyard of the imperial palace in front of all to see. After six years of losing his throne to a coup d'état, the eldest son of the former sultan was now back in power. According to traditional Ottoman sources, a tense presentation of ministers took place at the palace the following day, where Mehmed was seated on the imperial throne, receiving statesmen and foreign dignitaries. Although Halil Pasha and his followers ensured the swift ascension of Mehmed II back to power, it was yet to be known if the tensions of the last few years between the grand vizier
and the sultan were going to spill over into the next administration. During the presentation, Halil Pasha and his advisors hung at the back of the meeting hall in trepidation while the nineteen-year-old sultan was being greeted. Before long, Mehmed noticed the uncalm atmosphere at the back of the hall, and so he proclaimed, “Why do my father’s viziers hang back? Call them forward and tell Halil to take his usual place.” The young sultan then proceeded to insist that Halil Pasha continue his role as grand vizier, shocking many in the hall. The act by the sultan was seen
as a political move to unify his inner court in the capital, as it seemed like he had far grander ambitions to attend to. However, before he could attend to such ambitions, the young sultan had to first attend to his household. One of Mehmed’s first actions upon reascending the throne was to legalize the already common practice of fratricide within the House of Osman. Ever since the reign of Sultan Murad I back during the 1360s, the members of the royal family had often resorted to fratricide in order to secure the throne, most famously seen at its zenith
during the bloody years of the Interregnum. According to the Ottoman state, all royal princes had an equal claim to the throne, and it was only up to divine will and the prince's competency in political and military affairs that would help win them the race to ultimate power. After a prince had secured the throne, it was expected that he would eliminate all threats to his power as a means to ensure the stability of the state from future civil wars, and this included his siblings or even, in more desperate times, his sons. Although it was not a
widely popular act in the eyes of the wider public, the practice of fratricide ensured the stability of the state and the continuity of the imperial family for almost an entire century before Mehmed’s second reign. After officially codifying the practice of fratricide into law, the young sultan then ordered the execution of his infant half-brother, Şehzade Ahmed. It was from this legal ruling by Mehmed that Ottoman princes, for the next 150 years, would have to endure a life of total competition with their siblings or face an eventual early death. After securing his seat in power and unifying
his imperial court, Mehmed now began preparations to fulfill his childhood ambitions of seizing the ‘queen of cities,’ the Roman imperial capital of Constantinople. By the turn of the fifteenth century, Constantinople had served as the imperial seat of the Eastern Roman Empire for over a millennium. The city was founded by Emperor Constantine the Great in 324 on top of the former ancient Greek colony of Byzantium. His goal was to create a new lavish capital city for his new Christian empire centered in the east, perhaps in an attempt to closely monitor the volatile Persian and Danubian fronts
of his already overexpanded realm. The new capital also possessed quite advantageous natural defenses against invading armies as it was situated on a peninsula that could be supplied by a protected deep-water harbor in the form of a northern inlet dubbed the Golden Horn. On top of natural defensives, during the fifth century, the virtually impregnable three-layered Theodosian Walls were constructed, giving the city a further layer of acclaimed invincibility. It was to be these grand walls that repelled and deterred numerous adversaries over the years, such as the Goths, Huns, Avars, Arabs, Slavs, Bulgars, Kyivan Rus, and even fellow
Roman usurpers. At its height during the fifth and sixth centuries, Constantinople’s population had topped around 500,000. During this era, the city was also populated by numerous public buildings, grand squares, imperial palaces, gardens, triumphal arches, and lavish statues from antiquity topped with an enormous hippodrome. Nevertheless, the crowning jewel of the capital was the Hagia Sophia church, built during the eventful reign of Emperor Justinian the Great in the sixth century. Ever since its construction, the Church of God’s Holy Wisdom had been the world’s largest cathedral, thus becoming the centerpiece of Byzantine prestige during the Medieval Ages and
a prime symbol of Orthodoxy's triumph against its many foes in the West and East. However, by the time of 1451, Constantinople had long become a shadow of its former self. Back in 1204, the Theodosian Walls were breached for the first time by the Latin knights of the Fourth Crusade, resulting in a destructive sack of the Roman capital. Although the Romans would recapture their imperial seat from Latin occupation in 1261, the richness of Constantinople’s infrastructure and population was left in a desolate state. Roman efforts to reconstruct and repopulate their former ‘queen of cities’ were also to
prove largely fruitless. The fourteenth century saw the restored Eastern Romans battling amongst themselves in costly and bloody civil wars while the Black Death ravaged their urban centers, including the capital itself. Meanwhile, in the background, the sons of Osman established a new state for themselves that saw a further reduction of Byzantine lands in both the Balkans and Anatolia. The significant deterioration of Roman power in the fourteenth century had seen Constantiniple’s population dropping well below 50,000. With constant food shortages ravaging the capital, the once-powerful emperors of East Rome had now become reliant on the Italian maritime republics
of Venice and Genoa for military, political, and economic support. Although Sultan Bayezid I’s defeat at the Battle of Ankara had given the Eastern Roman Empire another fifty years of life, very little changed to revert the fortunes of Constantinople. By the reign of John VIII Palaiologos, the situation for Byzantium had become so great that its rulers forwent the religion of their ancestors in favor of a church union with the Papacy. It was believed that by mending the Great Schism of 1054, economic and military assistance from Western Catholic Europe would arrive at the aid of Constantinople and
prevent the state from falling to the Ottoman Turks. Two years before the ascension of Sultan Mehmed II, the emperor John had died of natural causes at the age of fifty-five after hearing the disastrous news of Hunyadi’s defeat at the Second Battle of Kosovo. The late emperor was succeeded by his younger brother, Despot Constantine of Morea who took up the purple in a simple ceremony at his provincial capital of Mystras. The Byzantine royal had been a much-celebrated war hero after his military campaigns in the Morea, Boeotia, and Thessaly and was seen as an ideal choice in
succeeding his late brother’s throne. However, it was now he who was reduced to begging for passage to his throne in Constantinople on a Catalan ship. By the time the now-proclaimed Constantine XI arrived at the Roman capital, the Byzantine world had been shrunk down to the capital itself and its suburbs, a few islands in the Aegean, and the isolated province of the Morea. Even though it seemed like the world was rapidly closing on him, the new ‘Autocrat of the Romans,’ unlike his quarrelsome brothers in the Morea, had been resolute in the face of Ottoman aggression. According
to Byzantine and Western sources, he was a straightforward and charismatic man who inspired loyalty to the people around him. Constantine was also a skilled administrator who was highly active in the daily tasks of running a state and, above anything else, incredibly loyal and patriotic to his country. However, the forty-seven-year-old had been unlucky in his private life, having been childless since the conclusion of two marriages. Although he made repeated attempts to forge new dynastic marriages with foreign powers, all had failed to bear fruit. The surprising death of Sultan Murad II in 1451 was widely celebrated across
Western Europe, for he had been seen as a competent Muslim leader who had dealt multiple significant defeats against the forces of Christendom during his reign in power. However, with the ascension of his untested son, many in the halls of the Vatican thought it was now the ideal time to strike against the weakened Turks with another round of crusades. Unfortunately for the Papacy, any hopes of another major crusade in the size and scope of the Varna campaign were severely slashed, as many of Edirne’s immediate neighbors were exhausted from the bloody wars of the last decade. As
a result, many European powers were now eager to secure a steady peace with Mehmed. By the fall of 1451, Venice had renewed peace with the young sultan, while Hungary, under John Hunyadi, agreed on a three-year truce in hostilities. In the following months, Genoa, Rhodes, Wallachia, Bosnia, and Trebizond were similarly able to secure guarantees of peace with Edirne, as many believed that the new sultan was now under the thumb of his peace-orientated grand vizier. Lastly, to further secure peace in the Balkans, the young sultan returned her much-trusted stepmother, Mara Brankovic, back to her homeland of Serbia
after spending the last fifteen years in the imperial Ottoman haram. She was now tasked with maintaining the neutrality of her father’s realm while also keeping an eye on Buda’s influence in the country. As a lulling peace settled on the broader region, Ibrahim II Bey of the Karamanid Beylik misread Mehmed's intentions for weakness and started conducting raids into Ottoman territories in Western Anatolia during the fall of 1451. Being faced with his first real test since coming back to power, the young sultan personally led his armies against the forces of Konya in a short but victorious campaign.
Once again, Ottoman specialization in gunpowder weapons proved superior to the classic Turcoman usage of unorganized Ghazi warriors and light cavalry. However, the destruction of the Karamanid Beylik was, for now, to be delayed as fears of a potential Mamluk military intervention to save their allies in Konya loomed over. As a result, only the border towns of Akşehir and Beyşehir were transferred back to Ottoman authorities during the following peace negotiations. Mehmed’s first military campaign had resulted in an overwhelming victory. In addition to conquering his first lands, the young sultan also took advantage of the sudden war by
putting loyal men in positions of power within the ranks of the elite Janissary military corp. A determined Mehmed still remembered the Jannisary rebellion that led to his deposition back in 1446, and he also knew that he needed the elite corp on his side for the eventual confrontation against the Byzantines. So as a result, over 7,000 recruits were added to the ranks of the Kapıkulu, along with dozens of loyal military officers and governors being stationed in high places of power. As the swift Karamanid campaign came to a close, tensions between Edirne and Constantinople had begun to
sour. According to traditional Ottoman sources, Constantine XI had sent a series of belligerent letters to the young sultan, demanding double the annual tribute for Orhan Celebi, and without such payment, he would be forced to release him from captivity in Constantinople. The Roman emperor’s implication was understood clearly by the Ottoman court. If Mehmed failed to pay the tribute, a fellow claimant to the throne would be at large to instigate a new civil war. While the imperial court at Edirne exploded into mad fury, the young sultan received the hostile letters with a poker face as he gained
a pretext for war against Constantinople. According to him, “the Red Apple,” that was the Roman capital was now ripe for the taking. By the spring of 1452, the construction of a new waterfront fortress across from the old fortress of Anadoluhisarı began in earnest. The young sultan not only wished to blockade the narrowest point on the Bosporus of maritime traffic from the Black Sea but also to secure a significant crossing hub for his armies in the Balkans and Anatolia safe from the prying ships of the Italian merchant republics. In only four-and-a-half months, the construction of the
Rumelihisarı, or ‘Rumelian Castle,’ was completed, thus further cutting off the Roman capital from the rest of the world. Overnight, vital grain supplies from the Black Sea were cut off from the Roman capital, causing a major panic within the city. To make matters even worse, later that same fall, the fortress first saw action when three Venetian ships refused to stop for inspection by local Turkish authorities, resulting in the bombardment and sinking of the fleet’s flagship and the demise of its entire crew. The construction of the Rumelihisarı sent the imperial court in Constantinople into a fury as
the fortress was built on Byzantine territory without the consultation of the Emperor. Petitions regarding the legality of the fortress were sent to Edirne, but only the bloodied heads of Roman diplomats were received by the imperial court in return. With a major war seeming to be looming around the corner, Constantine began his correspondence with the Western powers of Europe for military assistance at once. The emperor had been a staunch supporter of the union of the churches implemented back during the Council of Ferrara-Florence as it was a means to secure Byzantium’s military and economic survival with Western
assistance. However, with the three failed crusades of the 1440s and a loss in general appetite to make war with Edirne, the Eastern Romans were now left with limited options in order to stave off Mehmed’s eventual siege of their capital. Venice received Byzantium's pleas with deaf ears as they had recently signed a renewed peace with Edirne the previous year and did not want to provoke a new costly war that could harm its possessions in the Aegean. In spite of this, the merchant republic did allow Constantine to recruit troops from its colony island of Crete as a
compromise. Also, like their arch-rivals, Genoa also turned a blind eye to Constantine's pleas but did allow for local governors in their colonies of Chios and Galata to take independent actions with the Ottomans and Byzantines for their survival. Messages were also sent to Hungary and Aragon, offering both countries the remaining Roman territories of Lemnos, Messembria, and Selymbria in exchange for military help against Mehmed, but neither Kingdom offered Constantinople a response. Lastly and perhaps the most practical of all the pleas, the emperor contacted his two brothers in the Morea, despots Thomas and Demetrios, for immediate military assistance.
However, such hopes of assistance were dashed as Mehmed got wind of the appeal and ordered his trusted general, Turahan Bey, to invade the Morea during the fall of 1452. In a short campaign, the local region was ravaged, making it impossible for either Palaiologi brother to send troops to aid the Roman capital. With Turkish navies now blockading the Dardanelles and Bosphorus straits and no substantial help coming from the West, East Rome entered the winter of 1452-1453 in a state of doom and gloom. The ongoing blockades severely depleted the capital’s grain reserves, while snow storms and torrential
downpours of the winter season demoralized the citizens of the city. The already unpopular pro-unionist Constantine was now openly jeered at in public by his own citizens for the misfortunes of the Roman state. However, being true to his resolute character, the emperor went into action by preparing for the upcoming Ottoman siege even if all odds were against him. Throughout the winter, the neglected sections of the land and sea walls of the city were repaired and fortified, the main ditch in front of the sea walls was cleared out, and new weapons were forged and distributed to the
city's garrison. In an indicator showcasing the desperation of the Eastern Romans, such a large-scale operation was funded by the scavenging of precious metals from the rooftops of abandoned buildings, gathering of stones from old gravestones, and donations from the church. As Constantinople prepared for war, good news in the form of unexpected Western assistance had finally arrived. Hearing of the true desperation faced by the Romans, two Genoese galleons had broken through the Ottoman blockade and arrived at the capital in January. Loaded with ample military equipment, 400 heavily armored troops from Genoa, and 300 troops from the Aegean,
they were led by the charismatic Giovanni Giustiniani Longo, a Genoese nobleman and mercenary commander from the island of Chios. Being a self-proclaimed expert in siege warfare, Constantine appointed Giustiniani as the leader of the city's land defenses and with the imperial rank of ‘Protostrator.’ The emperor also promised him the island of Lemnos if the Ottoman siege were to be repelled. In the coming weeks, the defenders were reinforced by smaller contingents numbering around 200-300 men from Aragon, Castile and Naples. However, all of these military developments were to be overshadowed by the surprise departure of 700 anxious Venetian
and Cretan soldiers and sailors who had previously sworn to help defend the city but now thought their odds for survival were slim in the siege to come. Although the event was a major setback in morale for the defenders, Giustiniani’s efforts to prepare the defenses of Constantinople continued on with haste. During the background of all these Roman preparations, Mehmed had also spent the winter preparing for the upcoming siege. He had called for the mobilization of his household troops and provincial armies all across his realm for the following spring, in addition to repairing all roads and bridges
surrounding his capital. The latter preparation was to be vital in the transportation of the new bombard constructed by a Hungarian cannon founder and engineer named Orban. The renegade mercenary had first offered his services to Constantine back at the start of 1452, but after seeing that the Roman emperor lacked the funds needed for the creation of his cannons, he then offered his services to an already eager Edirne. He claimed to Mehmed himself that his largest cannon, dubbed “Basilica,” could blast ‘the walls of Babylon itself.’ While Orban and other Turkish engineers worked tirelessly on casting dozens of
cannons during the winter season, the first salvo in the war to come was fired when Ottoman troops under Karaca Bey crossed into Byzantine Thrace in February of 1453. In only a matter of weeks, the last remaining Roman settlements in the region were seized, and their fortifications dismantled. With the road to Constantinople being cleared open, Mehmed paraded out of Edirne in great pomp in late March at the head of a great host. According to the sultan, it was now time to fulfill not only his dream of conquering New Rome but also the dream of every Islamic
state since the original siege of the city back in the eighth century. A day after Orthodox Easter was celebrated within Constantinople, the first Ottoman troops began making camp only five miles from the walls of the city itself. The siege of Constantinople had just begun. Mehmed was now in command of the largest army assembled in his nation's history, consisting of 60,000 to 100,000 troops. He divided his land forces into four major sections. The sultan and his Kapıkulu soldiers were encamped on the advantageous terrain in front of the gates of St. Romanus and Charisius, enabling Turkish cannons
to fire down at the Theodosian Walls from a high elevation. Ishak Pasha’s army of Anatolia stood to Mehmed’s right, stretching down to the Sea of Marmara, while Karaca Pasha’s army of Rumelia stood to his left, stretching up to the Golden Horn. In front of the Ottoman host was a line of newly constructed trenches, earth ramparts, and siege works positioned 250 yards away from the city's walls. The last portion of the land army was led by Mehmed’s second vizier, Zağanos Pasha, stationed on the heights behind the neutral Genoese colony of Galata north of the Golden Horn.
Lastly, blockading Constantinople from the sea was a Turkish fleet of around 110 galleys and other light ships under the command of Admiral Baltaoğlu Süleyman. As the numerous Ottoman army took up their positions for the upcoming siege, the outnumbered defenders of Constantinople looked on in horror. They were now faced with the difficult task of defending over 20 kilometers of defenses with only 7,000 to 8,000 men. Luckily for the defenders, the defenses in question were the mighty three-layered Theodosian Walls that had stopped and destroyed many armies in past sieges of the capital. Mustering 2,000 of his best
native troops, Constantine took up positions at the Mesoteichion or 'Middle Wall' while Giustiniani and his foreign troops were stationed at the Charisius Gate to his north. The rest of the 5.5-kilometre land walls and its fortified towers were manned by various contingents of Byzantine, Venetian, and Genoese troops, numbering an additional 1,000-2,000 troops. Meanwhile, the southern sea walls on the Marmara coast were more lightly defended than the land walls, garrisoned by just over 1,000 troops comprised of Byzantine, Turkish, Catalans, and Papal soldiers. Similarly, the northern sea walls by the Golden Horn were guarded by Venetian and Genoese
sailors, totaling only a few hundred men and an allied fleet of 26 ships. Protecting the allied fleet and the northern harbors of the city was a massive chain spanning across the Golden Horn into the Genoese colony of Galata. Moreover, around 1,000 Roman troops were held in reserve, led by the emperor's 'megas doux' and chief minister Lucas Notaras, who was stationed in the Petra quarter of the capital. Finally, Nicephorus Palaiologos was stationed in the ancient ruins of the Church of the Holy Apostles. Following the Islamic tradition of offering terms of surrender to the besieged party in
exchange for their protection, Mehmed sent a final message to the emperor under a flag of truce. However, remaining true to his character, the resolute and firm Constantine rejected the sultan's terms as he was determined to defend his capital to the last soldier. As the war of letters and petitions neared its end, the war of gunpowder and blood began with a grand Ottoman bombardment on the Theodosian Walls on the dusk of April 6th. The next five days saw Turkish artillery crews testing their newly constructed cannons for the first time while Serbian sappers underground started digging tunnels
toward the city's defenses. Concurrently, Turkish engineers commenced their efforts to fill the moat in front of the Mesoteichion, yet frequent sorties by Lord Giustiniani's Genoese troops impeded any significant progress. Meanwhile, at sea, Baltaoğlu's fleet launched naval operations by surrounding Constantinople and capturing the Princes' Islands south of the capital. On April 12th, Orban’s heavy cannons, including the massive Basilica cannon, arrived on the battlefield after an arduous march from Edirne. Shooting colossal payloads ranging from 200 to 1500 pounds, these new war machines began blasting the ancient fortifications of the Roman capital in full force, specifically the Mesoteichion
and Blachernae land walls. Eyewitnesses spoke of the monstrous sounds and clouds of black smoke emitted by the enormous cannons, with one account claiming that the quakes from the guns could be felt from the Asian shores of the Bosphorus. However, despite their initial psychological impact on the defenders, operating such cannons proved to be difficult as the issue of overheating and cracking within the guns became an apparent problem to Turkish artillery crews. According to Christian sources, Orban allegedly met his doom when one of his creations overheated and blew up after being fired. All of this meant that
cannons like the Basilica itself could only be fired a few times a day, giving the defenders ample time to rebuild their defenses between each bombardment. In any case, after six days of repeated cannon fire, Sultan Mehmed concluded that the damage to the Mesoteichion was now sufficient for a significant frontal assault. On the night of April 18th, infantry contingents were sent to breach a collapsed section of the wall near the St. Romanus Gate while the navy attempted to break through the chain on the Golden Horn. However, what was thought to be an optimistic operation on the
land walls turned into a bloody affair as a bitter melee began raging within the moat in front of the collapsed wall section. The heavily armored Genoese under Giustiniani had reinforced the sector earlier in the day, enabling the defenders to successfully hold a strategic narrow chokepoint against the incoming Ottoman assault. With the Turkish infantry unable to leverage their vastly superior numbers and facing Roman arrows and javelins from the wall, the battle in the moat quickly descended into a savage bloodbath. After four gruesome hours and hundreds of casualties, the sultan called off the assault on the Mesoteichion.
The Theodosian Walls had once again repelled another invading army at their gates. Meanwhile, the naval assault on the chain also failed, as the crews of shorter Turkish galleys couldn't scale the taller carracks of the Allied fleet. The dual frontal assaults of April 18th resulted in significant humiliation for Mehmed, but the worst was yet to come. Weeks prior to the siege, three Genoese merchant ships provisioned with food, men, and weapons had been dispatched by the pope to aid Constantinople. By the first week of April, the fleet had arrived in Chios, where they were joined by a
Byzantine grain vessel, and two weeks later, they had entered the Dardanelles Strait. Fortunately for Mehmed, his scouts in Gallipoli had informed him about the fleet's whereabouts a week before they arrived at the Roman capital, providing ample time for Baltaoğlu Süleyman to prepare his ships to intercept them. With Constantinople on the brink of famine, it was crucial for the Ottoman war effort that no reinforcements reach the city. By April 20th, the Christian fleet appeared on the horizon of the city, causing jubilation among the defenders on the walls. However, the journey to dock safely in the Golden
Horn was to be challenged as Baltaoğlu and his fleet awaited in front of the chain. Late in the evening, the two sides clashed east of the walls of the Acropolis, observed by many spectators from the city and the sultan himself from the Galata shore. Despite a significant numerical advantage, the Turkish fleet struggled to penetrate the enemy vessels with arrows and cannon fire due to the height difference between their galleys and the Christian carracks. Unable to sink his foes, Baltaoğlu then ordered his ships to board and capture the enemy fleet, but like two days earlier, the
taller carracks proved too daunting for Ottoman sailors and infantry to scale. By sunset, the southern winds from the Marmara had picked up, propelling the Christian carracks forward for their final dash to the Golden Horn. Pushing past the smaller Turkish galleys around them, the fleet successfully crossed the chain before nightfall, to the astonishment of the defenders. With the morale of the defenders of Constantinople rising after the arrival of vital manpower and supplies, Mehmed went into a full rage, dismissing Baltaoğlu Süleyman from his post and appointing Hamza Bey to his position. To make things worse, it was
also during this period that rumors of potential invasion from Hungary by John Hunyadi had circulated the Ottoman camp, giving credence to the warnings of the Grand Vizier from before the siege. With Constantine now sending out terms of peace from an elevated position of barging power, the sultan sought the advice of his imperial council, but after long debates and discussions, it was decided that the siege was to be continued as too much was already on the line. It was thought that a failure to capture the Roman capital now could lead to a Janissary rebellion or, much
worse, another crusade from the West in the future. As a result, Byzantine demands for peace were rejected. Motivated to take action, Mehmed now came to the conclusion that he had to secure the Golden Horn in order to divert the resources and manpower of the defenders from the western land walls to the northern sea wall. However, realizing he couldn’t breach the chain itself, the sultan decided to transport his fleet, stationed at the Double Columns, across the forested terrain behind the colony of Galata into the Golden Horn. Supervised by Zaganos Pasha, a secret road made of wooden
tracks was constructed while cannon fire from the main army and above the Genoese colony masked the noise of such a massive engineering project. Additionally, cannons began firing from the northern shore of the Golden Horn to prevent the Allied fleet from venturing beyond the chain following their naval successes from the previous week. Throughout the late night of April 21st, thousands of wooden greaser rollers, soldiers, and hundreds of oxen dragged dozens of ships over four kilometers under cover of darkness. By the next morning, the defenders on the northern sea walls awoke to shock and horror, witnessing Turkish
ships freely sailing in the Golden Horn under the protection of cannon fire from the opposing shoreline. The entire military operation was Sultan Mehmed’s strategic and psychological masterstroke, causing Constantinople to erupt in massive panic, leading to the reserves of Lucas Notaras now rushing to reinforce the northern sea wall. In the following days, plans to eliminate the Turkish fleet in the Golden Horn were discussed by the emperor’s war council. After many discussions, the plan of Venetian galley captain Giacomo Coco gained support, which was to burn the enemy ships with ‘Greek fire,’ the same substance that had devastated
the Arab fleet during the siege of 717-718. After many delays, on the night of April 28th, five vessels loaded with Greek fire began sailing slowly under the cover of night towards the Turkish fleet in total silence. Everything seemed to be going according to plan until a last-second full-speed dash by Coco himself alerted Ottoman forces in the area, leading to cannon fire raining upon the ambushing Christian ships. In the night bombardment, all five ships were either sunk or captured, resulting in numerous casualties for the defenders, including the death of the Venetian captain. In an act demonstrating
the heightened brutality of the siege, the surviving crew of the ambushed ships were impaled in front of the land walls the next morning, followed by the execution of 250 Turkish prisoners on Constantine’s orders. The days after the failed ambush saw a renewed Ottoman focus on bombarding both the gates of St. Romanus and Charisius, in addition to the northern sea walls and the bogged-down fleet at the Neorion and Proshopian harbors. It was during this dire period that Constantine’s war council began advising him to escape discreetly to the Morea for his own safety but to no avail.
Instead, the Byzantine emperor doubled down on his war effort by beginning to melt down church metals to mint new coinage for his mercenaries and native troops after a series of defections on the land walls. The action couldn't have come soon enough. On the night of May 7th, Mehmed ordered a second frontal assault near a collapsed section of wall by the Gate of St. Romanus, but the inspiring leadership of Giustiniani saved the day, and the Ottoman attack was repelled. On May 12th, another frontal attack was ordered, this time on the Blachernae walls, which saw Ottoman troops
climb and breach the city walls for the first time. Only a hasty counterattack led by the emperor himself repelled the attackers. With his assaults on the land walls failing, Mehmed now turned to his Serbian sappers to undermine the defenses of Constantinople. Back in April, the sappers had tried digging tunnels toward the Mesoteichion, but due to the uneven terrain of the area, they were forced to abandon their operations in favor of targeting the Kaligaria Gate on the Blachernae walls. By mid-May, the sappers had finally reached the walls, but due to the anti-mining tactics of John Grant,
such operations were hindered. The resourceful Scottish mercenary used barrels filled with water to observe ripples, helping him identify the movements of the sappers below, upon which either stink gas or Greek fire was funneled into an opening in the ground. By the third week of May, both sides had been exhausted after more than fifty days since the start of the siege. On the defenders’ side, only half of the original strength of the city's garrison remained, while there was still no sign of promised reinforcements from the West. In reality, a fleet from Venice had been on its
way to reinforce the capital, but constant delays had forced it to only reach the Aegean by the end of May. To make matters worse, the citizens of Constantinople woke up on May 28th to thick fog and illuminating flaming lights coming off the dome of the great Hagia Sophia church, which was interpreted as the Virgin Mary, abandoning the city and its defenders. Meanwhile, the mood on the attackers' side had been even worse. The multiple failed frontal assaults of the last few weeks had severely demoralized the Ottoman army, with some beginning to believe the Roman capital was
unconquerable. Supplying the grand Turkish host with daily amounts of food and water for over fifty days had also begun to strain Ottoman logistics and funds, even though the entire sultanate’s resources were concentrated on the siege. With tensions already heightened, another offer of surrender was rejected by the emperor on May 26th, leading Mehmed to call for a war council. During the meeting, the grand vizier once again pushed for lifting the siege as fears of a Hungarian invasion rose when an emissary from Buda arrived at the sultan’s tent the previous week and openly threatened war if the
siege was not lifted. However, following a series of motivating speeches by Zaganos Pasha and Sheikh Akshamsaddin, the sultan decided to launch one final grand assault on the Roman capital. Either he would conquer Constantinople, or he would see his army crumble in front of its walls. On May 27th, the Theodosian Walls were again bombarded in full force, while final inspections were carried out by Mehmed himself, culminating in him giving a final motivating speech to his troops. Likewise, the defenders also prepared for the upcoming assault by repairing their defenses on the land walls, holding a mass in
the Hagia Sophia, and parading religious icons throughout the streets of the capital. The Romans and their allies had overcome more than fifty grueling days of besiegement and over 5,000 cannon shots to their defenses, but now everything came down to the final battle. The Ottoman army had spent the entirety of May 28th devoted to atonement and prayer before taking their positions for the nighttime assault. Sometime near midnight, the sounds of cannon fire were replaced by loud religious chants and music from the Turkish mehter band. Watching from the land walls in horror, Constantine and Giustiniani witnessed a
sea of bright flames spanning from the Marmara to the Golden Horn. By 1:30 a.m., the first wave, made up of light infantry in the form of 'azabs' and 'bashi-bozuks,' was underway, concentrating on the Blachernae walls, the Mesoteichion, and the Third Military Gate to the south. At the same time, the fleet under Hamza Bey began scaling operations all along the southern sea walls but faced great difficulties caused by the wild currents of the Marmara. Concurrently, the fleet in the Golden Horn, along with pontoon bridges built by the army of Galata, also began scaling operations on the
northern sea walls and faced much opposition. After two hours of bloody combat, the first wave on the land walls was called off in favor of the second wave made up of the better-trained provincial army of Anatolia. But by 5:30 a.m., this wave had also been repelled, giving way to the third and final wave composed of the sultan’s elite Kapıkulu troops, mostly consisting of Janissaries. Yet, as the exhausted Roman and Italian forces of Constantine and Giustiniani prepared to make a frantic stand at the Mesoteichion, disastrous news elsewhere began trickling down to the emperor. After repelling Karaca
Pasha’s army of Rumelia from the Blachernae walls, the Italian defenders of the Kerkoporta Gate had sallied out against the attackers but forgot to lock the gate behind them after their incursion. In only a matter of time, a group of fifty Ottoman soldiers spotted the open gate. Before long, they overwhelmed the local defenders in the sector and captured the imperial palace. Meanwhile, another disaster awaited the defenders as the vigi lant protector of the city, Lord Giustiniani, had been severely wounded, hit by an arrow in his leg and a stray lead bullet in his chest while defending
the St. Romanus Gate. While he was being stretchered off the battlefield, a giant janissary named “Hasan of Ulubat” and his thirty companions managed to scale and hoist the first Ottoman standards atop the ancient walls before succumbing to arrow fire. With their foes invigorated and their heroic leader now gone from the front lines, panic erupted among the defenders. To make matters worse, Ottoman forces from the north had begun to flank around and unlock the gates of Charisius and Fifth Military Gates. Elsewhere, the Plateia Gate was breached by the Galata army in the north, while Hamza Bey’s
sailors began clearing the southern sea walls of local Turkish, Catalan, and Papal defenders. As more and more attackers poured through the walls, the defenders of the Mesoteichion buckled under immense pressure and began frantically retreating to the safety of the Neorion and Proshopian harbors. While Turkish troops now indulged themselves in looting, a few hundred defenders and citizens fled onboard the allied fleet, which broke through the chain and began sailing to the Aegean. Back at the walls, Constantine XI tried to organize a last stand, but to no avail. According to myths, the emperor accepted his fate and
gave a final speech to his retinue: "God forbid that I should live as an Emperor without an Empire. As my city falls, I will fall with it. Whosoever wishes to escape, let him save himself if he can, and whoever is ready to face death, let him follow me." Flinging off his imperial insignia and drawing out his sword, the Roman emperor charged headfirst into a group of nearby Janissaries, never to be seen again. By 7:00 a.m., all resistance had collapsed, and Turkish troops had reached as far as the Augustaion and the Hagia Sophia, pillaging, killing, and
enslaving their way through the main Mese road. After fifty-three grueling days, the Siege of Constantinople came to a bloody close. Although Mehmed previously promised his army three full days of sacking, he decided to rescind his order on May 30th, wishing to reduce the harm already done to the city, which he aimed to turn into his new capital. Entering from the Charisius Gate with his entourage, the sultan inspected and toured the ancient sites of the city before making immediate plans to convert the Hagia Sophia into a grand mosque and repopulate the former Roman capital. Having achieved
his childhood dream and the ambition of various Islamic powers throughout the centuries, Mehmed then declared himself "Kayser-i Rûm," the new Caesar of Rome. According to him, for all intents and purposes, his newly proclaimed empire was the official continuation of the Roman Empire, a legacy dating back to the days of Augustus Caesar and Constantine the Great. Seizing an opportunity to eliminate a political rival during such a high moment, Mehmed began his rule in Constantinople by executing his grand vizier on dubious allegations of bribery. The most senior surviving Byzantine official, Chief Minister Lucas Notaras, was also executed,
and his wealth was seized. In only 150 years, the members of the House of Osman had established a small independent state on the fringes of Anatolia and became one of the foremost powers of their era. With the Middle Ages coming to an end alongside the Roman Empire, a new ‘golden age’ awaited Mehmed II and his successors as conquests lay on the horizon for the newly established Ottoman Empire. In only 150 years, the members of the House of Osman had established a small independent state on the fringes of Anatolia and became one of the foremost powers
of their era. With the Middle Ages coming to an end alongside the Roman Empire, a new ‘golden age’ awaited Mehmed II and his successors as conquests lay on the horizon for the newly established Ottoman Empire. In our next season on the history of the Ottomans, we will explore said ‘golden age,’ so make sure you are subscribed and have pressed the bell button. Please consider liking, subscribing, commenting, and sharing - it helps immensely. Recently, we have started releasing weekly patron and YouTube member exclusive content, consider joining their ranks via the link in the description or button
under the video to watch these weekly videos, learn about our schedule, get early access to our videos, access our private discord, and much more. This is the Kings and Generals channel, and we will catch you on the next one.
Related Videos
19:59
What Happened After the Fall of Constantin...
Kings and Generals
260,203 views

4:36:23
Rise of Augustus - Post Caesar Rome
Kings and Generals
1,141,096 views
7:21:27
The Life of Emperor Justinian - Vol 1-9 - ...
Flash Point History
819,139 views

4:19:28
Napoleon - Path to Power (All Parts)
Epic History
473,890 views

3:34:00
Hundred Years' War - Full Story, Every Bat...
Kings and Generals
5,629,826 views

6:38:28
The Complete Bronze Age Greek World // Arc...
History Time
485,669 views

3:22:55
50 Best of Bach
HALIDONMUSIC
4,230,621 views

1:53:12
Early Muslim Expansion - Khalid, Yarmouk, ...
Kings and Generals
8,009,359 views

2:14:39
15 Most Listened To Classical Masterpieces...
Classic Room
432,245 views

3:11:18
Richard Wolff: Trump, Hitler, and the End ...
Robinson Erhardt
2,571,109 views
3:01:11
Napoleon's Marshals, Ranked (All Parts)
Epic History
1,624,151 views

5:09:30
The Complete Story Of WW2 In 5 Hours
All Out Warfare
552,672 views

6:45:42
19. The Mongols - Terror of the Steppe
Fall of Civilizations
888,269 views

3:52:07
The Best of Baroque Music
HALIDONMUSIC
10,006,425 views
2:14:47
The Last Great Roman General? Belisarius a...
Epic History
7,996,666 views
2:10:53
History of the Ukrainians: From Kyivan Rus...
Kings and Generals
585,655 views

4:12:51
American Revolution 1775-1783 - All Battle...
Kings and Generals
688,658 views
1:30:43
The History of the Ottoman Empire (All Par...
Knowledgia
8,777,349 views

4:48:16
Dark Age Superpower: Empire of the Franks ...
Empire-Builders
260,983 views

3:04:19
Alexander of Macedon - Conquest of Persia ...
Kings and Generals
3,909,970 views