Make $13K /MONTH by Creating FACELESS KIDS EDUCATIONAL ANIMATION Using Canva
1.24M views4308 WordsCopy TextShare

Virtual Money
Discover the secrets to crafting captivating faceless kids' animation cartoons using FREE AI tools a...
Video Transcript:
in the past 30 days this educational kids channel made anywhere from $800 to $13,000, by posting faceless animated videos about various topics. for example, the video about naming fruits has over 43 million views. so in this video, I'll show you how you can easily, and for completely free, create animated faceless videos using my best method yet.
and just so you know, this can be applied to any single Niche. so the first thing you need to do is get video your ideas, you can go about doing this in two different ways. so the first way would be simply coming up with the ideas yourself, if you have that creative mind and you could think of stuff, great job, do that, but, if not, don't worry, because the second way you can go about getting video ideas is by coming on over to chat gpt.
now once on chat gPT, you're going to ask it for this prompt, give me 20 simple video ideas, for a niche educational faceless Channel. and over here all you want to do is insert your Niche, so we would simply replace this with kids, and hit enter. and as you can see, it has gone ahead and given us 20 wonderful ideas.
now once you have your video ideas, the second thing you need to do is come up with the video scripts. now you can go about doing this in two different ways. now the first way would be, coming on over to a Google doc and writing a script yourself.
if you can do that go ahead to do that, now if you can't come up with your own scripts, the second way you can go about getting your script is by using once again chat gpt. now once on chat GPT, you want to ask it for this prompt, “write me a short script for an educational YouTube video titled, and then you're going to insert the title of your video, and then, it says the video should, and then over here what you want to do is talk about, what your video would be about, what you wanted to include, the flow of your video, and then the target audience is, and then you simply insert your target audience. so in my case, this is how I would fill this house, write me a short script for an educational YouTube video titled, name the fruits that would be the title of my video, the video should and here I said include basic fruits, naming them, and how to spell them, and then that's target audience is kids, that's how simple it is to use this prompt, then hit enter.
and now as you can see chat gpt has gone ahead and given me a great script that I could use for my video. so whether you decide to use the chat GPT script, create your own script, or edit this script to fit your needs better, once you have your script it's time to move on to the next step now for the sake of this tutorial, to make it very easy and digestible, I've gone ahead and created my own script, and as you can see it's very simple and to the point again, so now the next thing you need to do is create the characters for your animation. now in order to do this, we're going to be using canva, find the link for canva in the description below.
now once on canva, what you want to do is come on over to this section, and then simply do a search for YouTube video, and then hit enter. and then once you've done that, you're going to click this one which says create a blank YouTube video. and now it's going to take you to this scene where we can begin creating the characters, and I swear to you this part is super easy but it's also super fun, cuz you get to be really creative.
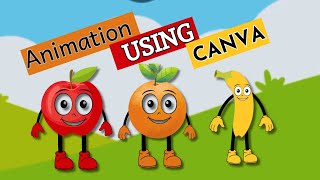
so now our video is about fruits, I have three fruits a apple orange and an orange. so the first thing I would need to do is get these elements. now in order to do this, I would come over to this section where it says elements, now once on elements I can go ahead and search for the fruits I want.
so the first one is a apple, so I do a search for apple. and then click onto where it says graphics, and then you could scroll through all these options and choose whichever apple that you prefer so I'm going to go ahead and just choose the first one that I see. so my other elements were the apple and pear, so I'll do the same exact process to get all my characters.
so now as you can see I have all three of my characters, great job, but, this isn't really giving anything special, it just looks like three fruits. instead we need to actually try to bring them alive a little make them look like actual characters. so in order to do this we need to give them some body parts, so what you'd want to do ensuring that you are in the elements once again, you're going to go ahead and do a search for cartoon feet, and then hit enter.
once you've done that click over where it says graphics, and now as you can see there's many different feet that we could choose from. so the one I recommend you use is this one, and once you've clicked onto it, you can now position it and adjust it onto your fruit character. and now as you can see, it's in front of the apple we don't want that, so in order to put it behind the apple, you want to right click onto it click layer, and then just simply click Send backwards.
and now we need to give it some arms, so in the search box, we're just going to search the same thing but arms, so cartoon arms, hit enter. so as you can see there's many arms to choose from, so scroll through this and choose the one that you would like. and then once you have it in you simply need to adjust it onto your character, and once again it's at the front we don't want that, so we're going to right click, layer, send backward, it's coming together great.
so we need to give him another arm, in order to do this you click onto this one, right click, duplicate. now we have two arms, but, it's a little bit sideways, don't worry that's an easy fix, simply click flip, horizontal, and then there you go. we can now adjust it, and then send it behind, and look at this the apple is already looking way better.
and now the last thing we need to do is give him a face, in order to do this we're going to come to elements, and then do a search for cotton face, click graphics, and then as you can see there's lots of different faces to choose from, so you just scroll through this and then choose the one you like. and once you find the one you like you simply click onto it, and then you just adjust it to fit onto your character. and there we have it guys doesn't he look so cute I think he looks adorable, and that's how easy it is to create your character.
and then there is one last thing you need to do to him as you can see his legs are both facing opposite directions you want them to face the same direction, and that'll come in handy when we're going to animate him, so just trust me, I've never said you guys wrong. so in order to do this the first thing we need to do is get it to be one leg, so You' want to click on this, click where it says crop, and then simply just crop it to be one leg. now we need to give him a second leg, in order to do this, you're going to right click onto the same leg, and then you're going to click duplicate, and then now as you can see he has two legs, you want to bend it a little so they don't look too weird, and then you're going to right click again, and then you're going to send it to the back.
so now as you can see, our first character is done, and now you need to do the same thing for all your other characters, but don't worry, you do not have to go and do this whole process and find all these things again, unless you want to you can simply duplicate it, what I mean by that is this. you're going to go ahead and highlight our entire apple, and then, you're going to copy it, and then you're going to paste it. as you can see we have two of him, and then you're going to put him over your second character, then you're going to click out of it, then now you're going to click onto the apple and delete him and now as you can see we're mostly done with our orange, all you need to do now is Click onto the orange, click where it says layer, and then click bring forward, and then you want to keep bringing it Forward, till it's in front of all the legs.
and there you go was that simple so from here all You' want to do is maybe just adjust the sizing of the character, so it's not too big or not too small readjust different aspects of it, and now just like that within 5 seconds later, I had my second character done, so this is the process you want to do for all of your characters. and now as you can see I have all three of my characters done, so now I can go ahead to further edit them, to be the perfect characters that I would want in my educational video. and now once you have your characters done, it's time to download them.
in order to download them, you want to click onto where it says, share and then you're going to click download, and then you don't want to download it as an mp4, so you're going to click onto this, and then you're going to scroll up and click PNG, and then you're going to go ahead to hit download. and now it's time to move on to the next step. so now the next thing you need to do is animate them, you're going to bring these characters to life but don’t wory because the method I'm going to show you guys requires no skills, whatsoever and it's literally done by a few clicks of a button.
so in order to bring them to life, we're going to be using this tool called animated drawings, I'm going to leave a link for it in the description. now once animated drawings it's going to take you to this page, and on this page over here where it says upload photo, you want to upload the photo of the characters that we just downloaded from canva. from here, you want to click next, and then it's going to take you to this page where you now need to select one character.
so we're going to just adjust these lines, and select our apple, and then hit next. and then once you've done this, as you can see, it's going to take you to this page where it's now outlined our apple. now you need to make sure that your entire character is actually outlined like this, if there's a piece of the background in you can click the erase button, and then you can erase it, now we don't want to erase this so let's undo, or if there's a piece of it that's not in the lines, you can click on the draw button and then you can simply add it in by coloring like this, and then once that part is done you need to click next, and then from here you need to adjust the main points on your character it mostly gets this well, but if it's a little bit off, then you simply put your mouse on the circle and as you can see here where it says right eye, you put it on the right eye, so you just adjust it properly according to what it's supposed to be.
now once you've done that it's time for the magic, all you need to do is Click next. voila look at this our animation is done, look at him just running across the screen, and now here's a great thing about this tool, we only had to do this once to generate him once, and then on this side under here where it says add animatio,n there's around 30 different animations you can let him do, which would be more than enough for you to create an entire animation with practically any movement could think of. and in order to change the animation it's as simple as just clicking on the one that you want, and now as you can see here he goes, and look at his legs, this is the reason why I said you wanted his legs to be facing the same direction, because if it wasn't if his legs was facing the opposite way, he would be walking with his legs open, so that's why I told you guys to do that step earlier.
and then from here you would go back to your script, and then figure out the different movements that you need your character to do, find it, and then download it in order to download it it's very simple, all you need to do is simply increase the size like this, and click the 3 dots here and click the download button. now go back and forth from your scripts, and animated drawings and just gather up all the different movements that you think you would need for your video. and then once you've downloaded all the moves for your first character, you need to go ahead to do this process for all of your characters, it's very simple to do, it doesn't take you long and it's completely free.
now once you have all your characters and their movements downloaded, it's time to move on to the next step. The Next Step would be getting the voice for your video, in order to generate the voices we're going to be using 11 Labs, you can find the link for 11 labs in the description of this video. but once on 11 Labs, you want to ensure that you are in the speech synthesis, the first thing you need to do is select the voice you want.
in order to do this, you're simply going to click on the drop down arrow, scroll through all the different voices listen to them, and then just click on the one you want to use, so for as case I'm going to be using Gigi just because I love how she sounds. now once you have the voice selected if you want you can adjust the voice settings, you only do this if you want it's not necessary, and then once your voice is ready you need to now add in the script of your animation. so I'm going to go ahead and copy the first section which is what the apple is going to be saying, I'm going to come back over to 11 labs ,and paste it in and then once you have imported your script, you want to go ahead to edit it with the correct punctuation, so that your character can say it in the way you want it to be said.
after you've done that all you need to do is hit generate. as you can see it's done, let's just take a look at what this sounds like. once you've done that you need to download your audio, in order to download it, you simply come to this icon, click download, and just like that it's downloaded.
so now you'll go ahead to do the same thing for your entire script, and if you have different characters or if you want to use different voices, then for each new part of your script you simply change the voice and then generate it. and now once you have all your voices downloaded, congratulations because now there's only one step left. in order to do the final step you need to come back over to canva in the same section where you generated the characters because what you're going to do now, is put everything together to generate your amazing animation so the first thing you would need to do is Click onto where it says uploads, and upload all the files that you just downloaded onto canva, so that will be the voiceovers, and then the animations.
click over here where it says to add a page, so you can have a blank page to start. from so from here the first thing you need to do is get a background for your animation, so in order to do this you'd want to come on over to elements and go to the search bar, and then search for the type of background you would want. so in my case I'll simply search for kids background, and then click onto where it says graphics, and then from here there's many backgrounds to choose from, so just scroll through and select the one that you like.
and then from here you can adjust it to fit your scene better, then once you have your background added in, feel free to adjust it even further to bring it more to life. by that I mean going to where it says edit photo, clicking adjust, and then adjusting the settings, so now that you have the background, you can now begin generating the actual scene. in order to do this you want to First add in your character, so you're going to come on over to uploads ,and then go to videos, and then select the animation that you want then you're simply going to click onto it, and then you simply adjust the sizing of what you want it to be in your animation.
now as you can see we can't just use it like this it has this white background, so we need to get rid of it, in order to get rid of it you simply want to click onto where it says edit video, and then click background remover, and canva automatically removes the background for us. once you have your video on your scene, you can now go ahead to further crop it, and edit it to better fit the background. so now this is what we're working with, and then from here what you want to do is take a look at your script, and figure out what your character is saying, what they're doing, and then you want to crop and adjust your animation accordingly to that.
and now as you can see, we're mostly done with the first scene, but from here you need to make it more visually appealing, in order to do this, you'd want to add in the text of what your character is actually saying. so in order to add in the text, you want to click onto where it says text, click onto add a heading, simply expand the sizing of this, go back over to your scripts, copy your scripts, come back over to canva ,delete this, paste it in. and then once it's in you want to go ahead to further adjust it to better fit your scene you could adjust the text font the sizing the color that affects the animation you do it however you feel like looks best.
and now voila this is what we're working with so far, so now the next thing you need to do is adding the audio that your character is saying, so you're going to go to uploads, click audio, and then, and showing that your playhead is where you want the audio to start, you're going to then simply click on your audio, and now just like that it's going to be added in. and then once you have your audio added in, you want to listen to it and see where the audio for that particular scene stops, so in my case it ends that about here, so once you get to that point you need to split the audio so that you can have the second part, in order to split it, you simply want to right click onto the play head where you wanted to, click split audio, so now let's separate this, and now we can see what this looks like so far. and that's pretty much your first scene done, now in order to generate your second scene it's literally following quite the same process, it's actually even easier in order to do it what you want to do is Click onto these three dots, and then click duplicate page.
now you have the page for your second scene already mostly done, from here what you want to do is Click onto the orange, cuz you don't need the same movement, click onto your character and then delete this movement if you no longer need it. then I'm going to now add in the New Movement for my second scene. so I'm going to go on to uploads, go to videos, and then click the second movement that I needed for my video, now that it's added in I need to follow the similar process to remove the background, now once the background is removed I need to now adjust the sizing, and the positioning of the orange, so that it's in the same spot that it was in at the ending of the previous animation.
so as you can see now it's in the same positioning, so what I need to do now is change the text, to what the second scene says, I'm simply going to go back to my script, copy what it's saying, come back over to canva, double click on the text that's right here, delete it, and then pasting the new one. and as you can see it's already nicely done and formatted for us. so then what I need to do now, is take my audio, drag it down to where I want it to start, and then once you have your audio in, you want to do the same thing you want to listen to it, and then you want to go ahead to split it where that part ends, so now you have two separated audios, and then that's how easy it is, you go ahead and continue doing the same process for all of your different scenes and for each of your different characters.
and set it up in such a way where it's engaging where it's following through until you've done your entire video. now as you can see, I've added in all my different characters and all my different text, once you're done that you're not done yet, because the last thing you need to do to truly make this a great video, is to add in some background music. now in order to find some good background music, we're going to be using the side that I like to use called pixabay, once on pixabay all you need to do is search for the type of music you want, and then over here be sure you select me music, and then as you can see it's giv me options, so what you want to do is scroll through this find one that you like, and once you find one that you like in order to download it, all you need to do is Click download, once you've done that you're going to head on back over to canva, and upload that music that you just downloaded.
and now once it's been added in, and showing that our play head is at the side of our video, we can simply click onto it, once your audio is added in you need to adjust the volume because you don't want it to be too loud, so click onto your audio, and then you click this, and then you adjust the audio of it. and then once you've done this, you can edit your video even further you can edit your audio add in sound effects you could do anything else you want be as creative as you wish, but once you're done you need to download your video, in order to download it, you want to click where it says share, then you're going to click download, and then you're going to leave MP4, and then all you're going to do from here is Click download, and then you can go ahead and post it to your YouTube channel. now lets see what it looks like.
and that's it, if you love similar content like this, take a look at my other videos. and if you like it, please smash the like button, and make sure you subscribe to the channel and hit the notification bell, if you have further questions, feel free to comment down below.
Related Videos

18:15
How I Created a $10,000/month Faceless You...
All About Money
1,298,143 views
8:37
Make $500/Day by Creating Kids Learning An...
Pixel Silhouettes
609,317 views

34:11
Create Faceless Kids ANIMATION YouTube Edu...
Odetta Rockhead-Kerr
624,355 views

11:13
Make $500/Day Creating Faceless Kids Anima...
Virtual Money
9,361 views

7:09
How to Create Animated Videos using Canva ...
Digital Canva Mastery
570,632 views

12:39
Make $5,780 /MONTH Creating Faceless YouTu...
Virtual Money
4,305 views
18:57
Earn $750 A Day Posting Kids Nursery Rhyme...
Odetta Rockhead-Kerr
130,557 views

18:38
Monetized On YouTube In ONLY 10 Days
Learn With Trey
138,545 views

19:58
How to Sell CANVA TEMPLATES | Step by Step...
Kate Hayes
2,002,336 views

32:15
Create Ai Animated Story Videos That Actua...
King Charles Tv
263,168 views

25:01
DHS Sec. Noem speaks outside Dem governor'...
Fox News
237,600 views

9:03
How much Youtube paid me for 1 million vie...
Joel Creates
69,492 views
18:03
Make MONEY EVERY MONTH by Creating FACELES...
Everyday With Kay
145,136 views

16:51
How to Create Full Animated Stories Using ...
Emmanuel Crown
232,147 views

15:30
How to Make Kids 3D - Animated Stories Vid...
Tiny Scouts
41,059 views

9:55
This AI Tool Creates 30-Minute Videos from...
TutStick
65,035 views

8:04
I used AI to copy this Channel that makes ...
Earnings Blueprint
135,545 views

13:55
Create Stunning 3D Animation Videos Using ...
AI Playground
85,802 views
19:19
How To Create Animation Videos Using Canva...
Diary Influencer
306,906 views

19:09
Make $575 A Day Using The Bible! Easy Copy...
Journey With The Hintons
486,681 views