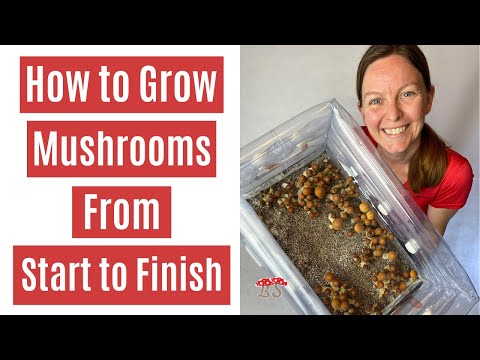
How to Grow Mushrooms from Start to Finish in a Monotub
3.32M views2463 WordsCopy TextShare
Boomer Shroomer
In this video I show you how to grow mushrooms from start to finish in a monotub.
Check out my new...
Video Transcript:
hi Ashley here and today i'm going to show you how to grow mushrooms from start to finish a mushroom starts as a spore spores are microscopic in size but contain the genetic outline of each fruiting body a mature mushroom can contain billions of spores one spore is half the coat to make up its complete genetic makeup when two spores are well suited for each other they will come together to create compatible hyphae called mycelium mycelium relies on different types of substrate like different types of grain vermiculite coco coir and gypsum for nourishment to help it
grow and fruit you can germinate a spore a few different ways one way is to inoculate a bag with a spore syringe this is by far the easiest way to germinate a spore but there are some downsides one issue is sometimes the spore syringe is contaminated before you even start so by testing the spore syringe on agar or looking at it under a microscope you can see if the spore syringe is contamination free or not sometimes you don't have agar or a microscope in order to look for contamination so at that point you just have
to go with it and hope that they're clean to start it's best to be in front of a laminar flow hood or in a sterile air box if you don't have one turn off your ac and your furnace and use your bathroom first we need to prepare our spawn bag look over the spawn bag for any damages holes or contamination then spray and wipe down the syringe and the bag with 70 isopropyl next we want to give the bag a quick mix because we do need to let in a little bit of fresh air so
the spores can germinate then wipe down the black injection port with an alcohol pad now let's prepare the syringe first open the needle and then the syringe and carefully screw on the needle to the syringe if the needle is new then it is pre-stale and ready to use then give the syringe a thorough shake i also like to squirt a few droplets out of the end before i start and then carefully insert the needle into the black injection port and inject three to five cc's of solution throughout the spa bag and then cover the black
injection port with a piece of micropore tape when inoculating a spawn bag by spore syringe spore germination is not always guaranteed two germinated spores need to come together in order to create mycelium so if they can't find each other nothing will ever germinate make sure that the solution stays partially intact so the germinated spores can create mycelium but i do like to give the bags a slight mix after i inoculate them if your syringe is used you will need to flame the needle for 30 seconds then you can inject the needle directly into the black
injection port injecting three to five cc's of solution in your spawn bag then after seven to ten days your spores will germinate and create mycelium and start to colonize the bag a spawn bag will usually colonize in about 15 to 30 days this bag took more than 60 days to colonize in order to shorten your colonization time it's best practice to mix the bag when it's about 10 to 30 percent colonized this will normally cut your colonization time in half after the bag is about 10 to 30 percent colonized break up and mix the mycelium
throughout the bag trying to distribute the mycelium evenly then wait 10 to 15 days until the spawn bag is fully colonized after the bag is fully colonized now it's time to make our mono tub first you will need a 66 quart sterilite tub with a clear lid next we need to drill ten one inch holes around the tub i like to place mine four inches from the bottom on the long side and two inches from the top on the short side then carefully drill the holes in the mono tub next we need to make our
liner it's really important to use a liner in order to reduce side pinning first measure the liner to 24 inches by 19 inches then make a two inch fold on each side making a very strong crease now let's make the corners fold the corners into the center then crease the middle and bring in the two sides making a crisp edge and then tape to hold in place then repeat these steps three more times or you can purchase one of my inflatable mono tubs that has 10 pre-made holes and a built-in liner after your bag is
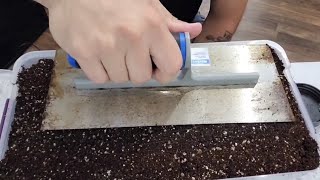
fully colonized it's time to make the bulk substrate i like to make my bulk substrate the day before i'm going to use it to make bulk substrate you will need 500 grams of vermiculite 500 grams of coco coir and 100 grams of gypsum then add all three ingredients into a five gallon bucket boil 16 cups of water then pour the water over the substrate in the bucket and close the lid then i like to wrap a towel around the bucket because i think this helps aid the pasteurization process then after 24 hours your bulk substrate
will be cool and ready to use don't use your bulk substrate when it's too hot it will kill the mycelium now it's time to add our bulk substrate and our colonized spawn into our mono tub first you want to spray and wipe down the mono tub the liner and the red plugs with 70 isopropyl then plug all the holes with the red plugs for the colonization stage you can also use tape and then place the liner at the bottom from now on i'm going to use my inflatable mono tub to show you how to colonize
and fruit your mushrooms but if you're using a hard tub it works exactly the same way the only thing that you need to do different is add a liner next spray and wipe down your fully colonized spawn bag with 70 isopropyl then gently break up the spawn bag into small little pieces so that you can put it into your mono tub then cut open the spawn bag and take a quick smell of it make sure that the mycelium smells super earthy if there's anything foul in there that is not good now let's put our bulk
substrate and our spawn into our mono tub first dump all the spawn into the mono tub i am using a three pound spawn bag then hand mix your bulk substrate and put about half of the recipe into the mono tub then mix your bulk and your spawn together finally lightly flatten to mold to the bottom of the mono tub trying to squeeze out all the air around the edges but don't pack too hard because the mycelium needs to breathe then add a final half inch layer of bulk substrate on top covering all of the spawn
and pack down evenly and neatly then close the lid and plug all the holes with the red filters you can plug the holes in the beginning i just forgot to do this in the video next wait for the tub to fully colonize you don't need to do anything during this time now we need to watch the tub daily to see how fast it's colonizing when the tub is about 80 colonized it's time to start the fruiting stage next we need to remove the red plugs and replace with our foam filters you can also use polyfill
micro post filters or micro pose tape for the inflatable mono tub i really like to use the foam filters i think they work super well i also like that they're easily removable now we want to start fanning our mushrooms this is a very delicate process we want to bring down the humidity and the temperature so the mycelium knows it's time to start fruiting by introducing fresh air this is the first indicator telling the mycelium that it needs to start pinning you want to fan your tub around 30 seconds twice a day make sure you wash
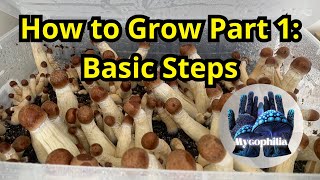
your hands and you're as sterile as possible when you're opening the lid to the tub there should be quite a bit of condensation on the side and basically when we're fanning we're just fanning out the carbon dioxide that's sitting at the bottom and we're just displacing it so the mycelium can breathe then over the next five to ten days you're going to start to see your mushrooms start to fruit and you'll just want to fan your mushrooms twice a day displacing the carbon dioxide sitting at the bottom then once the mushrooms start to break their
veil that's when we want to harvest and here's a side view of the inflatable these genetics were provided by mycotrophic now it's time to harvest our mushrooms carefully twist the mushroom from the substrate or cut the bottom trying to preserve the substrate as much as you can so we can get ready for our second flush then place your freshly harvested mushrooms directly into the dehydrator if you don't have a dehydrator you can set the mushrooms on a paper towel with a small fan then stack up your dehydrator trays and put them on the dehydrator then
set the dehydrator for 125 degrees fahrenheit and dehydrate for 8 to 10 hours make sure the mushrooms are completely dry before you store them once your mushrooms are completely dry store them in a mason jar in a cool dark place also add a dry pack to the jar to make sure to get all the moisture the ones that have indicator beads are super nice now let's prepare for the second flush i am using a hairdresser bottle which gives me a finer mist lightly mist the sides and fan the mono tub for 30 seconds never miss
the mycelium directly to prevent bruising if the tub has a lot of condensation only fan the tub and don't mist only miss the tub if the sides are dry then every day keep fanning and misting your tub as needed and your mushrooms will start to fruit in about 5-10 days now we need to harvest our second flush i waited a little longer after they broke their bale this time for them to sporulate in order to take a few spore prints i'm also going to take a live culture this is so we can preserve our genetics
as well as continue to grow generations of mushrooms i'm going to put most of these mushrooms directly into the dehydrator but leave a few fresh ones out in order to make a spore print and a live culture before we start making our spore prints we need to spray and wipe down our spore chamber with 70 isopropyl next lay out a few pieces of aluminum foil then take a freshly harvested mushroom that just broke its veil and twist or cut off the cap of the mushroom and then place the mushroom cap gills down on the foil
next wait 24 hours for the spores to drop then carefully remove the cap with a knife or a toothpick and then let the spore prints sit for a few hours and dry out finally wrap up your spore print and another piece of aluminum foil and then put into a plastic bag then store your spore prints in a cool dark place like your sock drawer now let's put our spore print to acar first open up your spore print and then with a sterile blade or loop scrape a few specks of spores onto the loop and then
carefully place them onto the agar then wrap your petri dish with parafilm then after about five to seven days your spores will start to germinate and colonize the agar finally store your petri dishes in a tote at room temperature i keep my house about 70 degrees fahrenheit all year long now let's take a live culture take a freshly harvested mushroom and split the mushroom down the middle then carefully cut a piece of tissue from the inside of the mushroom and place the live culture tissue in the center of the agar and then wrap the dish
with parafilm then after about three to five days the live culture will start to colonize the dish and now we can transfer our fully colonized agar dish to our spawn bag now let's inoculate our spawn bag with agar first make sure to spray and wipe down the bag with 70 isopropyl then cut open the top of the spawn bag and give it a quick mix next with a sterile blade cut a few chunks of agar and then drop them into the spawn bag then try to mix the agar chunks down into the bag finally reseal
the bag with a sealer you can also zip tie the top or you can fold over the top and tape it then wait for your bag to fully colonize and now it's time to start the process all over again we need to make our bulk substrate and now we're ready to put our spawn bag into our mono tub next we can prepare our mono tub for the colonization stage then mix up our bulk substrate next break up our spawn bag then add your fully colonized spawn bag into your mono tub add half of the bulk
substrate in there mix it up well and then add a half inch layer of bulk on top of everything covering the spawn then after your monotube is fully colonized your mushrooms will start to fruit in the next seven to ten days and that's how you grow mushrooms from start to finish there are a lot of additional resources on youtube through text or other social medias so make sure to explore them all also please feel free to check out my free mushroom guide that shows you step by step how to grow mushrooms thank you guys so
much for watching and if you have any additional questions please feel free to put them in the comments or you can reach out to me on instagram or through email bye always ensure a sterile environment by disinfecting your equipment and surfaces it's important to be as sterile as possible because it's easy to get contamination so it's crucial to minimize risk
Related Videos

5:23
How to Make a Monotub **UPDATED**
Boomer Shroomer
124,927 views

8:01
EASIEST Way to Grow Mushrooms - Broke Boi Tek
PhillyGoldenTeacher
1,348,006 views

22:30
Potassium Metal From Bananas!
Cody'sLab
6,290,746 views

18:02
How to Grow Mushrooms UPDATED
Boomer Shroomer
64,102 views

11:03
The “heroic dose” of psychedelics, accordi...
Big Think
7,903,618 views

22:41
How to Build a Monotub | Step-by-Step DIY ...
North Spore
168,852 views

40:32
How Much Can You Make Growing Mushrooms?!
UpFlip
607,351 views
34:22
How to Grow Mushrooms in a Monotub
Boomer Shroomer
451,872 views

11:39
Max Yield Bins - Setting up Your Mushroom ...
MAX YIELD INC.
1,014,935 views
12:06
How To Grow Mushrooms in a Bucket
GrowVeg
941,908 views

34:47
Adam Eats An Entire Mushroom Chocolate Bar...
Psyched Substance
7,694,002 views
43:48
How to grow mushrooms at home - Full proce...
Just Alex
1,970,657 views

13:12
How to Make Liquid Culture | Liquid Cultur...
Boomer Shroomer
409,068 views

21:27
Golden Teacher Mushrooms: What Are They? �...
DoubleBlind
586,707 views

23:02
AZ MYCOCAST - 20 - ازمایکوکست - گلدن تیچر
AZMYCO
4,420 views
11:35
How To Grow Mushrooms At Home in 2024: The...
Mycophilia
83,925 views

15:29
Uncle Ben's Tek: Inexpensive Way to Grow M...
EazyBlueThumb
130,003 views

1:06:16
Mycology Lab 101: Agar Work, Cloning, Spor...
Fungaia
109,317 views

10:55
How To Grow Mushrooms The EASY Way (No Ste...
Fast Gardening Michigan
467,239 views
13:55
How to grow mushrooms at home: Shoebox Tek
Stipe & Cap Mushroom CO
33,397 views