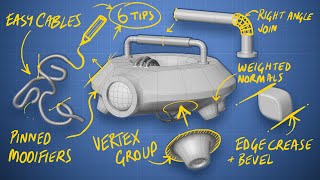
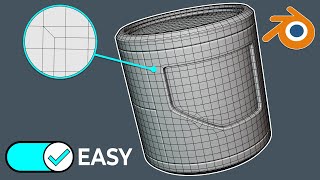
5 Blender Hard Surface Modeling Tips That Saved Me 1000 Hours
92.73k views7810 WordsCopy TextShare
JL Mussi
#sponsored #blender3d #3dmodeling
👉The first 500 people to use my link will get a 1 month free tr...
Video Transcript:
ever run into that tricky hard surface modeling shape and blender that you just cannot get right regardless of how many hours you spent working on it topology pinching modifiers it could all be overwhelming challenges of hard surface modeling but don't worry I got your back in this video I'm breaking down five Pro level hard surface modeling tips and blender that will help you create the most complex hard surface shapes quickly and without frustration I'm bringing the heat with these tips because they're super hot fire boom bam bop bada bop boom pow what's going on you
3D modeling Beast this is JL mcy I'm a professional 3D artist with well over a decade of experience I've created educational content for companies like Autodesk and my 3D software reviews have been featured in PC Mac but trust me my 3D models weren't always at Professional Standards I've struggled for years trying to learn the right workflows these are the tips that I wish somebody has shown me sooner when I started saving me thousands of hours of pain and frustration and make sure you watch all the way to the end because the last tip is a
game changer teaching you how to create one of the most tricky hard surface shapes with ease this first workflow is a life saver if you have multiple duplicated objects throughout your scene that are transformed in local space in one want the ability to update all them from a Master Copy set in World space number five posed instances for example this character here has these belt loops and these belt loops as you see they're pretty much duplicated across this character and they all have their local orientations now if I wanted to update one of these I
would have to go in here do my modeling changes then I would have to duplicate these and rotate each one one of them into place and really just hope that change that I made was the last change right so for every change that I wanted since these are not dynamically linked this process would have to be recreated and this would be a total nightmare and this applies to really any modeling task if you're setting up a scene in an environment or maybe if you had a robot with a bunch of bolts that are all need
to be the same and posed throughout a hard surface character this is the same exact problem that you're going to bang your head into the other problem here is that this is set to local space so for example if your art director decided to change these belt loops for this character maybe you had multiple wardrobes here combinations of these belt loops and he gave you some new concept art that was pretty much front back side orthographics it might be a lot easier to model this on world spacing and then have it reflect here on this
posed or local transforms what's the workflow posed instances so let's go ahead and actually hide these belt loops and we're just going to focus pretty much on these pants so we'll isolate them let's create this master copy that are going to control all of the other belt loops so for that we need to get a split view going so I'll drag one out we'll isolate here again and then for this we could actually jump here I'll get a q scale this down elongate it something like this and I'm just going to model a simple belt
loop here something that I'll do that's very important before you start creating your instances is you want to go ahead apply uh your transforms so what I want to do here is just place this right here on the origin so for that uh we'll get our 3D cursor and then I'll do selection to 3D cursor then I'll just want to apply my transforms so I'll do apply all transforms and these are all zeroed out now we're ready to begin creating these instances and I just shut the gizmos off here so let's create our first clone
we're going to do alt D and then just offset this clone and what is a instance some people call them clones but at the end of the day is pretty much the same thing uh we're going to be able to control this piece with this piece now the caveat to this at the object level nothing happen so if I were to scale this you see hey what's going on there's no changes but everything happens at component level so now if we go in here select all these verts and scale them you see that it applies
to our instance so the beauty about this inherently is that if you needed to have different scales if you wanted to have this one larger you could and have an independent scale from your master copy but the actual shape changes would be the same right so it's pretty flexible now here we don't need uh separate scales but that is a nice flexibility of instances in most 3D packages now we want to create a couple of these so I'll do alt D and create another instance here like so and I'll create one more of these here
and for this example I think I'll only use three the next order of business is going to be to place these where the old Loops were all right so I went through and placed each of these instances where they need to go also renamed my control here belt loop control you can name it Master you can name it parent whatever you want just so you know which one is the one that's going to control everything if we take a look at this let's go ahead and hide this little pop out menu here by hitting n
we'll notice that they're all rotated into place so if we look at our belt loops here that are place the first thing that we'll notice is that they're a little bit too thin we'll have to dive into edit mode here to be able to pass along those changes remember in object mode this is not going to work so now if I I scale these in the X you see they're becoming the right width the other thing that I probably want to do is maybe push these in a little bit to give it a little bit
more of a desirable shape so now select this Loop and I'll simply uh push in a little bit just to give it a nice little taper here and you see that it's being updated so that gives it a nice little feel so this looks good and all but what if your art director came at you at midnight and said hey J we're going with a new Direction here on these pants we want to have some trendy belt loops here they have a hole in it right now we have to do some modeling work and let's
just say they gave you blueprints for these right so let's just pretend we have a blueprint be very easy to line it up here in a orthographic View and we're just pretending here but I'll go ahead and just add a hole right in the middle right so now what I'm going to do is add more 3D modeling detail I'll inser this and then I'll right click here do Loop tools we'll do a circle this looks good I'll delete this these faces and now you see all those changes are passed down again to all our duplicates
these do look a little bit funny since we don't have any thickness so instead of modeling the thickness here why don't we leverage the strength of blender and its modifiers to be able to control this thickness on the Fly maybe this character has multiple belts with multiple thicknesses and we're better off having individual control of this instead of having to worry about modeling this detail so I'm going to add a solidify modifier here and you see that this gives me good control of how thick I want this so this looks pretty good by default the
modifiers are not passed down to the instances so we'll have to actually link them with a two-step process so the first thing we'll have to do is actually give the modifiers from here to our instances so I'll select all my instances select the modifier that we're basically sourcing I'll do control L this is going to allow me to link transfer data and we're going to do copy modifiers now you see that each single instance now has that modifier now the next step here is if we go back to our control copy play with the thickness
here you see that our clones are not updating while this copy the modifier is a St copy so now we have to make a connection this is very simple I'll go here to the thickness on my control copy I'll right click and I will do copy as new driver now I'll go to each one of these instances and in the thickness I'll right click and I'll do paste driver you'll see this purple color coding indicating that this connection is now alive so if I go in here and I adjust the thickness of this you see
that it's passed down to my instances now simply have to paste the driver in all of my instances and that's pretty much it now I'm able to go in here and not only control any of this model's uh details here by using the instances that we have created but we could also control this modifier because we made that connection via the driver and if we wanted to we could even give this subd modifiers just to give it a smooth look match the rest of the character and that's how you create posed instances in blender you're
doing great with each new workflow you learn you're becoming better 3D artist I'm always improving my own hard surface modeling by learning new skills from other skilled artists that's why I'm excited to share today's sponsor skillshare skillshare is the largest online community for creatives offering thousands of classes across hard surface modeling environment art 3d characters and more whether you starting out or looking to refine your skills skill shares learning paths will guide you from beginner to Pro right now I'm taking zbrush hard surf for sculpting for all levels by Sean Fowler to push my skills
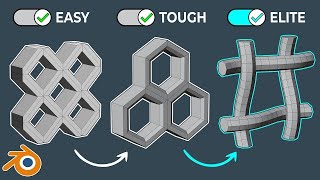
further you can start your own Learning Journey too the first 500 people to use my link below get a one month free trial of skillshare that's a whole month of unlimited access to classes by industry Pros just click the link in the description below and start mastering your 3D modeling skills today using symmetry in hard surface modeling in blender with workflows like the mirror modifier can dramatically speed up your workflow but it's too bad it's not possible with more complex setups that require radial symmetry actually it is tip number four is radial symmetry radial symmetry
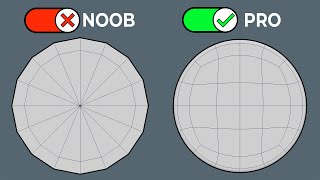
is great for creating hard surface assets like car rims gun parts like this example or any hard surface asset that repeats itself in a radio fashion the great thing about this workflow is that we can think of this as a 3D modeling pie and we only have to concentrate our 3D modeling efforts on a small slice of it and let radial symmetry do the rest of the work there are four main steps to getting this setup right and the first one is figuring out how many lines of symmetry do you have what's a line of
symmetry well how many times does this pattern repeat itself so if I count off the tops here we have 1 2 3 4 5 6 this pattern has six lines of symmetry if you had a five- spoked car rim then you would have five lines of symmetry so I want to start with A Primitive that's evenly divisible by six when you're working with radial symmetry you want to make sure that your cursor here is right the middle and so is your object's origin so we'll do shift a we'll get a mesh and we'll get a
circle in here I want to get something that's 60 that's going to be evenly divisible by six I'm going to hit RX 90 and then just scale this up and I'm basically just matching pretty much the uh perimeter of this or the radius of this with this radius here this looks good the next thing that I'll do is actually enable this in my perspective there we go it was just isolated I'll hit tab to go to edit mode and then I'll hit F to fill this with this face selected I'll hit I and we're going
to Simply inser this I'm going to inser this all the way down to roughly match our reference image here and we could actually delete this face in the middle the next step is to create one slice of this I'm going to bring up my calculator here even though it's not really necessary for this example I'll show you the math behind it so I chose a starting value that's evenly divisible by six so 60 ided by 6 that gives us 10 faces per slice so I'm going to select 10 but the reality is we only need
to model half of that one slice and that's because we're going to use a mirror modifier so that way we can concentrate our efforts on only half of this and have the mirror modifier do the extra bit of work so now we only need to select five as we're only going to be working on half of that one slice with that I'll do control I that's going to invert my selection X and then delete my faces and there we go that's half of our slice now we'll drop a mirror modifier and now we see that
what we do to one/ half of this slice is going to be reflected over that's exactly what you want the next order of business is to figure out how many degrees of rotation you need well again uh blender can do calculations within its parameters but I'll show it to you here in the calculator 360 divided by your symmetry lines which is six it's going to give us 60 so this slice is going to have to be rotated 60° that leads us to our final step which is the setup for this setup we're going to need
two things we're going to need a empty and we're going to need an array modifier so I'll get the empty first shift a empty we'll do plain axes it's going to drop there in the middle and now we'll select our slice here we'll add another modifier and this is going to be the array by default this is going to be off because we actually don't need the relative offset so we'll shut that off we'll use a object offset here we'll pick this empty here and you see that it's off in L land well why is
that well that's cuz of our transforms again so what we'll do is we'll hit control a we'll apply all our transforms and there we go it cleared that out and now if we start playing with the count here nothing's happening that's because we don't have any rotation so when we start inputting our rotations you see this starts to work and remember we already figured out that number so it's going to be rotations in the Y and I didn't constrain the axes here that's why I'm getting some added rotation values but I'll put 60 here and
you see now that this is working properly so we'll go back to the array and we'll get our count to the right number which is six and this is pretty much it as long as we work here on half of this slice you'll see that all these uh details are actually reflected here now one thing to keep in mind is you want to respect this uh boundary Edge as much as possible something you can do is you can tap G twice and slide your components along here and that way you're not getting into any trouble
by pulling off this surface what I'll do from this point is show you a little bit of the modeling process so you'll see how fast your shapes can take form with this setup I'll do from this point is show you a little bit of the modeling process so you'll see how fast your shapes can take form with this setup what can I say you're on a roll you made it to about the halfway point of this video just for hanging out with me today I have a free gift for you I put my years of
professional experience into creating the hard surface cheat sheets a 3D modeling guide that will Kickstart your hard surface modeling download it for free using the pin comment down below ever come across a shape with lots of repeating details that is supposed to be merged to a less dense part of your model it can be a pain to try to match the two different densities of meshes especially if you're trying to get clean results well not with this next tip tip number three is pattern match merge this rifle grip is a perfect example for this workflow
we have a couple of potential issues that this workflow really alleviates we essentially have this grip pattern that has a lot of details going into this much less denser part so the first thing that you'll see me do even before I get to the nitty-gritty of creating that initial detail is I'm actually shrink wrapping this via shrink wrap modifier this little bit of a base onto the main shape that it's going to be merged to the last thing that you want to do is create this pattern and when you go to merge it you have
some inconsistencies now I know that this base is going to be aligning with the bigger shape that ultimately it's going to merge onto the second thing that I want to do is use those instances in this case it's going to be an array modifier to create a pattern that's flexible so now I can flesh out this shape and pretty much align it to where this pattern is going to fit so once I have my pattern finalized I can then pose it back into place and tackle the next step in this part of the workflow we're
trying to match up the two densities right we have a very detailed part that's naturally going to require more density and then we have this larger part that doesn't have as many details but in order for a subd workflow these densities are going to have to match up a little bit closer so what what I need to do is treat this larger part and add more subdivisions to match before I do my merge the key here is that we're going to have to actually reinforce some of these edges first select all the edges that need
to be hardened or reinforced and set those edges to a mean crease of one that's going to allow us to hold up our shape once we introduce our added divisions so on this base MH we could add a subdivision modifier and actually bake it in now this is going to get our divisions a lot closer to each other now we can simply join both of these pieces and start welding these verts so after a little bit of manual cleanup and matching up those edges we were able to take this pattern create it separately and then
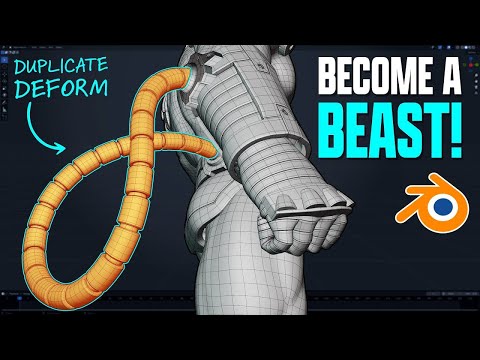
merge it onto this larger shape for a subd workflow and get ultimately clean topology we're down to the last two tips and they just keep getting better from here the next one will change the game on how you create hard surface cables and BL tip number two is duplicating the form this is a great workflow for creating hard surface cables like this and to pack as much value as humanly possible in this video I'm actually going to show you two bonus tips that pertain to this specific example one is going to be able to actually
reverse engineer a curve right in the middle of a cable like this why would you need that a lot of times you get models that you ultimately have these cables for but no curve curve to controls especially if that modeler deleted the history and those curves this will allow you to do to take a cable like this that you don't have a curve create a curve and then link that curve back to the object and have something that you can rig and control that curve once more the second tip that I'll be showing you is
using the curve warp modifier which is essentially what we'll use to create this final object but use it in a posed position a lot of the tutorials out there that I've seen use the curve warp but everything's lined up in the world and everything lines up perfectly when you're posing and having these curves kind of in the middle of your scene there's specific settings that you'll need to have your object and also your curve warp modifier when trying to get the curve warp to work with a curve that's off in 3D space let's get started
the first thing that I'll do is isolate this curve and what we're going to do is dive into edit mode we can kill the subd modifier essentially what we want to do is just pull off a strip of um topology here to create the bases of the curve however the problem here is that this strip right here assuming we didn't have a curve in the middle uh it's not in the middle of the object so that's going to be the first task that we need to do I'll go ahead and actually separate this first so
I'll hit p and I'll do by selection and now these are separate objects so I can go ahead and delete my original mesh and be left with this alone now we want to simplify this uh object because eventually it's going to become an edge that's going to become a curve in edit mode I'll select one vert and then I'll hit a select all my verts and now I can hit M and do a merge by distance essentially slide this up I'm going to crank this up just a little bit more and now we have a
perfect Edge flow here that's going to allow us to do the next step I'm going to bring everything back because I'm using basically this Middle Point here and this Middle Point here to gauge how close I'm in the middle of essentially this shape and we have this old construction curve I'm just going to hide this that way we don't get confused so now again we'll dive into edit mode one vert hit a for all and now we're going to do alt s is going to allow us to push and pull along the normals here and
now you see that this is lining up pretty much in the middle here and the middle here so now if I do controlr to add a Loop cut double click you see that this is pretty much in the middle here that's exactly what we wanted and if we wanted to fine-tune this again I could also just select all this again and do alt s and just push and pull along the normals just a little bit more and it gets us that little bit closer to the middle of these two caps I think this looks pretty
good now again I'll hit p and then I'll separate by selection and at this point now we could delete this strip and now we're left with this Edge this Edge is going to be converted to a curve so I'll right click convert to curve make sure that you're on object mode now we have a curve next step is to change the way this curve is being interpolated for that we need to dive into edit mode and make sure everything's selected we'll go down to set spline type and then we'll do a nerves curve and now
this is a smooth curve if you leave this faceted then when you do the final step you're going to get a fasted result with your object here being deformed now one thing you might notice is that we lost a little bit of volume here when this became a nerves curve if we go to wireframe here something we can do is uh working with nerves curves if we just select both of these uh verts here or these points and then we do a subdivide you see that it gets us a little bit closer so if we
wanted a little bit more continuity here if we just divided that a couple times times uh we get a little bit closer to kind of our cap and then uh ultimately we can just take these points here just kind of move them into place and there we adjusted the curve now if for some reason um your curve has too many points depending on what uh geometry you pulled it from blender does have an add-on that will allow you to essentially rebuild or simplify the curve under edit preferences and if you search for curve you have
the simplified curves add-on this ships will blender so just enable that and if you want to simplify just make sure that you're actually in edit mode you can rightclick you can curve simplify and now if you play with this error here you see that um we're losing quite a bit of volume here I actually like the curve that I originally had but this is an option if your curve is a little too dense and you want to basically simplify next thing we'll do is build our pattern so I'll isolate this curve I'll do shift a
mesh we'll get a cylinder in here we'll keep this pretty simple we'll drop this down to eight scale this down quite a bit I'm pretty much eyeballing the scale of this object with that scale of the curve but at the end of the day it doesn't matter since we're going to be using modifier stack all this is going to be pretty non constructive anyways and the height will be adjusted repeatable pattern here we need to inser both of these at the same time so this works properly and then here I'm simply going to extrude push
out in the Z here just a little bit and this is going to get deleted and so is this and now we have pretty much this shell that's going to lend itself well for our repeatable pattern we'll do a couple of bevels here just to shape this a little bit better I'll just do a bevel with contrl b and then here uh now that we have these faces selected we could just convert this we'll go to select loops and then select boundary Loop and now it basically took that face Loop and converted it to a
edge if you're a my user this is the same thing as Edge perimeter so this looks good now we need to do a bevel here with two divisions and make sure that this is since this is a holding Edge we just want the shape of one that way if you ever need to go back and delete these bevels it's a non-destructive workflow and remember if you're doing bevels and things are a little bit wacky uh just make sure that you apply your transforms here I don't have any scales I do have scales but they're all
even but uh if you had uneven scales this would kind of bleed into your bevels so always remember uh when doing bevels especially if they look a little bit funky I'll do control R here this is going to be bent along a curve so we need a couple more divisions I'll set this to three I think this will will work pretty good here all we need now we'll go to object mode we'll apply a modifier and we'll drop the array this needs to go into Z so we'll zero out the X put it a one
in the Z lo and behold we have a pattern hip hip array terrible joke but great result as this is working as it should put this to 25 and then we could always increase this uh once we drop it into the curve right now it is feeling a little bit big compared to that curve so I'll scale this down just a little bit I think we're ready to drop this the other thing that I want to do is since these uh verts are not merged we could always add weld modifier and this is going to
weld our verts and then we'll also add a subdivision modifier but we could just do control 2 for that right click here shade smooth and disable it here in edit mode and that's why I always like to just add my subd modifier and it will kind of expose any weaknesses and here we forgot to count for the edge Loop here within our base pattern so we'll just find that original one and all we'll have to do is go in here and just add a loop here and then also a loop here uh and that's going
to be actually at the bottom of this like this and now this looks pretty good all right so let's go ahead and deform this we'll need to add a curve deformer for this this needs to go above the subd we'll simply select our curve object now a little bit of a warning here uh if we look at our curve and I had to find the origin here but I can tell you right now this is not going to work why because our curve origin is off here in la la land it's off in space so
that's not going to work but the object itself it's fine we just have a scale here that's not going to affect anything and it was created here within the origin so that's ultimately where you want to create that repeatable pattern but to get this to work properly we need to have the curves origin within the world origin so I'm going to run it like this and you're going to see how it's messed up and then we'll troubleshoot it we'll select our object here and then under the curve warp modifier we'll simply select the curve and
then we're going to get this wackiness going on this is a tail taale sign that your curve warp modifier is not working properly your deform axis is going to influence this to a certain degree but if you did this right usually your object will snap to the curves end regardless of its deform axis now I can hold on control and kind of scrub through these and you see none of these work I'll select my curve so I'll go to object set origin we will do origin to 3D cursor exactly what I said would happen your
object is snapping at the end of the curve and its origin is right here in the middle of the scene which is pretty much what you want the only thing that we have to fix is the form Maxis so again control middle Mouse wheel scrub and there we go the Y is uh the axis that's going to work for you feels a little bit too big let's actually bring everything back and see how it looks compared to yeah just a little Tad too big compared to the other one not a problem we'll simply go back
here so we'll isolate this once more we'll hide the curve warp and we'll simply just scale this down a little bit since we scal this down we're probably going to need a little bit more on the count let's see how this looks we'll bring everything back and we we'll turn the curve warp back on here you see that we're just a little bit short now that we changed the scale we can just plop this up a couple times and this looks pretty good here so the great thing about this workflow here is that this is
all procedural with modifi so if you want to do any changes here this is very simple again we'll go back we'll disable the curve warp and we'll isolate our selection we'll dive into edit mode here for example if we wanted maybe a cool little paneline all we'd have to do is maybe just drop a couple edges here I actually just did this with the bevel select this Loop of faces here alt e we're going to do extrude faces along the normal and then we'll just push in slightly here we'll go back to select select Loops
select boundary Loop and now these are the edges again that we want to drop another bevel just to reinforce this little inside corner now if we enable our subd modifier here now you see that that we have this nice little panel line and if we bring everything back and we enable our curve modifier in object mode we see the result and you see how flexible of a system this can be I don't like that extra panel line I think it's a little bit too much I'm just going to undo all that enable everything again and
turn my curve warp on and we're back to square one now the beauty about this setup is that if we have uh any other cable maybe like a steel cable here this is very easy to just create another pattern and snap it with another curve to form so we have this cable here and now we have again the same setup here with the Curve deformer we'll just preview it and there we go look how easy that was and now we have a completely different pattern here that we have going on I'll enable our original once
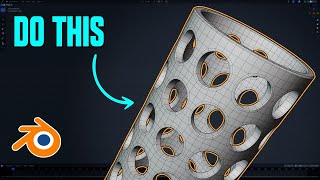
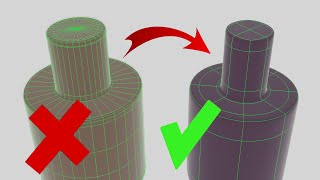
more and I'm pretty happy with the result yeah baby you made it to the last hard surface modeling tip I know you're serious about becoming a 3D model Beast while blunder has some serious powerful 30 Ming tools the ability to change primitive divisions after they have been created it's not one of them this can be extremely frustrating if you're coming from a 3D modeling app like Maya that has disability but I found a sneaky way to turn one of blender's weaknesses into his strength in my top number one hard surface modeling tip in blender is
screw that cylinder how many times in blender have you done something like this this you want to create a complex hard surface shape that is based on cylindrical surfaces usually you'll do something like this where you create a mesh and you create a cylinder you come to the realization that you only have one shot here to change the number of vertices or the divisions of this cylindrical shape and if you don't nail this right off the backat nine times out of 10 you'll have to restart your shape no matter how much modeling you've done so
right now I'm going to set this to eight and let's pretend that I want to create a more complex shape maybe use a boolean's workflow I'm going to subtract this from this now if you've been 3D modeling for a while you know this is a train wreck way to happen but I'll actually go through with this and show you one of blender's weaknesses which is the inability to change Primitives after they're created but actually one of his strengths which are modifiers and ultimately be able to turn that weakness into a strength itself so I'll select
this shape here I'll get a Boolean modifier we'll pick this as the difference and now if we hide our cutter uh you see what we have and maybe at some point you decide this is a good idea which is not and we apply this modifier and you waste 30 minutes of your life here uh thinking that you have a good blockout and you figure out that you know what uh this is actually this base cylinder was not dense enough and even with using things like Loop tools uh this is going to become somewhat of a
nightmare especially if you booing this out so this is going to be very very difficult also adding divisions like this uh you're really just forced into uh basically subdividing between this and this is maybe what you need but maybe these are not the same divisions that you do right so this workflow is not ideal and honestly you might not need to to subdivide this evenly you might need a little a couple more divisions so right now you're kind of forced to finagle this try to double this and we're not even going to talk about the
nightmare here that this Boolean is now merged this is going to be uh a headache and impossible to clean up so this is where screw that cylinder comes into place we're going to delete this and we're going to delete this as well we're going to start with shape or another primitive that actually doesn't resemble a cylinder at all but with the help of a Nifty little modifier and blender we're going to create a awesome Dynamic cylinder that we're able to update those divisions after its creation so we'll jump to the side view here I'll do
shift a mesh I'll get a cube I'll scale this down just a little bit dive into edit mode wireframe and with face selection on I'll drag Marquee I'll delete faces and I'm essentially trying to create uh profile here for a cylinder so I'm going to just push this here in the Y now the main thing that you do want to keep in mind is keep the origin of that object and since this is already created in the origin of the world this is fine but if your origin is off in space you want to make
sure that it's in the center of this shape for this modifier to work so I think this looks pretty good U now the next thing that I'll do is actually add a loop cut here we just need this Edge so I'll do shift D that's going to duplicate it and now I can hit p and then separate by selection now these are separated so now I'll just select this object here and delete it and we're left with this clean profile the next order of business is to go under Primitives we want to make sure this
is selected in object mode so in object mode I'm going to select my profile here I'll go to modifier and I'll type in screw and now from that profile we have created a perfect cylinder the beauty about this is that we could actually dynamically change the divisions here now the normals are going to look a little funky that's because it's set to smooth shading so we could disable this this is going to look a little bit better here and now we can set this to whatever we want now the great thing about this is that
if we want to control this shape we can always go back to that base so we can disable both of these here and all I got to do is to change this cylinder's height for example is I can grab these points move them up and now if we enable the modifier again there we go if we were to take this shift d move it into place and we're going to run a similar scenario to what we had earlier so now again I'll select this I'll add a modifier and this will be a booon I'll do
difference I'll subtract this and then I can go ahead and hide the cutter we're kind of back at square one where uh these divisions here are not really matching up so uh in this case we could increase the divisions here or we could decrease the divisions here and with this flexible setup we can so I'm going to select this here even though it's hidden we'll be able to update this on the Fly and you start seeing the power of this system since this is a smaller radius I can go in here and pick something that's
going to work and I'm looking at the face spacing here and this actually looks pretty good now this workflow does have a limitation where you can add Loop Cuts so for that kind of force to do one of two things one is if you wanted maybe extra Loop uh what you could do is if we disable this screw modifier here and also the booon modifier could kind of hack this by adding divisions so we could subdivide this and then again we could select these verts and do a subdivide maybe we'll move these up these verts
here are actually going to be adding Edge Loops as this is being revolved so now if we turn back our modifiers here you'll kind of see the result so now by controlling this vert I can control that edge Loop there and line things up this gives you quite a bit of a level of control but at some point if you want to use a knife tool or anything that needs to be done on a particular face you would shut this off we're going to bake in the booon operator now that we have this clean perimeter
here we can just add these faces here I'm painting them on the delete them I'll bring them my statistics we're sitting at 16 here we have a bunch of hang inverts we could manually select them but blender does have a select feature here so if we go to select similar and then amount of connecting edges since these are hang inverts uh they will all pretty much share that same information so this makes you to Breeze to select hang inverts now I can go to delete and then we can dissolve these vertices this is now cleaned
up and now we can get a true Count on this Edge which is this is 16 and this will match up perfectly so we'll select both of these here right click and now we will do a bridge Edge Loops this is now bridged we can go ahead and get these Edge Loops here probably bring them in quite a bit closer like this I'm going to apply all my transforms here I'm going to select all my edges here and before I add my bevels uh something that you want to make sure to check into for example
if I want to Bevel this Edge and you're getting wonkiness uh the geometry is actually fine it's an issue with the face normals so to identify that you go to your viewport overlays here face orientation and you see that this is flip for those that like bevels to use as holding edges this is going to be a lifesaver so all we have to do for that is Select these faces here just make sure that we select everything else go to mesh normals flip now these are flipped now we could Disable face orientation select all the
edges to be creased by the bevel apply a bevel turn off Loop side here give this a subd modifier shade smooth turn off the wireframe and I'm going to adjust this by sliding these edges just slightly just to give it a little bit more breathing room and now if we enable our subd modifier look at this and turn off our wireframe and there we have it you you see the stark contrast between the first workflow with the Primitive set and having no flexibility at all and the only option is to delete and start over versus
this workflow leveraging one of blender's strengths which are the modifiers to offset one of blender's weaknesses which is the inability to change the divisions On A Primitive after it's created and that's a wrap congrats on leveling up your hard surface modeling skills in blender you put some serious work into becoming a great 3D artist and I'm proud that you actually made it all the way to the video a lot of people don't you just learned five powerful techniques to tackle some of the most common hard surface modeling challenges so what are some of your favorite
hard surface modeling workflows did I miss any that should have made this list drop them in the comment section down below I'll read every comment if you enjoyed this video please subscribe to the channel it gets me a clear idea of who really enjoys this type of content and wants to see more of this in upcoming videos while this video covered five solid techniques to improve your 3D modeling there's one crucial concept that can make or break all these techniques clean topology it's one of the most misunderstood and challenging topics for 3D artists to help
you master it I've created this video right here [Music]
Related Videos
25:33
Cut Holes in Blender Like a Pro - Hard Sur...
JL Mussi
23,412 views

43:52
Maya Pro Tries 3D Modeling in Blender
JL Mussi
200,177 views

1:44:12
Hard Surface Topology (Why we struggle wit...
Mario Elementza
38,646 views
9:32
6 Blender Hard-Surface Modeling Tricks I W...
CG Boost
249,352 views

19:11
20 Years of Maya 3D Modeling Secrets in 20...
JL Mussi
12,832 views
26:00
How To Make ANY Hard Surface Pattern in Bl...
JL Mussi
19,208 views
27:32
Hard Surface Modeling in Blender is EASY O...
JL Mussi
52,686 views

22:25
Blender Modeling Tutorial - Advanced Hard ...
rileyb3d
38,381 views

12:48
Everything Blender can do in one video
blendereverything
431,912 views
21:52
Become a 3D Modeling Pro: 5 Common Topolog...
JL Mussi
168,646 views

49:40
SUBD Hard Surface Modeling Tutorial in Ble...
Josh Gambrell
14,419 views

19:29
10 Minutes vs. 10 Years of Animation
Isto Inc.
1,519,407 views

29:39
6 Powerful FREE Blender Addons For 3D Mode...
JL Mussi
69,706 views
13:17
Five Topology Tips Every 3D Artist Should ...
DECODED
869,337 views

1:27:09
From ZBrush to Entrepreneur: The Art of Ma...
J Hill
70,402 views

20:05
I Found 8 POWERFUL Blender Tips you've nev...
Kaizen
94,973 views

34:02
5 Topology Tips That Will Get You HIRED
JL Mussi
1,132,013 views

9:13
Become a Topology PRO with these Five Tips
DECODED
322,231 views

10:37
Hyper Realistic Water is this EASY in 3D G...
CG Geek
265,029 views

32:00
Blender Hard Surface Modeling TUTORIAL
Ponte Ryuurui
23,560 views