This Viral YouTube Niche Is Still Untapped—Start Today
26.58k views3527 WordsCopy TextShare
aiTrends
Want to make passive income with YouTube automation without showing your face? In this step-by-step ...
Video Transcript:
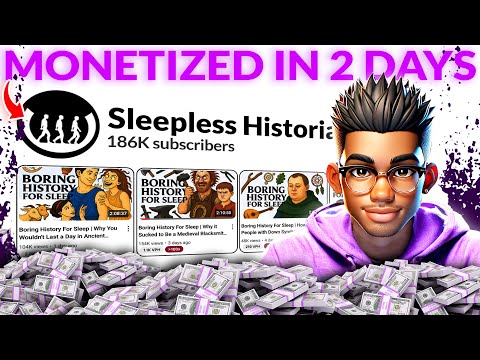
This YouTube channel is combining three powerful niches and the results are absolutely mind-blowing. As you can see from here, they launched their first video about a month ago, but in that short time, they've uploaded a new video every single day and already gained over 160,000 subscribers. What's even more interesting is the numbers the videos are pulling in.
This video, which was posted a day ago, already has over a 100,000 views. And the same applies to most of their recent videos, including this one that was posted just about a week and a half ago, but has already brought in almost 2 million views. That's how insane their strategy is.
If you're wondering exactly what they're doing, they've combined a bit of the low-fi niche, the viral point of view niche, and finally merged them with the history niche. And the result is this unstoppable channel that the algorithm seems to be loving. In simple terms, the channel creates relaxing sleep content by telling historical stories from the viewer's perspective paired with ambient sounds and soothing narration.
This blend of immersive storytelling and calming audio helps transport the audience to the past while fostering a peaceful, sleep-friendly atmosphere. The best part about all of this is that these videos are typically more than 2 hours long, which means more ad revenue from a single video. Additionally, the videos don't take much time to edit.
In fact, you can create an entire video in less than an hour. So whether you have a full-time job or you're looking to make YouTube your permanent gig, this niche could be the gold mine you've been looking for. You don't even need to spend anything as these videos can be created using completely free AI tools.
That's how game-changing this entire niche is. And no need to worry about monetization as this style of content is highly monetizable. But there's always going to be someone coming to the comment section to claim the channel isn't monetized.
So I'm going to make this easy for you. The truth is that these people are using YT Large to check monetization, which unfortunately isn't accurate anymore. At the time of making this video, almost every channel you check with this tool shows monetization is off, which is completely false.
It even says my channel isn't monetized, which isn't true. If you check Mr Beasts or any other channel, you'll get the same result as you can see. So, if this tool is totally wrong, which other tool can you use?
Well, I personally recommend combining two tools just to be on the safe side. The first tool is NextLev, which shows monetization right on the channel page. It also makes mistakes sometimes, which is why you need the second tool, which is YouTube monetization checker.
Install the extension from the Chrome Web Store and come back to the channel page. Go to the extensions bar and hit this icon. Then select check this channel and in a few seconds, you'll know whether the channel is monetized or not.
As you can see, this one is monetized. So, you can scratch that off your list of excuses not to enter this niche right now. To make things even easier, I'm going to carry you step by step through the entire process of creating these videos.
From finding intriguing topics to creating engaging scripts and converting them to voice over. Then we'll generate the same style of images these channels are using and move on to editing the video. Finally, we'll end with a short course on designing thumbnails just like these channels.
Guys, this is going to be detailed. So, I've made every prompt that will be used in this video available inside a Google doc which you can find in the prompts channel of my Discord server. Just look for the name Sleepless Historian and the link should be on that card.
I'll leave the link to the Discord in the description of this video. And hey, if you find this helpful, don't forget to hit that like button. It doesn't cost you anything, but it really helps me out and keeps me motivated to keep dropping more tutorials like this.
To give you a quick glimpse of what we're about to create in this video, check out this short demo I made using the exact same strategy I'm about to walk you through. Hey guys, tonight we set sail not on a ship made of dreams or moonlight, but on a creaky splintered deck that smells faintly of sweat, seaweed, and pickles. Yes, pickles.
Forget buried treasure or glittering swords for a moment. You're standing barefoot on the slick boards of an 18th century pirate sloop. And what's got the crew in a frenzy isn't gold.
It's the sour crunch of something floating in brine. A barrel gets cracked open and the scent wafts out. Tangy, sharp, weirdly mouthwatering pickles.
That, my friend, is what's keeping this crew from going completely feral. You probably won't survive this, by the way. Pirate life is all bruises and mildew, and the food, mostly beige, beige, and horrifying.
But tonight, you'll learn why pickles, those humble, shriveled champions, were the unsung heroes of high seas survival. Now, the first step is to come up with topics for the videos. For this step, you can check out some of the topics that these channels are creating.
But to make things easier, I've created a prompt that will simplify this process. First, go to the Google doc I mentioned and look for this heading. Copy the full prompt and open your preferred text generator.
This part depends on your personal preference. So, you can go with DeepSeek, Quen, or ChatgPT. But for this demonstration, I'll be using chat GPT.
So, open your chosen tool and paste the prompt. You need to specify the number of topics that you want the AI to generate. Feel free to choose as many as you want, but I'll go with 20 for this demonstration.
So, remove this placeholder and replace it with however many topics you want. Then, scroll down to the bottom and replace this second placeholder with the same number. Once that's done, hit enter and wait for chat GPT to do its magic.
As you can see, it's generated topics in the same style as the channel we're modeling. So, go through and pick whichever topics interest you. If you don't find any that you like, regenerate as many times as necessary till you find one.
The next step is to generate the script. Head back to the Google doc and look for this heading. Now, as I said at the beginning, the channel we're modeling creates really long content.
Their videos typically average around 2 hours long. So, the prompt is structured to create scripts ranging from 15,000 to 16,500 words. But, I'm sure you know that most AI text generators won't create scripts that long.
To achieve this word count, the scripts will be split into 15 sections each with a word count anywhere from 1,000 to 1,100. Just in case you want to make your script shorter or longer, you'll need to change these numbers to reflect exactly what you want. Once you're done with any changes that you want to make, copy the full prompt and paste it inside ChatGpt.
The only thing you need to add to this prompt is the topic you've chosen. So, look through the ones that ChatGpt generated and choose the one you want. One important thing you should keep in mind is that the titles typically have these words at the beginning followed by the real topic.
You don't need to copy the full thing, but only the second part, which is the real topic of the video. Replace this placeholder with the topic and hit enter. The first thing the AI is going to do is to create an outline for the video.
Once that's done, scroll to the bottom and you'll see this. It simply means that the AI is expecting you to type that word to move on to the first section of the script. So, type continue and wait for the AI to finish generating the first section.
As you can see, the first section is complete and the AI has even printed out the total word count for the section. That may not be very accurate, but it should be close enough. It's also expecting the same command we used.
So type continue again and wait for section two to be generated. This section is also done. So repeat the same thing for the remaining sections till the entire script has been generated.
Once that's done, you can go through the full script to make sure there are no issues and then move on to creating your voiceover narration. For that, I recommend using 11 Labs if you've got a budget, but if you want a free alternative, ClipChamp is a great option. The quality of their voices are pretty good, and I haven't seen a limit on their voice generation so far, so feel free to use that one.
For this demonstration, I'm going to be using 11 Labs. The first thing you need to do is to find a voice character. So, head over to their voice library and browse through the available voices till you find whatever voice you prefer.
To make things easier, you can use the filters. Just make sure you select your preferred language. In this case, I'll choose English, an American accent, set the gender to male, and select the age range for the voice.
A deep and calm voice works great, but this all depends on your personal preference. Listen to a few samples until you find one that works for you and choose that. Now paste the narration and hit generate.
If it doesn't sound good enough, you can make changes to the settings till you find what you like. The next step is to generate images for the video. But before that, you need image prompts that will simplify the process.
So go back to the Google doc and copy this prompt, paste it inside chat GPT and make a few changes. As you know, the typical duration for these stories is about 2 hours. Simply asking the AI to give you image prompts for the full 2 hours isn't going to cut it.
Most of the time, the AI will pick random scenes that do not match key parts in your script. To avoid this issue, the prompt is created to take in individual sections and then generate image prompts for only that particular section. Let me show you.
First, replace this placeholder with the number of image prompts that you want to generate for that section. Let's go with 10. Scroll down and replace this second one as well with the same number.
Then, finally, it's time to add the script from the section that you want to generate the image prompts for. So, copy the script for that section, leaving only the title, word count, and the command at the bottom. Remove this placeholder and paste the script you just copied.
You don't need to do anything else. Just hit enter and wait for the prompts to be generated. As you can see, each image prompt includes a detailed scene description as well as the image style.
Repeat this for all other sections of your video. Now, it's time to move on to generating the images. You can use any image generator that you prefer, but for free users, I recommend Google's Image FX or Leonardo AI.
Let's test them both. I personally like the images from Image FX, but let's first see the results from Leonardo AI. Hit this button to be taken to their image generation page.
The first thing you need to do is go to preset and choose the Phoenix model. Close the popup and choose the style. Feel free to test some of these out, but I'll go with dynamic and also select a high contrast.
Then choose 16x9 aspect ratio for long form and paste the prompt. You can make changes if necessary or simply go ahead with the generation. It doesn't take long, but take a look at these results.
They don't look bad, so let's try the second prompt. These images look good as well, so you can use this for the images. Now, let's try giving these prompts to image FX.
Paste the prompt and choose the same 16x9 aspect ratio. Hit create and wait for the images to be ready. Check these out.
I personally prefer these to the results we got from Leonardo AI, but they're both good, so you can use either of these tools. Alternatively, you can use Chat GPT's new image generation if you have a GPT plus subscription. Once you have your images, it's time to move on to editing the video.
But before that, you can enhance the resolution of your images. This is completely optional, but the higher definition images will be useful if you want to export the video at 2K or higher resolution. The tool I personally recommend for this is Upscale with a Y.
It's completely free and works for both Windows and Mac. So, make sure you install and open it. Also, put all your images inside a single folder and check batch upscale.
Select the folder that contains your files and choose your preferred model. In this case, this model works just fine. Choose anything from two to four times for the scale and hit upscale.
The duration typically depends on the speed of your computer and the number of images. So, the entire process could take anywhere from a few seconds to a couple of minutes. Once this is complete, it's time to edit the video.
You can use any video editor you prefer, but Cap Cut works perfectly, so I'll be using that one. Import all your files, including the images and narration. Then, drag and drop the voice over inside the timeline.
Go through the narration and remove any long pauses. Don't forget to keep playing it to ensure that you're removing just enough for the narration to still flow normally. If you're using a video editor like Premiere Pro, you can simplify this with just a few clicks.
But if you want something that can help with this process, download and install Audacity. Don't worry, it's completely free to use. Once you've opened it, drag and drop your audio file inside.
Then with the track selected, go to effect, special, and truncate silence. You'll get this pop-up with these settings. The first numbers here represent what you want the tool to detect.
So any sounds below this threshold that lasts for this duration should be detected, and the second part represents how much it should be decreased to. You can modify these based on your specific audio, but once you're done, go ahead and hit apply. As you can see, the audio track has shortened a bit.
You can undo if the audio seems too fast and change the numbers. When you're done, go ahead and export it as an MP3 or wave file. Now, back to Cap Cut.
This style of video is really simple, so you don't need to do too much. Just arrange your images in the timeline according to the flow of your narration. Feel free to decrease or increase the duration of the clips where necessary till you're done with the full video.
Once that's done, go to filters and look for the one that best fits the look you're going for. Unfortunately, most of these filters have become paid now, so it may be best to use an adjustment layer if you're on the free plan. Go to adjustment and drag the adjustment onto the timeline.
Extend it to cover the full duration of your video and look for the settings under basic. Play around with these settings till you get the look that you want. Once everything looks the way you want it, go to effect and look for this vapor effect.
The channel we're modeling uses this one, so if you want the same look, you may need to become a Cap Cut Pro user. You can even add the spark effect as well, just like theirs. No need to worry though if you don't have Cap Cut Pro.
I'll show you a few ways to make your videos look similar to theirs. But first, you can try a different look with the film frame effect. Drp it inside the timeline and extend it to cover the full video.
To add a bit of movement to your video, go to the start of each image and set a key frame. Then, drag this line to somewhere around the middle and increase the scale amount slightly. Now, drag the line to the end of that image and decrease the scale back to the same size as it was at the start.
Repeat this with all the other images and your video should have this slight motion animation. This looks all right, but it's not the same look as the channel we're modeling. We're going to use a simple overlay to achieve the effect.
So, go to your preferred stock footage website like Vectasy and search for vapor or smoke. Download whichever one you want and add it to your timeline. Go to blend and choose color dodge.
This looks all right, but since the footage I chose had a reddish color, it has increased the saturation of the video. So, I'm going to move the adjustment layer to the top and play around with the adjustment settings to fix the color. Once that's done, duplicate the overlay as many times as necessary to cover the rest of the video.
Now, for background music, you don't need anything special. Instead of using a soundtrack, the channel we're modeling simply uses some form of soft burning sound effect. You can grab one from a platform like Pixabay.
Just make sure you select sound effect, search for fire, and play a few for one that sounds just right. I like this 30 minutes long one, so I'll go ahead and download it. Add it to the timeline and trim it.
Don't forget to decrease the volume if it sounds too loud. The video looks all right now, so you can export it at either 1080p 2 or 4K resolution. The final step is to create a thumbnail for the video.
You can use Photoshop or any preferred image editor. Photopia works perfectly, so I'll be using that. But before we jump into the editing, we need an image that will be used in the thumbnail.
Normally, I'd give you a prompt to automate this entire process, but you'd only get something generic if you leave this very key step to AI. Instead, you need to look at the topic of your video and come up with a concept. In this case, mine revolves around pirates and pickles.
So, a pirate holding a pickle works fine. I want the image to be something simple, but make sure yours is as dramatic as possible. Then, go to the Google doc and copy this last prompt.
Paste it inside chat GPT and replace this placeholder with the description that you came up with. Now, hit enter and chat GPT will give you a simple prompt to generate the image. The channel we're modeling uses ChatGpt to generate the images for their thumbnail, so feel free to use that.
But free users can still use image FX. Simply paste the prompt and choose your aspect ratio. I'll go with a portrait style for this simple image.
Hit create and check out the images. Now that the image is ready, we can go to photop and create a new 2560x440 aspect ratio document. Drg and drop the image on the canvas.
In case the image isn't showing, simply move it above the background layer and position it to the right. We could remove the background for the character, but that isn't necessary since it matches the background of the canvas. I'll scale it and bring in these images I generated.
Then arrange them however you prefer. Once that's done, select text and write out this text. Feel free to change the font to what you want, but once you're done, hold Alt on the keyboard and use the mouse to drag the text layer down to make a duplicate.
Drg the copy down and change the text to history. Duplicate the layer again, but this time change the text to something like this. Feel free to make any additional changes, but once you're done, export the image as a JPEG.
Now, maybe you want to explore other trending niches before picking the one to start.
Related Videos

16:52
I Bought A Dead Channel To See If I Could ...
MistrAI
15,347 views

18:48
The 9 WORST Niches to Make a Faceless Chan...
VIRAL PROFITS by Jake Tran
9,018 views

2:32:10
AI AGENTS EMERGENCY DEBATE: These Jobs Won...
The Diary Of A CEO
556,306 views

15:30
From Zero to Viral in One Upload—Here’s th...
aiTrends
14,995 views

21:27
I Revealed the SECRET YouTube Shorts Chann...
IncomeIQ
13,045 views

13:56
If your videos get less than 500 views… do...
Dan the creator
20,240 views

17:52
The Catastrophic Failure Of Modern Top Gear
Phat Memer
110,613 views

12:16
This Business is Secretly Making People RI...
Jason Lee
33,081 views

46:14
I Found 50 UNTAPPED Niches For Faceless Yo...
Victor Catrina - YT Automation Expert
1,618 views

22:30
9 Side Hustles You Can Start With Absolute...
Shane Hummus
20,568 views

14:05
The Gurus Ignored This Niche—Now It’s Your...
aiTrends
40,393 views
2:39:34
I Cloned Every VIRAL YouTube Niche With AI...
aiTrends
16,989 views

11:54
NEVER Do These Things On YouTube
Dan the creator
85,533 views
11:00
I tried Youtube shorts for 100 days (and w...
Money Guy
91,419 views

25:28
How I Turned AI Into a $10k/Month YouTube ...
Money Degree
145,294 views

23:38
Why 99% of Faceless Channels FAIL
VIRAL PROFITS by Jake Tran
2,933 views
15:56
I Copied a Viral Chinese Surreal AI Art Ch...
Saidox AI Flow
72,426 views

15:35
The Easiest YouTube Niche to MONETIZE Righ...
aiTrends
34,570 views

18:31
I made 300 YouTube videos and learned this
Ed Lawrence
372,153 views

15:22
This Niche Came Out of Nowhere—And It’s Pr...
aiTrends
25,312 views