Blender Design Basics for 3D Printing | Beginner Guide with Keychain Tutorial
9.35k views3586 WordsCopy TextShare
Kevandram
Hey everyone! If you’re new to 3D printing and Blender, this video is for you. Today, I’m walking yo...
Video Transcript:
So you just got a 3D printer and want to start creating things to print, but you don't know any CAD or 3D programs? No worries, because in this video I'll show you how to get started with blender, a completely free and powerful program for 3D printing. Hey everyone!
My name is Kevin and blender has been my go to creative program for the past four years. I've primarily used it for 3D and animation, but I've recently been using it for 3D printing and it's been great for that purpose as well. I made this video as a step by step guide for anyone completely new to plunder, looking to create things specifically for 3D printing.
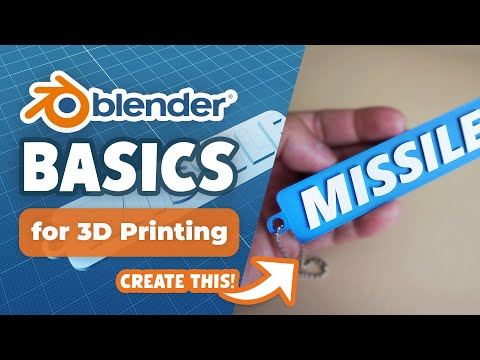
To do that, I'll walk through a customizable text keychain that you can print. I'll start with a quick overview of the interface, then move on to navigating and moving around the scene. The keychain tutorial and finally a recap along with specific blender 3D printing tips and techniques not covered in the tutorial, but can help in various situations.
You can also skip the tutorial and go straight to the recap and tips. If you're somewhat familiar with blender. I'll have timestamps below.
Now, because blender is shortcut heavy, I'll have key presses in the bottom right for reference. Let's get started. To download blender, you can go to the official website blender.
org and click download as of this video. The latest version is blender 4. 2, which is what I'll be using here, but you can still follow along using most versions of it.
I'll only be using core functions. Once installed. Open it up and you'll be brought to this screen.
So this main window is called the 3D viewport, which gives us a view of our scene and is where we'll do most of our work. In the top right, we have the outliner, which lists all the objects currently in the scene, such as the camera, a cube, and a light. Below that is the properties panel, which contains different settings for our scene, and I'll cover these as we encounter them.
At the bottom there's a timeline which is used for animation, and at the top we have different workspaces we can switch between depending on what we want to focus on. Since this video is about designing for 3D printing, we'll keep it simple and stay in the layout workspace. We also don't need the light or camera, so let's delete them by selecting each one and pressing X.
To navigate in the viewport, I recommend using a three button mouse and a numpad. Both will significantly improve your experience with blender, but if you don't have them, no worries as I'll cover alternatives as well. To rotate around the scene, hold down the middle mouse button and drag to zoom in.
Use the scroll wheel or hold down control middle mouse and drag up or down. And quick note if you're using a mac, anytime I say control, it'll be command to pen, hold, shift, middle, mouse, and drag. If you find your rotation isn't centered on the object, select the object and press numpad decimal to zoom in on it and reset the pivot point.
Alternatively, you can go to Edit Preferences Navigation and toggle orbit around selection. This will center your rotation on the selected object, but I'll leave this off. If you don't have a three button mouse, you can go to the input tab in preferences and select emulate three button mouse.
This will make all left click act as a middle mouse, so alt left click will rotate around the scene control alt left click, zoom in and out and shift alt left click or pan. I'll leave this toggled off as well. Additionally, you can access these functions using the buttons on the right side of the viewport.
Click. Drgging on the gizmo will rotate, the magnifying glass will zoom, and the hand will pan. If you're new to working in 3D, it's important to note that objects are defined along three axes x side to side, y front to back, and z up and down.
You can access specific orthographic views by clicking the corresponding letter on the gizmo or using the numpad. The ones I commonly use are numpad one for front view, numpad three for side view, and numpad seven for top view. Numpad zero is for camera view, but since we deleted the camera, it won't work in this case.
You can also hover over each letter to see the tooltip and find its shortcut. And in general, this works for every button in blender. If you don't have a numpad in preferences, you can go to input and toggle Emulate Numpad.
This will make the numbers at the top of your keyboard act like a numpad. And when I primarily use Mac, this is helpful. I'll keep it toggled off.
This cube here is called a mesh, and it's how we'll create objects for print to bring more meshes into the scene. You can hit shift a mesh and find a list of primitive shapes. You can also bring in other objects through this shortcut like text, lights, or cameras.
To move an object, select it and press G to grab. You can lock movement to a specific axis by pressing G, followed by X, Y, or Z to rotate the cube. Press R and again you can lock it to an axis by pressing R followed by x, y, or z.
Finally, to scale the cube, press S or lock it to an axis with s followed by x, y, or z. Additionally, you can exclude a specific axis when transforming by holding shift and the corresponding axis letter. For example, if you want to move the cube along only the x and y axis.
Press G, then shift Z to exclude moving it in the z. You can access the transform controls from the toolbar on the left. Before we start our keychain, we need to adjust a few settings in blender.
First, go to the Scene Properties tab and under units. Make sure the unit system is set to metric and change the unit scale to 0. 001.
Then set the length to millimeters, which are the units commonly used for 3D printing. This ensures that we're working at the correct scale for our print. Additionally, head over to the viewport Overlays tab, which is this button up here.
Click the dropdown and adjust the grid scale to 0. 001. This makes the Visual Grid guide appropriately sized at the new scale.
Now to create our keychain, we'll add some text and create a backing with a hole for some sort of chain. First let's delete the cube by selecting it and hitting x. Hit shift A in the viewport and select Text Object.
To change the text, we need to enter edit mode. Currently we're in the default mode, which is Object mode. Edit mode allows us to edit specific parts of our scene objects, and in this case, modifying the text itself.
Press tab to enter it, then change the text to whatever you want. I'll change mine to missile, which is the name of my new puppy. When you're finished, press Tab to return to Object Mode.
Now let's adjust the text. Go to the Object Data Properties tab. I want to change the font.
So under font go to regular and select this folder icon or open font. It should open to your System Fonts folder, but if not navigate to where you keep them. I'm going to select single UI black italic.
Under this section you can also change alignment and spacing, but I'll leave those as is. Since this text object is not a mesh, we need to convert it into one to continue. Keep in mind once converted, we can no longer edit the text.
If you'd like a backup copy, duplicate it with shift D and right click to leave it where it's at. Then hit M to move it to a new collection named Extra. In the outliner, you'll see the duplicate text object under the Extra collection, which are essentially folders.
We can organize our objects into. However, we don't want this collection to appear in our export, so let's uncheck this box to exclude it from view. Clicking back on the original text object, right click and convert to mesh.
Now I want to center this text object at the world origin, which is where the x and y axes intersect. To do that, we're going to move the origin point of this converted text object to the center of it, and then move it to the world origin. So each object has this orange dot which is its origin point.
And this determines where transforms like scale and rotation are focused to center it on the geometry. Right click and select set origin origin to geometry. Now to move it to the world origin we'll use the 3D cursor which is the red and white circle.
The 3D cursor is useful for positioning objects, and we can move it by shift right clicking anywhere in the viewport. Since I want to place it back at the world origin, hit shift S to bring up the snap menu and select Cursor to World Origin. Then select your object.
Press shift S again and choose a selection to cursor. And now our object is centered at the world of origin. Now I want to make this text large enough for our keychain.
Let's expand the side menu with end and in the item tab under dimensions, we can see it's about 2. 8mm in the X, which is very small. I want this to be about 95mm which translates to about 3.
7in. Now if you want to be exact with your measurements, you can input whatever units you're working with and blender will automatically convert it into millimeters. So to scale this, hit S and drag to where it's about 95mm.
And the X. You can also click drag on the X and y boxes to make sure it's scales in proportion. Now this is completely flat and we don't have any thickness in the Z.
So we'll need to extrude it tab into edit mode. Hit A to select all and E to extrude upwards until it's about two millimeters under median. For 3D printing, you'll want to make sure your thickness is at least 1 to 2mm for strength.
When you're done, tab back into object mode. And if you want to adjust the z value, you can just edit it in dimensions. I'll set it to two.
With our transforms complete, we'll need to apply them onto our object. And that means locking in changes to an object's location, rotation, and scale. This ensures the correct size and orientation for 3D printing.
To do that, hit Ctrl a to bring up the apply menu and select all transforms and you'll see the scale values reset to one. Now I want to create the backing for the text to sit on. Hit shift A and bring in a mesh plane.
Scale it to where it fits around your text. Again, you can scale with s x or s y as needed. For me, that'll be about 110mm in the X and 26mm in the Y.
I'll move it along the X slightly to be centered with the text. Let's give this some thickness. We could extrude it like before.
But another method is to use a modifier. Modifiers are tools that allow you to perform nondestructive edits to your objects. Before we do this, we need to apply transforms with control A so the modifiers appear accurately on the mesh.
Once done, head over to the modifiers tab and add a solidify modifier. This will allow us to add thickness and control it. Set the thickness to two millimeters and you'll see it affect the mesh.
Now this thickness isn't part of the actual geometry yet, it's just a visual to make it permanent. Click this dropdown and select apply or hover over it and press Ctrl a. Now I want to extrude only a small portion of this backing on the left to create a hole for a chain to pass through with the object selected, tab into edit mode and hit control R around the sides to add a horizontal loop cut.
Use the scroll wheel to adjust the number of cuts. I'll add two and then click twice to confirm. You can also adjust the number of cuts in the menu that appears once you confirm in the bottom left.
So with that small portion created, let's extrude it. Now there are three ways we can select parts of a mesh. And that's through a vertex which is a point an edge and a face.
The selection controls are up here and they correspond to shortcut one, two and three respectively. With face select, select the side face of that middle portion and in top view with numpad seven. Extrude it with E to the left until you form a rough square shape.
Now I want to bevel some of the edges so it's not so angular. Switch to edge. Select with two and while holding shift, select all the sharp vertical edges of the backing.
Then bevel with control B and adjust the number of segments with your middle mouse wheel. If you don't have one, you can just bevel as needed and then adjust the number of segments in the menu that appears in the bottom left. After you confirm.
And just to clarify, more segments will ensure a smoother print when you're finished. Tab back into object mode. Almost done.
I want to create a hole in this extruded portion in top view. Bring in a mesh cylinder. Set the dimensions to 5 to 6mm all around or however big your chain is.
Then position it over the extrude add portion to create the hole. We'll use another modifier. Select the backing mesh and add a boolean modifier.
This modifier is super helpful in 3D printing because it allows you to combine and subtract geometry. Here we'll want to use difference under object. Select a cylinder or by using the eyedropper tool on it, and then apply the modifier.
Now it doesn't look like it did anything, but if we delete the cylinder, you'll see a hole has formed. And now our key chain is complete. Before we export, let's do a few checks.
One make sure we don't have any floating regions. Just check that the Texas sitting nicely on the backing. And to see that clear, we can enter X-ray mode with alt Z or by clicking this button at the top to make sure your mesh faces are oriented correctly.
So every face in a mesh has a normal and they need to be facing the right direction which is outward. This will ensure a correct print to check. Go to the overlays dropdown and toggle Face Orientation and if it's blue, it's facing the right direction.
If it's red it isn't. To fix it, we'll need to select the object tab into edit mode. Hit A to select all and hit shift and to recalculate normals.
I'll toggle off this overlay. Three make sure all transforms are applied, which they should be since we applied them before adding the modifiers. And four make sure all modifiers are applied again because they're just visual in blender.
We'll need to apply them to make sure they affect the actual geometry for printing. Once you're finished, go up to file at the top. Export STL and leave the settings as is.
Then you can import your creation into your slicer software of choice. Now there are a couple of things I want to mention that I didn't cover in the tutorial. These will be helpful for creating other things in blender.
So this section will be a recap or setting up blender for 3D printing and some quick tips. The first is to set units. So under the Scene Properties tab, set the units scale to 0.
001 and the length units to millimeters. This ensures the object is the correct scale when exporting for 3D printing. The second is to ensure wall thickness, so check that the model has appropriate wall thickness, typically at least 1 to 2mm, to make sure it's printable and structurally sound.
If you do need to add thickness again, you can use the solidify modifier. The third is to check geometry. And there's four things to check here.
So the first in this section is floating or loose geometry. Fix any suspended geometry and if you have any loose vertices you can select your mesh tab into edit mode, select all and merge with M by distance to remove any stray points or hidden vertices that could cause print issues. The next is to check for intersecting geometry and use the boolean modifier if needed to fix it.
So here I have two Susann meshes overlapping to combine them. I'll select the original and add a boolean modifier set to Union and I'll drop the duplicate. When I apply the modifier you'll see there combined into one object and no longer intersect.
Just be mindful that the boolean modifier will create a duplicate of the additional mesh, so you'll need to delete it. Next is to identify overhangs which are angles greater than 45 degrees, to determine if supports will be needed during printing. So depending on what slicer software you use, support generation might be automatic, but if you want to optimize that, you can create them yourself.
The last is to ensure the geometry is manifold or watertight. This is particularly important for larger prints, but it's a good habit to check that there are no gaps, holes, or overlapping geometry in your model. You can actually do this through a free add on called 3D Print Toolbox to install it.
Go to Edit Preferences, get extensions, and search 3D Print Toolbox. Once installed, you can access it from the side menu with N and clicking the 3D print tab. Here you can do some checks to help identify non manifold geometry, ensuring your model is printable.
Under cleanup, you can also select Make Manifold and it'll fix the geometry as needed. This sometimes doesn't work accurately, so be mindful when using this, but there are lots of other helpful 3D printing options you can do with this add on. The fourth is to recalculate normals if needed.
Select the object and again using the face orientation overlay. Make sure the faces are pointing outward. If they're not going to edit mode, select all with a and hit shift and to recalculate normals.
This prevents issues where parts of a model may not print properly. The first is to apply transforms, apply the model scale, rotation and position by pressing A and selecting Apply All Transforms. This ensures the model prints at the correct size and orientation.
The sixth is to add modifiers to fine tuned models and I'll cover five here. So the first is the solidify modifier which we talked about, which will add thickness to your mesh. The second is the subdivision surface modifier, which will help smooth a model and increase surface quality.
I like setting my levels to three. The third is the decimate modifier, which optimizes the polygon count for simpler prints and faster slicing. The fourth is the boolean modifier, which is again great for fixing intersecting geometry by merging or subtracting objects.
And the last one is the Remesh modifier. To demonstrate how this works. I'm going to duplicate this Susann again.
I want to join these into one object, so I'll do so by selecting both of them and hitting Ctrl J. However, for print, there's still intersecting geometry. To fix that, I'll add a Remesh modifier set to voxel and lower the size to a small value around 0.
02. The monkeys come back and if I apply the modifier, you'll see I no longer have intersecting geometry. When checking in edit mode.
However, depending on your scale and system, it may not work and will crash. Blender. Also, just be mindful that details may not appear as accurate.
The seventh is to apply modifiers so that they're a part of the real geometry before exporting. The eighth is to uncheck or delete hidden objects, and this is to make sure they don't get exported along with your model. In the ninth and last one is to export as an STL by going to file export STL, which is the most commonly used file format for 3D printing.
And here is the final print and I think miss it likes it as well. That's it for this video. Thank you so much for watching.
I really appreciate it. I hope this was a helpful guide for any beginner trying to get started in blender for 3D printing. If you have any questions, feel free to leave them below.
And if you want to check out my 3D printing journey, you can find my other videos like my first time 3D printing in the description. Anyways, thanks again and I'll see you in the next video.
Related Videos
11:37
3D Printed Ice Cream Planter | Design with...
Kevandram
1,613 views
13:43
How I Made My First Art Toy: Blender, 3D P...
Keelan Jon
336,193 views

8:24
9 Game Changing Slicer Settings You NEED T...
The 3D Printing Zone
147,372 views
17:57
Blender Tutorial for Complete Beginners - ...
Blender Guru
6,135,355 views
23:31
How to Design for 3D Printing in Blender -...
ZeroDotCMD
16,876 views
23:27
EASY Tutorial For COLOURED Wall Art with B...
DraftID
32,798 views
14:25
Blender. How to cut and key a model for 3d...
Not Very Good Guy
106,632 views
29:10
How to 3D Model Using Blender - Easy Begin...
3D Printer Academy Tutorials
205,101 views

14:33
CAD Sketcher VS Precision Modeling In Blen...
Keep Making
251,368 views
10:09
Is This ChatGPT for 3D Printing? | Create ...
Slant 3D
203,502 views
37:14
Mastering Precision Modelling in Blender -...
SFE-Viz
13,284 views

22:08
3D Print T-Shirts, Holograms, and More! 5 ...
Zack Freedman
536,698 views
51:55
Let's Learn Blender! #4: 3D Modelling in E...
BornCG
229,861 views
14:48
The Animation YOU Can't Stop Watching | Bl...
CG Geek
71,203 views
15:33
Blender Mesh Fixing | 3D Printing Tool Box...
Keep Making
88,819 views
35:38
First steps | 3D Modeling with Blender for...
KamuiCosplay
461,533 views

29:43
CAD Modeling In Blender 3.2 | Using CAD Sk...
Keep Making
350,194 views
11:05
is Blender Good for 3D Printing
InspirationTuts
217,514 views
12:50
I'm Ditching Blender for Onshape
The Next Layer
437,226 views
22:38
13 Must-Know Sites to Find the BEST 3D Pri...
ItsMeaDMaDe
101,866 views