Build an AI WhatsApp Bot with n8n Responds to Text, Audio & Images
1.54k views2283 WordsCopy TextShare
Eric Tech
Learn how to build an AI-powered WhatsApp bot that responds to text, audio, and images using n8n and...
Video Transcript:
In this video, I'm going to show you step by step how to build an AI powered WhatsApp bot that can handle text, audio, and images, all integrated with AI agents. We will walk through the full setup, connecting Meta's WhatsApp API, integrated into N workflows, and sending messages back through WhatsApp. Now, if you find this video helpful, please drop a like or comment.
And with that being said, let's get started. All right, so to get started, first we're going to navigate to developers. fas.
com. facebook. com.
Here we're just going to click on get started. And then we're just going to register our meta for developers. And then here we're just going to verify our account with phone number.
All right. So once our account is verified, now what we can do is to complete our registration. So we're just going to click this.
And here you can see we have our app list on Facebook. And here we don't have any apps because we haven't create our Facebook app yet. So we're just going to create our Facebook app.
I'm just going to name it nan AI agent. And here we're just going to click on nest. In terms of the use case, uh we're just going to click on other.
So in this case, click on other. Click on nest. And then in terms of the app type, we're just going to select business because it has WhatsApp integration.
So we're going to select this. Click on nest. And then we're going to create the app.
Once the app is created, we're in the dashboard and we're going to set up our WhatsApp integration. Now here you can see we have the WhatsApp business platform API and we need to create our business portfolio first. So we're going to continue on this.
All right. So once we create our business portfolio, we're just going to start using the API. And either we're going to click on this or we're going to click on the API setup to start using the uh WhatsApp API.
So here for the API setup, we have the access token and we also have the send and receive messages. So here for step one, we select the phone number and here we have the from which is the sender which are using the test number. But for the recipient, we're using our own WhatsApp account for testing.
So in that case, we're just going to click on this and we're just going to click on manage phone number list. And here we're just going to enter a phone number that's being used for our WhatsApp account. So that's going to be the WhatsApp number for the phone number.
And it's going to send a verification code and we can just navigate to WhatsApp to get the confirmation code. And you can see that is under the WhatsApp business. We're just going to copy the confirmation code, come back to Facebook and paste it for the verification code.
And then we're just going to click on next. All right. So then here we have the generate access token.
Now this access token can allow us to send messages in WhatsApp uh through API and we will get there once we have the nan workflow built. So the next step we're going to do is to build our nan workflow and here you can see we have our workflow created and I'm just going to rename this to WhatsApp AI agent and the first step is going to be creating a trigger. So whenever there's a message from WhatsApp it's going to trigger the workflow.
So, we're going to select WhatsApp business cloud and we're going to click on unssage. And here we're just going to create a credential. So, for the client ID here, we're just going to come back to the app dashboard.
Click on the app settings basic. And then here we have the app ID. And app ID is going to be the client ID.
And the app secret here is going to be the client secret here. All right. So, once we set up our credentials, then we can close this and test our workflow.
So, right here, we only have the WhatsApp trigger. And if we were to click on the test flow or test workflow, it's going to trigger uh listen for a message in that chat. And we're just going to click on test workflow here.
We're just going to send a message. I'm just going to say hi. And I'm going to send a message here.
And it's going to trigger the workflow. You can see that the workflow has executed successfully. And if I were to click on the WhatsApp trigger, you can see that this is the output.
Now, instead of the outputs, we have the metadata, context, and messages. And then here we also have the text. which is the message that we sent on WhatsApp.
So, we can be able to pass this message to the AI agents to generate the response. So, that's what exactly we're going to do. We're just going to close this.
And here, we're just going to to drag this over here. And I'm just going to click on the plus sign here to search for AI agents. And we're just going to integrate AI agents into the workflow.
So, we're just going to first choose the uh define below for the source for prompt. And in terms of the prompt, we're just going to pass the message that's sent from WhatsApp to the AI agent. So I'm just going to pass the messages dot the first element in the messages text body, right?
And that's going to be hi, which we see here. All right. Then we can be able to define the system prompt or system message and that's going to be the instructions that we're going to pass to the AI agents before the conversation.
Right? So, for example, we can be able to set certain instructions. For example, like your name, maybe your location, your time, right?
The time that's currently taking place, right? So, I'm just going to set your name is Eric. Okay?
And then we also need to add a chat model for the AI agents. And I'm just going to search for AI open AI chat model. And in this case, we're just going to select the uh GPT 40, right, for the chat model.
And once we have the chat model graded, we can then test the workflow. So we're going to click on test step and here you can see we have the output on the right and here is the logs but we're also going to click on the outputs and that's the output that's generated by the AI agent. So once we have the outputs we can then think about how we can be able to send the outputs back to WhatsApp.
In that case we're just going to click on the output and add WhatsApp. So we're going to search for WhatsApp business cloud send message. For send message here we're just going to click on create new credential.
And in terms of creating new credential, we're going to pass the access token as well as the business account ID. Now we can get this back to the app dashboard on Facebook and we're going to click on API setup. And here we can be able to copy the business ID and paste it here for the business account ID.
And then we can generate the access token for the token here. And then once we get a token, we're going to paste it for the access token. Once we save this, we're going to define the form.
All right. So here for the sender phone number we're just going to select the test number and in terms of the recipient phone number we're just going to pass the context or in this case the messages from right the first element of the messages from and that's going to have the recipient phone number and in terms of the message type we can choose text location audio documents and so on and we're just going to choose text and since we have generated the outputs from the AI agents we're just going to pass the output from the AI agents to the text body and now we can be able to test it by click on test step. This will send a message to our WhatsApp chat which we can be able to see here.
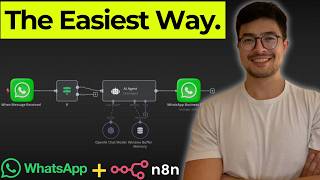
All right. So that's pretty much how we can be able to integrate WhatsApp into our Nan AI agent workflow. Now you can also add more things like memories or tools which I already mentioned how we can do this in previous couple videos but in this case for this video I'm going to focus on how we can be able to add additional things like how we can be able to pass images audio messages to our AI agents for our workflow.
Now to do so without wasting too much of your time, I have gone ahead and basically created a new workflow that contains features like audio transcription, analyze image files from the WhatsApp inputs and also you can be able to send text message from WhatsApp and still be able to process the requests to our AI agents and as the output for AI agents, we can be able to return the output as a audio message or a text message as the output of the AI agent. So the way how it works is that here we have our trigger just like how we did it for the previous workflow. But here I have additional which is the check input type.
We basically check the JSON messages and if we were to scroll down this is the message. So if there is audio we're just going to return audio for the output and if there is a image in this case we're just going to output as image. But if it's just text for example we have text.
body and the output name here is just going to be text. So it's basically a simple if else statement. And once we return, in this case just text, then it's going to go directly to the text path.
And here we're just going to define a variable. So text only prompt which we assign the input message to the variable text. Okay.
Once we assign the variable, then we're going to pass it to the AI agent. And AI agent is going to process this. And notice here that I also add a simple memory to keep track of these conversation.
And inside of the simple memory, we basically keep track of the context window length. And here I basically set past 20 interactions the model received as context. It knows the past 20 interactions that the model received.
Take that as context to generate the response. Okay. And here you can see once we have the output we will then check to see if we should send a audio message or a text message.
And the way how we define this is to check to see if it is audio file. If we don't receive the audio message we're just going to return a text message. If we do, then we're just going to generate the audio using chat GBT and then we're just going to respond through audio message.
And here we also have a fixed meme type. Now, the goal for this one is because when we send a audio message in WhatsApp, it only takes MPG for the audio. And because when we generate the audio, it only generates an MP3, which is a code that basically converts the MP3 to the MPG.
Okay. And once we've done this, we're just going to send the audio message to WhatsApp and it's going to generate a response. So we can also test this workflow.
So here I'm just going to send a voice message. What is oneplus 1? Send a message.
Let's see how it triggers. So it downloads the audio, transcribe it, call the AI agents, generate the audio, fix the main type, and respond with audio. So it has a message send.
Let's listen to this. 1 + 1 equals 2. Okay.
So you can see that we have the response sending back to our WhatsApp chat. Now I can also send a image. So if I were to take a screenshot of this so which is oneplus 3.
So here I'm just going to paste the screenshot and I'm just gonna say what does it equals to send the message contains the image come back here. It basically downloads the image analyze the image calls the AI agents and send the response back to us. And you can see after it's done you can see the expression oneplus 1 plus 3 equals 4.
All right. So you can see that this workflow works and we can be able to send audio file image files and text messages to our AI agents which will help us to generate the response back to us either through audio message or text message. And I will make sure to put the link for the workflow in the description below where you can be able to download this for both of the workflows that you can test it out.
So that's basically it for this video. Thank you for watching and I will see you in the next one.
Related Videos

27:32
How to add AI Agents to WhatsApp using n8n...
Leon van Zyl
35,106 views
13:00
AI Chatbot That Remembers You! (n8n + Supa...
Eric Tech
2,610 views
24:58
No-Code AI Agents: Automate with n8n & Ope...
Eric Tech
1,908 views
14:47
N8N Tutorial: Build N8N Whatsapp Chatbot! ...
Productive Dude
83,404 views
11:44
How To Connect WhatsApp To n8n Without Hav...
SW Automation
3,596 views
12:58
14 Front End System Design Concepts Explai...
Eric Tech
22,102 views
30:07
This Hybrid RAG Trick Makes Your AI Agents...
The AI Automators
7,602 views

25:07
Two NEW n8n RAG Strategies (Anthropic’s Co...
The AI Automators
6,975 views

29:22
Build an AI WhatsApp Chatbot using n8n (No...
Let's Automate It
31,756 views
11:09
Build AI WhatsApp Sales Funnel with n8n | ...
Eric Tech
1,260 views
24:47
How To Build a Startup Team of AI Agents (...
Simon Høiberg
594,919 views
9:06
Google's A2A Protocol Makes Multi-Agent AI...
Eric Tech
7,698 views
10:33
Build Your Own MCP Server (Python Guide)
Eric Tech
3,071 views
28:48
I built an AI App with Loveable & n8n (No-...
AI Workshop
45,976 views

32:09
Code 100x Faster with AI, Here's How (No H...
Cole Medin
132,984 views

40:53
8 Insane AI Agent Use Cases in N8N! (autom...
AI Foundations
178,079 views
15:09
How to Connect n8n AI Agent to WhatsApp, S...
Frank Nillard
20,447 views

19:29
How to Use Claude to INSTANTLY Build & Rep...
Mark Kashef
105,406 views
44:39
Replace your $10,000 Marketing Team (Lovea...
Jack Roberts
15,339 views
39:21
Build AI Agents for anything & everything ...
David Ondrej
36,232 views