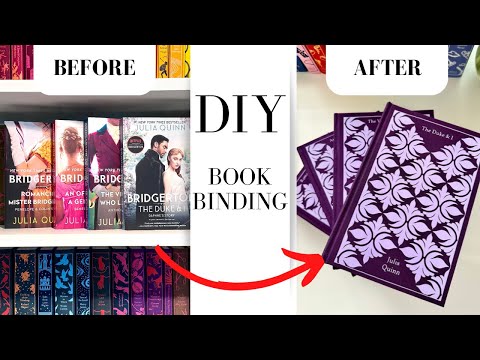
Rebinding Bridgerton: a how to guide to rebinding a series
12.49k views6691 WordsCopy TextShare
That's My Bookshelf
The first 500 people to use my link https://skl.sh/thatsmybookshelf01251 will get a 1 month free tr...
Video Transcript:
welcome today we're going to go through rebinding half of the Bridgerton series quickly we're going to go through supplies that you need and then we'll Dive Right In please like And subscribe and I hope that you find this helpful here are all the things you'll need card stock got it at Michael's scissors had them at home bookmark ribbon and endband got them on Amazon rolling cutter and Ula cutter this is for your book boards and this is for your Fabric and your npes pH neutral PVA glue Amazon see these are 3D printed spacers very helpful
especially the corner cutter one brick 50 cents at Home Depot just wrapped in book cloth mole get it on Amazon pre-cut boards from hollanders book cloth got it at bookcraft Supply coat one of these silicone brushes easy to rub paint off of and a bone folder both from Amazon lots of parchment paper from Costco if you want to do an HTV design you'll need HTV heat transfer vinyl this is caer brand from Joann's a cutting mat for your Cricket or silhouette or Cameo this is from Amazon something to weed this one was free with a
brand that I bought and some method of ironing it on I like the Cricut Mini press cuz it's not too expensive um there are bigger ones but you definitely need a something that's flat like this you can't use a normal iron to iron on HTV and a book press the easiest one is just two bar clamps and two cut pieces of wood sanded down okay let's get started I did not talk over this and so when I was doing it so we going to have my voice over today hi welcome so the first thing you
do is you cover of books um and I like to use the spines as bookmarks so you see how I'm sort of like shimming this off slowly another thing that you can do is if you have a hair dryer or a heat gun then you can put it along the spine to heat that up I just haven't used or owned a hair dryer in like seven years so do you see how I'm just like slowly G gently fipping it off there it goes and so see that spine is totally intact so later when we glue
it to card stock it'll be a fun little book Mark and then here we just go fast for the rest of them and apologies for my little name in the corner there I here if I move it you can see that it was my I had I got the ring light in there anyways okay so okay so here we go we are are first going to just take off any extra pages that are on the top I personally don't like having those like we don't need those yeah it's fine oh look I have signed copies
um rip them up anyways so you find you get your card stock and you find whatever you um you want your end Pages I've already picked mine out I've got four different ones and what you're going to do is you're going to measure them you're going to measure the height of the book and you're going to me measure the width of the book and then multiply that by two so what I normally do is I will just first measure the height of the book and I'll cut that off first on the paper and then from
there I'll normally just fold the paper in half and then hold it up to the book and sort of do an eyeball measurement of how long book should be and I find that that actually is better for me personally than if I was to literally like write each measurement down on the write each measurement down just because I I don't know what all the things on the ruler means I don't like counting and everything so I normally just mark on the ruler I find that a lot easier personally and so once you get what you
want you fold it in half use bone fold BL so you can get like a really crisp crisp Mark and then here as you see I'm just holding it up to the book and I'm just going to draw a line and then I'm going to once I've draw that line then I'm just going to cut from that line as opposed to some people put their ruler down where the line is and they either cut with her xacto knife or with the rolling cutter on the text block I tried that twice I messed up both text
blocks like cutting into them so I never tried it again but it works for some people so you know if it works for you go for it I just didn't want to cut up any more text blocks because the time I was making my own books and text blocks take forever to make to begin with so it just wasn't worth it for me so this is a method that I find works just fine and this way you can sort of just like shimmy the piece if you're not the best at precise measurements which I'm not
then I think that's a better way to do it so I just as you can see I'm just slowly making everything proper size so for some oh I that too sorry I'm knitting while I'm talking over this that's my new my new side quest so to speak um thank you Instagram reals for teaching me what side quest so far so for this one I really wanted to have the B as um part of the end paper but the issue is that the be was on the on the far end and normally I cut off the
ends and I just stick to the middle so this is just showing me marking sort of a better approximation of how to get the B to be within the end page when I cut it down to size so that just it this just shows you know me figuring out okay if the B is there where do I fold it in half and just doing a little bit more math just to make sure that I could get the be on there again I I really like the rolling cutter for cutting these as opposed to using my
xacto knife and some people do use their exactal knives for that I don't know I just I found the rolling cutter easier anyways okay so once you have your end Pages cut down to sides and folded in half you're going to glue them to your text block and let them um let the glue sort of sit in for like five minutes or so so you just put glue you can either put it onto the text block directly where you see I'm putting these papers down or you can put glue onto the piece of paper as
you see me doing here uh about like 3 four 5 mm of glue just a tiny bit um and you just sort of push it down along the side you do the front and the back and then you just want to let it sit for a little bit before you put your text before you basically finish propping your text block and so the reason I have the parchment paper there is that normally the way that you would do this is you normally the way you would do this is you put the glue on you put
it down and then you sort of put a weight on top of it so what I I use my um I I use my book press boards but I don't want them to get gluey just in case a little bit of glue spits out on top of little bit of glue sticks out on top of like outside onto the glue onto the book press board so that's why there I do the parchment paper in between so it's a little little safety sandwich and I use parchment paper a lot in binding books a lot more than
I think a lot of other people because I tend to be an overg gluer but I found that it's easier this way to just make sure that you keep your board clean and from glue and you also keep you like your your coverboards when you're make you're cutting matte clean I mean TR of me but then also your um your board that's like your cover boards because there's so many times that I when I was starting out that I messed up on my cover boards because I got glue on them for one reason or another
just because you know glue is sort of everywhere when you're making the cover and so I found that this is just this is an extra helpful way just to make sure that your glue stays where it should be and you know not where it shouldn't be so you just keep doing that for all of them and then so when you're making a series The most important thing is just to keep track of everything so you're going to mark your text blocks Mark always on all of your text blocks always Mark which way is up mark
it on the front um cover and on the back and page as I'm doing and on the spine the spine is important for if for placement of your bookmark ribbon if you want your bookmark ribbon to be um up or down like coming up from the and you want a charm on it then you're going to glue it to the bottom of the next BLX and if you don't care about a charm and you want it to come from the top then GL it in the top but especially when you're doing a series it's really
really really important to additionally Mark where Mark Mark each one so that you know which Focus because I have actually cased in books to the wrong case because I got distracted by which if I had multiple ones oh this looks a lot better okay so the things you need for prepping here obviously you have your bookmark ribbon you have your mole and you have the endbands endbands are those little purple things and those you cut down to size just the length of the text block and the ribbon you want it to be a little bit
longer so it can sort of dangle if you want and then the mole should be a little bit less um tall than the text block but probably like an inch or more on either side and then you're going to still trim it down so you can always go with more to begin with and then that last thing that I was cutting is just a spine strengthener it's just a piece of um card stock and for that just make sure that's a little bit less than the width of the text block because we're going to glue
that down afterwards and the order in which you glue them is you do the end bands well sorry okay so you do the bookmark ribbon first and then you do the end bands on top of them top of the bookmark ribbon otherwise it's going to look super silly and then you do the mole and then you do the spine strengthen if you want to do a spine strengthener so then and then I like to use a piece of parchment paper to sort of just um push down the spine strengthener in this way because if there's
extra glue and it oozes out it's not going to get on your bone folder these are like legitimately really tight okay and then you just let it dry doing a series is just a little bit tedious anyways okay so now the biggest thing about doing a series is that if trying to do it all at the same time I did Harry Potter over the course of 6 months and all my books were some of them were like the tiniest bit not the same height because I would cut the book boards as I did the books
and you know I don't know I'm human but if you're doing a series and um cut all of your boards at the same time that way all of your books will be uniform height and so all you really need to do is just measure one book and the measurements for this are exactly the width of your text block so like including now that it's glued and everything and then exactly the height of the text block plus 6 millim and the 6 millimet accounts for 3 millimet on either side the top and bottom so when you
actually put it into the case you'll get the tiniest bit of overhang and so the biggest rule of thumb is to measure twice and cut once and these are pre-cut boards from hollanders and they do custom cutting which I find so helpful because when I first started out I just bought these big sheets and cutting down big sheets to size is it's hard to get the squares and I the amount of like tools I have from a in like my little tool you know trying graveyard of trying to get perfect squares on all four sides
and right angles from when I just started out is you know more than I need because it's just a lot harder so I really recommend doing the custom cut boards because what you can do then is that basically they're just you get the measurements that I would do for them is you find the biggest book that you think you're going to bind whether it be a hard back or a paperback find your biggest one and then may do like quarter inch on either side wider than the dimensions of that book so that you have leeway
and then all of your other books will be a little bit smaller and that way then if you already have these boards that are almost a size you only have to make those two cuts and only having to make those two cuts gives you a much better chance of keeping everything Square along the like along the way and so just the shipping is is super expensive not going to lie the shipping is a lot but if you're planning on doing because I mean there you're shipping very heavy book boards but I last time I bought
from them I think I bought like 400 pieces of cut you know because I mean I'm doing a ton of books I'm trying to do my whole Library which I do have a library now guys it's over a thousand books which means I'm not buying any books this year because I have too many books but um just yeah I really highly recommended it if you're planning on doing a fair number of books it's going to save you a lot of time and then this is such a game changer I they are $10 on Amazon I
think it's battery powered I have never changed batteries and I've tried it now for a year look at that because it just makes such a big like silly little m but that little vacuum is it's everything I recommend it to everybody it's linked in my storefront along with all the tools and everything that you need sorry I'm trying to knit while I do this because my hyper fixation is real um and I messed up a stitch but yeah okay so now we're cutting the um now we are cutting the um spine piece and for the
spine piece I personally like to I take my text block and then I put the two pieces of board the front and back cover board there and then I take the height of the text block plus one of the pieces of board so some people just do the height of the text block some people do the height plus both the boards I personally like the height and one of the boards so then I will measure that and cut that and then you don't have to put you don't have to use a um a piece of
um board for your spine you can easily just use a piece of card stock or use nothing at all depending on how stiff you want your spine if you have a really big book you're not going to want um a board a boarded spine because it's going to hinder its opening you're going to want you know a piece of card Stu or something that can bend a little bit more easily but for a book this size it's fine and I like the look of having the spine the spine straight like that so now that you
have your pieces cut you're going to get your book cloth and I measur measure just a little bit more that I think my ruler there that's the per fact ruler um is maybe an inch or so wide because you want to give yourself a little bit of leeway room and then parchment paper is key here so parchment paper goes down [Music] underneath the parchment paper goes down it's a barrier between your cutting mat and your book cloth because you're going to be gluing on your but Po and it's going to if you're like me it's
going to come off potentially and you want I'm using a smaller needle and you basically want to keep your cutting mat clean of blue because that's the biggest area where you're going to mess up getting glue onto your case so now that I've sort of lined them up I cut it down a little bit more to size by just taking off on that right side you're going to see I'm going to cut off just that side piece up there goes my flowers my flowers die halfway through this video but they were pretty well they lasted
um p is the best but okay so these little things from Etsy they are spacers they're 3D printed mine are 8 mm normally um I used to use 7 mm as my space between the end end boards and in the spine piece but these ones were eight so I just you know I've just been using eight and it's been fine they just save you a lot of time and they help sort of square everything up before I was using a te- spacer at the bottom to help what did I do okay hold on I'm knitting
anyways um I was using a te- spacer at the bottom as well but now I just use these and I just outline and then I glue onto my book cloth some people will glue onto the piece of board and then they put it down you can do whatever you want truly this is like there's the basics to book binding and then there's just you know you find what works for you because there's there's going to be different things that work diff work well for other people it's you know you you can make this craft what
it is and I can already see that that's too much glue but it is what it is and see my pieces get gluey and so then I when I put this down here you're going to go over it with your bone folder to get just to make sure that the that there's um no like air bubbles or anything on the main pieces but then also you want to use your burn colder to make the hinges nice and crispy because crispy hinges o look at that they look great so just you know go [Music] over look
I'm finding it there then I'm going to go over the sides and then from there curling curling um so just you just go over it a bunch with your bone folder and um once that I've done that then I'm going to flip it back over but the issue is that if I flip it back over there's glue on that piece of parchment that I just um you know push all my hinges making them clean so then you get another piece of parchment so you do two pieces of parchment and so that when you flip your
book cover back over the purple side it doesn't f you want it and so now you have to trim down and so the corner cutter is the so the two things that you're going to want are now that's a 15 mm um edger I think I have a 15 mm one and a 20 mm one you can use either some people also just use the ruler but I sort of like a thinner trim down Edge so whenever I can find my 15 mm one just most of the time but not always because I'm messy um
I'll use that and then the corner Cutters the those save a ton of time because if you're just hand corner cutting you know like a ninja that's great and all but sometimes you sort of over cut and then when you're trying to um fold up everything you'll have a little piece of bookboard peeking out cuz you will cut too much so your um your book cloth when it folds over doesn't cover everything you need but with the corner Cutters that never happens they are designed perfectly to not have that happen to you so if I
could recommend you buying one extra thing for book findinding it wouldn't be a cricket it would be these tools and they sell them on Amazon now I hadn't looked at my I have an Amazon storefront that just has everything so you guys can like put it in a cart and see if how much it costs for you just see like which ones I use or whatever but when I I went to like update it after not looking at it for basically a year and um I doing knitting or curling and now those pieces are available
on Amazon they used to just be um sold by Etsy sellers so I mean you just want to support an Etsy seller you do you but they're also on Amazon now so um but yeah so these I can't recommend them enough so want you cut down all your sides oh wow I'm taking a long time cutting these down I will speed that up then you're going to start gluing them and the most important thing about gluing like basically it's called like your turn-ins is you VI if you're looking at the case as if you were
to put the book in it and read it like this you're going to do the top here and the bottom first and then the sides and always it's also important to know to glue basically away from there because that way you're going off the page so that glue it's going up and off because if if you thought about it coming the other way then the glue could and your brush could potentially like come in like an onto cloth and so then I fold it up just to get an extra crease and then I use my
fingers to what am I doing okay sorry so um yeah so I use my fingers andless there's like a ton of glue then I will probably use bone folder you want to make sure your bone folder is like nice and crispy clean um of glue but you really need a very very very little amount of glue for this this isn't like you know buckets this is you know a breath of glue it's like the thought of glue and that's enough and so once you do the nice and crispy like folding up and getting those sides
done then it's time to do the top and the bottom that's my stach so then I pull everything up and then so you're going to do you're going to glue again but here then you're going to do something a little bit different you're going to before you just fold it over and put it in you're going to take your bone folder the pointy end of your bone folder and you're going to poke in the sort of corner and I think I'll just show it to you here and then I zoom in the next time I
do it so just watch I'm just like poking them in a little bit like that and then I do the foldy fold and push it over like that and just like getting them nice and tight and then on the other side here I'm going to zoom in and then you can see what I mean so just the thought of glue it's not a ton of glue it's just the the idea of glue and I get it up in the corner and then you take your bone folder then see I'm just like poking just a tiniest
bit it's just like a little poke it's not huge it's a little teeny tiny poke and that teeny tiny little poke just makes it that when you fold it over the edges don't pop outling um okay so once that's done I'm going to press it and here's the thing is that I have a second set of book boards it was from the original press that I made and they are bigger they're I think 17 or 18 in wide and those are ones so here it'll go over with the bone folder and those are ones that
I used to press my cases and the reason there's parchment paper there is two fold one in case there's any extra glue that's like popped out but also these boards they could have been treated with some type of oil or something and so this way putting a nice P sheet of parchment paper like on either side of it protects any oils that are potentially in these boards from getting onto your case because now that you've spent time you know cutting your boards and gluing them down and all that you don't want to ruin your case
with like wood oil anyway so that's just going to go and do its thing and dry I press it normally for a couple hours or overnight and then you go and you design whatever design you want for it and I did that in design space and I've got tutorials on that that I'll put a card up above to you know do that and then so then you get your this is the Cricut section so this is HTV by CER Caesar caer I can't pronounce this thing um but anyways then you cut however much you need
and so that's me cutting count counting like I'm you know three cuz I never trust myself so I normally double count and then you take your HTV and that's a mat that the film has been taken off of my mat's a little dirty but honestly it's fine so you just basically There's a sticky part of your mat and so you line up your HTV with the sticky part of the mat and then you just sort of roll it down and yes there's big bubbles but we'll get rid of them so you just spread it out
and then use your bone folder and just sort of go over it and yes see all those little dots on it I'm pretty sure those are I don't know dirt but it it cuts fine so that's just it cutting in the fast and you take that off and do that five more times or four more times there were four books that I made and then I I personally like to cut them each into their front and back and title pieces some people lead on the mat and personally I think that's insane if you if you
do that you go for it but it's sticky and I like to be able to just like work with the tear anyways so and I'm going to put some music on stop talking at you and you can enjoy me weeding or you can fast forward I'll put maybe this could be like your pimple popping you know whatever [Music] [Laughter] [Music] hi I'm back okay so after that lovely quiet time I sometimes lose letters when I'm um ironing on or reading and so this way you can just basically um print another one out and then just
iron it on after the fact but just always remember that when you're ironing that your iron can't touch the vinyl so this is why we put on the the parchment paper before we dive back into our book binding tutorial I want to take a moment to thank skillshare for sponsoring this video I recently went deep down the rabbit hole of Yarn Crafts as you can tell from my slightly distracted voiceover and have begun to learn to knit and crochet I asked for recommendations before I remembered I had a skill share subscription and checked there they
have lots of amazing beginner classes that I found incredibly useful skillshare is the largest online community for creatives offering thousands of classes led by industry experts across various Fields like illustration graphic design photography music marketing productivity and more whether you're a beginner or Advanced skillshare are something for everyone allowing you to go from a dabbler to a pro in just a matter of hours what sets skillshare apart is its learn by doing approach where you can create and share projects after completing a class and get feedback from the community plus with its OnDemand platform and
stockable lessons you can learn at your own pace no matter what your skill level is this month skill share is focusing on the idea of treating creativity like a muscle that needs regular exercise just as we prioritize are health and wellness let's make 2025 the year we dedicate more time to our creative Pursuits I for one am excited to try a lot of different new artistic Outlets this year skillshare is here to help you make that choice to learn grow and nurture your creative practice by consistently working on your creative skills you can achieve personal
and professional growth in ways you never imagined so if you're ready to flex the creative muscles the first 500 people to use my link in the description will receive a one Monon free trial of skills share get started today and take your skills to the next level okay now now comes the last part it's called casing in so it's basically the process of taking the case that you've made and that you've ironed on and attaching it to the text block so now that you have everything glued and ready to go then if you want this
is sort of when you trim down your mole you can keep it bigger if you want but I like to trim it down sort of like an inch or so and sometimes you can do a little sort of like um triangle cutting like I'm doing right here but you don't have to that's just personal preference and so when you're doing this and especially when you're doing with this with a series just triple check everything make sure that your text block is facing the correct direction make sure that you are going to glue the correct case
to the correct text block because as I said before I have messed this up on more than one occasion so that's why it's really helpful especially having the arrows because that's just like a quick way to see and then just I like to number them so I just sort of numbered the series or you know just write it down because that inner that piece of paper right there that has the arrow on it it's thick enough that you're not going to see that through once I glue this down you're not going to see any of
that writing because it's going onto the back of that page so anyways what you do is you first you need to put a pace of scrap paper down between the end pages so you're going to glue under the mole and then over the mole and you're going to glue off the page so this is again we talked about with the gluing you're going off the page so that no glue gets stuck under this piece of paper and I like using the Big Brush because it just it you can get a lot on but then it's
really easy to just sort of swipe it all off and so see I'm getting glue off the page that's okay because it's not getting under so it'll be fine so you just glue and glue and then what you're going to do is you're going to get rid of this piece of paper very carefully and you're going to put a clean piece of parchment paper in between these two pages and that is so in case any when you close this down so you close it and you sort of roll it down no glue comes out and
if any glue comes out then it's not going to get onto the other P the other like side of the end page and so it won't stick together so when you're all said and done and the book's been in the process and it's dried it will open Clean it won't sort of um rip the end Pages cuz I've had that happen before when I was just starting because the glue just I as an overlow so this is just to make sure that you have a nice clean book when you're all said and done and for
me personally the way that I case it in is I line it up I line up the text block within the case and sort of shimmy it around making sure that both the top and the bottom has eyeballing about the same amount of space and I push text block when the case is closed I push text block all the way to the back so it's basically touching um where the spine would be and then I open it like this as you can see um do the gluing and then what I do my way of casing
in is just taking the cover rolling it down and being done I call it good some people they'll now at this point they'll flip the book over they'll open up what they just glued down and they'll take the bone folder and they'll go over it just making sure that there aren't any creases and just that everything's like nice and crisp every time I've tried to do that I mess it up I this is um I've said it in previous videos but this is I think the fifth different method of casing in that I tried and
this is the first one that worked for me without completely getting really crinkly um wrinkled end Pages at as an end process and so for me this is just what works and so I fold it up and then like I've said before just um drop the whole thing in parchment paper in case there's anything on your boards any kinds of oils or anything on your boards so it doesn't stick to your brand new Cas in weeded iron on um cases and then you just put it in the press and the biggest thing about when you
put it in the Press is just make sure that the spine is poking out so that you don't squish or break your spine and then now here really quickly I'm just going to show show you how I turn those spine pieces of the cover into little bookmarks that's really easy basically you just take it and you're just going to cut them off and this you can I can see how I already this one these I think were some of the first ones that I tried to do or I thought about it after the fact for
doing them and so these are a little bit wonky but basically if you were to do this don't I'm cutting way too exact right now cut bigger than you need because what you're going to do is you're just going to cut these and then you're going to glue them to um whatever card stock that you want to glue them to that you want us the opposite side and you're going to glue them and you're going to press them and then after they've been glued and pressed normally I think like overnight or just for a couple
hours honestly just a long enough time that because the uh the spine piece as you can see or it wants to sort of curl up because it's so thin because it you it's not the normal thickness of the front or back cover it's just sort of like this thin piece cuz you've of the way that you've pulled it off there's still a lot stuck on the spine of the book so basically you're just going to cut whatever piece you want at the other side and then you're just going to put them on parchment paper parchment
paper is key for this and you're just going to glue and it's oh on this it's totally fine if the glue goes over because I'm just going to see how I'm just sort of making another little parchment sand W that's fine because the whole thing is just going to be protected with parchment and you're going to let it glue and you're going to press it flat and then once you've done this for all of them you press them all flat and then this is the next let me see what is this no I'm making the
last two um so yeah so I'm making the last two and they're just going to go like that press flat dry them and then the next day this is the next day I'm just cutting off all that excess and so that this is when you sort of trim them down the sides which is why it's fine for them to be bigger when you're cutting them off the covers because this is the end point when you trim them and then they're just done and here's the final product of everything here's all four of them I did
a little something different on the spines of these um I really like how these turned out oh there's my B see it came in thanks for following along I'm sorry this was chaotic and half the time I was obsessed with my knitting but I'm slowly getting better at that um please remember to like And subscribe if you found this chaos helpful most of them are not this chaotic and I hope to see you around leave any questions in the comments and I will get back to you
Related Videos

32:08
Rebind a paperback to hardcover full tutor...
That's My Bookshelf
122,732 views

31:16
Rebinding DUNE - Part 1 - Disassembling A ...
Four Keys Book Arts
448,790 views

18:01
How to do Sprayed Book Edges with a Cricut...
Hey Let's Make Stuff
26,516 views
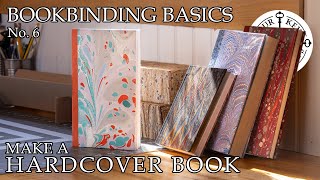
39:56
Bookbinding Basics: Chapter 6 - Making a H...
Four Keys Book Arts
35,177 views

20:28
Rebinding The Lord of the Rings Trilogy + ...
TheBinaryBookBinder
2,465 views
1:43:53
Bullet journal ideas MARATHON 💜 +120 idea...
JashiiCorrin
348,630 views

2:25:27
Former FBI Agent: If They Do This Please R...
The Diary Of A CEO
1,429,888 views
34:23
Gel Plate Printing Techniques 101 🎨 Basi...
Paper Crafting with Lou Collins
226,709 views

16:17
Bookbind With Me: Transforming My Bridgert...
Sydney
10,163 views
27:19
6 ChatGPT Hacks for Etsy Print on Demand
SimplyPOD with Mandy
6,235 views

17:40
The Cursed Life of History's Most Inbred P...
Forgotten Lives
571,821 views
36:36
Step-by-step case binding tutorial
bitter melon bindery
403,236 views
20:30
I Made The Hunger Games Books Even Better
Jess Less
102,616 views
27:07
Bookbind With Me: Let’s Transform My Copy ...
Sydney
3,836 views

42:57
REBINDING SOFT COVER BOOK INTO HARD COVER
Nik the Booksmith
193,185 views

10:22
Book Rebinding Basics: From Costs to Compl...
That's My Bookshelf
11,226 views
11:31
Book page flower tutorial - DIY Roses and ...
That's My Bookshelf
1,883 views

11:06
DIY Paperback to hardcover - I transformed...
Extra Cozy DIY
933,541 views

25:36
Part 3: MAKING THE CASE- Penguin Clothboun...
That's My Bookshelf
47,828 views
30:27
Nighttime bookbinding for restful sleep, a...
bitter melon bindery
66,942 views