This n8n Voice AI Agent CALLS Your Customers (No Humans Needed!)
38.13k views6747 WordsCopy TextShare
AI Workshop
All resources, LIVE BUILDS, Templates and Community are here 👉 https://www.skool.com/aiworkshop
Si...
Video Transcript:
In this video, I'm going to show you step by step how to build this amazing appointment reminder voice AI agent that will call your customers to remind them about their upcoming appointment. This is going to be a huge timesaver for yourself, for businesses, or you can actually sell this for businesses because this is going to be extremely useful. So, let's go ahead and start with the demo first.
I'm going to show you exactly how this thing works and then we're going to build this thing step by step. So, as you can see, my phone right here, it's blank right now. I have no calls.
I'm going to keep it on and you will see that I'm going to click on test workflow and then I'm going to receive a call shortly. So, I'm just going to leave my phone on and you'll see that the AI agents will be firing. Workflow successful.
I should be receiving a call any second now. And perfect. As you can see, I'm receiving a call.
So, I'm going to take this call and then you'll see what the interaction looks like. Hi, am I speaking with Zubat Zada? Yes.
Great. Thanks for confirming. This is Jarvis from the AI workshop AI agency.
I'm calling to remind you about your upcoming consultation regarding AI automations and workflows for your business. Your consultation for AI agent automation is scheduled between 1:00 p. m.
and 2 p. m. on Tuesday, May 6th.
Does that time still work for you? Yeah. Can you tell me a bit more details about the appointment?
I can't remember exactly what I scheduled this for. Absolutely. Your appointment is a consultation focused on AI agent automation for your business.
During this session, we'll discuss how AI agents can help streamline your workflows, boost productivity, and reduce costs by automating day-to-day tasks like managing emails, scheduling. Oh, okay. Yeah.
Yeah, I I I remember that. Thanks, Jarvis. I appreciate it.
Yeah, I should be able to make that appointment tomorrow. So, go ahead and confirm. Awesome.
We're excited to talk more about how AI can help your business grow. If you have any other questions before your consultation, just let us know. All right, have a great day.
Thank you so much. Perfect. There you go.
So, it confirms the appointment and once uh customer says that appointment has confirmed, it just greets him and said, "Thank you so much. Have a great day. " And it hangs up the phone.
Very, very simple, very easy. So, now let's go ahead and test another scenario where the agent doesn't know a answer to a question and it will actually transfer it to a human being. So, let's go ahead and test that out.
So, same thing. I'm going to click on test workflow. This is going to fire up and I'm going to get another call soon.
There you go. I'm getting a call. So, let's go ahead and answer.
Hi, am I speaking with Subzada? Yes. Great.
Thank you. This is Jarvis from the AI Workshop AI agency. I'm calling to remind you about your upcoming consultation regarding AI automations and workflows for your business.
Your consultation for AI agent automation is scheduled between 1:00 p. m. and 2 p.
m. on Tuesday, May 6th. Does that time still work for you?
Um, no. Unfortunately, actually, that doesn't work for me. Can you uh maybe uh schedule another time or is there a way I can talk to somebody that I can ask additional questions?
No problem at all. I'll transfer you to someone on our team who can help you reschedule and answer any questions you have. There you go.
As you can see, now it transferred my call. I mean, it transferred it to my own number because that's what I put in there. But it automatically transferred the call when it doesn't understand um uh or it doesn't have a answer to a particular question or if you tell it that I'm going to reschedule or I need to talk to a team member.
So, as you can imagine, this is a very powerful build. It's a very powerful AI agent. I'm going to walk through step by step about all of these builds.
So, regardless of your background, even if you have no tech background, I'm going to make it very easy. So, make sure that you can build this on your own. So, make sure you stick around to the end of the video because again, you can use this and sell it to service for existing businesses.
You can use it in your own business or in your own personal life because I know myself I built this actually for my own AI agency because it's a huge waste of time when people actually schedule appointment and they don't show up. All right, so without any further delay, let's jump right into the video. All right, so I'm in my NAN blank workflow.
For those of you who are new to NAN, I'm going to put the link in the description. Please go ahead and click on that. You can join for a free 14-day trial.
You're going to once you log in, you'll come right here uh to your blank workflow. You will click on new workflow and this it will bring you right here. So the first step is always going to be some form of a trigger.
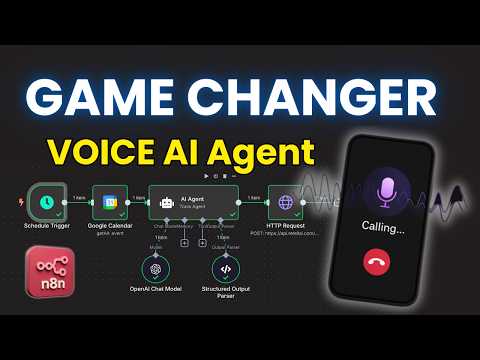
In our case, we're going to be using a schedule trigger because obviously you want your workflow to monitor your calendar and then on a daily basis, let's say at 8 a. m. schedule the trigger so that way the AI agent can call your appointments for that day.
Uh so I'm going to go ahead and grab on schedule trigger here. So this is where you can select the trigger interval. So days, uh, seconds, uh, weeks, months, or whatever it may be, but we'll just use days, and then we'll just trigger at 8:00 a.
m. for example. All right.
So you can identify at minute, but I'm just going to leave it as it is. Okay. So the next step is we need to now add our Google calendar because obviously it needs to monitor our Google calendar.
So you're going to click on the plus button sign here and you're going to look for Google calendar. And then I'm going to do get many events. We can change this from here if you want.
So, if you don't have a Google calendar account, it's very easy. You're just going to click on new credentials and you'll just sign in with Google and it will pop up and ask you to sign in, allow permission, and you'll be all good to go. I'm going to close this since I already have one.
So, I'm just going to leave that as it is. All right. So, the resource is going to be event operation is going to be get many because obviously we wanted to have all of the meetings for that particular day.
From the list, you'll just select. So if you uh did your credential properly, this will load up all your list and calendars. I'm just use my uh email here.
And we can do return all. So basically all of the meetings for that particular day. Okay.
For the after you're just going to leave it as now because obviously we wanted to look for meetings from now to the future. And then before we're going to type in so let me just go ahead and type in. So we're going to do now plus 24 hours, right?
because I wanted to look for meetings from now till tomorrow essentially, right? So you can depending on what you um you know what your schedule is. You can add like 12 hours, you know, like um 24 hours, 48 hour, whatever makes sense for you.
So you can play around with this um and it will uh grab all the meetings that's upcoming. All right, so let me go ahead and take a look at my calendar. So tomorrow as a sample, I've only put this one uh meeting here.
It says appointment with Zub, which is me. And then I have put the name, the phone number, the reason for the meeting, and then also the email as well. And this is just the description of the meeting.
Right? So as you can see right here, um I don't know why I have this bold. Let me get rid of this.
There you go. So that way I can keep it nice and simple. All right.
So it's just appointment with me and then the name, the phone number, the reason for the appointment, and then also the email itself. So I'm just going to click on save. So this is the only appointment I have tomorrow.
So let's go ahead and now test this to make sure that that appointment gets brought up to our Google calendar. So, I'm going to click on test step. And there you go.
So, it brought up the one appointment that I have and this nice JSON schema and then all of the other details as well. All right. So, we're good to go there.
So, it looks like we got our Google calendar. The next step is to add our AI agent. So, I'm just going to click on the plus button.
I'm going to look for AI agent here. So, we need to change this from cuz it automatically goes to connected to chat trigger node. We're going to change that to defined below.
And then what we need to do is let's go ahead and add a chat model. So I'm going to click on chat model here. I'm going to select open AI, but feel free to select whatever you want here.
Um I'm just going to use GPT4. 1 which is the new one. So all right, that's good to go.
Um you can add memory, but totally up to you. It's not necessary. I wouldn't do it for now.
Um as far as tools, same things. If you wanted to give I'll create more videos with these voice agents that you can give multiple tools that it will have access to additional information but this one I want to keep it simple because this is just an appointment reminder voice AI agent so I want to keep things very very simple so we're going to go inside the AI agent now what we need to do is here we need to give um the prompt the user message so this is where we need to provide all the details of the appointment right uh and I'm going to explain a little bit why but let's go ahead and first what I need to do is add our appointment details or appointment description. Let's say appointment description.
And then we're going to grab our appointment description from the left hand side right here. So I'm just going to literally grab this and bring it over here. There you go.
It looks good. And this is just bringing over the name, the email, the phone number, and all of the details about that appointment or who that appointment is with. Okay.
And then I'm going also do start time and the start time. And then also end time. Let me go ahead and type this down.
And then let's go ahead and grab the start and end time. So the start time is going to be right here on the left hand side. It says start.
I'm just going to literally grab this date and time. Bring it over here. The end time.
Same thing. It says end. So you're just going to grab the date and time.
And perfect. So that's where we got our appointment description, the start time, and the end time from our Google calendar here. All right.
So another important thing is that we need to add a system message. You're going to click on add options here. You're going to click on system message because this is where we need to give this AI agent the system or the behavior of how it should interact or what it's supposed to do.
Right? So, by default, it just says you are a helpful assistant. So, I'm going to go ahead and uh I'm just going to actually go to my community so that way it's a lot easier.
So, I'm going to go over to the classroom section and I'm going to go to the and then automation and then right here. Yep, everything is right here. So, I'm just going to copy and paste.
But again, feel free to um you know, stop the video and just type this out yourself. But I'm just going to grab that. So, this was the prompt, the user message that I literally just typed in earlier.
The system messaging is a little long, so I don't want to type it all in. So, I'm just going to copy this, and then I'll explain what's going on here. So, I'm going to come back here, paste it, go to expression, expand this, and all right, so I'm just saying you're an assistant.
You need to generate a structure JSON object with the following fields, right? It's going to be the name, the phone number, the reason for the appointment, the start time, end time, email, and I wanted to return a specific output style, the JSON format. Very, very simple, but again, feel free to type your own if you want to change things.
Very important thing, we need to have we need to toggle this require uh specific output format. And this is where we need to identify exactly what kind of format we want. So, as soon as you click on this, as soon as you toggle this, if we go outside to our canvas, you'll see this little uh output parser shows up with a plus sign.
So, if you click on the plus button, it opens up these different options. We're going to select the structured output parser because we can easily identify the input schema here. So, I'm just going to click on schema type.
Go to define below. Don't worry about this. Again, you don't have to understand this.
You can just like uh use chat or claw to give you an example input schema. Essentially this just says that I want the output format to be in this particular way. So the way to do that I'm just going to again same thing use my community here because I have put everything here but feel free to come up with your own using u chatgpt or um uh claude.
So I'm just going to paste this. Essentially what this is doing is I'm identifying each different property here. The name the email the phone number the reason as string date and time and the format itself.
and I'm giving it that these things are the required parameters that it needs to output. All right, so that's good to go here. So now let's go ahead inside our AI agent and I'm going to click on test step and you'll see that this will uh essentially grab all the details from our Google calendar and output it in that uh based on that input schema that provided which is nice and clean.
It just puts the name, email, phone number, reason, start time and end time. Very very simple. We've kept it you know super well structured.
That's why we put the structured output parser because we want to control the formatting of the output from the AI agent. Okay, so that's good to go. Now the most important part, we need to add our retail uh AI uh API request that we're going to sell to retail.
So what we need to do is click on the plus button. Search for HTTP request. There you go.
All right. So the method is going to be post and the URL because we need to uh create a call here. So what we need to do is head over to uh I mean you can go to the retail retail API documentation.
So we have if I go to the top here yeah you can go to retailai. com and you can go to their documentation. They have some great documentation.
Feel free to read through this. They have all sorts of different uh endpoints that you can interact with. But we're going to directly grab uh if I come down here where' it go right here the HTTP node.
So we're going to grab this URL which is the endpoint create phone call. Okay. So we're going to come back paste this in the URL.
All right. Great. The authentication we're going to do uh generic credential types.
Whoops. Generic credential types. the generic O type it's going to be a custom O.
Okay, because we need to identify um we need to send headers including our API key that we're going to grab from retail retail and then we're also going to send um our another header that's required which is part of the API documentation. So if I go to custom off all I have to do is click on create new credentials. So I'm going to go back to my community right here.
I'm just going to copy this again. And feel free to pause this and uh write this down yourself. I'm just going to paste this.
So right here, you're going to uh it says bear your retail API key. The way to grab your API key. So now let's head over to our retail.
So you're going to come to this account obviously. Let me go back here actually. All right.
So you log in. I'll put the link in the description. So you can click on that directly.
It'll take you there. It will you can create a free account. So, you're going to click on the free account.
This will uh take you to your page where you'll sign up. Once you sign up, you'll come right here to your dashboards and you're going to click on AI agents. Okay.
So, obviously I already have one here, but yours is going to look blank. But before we do that, what you need to do is go to your uh workspace here and you need actually no, never mind, sorry. You're going to come here on the left hand side, click on API keys.
You're just going to click on add and you'll generate a new API key. And then you're going to come here and click on copy. And then over here, if we go back to our workflow, you just need to make sure that you're deleting this and replacing it with your own API key.
Okay? And you have to just click on save. And make sure name it also.
It's always a good practice to name it. But once you click on that, you'll be good to go. You can use it in the future.
Since I've already done this, I'm just going to get rid of this. Oops. Close.
And then I'm going to go ahead and select Where is it? Retail AI. There you go.
Okay. So now everything else we're going to leave as blank. You don't need to send any headers, but we do need to send bodies.
You're going to click on body. Uh the body content is going to be JSON. And then for specify below, we're just going to use using JSON.
Okay. So what we need to do is now same thing. I'm just going to head over because I'm lazy.
So I'm just going to copy this. [Music] Copy. Paste.
And I'm going to expand it. And I'll show you what's going on. Click on expression expand.
Okay. So what we're doing is we need to grab the from number from our agent and then also these other parameters are be coming in from our uh AI agent here and then also the override agent ID. This is something that's going to be coming from our retail when once we create our AI agent or our voice agent there in front.
So let's go ahead and now switch over to retail and create our agent. So, what you need to do is you're going to come after you log in, you're going to come to agents. Again, yours is going to look blank, but what you need to do is click on create an agent.
We're going to use a single prompt agent because this is going to be a very simple kind of reminder, appointment reminder. Obviously, in the future, I'm going to be doing more uh complex AI agents with uh retail. So, therefore, uh we will do multi-prompt agents and conversational flow and everything else.
But for now, we're just going to click on single prompt agent. You're going to click on start from blank. And then this will open this universal prompt from your AI agent because this is where you need to give this voice agent a persona, a role.
You need to define the objective, what it's supposed to do, and every other detail that you can think of. You'll put it right here. Don't worry about this for now.
Let's go ahead and type and give this a universal prompt for the agent to give it a role and specify what it needs to do. So again, same thing. I'm going to head over here and go to the top.
This is the main prompt. So, I'm just going to copy all of this and I'll explain it to you in a little bit. Paste.
All right. So, what we're doing is first of all, you need to give us an identity. Obviously, I'm going to use Jarvis.
Uh, but I'm just going to say you're AI powered voice assistant for AI workshop AI agency. Your job is to remind clients about their upcoming consultation appointments related to AI automations AI agent for their business, right? Because obviously I'm using this to remind uh people when they sign up for a consultation with our AI agency.
So this is just to send them a reminder or give them a call to make sure that you know they're aware or they can confirm the appointment. So that way it's not a waste of time, right? So that's kind of that the big headache in this space when there's consultation.
And a lot of times people don't show up and it's a complete waste of time and it also removes um that particular time slot from others to sign in. So that's why this is such a good and useful agent that you can use and sell to businesses or for your own personal use too, right? So same thing you're giving my identity.
You're giving it style guard rails. I you need to you're telling it to be concise, be professional, sound friendly, uh avoid repeating things and then also we're giving it a proper task breakdown. Right?
But this is where now you can play around with this depending on what you're using this for, what industry you're using this for. You can make this as decent detail as possible. And I highly highly suggest like giving it good examples.
So you can copy this uh as an example. But what I'm doing it is saying, hey, as an example, you need to begin by confirming who you're speaking with, right? So you're going to say, hi, I'm am I speaking with, you know, the name of the person, whoever the appointment is set.
And we're going to grab this dynamic name from our AI agent that we're going to look at in a little bit. But essentially, we're just giving this all these uh different parameters. If it says yes, move to step two.
If it says no, then say this, right? And then wait for response. So if the name is not available and no message can be so there's all sorts of different examples and parameters that we're providing here.
So that's why I always say make sure that you do your research, you uh play around with your chat GPT or cloud of the world where you can create a very concise prompt here. Uh so that way this agent knows exactly what to do. Okay.
And then uh also we need to provide two functions. One is going to be end call and then another is going to be transfer to a human. Right?
because it's very important. We need to be able to transfer uh this to a human if the agent doesn't know uh if if it you know if it can't answer a question. It's very important because we want to make sure that the human is always involved there.
So we're going to add two functions. Let me get rid of this and I cuz I already did this. So let me just go ahead go to this appointment reminder agent and I'll show you.
It's the same thing. This this uh identity and the prompt is the same exact thing as I just copied. Uh except that now on the right hand side I've already defined the functions.
It's very simple again if I just click on edit here. So there's a transfer call transfer the call to human agent and we need to provide the number that you're transferring the call to everything else you you're going to leave as it is and the functions uh this is just very easy to add like if you have seen my um so if I go to the community here the classroom section I've done a deep dive topics on 11 labs so voice agents with 11 labs here it's pretty much similar to the tools there so in retail they're just called functions which is essentially to the uh you want your agent you're giving the agent the capability to like you know do other things like book calls calendar bookings you know call termination like end call transfer calls so that's what it is right and very easy to add function going to click on add here you can do end call call transfer check availability uh book calendar right so all of this is available here that you can and you can obviously always do a custom uh function in here as well but anyways we're not going to obviously do any custom functions you're just going to do an end call and you're going to do a call transfer. Very, very simple, very easy to do.
So, if you click on end call here, you're going to leave everything as it is. You don't have to give a description here, but totally up to do. Same thing with end call.
It's very simple to do. All right. I've added knowledge base, which is my um AI workshop frequently asked questions.
You can do you can add let me click on this so I can show you exactly what to do here. So, you can actually add files, you can add documents, you can add web pages, and you can also add text manually. So, totally up to you.
check that out. Um, but if you don't want to provide that, that's totally fine. I've just given it my uh frequently asked question.
So that way it has some knowledge about AI workshop. So when somebody asks them a question, it knows how to answer that from this knowledge base. This is essentially kind of like a rag if you think about it, which is I've done a bunch of videos.
If you're not familiar with what rag is, make sure you check that out. But essentially, again, this is just telling the the voice agent that if a customer asks a question, use your knowledge base to answer questions. Right?
That's simple as it is. So that's why it's really good if you have a business to put the document frequently asked questions in a PDF and just upload it here. Or like I said, if you have a website, you can just add your URL here.
All right, cool. And then at the bottom, another very important thing, this welcome message right here. Make sure it says AI initiates because when the AI calls, AI begins with a dynamic message.
What that means is it's going to say, hey, am I speaking to whoever the appointment name is? And then it's very natural, right? So you want to make sure you're selecting this because by default it comes as user initiate.
So totally up to you do up to you but uh I think the AI initiating and kind of saying hey who am I speaking to this person is probably more natural but totally up to you. All right so I'm going to um once you done with everything you just click on save. I obviously I don't want to save because I already built this.
On top right here you're going to select the model and the great thing is this actually provides you the pricing. So depending on which model you want to go with, the most expensive one is actually this GPT4 or real time. I mean it's like half 50 cents per minute.
So you can imagine it's very very expensive. Uh you can use GPT4. 1.
You can use uh 40 uh or a mini. So play around with different models, see what you like. Obviously the 3.
5 uh set is also a very powerful model, but they are very reasonable, you know. So, I mean, for GPD4. 1, it's uh 4.
5 cents per minute is pretty good. So, and then obviously Nano is going to be the fast one, but sometimes the GPT 4. 1 Nano is not very smart.
So, I would suggest just playing with different models depending on uh what you're building there. So, the voice, you can choose one of these pre-made voice. Obviously, I have Cologne Jarvis's voice when I built my the Jarvis uh video that I did.
So, hey, I'm your virtual assistant from retail. There you go. So, you can click on these play and then you know these different voices will will uh show up.
So, the way to simply use this in the right hand side, you're just going to click on use voice and then this will uh be brought right here. Okay. And then obviously you select the language.
Obviously, it supports multiple languages, but I'm just going to leave it as English. And that's pretty much it. You're you're pretty much done here.
Another very important thing is that you need to make sure that you're adding a outbound call. So the way to do that is if I go back here, you need to have a phone number obviously. So if you go to phone numbers here, uh here's where you need to buy a phone number, right?
Because obviously if uh you're calling uh customers, you need to make sure that you're buying the phone number that's relevant to that particular country. Retail actually makes it very simple. All you have to do is click on the plus button.
You can actually buy a number directly from Twilio. Very, very simple. Uh, or you can use this Telenx, but I've used Twilio before.
And it's $2. And you can also identify the exact area code. So, mine's like because I'm in the Bay Area, so I just put 510, but you just put this and you click on save and it will give you a number.
It comes with the free account comes with $10. So, feel free to buy that. You can easily use it.
Okay. Okay. So once you buy the number, another very important thing is that you're going to come to the outbound call agent because for our case we need to make sure that our um outbound is being used for this particular agent.
And this is where the naming of your agent comes in. Right? So as you can see I have an appointment reminder agent and the single prompt agent that I didn't name earlier.
So that's why it's showing up here. But you'll select the exact one the name of the agent that you created. Obviously I'm just going to select this.
So that's why it's there. Uh since we're not using this, it's inbound call. So we're going to leave it as none for now.
Uh another important thing is that you can see right here it says make an outbound call. It's enabled for me. On the right hand side when you come here for you, this is not going to uh show right away because you need to verify your identity.
Uh if you're in the US, I think that's a requirement now. So but it's very simple. You're just going to click on verify identity.
It'll give you like a QR code and you'll quickly do your identity verification and you can come back and this will show up. But other than that, you're good to go. So now, let's go ahead once you set up your number and everything.
Important thing is you need to copy this number because this is going to be the outbound number that your AI agent or your workflow inside and then is going to make a call. So you're going to click on copy here. You're going to come to your workflow and right here you're going to get rid of this.
As you can see, it says from number, right? I'm just going to paste that. So this is very important because obviously this is the number that your agent is going to make a call and this is what's going to show in that uh when somebody is receiving this call.
So make sure you copy that properly. Another thing is override agent ID and I'm going to get rid of this again and we're going to head over to our AI agent here. Go to agents.
Click on that agent that you created. And then on the top right here it says agent ID. You're just going to copy this.
You're going to come back and you're going to paste it. Okay, perfect. So now if I head out of this now, everything should be good to go.
If I test this now, where's my cell phone? Right here. If I click on test, this should give me a call.
So if I click on test, so I'm going to show you. You can see the phone here. I should get a call quickly.
There you go. Perfect. Right.
I know it's a little blurry, but you can see there you go. I got a call. So now I can answer the call and you can listen to this.
Hi, am I speaking with Zubatzada? Yes. Great.
Thanks for confirming. This is Jarvis from the AI workshop AI agency. I'm calling to remind you about your upcoming consultation regarding AI automations and workflows for your business.
Your consultation for AI agent automation is scheduled between 1:00 p. m. and 2 p.
m. on Tuesday, May 6th. Does that time still work for you?
Yeah. Can you remind me a bit uh give me a bit more details about the appointment and uh who it's with? Absolutely.
Your appointment is a consultation focused on AI agent automation where well discuss how AI can help streamline your business operations. Oh, okay. Yeah, that sounds good, Jarvis.
Yeah. No, I appreciate it. Thank you.
Yeah, I should be able to make that appointment. So, we should be good to go. Awesome.
We're excited to talk more about how AI can help your business grow. If you have any questions before your appointment, feel free to reach out. Have a great day.
Thank you. You, too. There you go.
And it just hangs up the phone itself. So, as you can see, it worked. Um, and again, if yours is everything is set up properly, if you click on test step, it should give you a call.
So make sure you double check that before uh everything goes through there. So as you can see everything works. Now if you just uh click on live here cuz right now it's inactive obviously if you click of active here.
So you would have to save make sure you you save your workflow here and now it's good to go. So now every time uh on it based on whatever trigger you have. So every day at 8 a.
m. this will trigger the workflow. It will monitor your calendar and then it will call all of the appointments that are set based on your calendar right here.
Of course, uh depending, you know, it should have all of these information. Um and if you're making those appointments, make sure you're are testing these appointments, make sure you're adding these details because that's what we defined on our AI agent in the structured output parser here. We made this a requirement, right?
and it should gather all of that information that's coming in from the Google calendar here. But anyways, this is essentially the entire process. I know it's kind of like a simple build, but you can imagine you can now do additional things with this.
You can add additional tools to give your AI agent insight and then more information on the retail agent itself. you can add multi additional kind of uh examples and uh if you want to put like more guard rails as far as how it needs to interact with the customer. So this is where you can really play around and make this your own, right?
And then also obviously for the function calling and knowledge base, that's where you can also play around and check the different versions there too. And same thing when you're interacting with uh with with the AI agent when it gives you a call if it um doesn't know the answer it will actually transfer it to a human because it's set up in a way that uh it needs to transfer the call. So it says if the client asks to reschedule cancel or has a question outside your knowledge base you need to transfer the call and you need to use this function call called transfer call right because this is that function right here.
here. So, if I click on edit, you'll see this just says transfer the call to a human agent and it will automatically do that. And as we saw in the demo in the beginning of the video, it actually does that.
When it gets stuck, it will transfer you transfer you to a real human based on the number that you provide here. So, again, it's a very nice and well put together agent here for real life use case for businesses. So, you can imagine you can sell this like I said or uh add additional functionalities here depending on what you're doing with it.
All right. Well, that was it. Again, I will be doing a lot more with retail.
And if you're interested about learning kind of the basics of how voice agents works, make sure you check out the community here. I have this kind of introduction of how voice agents works with 11 Labs, but it's pretty much the same concept, right? So, it will work with that, too.
And then, obviously, I'll be adding more uh voice agents to these classroom sections, so that way you can have those interactions and learn more advanced use cases there. All right. Well, thanks for watching.
Hopefully you found that video. Hopefully that wasn't too complicated. Make sure you like and subscribe because I've got a lot of really great content, especially around voice agents that are upcoming you don't want to miss.
Thanks for watching again and I'll see you on the next one.
Related Videos

23:02
My Voice AI Agent Negotiated 800+ Business...
Greg Isenberg
88,880 views
25:58
From Zero to Your First AI Agent in 25 Min...
Futurepedia
594,626 views

1:56:29
Master AI Voice Agents with 11Labs + n8n (...
AI Workshop
2,975 views

16:30
10 Insane AI Agent Use Cases in n8n! (stea...
Jono Catliff
57,659 views

17:17
I built a LinkedIn Post Generator for $0 (...
Abishek
1,734 views

25:50
This AI POSTS Viral LinkedIn Content FOR You
AI Workshop
7,330 views

23:31
I Built an AI Content Agent With N8N and C...
Greg Isenberg
81,618 views

27:10
How I’d start a Voice AI Agency in 2025 (i...
Jannis Moore | AI Automation
45,150 views

26:30
Automate EVERYTHING with this No-Code Voic...
AI Workshop
15,982 views

19:27
How I'd Teach a 10 Year Old to Build AI Ag...
Nate Herk | AI Automation
255,651 views

24:08
How to INSTANTLY Build An AI Agent Army in...
Mark Kashef
82,413 views

32:19
7 AI Agent Tools for n8n you MUST have! (I...
AI Foundations
41,308 views

24:47
How To Build a Startup Team of AI Agents (...
Simon Høiberg
649,403 views

20:15
Build Anything with Lovable + n8n AI Agent...
Nate Herk | AI Automation
94,762 views

14:08
Don't Sell N8N Workflows, Sell AI Infrastr...
Ethan Nelson
71,312 views

32:40
The ULTIMATE n8n RAG AI Agent Template - L...
Cole Medin
85,713 views

20:51
The Only 12 n8n AI Automations You'll Ever...
Jono Catliff
29,239 views

34:16
The ULTIMATE AI Social Media Automation Sy...
AI Workshop
14,292 views
31:43
N8N Full Tutorial: Building AI Agents in 2...
AI Foundations
295,203 views

26:46
Sell AI Systems, Not AI Agents (how I made...
JP Middleton
102,221 views