Price Action Trading For Beginners: Market Rules EXPLAINED | Trading Secrets
79.37k views6773 WordsCopy TextShare
Thomas Wade
The only people who know where the market is heading are institutions. They are the ones who make th...
Video Transcript:
what's going on guys welcome back to my youtube channel and in this video we're going to talk about the price action rules in general and our rules how we actually take the trades but before we get started we need to take a little moment and talk about how market actually moves and how the prices on the prices print on the chart the first the most important thing to realize is that we cannot move the market we are average retail traders it doesn't matter how many contracts you can trade unless you're ridiculously wealthy if you and
your 20 friends sit down in one room and try to take a trade and you think you're gonna make the market move it's not just gonna happen just not gonna happen so we need to understand that there are big players dynamic players they are moving the market and these players are big institutions hedge funds banks all these all these institutions are using mostly programs and softwares to do the trading for them so all we are doing we're just following these big players we're just following the dynamic traders who can move the market we cannot move
the market so all the price action trading is and all we are doing here is we're just it's just we're like we are tracking wild game we're just tracking the wild animal that is leaving footprints leaving mess where had it has been you know leaving some sort of scent you're passing through all this is what we are trying to accomplish here because nobody knows where the market is going to be week from now nobody knows but those people who are actually taking the trade those people who got deep enough pockets those big players they know
where the market is going to be because they are they're the ones who are moving the market they are the ones who are moving the market so they know what's going to happen 90 of retail traders on youtube nobody knows what's gonna happen even i don't know what's gonna happen long term i just know that if i follow the price action and i will follow their footprints i will get my skull portion and i get out and that's what i'm trying to show you guys here okay so now that we understand how market moves we
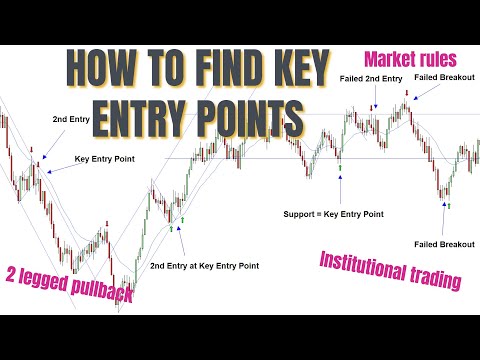
where do we find the proper entries because we cannot just take any entry we see we can't just enter on every single bar thinking that we're going to work we just need to we need to have some reason for entering we need to find the proper spots when the prices are reversing when the prices are pulling back then the prices are making corrections we need to find the proper entry to know how to correctly follow these big players and this is basically what we are trying to do here there is a lot more to price
action trading but our key setup our key thing that we are looking for is the second entry at the very important entry point or or key entry point and what are key entry points key entry point is trendline ema or support and resistance these are the key entry points these three or four if you count support and resistance s2 these four for lines or for support and resistance type levels are the key entry points of where we are looking to find the second entry and why we find why we are looking for second entry and
not just first entry or not third third entry well because you can actually check the al brooks's material on this because i have studied al brooks almost religiously when i started trading it is hard to understand but it works he explains that when people are trying to do something once they will usually give it one more try before they stop doing it again so when it works the same way in trading if traders are trying to move the market up they will try to do it once if it fails they will take a little break
and try to do it again then if it fails again there is 90 chance that they will completely abandon their decision and go with the flow so this is why we are looking for second entries and but not just second entries anywhere on the chart like i said at the key entry point but simultaneously we are also looking at failed second entries and your first thought is probably well what's the difference you know how do i know when the second entry is failing so i know that it is a failed second entry and not just
second entry that is failing on me well the the difference is we are trying to take second entry with the trend and when we are trading we are taking failed second entries it's usually counter trend trade like for example this is a felt second entry long and this is a second entry short it is a failed second entry long because we are in a downtrend and it is a valid second entry short because we are once again in a downtrend so these are the main setup that we are looking for but before i get into
more details about the price action rule in general how the market actually moves because there are the rules of the trend line and rules of the trading ranges i'm gonna take a quick moment to actually describe a little bit the money management and how you actually handle placing an order into the market when it comes to money management system this is basically up to the trader himself i recommend going at least for one to one ratio meaning you risk you're gaining the same amount as you're potentially risking in the esd i'm trading right now i'm
going for 10 ticks and most of the stop loss i take are around the two point area so this is why i hedge my bets that i'm going only for one to one ratio but if you're trading stocks or forex it's not going to be 10 ticks per se because this is typical for es but you can eyeball it how much is the average stop loss you basically have to sim trade it long enough to get the feel what the average stop loss is and you're gonna your target profit is going to be the similar
amount as the stop loss you are averaging on let's say 100 trades and this should be equal to your skull portion whether to place a stop stop order or limit or this is solely up to you i like limit orders because i like to sneak a little bit back to you know hedge my bet so i can scalp much more easily but if you like stop orders hey it's your choice it doesn't really matter i just me personally i like limitors the only thing that is absolutely rigid is you have to put your stop one
tick below this below or above the signal bar so if you look at this area right here this big bearish signal bar you have to put your stop loss one tick above the signal bar you don't want to put it more ticks than one take because if if the prices go one take about this very signal bar the prices are most likely going in the opposite direction and you're most likely wrong so you just want to catch your losses catch your losses as quickly as you can you don't want to be one of those guys
who keep moving the stop further and further back and giving all the money back on one single trade trust me we've all been there so put your stop loss one tick above or below the signal bar that you're taking the trade this is a rigid and you cannot you cannot change this rule and the final rule when it comes to other actually two more rules when it comes to managing the trade if you miss a trade and you actually get the scout portion let's say you go short here and market moves and scalps the 10
ticks but you didn't get filled but your order is still hanging here you have to cancel it because the trade has worked but you didn't get filled you get left behind and that's okay but you cannot wait to get filled again and then hoping you're gonna make the trade happen once again it's not once a trade makes the scalp portion and you didn't get filled you have to cancel the order and look for the next one and final rule when it comes to managing the trade is you have to let the signal bar finish this
is the big problem when i first started trading you know a bunch of years back ago is i actually stumbled upon a few traders who taught me to try to sneak a little bit early when you see the signal bar pushing in one direction place the stop place the stop order there and hope the signal bar is going to work but you you you don't want to jump the gun you need to wait for prices to finish for signal bar to finish to know whether it is truly a bearish bar or a bullish bar if
you're looking to go long so never try to sneak in early you know the price just because prices are reversing nicely on one move doesn't mean that they're not gonna bounce back few few last ticks in a few last seconds they might go in a completely opposite direction you just got trapped because you went long or short too early so always wait for prices to complete their the the closer countdown and i just want to quickly talk about two price action rules that are common for the markets and the main rule is called the trend
line rule and the rule says that after a break of a trend line there is most likely going to be a re-test of a new extreme after break of a trend line you are expecting at least correction and ninety percent wise a break and a new extreme up you can see they happen right here break new extreme you can see they happen right here break and a new extreme and it happened it's happening on smaller trend lines as well so this is the rule of the trend line and there's a rules rule of trading ranges
stick with me i know there is a lot to talk about but it is worth it because i explain this in the video as i go on so i want you guys to understand what i'm talking about what i'm looking for once the prices go into trading range the trending range the best way to trade trading range is obviously sell the highs and buy the lows duh that's what everybody's teaching you probably know that that you should avoid trading in the middle but the best way to trade trading ranges is the faith the breakouts fading
is trading in opposite direction of the breakout this is the fading of the breakout and this would be the fading of the breakout and you can see most breakouts of trading ranges will fail but let's talk about actually the practice of the rules as you can see prices are working lower so we are in a downtrend now and what are we doing we are waiting for second entries at the key entry point so this is the new low prices are working higher but we did not triggered below any of these bars we didn't trigger below
any of these bars this was the first bearish bar that we triggered below this you can see we triggered below this bar this is the first entry it is close to the key entry point so we can count that this depends on experience but this is just the first entry this is not according to a rule so we have to skip this trade just because it worked here doesn't mean it's going to work next time but price prices tried to make one more push higher and failed once again now this is still part of first
entry but now we made a lower high it is still at the key entry point and trendline rules are telling us that we are looking for a new extreme so this is why it is a good trait to take even though it is not a textbook second entry just because it's not second entry doesn't mean that if you got more rules there you know connecting the dots for you you're not going to take the trade but if you're just starting out looking for typical second entries is the best way i'm marking all the possible setups
because i got the experience and i want you guys to get the tips what i've learned so right now we are working lower we made a break and a new low a little bit push lower so this trend line has already played out the downtrend has already played out and now what we are looking for the trendline rules are telling us we should be looking for a correction at least or a complete reversal and this is what happened prices reversed from here and once again notice this we are not breaking lower below any of these
bars this is the first break lower so this is just first entry below this bar prices are pulling higher so first entry failed first entry short fell what when we broke about this bar this is a failure so prices tend to mate attempted to make a second entry we are working higher we triggered one tick below this bar we're pulling back first entry felt second entry triggered below this bar this would be good bar to take good trade to take this would be a good second entry because we worked higher we spiked through ema ema
is holding so this is one key entry point there is a trend line this is the second can second key entry point so we got two key entry points going in our direction we are looking for new high and we are looking for a reversal because this downtrend has played out with the break and a new low the only reason why i didn't mark this trade even though it is a perfect setup is because the signal bar is absolutely horrible we are looking to go long and we need a nice bullish reversal bar like this
this is a bearish bar stims on both sides so even though this is a second entry the signal bar is important don't forget that and one and we made a one push lower still at the key entry point still at the trend line and at the ema so this is why this was a good trade beautiful signal bar so just something to think about second entry was perfect key entry points were perfect and you see if you would have taken it it would have worked you know because the second entry is such a powerful setup
it still would have worked we just want to maximize we want to get as much higher probability on our side as we can so it's better to wait for the better signal bar and once again we are working higher we have a break couple legs to a new extreme and you can see we broke few ticks higher so we have a new high here so what the rules of the trend line are telling us after a break over of the trend line we're most likely going to have a correction and a break and a new
extreme and this is what happened here so we have a double tap forming here you're expecting the reversal as it is happening you can see we pull back through ema this is the new low this is the new this low is lower than this low so the count stands over from here pull back first entry be triggered you can see the one you can see the one little tick break below this bearish bar so this is just a first entry but it's not according to our rules we are looking for second entry so pull back
first entry pull back second entry the first entry felt once we triggered one tick above this bearish bar so this is a failure first entry failed and the second entry triggered with the take one tick lower below this doji bar it is at the ema we are looking for break and a new low of this trend line so second entry at the key entry point at the ema and we are waiting for a new low good quick scalp to take i was quite the surprise i was surprised that uh we reversed once again highly laggier
and this you can see nothing in price action is 100 and nothing is going to work 100 nothing is written in stone but you can see you can get even if we are we were off here but our rule still got us easily our skull portion this is what we're trying to do this is the nice advantage of intraday trading we can actually we can even be wrong and still make a winning trade because this is how this strategy is set up to do you don't have to be right on big moves you just have
to follow the institutions and just get the piece of their money just get the piece of their money and it turned out we actually made a few more legs the new high this was the first lag this was the second lag you can see it's not quite measured but it this was very surprising move i don't know what happened here nobody knows only the institutions who are placing the trades no but we definitely got a new high here this trend line working hard higher you have a new high here but you can make a case
that a lot of traders probably didn't take this new high into consideration so they tried to make a new high but that's up for debate but you can see clearly new high here this bullish trend is over now just like this bearish trend was over here here this bullish trend is over so now this is the highest high of this entire swing this height is higher than this wing is higher than this wing this is the highest high of this move so we're counting over from now prices are pulling lower first entry triggered one tick
above this bullish bar we're working lower we're shooting through the ema and second entry triggered one tick above this bearish bar so we now we now have two like a pullback first entry second entry and now we can draw the trend line you can see trend line is fitting nicely from the both sides this is how you know you have the trend line correct if the prices are fitting neatly in the trend line so the second entry is now open because people who went long on the second entry went along one tick above this bearish
bar it is a horrible signal bar ignore that for our counting rules this is the second entry and with the break and you can see this bar this bar broke this bar made the second entry long as a failure but we like i said we need to wait for signal bar to finish we cannot you cannot enter let me put let me show you this so you can see a little bit more clearly we cannot enter one take below this bullish bar you can't then one tick like this below this this bullish bar because this
we need to wait for proper signal bar this is a horrible bullish signal bar so with this signal bar this made the second entry failure signal bar but we didn't take lower so the felt second entry long didn't trigger for us for us to go short it happened here we made one push higher the the trend line is still holding it's a key entry point and now we finally triggered below this and even this so this is a failed second entry long not that perfectly clear but it is there and you can see it worked
once again and just like always you have a trend working lower and you have a break now you're at the ema so what do we do okay we draw the trend line because the shorter term trend lines will work as well this is just a first entry we've triggered one tick below this beautiful reversal bar but it's just the first entry we cannot take this and there are trades there are first entries that i'm going to mark because based on experience i'm getting the gut feeling that's going to work so if you watch my videos
this is what i'm trying to show you but if you if you want to stick religiously to the second entries you have to skip this and it's a good move to skip this so we have a first entry here here prices pull back and the second entry here first entry pull back second entry with the trigger below this doji looking bar we are at the key entry point you can see how ema is not letting prices to close higher so this is one key entry point this is one key element of our rules it is
a second entry second element of our rules we are in the midst of a correction in the break and we are looking for a new extreme third element of our rule because we are waiting for this for the new low of this downtrend working lower and you have a break and you have a trailer working higher break and attempt to make a new high now you are probably wondering why sometimes we get a clear new high and sometimes we just get attempt the attempt a lot of times is enough for us to count it as
a new high you cannot make a new high here because we are at the key entry point and the key entry point will not will allow us to make the new high so we just have to set be happy and be content with at least attempt for prices to make a new high so this is the second entry once again you can see perfect price action this is textbook price action and it's actually good that i get to film this video under such a beautiful textbook day most days are not like this and once again
for some reason we kept going lower here maybe there's a bigger pattern unfolding can be something like this this can be possibility um of course if you're a beginner trader with the break and a new low you should be stop looking for shorts okay this was really right but notice how this is a little bit more advanced this is why with experience you get better and better get this why this is a good second entry once again notice new low we are working higher first entry break make a new high this bullish correction is over
we have a break and a new high second secondary trigger one take below this it is almost repeat pattern of this even more more perfect the key entry point is still holding but the reason why it's okay to look for shorts here because you can see how the ema is rejecting prices this is not a reversal pattern you can see take a look at this you have a break right here you have a trend line working lower break new low and you can see how prices push the ema and ema now acts as a support
this is a reversal pattern we push through the ema and ema acts like a support so ema is helping us here to go long because it acts as a support but here this is not a reversal pattern this is the opposite of reversal pattern even though we are expecting at least a correction and this is what happened this was a correction we are expecting to make uh to reverse from here you need to wait for a reversal pattern just like reverse the pattern happened right here because we went through the ema and like here we
went through ema you have a trend working higher break new high and you can see how ema didn't put any resistance we slice through it like it's not even there and now it's holding as a resistance this is a reversal pattern this is not a reversal pattern the ema we didn't close above ema how how how can this be a reversal pattern if we didn't even close above the ema ema is not holding as a support it's actually doing the opposite it's holding as a resistance so this is a tool like a pullback second entry
once again textbook setup so i hope this is helpful to you and it is quite a lot to take in but you can see the second entries they are there it is fairly it is obviously it is not that clear cookie cutter once you're trading live but you can see if you follow the short term trend lines you follow the ema and you're waiting for second entries if you're just patient this is what happens a lot of people a lot of people are they're either being too scared to enter on the right second entry or
they are being way too patient excuse me they are being they're jumping in the gun way too much they're jumping way too early but let's take a look actually yesterday and you can see how yesterday played that once again you are working lower you have a break and a new high and the reversal from here this is textbook price action you can see i'm not making this stuff up this this stuff works and you can actually learn this if you just dedicate yourself to it and this is a reversal pattern you can see how ema
ema is not even there we slice through the email like nothing reversal pattern but let's talk this this is what i mentioned a few minutes ago how the shorter term trend lines sometimes we will not get a new extreme because the key entry point is holding the prices and this is once again the situation the key entry point here is the trend line and the ema here this is the new law of the move bear with me i know just grab your popcorn grab some juice or coffee and just let's get into this this is
a new low pull back first entry we triggered one tick lower below the signal bar it failed on them we broke higher it felt on them and a second entry one tick lower below this single bar so this is the second entry and the signal bar is horrible but you can see it still once again it would have worked perfectly because the price action works why i don't like taking this straight apart from this being another great signal bar is because the trend line rule works as well on the smaller trend lines on the smaller
you know the patterns and we have a small little correction working higher here we have a break an attempt to make a new high this is the first break and prices trigger one tick above this and you can see prices tried and tried to go higher they tried to retest this bullish trend line working her low higher but they got slapped on their hand and instantly reversed down because there's a key entry point there is a trendline working lower there is a ema and this is the lower high and this is similar pattern to here
we are we are working higher first entry and you can see prices went a little bit lower and still they tried to make the new high they pushed higher but instantly the ema and the people are waiting this was such a strong move down people are waiting for a new low this is the lower high so the the key entry point in the overall momentum didn't allow this shorter term prices to make a new high and this is what happened the same thing happened here so we make work lower so you now have a break
but now once again you have a trend line working higher you have a break and attempt to make a new high this is this is not that cookie cutter clean for beginners this is a good trade for a little bit experienced traders because we are still looking for shorts this is such a big move down gigantic move down so even though you have you don't have a new high and the key entry point is not allowing it it is still very good trade because this bullish trend line now have a break and at least attempt
but this was such a strong move down that i actually took this trade and i liked it but you will actually learn this with experience so don't worry and if you're just unsure you just you can just skip this it's okay but remember price action rules worked once again break new low so we are now looking for for at least a correction or reversal but you can see i'm just i'm just gonna throw a little nugget in here this is once again almost 90 degree angle move and i keep telling you they won't last a
long time so once you see trend line a break and a big sharp 90 degree angle move you're most likely going to reverse from here so this was very expected by experienced traders and once again take a look another situation and you can see the second entries are working but it's more safer you get much more higher probability win percentage you get 90 win percentage if you just wait for the retest of a new extreme the attempts just like we tried to make a new high here and the key entry point is holding the prices
we have a new high here pullback first entry we trigger one tick higher above this bullish bar it failed working lower second entry we trigger one tick above this so this is a second entry long of the trend line and off to ema and a little bit even off the trend line it's not perfect but you don't have to be perfect so looking back now this i'm probably gonna even mark it because this is such a beautiful signal bar but you can see how much safer it is to wait prices broke higher so we have
a break of the australian working lower and attempt to make a new extreme but the ema one key entry point trend line second key entry point the key entry points didn't let the prices make the new extreme and this is a beautiful bullish reversal bar you have to go along here and you're working higher and higher you make a new high here you have a first entry pullback second entry and you can see how horrible signal bar this is and if you just if you just create blindly second entries you would have gotten burned here
but that's still that's okay because you have four four winners here or you have i don't know two energy or multiple winners here that's what trading is about nothing works 100 if you just close your eyes and take this horrible berry signal bar you got trapped because the signal bar was horrible you're looking for a signal bar like this because we're going long so we need nice bullish reversal signal bar but it's okay if you take all the second entries with the trend you're still gonna end up with 70 win percentage easily we're just trying
i just like to be right as much as i can even though i want to be emotionless as a trader i just want to get my odds in my favor so you can see you have a break new ho new low new low right here the ema is holding and you're looking for a new extreme to make a new extreme and some of you might ask why i'm not looking for failed second entry with the canon trend trade you're looking for failed second entry once you once the one trend played out so you have a
break now here of this bigger bullish uptrend you have a new high here so this from this point on if you want to count trend trade that's where you look for failed second entries with the trend we're looking for second entries and content right we're looking for failed second entries but now we're getting into trading range category and you can see that the trading range now we have to a little bit tweak our rules because now we have to play trading range rules and with during trading range we are most likely looking to buy the
lows and sell the highs and fade the breakouts i'm just going to mark it you know i didn't take this trade and it is hard to take i'm just going to mark it as a failed breakout for purpose of this example and you can see you always have to draw these shortened trend lines and you can see nothing is perfect we didn't make a new low right here because there's a key entry point to support we we though have made a new high here we're working higher brake this is a key entry point look at
this this is a key entry point support is proven good trade according to our training range rules we're working higher we made a two legs to a new high and now trading range support easy to find resistance easy to find okay we have a break of this bullish trend line of this bush train line break new high so we are looking from this point this is our chance to look for failed second entries this is the because this correction played out this bullish momentum played out we are at the resistance and we are now concentrating
because we're we are about to sell the highs we're smart traders we're selling the highs you even have a little bit break break out here so this is a fail break higher as well this is the new high right here this high is a little bit higher than this high price is pulling back lower back in the trading range first entry we trigger one tick above this bullish bar we trigger one tick above this bullish bar it failed so first century long failed but once again human psychology people will attempt to do things twice this
is a tool like a pullback market moves in tools remember this is it and look at this oops this is a tool like a pullback on a little bit smaller picture one leg second leg and it is a two legged pullback on a little bit bigger picture this is the one leg this is the one leg and this is the second leg so there's the levels to this and it may seem a little bit overwhelming now but once you get into this it will be fairly easy to identify the two like a pullbacks but this
is the first entry second entry long it's going going higher and it it's failing it failed one tick below this big bearish bar now i marked this for sake of the example this is a failed second entry long at the high of the trading range nevertheless my experience is telling me that we are on the ema and you can see ema is kind of holding the prices so once we made this beautiful bullish reversal bar gigantic bar a lot of people jump on board going along into the resistance this is a little bit lower high
this is still the continuation of the failed second and failed second entry long but this is much safer setup right here but nevertheless the second failed second entry long still would have worked easily so you can see that the rules apply when i'm doing my videos i'm just trying to give you all the nuggets that i've learned over the years almost over the decade i'm in my ninth year now i started trading when i was 18 or 19 something like that so i want to give you as much as knowledge as much experience as i
possibly can and you have a fail break higher and fail break road this is pretty much self-explanatory that you want to once you're this is hard for beginners to trade because this is so counterintuitive because look at this bullish uptrend now and look how the prices has proven you know common thomas you you cannot go short here because the prices have proven anybody with a common sense any doctor any engineer any lawyer can see that the market is going higher who on their with their right mind will want to sell this market when it has
proven prices have told us that we are going higher well this is the common sense that you have to throw out the window because of common sense some of the most smartest people and some of the wealthiest retirees the people that are very experienced and very successful in real life are failing miserably in trading because they rely on their common sense common sense will not help you in trading you have to erase completely every everything you've learned during your life and embrace the way market things and market operates because this is so hard to take
this is so hard to take but you can see you have to trust the rules that the most breakouts will fail and it happened and it happened right here you can see look at this bearish momentum going over now we are clearly reversing okay i was wrong right here i was trying to go along here but it failed but now i'm gonna be right look how this bearish momentum is going over okay now we are reversing okay okay i gotta go i gotta go short i gotta go short i'm gonna go short on this bullet
on this doji bar right at the low of the move and boom it's a fail break lower and smart institutions are going higher they just trapped everybody so this is just some something to think about hopefully this video was helpful to you um it is you can see the second entries with the trend they are there at the key entry points the ema it is a 21 bar ema by the way this is the key entry point and if you get any comments you know feel free to put in the comment section i will try
to reply or you can shoot me an email i will though it will take me a little bit of time to get through all the emails because the channel is growing which i really appreciate and i got only a little amount a limited amount of time in day but hopefully you liked the video hopefully this was useful to you and i see you guys in the next video bye guys
Related Videos

20:52
Price Action Trading For Beginners: How to...
Thomas Wade
36,846 views

31:16
5 Price Action Rules EVERY Trader NEEDS To...
Thomas Wade
2,029,037 views

45:59
The 3 Scalping Setups That Make Me A Livin...
Etienne Crete - Desire To TRADE
753,548 views
23:25
The One Trading Strategy That Works Everyd...
The Rumers
415,113 views

20:26
Rules For Scalping Trading Money Management
Thomas Wade
45,324 views

54:56
How to Read Candlestick Patterns (Step-by-...
Ross Cameron - Warrior Trading
689,747 views

1:18:10
Manipulation Expert: Success Isn’t Luck, I...
BigDeal by Codie Sanchez
533,232 views

29:34
Price Action Trading Strategy Extended Cra...
Humbled Trader
286,336 views

47:30
Al Brooks Webinar - TradersEXPO Las Vegas ...
Brooks Trading Course
153,769 views

1:09:23
WEBINAR: How to Trade with Volume Profile ...
Trader Dale
475,400 views

21:19
Day Trading Price Action Masterclass! MY S...
Patrick Wieland
71,369 views

1:10:01
Brooks Price Action: Trading Opening Break...
Brooks Trading Course
741,814 views

27:58
Every Candlestick Tells a Story... Here's ...
JeaFx
548,125 views

46:11
Secret SMC Strategy: How I Make $30,000 Pe...
Lewis Kelly
263,915 views
49:19
Ultimate Beginners Guide To Price Action T...
The Trading Channel (The Trading Channel)
173,837 views

27:40
The ONLY Beginner's Guide To Trading Trade...
Thomas Wade
147,085 views

28:06
Scalping series: #01 Rules for scalping
Brooks Trading Course
817,377 views
22:11
Reading A Price Chart Bar by Bar | Price A...
Thomas Wade
41,968 views

22:48
Ultimate MA 95% Winning Strategy | Step-by...
TRADE ATS
483,101 views

1:25:29
How Pros OUTSMART Retail Traders (Insider ...
Words of Rizdom
120,722 views