HUGE Magnet VS Copper Sphere - Defying Gravity- Will a Neodymium Magnet Float Inside?
3.35M views1394 WordsCopy TextShare
Robinson Foundry
In this video, I test the interaction between a neodymium magnet and a copper sphere using the princ...
Video Transcript:
I recently made this seventeen pound copper tube to experiment with Lenz’s Law using this terrifyingly powerful neodymium magnet. It's fascinating to watch the magnet seemingly defy gravity while it floats to the bottom of the tube, This happens because as the magnet moves, it creates electric currents in the copper, which in turn create magnetic fields that oppose the magnet's motion. This invisible resistance slows the fall, making it look like the magnet is defying gravity.
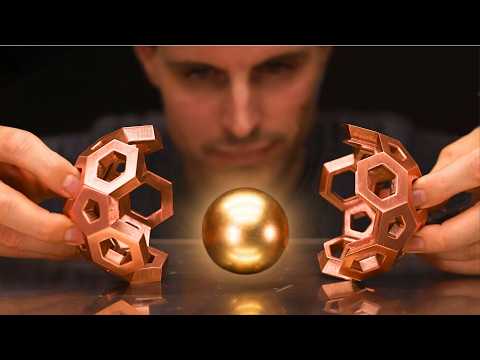
What's even more fascinating is that when I place the magnet in the tube and spin it, the magnet stays suspended in the center. This got me thinking, will a spherical magnet float in the center of a copper sphere? Well in today's video we’re going to find out but first I need to make a copper sphere that we can actually see into I wasn't sure how I was going to design something like that until I noticed one of my dogs favorite toys.
Here's what I designed. It's as close I could get to a sphere while still being able to see the magnet through it. This actually called a truncated Icosahedron but that's a mouthful so for my sanity I’ll just refer to it as a sphere.
I started by 3D printing it in PLA plastic. I’ll use these 3D prints to make a mold out of ceramic shell. It came off of the printer looking pretty good but I still needed to spend some time cleaning it up to get it ready for casting.
Next I’ll attach some sprues. These are what I’ll pour the metal into and they're really large because they'll also act as risers, supplying the castings with molten metal as they solidify and shrink. Here's the ceramic slurry that I use.
Over the course of about a week I’ll dip the models into the slurry a total of nine times in order to build up a thick shell. In between each layer I’ll coat them with fused silica sand. This helps thicken the shells and also adds some strength.
Making complex shapes like these is where casting in ceramic shell really shines. There's no way I could make these any other way and having a machine shop make them would be incredibly expensive. Next it's into the kiln to burn away the plastic and turn the shells into a strong ceramic.
I don't just burn away all of the plastic though, once the temperature is high enough for it to liquify I remove most of it, and then return the shells to the kiln and fire them at 1600° Fahrenheit. Here’s all the copper I’ll be melting. This is nine pounds or about four kilograms.
It’s mostly copper pipe with some wire thrown in there also. It’ll take about an hour to melt this amount. Copper is always fun to melt because it creates these really cool looking green flames when I add fresh pieces to the crucible.
Once the copper is hot enough to pour into the shells. I’ll quickly remove the shells from the kiln while they’re still extremely hot, place them on some sand to catch any spills and then pour in the metal. It’s always amazing to me that for all the prep work and time that I put into thinking about how to do this, figuring out how to execute it properly without fumbling around or making any mistakes it only takes a few seconds or so to cast these and then they're done, Its out of my hands.
I’ve done this hundreds of times by now, but I still get a little rush of adrenaline every time I pour a casting and I think that’s mainly because of how much work has led up to this point and I just want everything to go right and fortunately most of the time it does. Now I just have to wait for them to completely cool overnight before I can begin removing the shells. I'll have to use my sandblaster to carefully remove the shell because I can't risk trying to break it off since copper is so soft.
I could end up deforming the castings in the process. This is actually really satisfying. Instead of just slowly blasting the whole thing away, I try to cut large pieces off.
To give you some idea, each shell took about thirty minutes to remove. These castings turned out super nice looking. You can see these booger looking things here which are caused by air bubbles as I dipped the models into the slurry, these are easy to remove with a chisel and besides that they're just about perfect.
Now I’m drilling a hole in the center while I have something to hold onto in the vise. It'll make it easier to file in the pentagonal shapes later on. You’ll see what I mean in a minute.
I wonder what I could use these for? Any Ideas? It's important that the pentagonal holes are filed straight and precise, as I'll be 3D printing plugs to fit perfectly into them.
These plugs will serve as the points where I’ll be able to spin the sphere, so the fit needs to be exact for smooth and balanced rotation. The last step is to polish each facet and this little belt grinder really made it easy. I'm using a Scotch-Brite like belt, which can polish each facet in just a few seconds.
Since it's solid copper, though, it heats up quickly, so I have to cool it down in between each one. Well here it is. I think this turned out incredibly cool looking.
Honestly, even if I had made it just to have something interesting to look at, I’d still be happy. Okay, let's find out if it actually works. Here are the plugs that I’ll press into those holes I filed in.
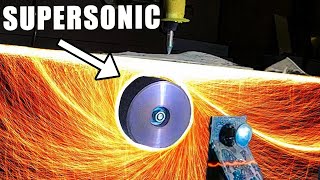
Hopefully they'll stay put. The magnet I’m using is a two inch N52 Neodymium magnet. It's the most powerful grade you can buy as far as I know.
To hold the sphere together I printed some clips which should do the trick. And I also made a stand for everything to sit on. Okay so I’ve resisted actually spinning this thing up until this moment so hopefully something cool happens.
Oh yeah it is, it's actually floating right there, look! There, now it's kind of falling but, at the right speed Right there! Yep Ah that’s so cool!
I wonder if I can get a better angle on this, so you can see what I mean. Okay, so I changed up the lighting a little bit and obviously it's a different angle so hopefully you can see what I’m seeing. Yeah it is actually floating there!
It's just about getting the right speed. Right there. Yep Totally just floating there.
That's awesome! Ah man that's so cool! Let's try a drill.
So I think when I do it really really fast centripetal force is just forcing it over to one side, I think. So obviously this is working but its difficult to get it at a consistent speed. And also this plug isnt fitting there really well I think its kinda worked itself loose so.
I’m going to need to re-print this and then uhm in the future maybe I’ll hook it up to a motor, that'll make it a lot more consistent. So clearly it works but the effect isn't quite as dramatic as I was hoping. There may be some ways I can improve on it so let me know if you have any ideas.
Besides levitating a magnet, there are a lot of other things that can be done with this thing. By using another magnet about a foot away I can rotate the whole sphere. It's hard to show on camera just how strange it is to manipulate the magnet in here.
It's almost like it's underwater. Let me know if you can think of some experiments I should try and I’ll make a compilation video. If you would like to follow along with the progress of my projects and help to support the channel then consider joining my patreon for patreon only content.
I hope you enjoyed this video and if you did then let me know in the comments give the video a thumbs up and subscribe for future projects.
Related Videos
14:34
Can I make Titanium Damascus?
Alec Steele
2,208,060 views

27:44
How many plants do you need to breathe? T...
Joel Creates
3,865,970 views
23:05
World's Strongest Magnet!
Veritasium
13,338,273 views

14:01
I Turned Iron Pyrite into PURE GOLD
Ask Jeff Williams
88,433 views

21:23
Custom Transformer Shatters All Voltage Re...
Plasma Channel
535,709 views

14:43
The ancient computer that simply shouldn't...
fern
1,245,940 views

14:40
More Bizarre Attempts at Perpetual Motion ...
Sideprojects
713,682 views

17:11
The Client Sent My Sculpture Back... DESTR...
BM Sculptures
1,804,739 views

14:38
We've Just Found a New Type of Star and It...
Thoughty2
1,000,262 views

16:53
Melting Copper Wire Into a River Table
Burls Art
1,794,420 views

12:29
I made a bolt with MAZE threads - Don't st...
Robinson Foundry
3,717,440 views

16:30
Designing A Self Propelling Ionic Thrust Wing
Plasma Channel
5,404,039 views

11:35
There Is Something Hiding Inside Earth
Kurzgesagt – In a Nutshell
3,921,190 views

18:35
Was This The WEIRDEST Discovery of an Elem...
Chemistorian
151,740 views

42:57
How much ALGAE do you need to breathe? TESTED
Joel Creates
1,443,839 views

15:51
I Built The First LAMINAR FLOW ROCKET ENGINE
Integza
2,934,343 views
11:21
Making Anti-gravity tubes - Copper & Silve...
Robinson Foundry
984,326 views
14:03
How Fast Can We Spin A Titanium Skateboard...
Waterjet Channel
2,049,006 views

34:49
Seeing Inside a Thermite Reaction
Veritasium
5,443,004 views

28:32
Six questionably legal pencil sharpeners
Stuff Made Here
11,143,721 views