HVAC 147 Vacuum p14 Example 2 single hose setup
23.61k views4401 WordsCopy TextShare

Love2HVAC with Ty Branaman
Another example of fast vacuum but with a single vacuum hose.
There is a lot of similarities betwee...
Video Transcript:
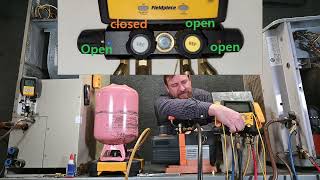
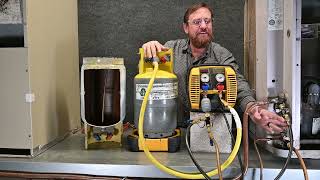
last time we pulled a vacuum using two vacuum hoses and three valve core removal tools now we're going to drop it down to one single vacuum hose and two core removal tools we're still getting our nitrogen tank which we need anyways for brazing or pressure testing we have a refrigerant tank and our scale we have a coarser vacuum pump and our optional but really great to have tank heater just like we did before we need to start with our bench tester blank off test for a vacuum pump so let's start there hint i never actually
changed the vacuum pump oil from last time so let's see if that oil is still good valve core tool is connected i'm going to put a cap on the end which i shouldn't need because this is a vacuum rated valve but just in case we'll put that cap on now i can put my micro engage right here on the end we'll power up our micro engage and just like before micro engage is on this side of that valve so once we turn this pump on we'll be able to see how good our oil is and
at the condition of our pump and also be able to check our micro engage we said we pulled our microphones down to 40 microns that wasn't as deep as we had at the first time when we had virgin clean vacuum pump oil however we still pulled on below 50 microns so i'm going to continue to use this same exact vacuum pump oil it's the same exact day we haven't lost anything other than just a couple hours of time so we're going to run with that next thing we do is let's go ahead and set up
for our vacuum and just like before we want to check these caps now before i already put the nylog on the caps not to worry about sealing that again you can see the valve is pulled all the way up it's completely open and it's almost flush with the top so we are pulling a vacuum through the entire line so you either want this to be all the way open or all the way closed in a pump down situation that valve is going to be closed all the way down and it's going to separate the compressor
side from the side that we're pulling a vacuum on so the surface port here is going to be connected to this side of the hose and if this valve was closed everything on that side would be separate now if you're going to pull a vacuum from a pump down you got to think also about these valves if somebody overheated the valve like they did here it's unlikely that this valve is going to seat or close properly when you pull it all the way shut so it's possible you won't get down to a deep vacuum when
you're pulling a vacuum from a pump down system we have the same thing here we make sure that this valve is all the way up it's almost flush with the top which we want we can see the corrosion from before we can't help that but also put the nylog in here already from the last time and since the caps all the way up we're pulling all the way from the entire system and again if it was pumped down this valve would be closed all the way down their service port would be reading on this side
of the line make sure the cap is on there all the way and make sure it's good and tight because as we pull a vacuum just like before if we pull a vacuum with that cap off it's going to be pulling in atmospheric pressure i already have the valve core removed from this side what i'm going to do different is i'm actually going to install the valve core on the liquid side so we're going to put our valve core in right here now we have the valve cord on this side not on this side and
just like before we're going to put our valve core tool on the suction side with no valve core end just a little drop of nylog around there put the valve core removal tool in make sure i can open and close this valve we're in good shape i do not have a valve core in the side port which is how i want it to be i'm going to take my second valve core tool i'm going to put it right here on the side a little drop of nylog take my micro engage i'm going to put it
right here on this very end for this example i'm going to add an extra extension on so we can see it in the camera so this is the adapter i'm going to be using i already have my nylon still on there so i don't need to reapply just going to add my little adapter since i have two female connections they won't hook together so i'm going to use this adapter in field service i wouldn't do these extra steps because again the more connections we have the more likely we are to have fail points or leaks
so i want to make sure the fewest connections is possible but for this video demonstration we'll use it like we did before we have our vacuum hose or large vacuum hose i have the plug here for the large side and also on the small side i have just this little adapter since i don't have the two hoses connect together i just have something i can put in here to keep it dry now in this case i use an automatic loss fitting but you could use an old pressure sensor in there or anything that can just
plug that hole they also make little caps for that but this is the quarter inch side we're going to put the quarter inch side right on the very end of the suction other side of our hose we have our 3 8 connector i'm going to take the plug out and we're going to thread that right onto the 3 8 connector that comes with our vacuum with the design of this pump i cannot get my hose to attach properly notice that the angle that this is at so i'm not able to use it without an adapter
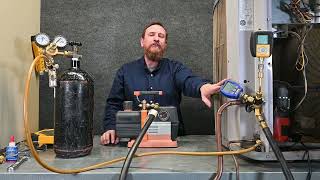
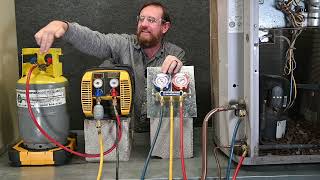
so what i'm going to use is the t that i used before i'm just going to leave the cap of my tee on the back side we take the front side of the cap off and we can attach our hose right there just put a little drop of dialogue so with my vacuum hose hooked up we still have something else to do we have to purge our nitrogen through so that's where i want to use my other hose again this is the hose i use only for vacuum or nitrogen so this hose is clean and
clear it's never had any kind of oil in it the side that has my manual valve this is what i'm going to install right here at my liquid line so it does have the valve core depressor and we do have the valve core located right here so i'm going to thread this on the high side it's going to leave this little manual valve right here leave it in the open position in line with the hose the other end of this hose we're going to attach over here to our nitrogen tank to our flow regulator so
our nitrogen tank is connected to our nitrogen regulator which is connected to our flow regulator which is connected to our quarter inch hose with the valve on it from there it's connected to our valve core automatic valve core which is connected into the liquid line so when i open this up nitrous is going to flow through this hose through that valve core all the way through the liquid line through the meter device through the evaporator coil it's going to come back to the suction side it's going to continue to flow through this vacuum hose i
have the vacuum open on the bottom side and it's closed at the top side this prevents pushing any air or moisture up into my micro gauge it keeps it separate so again the micro engage valve is closed off but the valve is open for this large hose so as i force nitrogen through nitra is going to come through this hose to this connector right here and then i have the cap off on this end so it's going to free flow right out of this opening instead of it going into my vacuum pump just a very
small amount of pressure i really just want to flow nitrogen through the system to push out as much moisture as i can so the first time i pulled a vacuum in this system that method had the card stacked against it because this system had been left open from the valves all the way to the side for over a month so now we're doing it with we've recently pulled a vacuum so this should be a lot faster however i did leave both of these open for about two hours to try to make up the difference there
would be some moisture in there to make all of this relevant we'll see what happens so i'm going to make sure my nitrogen regulator is backed off i'm going to open my nitrogen tank this side is going to read the pressure in the tank this side is going to read the pressure going down to my flow indicator i should be using such a small amount i shouldn't even see it reading right here but we should be able to see it reading with this little ball right here so i'm going to close this down ever so
slightly just nice and slow close this down and here and we can see this ball pushed up on the top side so now we know that we have pressure pushing nitrogen through the liquid line through the meter device through the evaporator it's coming all the way back to the suction line it's flowing through this valve right here through the big hose and it's leaking or purging out right here it's a very small amount of pressure i'm going to increase the pressure so we can hear it but i really don't want that much pressure flowing through
so i'm going to back this off on the flow regulator side i'm going to adjust this knob that's going to adjust the little ball in here which really just represents how fast we're flowing so just a little bit above the middle this allows me to just barely flow some nitrogen through here i'm all i'm trying to do is push out any moisture that's in that system it's just barely flowing through here that's going to speed up my vacuum and it's going to make my oil last longer because i'm not pushing all that moisture into it
now while this is flowing nitrogen we're going to hook up our tank heater now our tank gear is installed there's a thermostat on this tank heater that keeps from getting too hot and all we have to do is plug this in now if my compressor came with the crankcase heater i wouldn't need to use my tank heater however i still like to use a tank heater because it's quick it's fast and even though it's designed to heat tanks it does really well to heat the bottom of the compressor a lot of people don't have these
tank heaters to use and that's okay you can still use a heat gun or a lot of people just do it without especially when the temperature is colder though you want to make sure you keep this oil up now it's not going to make any difference at all while we're flowing nitrogen because nitrogen can't flow through the compressor because of the valves all we're trying to do is help speed this up while we're pulling vacuum the reason i'm doing it right now because while i'm waiting for that nitrogen to flow i go ahead and hook
this up get it plugged in and it just saves me a little bit of time now depending on who you talk to there's different ideas of how long you should flow nitrogen this is a fairly small system so i'm just flowing it through for a couple of minutes or so now if it's a contaminated heavily contaminated system or it had been raining or snowing or something like that and i know there's a good chance of contaminants i'll run it for much longer i just simply flowing it through again i do not want to put pressure
inside of that system if i put too much pressure it can actually cause the water vapor to condense back into a liquid back on these surfaces so by keeping it in the vapor form and just smoothly flowing out helps next i'm going to do is put this cap on and i'm going to close off the suction valve to my vacuum hose now i'm adding a little bit of pressure i don't want too much maybe about a pound or so so i'm just going to add just a little bit of pressure in here just to add
some positive pressure in that system i'm going to close off my nitrogen tank because i'm not going to need that i'm going to close off the little valve right here on this tank hose there's just a little bit of positive pressure in the system so i'm going to take my hose loose here we hear the nitrogen come out of the hose but we also hear the nitrogen slowly bleed out of both regulators to let equals back out next thing i want to do is get my refrigerant tank ready i'm going to take and connect this
hose to my refrigerant tank and in this case i'm just going to open this valve a little bit to allow some of that pressure to flow back through this hose to make sure it stays clean and while that's purging i just simply tighten that up i turn my tank upside down i take my scale i go ahead and turn my scale on and i zero or tail the scale out so it's reading everything on here zero then i'm going to turn my scale back off because i'm not ready for it right now but it's going
to be ready when i'm ready for it so now we have purged the system and again at this method we're not able to purge through the condenser but that's okay we purge through a lot of the system it just takes a couple of minutes to do that i have a little bit of pressure built up in here so we're going to do is go ahead and open this valve and we'll make sure that all of that pressure comes out here how the pressure's dropping now that the pressure's dropped i put this cap back on and
we know that we have nitrogen in the system no moisture no pressure i'm also going to open up the valve to my micron gauge so the valve is open to a micro engage open to my large vacuum hose and i'm also open all the way to my tank so everything's open open open open open it's all open we're ready to now pull our vacuum the caps are on everything's tight we have nylon all of our connections we're going to loosen the gas ballast then we're going to start the vacuum up we get down about 20
000 microns we're going to close this gas ballast last time it happened so fast we blew past that stop but it's okay we'll get started [Applause] [Music] [Applause] please over here we blew past our stop point we're already below 800 microns i'm going to go ahead and close my gas ballast but really you should close it beforehand with this fast vacuum setup we're able to pull that vacuum much faster and you didn't see too much smoke going on here but a lot of times there's a lot of water vapor that water vapor will be coming
out of the pump and you'll see what it looks like smoke but it's typically water vapor [Laughter] [Music] so we're below 700 microns this is a great time to do a preliminary leak test what we can do is then close off our suction valve right here so all this vacuum hose is completely isolated and we can see how fast our microns are jumping up now we can see our microns are rising let's see what it levels off at so notice that we jumped up to 877 microns and it's still going up but very slowly this
tells us that we're unlikely to have a leak if i had a leak in the system it would be going up non-stop so the reason it jumps back up is because we still have water vapor in there we still have water evaporating moisture evaporating even possible refrigerant evaporating that's in that oil so now that we've done that test we can open this valve back up again so now that with this valve open we're then pulling a vacuum from the system and we see our microns again start to drop so we're going to go down below
500 microns and then once we get down there we're going to do another blank off test [Music] so we've pulled down the 357 356 microns but it takes a lot longer where it took us 30 minutes to get to this point but we are down low enough our next step is going to do our decay test so for a decay test i'm simply going to close off this one valve right here and that's going to separate the vacuum hose and vacuum pump from the system so this hose is still hooked up to our tank so
i can shut this valve or leave it on it's not really going to matter i do leave this valve on to my micron gauge so i'm reading what's in the system so the microphones will go up but they should level off if it goes up to a high level say a thousand microns and then levels off then we know we got moisture in a system if it goes up non-stop then we know for sure that we have a leak in that system so we're going to give it about 15 minutes or so and see how
high we go every manufacturer is different for what they want follow their specifications now that we are in our decay test and have this dial shut off i can shut off my vacuum pump so after a decay test or a vacuum test or blink of test we did hit 500 microns after 15 minutes either way we're going to continue with our example i already have the hose closed off to the vacuum pump and the vacuum pumps off the next thing i'm going to do is close off the valve to my micron gauge this isolates my
micro engage so that it doesn't have any damage and what i can do next i can actually take my micron gauge off so it's out of the way atmospheric pressure comes back into it it goes to ol and if i wanted i could also take loose this vacuum hose because we don't need it right now then my vacuum hose i got this large opening i'm going to put the plug back in so i keep it clean dry and tight there's the other side it's going to put a little plug in here as well this is
going to keep it nice and clean and dry you can also put in a connector and you can pull a vacuum on your hose if you wanted or put nitrogen or purged nitrogen through this individual hose if you wanted it is an option now that we're done with the vacuum pump we're done with the vacuum hose we're doing the micro engage we're ready to charge the system next is close off this valve to my tank i'm going to turn on my refrigerant scale and then i'm going to open up this tank so we have liquid
refrigerant flowing into this hose it says that there's three ounces of liquid refrigerant in this hose and ready to charge the system now i've already pulled the vacuum through this hose so it's clean dry and tight and now there's nothing but pure refrigerant in it and this hose is still protected because there's pressure in the tank of refrigerant there's no refrigerantness hose but there's no oil in this hose because there's no oil in this tank and the pressure in the hose is going to be greater than the pressure line because we are below atmospheric pressure
so i'm going to just open this valve and let's liquid refrigerant flow directly into the liquid line that liquid refrigerant flows in both directions flows through the metering device evaporator blowing from a liquid to vapor and in this case it's also flowing into the condenser boiling from a liquid to vapor as that liquid refrigerant boils into a vapor we end up getting vapor pressure on both the high and the low side the difference is i only have vapor on the high side and the low side when i get done i'm still going to have a
pure liquid refrigerant we never want to do this step on the suction side with the system off because all that liquid refrigerant will fill up this line it will fill up in that compressor and when that compressor starts up bam we're going to have a dead compressor so we want to make sure that we only put liquid in through the liquid side when the system is off so now that i have positive pressure in my system we can put these valve cores back in my valve core here is on the end of this tool i'm
going to slide it up inside of this component put the little end cap on it now when i open this valve positive pressure is going to push back this direction now i can overcome the positive pressure with my thumb i can push it in and then i can thread that valve core back into place so i'm going to close this valve off and i'm going to loosen this end and just to make sure that we have it correct i'm going to slowly open this to make sure no refrigerant came out so this is open no
refrigerant came out so we know that that valve core is doing its job we can now take this tool off now our valve core is in here and we also still have our valve core in on this side as well i can now take off this and because there's a valve core here i can take this off without any problem just a de minimis amount just from what was between this part of my hose valve core is in valve core is in our vacuum is done now i do have my tank heater on that compressor
acting as a crankcase heater i do want to take that off before i start that system up we take that out the system is ready to be started up ready to run and we can top it off with super heat and sub cooling from there and our system is ready to go so we take our vacuum pump put it back in the truck take our nitrogen tank put it back in the truck put our hoses micro engage make sure we keep all this clean and dry make sure it's in some kind of protective container so
it doesn't get dirty or wet or anything like that so it's in as great as shape as possible now that we've taken all of our vacuum system off we can now hook up our probes or gauges or whichever method you prefer and then we still have a refrigerant inside this hose from there if i'm using probes i put the t on and i can use this little valve to continue charging it after the system is running throttling it in small amounts of refrigerant into the suction side giving it time to boil into a vapor before
it hits the compressor or i can hook this onto the middle port of a traditional manifold gauge set and i can throttle it into the suction little bitty shots of refrigerant in there allowing it to turn into a vapor before it gets that vapor pump before i get completely charged i would then take my tank and turn this valve off and then i can bleed that last little bit of liquid refrigerant out of this hose only have vapor refrigerant left from there i can take this hose off put my little adapter between it connect my
hose together and make sure i keep this hose oil free because i'm only going to be using it for vacuum and nitrogen even though we ran refrigerant to this hose refrigerants flowing into the system so we never had oil in this hose and that's the key to that the refrigerants aren't going to hurt it it is the oil that we're worried about from there our vacuum is done we've did the vacuum test we did all the steps stay tuned we're going to be doing some other examples with different types of vacuum let's see how that
works
Related Videos
15:31
HVAC148 Vacuum p15 example 3 The 4 port ma...
Love2HVAC with Ty Branaman
23,655 views

32:10
HVAC 146 Vacuum P13 example 1 Fast Vacuum...
Love2HVAC with Ty Branaman
6,646 views

19:24
2 Hose Vacuum Pump Procedure VS 1 Hose Vac...
AC Service Tech LLC
176,033 views
13:25
HVAC 123 Recovery Tanks part 1
Love2HVAC with Ty Branaman
50,627 views
14:48
HVAC 150 Vacuum p17 Example 5 Triple Evacu...
Love2HVAC with Ty Branaman
20,988 views

13:15
HVAC 149 Vacuum p16 Example 4 Standard man...
Love2HVAC with Ty Branaman
8,845 views

6:49
31 year old Heat Pump Copeland scroll cut ...
Love2HVAC with Ty Branaman
10,132 views

17:35
HVAC Tips to Avoid Vacuum Problems! Top 15!
AC Service Tech LLC
217,713 views

12:54
Why I Choose A ONE Hose VACUUM Setup | HVA...
Quality HVACR
181,693 views
8:41
How To Pull A Vacuum In Less Than 10 Minut...
The DIY HVAC Guy
77,862 views

20:53
Fastest Automatic Firewood Processing Mach...
Titan Tech
30,687 views

20:22
Fastest Automatic Firewood Processing Mach...
Titan Tech
97,999 views
15:29
HVAC 129 Faster Recovery
Love2HVAC with Ty Branaman
99,567 views
12:51
Heat Pump 12 Hight Pressure trips only in ...
Love2HVAC with Ty Branaman
11,627 views
13:32
HVAC 153 Nitrogen Pressure test with Analo...
Love2HVAC with Ty Branaman
49,696 views
10:43
HVAC 128 Recovery most used but slowest
Love2HVAC with Ty Branaman
90,786 views

30:08
Woodworking Expertise: Perfecting the Art ...
ChipWorks
1,012 views
8:00
How to Leak Test an AC With Nitrogen Pressure
HVAC School
242,362 views

6:54
HVAC Advanced: Triple Evacuation
Chadwell Supply
11,639 views