How to Draw Arms and Legs From Any Angle
216.04k views3119 WordsCopy TextShare
Proko
Get your FREE reference photos and participate in our community of amazing artists! - https://www.pr...
Video Transcript:
I'm going to show you how to draw arms and legs and make them look dynamic. A lot of us start learning how to draw the figure by constructing simple cylinders and maybe boxes for the bony areas. And this is great, it's a really good start to thinking about the figure in 3D.
But it does lead to very stiff poses as if you're drawing that silly wooden mannequin. So, if you're tired of your drawings looking like this, then you need to start thinking about rhythms to connect all those 3D parts with the fluid gesture. In part one of this lesson, I showed you guys how to lay in the head, neck and shoulders.
To quickly summarize, what we're trying to do with rhythms is find visual alignments that capture a flow between the forms. It's an abstract way of looking at the subject. In fact, a system of rhythms is sometimes called an abstraction.
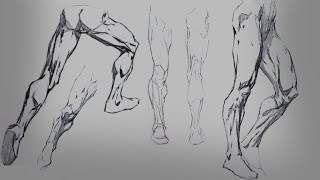
Because with rhythms, we're looking for connections between the forms, these larger flowing lines help keep the pose feel connected. It's more convincing that all these parts make up one machine where all the parts are working together because they're unified with a common flow, a common idea. For the legs, let's start with the side view and it's basically an S-curve.
We're going to follow the curve over the quads and then at the knee, starts to turn the other way. And I like to find a rhythm all the way through to the toes. Now, the back of the hamstrings, you're gonna see the hamstrings coming out, you know, curving this way, but we want to find just the general flow, like this big S-curve And so, there's some muscles we're gonna ignore in the initial stage when we're just trying to find the pose.
So, generally, we ignore the hamstrings and we either curve it this way with it or we can actually start with a straight line. Now, straights are gonna add some stability. If this leg is locked and it's planted and all the weight is on that leg, I might look for a straight in here and in this case, it is.
I'm drawing a leg with a person just standing straight up. Straight and then right through here, we're going to continue the rhythm through the calf. In here, in the calf, you can kind of pick a flavor of the day.
Sometimes I'll add a corner and then from there, curve it back in and actually curve it all the way to the toe. Or sometimes I won't add a corner and I'll just kind of flow one big S-curve all the way through here. It just kind of depends if I want to construct this thing out of a few rhythms or try to kind of nail it with one rhythm.
How confident am I that I could just nail it in there? And then you notice how I kind of ignored the heel initially. It's really easy to then just add it in.
You just rhythm down to the heel and then over to the toe. And then of course, in here, you're gonna have the glutes but that's part of that rhythm that we already talked about for the torso. This is connected to this whole shape up here.
Maybe that's a little bit too large. Now, one common mistake that I see when people are finding this curve is to way over exaggerate the curve. What that does is it loses the sense of They're being bones in the body.
It just feels like a big noodle and that this leg cannot actually support the weight of the body. Notice how right in here, this angle, if I could imagine an angle of this portion, this kind of comes right down and aligns with the front of the shin. That's typically the maximum that I'll like to go, that's kind of a general rule for myself.
But sometimes I'll see people going way too far, like they'll curve this. And then they'll curve this and they'll they think that, you know, by putting so much motion into it, they're just making their poses super dynamic and interesting. It's like, yeah, sure, you are finding more motion but you're finding so much motion that you kind of just destroyed the anatomy.
It definitely is dynamic, like there's no question about it. If you're doing something like super exaggerated where the shapes are like really, really contorted, this could make sense. Like this is very dynamic.
There is a balance between finding that gesture and that curvature and the action and the movement through the limb and stability and reality. When the knee bends, we're still going to follow the curvature of the quad. But, now we're gonna add a corner right there.
There's a knee there, there's an actual bend and then the bottom side also follows this arc but it tapers a little bit, the knee is a little bit thinner. Same thing in here, there's a taper from the calf to the ankle. So, obvious zigzag, lots of tension in both joints.
Some people might decide to actually add motion through this whole thing. And sure, this captures the flow and the action and I can tell that the knee is bent, but it loses the structure in the knee and I personally think that this is just not a good balance between gesture and structure. This is just too heavy on the gesture.
Again, it looks like a noodle leg to me, so I usually do not go for this. Okay, moving on to the front view and this one, the front view It's really subtle. There's a lot of little curves and muscles that might distract you from finding the quick indication of the pose.
So, I'll usually start with the inside line. In this left leg, most of the weight is on that and so I want to show a little bit more stability on that left leg. From the hips, from this pubic bone area, I could drop a single line that's a little bit curved all the way down to the heel.
And then on the outside, this is where I could put more activity following the curve of the hips down into the knee and then from here. . .
Out to the calf and then for the foot, again, I do like to find a rhythm all the way to the toes. So, in this specific example, it's going to be something like this and then just a little triangle for the heel. On this other foot, I feel like there's a little bit less weight on there.
At this point, I could go either way. I could totally put another straight line going through here but I'm going to show you another one that I use when I want there to be a little bit more flow in the front. So, I'll start with that same thing where it's mostly kind of a straight going across there, ignoring any kind of muscle anatomy type in here, just going right to the knee.
And then at the knee, now I'm going to curve it with that shin. The front of the shin has this kind of curve like that. And this will make the leg feel a little more graceful.
And then again, on this side, following that curve. Now, the back of the leg is a very similar concept. Again, from the front, I'm just going to draw a very simple leg.
So, straight down and I'm going to change the character of this one. This one will make like a little more curvy. Now, from the back, it's going to be a very similar thing like straight line down, curve, calf, right?
So, at this point, I'm not sure if this is a front or a back. It all depends on how I indicate things on the inside. We could add some more context here.
So, instead of this abdominal triangle in here, Instead, we can add more of a rectangular shape, right? Now suddenly, this is glute. And then the overlap, instead of a kneecap in here, I could put a rhythm in here just to indicate the attachment of the calf.
And then of course, now we're actually going to see the heel. Here the heel is behind, but here the heel is in the back. And so, you'd get this little overlap.
And one more thing I want to mention about the heel to toes indication of the foot. When I'm indicating the inside of the foot, like in both of these, you can see how I'm separating the heel from this rhythm. There's like a corner, an overlap.
Now, when I'm indicating the outside of the foot, it's a little bit different. You don't get as much separation between these two parts. The heel is actually anatomically, it's a little bit more towards the outside and so you won't get this separation.
So, if I'm drawing the outside of the foot, I'll still find this. When I add the heel on, I'll take it all the way to the toes like that. So, it looks more like a boot or like a shoe.
You can look at your own foot. On the outside, this is more of a line all the way across and in here, you see this big overlap. But either way, I still like to find this rhythm through here unless it's like a straight on side view.
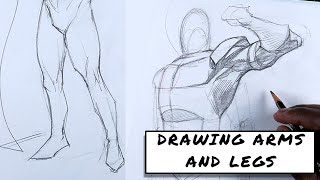
Do this, right? It's just a lot easier for me to like add stability, really quick triangle across and this gets the point across much quicker and probably even better because I'm trying to make it stable, not flowy. And finally, we've made our way to the arms and hands.
Very similar concepts to the legs. It's about gesture versus structure, stability, showing tension when the elbow is bent. In this example, we're not seeing the elbow, so we're not going to get that like sharp corner of a plane change.
It's not like a straight line down from the shoulder to the hand. There is a C curve. So when that's the case, when I'm just seeing this C curve across, I'm going to ignore all the muscle bumps and I'm going to go from the armpit To the wrist.
And then from the shoulder, I'm going to ignore the deltoids and again, flow to the wrist. And the hand, I will interpret kind of as its own thing sometimes because hands are so gestural, it's important to really look at it and be like, okay, what's the hand doing? How does it add to the pose and the body language?
In this case, it just kind of has a subtle turn and it's holding a gun. So, it's going to continue this flow and it's going to make into an S-curve. And I'll just add like this mitten shape to it.
And that's good enough for me to establish what this arm is doing. I usually don't go that much farther unless I'm starting to add like anatomical details on top of it. Now, sometimes if I want to add a little more structure in a pose kind of like this, I'll add a straight in here on the inside of the arm.
This is a very obvious bone, part of the humerus. So, what I'll do is from the armpit, I'll put in a straight and then curve that out. And it's a very similar thing, you can see it's almost the same thing but now we just have a little bit of a corner.
And I just go by what I'm seeing and the body type of the person. Sometimes that corner, this bone coming out is just so obvious, it feels like it's part of the character that I'll put it in. And sometimes everything's real soft and I'll just find the flow.
Now, here's another one from the back side and it's a similar concept. You know, in this case, I'll usually already have the deltoid as part of my shoulder indication because I don't see the shoulders other than this real nice flowy curve this way. It's very, very important to show what's going on here.
So, I'll actually put that covering up the head and then from there, find the flow. all the way to the wrist, from the armpit all the way to the wrist and then for the hand, I feel like it's actually kind of important to get that corner like that. This could absolutely be enough to show what's going on but again, I could add a little bit more structure in here.
So, let's say here's the shoulder and then from I'm going to start with the bottom one just there's the curve and then I'm going to add a little corner up here. So, doing this very similar thing but you can see this is more simple, you could probably do this in a few seconds. This one is a little bit closer to what's going on, showing just a little bit more structure throughout the whole thing.
But still very simple, very quick to do and would indicate this pose pretty well. Now, when we're getting a bend, a bend enough to start showing the elbow, this is probably the easiest. It's kind of straightforward.
You're just going to follow the curve this way, put a corner in here, a little taper where it gets thicker. And then again, for the hand, generally I just observe and I'm interpreting what I'm seeing or what I'm feeling and I'm trying to simplify it down to just a mitten and sometimes maybe like take out one finger if I feel like it's really important for part of the expression. And then again, sometimes I'll add A gesture for the deltoid.
Now, this is one interpretation of it is to put a corner on both sides. Something that a lot of people do is they actually mix gesture and structure together and they'll put the structure, these two rhythms on the bottom or on the outside. And on the inside, they'll find the curve.
And this is totally fine too. You can see they feel a little bit different but they indicate very similar things. And so, also kind of like choose your flavor.
There's other times when The elbow is bent quite a bit more than just that 90 degree and I will rarely choose to just put a curve on the inside. Like in this example, I feel like the overlap on the inside is more important to capture than like a curve like it's just a single C curve. So, for an arm like this, I will capture the motion of the outside like so, get that overlap right there.
And there's the hand and then you know, you'd obviously connect all that to the torso, deltoid and so on. This isn't a good example of where none of the stuff I just told you really fits. The elbow is locked so we're not getting a corner there at all.
There's a lot of bumps that are kind of difficult for me to figure out what's going on. This could be interpreted in probably several ways. The way I would interpret this one is from the armpit, I'm seeing a very clear curve this way.
And then from here, the elbow would do this sort of thing and I'd find a flow all the way through to the fingers going way further than I need to. And then I'd probably ignore the biceps. The hand is so expressive in this one, it's kind of hard not to put a few fingers.
You don't need to put too many but you know, something in there is quite important. So, you can see quite different from an arm. In fact, if you kind of bring it vertically, it almost starts to look like a leg.
They have very similar anatomy, they're just different proportions. So, that was a very unique one. Now, I'm going to show you just one more example where the arm is actually carrying some of the weight of the body and you have to make it feel that way.
So, on this one, both of them have the weight. The one on the right, you could see it's even bowed outward making it feel like it's Taking even a higher load. I'm going to show you the one on the left since it's a little more common and very similar again to what we did with the leg where the inside is going to show structure with a straight from the armpit all the way to the heel of the hand, right?
And then there's structure down here on the hand touching the ground and then I'm going to again ignore the deltoid and find a rhythm flowing through here. to the calf of the arm, it's the forearm, like that to the ankle. I know it's an arm but just it's very similar to a leg.
If you could see how that almost looks like the calf, the inside of the leg, the heel, the foot coming out with the toes and then you can add the glutes Like so. So, you're getting lots of stability, lots of structure. on both sides, but because we're showing rhythms still going through here, it feels dynamic.
You might have noticed that line quality could make these little sketches look better or it could completely destroy it. So, if you need help practicing your line quality, I have several lessons in the Drwing Basics course that will help you with exercises and just general advice on how to improve your line quality. So, that's over at proko.
com/drawing. And also, none of this really matters unless you go and practice it. You need to actually do it many, many times to get it through your noggin.
And then after you're done, go submit it to the Proko community. The link to this lesson is in the description below. Even if you're not a premium student, if you're not paying for the course, you are welcome to go in and submit.
Everybody's welcome. Seriously, just go. Even if it's just for this one lesson, just go, submit, click on the link in the description and participate.
And also on that same page is the downloads tab where you can get the reference to practice this stuff. Link in the description. See you guys.
Related Videos
11:17
The Easy Way to Draw Hard Poses
Proko
134,802 views

15:24
Draw ANY Pose From ANY Angle
Proko
340,445 views
19:31
The 16 Line Gesture Method
Proko
40,533 views
20:41
Improving Line Quality and Rhythm - FORCE ...
Proko
686,631 views

29:00
Breaking Technical Barriers in Drawing
Proko
201,048 views

2:02:33
Gestures with Michael Hampton
Proko
36,017 views

23:35
How to Draw like Kim Jung Gi
Proko
6,286,467 views
![Draw Gesture with O̲N̲E̲ shape: NEVER draw ArMs or LeGs- EVAR! [also never ever use bean shape]](https://img.youtube.com/vi/iLIjD-5AgWU/mqdefault.jpg)
9:13
Draw Gesture with O̲N̲E̲ shape: NEVER draw...
Ethan Becker
857,173 views
12:21
HOW TO DRAW ANIME FACES from any angle - Y...
Marc Brunet
65,704 views
18:52
How to Master Structural Gesture
Proko
152,313 views

27:07
You Suck at Drawing Portraits (and so do I)
JakeDontDraw
221,228 views
16:19
How To Draw Literally Anything
goblish
1,950,098 views

28:40
Karl Kopinski Sketching from Imagination
Proko
1,261,867 views

28:09
Training Yourself to Draw From Imagination...
Proko
2,036,038 views
15:02
The 11 Steps to Great Gesture Drawing
Love Life Drawing
351,021 views
17:33
How to Draw Legs
David Finch
308,033 views

29:27
How To Create Your Own Pokémon
Subjectively
135,081 views
12:58
Develop your OWN Art Style | And how to dr...
Draw like a Sir
1,332,731 views

19:55
25 Essential Drawing Exercises: Unlock you...
brokendraw
205,470 views
11:20
Drawing Arms and Legs
Ryan Benjamin Art
38,997 views