How to Edit Viral Reels In 2025 (Full Capcut Tutorial)
581.52k views14573 WordsCopy TextShare
Pablo Quesada
Check the free and paid resources here: https://pabloqcontent.gumroad.com/
Join my free Discord com...
Video Transcript:
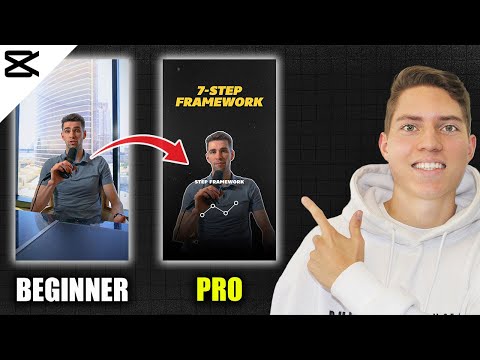
in this video I'm going to show you how to go from a complete beginner in capcut to editing like a pro in less than 80 minutes but before we do that let's actually take a look at how you're going to be editing by the end of this tutorial if you're looking to start or scale an airb business in 2024 if you have at least 5 to seven hours a week to put into this and you have at least a small amount of capital to start with I want to give you my seven step framework for
free and how I was able to go from Z to $320,000 A year in Revenue in my very first year of Airbnb Arbitrage so whether you want to learn the editing skill yourself or you're just curious about how these videos are edited this is the right tutorial for you and here's actually what we are going to be covering first we're going to be creating template so you can start editing faster and easier every time you create a new piece of content then we're going to learn how to prepare your footage so you can start editing
right away after that we're going to be learning how to add captions whether using capcut or using other softwares after that we're going to be working on defining the big idea so this is basically dividing the video into segments so you have total Clarity by always knowing what's the next step on your editing then we're going to be editing the hook and also the rest of the video you're going to be learning Basics you're going to be learning animations and some cool features that cap cat has so I hope you enjoyed this tutorial again I
go in depth with all the things that I'm talking about so be patient follow along along practice and let's actually dive into it so um the first thing that we're going to do is to create a template so we are going to open capcut and if you don't have it yet you can go ahead and download it for free okay cap.com you can get it and after you do that um you know you're going to see this actually empty I I have a lot of videos as you can see and I also have templates for
my clients and even for myself all right so the reason why we want to use templates is because every time you edit a new piece of content okay you you don't want to add all the backgrounds and all the video effects over and over again to a new project for example I'm going to open a new project here okay I'm going to click here and as you can see there's nothing here okay there's nothing here so if you did if you do that you know every time you edit a new piece of content you're going
to have everything empty which means that you will need to import all your backgrounds and all your video effects over and over again all right so we're going to call this template and we're going to build one so you don't have to do that over and over again now if you don't have any backgrounds or any video editing assets I have created these video editing assets I'm going to leave the link in the description um it's actually free you just type a zero here but if you want to donate something you can go ahead and
do that as well once you download this okay it is going to take you to this um drive folder where you're going to find pretty much everything okay all the backgrounds um all the video effects I also uploaded some of my footage that you can you guys can use in this tutorial so you guys can practice um you know whatever I'm going to teach in this tutorial okay so feel free to download the things that you need for example you can download this folder here okay back um it's going to take some time so I'm
going to just cancel this all right and after you download everything it's going to take you here to well the downloads uh folder on your computer and you know something that I like to do just to keep it organized I like to create some folders for the all the video editing assets okay where I can just put everything together so for example in this one I have the backgrounds and pretty much everything video effects okay okay so after you download and you organize it into your computer somewhere where you can access it you know just
easy you're going to go on cap cut and you're going to import all the things that you downloaded so for example I have this here the templates and I have backgrounds and I have effects and audio and everything so you just select the folder and you import the folder okay it it is just that easy and you're going to do that for every you know every folder that you download and every template that you download I am going to give you guys an example um when it comes to the overlays and effects okay so for
example I'm going to bring this here to the timeline and I'm going to import a video here okay just for for the example that I want to give you in this um section of the video so let's actually take this um raw video from one of my clients we're going to put it on the timeline and we're going to put this here above okay now um keep in mind that this template that we're building it is going to be for reals okay so we can select here the ratio and we can select 916 okay so
that makes it for a real if you're editing a YouTube video just go ahead and select this one all right so after you do that um here we have some transitions um an overlays that I actually like to use you can find them here again on the on the video effects on the video editing assets so you can go ahead and use them but as you can see it's black okay and we don't want to do that we we want to actually use the transition now here are like 2 any transitions so we are going
to with control and scroll we're going to make this bigger and then I'm going to use this first transition here so I'm going to cut the clip with contrl B okay and I'm going to delete this and just to give you guys the example I'm also going to cut this clip all right so we would like to use the the overlay right there okay so all we have to do is go ahead and rotate it to 90° and then adjust the size and then click here on mode and put it into the screen mode okay
$1,000 per month I actually left my nineo five careers okay there we go so we have the overlay ready now you want to do this for all the overlays or you know even you can go ahead and add some let's go to templates here really quick and you can go to audio actually let's just import the the whole audio folder and here I have like some wishes and you'll find some some sound effects okay so for example I want to use a um a wish okay so I'm going to go here to wishes and I'm
going to drag and drop this ones here so these are a list of like 20 you know wishes so for example um maybe I like this one here okay so crl b contrl b again and I delete this all right and I want to add it here you know together with the transition per month I actually left my 9 to five careers okay something like that okay um so if you really like this wish you can also adjust the volume of of it so it doesn't sound like very loud and and so let's say that
you like that one and so if you don't want to you know go over and over again to the folders and finding the bues that you like or the transitions you can have them on the template so for example I want to delete this because we don't need it and we keep this here and then I'm going to Del this here because again this is the template I'm going to import the the effects folder okay and then I'm going to get these overlays here inside D FX okay again feel free to go ahead and check
the video editing assets and download everything the the things that you like and the things that you think you will need for your editing okay and add them here to the timeline and leave them there okay and you're going to see why uh in the next section once we start editing for my the real for my client um but yeah I just wanted to give you guys that example really quick so we can move on to um the next section okay so we have the template ready again add everything and let's move to the next
section okay guys so in this section we are going to prepare the footage okay so that means that we are going to color correct the video that we're going to be editing we're going to trim it and cut it and we're also going to add the audio from the microphone if you're using a microphone or if your client is using a microphone like this one and then they want to get rid of the audio from the original camera and they want to use the audio from the microphone then we're going to do that as well
okay so let me actually show you because that I know that was confusing so let's go here to real 7 okay um of my client this is the audio from the microphone they used and this is the raw video okay with the camera audio and everything so we're going to go uh on cap cut and we're going we're not going to use the template yet okay we're going to create a new project because we just want to prepare the footage okay so um on this here on this new um you don't have to name it
if you want you can name it but there's no need to name it you're going to just go ahead and find the footage that you want to prepare in this case we're going to be using real 7even for this tutorial so I'm going to go ahead and import these two files okay again one is the file for the you know audio from the microphone they used and the other one is the camera and the real video so I'm going to drag and drop the video here to the timeline okay I'm going to make this speaker
a little bit and then I'm going to also drag and drop these um the audio file all right so we now want to syn them sync them okay so I'm going to right click here and I'm going to sync the video to sound all right now capcut does its thing and now we have them synced okay but now now we have the audio duplicated so we want to go ahead and select just the video okay just the video here and we want to right click and extract the audio okay and we want to delete it
all right so after we do this we can select both Clips the audio and the original camera we right click and we create a compound clip right now I want this to go to the beginning of the timeline so I can just drag and drop it or I can select this one here okay it's like a magnet it makes the video go to the very beginning okay so the next step would be adjusting the size of the clip okay depending on the clip you want to adjust the size before trimming the Reel and before color
correcting the clip all right so for me for example this guy the speaker it's um there's a lot of that space here okay that we can cut so for example I'm going to take this and I'm going to just zoom in a little bit maybe like 100 24 okay and then he is very like below and there's a lot of space still above so I'm going to drag and drop him like around here okay so let me see okay that looks cool I still want to leave some room for the zoom in and zoom outs
that we're going to be doing on the next sections of this tutorial okay so just keep in mind that we're going to be using icons and and text and stuff like that so you want to keep you want to leave some room in order to do that okay all right so we have adjusted the clip now we are going to color correct the clip so for example I'm going to cut this clip here cut it here with contrl B again and then I'm going to go here to this clip I'm going to select it I'm
going to make this bigger just so I can see more the colors and then I'm going to adjust all these colors okay so again what you want to do is you want to play around with it depending on your your video and you want to play around with it and just make it look a little bit better okay so I'm going to do that and then I'm going to show you I'm going to compare both Clips so you can see Okay cool so I have adjusted some things here and now as you can see guys
I can drag and drop this thing here and it's a little bit different okay this one is brighter and this one is a little bit darker a little bit more professional maybe so once you are fine with the color and you like it you can select the clip that you edited and then you apply to all so it is going to app apply the color to all the other Clips so after you do this what you want to do we can take this here again to its normal size and then you want to cut the
clip okay um just you just want to trim it okay cut the dead spaces and all that stuff now now keep in mind that this video that they sent me has already been trimmed okay so I don't have to do that I'm noticing here some dead spaces though so I'm going to just go ahead and you know go ahead and do this here and you can go through the video you know notice the you know the de spaces and then start editing so I'm going to just go through the video and I'm going to notice
the de spaces and I'm I'm just going to you know edit it a little bit more okay guys so I have gone through all the video I noticed some dead spaces and I trim the video accordingly okay so we have um trimmed the video we have added the audio from the microphone that they are using which is this one here and we have color corrected the video so it's ready it's ready to edit so what we're going to do is we're going to export it okay we're going to name it accordingly so for example this
one is is real s okay so I'm going to call it Adam um and you can call it framed version all right and then you want to place it or save it within the correct folder so in this case it's Dr 7 select for folder and then you're going to export it if you're looking to start or scale an airb business okay cool now you want to close this and if you want you can keep this like you can keep the you know the trm version um but just make sure also if you're going to
delete this which I'm going to do just make sure that it exported correctly to the correct folder so if you're looking to start or scale an airb business okay perfect looks good so once I I'm sure that you know it has been exported I can just go ahead and delete this one here because I don't need it anymore okay so now on the next section we're going to start editing using the template all right cool guys so I feel like we're making some good progress here so let's actually keep going and now we're going to
be talking about captions all right now different ways to add captions you can add them with capcut you can also use paid softwares um actually like subp magic that I'm going to show you and then I'm also going to show you how you can upload your own fonts okay to capcut so you can make different style of you know text and stuff like that let's actually see how we can do that so we're going to be using the template okay now you don't click on the template you go ahead and you duplicate it okay again
remember this is a template we don't want to edit on the template we want to duplicate it with all the things that it has and you're going to see you're going to rename it here to um tutorial for example okay and then tutorial practice can be your whatever name you want to give it and then you're going to click it okay and now what you're going to see is everything okay the the things set you the the transitions all the folders and everything which is different again and that's why I I explained how to create
the template which is different than creating a new project and actually starting from scratch okay so that's why we created the template it's going to be helpful for you for the next projects that you're going to be editing so let me actually delete this and you're going to be using the tutorial but me I'm going to be editing for Adam okay in this tutorial in this video so I'm going to use this template that I have already created for Adam so I'm going to duplicate it and I'm going to rename it for real 7 I'm
going to call it real 7 atom okay I'm going to click on it and you guys are going to see um this is a template that I have built for my clients so there are some things that I use a lot within their videos so as you can see I have added all like the overlays uh ready on this timeline all the sound effects as well and some other things like shadows and just a couple things all right now I have also um I like to put the you know their name on the on the
on the template their name and just to make sure you know that this is their template and as you can see these type of fonts these are not fonts from capcut okay these are fonts that I have downloaded and added into capcut from my my computer and I'm going to show you how to do that but before we actually talk about that let me actually uh go ahead here really quick and because I want to show you the first way of adding captions okay so captions in case you don't know um are these little subtitles
here on the reals okay so we are going to be doing that for the reals and with subm magic you can use different style of captions um like imti or MOSI Ali and as you can see here if we scroll um you can see all the you know the captions and the style so you can test this one but for this video in this tutorial we're going to do it the cap cut way okay it's the free way and I'm going to show you how to do that so the first thing that we need to
do we're going to go ahead and add the video that we just prepared okay so in the in the previous section we um prepar the footage okay which is the trim version of real 7 so I'm going to import it I'm going to open here and I'm going to drag and drop it here okay so that's um that's the video all right now just for now I'm going to uh deactivate these um these things that I have on the template okay just um just to edit the captions for now so the next thing we're going
to go on text okay and we are going to go here to Auto captions and we are going to generate them so I'm going to generate them and we're going to wait a couple minutes here okay cool so the captions are ready so as you can see guys um all the captions here have been added to the video now they are pretty simple as you can see right so what we're going to do is well first we're going to Center them and you're going to locate them whenever you want on you know wherever you want
on the video so for example I want them here like kind of like on the center right and now uh something that I want you guys to see is that this little button here okay so it's applied to all that means that if I move this sentence here on the caption so if I move it for example here um it is going to move all the captions to the same place even though when they are not selected okay now if I select this this uh caption here this sentence and I deactivate this button here and
I move it around maybe make it bigger okay it is not going to apply to all the captions all the other captions all right so just something to keep in mind I'm going to center it here and I'm going to make it just smaller and then apply to all and as you can see they all apply the same style now you can go ahead and apply a template for your caption so for example we have a lot of templates here within capcut okay you can select one for example this one and then maybe you can
make it um a bit smaller and then you know you can can check it out actually let's check it out you're looking to start or scale an airb business in 2024 if you have at least 5 to 7 hours a week okay cool it looks cool now I'm not going to be using a template for this tutorial but you guys can use one and you can test it out and you can play around with it okay um again we apply this template to all the captions all right so um I'm going to deactivate it here
I'm just going to you know keep it with the basic one and now I'm going to add a phone that my client told me that he wanted to use so let's actually take a look at the fun so my client sent me this reel they found and they liked these captions okay and they were like hey Pablo if you can use these captions that would be amazing all right so I tried to find it on capcut but it was kind of impossible I didn't know the name I didn't know where it was right because captions
they have different names and everything so I found this um website actually that you can identify a font I'm going to leave the link on the description but before we go in the website as you can see we need to upload an image right so what we're going to do is we're going to use whether you're on Windows or a Mac you're going to use your Snipping Tool all right and you're going to create a new um you know screenshot and you're going to just take a screenshot of this and you can uh save it
on downloads if you want okay so you can save it there we can go now to the font identifier website and and we can upload the image that we just took okay the screenshot that we just took now you're going to click here on mat at it and then this the the website is going to identify the caption for you so let's actually take a look at the name so in order to do that you can click here and by the way it gives you like a lot of similar other options but the first one
is you know most of the time is the the one that is the the font okay so it's core sense all right so that's the name you want to copy and paste it and now you're going to go to this website okay I'm going to leave the link in the description as well and you're going to paste the name of the uh fun so for example in this case is quense uh and see you know 95 so we're going to search it and then we are going to just go ahead and take a look at
the names and try to find it all right guys so I found it here it says quense um it's not like it's similar right sometimes you're not going to find the like the exact same font um but this one is pretty similar this one works so what you're going to do is you're going to deactivate this one you just want to download the ttf all right the ttf version so you download it then you click here on free downloads um the download is going to start so we're going to go here to going to minimize
this and we're going to go here to downloads all right and then as you can see we can delete this if you want and then we're going to extract this here and then you can delete these things if you want and here we have the font okay this is the font that we want to install into our computer so you're going to double click it and then you're going to install it okay okay uh I already installed it so I'm going to click here no but you know in your case guys you're going to install
it okay so once you do that you can close this one um you can also close this one and now what you need to do is you need to close capcut okay because if we try to find it you know the system hasn't updated the funds yet so we need to just go ahead and close it and then close it again here no worries capcut uh always you know automatically saves the project for you and no warries for that and then you're going to open capcut again all right perfect so now we can return to
our project okay and again you're going to take a look at the name of the you know of the font which is core so it starts with c and then you're going to go on cap cut and select the font all right that you want to modify and you are going to look for um as you can see we have some fonts here but you want to go to where it says the system fonts if I'm not mistaken so it says system font okay so you're going to go to the C in this case because
it's core sense and we're going to try to find it so here it is okay I have downloaded actually two of them uh they are pretty similar but you are going to select the one uh the one that you want okay so in my case uh I think it's this one yeah it's going to be this one okay so I'm going to select it and then as you can see I have the same font that my client was asking for okay it's the same font and um I can even go ahead and apply some stroke
to it so it looks a little bit better um maybe not too much just a little bit okay so um it looks a little bit better right cool so now I'm using the font that my clients you know wanted to use so you can if you you know watch a real from a Creator and you want to use the the font that you're using you can go ahead and apply this you know quick process and then you can upload the phone to capcut and you can use that as your own captions as you can see
something that you can also do guys before we jump into the the next section of the video um is that as you can see these sentences here they are like sometimes they are too long okay so let's actually take a look at this one it's too long right we don't want the captions to be too long so what you can do in order to fix that is you go here on captions okay and then you can click each sentence and then you can just click enter and you can separate them okay uh whatever you want
so Airbnb business uh in 2024 and you can do this over and over again right okay cool so I have finished um just you know cutting uh the captions all the captions and what you want to do now guys is sometimes these captions are not matching with the voice of the speaker so you want to go through the video and start matching the captions with the speaker this can take a little bit time but it will look more it will look better okay so let's actually um let me actually just go ahead and do that
okay perfect guys so I have um you know gone through all the entire video and I just adjusted some of the you know captions so they match the the actual speaker on the video okay so that's pretty much about captions now we can move on to the next section okay guys so now before we start editing the video and everything we want to work on the big idea okay so the big idea for the video okay this is pretty much um just defining where do you want to use backgrounds where do you want to use
b rolls and where do you want the actual speaker on the uh on the video okay so um for example just to give you an example I'm going to to cut and this is how we start you know working on the on the idea of the video uh I'm going to start cutting the you know the video in segments okay so I'm going to cut it in segments and then after that I'm going to add some backgrounds okay and also some volls so you guys have an idea of what I mean with the big idea
so let's actually take a look here at the very beginning of the video because most of the time it is going to be the hook okay if you're looking to start or scale an Airbnb business in 2024 okay so if you're looking to start an Airbnb business in 2024 that's a hook okay so I cut that first section right there okay let's take a look at the next one if you have at least 5 to seven hours a week to put into this okay so if you have a 5 to seven hours um you know
a week to put into this that's another segment of the video okay and let's actually take a look at the um another one and have at least a small amount of capital to start with okay and you have at least a small Capital to start with okay so that's what I mean with um just dividing the video on segments so I'm going to do that for the rest of of the video really quick okay guys so I have finished here so as you can see I have divided the video on segments okay and as I
was dividing the video on segments I was also so uh just on on my imagination like kind of like seeing where can I add some backgrounds and where can where can I add some B- rolls and just kind of like thinking okay thinking about the big idea of the video so for example uh the hook I'm just going to leave it like that and then I'm going to add a background um maybe this one here okay and by the way I deactivated these things here I'm going to activate them again um so I'm going to
add the background some more here okay and then I'm going to take this and so the background is on this next segment after the you know after the hook so let me actually just put it here and there you go there's the first background right here okay let me actually adjust this and as you can see I have my transitions here all right so I'm going to place this one here and place another one after the first um background okay this one I'm going to see maybe this one can go um somewhere around here maybe
okay so let's actually take a look really quick 2024 you have at least 5 to 7even hours a week to put into this and you have at least a small amount of capital to start with I want to give you okay cool so here I want to add another background okay so for example I want to add this background here it's going to be here and it's going to end here okay maybe maybe maybe because I'm going to be using a Boll here so for example on the on the next segment which is this one
I was thinking about adding a b roll so again guys you can go ahead and do this on your um with your video okay you can just go ahead and do it with your video uh just go through the entire thing and thinking okay where can you add be rolles where can you add some you know backgrounds or where can you just leave the speaker talking alone like we did here on this on this segment okay I'm just leaving the speaker here so let me actually just take a look really quick free and how I
was able to go from zero to $320,000 a year in Revenue Okay cool so we're going to cut it there in my very first year of Airbnb Arbitrage okay and this one we can leave just the speaker okay so as you can see I already know and this by the way this is a you know this is a very like quick like 20 second clip uh that I'm using on this tutorial okay so this is like a 20 second clip uh and I decided to do this one so we do not take too long on
the tutorial okay and I'm going to be able to show you guys some um the things that I want to show you in this tutorial so for example the hook which is in the next section um how to use backgrounds how to use a cat out feature you know and and stuff like that so 20 second video but um obvious obviously if the video that you're editing is longer then you're going to do that for the entire video okay the side on the background and pretty much everything so um I think that's it for defining
the peak idea and yeah just a quick um just a quick thing here okay that I wanted to mention is that again these backgrounds and these Transitions and the sound effects and everything you can go ahead and get them here on the video editing assets on the link the description okay but there is another way of um actually having that so let me actually go to the momentum Community this is a new community that I just created okay and I created it um to host some free resources like the video editing assets okay and more
resources that I create okay um this community is for Freelancers or you know um any like online business entrepreneur like course creators or coaches that first want to connect with me because we can chat on the general chat you can ask me any questions we can connect and also if you guys want uh the free resources that uh sometimes I create okay like the video editing assets and more resources that I will be creating okay so I'm going to leave the link in the description if you want to join the free community let's actually move
on now I think we can move on to the next section of the video which I think is going to be the hook okay guys so now we're going to be editing the hook which is this clip right here okay it's the first one obviously and we're going to be editing that we're going to be talking about how to animate text all right for the hook and just basically like in general how to animate text using capcut and how you can also animate video okay so you can animate you know apply some animation to the
video and you can also apply some key frames we are going to be talking about that as well but let's actually start with the hook okay okay so I have this again remember this is a template okay so I already have this ready for uh ready to use because um I always want to keep the branding whenever I'm editing for my clients so for example all the hooks for Adam I I do them with this type of font and with these colors okay just to keep The Branding of the real all right but in order
to you know in order for this tutorial I'm going to delete this okay so I'm going to delete it and then I'm going to show you how we can also use how you can upload your own fonts just like we did on the captions you know section of this tutorial we're going to be um learning how to how to do that as well for the hook and just to have how to upload any any fonts okay so I'm going to use the default text here okay so I'm going to put it here I'm going to
make it um the size of the hook and as you can see it's just normal text okay now for the the hook I want to deactivate the captions okay because I don't really want them okay um at least on the hook so I'm going to right click and you can deactivate them or you can use the key the V key okay so I'm going to use it actually let me do that okay um for all the captions within the hook all right let me actually put this closer here all right cool now for Adam I
always use this font uh called this one fabella okay so I'm going to select that and I also want it to be uppercase okay so I'm going to select it and then there you go okay we have the text with the font that I want to use now if you guys want to use the same fonts that I'm using in this tutorial I just upload them here on on the Google Drive okay so I just uploaded them and you can go ahead and uh for example fabella which is the one we were using right now
you you can just download it you can go to your downloads um you know file uh on your computer and then you again just double click and install it remember you install it and you have to close capcut in order for capcut to update on the back end uh system the font okay and then you open capcut again and you are going to find find it uh within the letter F okay you you go to the you know U down and then you're going to find it on the on the F section so there you
go okay how to how to upload your own um you know captions and now we're going to be obviously editing the hook so for example we are going to take a look of what Adam is saying okay in this case the speaker and you obviously want to choose something that relates to the hook so let's actually see if you're looking to start or scale on airb business in 2024 okay so if you're looking to start an airbn be business in 2024 okay so for example okay we can go ahead and be like how to like
how to start okay that's what he's talking about and then I want I want to duplicate this actually okay and move it a little bit here and so how to start on ER BNB uh business okay so we can make this one smaller okay a little bit smaller here and then if you want and something that like I like to use just to keep The Branding again of the you know just to give The Branding of the of the real I want to select another color here which is this one and then maybe I also
want to do this italic okay so let's actually take a look um so how to start an nbnb business now as you can see it's kind of hard to read right as you can tell so we can apply some stroke to either stroke or Shadow okay uh you can play around with it um let's actually apply some Shadow to both of them and now as you can see they look better okay it's it's uh way easier to read what you know the hook so um okay that's about the hook we now have uploaded and used
our own font and also applied some you know some Shadow and some things to to the text now we want to animate it okay so there are several ways you can do this for example for how to start we can apply several animations I usually use this one so let's take a look if you're looking to right it's like time right this like typing um and for this one um we can go ahead and apply maybe slight you're looking right okay cool now um actually for this one if you don't want to apply like um
you know actual actual animation you you can apply a loop as well okay so I'm going to use this one here if you're looking to start or scale on air so let's actually take a look at the letters okay so you can see the little effect here if you're looking to start or scale an airb business in 2024 yeah okay it looks very cool um so I'm going to keep it but it's kind of going like very fast so I'm going to put it on a if you're looking to start or scale an airb business
in 2024 you have at least cool perfect so we I think we're done with the text um on the intro I think we're cool with that uh again you can always play around with it and make new things now I want to go ahead and edit the video itself okay so usually I like to apply a zoom zoom uh one here if you're looking to okay so we have that Zoom effect right there and then I also want to apply some key frames when when he says uh 2024 right so let's actually see start or
scale on airb business and okay so some around here so we can um go ahead and apply key frames here okay so you select all the key frames okay depending on what you want to do so you select all the key frames and then you move it around a little bit I want to make a zoom in okay really quick so I just go ahead and zoom it in um maybe around here it can be and then I just make it a little bit like here maybe okay so let's actually take a look at that
at that new business in 2024 okay it's kind of weird that last thing that I made there so let me actually Center it again it's actually here if I'm not mistaken let's see new business in 2024 okay there we go okay perfect so we applied some key frames um as you can see just to make the zoom in effect and also I he says 2024 all right so I want to use um I want to use this um this letter as well as well okay these type of of text so I'm going to con uh
copy and paste it all right oh let me see what I did here okay so I'm going to copy and paste this one here and I want to apply for 2024 let's see business in 2024 okay so maybe something around there so I'm gonna um just take it I'm gonna change it to 20 24 okay by the way um okay I wanted to show this to you guys so this font that we're using is a demo okay so for some reason the number four doesn't work or you know the special characters the special characters it
you know it's understandable it's a demo but the number four it's not working so in order to fix that you just change the font to another one so for example I'm going to change it to uh um two core sense okay we can we can the same that we are using for the captions remember we can use it here on 2024 and actually this one doesn't give you any problems you can use the special characters as well okay so 2024 now the color I wanted to be white though so we're going to keep it on
white and um yeah I think it's pretty solid now I'm going to explain the cat out feature okay and let me actually um change the animation for for 2024 I want it to be this type and 20 type effect and now I'm going to just um drag and drop this keyboard typing sound effect that I have ready to use again um you know I have it ready to use because I built the template okay I buil the template uh I could go ahead and look for it here on sound effects and start looking for it
but that's why I built the template because I have it ready just drag and drop it right away because I use this one a a lot okay I use this one a lot so we put it there and let's actually see in 2024 okay cool now the hook it's it's pretty good just as it is right now but I want to go a little bit further and add some icons and also I want to add this 2024 behind the speaker okay so we can do that with a c out featur so I'm going to select
the clip okay and we want to cut copy and paste it all right and want to we want to bring it up here okay we want to bring it up not above Airbnb and the other one well we want to keep it there actually the one that we want to drag and drop is 2024 just in the middle of both Clips okay now what we want to do is we want to extract the audio here okay so we want to extract this audio and then we're going to select this one and we want to apply
the cat out feature now now keep in mind that you need to do this after you have added the animation to this clip and the key frames and pretty much everything because if you do this and then you apply key frames to this clip it's going to look different so for example I'm going to delete this one here just to give you the example and I have applied the CLE feature to this clip here okay which basically means is is this okay this is the cat out feature we just have the person we just have
the speaker it can only be done with humans okay so I have deleted the key frame here okay no worries I I I will add it again but just for the example and then let's see actually what happens if you're looking to start or scale an airb business in 2024 okay as you can see in 2024 the only one that um you know did the zoom in was the the second clip okay because it has the key frame and that's why you have to do let me actually rever this that's why you actually do have
to do all the key frames and everything before you you know duplicate the clip and apply the auto cat out feature okay uh let's take a look at the at the hood really quick if you're looking to start or scale an airb business in 2024 Okay cool so you see the 2024 it's behind the subject okay and I don't know for me it looks cool it's it's um it's a way to play around with the with with the edits as well so he says Airbnb somewhere right so let's actually see scale on airb okay Airbnb
business now you know for this client and for this template that I'm using for Adam I already added some images that I again usually use whenever I'm editing one of his reals so I have airb an Airbnb image here okay that I can just go ahead and drag and drop but I'm going to show you because uh in order to get these images what I do is I go here on canva okay and keep in mind I'm paying the pro version of Cana so um I'm able to go ahead and and and download some premium
images and things that uh you cannot download with a free version so keep in mind that I'm using the you know the pro version so the the thing that I do here is I create um you know an Instagram story okay because it has the dimensions for the real so Instagram story and I create it and then guys I add pretty much whatever I want okay if I want to download uh an image about a house I can just type house okay I go on photos or graphics and I can drag and drop it and
download it um something that I do with images a lot you know mostly with person let's say actually a person or let's actually let's actually go ahead and look for someone one here okay so let's actually try it with Alex heroi and let's say you want to use Alex Heros in one of the videos okay so we can select this image here we can uh copy the image we can go to canva and we can put it here okay now it has a background we just want to use Alex or MOSI so I the best
way and that's why I use canva you can go ahead and edit the photo and you can remove the background okay you can remove the background and then we can apply some Shadows okay so depending on the shadow that you want to apply you can outline it you know you can select the color to maybe um maybe white okay you can make this color here let's actually do this here okay so you can actually notice the difference um you can select the image someone that I something that I like to use a lot is glow
okay just the glow and I wanted to use uh the black glow okay so now we have we just have heroi Okay um without background with anything and I can go ahead and download it here PNG transparent background download okay it's going to download we go here to our downloads and there we go okay so Alex Hermos so Alex Hermos well uh yeah I had this activated no worries we go on the folder that we're using just to keep everything organized we put it there and we go on cap cut and obviously I'm not going
to use Alex Orosi here but just to give you guys the example um I imported Alex oroszi and then I put it here on the timeline okay so I want to use it just on the hook and then I want to use it here okay maybe maybe I want it I want it to be there okay now I can apply some animation to Alex Orosi so maybe slide up on airb okay cool and now there you go Alex rosi um so that's how you can use to pretty much download anything I have downloaded 3D icons
so for example you want an icon um about a house for example so 3D house I like to use this ones a lot because it it's I don't know it's kind of like better 3D Keys you know 3D stuff that you can just go ahead and download and it looks cool for your videos okay so uh again I'm not going to be using Alex Orosi so I'm GNA delete it sorry Alex I know you you know you wanted to be on the video but um what I'm going to use is Airbnb okay because he says
Airbnb let scale on Airbnb okay there he goes so we're going to apply some animation as well SL okay perfect we're going to keep this here and as you can see guys um you know so far we've been we've been doing some some good things you you've been able to animate text animate video uh use the cat out feature put some text or it can be I I use text here but you can also for example I can drag and drop this one here and I could use the Airbnb behind the the subject as well
okay but I want I don't I don't want to do that I want to use it here above and I want to use it here below now I haven't mentioned this vertical you know what is this vertical black shadow okay that I'm using I'm going to actually deactivate it so I use this black shadow for these reels because at first I think it looks cool and I like to use it um but yeah it's just a shadow okay so if you actually go here and I think I need to up upload uh not upload but
uh update these um these images here so on the video editing assets you go to images and you're going to be able to find some Shadows okay now I need to uh actually update this as I'm telling you because sometimes I use Shadows for for the real so for example this Shadow allows you to you you know just it's for me it looks cool okay I like to use it um and I like to use it you know on the entire video as you can see it's on the entire video but this image I don't
want it to I want it I don't want it to be like um you know behind the shadow so I just I'm just going to move it here okay and another thing about the Shadows guys is that um for example for the hook okay you can also put a sh Shadow or place a shadow uh behind the hook so it the you can see the letters more clear okay so for example let's go here to Shadows just to give you the quick example um because I'm I I know I'm taking a lot of time on
the hook but yeah we're going over some good stuff here so let me put this Shadow here okay and then I'm going to um I'm going to show you so this is a shadow as you can see and I can move it around make maybe I can place it here and now as you can see the text looks better you know it's it's easier to read okay I know that we have applied some sha Shadow to this uh to the text we can even apply more Shadow by using Shadows okay where did I get these
Shadows again from Kaa okay just look for shadow whatever Shadow you want to use and there you go okay keep in mind again these are premium like things so just keep that in mind okay um I'm not going to use Shadow for this one okay I'm not going to use Shadow for this one and um Airbnb logo we got it there maybe it can be a little bit here and something that I want to do is I want to apply an effect for the icon so it's not flat so for example let's see airb business
in 2020 you know you see it's flat I mean it's fine like that but I want to apply some effects so it's kind of like moving around so here are a lot of effects within copcut but I like to use these ones these are my favorite ones and I use Play Pendulum a lot so I'm going to apply that now on the twist I actually just keep it at zero because sometimes it takes away the quality from the image and then I you know you can adjust the ex strength and the sharpen and all that
stuff so um it's going to be moving as you can see let's actually take a look at the whole hook for a moment if you're looking to start or scale on airb business in 202 okay uh we can make it a little bit here because it's kind of like delayed um and then I'm going to put this here and I'm going to actually use this whoosh here whenever the icon appears I think it's somewhere there if you're looking to start or scale an airb business in 2024 you have at least okay there you go the
hook is ready pretty much and now we can start um we can go to the next section of this tutorial which is basically the rest of the video so let's actually go ahead and and continue okay guys so let's keep going uh we're almost finishing let's actually keep going this is exciting uh we're about to edit the whole reel give it a look nice professional look okay and yeah I think this is pretty cool like you can take all these basic things um you know from capcut the free version and this is a free version
guys like it's it's amazing that we can do all these things within the free version and I'm telling you I'm not like a very Pro like I learned this like about 3 months ago two months ago and um yeah it's pretty cool it's pretty cool all the things that you can do within cop Cod okay so let's continue all right let's continue and another feature that I want to show you because sometimes it's um it's a cool you know a good feature that I think it's cool so I'm going to copy and paste this really
quick here okay and again remember whenever we copy and paste the main clip the audio is going to be duplicated so we just right click and we extract the audio okay and we delete it and then the feature that I wanted to show you is mask okay so masking is another thing that capcut allows us to do okay so in this example I'm going to use the circle mask and I'm want to Circle mask the speaker let me see yeah you want to Center the speaker maybe a little bit here maybe a little bit bigger
so we have some room there um there you go okay perfect and then you want to click here on basic again so there we have it okay um let me see and now we can we can actually place it wherever we want we can make it a little bit smaller we you can place it here um at the top of of the screen you know depending on whatever you want to to do with your edit so let's actually take a look at it you have at least 5 to seven hours a week to put into
this and okay if you have at least 5 to seven okay hours a week so I think uh now will be a good time to show you guys how to also animate some text with sound effects as well when it comes to numbers okay um now something that I didn't explain is that you can go ahead for example if you like this you know how to start um you know this font okay if you don't want to go ahead and add a default text for example and go on the default text and apply you know
the the font again and the color and the shadow and the stroke and pretty much everything if you don't want to go and do that over and over again because it will take some time you can just go ahead and click the the font that you already edited and you can save it as a preset okay so let's actually do that let's save it for a preset and here on presets you're going to find it okay it's actually uploading here um I have created some um I actually created uh one for this tutorial okay but
they are pretty much the same you can rename it and in this case I'm going to rename it for for example hook okay you can put it hook so you can save it and then uh if you want to use it um again on you know later on the video you can go ahead and do that you just you know drag and drop it okay it's just that simple again we can save a ton of time by doing that so uh with this one I'm going to keep it um you know lowercase okay and he
talks about five or seven hours a week so I'm going to use this color you know I'm going to use the this color and I'm going to use five I'm going to put here five hours okay and maybe we can make it italic okay and I'm going to deactivate these at least for now I'm going to deactivate them because I think I I don't want to show the captions here um as well so let me let me actually do that okay cool so 5 hours Let's actually see when um he says 5 hours we have
at least okay some somewhere around here okay five hours five to seven and seven as well so I'm going to copy and paste this here okay copy and paste I'm going to drag it a little bit here drag and drop it and then seven hours all right perfect cool actually um the size is a little bit small so I'm going to you know just just change the size and now I have to change the size for this one as well just to match it okay so there you go 7 hours if you have seven five
seven hours a week okay now we could we could keep it like that let's actually see you have at least 5 to seven hours a week to put into this okay but I would like to use something um you know just to animate it a little bit okay and I also want to show you guys how to use the sound effects from capcut as well okay so we're going to animate this one using uh this one here okay I to seven okay and we're going to just five to seven increase this a little bit so
five can be can go a little bit here now you we have a lot of sound effects here on capcut okay but I have found some um some of the ones that I use the most okay and you can for example on the sound effects if you you know if you like a sound effects for example click you can add it to your favorites and then once you're on sound effects you just scroll up and then they will show it to you you can also search for by keyword okay any sound effects that you would
like to use so for example in this one I'm going to use text appears on screen and I'm going to put it here whenever 5 hours start okay now these sound effects sometimes are loud so you can control the you know the the basically the the volume here okay so I'm going to put it like six and then I'm going to just put it here okay so let's actually see 5 to seven hour okay it's 5 to seven okay five to seven we're going to do the same for um seven so let me actually seven
we apply the same animation okay s hours and then we take this one make it a little bit just smaller and then copy and paste the other one so let's see 5 to seven hours a week to okay there we go so 5 to seven hours a week um and then we have the transition and then we have just the speaker so for this speaker okay I want to just you know make it a little bit close here okay maybe like yeah 114 and then at the end of the clip I also oh by the
way don't forget to add the key frame okay so you um zoom in and then you add the key frame you can add it you can you know you can add it just here but I like to you know just add them add them all and then I go here and I just put um actually a clip here and I just put 100 okay so 100 so there you go okay now uh I did that because I just wanted to give this uh effect of the camera just going back so let's actually take a look
and you have at least a small amount of capital to start with I want to Okay cool so um there you go let's actually take a look at the whole the the hook that we edited uh the you know this segment here with the maskin and then this little simple segment here with the you know the zoom zoom in and zoom out so let's actually take a look if you're looking to start or scale an airb business in 24 you have at least 5 to 7 hours a week to put into this and you have
at least a small amount of capital to start with I want to give Okay cool so I think it's pretty solid um what I'm going to do now is that I'm going to show you guys how to for for this segment here how to apply the cat out um but using a background as well so I'm going to just go ahead and copy and paste this clip here okay and I actually want to put it above the background okay so we can actually see it so let me actually just put this background here and this
one here and then again we are going to extract the audio we're going to delete it and we are going to go and apply the cat out feature to this clip here okay perfect so there you go it's ready so we have now the speaker talking but it looks a little bit weird right as you can tell so we can go ahead on the on the cat out uh clip the clip that just um we just apply the CLE feature to and then you can apply some stroke okay now this stroke um there are different
types as you can see of a stroke you can use the one that you like I like this one here the second one and I like just to put it you know at zero because I don't want too much stroke I just want a little bit so it doesn't look you know weird um and then I don't like that's why I use this this Shadow here because I want this um guy to be a little bit here and I want I want to make him a little bit just bigger okay and I want to put
it maybe maybe there is fine let's actually take a look start with I want to give you my seven step framework for free okay seven step framework for free okay cool now um guys something that I forgot to mention but if you like a background a lot okay that's fine but if you use it like too many times you know it can be it can get repetitive again it's fine because also you want to keep the branding of the reals okay it's totally fine but if for some reason you want to change the color of
a background you can do it okay so you can still use the same background and maybe you can you know change the color of the background so you're again you're still using the same background but it's a little bit different so for example with this one you can play with the saturation and so I'm going to play with the saturation here the full full saturation and then I go to the video it's a different color okay so same background different color it changes a little bit it it doesn't get repetitive if I'm using this background
a lot of time a lot of times so um there you go okay just something really quick that I wanted to explain now the as you can see the captions are over overlapping the face so what we want to do is I want to go here and I want to deactivate this option and I want to drag and drop it somewhere here okay somewhere here is fine and then I'm going to copy the you know the coordinate and I'm going to apply that to the other the other ones so just copy and paste just copy
and paste to the other ones the other ones in this segment okay I need to do it manually yeah it's it's kind of like annoying but you have to do it manually click enter and there you go if we go and hit play I want to give you my seven step framework for free and how okay there we go so seven step framework okay now you can get creative with it um you know at this point for me I'm just going to use a preset that I have created so it's actually this one again you
know how to create presets so you can create as many PR presets with the colors and fonts that you want okay and you can save them here uh as you can see I have um quite a a lot here well not a lot but some some um presets so seven step framework so we can put it like seven okay and step seven let me see seven step framework okay seven St framework um just to give you the branding I want to use this color and I think that's looks that looks cool okay so seven step
framework we can also so if we wanted to apply some animations for example I like this one which is open okay I want to give you open and I like to I want to give you my okay there we go seven step framework okay I think that looks cool uh or I can actually not apply um this and apply some I want to give you my seven step framework for free okay cool I think Lop I want to give my seven step framework for free okay cool I think that that one looks uh better just
like the the hook here on the intro I think that's that will be cool so maybe make it a little bit you know bigger and again you can you can add some like for example a step framework so I have some icons here I I think business and again you can find them here again on the on the you know on the video editing assets you can find some icons here here they are I think the the the neon icons um you can find them there but for example I'm going to use the it's talking
about the step seven step framework okay so I'm going to get this one here and I'm going to put it here I want to give you my seven step framework okay sometimes it gets laggy okay you can you know sometimes it's just to match things on the timeline the computer can get laggy um and for this one I I'm also because I don't like like Too Many Colors some time so I can adjust these icons also and apply some saturation so there are just black and white and then I also want to drag and drop
these uh sound effects that I have ready again uh sound effects you can you can find them here on the folder uh on the video editing assets so let me actually just drag and drop this one here with I want to give you my seven step framework for free and how I would okay now how was how I was able to um let's and how I was able to go from zero to $320,000 a year in Revenue in my okay so from zero in in from zero to 3,000 three $320,000 okay cool um so yeah
I mean um I guess like I I've I've gone pretty much through all the things that I wanted to show you guys the cat out feature um you know adding backgrounds add in add in text how to apply animation to text and also how to apply animation to icons like the Airbnb icon here um yeah I mean you can also apply um animation to videos so this little video here about the icon you can apply some animations so it moves around um let's actually take a look I want to give you my seven step framework
for free and how I okay cool I think it looks pretty cool uh I have also talked about the the backgrounds what I'm going to do now is I'm going to take um I'm going to think about what I can do in this next section and then I'm going to show you guys okay what I did and basically I think after that I'm going to be editing the the outro of the video so the call to action and pretty much everything I'm actually going to get rid of this really quick um but yeah just talk
about the outro of the video and yeah I think I'm going to do that and then I'm going to show you how you know how I edited this okay guys perfect so as you can see I added some stuff here like numbers and stuff like that and then some text here as well and I also added like some icons and also a call to action at the end so I pretty much just finished editing the you know this real here and I also wanted to show you a couple things that we can do okay just
to finish the real just to finish the tutorial and so you guys have some good Insight so for example something that I wanted to show you is um you know this feature of the you know the screen feature that we were talking about so let me actually go here on it's kind of like the same feature we talked about with the with the overlays but now we're goingon to apply it to a video okay so any video with a black background so for example here on fil film grain we have these um builds okay as
a as a clip okay so whenever he says $320,000 I want these builds to pop up okay even though we have you know the Builds on the backgrounds um this is just to show you guys the example of what I want to do so we're going to rotate this here and I'm going to make I'm going to adjust it to the screen and now uh when ever the money payment sounds I also want these fields to appear on the screen but as you can see they are you know they have black background and they are
also a little bit slow okay so what I'm going to do is I'm going to select the clip and I'm going to here on blend on mode and I'm going to choose a screen okay so with that we only see the builds and not the B the black background color keep in mind this can be done with any any animated video or anything that has a black background so for example if you uh by any chance let's go to um here the Instagram story that we were creating so if we go to any animated video
like let me just put animated here okay go to graphics and you see for if for example you want to use any of these animations um I don't know which one could we use here uh maybe maybe this one okay so maybe you we we want to use this one let me actually just um what you have to do actually is change the the background color of the clip you change it to Black okay and now these clip is around 6 seconds okay so what I'm going to do is I'm going to download it okay
and um yeah just download it okay so we're gonna wait a little bit until we have the video okay perfect so here we have it now we're going to change the name can be just this whatever name you want to give it and then again put it on the folder that we are using and now you can go here for example and um you're going to add the video here on the video so let me go to Real where is it real 7even okay perfect so we go here and this is just to give you
the example again I'm not going to use this R video but you can do the same thing you can just screen okay and actually we can just add it here as an example and I'm going to just put it here actually we we can put it on the on the whole segment okay just to give you the example let's see how that looks like free and how I was able to go from zero to $320,000 a year in revenue and my very so as you see you can see there on the corner okay so that's
how you can use any animated videos just make sure again that the video that you want to use or the animation has a black background okay uh now you can also go ahead and and search on YouTube different video effects and overlays but um yeah I don't I'm not going to do that because I don't want this video to be too long this tutorial so cool now just one thing these builds are kind of like slow okay I want them to be faster like more explosive right so I I'm going to use the speed feature
here on cop cut and I'm going to just speed it up to maybe 6.5 let me see $20,000 a year in R okay cool yeah that that looks cool maybe a little bit more maybe seven maybe faster $20,000 a year in Revenue Okay cool so there you go there we have it okay and now that's what I wanted to show you in terms of the screen mode on a video okay which is you know pretty similar to the um to the Transitions and overlays and now here I want to add a background video like a
b roll okay which I already have it here and I wanted to show you guys how you can add b rolls on the clip as well so I'm going to drag and drop this one here okay to the timeline and I want it I want to use it above the video and also like kind of like behind the speaker so what I'm going to do isue in my very first year of airb okay you see it's obviously we we don't want it to be that way so I'm going to adjust it a little bit just
zoom in a little bit and I'm going here to put it um here here is fine okay maybe a little bit above maybe there okay and now what I'm going to do is I'm going to go to mask and previously we used the ccle mask mask okay but now we're going to use the horizontal mask feature okay so um we can drag and you know we can drag this thing okay here the line and we can also drag and drop this one here okay so just feel free to adjust it whever you want okay so
in my case it can be somewhere I don't know maybe maybe like somewhere here all right and I also want to you just click on basic you can put it a little bit above if you want to okay maybe make it this smaller and then go back to mask and readjust it as you want okay so maybe maybe there maybe there is fine okay and click basic again and then I'm going to cut it here right and there you go we now have a background b-roll video um on the clip as well so yeah guys
that's pretty much it I also added some an icon here like a some builds icon and I also changed this one um previously it has like an animation with the loop but I decided to change it to just a normal in animation okay couple Stu I also added the free you know icon there so you know just to make it look a little bit better when he says has a free framework um and yeah that's pretty much it now before I show you the end result again remember we got the community here you can join
if you want to connect with me if you have any questions also um something that I wanted to mention is that if you want to possibly work with me um as a video editor you know you can learn using the tutorial and then you can practice and um you can reach out to me sometimes I need an editor um because because sometimes I cannot handle all the work if I'm getting like too many clients so um you can also have the opportunity to work with me but um yeah you can join the community we can
chat we can connect and now let's actually take a look at the end result I hope this tutorial was helpful for you guys and you learn some new insights feel free to go ahead and practice again you have everything here on the video editing assets you can use my raw videos this has already been trimmed so you can just go ahead and start editing right away with that being said take a look at the end result and see you in the next video If you're looking to start or scale an airb business in 2024 you
have at least 5 to 7 hours a week to put into this and you have at least a small amount of capital to start with I want to give you my seven step framework for free and how I was able to go from zero to $320,000 a year in Revenue in my very first year of Airbnb Arbitrage message me the word blueprint and I'll send it over absolutely fre [Music]
Related Videos

7:00
How to ACTUALLY Make $5000 With AI Generat...
AI Venture
40,296 views

17:53
Final Cut Pro For Beginners 2025 - Getting...
Nick Kendall
110,680 views

18:32
How to Edit Viral Bymaximise Reels Step-By...
Joseph | Video Editing
122,181 views
23:40
CapCut for PC & Mac - COMPLETE CapCut Vide...
Primal Video
872,319 views

52:42
$1 Edit VS $100 Edit (Capcut Challenge)
Pablo Quesada
26,179 views
![Upbeat Lofi - Power and Energize Your Workday - [R&B, Neo Soul, Lofi Hiphop]](https://img.youtube.com/vi/ONcY0BM5EAg/mqdefault.jpg)
3:23:17
Upbeat Lofi - Power and Energize Your Work...
A Lofi Soul
615,467 views

16:42
How to Edit Viral TikTok & Instagram Reels...
Vid & Views
381 views

1:03:29
اتعلم اسهل واسرع برنامج مونتاج CapCut
Amr Atallah - عمرو عطاالله
667,852 views

13:16
How to Create TRENDING Reels, Shorts & Tik...
Grow with Alex
105,399 views

17:26
Editing TRICKS That Make Reels Go Viral (C...
Ben Claremont
14,135 views

19:58
How To EDIT a Cinematic Travel Video
Learn Online Video
54,714 views
13:56
Editing Like a Professional YouTuber in Ca...
Validation
376,063 views

21:12
I Got 9 Editors to Edit the Same Video - E...
TomsProject
12,027 views

5:04
How To Create PRO Videos in CapCut Without...
Luka B
521,610 views
16:35
How to Create Irresistible Hooks (and blow...
Kallaway
174,603 views

35:47
Edit PRO Youtube Videos in Capcut | In Dep...
Content Creators
313,194 views
29:06
Capcut For Beginners 2023 | Everything You...
Vince Opra
962,757 views

17:48
How to Edit VIRAL Instagram Talking Head V...
Joseph | Video Editing
79,512 views

21:05
9 Advanced Editing Tips In CapCut PC
Collin Michael Tutorials
25,007 views

1:08:01
How to Edit Full YouTube Videos in CapCut
Pablo Quesada
16,390 views