How To Grow Mushrooms in a Bucket
1.36M views2059 WordsCopy TextShare

GrowVeg
Want more mushroom magic? Watch this next:
https://youtu.be/8aouihUZOuw?si=Mw7NJq3V8G0SeYUR
Welcome...
Video Transcript:
I reckon mushrooms are the most exciting thing you can grow. Quick, fun and always tasty. Now mushroom growing kits offer an easy way to get started but they can be on the pricey side.
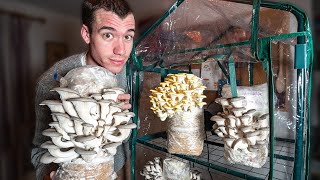
So in this video I'm going to show you a deliciously simple way to grow mushrooms like these and once you've got the hang of it you will be hooked I just know it. Because you can never have enough mushrooms, right? I'm opting for a system that should prove both very cost effective and time saving so I can grow more mushrooms repeatedly.
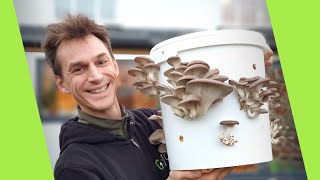
With this in mind I've opted for these 1 gallon or 5 L lided plastic containers. These can be found very cheaply indeed, or you may even be able to find them for free by asking a local restaurant. They may have contained for example pickles.
We'll need something for the mushrooms to grow on, our substrate, and for this I'm using straw which is very cheap indeed. Then of course there's the mushroom spawn itself and for this I am using grain spawn which is really easy to crumble apart and handle. And today we're going to be growing oyster mushrooms, specifically blue oysters which are amongst the very easiest to grow at home and the most delicious in my humble opinion.
The mushroom world's your oyster. And then we've got some surgical tape here and this netting sack and if you're wondering what on Earth these are for don't worry, all will become clear in a bit. Let's start by preparing the buckets.
Now I don't have a suitable size drill bit but I know a man who does. Cheers Trevor, really appreciate that. No problem.
Thanks a lot. I'm just drilling a series of holes across the wall of the bucket and finally I'm just going to drill some holes across the bottom for drainage. This will stop water pooling at the bottom and creating kind of unpleasant conditions.
Okay that's the drainage holes done. And then to finish finish off I'm just going to pick off these kind of bits of sticking out plastic here and give it a bit of a sand as well, just to give nice smooth edges. Now you can use special mushroom growing bags, but by drilling our own buckets like this we can reuse these time and time again and get our costs down.
If you want to use something a bit bigger then you could go for something like this 5 gallon or say 25 L bucket and for something this size I would suggest around 20 holes. And they would be spaced about 6 in or 15 cm apart and probably have up to four rows of holes in something this size. Let me show you the straw I'm using today.
I'm using this straw from a pet store. It's clean, but crucially it comes chopped up into these smaller pieces, and that's important because it means the mycelium, that's like the roots of the mushrooms if you like, can get in and colonize it a little bit quicker so we'll get our mushrooms that much sooner. You you could use straw from a bale but it will need chopping up into smaller pieces first, so do bear that in mind.
To ensure trouble-free growth free of any contaminants or weed fungi I'm going to pasteurize my straw and I'm just going to plunge it in here in a bucket full of hot water. Now this is where the sack comes in of course, but if you don't have one of these you could use for example an old pillowcase or kind of hessian sack, something like that just to hold our straw. now we are looking for a temperature of 140 to 175 Farenheit, that is 60 to 80° Celsius.
This hot water will pasteurize our straw by killing off most of the microorganisms but not all of them. It will leave some of the good guys that will actually help our mushrooms to grow. If I was to sterilize the straw by boiling it up and killing absolutely everything, perversely our straw is more open to contamination.
This offers us that sweet spot hot water but not boiling. Now I've already got some hot water in here from the faucet or tap and I've just topped it up with the boiling water to give us that kind of perfect temperature range we're after. That should be enough I reckon.
Now let's just get our straw in there. We want all of the straw to be in contact with the water so just weigh it down with something heavy, just so it's completely underwater and now this will stay in here for about 1 hour. Kind of feels like a witch's cauldron doesn't it?
Double double, toil and trouble, fire burn and cauldron bubble. . .
Great stuff, this has had its allotted time, let's drain it all off now and it should take about half an hour to drip dry. So this is now cool to the touch and it's drained off and if I give it a squeeze you can see there's there's no more drips coming from it so this is good to go. The wet straw will be quite heavy, about three times its original weight.
And now for the real magic, inoculation time. But before we do anything else we need to make sure everything is squeaky clean because we don't want any contaminants spoiling our whole efforts here and turning things sour. Now you could use something like this isopropyl alcohol here with gloved hands, but I'm just going to use this kind of sterilizing powder which I use for my home brewing, that's another story.
Now this is quite safe and I'm just going to rub the surfaces clean with it, obviously the buckets and the lids, anything that's going to come into contact with that spawn and my hands as well. So give it a stir and then just wipe everything down. Don't forget to wipe down the actual surfaces of wherever you're working as well and even the outside of the spawn bag itself, so every single surface is super squeaky clean.
Time to fill. And I'm going to start with a good handful or two of our straw and just push it right down, don't be afraid to squeeze it down like that. That'll do.
And then in with our first layer of our spawn. Just break it up as best as you can like this and sprinkle over the top and we'll be working in layers like this till we get to the top of our bucket. Now as a rule we're aiming for between 5 and 10% by volume of our grain spawn to 90 to 95% of volume of our straw.
You can get away with a little less of the spawn but that opens us up to the risk of weed mushrooms getting in there so this gives it a bit of a head start and ensures that we get our mushrooms quicker. And and that's us right up to the top now so, let's get those last stragglers in and it's on with the top which I have of course sterilized first. 'And what about that surgical tape?
' I hear you ask. Well good question. What we're going to do now is simply cover up each of our holes with a little bit of tape.
Now this serves two purposes: Firstly it's going to keep the straw and our spawn nice and protected from contaminants kind of blowing in and because it's breathable it's going to keep everything nice and airy while it does that, but it will also help to retain some of the moisture in the straw and keep the humidity up, which of course we know mushrooms absolutely love. There we go, that's the last one. Now these are going to be kept at room temperature away from wild fluctuations in temperature.
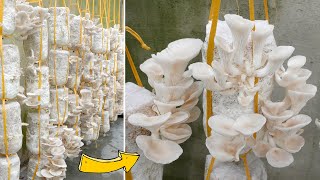
Now over the next 2 weeks or so the mycelium and will spread out from the grain spawn and throughout the straw completely colonizing it, ready for our next stage. Look at this one. Now this is one I started two weeks and two days ago only and you can see it's completely turned white, the mycelium has fully colonized our straw so we're on to the next stage of the actual mushrooms being produced.
So I'm going to remove the surgical tape from this one and you can see here we've got the white of the mycelium right up to the holes here and obviously the holes are where the mushrooms going to come from. Just pop the lid back on to keep it nice and clean and protected. As our mushrooms grow it's really important to offer them somewhere that's really humid and also get some light.
Now in the summer that could be underneath the shade of a tree, but as it's winter I'm going to put them near this window here but it's out of direct sunshine and that's important. To keep the the humidity up I'm simply misting my shrooms twice a day, once in the morning and once again in the evening. If I can remember, at lunchtime as well.
Just give them a good mist like that. And I've got them on a plate there to keep everything tidy. It's another few days on and look, we've already got pinning.
That's just the tiny embryonic fruiting bodies that are ready to kind of pop out and explode into growth now mushrooms don't grow like plants. These guys, believe it or not will pretty much double in size every day. It's the speed with which these mushrooms grow that is the most exciting part.
I get giddy with excitement coming down the stairs in the morning and seeing how much they've grown, it's just incredible. Imagine getting the kids involved with this, how much they'd love it. Never mind Xbox or Playstation, this is where it's at!
These guys are now ready to harvest I reckon, or at least some of them. Let me bring them over. Now the the best time to harvest is when the caps haven't quite fully opened out and they're not flattened out.
Harvest them while they're still curled over a bit otherwise the spores which they produce when they're fully open will go absolutely everywhere. And to harvest, very simple just reach behind and pull and twist your clump free like that. Now all of these holes are growing at different rates so they won't all be ready at the same time, so just take them when they are ready and leave the others to grow on and of course during that time keep the humidity up by spraying again morning and evening.
Now once you've harvested all of the holes just leave it a few more weeks keeping the humidity up and you may well find that you get a second flush or harvest of mushrooms and perhaps even a third flush. Once your bucket is completely done cropping you can try using the mycelium-laid straw as seed for a new batch of mushrooms. I'd suggest breaking it down into thirds to inoculate three new buckets.
And I'd do it exactly the same as before. Layer your pasturized straw with some of the mycelium-laden straw and then more pasturized straw and so on in layers until you've populated a new bucket and then grow it on in exactly the same way. Now it's a couple of weeks on from using the old straw to inoculate the new pasteurized straw and I'm really pleased to see there is some mycelium colonizing the new straw pushing through to the top and it's all layered up, so I'm pretty confident that another kind of 2, 3 weeks this lot will be bearing mushrooms as well so we can keep the cycle going.
If you'd like to try growing mushrooms from kits before launching into buckets like this, then do check out this video next. In the meantime these guys are destined for deeply delicious things. If you have any recipes for using them by the way please do share them in the comments below.
I'll catch you next time.
Related Videos

14:11
Garden Checklist: 10 Tasks to Give Your Ga...
GrowVeg
325,689 views

27:12
How to Grow Mushrooms in Buckets! A Step-b...
North Spore
1,123,015 views

13:35
How to Grow Lion's Mane Mushroom from Star...
GrowVeg
52,848 views

4:12
Top 5 Best Camping Tent in 2025 on AliExpress
Gobi Express
1 view

13:45
How to Grow Mushrooms at Home Starting fro...
MiradasBiologicas
1,805,942 views

16:29
How to Grow Portobello Mushrooms | Agaricu...
Spore n' Sprout
38,673 views

10:52
Grow Mushrooms at Home In A 5 Gallon Bucke...
FreshCap Mushrooms
4,073,017 views

11:18
Unbelievable - Here's How to Grow Mushroom...
EY - Gardening
730,262 views

14:10
Grow your own SHIITAKE MUSHROOMS!! Detaile...
Whole-Fed Homestead
26,960 views

20:12
How to Grow Mushrooms at Home Starting fro...
MiradasBiologicas
191,875 views

9:45
Soil Companies Will Hate Me For This
Keep on Growin' with Mike VanDuzee
259,602 views
![[Gardening at home] Mushrooms are easy to grow and harvest every day](https://img.youtube.com/vi/2_Syf9N2CiE/mqdefault.jpg)
27:04
[Gardening at home] Mushrooms are easy to ...
Terrace Garden
92,478 views

19:07
Ginger Masterclass: Plant Once, Harvest Fo...
GrowVeg
1,815,194 views
43:48
How to grow mushrooms at home - Full proce...
Just Alex
2,222,764 views

18:09
Inside the Mushroom Farm: How Mushrooms ar...
GrowVeg
39,910 views

25:11
A psychoactive beer plant, chaga and lots ...
Buschfunkistan
42,123 views

10:55
How To Grow Mushrooms The EASY Way (No Ste...
Fast Gardening Michigan
503,523 views
9:03
Growing Mushrooms in a Bucket! (Super Easy...
GroCycle
163,499 views
10:03
How to Grow Bbalone Mushrooms at Home for ...
TEO Garden
4,806,183 views

12:08
Wish I knew this method of growing tomatoe...
DIY Garden Ideas
6,762,056 views